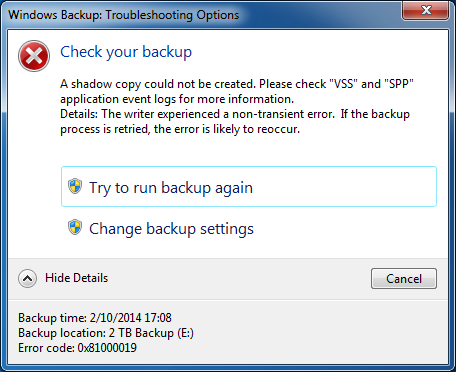
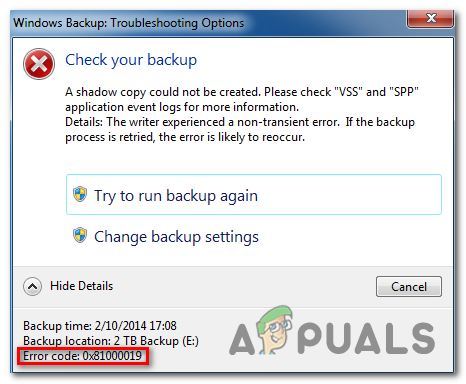
Во время создания резервной копии Windows можно наткнуться на ошибку с кодом 0x81000019. К ошибке прилагается следующий текст:
Не удалось создать теневую копию. Проверьте журналы событий приложений “VSS” и “SPP” для получения дополнительных сведений.
Сведения:Непредвиденная ошибка поставщика теневого копирования при выполнении указанной операции.
В сегодняшней статье мы попытаемся с вами исправить ошибку 0x81000019 и вернуть возможность создания резервной копии Windows.
Содержание
- Избавляемся от ошибки 0x81000019
- Метод №1 Проверка служб VSS и SPP
- Метод №2 Проверка свободного места на ПК и носителе
- Метод №3 Отключение стороннего антивируса
- Метод №4 Удаление точек восстановления
Избавляемся от ошибки 0x81000019
Системный компонент «Просмотр событий» — наилучший вариант для выяснения того, что конкретно вызвало ошибку 0x81000019. Для открытия этого компонента сделайте следующее:
- нажмите Windows+S;
- пропишите в поисковую строку «Просмотр событий»;
- выберите найденный результат.
Поищите лог для данной ошибки и попробуйте определить источник ее появления. Затем отталкивайтесь от своей находки для поисков наиболее эффективного решения. Как правило, так от нее и избавляются.
Если же вы так и не смогли определить, что вызывает ошибку 0x81000019, то можете воспользоваться четырьмя методами ниже. Все они были не единожды проверены многими пользователям по всему Интернету. Мы рекомендуем вам выполнять их в заданном нами порядке.
Метод №1 Проверка служб VSS и SPP
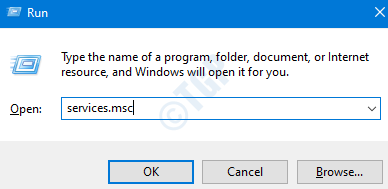
Отталкиваясь от текста ошибки, можно предположить, что службы VSS и SPP работают не вполне корректно. Вам нужно проверить состояние этих служб и убедиться, что они активированы в вашей ОС. Для этого необходимо сделать следующее:
- нажмите Windows+R;
- напишите значение «services.msc» и нажмите Enter;
- найдите в списке службу «Теневое копирование тома» и дважды кликните на левой кнопкой мыши;
- выставьте в типе запуска службы значение «Вручную»;
- кликните на кнопку «Запустить»;
- сохраните изменения и закройте свойства службы;
- теперь найдите службу «Защита программного обеспечения» и убедитесь, что ее тип запуска выставлен на «Автоматически (отложенный запуск)»;
- точно также нажмите на кнопку «Запустить»;
- закройте окно со службами.
Попробуйте создать резервную копию Windows еще раз. Ошибка 0x81000019 не должна вас потревожить.
Метод №2 Проверка свободного места на ПК и носителе
Процесс резервного копирования Windows 10 требует для себя достаточно большое количество свободного места как на самом компьютере, так и в месте, куда сбрасывается копия. При недостатке свободного места появление ошибки 0x81000019 не так уж и удивительно. Убедитесь, что задействованный носитель свободен хотя бы на 40 процентов.
Метод №3 Отключение стороннего антивируса
Время от времени сторонние антивирусы могут вмешиваться в процесс создания резервной копии Windows. Если на вашем компьютере присутствует сторонний антивирус, то мы рекомендуем отключить его и снова попробовать выполнить резервирование. Некоторые пользователи утверждают, что им помогло именно это решение.
Метод №4 Удаление точек восстановления
Если в сообщении вашей ошибки утверждается, что не удалось найти какой-то определенный объект — удалите все доступные в системе точки восстановления. Некоторые пользователи утверждают, что им удалось избавиться от 0x81000019 их удалением.
Нажмите правой кнопкой мыши на диск и перейдите в его «Свойства». Теперь перейдите во вкладку «Предыдущие версии» и посмотрите, доступны ли вам какие-то точки восстановления. Удалите все точки, находящиеся в списке данного окна, и примените изменения. Перезагрузите Windows и попытайтесь снова провести ее резервацию.
Ошибка 0x81000019 должна была исчезнуть.
При попытке сделать резервную копию Windows 10 вы можете столкнуться с ошибкой — Не удалось создать теневую копию. Эта ошибка связана с журналами событий VSS и SPP и может сопровождаться кодом ошибки 0x81000019. Если вы столкнулись с этой проблемой, то следующие возможные решения могут помочь вам решить эту проблему. На изображении ниже показан один из сценариев сбоя резервного копирования с упоминанием журналов событий VSS и SPP.

Что такое VSS и SPP?
Служба теневого копирования тома или VSS используется для создания резервных копий или снимков компьютерных файлов и драйверов Windows. Он доступен, если вы используете NTFS, и эти копии могут быть сохранены на локальном или внешнем жестком диске. Если служба остановлена, процесс резервного копирования, связанный с VSS, завершится ошибкой.
Служба защиты программного обеспечения или sppsvc.exe позволяет загружать, устанавливать и применять цифровые лицензии для приложений Windows и Windows.
Журналы для них можно найти с помощью средства просмотра событий. Пробег eventvwr.msc чтобы открыть его. В средстве просмотра событий вы можете проверить журнал приложений на наличие ОШИБОК, сообщаемых этими службами. Ошибки VSS будут отображаться в журнале приложений как записи с источником, помеченным как VSS и SPP для службы защиты программного обеспечения.
Если при создании резервной копии Windows 10 вы получаете сообщение об ошибке 0x81000019, теневая копия не может быть создана, проверьте журналы VSS и SPP, а затем следуйте нашим рекомендациям по устранению проблемы. Хотя лучше всего проверить журналы в средстве просмотра событий, чтобы выяснить точную проблему, если вы не можете понять ее, сделайте следующее:
- Проверить статус служб VSS и SPP
- Проверьте место для хранения на внешнем диске или компьютере
- Отключить стороннее программное обеспечение безопасности
- Удалить точки восстановления
1]Проверить статус служб VSS и SPP
Тип services.msc в командной строке и нажмите клавишу Enter.
В диспетчере служб найдите Служба теневого копирования тома и Служба защиты программного обеспечения.
Дважды щелкните, чтобы открыть каждый из них, и убедитесь, что их статус запуска установлен следующим образом:
- Служба теневого копирования тома — Руководство
- Служба защиты программного обеспечения — автоматическая (отложенный запуск)
Затем нажмите кнопку «Пуск», чтобы вручную запустить эти службы, если они еще не запущены. Теперь запустите Резервное копирование и восстановление функция и посмотреть.
2]Проверьте место на внешнем диске или компьютере.
Службе архивации Windows требуется достаточно места как в источнике, так и в месте назначения. Если у кого-то из них его нет, это может привести к этой ошибке. Это могло быть одной из причин ошибки, но единственной причиной. Запустите CCleaner или Disk Cleanup Utility, чтобы освободить место на диске. Вы также можете использовать Storage Sense для очистки дисков.
Теневое копирование тома может работать некорректно, если доступное пространство на любом диске меньше 40%. Так что используйте встроенное управление дисками или какой-нибудь бесплатный менеджер разделов, чтобы изменить размер диска, если хотите.
3]Отключить стороннее программное обеспечение безопасности.
Иногда сторонние службы безопасности могут мешать работе службы резервного копирования Windows, и в этом случае вмешивается служба защиты программного обеспечения. Мы настоятельно рекомендуем вам временно отключить программное обеспечение безопасности и посмотреть, поможет ли оно.
4]Удалить точки восстановления
Если сообщение об ошибке включает — Указанный объект не найден. Код ошибки 0x81000019, то вы можете удалить старые точки восстановления диска, резервную копию которого вы пытаетесь сделать.
- Щелкните диск правой кнопкой мыши и нажмите кнопку «Свойства».
- Переключитесь на предыдущую версию и удалите все точки восстановления.
- Попробуйте сделать резервную копию сейчас.
Наконец, вы можете попробовать сделать резервную копию в состоянии чистой загрузки, но тогда она будет временной. Если у вас мало времени, вы можете использовать эту опцию, чтобы сделать резервную копию, а затем позже устранить проблему.
Мы надеемся, что этим советам было легко следовать, и вы смогли решить проблему.
by Matthew Adams
Matthew is a freelancer who has produced a variety of articles on various topics related to technology. His main focus is the Windows OS and all the things… read more
Updated on July 31, 2021
- Error messages are, unfortunately, a regular part of the Windows 10 experience.
- The article below will show you how to handle Windows 10 error 0x81000019.
- We have plenty more articles like this one in our System Errors Hub, so visit that as well.
- For more helpful info, also check out our Windows 10 Errors page.
XINSTALL BY CLICKING THE DOWNLOAD FILE
This software will keep your drivers up and running, thus keeping you safe from common computer errors and hardware failure. Check all your drivers now in 3 easy steps:
- Download DriverFix (verified download file).
- Click Start Scan to find all problematic drivers.
- Click Update Drivers to get new versions and avoid system malfunctionings.
- DriverFix has been downloaded by 0 readers this month.
The 0x81000019 error can arise when users try to back up Windows 10. The error message states:
A shadow copy could not be created. Please check VSS and SSP application event logs for more information.
Consequently, users can’t back up Windows 10 as required. Do you need to fix that error? If so, go through these potential resolutions for error 0x81000019.
How can I fix error 0x81000019 on Windows 10?
1. Check the VSS and Software Protection services
First, check that both the required Volume Shadow Copy and Software Protection services are running.
- Right-click the Start button and select to open the Run accessory.
- Enter services.msc in the Run accessory’s text box, and click the OK option.
- Double-click Volume Shadow Copy to open the window in the snapshot directly below.

- Select the Automatic startup type for VSS if the service is disabled.
- Click the Start button in the properties window.
- Click the Apply option, and press the OK button.
- Double-click Software Protection to open its window.
- Press the Start button there if the service is stopped.
- Click OK to exit.


2. Free up storage space
The 0x81000019 error can often arise when there’s insufficient storage space available on the destination or source drive. So, make sure you have sufficient space on the drive you’re trying to back up Windows 10 to.
Furthermore, you’ll also need to have a good amount of space available on the source drive (about 40 percent free space). So, you might need to free up space if your hard drive is very full.
There are various methods to free up storage. Software will usually take up the most space, so uninstalling superfluous apps is one of the best methods.
In addition, you can also free up quite a lot of space by deleting junk files with system maintenance utilities.

3. Expand the system reserved partition
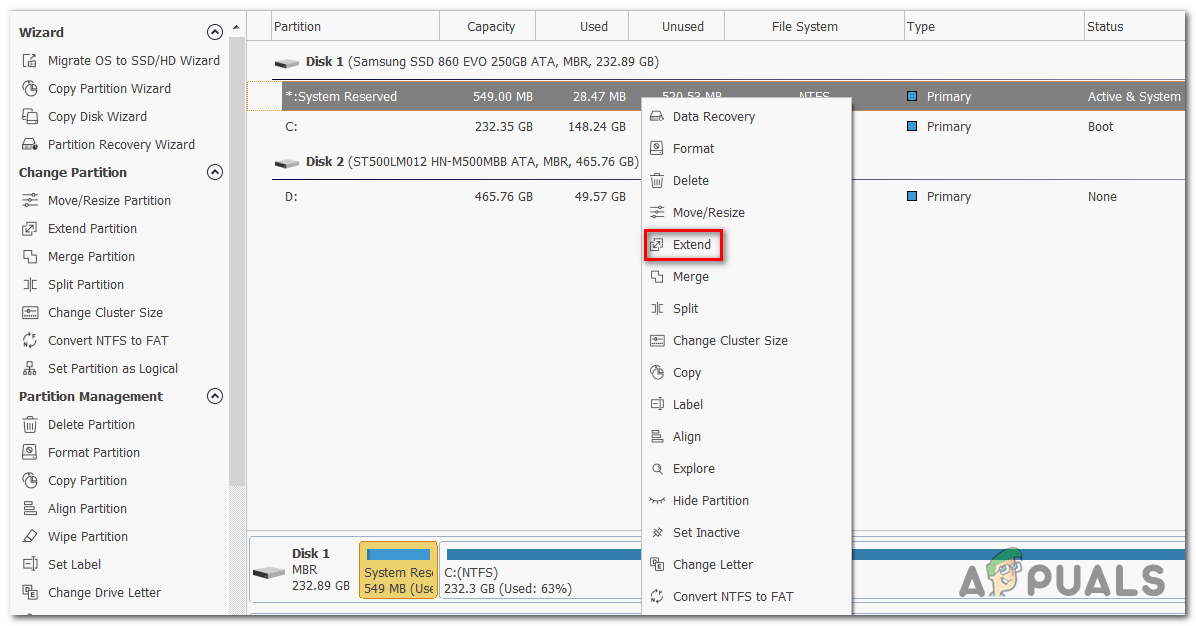
Some users might need to expand their reserved system partition space to more than 500 megabytes to fix the x81000019 error. You can do that with the freeware MiniTool Partition Wizard software.
Click Free Download on its download page to get the installer for that software. That linked page also includes guidelines for how you can expand the system reserved partition with MiniTool Partition Wizard Free 11.

4. Erase System Restore points
Error 0x81000019 could be due to outdated system restore points if the error message says The specified object could not be found.
- To fix that, open Run.
- Enter Control Panel in the Open box, and click OK.
- Click System and Security on the menu shown directly below.

- Click System.
- Click System protection on the left to open the window shown directly below.

- Then press the Configure button.
- Press the Delete button shown directly below.


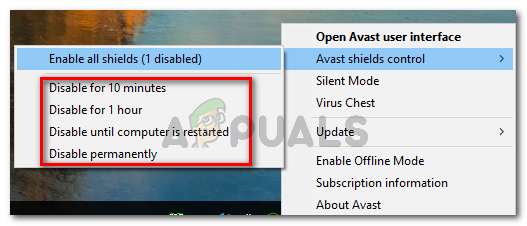
5. Disable or uninstall third-party antivirus software
Third-party antivirus software, such as Avast, McAfee, and Comodo, might be interfering with the Windows Backup.
Try disabling your third-party antivirus utility by right-clicking its system tray icon and selecting a disable option on its context menu, like the one in the snapshot directly below.
Select to disable it until you restart Windows to give yourself time to carry out the backup. Some users might need to completely uninstall their third-party antivirus software to fix error 0x81000019.

The above resolutions might fix error 0x81000019, but they’re not entirely guaranteed for all users. If the resolutions above aren’t enough, try running a system file scan with the sfc /scannow command.
As a final resort, a repair install of Windows will probably do the trick.
Which of the solutions mentioned above worked best for you? Let us know by leaving us a message in the comments section below.
![]()
Newsletter
Многие пользователи Windows сообщали об ошибке при создании резервной копии Windows. Полное сообщение об ошибке выглядит следующим образом:
Не удалось создать теневую копию. Пожалуйста, проверьте журналы событий приложений «VSS» и «SPP» для получения дополнительной информации.
Подробности: писатель обнаружил непреходящую ошибку. Если процесс резервного копирования повторяется, ошибка, вероятно, повторится снова.
Как упоминалось в сообщении об ошибке, эта ошибка связана с VSS и SPP. Известно, что эта проблема присутствует только в Windows 10. Код ошибки, связанный с этой ошибкой,-0x81000019. Эта проблема в основном проявляется в следующих случаях:
На ПК есть проблемы с памятью. Поврежденные системные файлы. Мешает сторонний антивирус.
В этой статье мы собрали некоторые исправления, которые помогут вам решить эту ошибку резервного копирования.
Содержание
Исправление 1. Запустите службы
Шаг 1. Откройте диалоговое окно”Выполнить “с помощью клавиш Windows + R .
Шаг 2: введите services.msc и нажмите Enter.
Шаг 3. В открывшихся окнах служб прокрутите вниз и найдите службу с именем Служба механизма резервного копирования на уровне блоков и дважды щелкните на нем.
Шаг 4. В открывшихся окнах”Свойства”измените тип запуска на Автоматический
Шаг 5. В разделе”Статус службы”нажмите кнопку Пуск и убедитесь, что статус службы равен Работает .
Шаг 6. Нажмите кнопку Применить и затем нажмите кнопку ОК .
Шаг 7. Теперь повторите шаги 3–6 и убедитесь, что следующие службы работают:
Удаленный вызов процедур (RPC) RPC End Point Mapper Резервное копирование Windows
Исправление 2. Выполните проверку ошибок на диске
Шаг 1. Откройте проводник Windows с помощью клавиш Windows + R.
Шаг 2. На левой панели щелкните правой кнопкой мыши диск Windows (C:) (диск, на котором в вашей системе установлена ОС Windows)
Шаг 3. Выберите Свойства
Шаг 4. В открывшемся окне свойств щелкните вкладку Инструменты .
Шаг 5. В разделе «Проверка ошибок» нажмите кнопку Проверить .
Шаг 6: В появившемся запросе нажмите Сканировать диск.
Шаг 7: Вы увидите, что сканирование начинается. Это может занять некоторое время. Подождите, пока сканирование не завершится.
Шаг 8: После завершения сканирования перезапустите систему.
Исправление 3: Запустите сканирование DISM и SFC
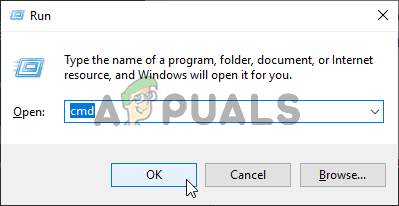
Шаг 1. Откройте терминал запуска. Для этого можно использовать ярлыки Windows и R .
Шаг 2. Введите cmd и удерживайте клавиши Ctrl + Shift + Enter , чтобы открыть командную строку в режиме администратора.
Шаг 3. В появившемся диалоговом окне подтверждения нажмите Да
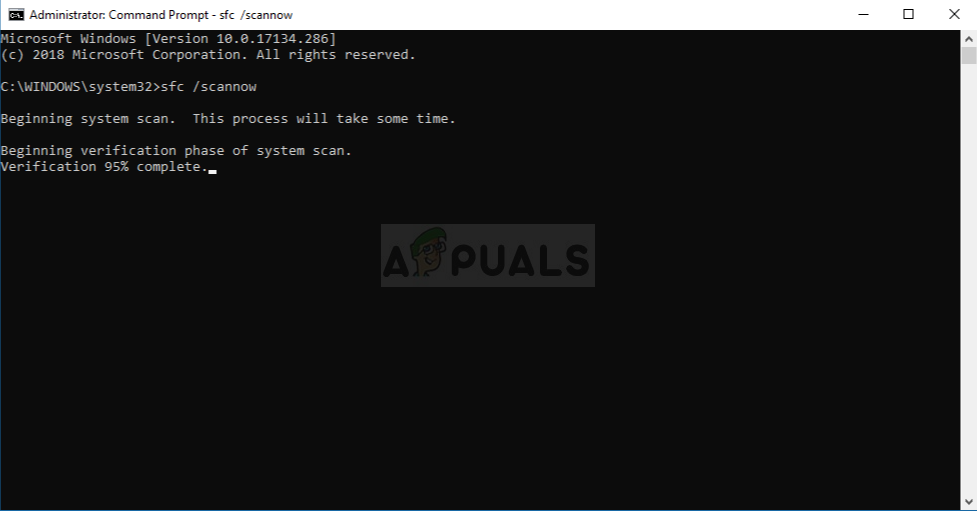
Шаг 4. Введите следующие команды одну за другой. Сделайте так, чтобы нажимать Enter после каждой команды
Dism/Online/Cleanup-Image/ScanHealth Dism/Online/Cleanup-Image/RestoreHealth sfc/scannow
Шаг 5. Дождитесь завершения сканирования и затем перезапустите системы.
Проверьте, помогает ли это решить проблему.
Исправление 4. Отключите сторонний антивирус
Если у вас установлен какой-либо сторонний антивирус систему, может помочь ее временное отключение или удаление AV. Обратите внимание, что неизвестно, что проблема вызвана брандмауэром Защитника Windows. Обычно это наблюдается с антивирусными программами, такими как Mcafee, Avast, Combo и т. Д.
Шаг 1. Во-первых, попробуйте отключить антивирусную программу. Посетите веб-сайт AV, чтобы узнать, как отключить антивирус, поскольку инструкции различаются для каждого поставщика.
Шаг 2. Если отключение не помогло, попробуйте полностью удалить антивирус.
Шаг 3. Откройте окно «Выполнить» с помощью Windows + R
Шаг 4: введите appwiz.cpl и нажмите Enter.
Шаг 5. В открывшемся окне «Программы и компоненты» найдите свою антивирусную программу .
Шаг 6. Щелкните программное обеспечение правой кнопкой мыши и выберите Удалить , как показано ниже.
Шаг 7. Следуйте инструкциям на экране и выполните процесс удаления.
Шаг 8: Перезагрузите компьютер.
Шаг 9: Попробуйте снова выполнить резервное копирование.
Шаг 10: Если вы не найдете любые сообщения об ошибках, это означает, что проблема была вызвана сторонним антивирусом.
Шаг 11. Попробуйте снова установить стороннее антивирусное программное обеспечение с последней версией и проверьте, видите ли вы проблемы.
Шаг 12. Если проблема не исчезла, возможно, вам придется подождать, пока выйдет следующая версия.
У многих пользователей сообщили, что эта проблема помогла им решить проблему.
ПРИМЕЧАНИЕ. У вас должен быть готов загрузочный установочный DVD-диск Windows
Шаг 1. Вставьте Загрузочный установочный DVD Windows
Шаг 2. Вас спросят, хотите ли вы продолжить загрузку с CD или DV. Д. Нажмите Enter
Шаг 3. Выберите языковые настройки и нажмите кнопку Далее
Шаг 4. В нижнем левом углу окна нажмите Восстановить компьютер
Шаг 5. В появившемся синем окне нажмите Устранение неполадок
Шаг 6. Теперь нажмите Дополнительные параметры
Шаг 7. Наконец, нажмите Автоматическое восстановление или Восстановление при загрузке
Шаг 8: Устройтесь поудобнее и терпеливо дождитесь завершения автоматического восстановления.
Шаг 9: Перезагрузите систему.
Это Все
Надеемся, эта статья была информативной. Просьба прокомментировать и сообщить нам об исправлении, которое помогло вам решить проблему.
Спасибо за чтение.

Ануша Пай-инженер-программист с большим опытом работы в ИТ-индустрии и страстным желанием писать.
Several Windows 10 users have been encountering the 0x81000019 error code when trying to take a backup of Windows 10. After several minutes of processing, this error code comes on the screen accompanied by the error message ‘A shadow copy could not be created‘. This error is often associated with the VSS and SPP event logs. As it turns out, the issue seems to be exclusive to Windows 10.
What’s causing the Windows Backup Error 0x81000019?
We’ve investigated this particular issue by looking at various user reports and by trying out the most popular repair strategies that other affected users have successfully used to get to the bottom of this issue. As it turns out, several different scenarios might end up producing this issue. Here’s a shortlist of potential culprits:
- Insufficient space in the system reserved partition – As it turns out, this issue can often occur due to insufficient space in the System Reserved partition. Windows Backup will do a lot of data swapping from the System Reserved partition during the creation of a backup, which will facilitate this error if not enough space is available. In this case, you can resolve the issue by enlarging the system reserved partition.
- Volume Shadow Copy service is set to Manual – Another potential culprit that might cause this behavior is an improper instance of the Volume Shadow Copy (VSS service). If the service is set to manual, the backup procedure will likely be affected. If this scenario is applicable, you can resolve the issue by changing the status of the service to Automatic.
- 3rd party Antivirus interference – An overprotective AV suite can also be responsible for the apparition of the 0x81000019 error code. In most cases, Avast, Comodo, McAfee are reported for being responsible. In this case, you should be able to resolve the issue either by disabling real-time protection or by uninstalling the security suite altogether.
- System file corruption – In rare circumstances, this problem can occur due to some kind of system file corruption that’s somehow interfering with the backup component. If this scenario is applicable, you should be able to fix the problem either by running a couple of utilities (DISM and SFC) or by reinitiating every OS component via a clean install or a repair install (in-place upgrade)
If you’re currently encountering the same issue and you’re looking for a way around it, the steps below should eventually allow you to fix the 0x81000019 error code for good. Keep in mind that each of the potential fixes mentioned below is confirmed to work by at least one affected user.
If you want to be as efficient as possible, we encourage you to follow the instructions below in the same order that we arranged them in (via efficiency and severity). Eventually, you will stumble upon a fix that will allow you to resolve the issue regardless of the culprit that’s causing the problem.
Let’s begin!
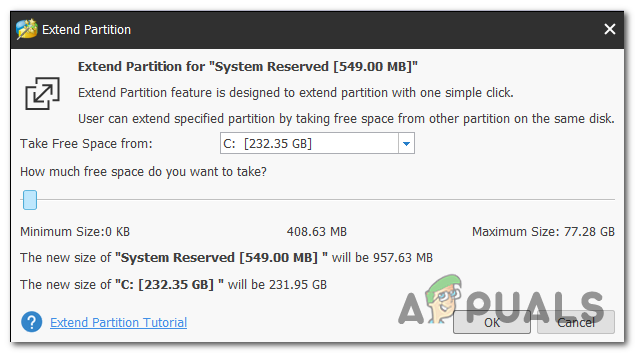
Method 1: Enlarging the system reserved partition
As several affected users have reported, you’re likely encountering this problem due to an insufficient system partition space. During the backup procedure, Windows will swipe a lot of data back and forth the system reserved partition. If not enough space is available, expect to see the 0x81000019 error code as a result.
Some users have confirmed that they were able to resolve this issue by using a 3rd party application to enlarge the system reserved partition to over 500 MB by taking space from C or a different regular drive.
If you think this scenario is applicable, follow the instructions below for step-by-step instructions on enlarging the system reserved partition by using Partition Wizard:
Note: We’re using the free version of Partition Wizard, but feel free to use any other product that’s capable of doing this, if you’re more comfortable with it.
- Visit this link (here) and click on Download Freeware on the next screen to initiate the download of the free version of Partition Wizard.

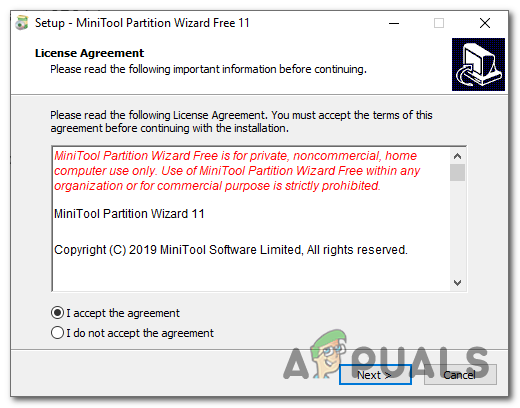
Downloading the free version of Partition Wizard - Wait until the download is complete, then double-click on the Partition Wizard installation executable, follow the on-screen prompts to complete the installation of the 3rd-party partitioning software.

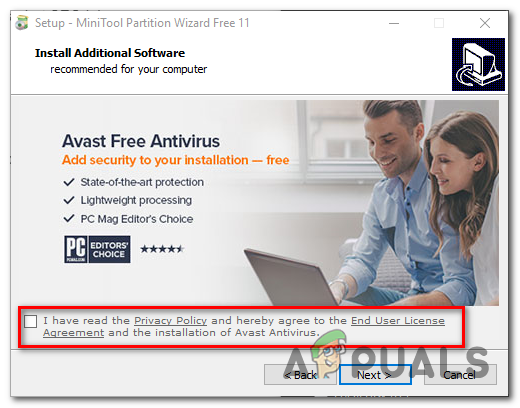
Installing the Partition Wizard executable - Go through every installation screen to complete the installation, then restart your computer once the process is complete. If you pay attention, you can avoid the installation of unnecessary PUPs by unchecking the agreement box.
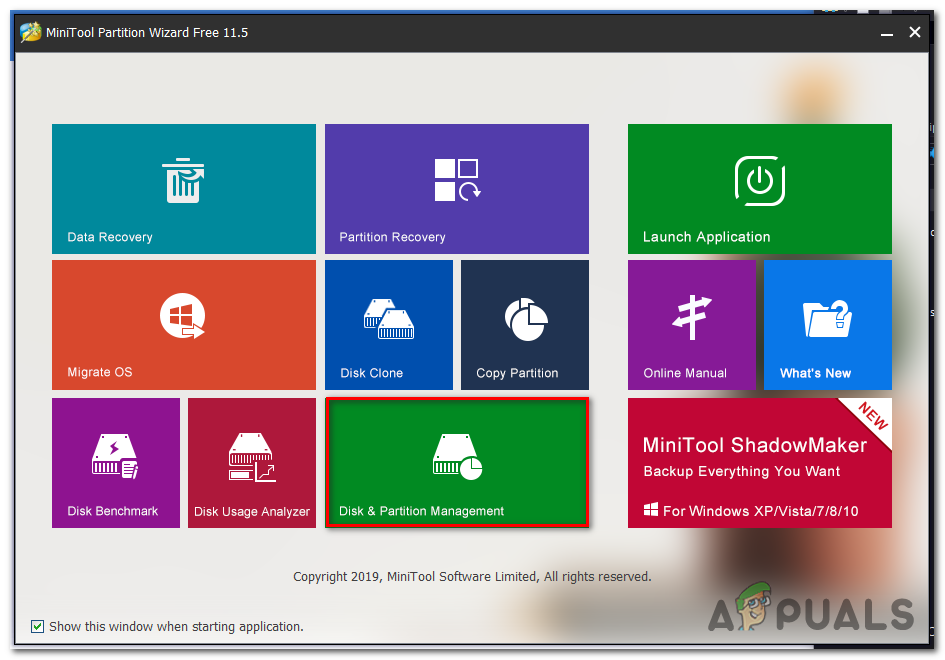
Preventing the installation of PUPs - At the next system startup, open Partition Wizard and at the initial screen, click on Disk & Partition Management from the list of available options.

Accessing the Disk & Partition Management section - Once you arrive in the correct section, move your attention to the right-hand section, then right-click on the System Reserved partition. Once you see the newly appeared context menu, choose Extend from the list of available options.

Extending the system reserved partition - When you’re inside the Extend section, start the operation by selecting the drive that you want to take space from. Once the correct drive is selected, use the slider below to enlarge the System Reserved partition to at least 1 GB, then click on OK to save the changes and start the operation.

Enlarging the system reserved partition - Wait for the operation to complete, then restart your computer and see if the problem is fixed at the next system startup.
- At the next system startup, repeat the backup attend again and see if you’re still encountering the same problem.

If you’re still encountering the 0x81000019 error code, move down to the next method below.
Method 2: Setting the Volume Shadow Copy Service to AUTOMATIC
Another potential cause with the potential of triggering the 0x81000019 error code is an improper instance of the Volume Shadow Copy service (commonly referred to as the VSS service). In most cases, the backup procedure will not be able to complete because the VSS service is set to Manual.
Several affected users that were also struggling to resolve this problem have reported that they finally manage to resolve the issue by changing the status type of Volume Shadow Copy to Automatic. Most users have reported that after doing this, they were able to complete the backup procedure without encountering the 0x81000019 error code.
Here’s a quick guide on modifying the status type of Volume Shadow Copy Service to Automatic:
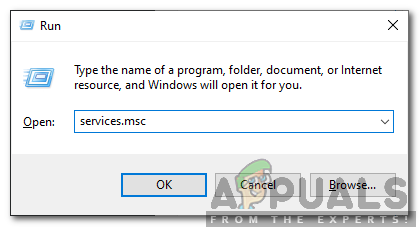
- Press Windows key + R to open up a Run dialog box. Once you’re inside the Run box, type ‘service.msc’ and press Enter to open up the Services window.

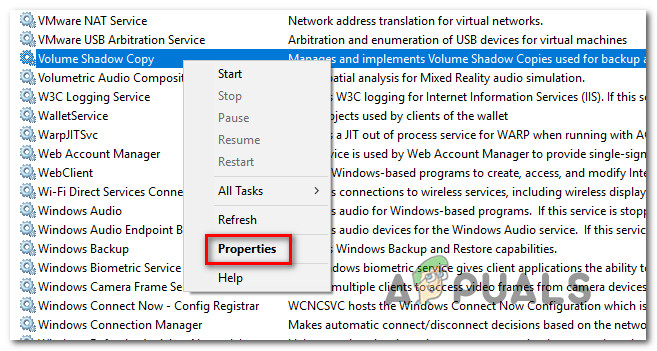
Running Services Manager - Once you’re inside the Services screen, scroll down through the list of local services and locate the Volume Shadow Copy service. After you manage to locate it, right-click on it and choose Properties from the newly appeared context menu.

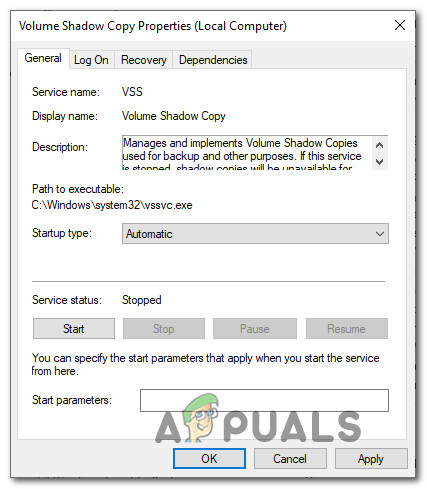
Accessing the Properties screen of the VSS service - Once you manage to get inside the Properties screen of the Volume Shadow Copy service, select the General tab from the list of options at the top, then change the Startup type to Automatic. Next, click Apply to save the changes.

Change the status tab to Automatic - Restart your computer and restart the backup procedure at the next system startup.
If you’re still encountering the same 0x81000019 error code when trying to repeat the action, move down to the next method below.
Method 3: Disable 3rd party AV suite (if applicable)
As it turns out, in some cases, the decisive factor that’s causing the backup procedure to fail with the 0x81000019 error code is an overprotective 3rd party security suite. Keep in mind that certain 3rd party security suites are known to interfere with some Windows components including the Backup component.
Avast, Comodo, McAfee are just a few potential culprits that might be responsible for the apparition of the 0x81000019 error code. Several affected users that found themselves in this exact position have managed to get the problem sorted out either by disabling the real-time protection while the backup was being created or by uninstalling the intrusive security suite altogether.
If you want the less intrusive approach, you should start by accessing your AV settings and disabling real-time protection first. Chances are it will let you complete the backup process without getting the error again (unless a firewall component is also involved). With most 3rd party suites, you can do this easily by right-clicking the taskbar icon to access the quick menu.
If the same problem is still occurring even after you disabled the real-time protection, we encourage you to uninstall the 3rd party suite completely from your computer – just to make sure that your AV hasn’t enforced some passive security rules that will remain active even when the real-time protection is disabled.
If you’re looking for a quick and effective way of doing this, follow this article (here) for step by step instructions on getting rid of your 3rd party AV and removing every remnant file.
If you already followed this method to no success or this wasn’t applicable since you don’t use a 3rd party AV suite, move down to the next potential fix below.
Method 4: Running DISM and SFC scans
As it turns out, this particular problem can also appear due to some kind of system file corruption. This has been consistently reported by several different Windows 10 users that have been hinting that the backup component can be inhibited by corrupted data present in critical folders.
If this scenario is applicable, you should be able to fix the problem by running ac couple of built-in utilities designed to deal with instances where system file corruption ends up breaking important components. DISM (Deployment Image Servicing and Management) and SFC (System File Checker).
While SFC is more focused on repairing logical errors, DISM is better at fixing dependencies that might affect the backup and updating operation. With this in mind, we encourage you to run both utilities to maximize your chances of getting the backup component back to a functioning state.
Here’s a quick guide on running both the SFC and DISM scans from an elevated Command Prompt:
- Press Windows key + R to open up a Run dialog box. Next, once you’re inside the newly appeared Run dialog box, type ‘cmd’ inside the text box and press Ctrl + Shift + Enter to open up an elevated CMD command. If you’re prompted by the UAC (User Account Control), click Yes to grant admin access.

Opening the Command Prompt - Once you manage to get inside the elevated CMD prompt, type the following command and press Enter to initiate an SFC scan:
sfc /scannow

Running the SFC scan Note: This SFC scan uses a locally cached copy to replace corrupted instances with healthy copies. Once you start this scan, you mustn’t interrupt it, since you run the risk of creating additional logical errors if you close the window before to operation is complete.
- Once the process is complete, restart your computer and wait for the next startup sequence to complete. After the startup sequence is complete, follow step 1 again to open up another elevated Command Prompt.
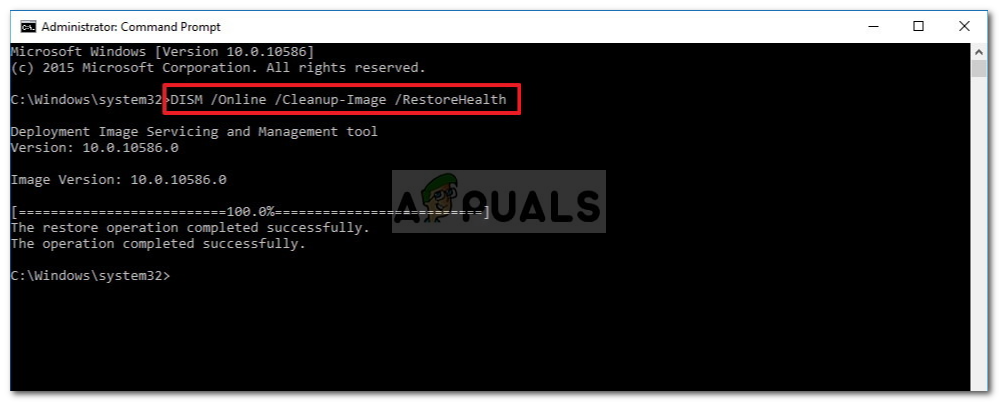
- After you manage to return to another elevated Command Prompt, type the following command and press Enter to initiate a DISM scan:
DISM /Online /Cleanup-Image /RestoreHealth

Restoring System Files Note: It’s important to keep in mind that DISM requires a permanent Internet connection. This is crucial since the utilities borrow the WU (Windows Component) to download healthy copies that will be later used to replace corrupted instances. Due to this fact, you’ll need to ensure that your network connection is not interrupted during this process.
- After the DISM scan is complete, restart your computer and see if the backup component is fixed at the next system startup.
If the same 0x81000019 error code is still occurring, move down to the next method below.
Method 5: Perform a repair install / clean install
If the general system repair that you performed above didn’t allow you to resolve the issue, it’s very likely that you’re dealing with some kind of system file corruption that cannot be resolved conventionally. In case this scenario applies to your current situation, you should be able to fix the issue entirely by resetting every Windows component including booting-related data.
When it comes to doing this, you have two ways forward:
- Clean install – This is the easiest procedure out of the two since it can be done I just a couple of steps with no installation media. But the major disadvantage is that you will end up losing all your personal files unless you back up all important files in advance and store them outside your OS drive.
- Repair install – A repair install (in-place repair) is the more tedious approach that will require you to use a compatible installation media. But the major advantage of going this route is that it will only affect your Windows components. This means that every personal file (apps, games, media, and even some user preferences) will remain intact.
Feel free to follow whichever method is closer to what you have in mind.