
In newer versions of Blender the previously available Tool Shelf buttons Flip Direction and Recalculate, typically used to flip inverted surfaces that made meshes appear inside-out, have been moved to the main Mesh menu upper-left of the 3D View. As the option is now context sensitive it only appears as a menu option in Edit Mode.
Design note: the Mesh menu is specific to Edit Mode and does not appear unless that particular editing context is active.
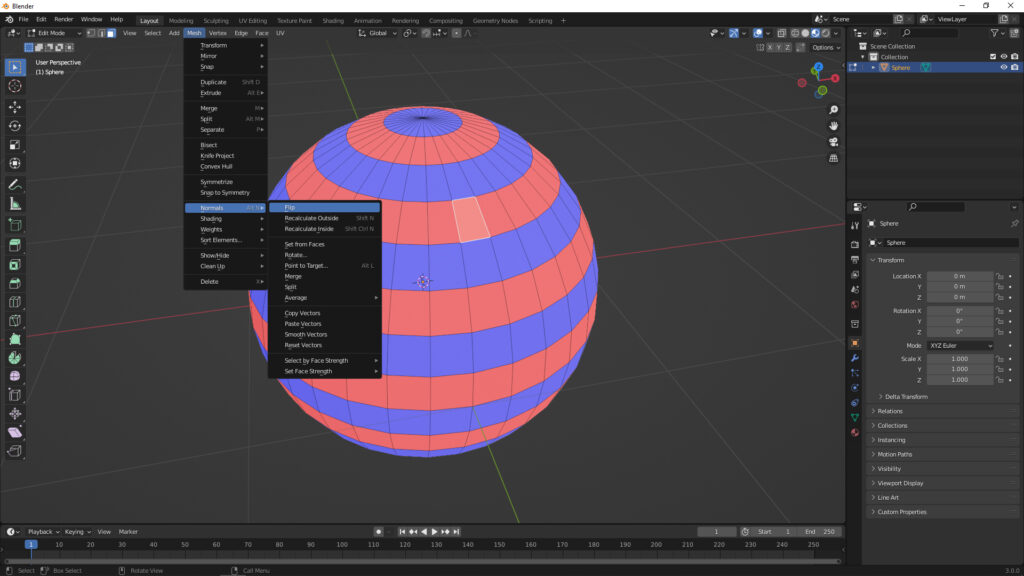
Flip Selected Faces
To access the option and/or correct an inside-out or inverted face, first select the errant mesh element in Edit Mode [1] (using vertex, edge or face) and from the Mesh menu upper-left click Normals [2] then Flip [3] from the options that appear – Mesh » Normals » Flip. Alternatively use Alt + N to access the Normals context menu then select Flip. The highlighted inverted face/s will immediately invert based on their current orientation.
Design note: when selecting errant faces using vertices or edges make sure all component elements are included to the degree that the inverted faces highlight.

The option to flip or invert faces [1] is an Edit Mode option only (accessible only when editing meshes), click Mesh » Normals » Flip [2 & 3] with an individual face or group selected.
Recalculate Faces
As an alternative to selectively inverting faces, or re-orientating a large mixed selection so everything points in one direction, inwards or outwards, use Recalculate Outside (Shift + N) or Recalculate Inside (Shift + Ctrl + N) options. To do this and force the orientation in one direction or the other, in Edit Mode select the entire mesh (A) and access the Mesh menu. Here select Normals » Recalculate Outside to flip faces/selections outwards, or Normals » Recalculate Inside to invert selections inwards – Mesh » Normals » Recalculate Outside/Inside.
Design note: in previous versions of Blender Recalculate tended to orientate faces randomly depending on the predominance of inwards or outwards facing surfaces prior to use. For Blender 2.8+ this is no longer the case, Recalculate Inwards and Recalculate Outwards forceably re-orientate selections based on the option selected, either in or out but not both.

For instances where surfaces are randomly facing one way or the other [4], or there are too many to select and manually process, use Recalculate Inwards/Outwards [5] to force everything to face the same direction, in or out, regardless – make a selection (individual, group or all) then click the Mesh menu, Normals then Recalculate Inwards/Outwards.
Face Orientation
To assist determining which way a face might be pointing, especially if Backface Culling is not disabled in Viewport Overlays or Viewport Shading options (depending on the viewport display mode) or a given materials Settings properties, Blender 2.8+ includes an option to colour tint faces based on their orientation, RED for surfaces pointing inwards and BLUE for those pointing outwards, making it much easier to see at a glance what’s going on, which then allows for individual faces to be flipped or recalculated as needed. To use, click the Overlays button upper-right of the 3D View [6] and from the menu select Face Orientation [7] – Overlays » Face Orientation. Everything will immediately tint blue/red based on their orientation. To disable, repeat, select Overlays » Face Orientation.
Design note: if X-Ray (Alt + Z) is active for any of the Viewport Shading modes, Wireframe, Solid etc., Face Orientation won’t work.


If Backface Culling is disabled (off) it can be difficult to determine which way a given surfaces is pointing because both front and back of the mesh are the same. In this situation using the Overlays [6] setting Face Orientation [7] can help as it tints surfaces based on their orientation, inwards or outwards.
While the question is rather old and solved, it’s still an important and underestimated topic leading to other questions coming up, so i would like to add one approach i did not see in the available answers here, for completeness sake.
Normals (or the orientation of the faces) in Blender can be made visible in 2 ways, one way would be with little lines pointing outward from the middle of a face, specifically the face-normals, while it gives us the information we may need, it can be hard to see wrong directed normals on complex geometry and long stretched faces, if you are a bit zoomed out.
Here i would suggest the Face Orientation to help get an easier overview on where there are faces in the wrong direction. Front and back of the face become blue and red respectively to have a strong contrast and allow better visual identification.
While it is easier to spot with the Face Orientation it does not replace the Normals as those i compared were only the Face-Normals.
But something that happens often is that we work on geometry and apply subdivision surface modifiers to name one that makes most obvious problems with wrong Normals, just to then have to find out that a face got turned for whatever reason.
So i would like to suggest to switch on Face Orientation at least once before giving up on surface problems, most likely if it turns out to be the Normals, the solution is underestimated easy.
Be it with recalculating Shift+N to let Blender figure out what’s in- and outside, or by selecting the wrong ones manually and flipping them with Alt+N selecting «Flip». One thing to keep in mind though, both functions need you to select the faces you want to affect!
Advertistment 1
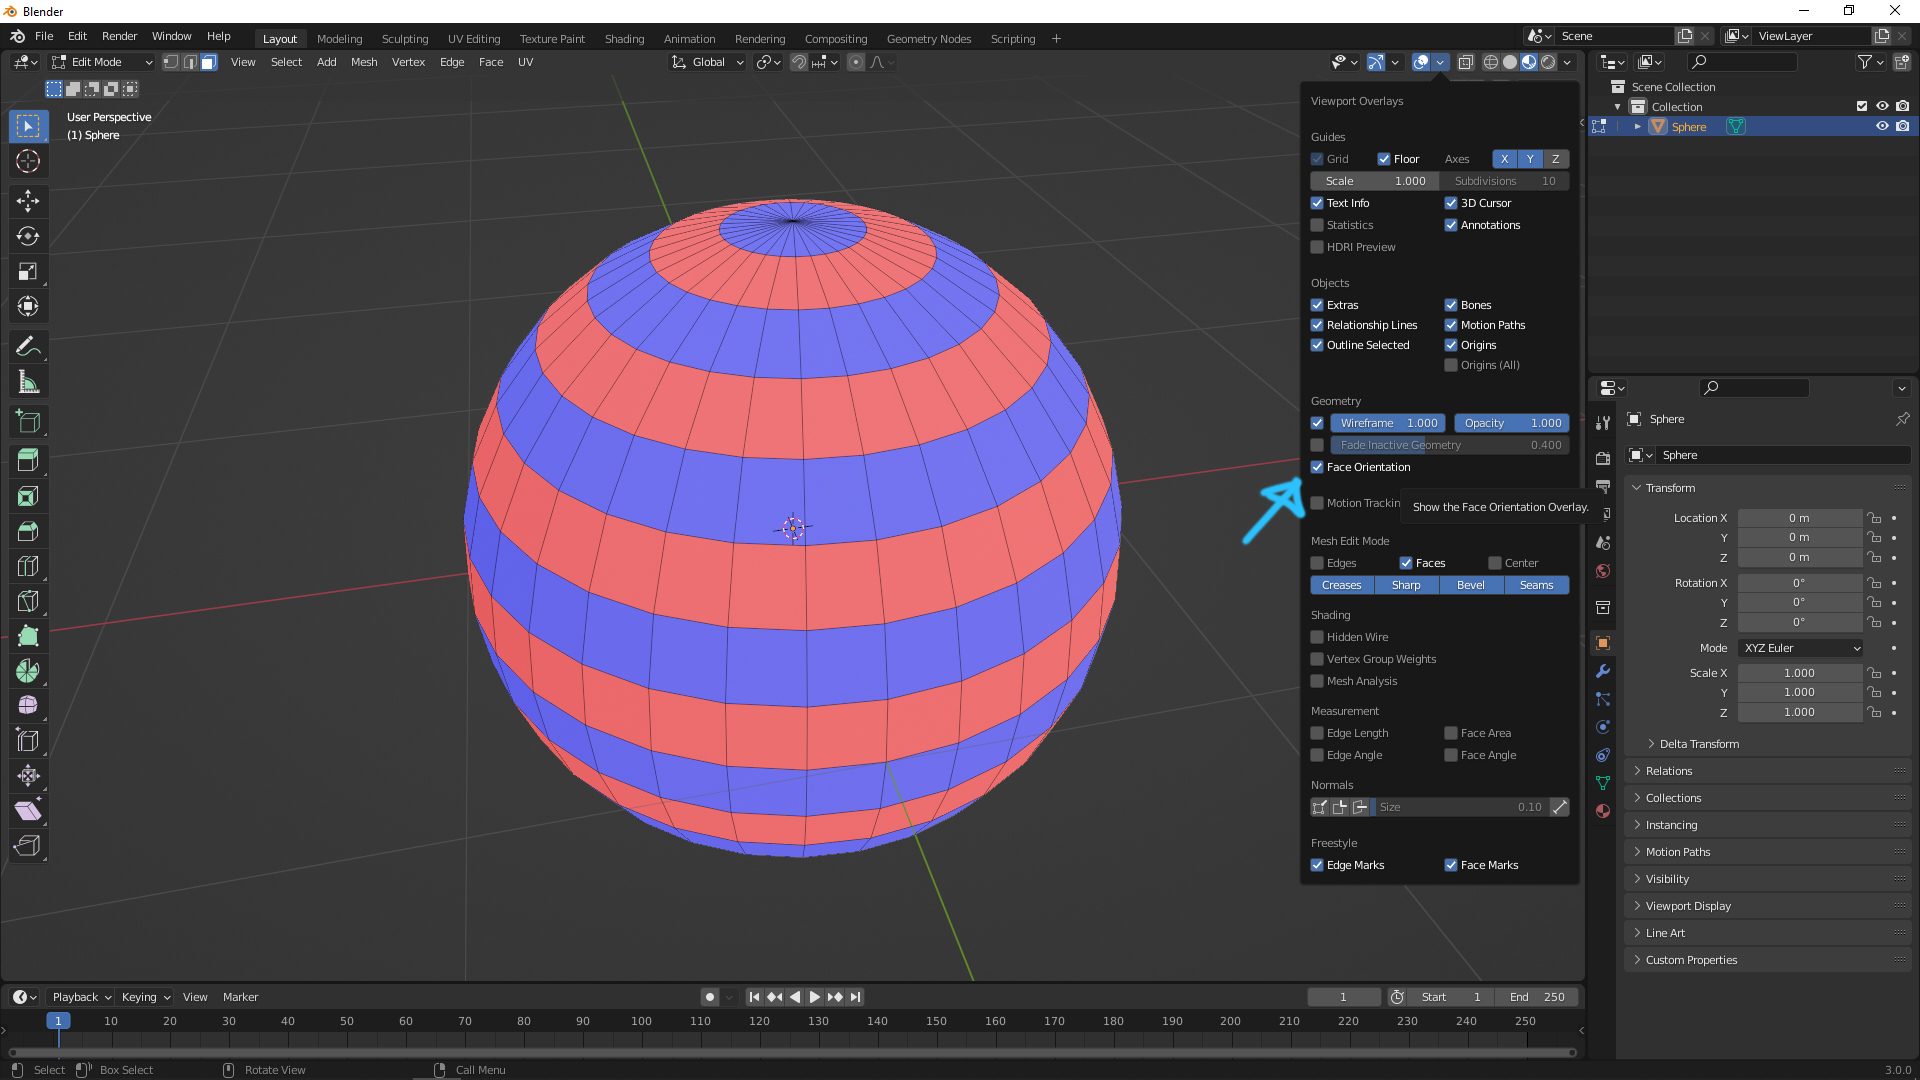
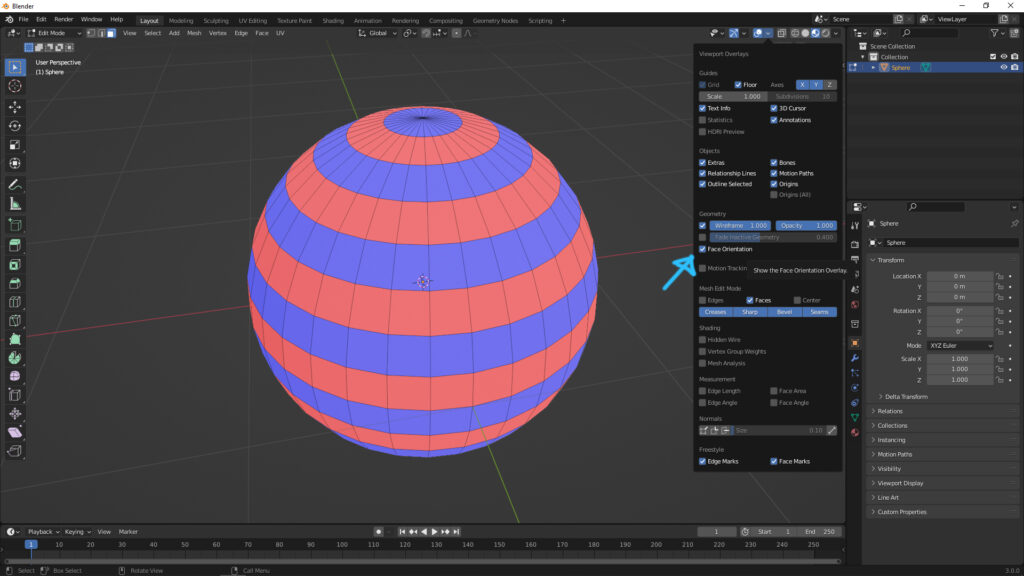
When we make a 3D object in Blender, we may find that the face orientation is not as our expectation. As upper screenshot, there are different colors (blue and red) on the object when showing the face orientation. To fix the wrong face orientation, we can follow the steps below to show the face orientation and flip normals in Blender.
1. Select the object that you want check its normals or face orientation,
2. Go to edit mode,
3. Check the box Face orientation as upper screenshot shown. The different color of faces mean that face orientation different : Blue color is face forwards, and Red color is facing backwards.
4. To fix the face orientation, we can change the face orientation by using flips orientation.
5. Select faces that you want to change the face orientation.
6. Select Flip normals as below screenshot.
Watch Tutorial video on YouTube.
Hope this helps. More Blender Tutorial, Tips and Tricks are available here.
Continues Reading:
How to select Vertices, Edges, Faces behind object in Blender
Blender Geometry Nodes Tutorials and Examples
How to Lock object in Blender
Tips and Tricks
from artist.B
Welcome to share by using below button.
Now Reading
How to flip normals in Blender 2.8?
Contents
- Full Article
- Comments
Blender 2.8 Modelling – Flip Normals
1. Select object and then go to the Viewport Overlay icon on the top right and click on the arrow dropdown.
2. Check Face Orientation on.
3. You will notice your selected object turns blue. Any faces that show red means the normals are reversed.
(You can also check if the normals are reversed by checking on the display normals icon if you are in edit mode.)
4. Go to edit mode and press 3 to select the red polygon faces.
6. On the top menu select Mesh and then Normals followed by Flip. This will reverse the normals. Your mesh should now all be in blue.
7. Go back to Viewport Overlays to switch of Face Orientation.
This Blender Guide on Design Sync offers quick tips and tricks for moments when your stuck or need to learn something really fast to get moving. Cater for beginners or people like me who have problem remembering everything inside Blender. Also design for people coming from other 3D software platform such as Maya, Max, Cinema 4D, or Houdini.
Other design articles you might like:
Read More

OptiX issue in Blender 2.9 timing out
Read More
Slow animation playback solution beginners fix
Read More
Add or reduce subdivision on object once you add an object to your scene
Read More
Using Metaballs to create interesting shapes and forms
Read More
Render region from a scene
Read More
Время на прочтение
3 мин
Количество просмотров 48K
Blender это замечательный бесплатный 3d пакет, который делает возможным и доступным осуществление гигантского количества проектов, и, как человек, прошедший путь от абсолютного новичка в 3d до преподавателя данной программы в учебном центре «Специалист» в Москве, я могу поделиться несколькими типами, которые помогут преодолеть несколько несложных, но каверзных моментов, которые хоть и очень просты, но далеко не очевидны, и могут заставить просидеть несколько часов в поиске решения проблемы.
Перевод программы и подсказок
Перевод программы и подсказок — Blender, как и почти все программы является англоязычной, но в настройках (preferences) мы можем сделать его интерфейс русскоязычным. Переводить его полностью на русский язык я бы не советовал, т.к. названия всех терминов и команд почти необходимо знать на английском языке для дальнейшего развития, и, так или иначе, много из них заимствовано великим и могучим русским языком и используется всеми и повсеместно (нормали, фейсы, вертексы и т.д.). А вот перевод подсказок действительно может упростить процесс входа в программу и снять много вопросов в процессе их появления. Окошко с подсказкой возникает при наведении курсора мыши на любой элемент blender.
-
Для того чтобы активировать подсказки, если они не работают, нужно зайти в меню Edit-Preferences-Interface. Поставить галочку напротив Tooltips.
-
Для активизации перевода подсказок в том же разделе открываем выпадающее меню Translation, ставим русский язык, и галочку напротив Affect Tooltips.

Забагивание области просмотра
Следующая проблема с которой я постоянно сталкивался это забагивание области просмотра — при попытке панорамировать видприблизитьсяотдалиться от объекта, blender упорно отказывается это делать, точнее делает это очень медленно . Тут помогает функция Frame, которая перезахватывает выбранный объект во вьюпорте и данная проблема устраняется.
-
Находится эта функция в меню View-Frame selected.

Clipping
Некст проблема это clipping — при попытке работать с объектом на близком расстоянии область обрезает часть нашего объекта, и мешает нам работать.

-
устраняется заходом в боковое меню нажатием кнопки N, и во вкладке view в выпадающем меню view, уменьшаем значение Clip Start (Например 0,001)

Нормали
Следующая проблема это нормали — будь то незнание того — что это? или незнание того — как их привести в правильное положение. Проблемы с нормалями возникают например при попытке запечь карты деформации, во время скульптинга, при попытке нажать Shade smooth и тд.
-
-Нормали это вектор перпендикулярный плоскости полигона, который указывает блендеру куда ему отражать свет. Направлен этот вектор только в одну сторону, то есть если нормаль вашего полигона развернута внутрь объекта, как часто случается в blender, то из за этого у вас будут проблемы на каком-то этапе работы.

-
Как мы можем видеть на данном изображении — все нормали объекта, кроме трех выделенных, повернуты наружу, а три выделенные — внутрь. При обычном режиме затенения Shade flat — этого не видно, но если я включу режим затенения shade smooth, то результат будет совсем иным.

-
Проверить направление нормалей своего объекта я могу перейдя в edit mode, и в выпадающем меню overlays поставить галочку напротив Face orientation . Тогда все нормали повернутые наружу будут отображаться синим цветом, а направленные внутрь — красным. В этом же меню Overlays я могу включить отображение нормалей как векторов.

-
Развернуть нормали нам помогут функции Mesh-Normals-Flip (или recalculate outside)
-
Flip — развернет выделенные полигоны.
-
Также мы можем выделить все полигоны объекта (шорткат А) и нажать Recalculate outside чтобы blender автоматически пересчитал все наши полигоны наружу.

-
За направлением нормалей лучше следить.
Двойные вертексы
Двойные вертексы — часто в процессе моделирования и оперирования командой Extrude могут создаться вертексы, которые стоят друг в друге и будут портить нашу топологию, это может нам аукнуться на этапах UV развертки, создания рига и тд. Чтобы избежать этого, на промежуточных этапах работы можно выделять всю свою модель в режиме работы с вершинами и нажимать Mesh-clean up-merge by distance. Двойные вертексы будут объединяться.

Карты нормалей
Карты нормалей запеченные в других программах (substance painter, Zbrush) дают странный результат в Blender .
-
Проблема в том что карты нормалей, в вышеперечисленных, и не только, программах, запекаются c использованием DirectX, а blender работает с OpenGL. Если говорить простым языком то нам нужно развернуть зеленый канал на карте нормалей. Делается это следующим образом:

Надеюсь, что данный пост поможет людям, осваивающим блендер, проскочить несколько часов поиска решения проблем!