На написание этой статьи меня подтолкнул Ramil.
В таких играх как: Call Of Duty Modern Warfare 3, Medal Of Honor, и Battlefield нету индикатор здоровья, но когда в ГГ стреляют то сверху появляется «Красная полоса» и некоторым очень трудно её найти, об этом и статья!
В этих играх адрес жизней DMA, так что если мы умрем или перезагрузим игру то всё насмарку.
1. Запускаем Cheat Engine (Любая версия)
2. Запускаем игру
3. Возвращаемся к Cheat Engine
4. Выбираем процесс игры «iw5sp.exe«
5. Заходим в одиночную игру, выбираем любую миссию
6. Возвращаемся к Cheat Engine
7. Выбираем тип сканирования («Scan Type») из раскрытого списка выбираем «Unknown initial value» (Это означает «Поиск Неизвестного значения»)
8. Выбираем тип значения («Value Type») из раскрытого списка выбираем «4 byte» (Это означает «4 Байта») (В других играх, может быть другой тип)
9. Нажимаем «Fist Scan» (Это означает «Начать поиск»)
10. В игре даем в себя стрелять и сверху появилась «Красная полоска» когда она появилась резко ставите игру на паузу (Это необходимые действия перед отсеиванием)
11. Возвращаемся к Cheat Engine
12. В «Scan Type» (Это означает «Тип сканирования») выбираем «Decreased value» (Это означает «Значение уменьшилось»)
13. И после этого нажимаем «Next Scan» (Это означает «Следующие сканирование» или «Отсеивание»)
14. Возвращаемся в игру
15. Находим укрытие, ждем пока «Красная полоска» не пропадет с экрана, когда пропала ставим игру на паузу
16. Возвращаемся к Cheat Engine в «Scan Type» (Это означает «Тип сканирования») выбираем «Increased value» (Это означает «Значение увеличилось»)
17. И после этого нажимаем «Next Scan» (Это означает «Следующие сканирование» или «Отсеивание»)
18. И так делаем несколько раз пока не останется несколько адресов (Адрес жизней или нет можно проверить путём «Заморозки адреса», слево адреса есть «Маленький квадратик» («Active») — Он замораживает адрес, или активирует скрипты, достаточно нажать в середину «Маленького квадратика» и в нем появится «Крестик» — это означает что адрес заморожен, или скрипт активирован, деактивировать — можно, повторно нажав в середину «Маленького квадратика»)
19. Когда заморозили адрес, заходим в игру и опять даем врагов в себя стрелять, если враги в тебе стреляют а ГГ не умирает, то адрес наш!
P.S В новых играх очень трудно и немножко долговато найходить адрес здоровья, так что нужно быть очень внимательными при «Отсеивании». Если инструкция работает с адресом нашего ГГ и адресами здоровья врагов то читаем эту тему: http://forum.gamehac…%B0-id-players/
Скрипт «Бесконечное здоровье» в Call Of Dity Modern Warfare 3 (v1.0) (Автор скрипта Grom-Skynet)
[ENABLE]
alloc(newmem,2048)
label(returnhere)
label(zd)newmem:
push edx
mov edx,[010BF428]
cmp [esi+00000150],edx
pop edx
je zd
sub ecx,ebp
mov [esi+00000150],ecx
jmp returnherezd:
db 90 90
mov [esi+00000150],ecx
jmp returnhereiw5sp.exe+22058:
jmp newmem
nop
nop
nop
returnhere:[DISABLE]
iw5sp.exe+22058:
sub ecx,ebp
mov [esi+00000150],ecx
dealloc(newmem)
Изменено 7 мая, 2012 пользователем 24K
24K, можешь поправить свой текст удалив мои примечания или оставь как есть
Cheat Engine – программа для гейм-хакеров, предназначается для читерства в компьютерных играх. Принцип работы заключается в том, что показатели игры – достижения, жизни, патроны, ресурсы – хранятся в виде цифр по определенным адресам оперативной памяти компьютера. Указатели — память, которая содержит не значение параметра, а адрес нахождения параметра. Сканирование памяти игры в Cheat Engine делает доступным эти адреса найти и изменить цифры на те, которые нужны.
Для чего нужен поиск указателей
Переменные объекта в игре создаются динамически, чтобы не нагружать оперативную память игры и процесса – с текущими параметрами игр оперативной памяти не хватит. Соответственно, ведется учет, где в памяти размещается тот или иной параметр. Базовый элемент — указатель, а внутри – параметры здоровья, ресурсов, опыта, патронов, денег. При каждом новом запуске игры или нового уровня, адреса динамических игровых параметров переезжают в другую область памяти. Для изменения приходится снова и снова находить. Для того, что бы этого не делать применяется поиск указателей.
Найти одноуровневый указатель
Запускаем Cheat Engine. Находим и копируем в нижнее окно адрес переменной, которая отвечает за нужный параметр. Правым кликом по адресной строке вызываем меню, находим строку «Find out what writes to this address». Ставим break на запись и разрешаем запуск отладчика. Идем в игру и тратим часть золота или теряем одну жизнь — чтобы изменить показатель. Возвращаемся к Cheat Engine и видим в окне отладчика новые строки. Выбираем одну типа mov и переходим во вкладку «More information». Правым кликом открываем меню и выбираем «Copy info to clipboard» — скопированное переносим в блокнот, закрываем отладчик.
Далее переходим в главное окно программы и в поисковой строке вводим адрес из указанной области 07AF.., отмечаем галочкой НЕХ и тип значения 4Б, — запускаем поиск. В результатах поиска ищем постоянный адрес – выделяется зеленым. Копируем в нижнее окно и кликаем дважды по строке «Adress».
Копируем адрес сверху, отмечаем галочкой «Pointer» и вставляем в нижнее выпавшее поле. Тип определяем исходный. Далее при помощи вендового калькулятора рассчитываем смещение между первоначальным адресом, копированным в блокнот и найденным зеленым. Результат вставляем во второе поле снизу и жмем «Ок». После этого правым кликом по значению – «Value» выбираем в меню «Show as decimal» — отражать показатели в десятичном формате. Итог сохраняем в типе файла *.СТ. При загрузке этого файла в Cheat Engine с запуском уровня не надо будет снова искать переменные.
Найти многоуровневый указатель
Многоуровневый – это такой, который ссылается не на искомую информацию, а на другой указатель. Таких уровней может найтись сколько угодно. Многоуровневая адресация усложняет процесс поиска цепочки указателей. Обработка занимает время. Сканирование памяти проводится 8-12 раз с перезапуском игры до тех пор, пока не выявится постоянный результат и один показатель не отразит хоть раз одинаковый результат с игровым параметром при перезагрузке.
Cheat Engine (помогите разобраться!)
неизвестное значение ищи, побегай, потом перед вторым сканом выбери Значение изменилось или Значение уменьшилось, если, например, после бега выносливость стала меньше той, которая была при первом скане, потом подожди немного, допустим выносливость восстановилась, перед третьем сканом выбираешь Значение изменилось или Значение увеличилось, то есть значение стало больше, после второго скана, ну вот так и отсеевай.
(лучше отсеевать по увеличению и уменьшению, так как отсев просто по измененному значению будет очень долгим)
пример:
1. в инглише. вместо Exact value ставишь Unknown initial value (4 байта, скорей всего)
2. скан
3. побегал, например выносливость уменьшилась, ставишь паузу, так как значение не должно равняться или быть больше того, которое искали в первый раз, тут думаю понятно почему, выставляешь Decreased value (уменшилось)
4. скан
5. отдохнул, выносливость увеличилась, ставишь Increaced value (увеличилось)
6. скан
7. повторить процедуру с пункта 3 до нахождения нужного значения
таким образом можно найти практически любые значения не отображаемые в числовом виде
трейнер скачай, проще будет. или таблицу для Cheat Engine поищи, может есть. по мне так табличка самое оно
[СТАТЬЯ] Находим указатели в играх
Я пишу эту статью исключительно для новичков, но она может быть полезна и бывалому читеру.Здесь, в отличии от других гайдов, я буду объяснять почти каждое действие и вдаваться в подробности.
Как вы уже заметили, находя значение жизней и тому подобных, при перезапуске игры их значение заменяется на . Это означает что у вашего значения поменялся адресс.У этого значения есть указатель, который неизменен.Их может быть и больше.В этой статье я научу вас их находить.Приступим.
Я возьму для примера tutorial cheat engine step 8.Везде принцип один и тот же, то-есть таким же образом вы сможете найти указатели во многих играх, в том числе и в Perfect world, Jade Dinasty.
Во первых если у вас нету программы которая работает с памятью, нужно скачать программу Cheat engine.Ее можно скачать с офицального сайта — http://www.cheatengine.org/
Переходим по ссылке, нажимаем download cheat engine, качаем, устанавливаем.
Открываем Tutorial-i386.exe в папке с программой.
Мы видим такое окно:
В поле password вводим пароль 8 ступени — 525927 и жмем ок.
Открываем Cheat Engine нажимаем на светящийся монитор и выбираем процесс Tutorial-i386.exe 
Теперь настройка закончена.Перейдем к взлому.
Смотрим на окошко туториала — 
Там есть две кнопки — change value и change pointer.Из этого уже известно что там будет хотя бы один указатель.И есть значение, в данном случае оно у меня 1621.
Переходим в окно Cheat Engine и в строку value вводим 1621.Ничего не меняем.Жмем first scan.Если оно одно — хорошо.Если несколько, жмем change value в строку вводим следующее значение и жмем next scan. 
Жмем на значение два раза и оно появляется внизу.Перейдем к находке указателей.
Жмем внизу по значение правой клавишей мыши и жмем find out what writes to this adress. 
Появится новое окно.Оно спросит разрешение, нажмите yes.
Перейдите в туториал и нажмите change value.В том окне появится функция.Жмем по ней и more info.Зеленым выделено смещение.Его нужно запомнить, оно понадобится нам позже.Желтым указан указатель в hex’e.Это первый указатель, а их здесь 4. 
Переходим в окно Cheat Engine и жмем new scan.Ставим галку напротив hex и вводим адресс. 
Внизу жамкаем по нему find out what acces to this adress. 
Находим так указатели пока не дойдем до зеленого указателя, он статический, последний указатель. 
Теперь закрываем лишние вкладки cheat engine переходим в главное окно и жмакаем add adress manually.Жмем галку напротив pointer и 3 раза add pointer.Зеленый указатель вставляем в самую нижнюю строчку.
Помните я говорил вам запомнить смещение?Теперь оно нам нужно.Ставим его в поля оффсет в порядке 18 0 14 c и сверху должен быть адресс самого первого значения.Внимание на рисунок. 
Жмем ОК и у нас внизу появилось еще одно значение.Замораживаем его — ставим крестик в окошке и изменяем значение на 5000.Переходим в окно туториала жмем change pointer — и вуаля!Туториал пройден. 
![]()
Download Article
![]()
Download Article
This wikiHow teaches you how to use Cheat Engine to exploit some computer games. Cheat Engine is a memory scanning tool. It allows you to access data stored in your computer’s memory and make changes to that data. This allows you to change information in a game, such as health, ammo, score, lives, and the number of things you have in your inventory.
Things You Should Know
- You can download Cheat Engine for Windows or macOS from https://cheatengine.org/downloads.php.
- You can use Cheat Engine to change the number of items in your inventory by modifying their aspect numbers.
- Not all games work with Cheat Engine, but you’ll have the best luck with single-player Steam games.
-

1
-
2
Click Download Cheat Engine. It’s a large link in the middle of the page.
- This button will also have the current version of Cheat Engine listed on it (e.g., Download Cheat Engine 6.7).
- If you’re attempting to use Cheat Engine on a Mac, click the Download Cheat Engine 6.2 For Mac link instead.
Advertisement
-
3
Install Cheat Engine. Doing so will vary depending on your computer’s operating system:
- Windows — Double-click the Cheat Engine setup file, click Yes when prompted, click Next, check the «I agree» box and click Next, click Next three more times, uncheck the «I agree to install McAfee WebAdvisor» box and click Next, and click Install. Once setup completes, click Next if prompted, then click Finish.
- Mac — Double-click the Cheat Engine DMG file, verify the installation if prompted, click and drag the Cheat Engine logo onto the «Applications» folder, and follow any on-screen instructions.
-
4
Open Cheat Engine. Once you’ve finished installing Cheat Engine, open Start
(Windows) or Launchpad (Mac), then click the Cheat Engine option.
- You may have to click Yes or Open before Cheat Engine will open.


Advertisement
-
1
Start a game. Open the game that you want to use with Cheat Engine.
- Remember, this cannot be an online multiplayer or server-based game.
-
2
Click the «Processes» icon. In the Cheat Engine window, click the computer-shaped icon in the top-left corner. This will open a pop-up window with your computer’s current programs in it.
-
3
Select your game’s process. Scroll through the list of processes until you find your game, then click the game’s name. If you’re attempting to use Cheat Engine for a browser game, you’ll select your browser’s name instead.
- If your game doesn’t appear in the «Processes» list, you cannot edit it in Cheat Engine.
- You may first have to click the Processes tab at the top of the window.
-
4
Click OK. It’s at the bottom of the window. This will open the game in Cheat Engine.


Advertisement
-
1
Determine a game aspect to change. In order for you to be able to change a game aspect, the aspect must have a number attached to it (e.g., amount of ammo, health, or items).
- The number must be on-screen. For example, if you want to change the number of a certain item in your inventory, you would first have to open your inventory to the page on which the item’s number is available.
-
2
Minimize the game window and click over to Cheat Engine. You’ll need to pull up the Cheat Engine window while the game is minimized.
- Don’t pause the game when you do this.
-
3
Click New Scan. It’s at the top of Cheat Engine next to the panel on the left. Any time you want to scan for a new value, you need to click New Scan.
-
4
Select a scan type. There are five scan types you can do when you start a new scan. The two main ones you’ll be using are «Exact Value» and «Unknown initial value». Use the drop-down menu next to «Scan Type» to select the type of scan you want to do. The scan types are as follows:
- Exact value: Use this scan type if you know the exact number you want to change. For example, if you know the exact number of lives, or ammo you have, you can select this option.
- Unknown initial value: In video games, sometimes a value isn’t represented with a number. For example, your health may be represented by a health meter instead of a number. In which case, you don’t have an exact number for how much health you have. There is a number that represents your health, you just don’t see it on-screen. In this case, you can select Unknown initial value.
- Bigger than…:’ Select this option if you don’t know the exact number you’re look for, but you know the smallest possible value.
- Smaller than…: Select this option if you don’t know the exact value, but you know the largest possible value.
- Value between…: This option allows you to enter a range of values to look for.
-
5
Select a data type: The data type represents how a value is stored in the memory. It can be hard to know what data type to select, so this can take a little guesswork. Use the drop-down menu next to «Data type» to select a data type. If you can’t find the value you are looking for using one data type, click New Scan and try again using a different data type. Some of the more common data types you will be using are as follows:
- Bytes: 2 Bytes and 4 Bytes are the data types you’ll be using most often. Most Windows applications use 4 Bytes, so start with that. You can also find these values using 2 Bytes. 1 Bytes and 8 Bytes can work as well, but you may run into problems.
- Float: Floating point data types are values that have a decimal point in the value (though you may not see the decimal point on-screen in the game). Some times games store values as floating points to prevent simple memory scans. If you’re not able to find the value you are looking for by scanning bytes, try scanning for floating points.
- Double: Doubles are similar to floating points, but they can contain twice the amount of digits. If you are unable to find a value by scanning for bytes or floats, try scanning for it as a double.
- All: This option scans all values of all data types. This is a good option if you don’t know what you are searching for, but it will also return more search results that you will need to narrow down.
-
6
Enter the value you want to change and click First scan. For example, if you have 20 bullets left in your ammo, you would type 20 into the «Value» text box. This will scan for all values that have the number «20» in it. This will likely produce a long list of values in the list of addresses, you’ll need need to narrow it down a bit.
-
7
Return to your game and change the value. How you do this will depend on the game itself; for example, if you’re trying to give yourself more health, you might purposefully damage your own health in order to lower the number. If you want more ammo, you might fire a couple of shots to lower your ammo count.
-
8
Return to Cheat Engine and scan for the updated number value. Minimize the game again and click back over to Cheat Engine. Type the new number into the «Value» section, then click Next Scan. This will scan all the values in your first scan and narrow down the addresses to the ones that changed to the value you entered in the «Value» bar.
- Unknown initial value: If you selected «Unknown initial value» for your first scan, select Increased value or Decreased value under «Scan type» depending on if the value (or meter) increased or decreased. This will scan for all values that increased or decreased instead of scanning for an exact number.
-
9
Repeat the search process until you have 4 or fewer values. You’ll keep changing the number and then searching for the updated number until you have no more than 4 values listed on the left side of Cheat Engine.
- You should eventually see the previous number you searched for listed in the «Previous» column of each value’s number, while the current value of the item will be in the «Value» column.
-
10
Add the values to the address list. You can either double-click a value to add it to the address list at the bottom, or you can click an address to select it and click the red, diagonal arrow in the bottom-right corner of the list of values. Doing so will place the values in the list of addresses at the bottom of the window.
- To select multiple addresses, you can hold «Shift» and click the top address and the bottom address.
-
11
Change the number to a value you want. Use the following steps to change the value number:
- Double-click the number below «Value» in the list at the bottom of Cheat Engine.
- Enter a new number in the «Value» field.
- Click Ok.
-
12
Check to see if the value updated in your game. When you re-open the game, the value you edited should reflect the number you just entered. The next part teaches you how to stop a value from changing by replacing it with non-operational code.
- You may need to change the value one more time before it will update.


Advertisement
-
1
Scan for a value you want to stop. This part teaches you how to use the Code Finder to find what writes to the address you want to change and then replace it with non-operational code. This will prevent the value from changing in-game. Use the steps in the previous part to find a value you want to change. Add it to the list at the bottom of the screen.
-
2
Right-click the address and click Find out what access this address. This opens the Cheat Engine Debugger. This displays instructions that write to the address you are accessing.
-
3
Click Yes. This confirms that you want to attach the debugger to the Cheat Engine process. This opens the Code debugger. The list will be blank when the window first opens.
-
4
Return to the game and change the value again. Once again, return to your game and do something to change the value you want to stop. This will cause the code instruction that accesses the address you selected to appear in the debugger window.
-
5
Return to Cheat Engine and click the instruction in the list. There may be more than one address. If that is the case, select the one that doesn’t write to the same base address. Look for the instruction that has a different value between the «[‘ and «]» brackets than the rest.
-
6
Click Replace. This replaces the code with non-operational (NOP) code. [1]
- If there is more than one item in the list, go ahead and select all of them.
-
7
Click Stop. This puts the non-operational code into effect. This will prevent the value from changing in the game.
- To restore the original code, select the item in the list and clck Show disassembler. Right-click where it says «NOP» and click Restore with original code. If you don’t see this option, click Replace with code that does nothing, click Yes. Then right-click NOP again and select Restore with orignal code.


Advertisement
-
1
Scan for a value you want to change. Sometimes values can change address either when you restart the game, or in the middle of the game. You can use pointers to find what writes to an address. Once you find the base level static address that doesn’t change, you can change that value.
-
2
Right-click the address and click Find out what writes to this address. This opens the debugger window.
- If there is multiple addresses, open a debugger window for as many addresses as Cheat Engine will allow.
-
3
Return to the game and change the value again. Once again, return to your game and do something to change the value you want to change (i.e. fire your weapon, get hit). This will cause the instruction that writes to that address to appear in the debugger window.
- If nothing changes in the debugger window, it is not the correct address. Try a different one.
-
4
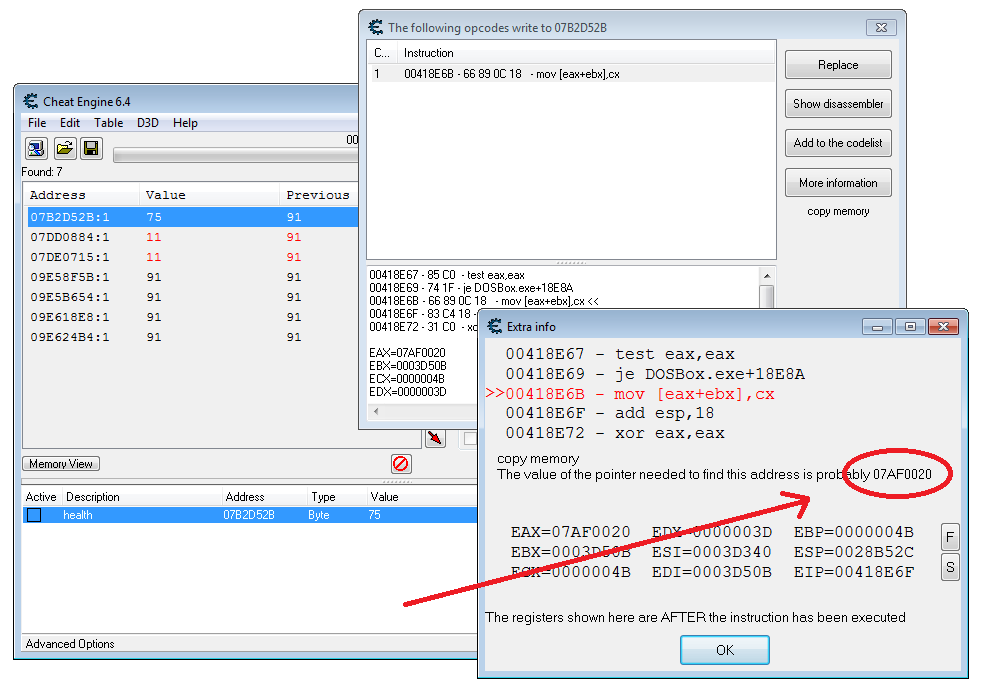
Return to Cheat Engine and click the instruction in the list. It’s in the debugger window. There may be more than one address. If that is the case, look for the instruction that has a different set of characters between the «[‘ and «]» brackets than the rest. If there isn’t a single address that has different characters, check to see if the pointer is the same for all of them.
- If the characters have a + and a number at the end (i.e. [ESI+14]). That is an offset number. Write it down. You’ll need it later.
-
5
Click More information. This displays instructions that happen when the value changes in the Extra Info screen. This also lists the pointer that writes to the address.
- You can also find the address by checking the characters in the bracket, and then checking what number comes after those characters listed at the bottom. For example, if the address has «[rdx]» next to it, look for RDX=xxxxxxxx at the bottom.
-
6
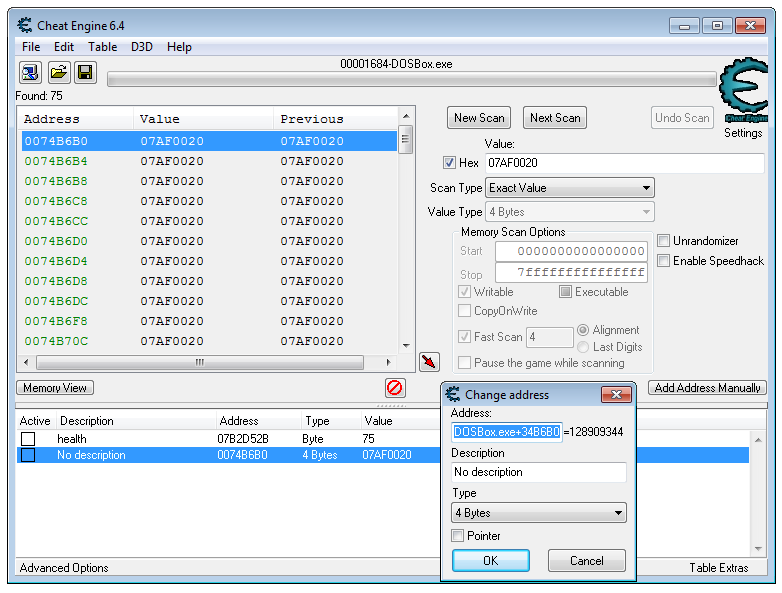
Click the checkbox next to «Hex» and do a new scan for the pointer address. The address of the pointer is listed in the text that says «The value of the pointer needed to find this address is probably xxxxxxxxx». Use the following steps to search for the address at the end of this sentence.
- Click New Scan.
- Click the checkbox that says «Hex» next to the «Value» field.
- Enter the pointer address in the Value field and click First scan.
-
7
Double-click the pointer address. This adds the address to the list at the bottom of Cheat Engine.
- If the address is listed in green in the scan results. This means it is a static address and probably the pointer you are looking for. In some cases, the pointer you find may also be a pointer. This is called a multilevel pointer. In this case, you’ll need to repeat these steps for each pointer you find in order to find out what the root static pointer address is.
-
8
Double-click the number below «Address». This opens the «Change address» dialogue box.
-
9
Copy the address in the field and click Cancel. To copy the address, simply highlight the entire text in the field at the top of the «Change address» box. Right-click it and click Copy. Then click Cancel to close the field.
-
10
Click Add address manually. It’s the button on the left above the address list at the bottom of Cheat Engine. This opens a box that looks similar to the «Change address» box, except this one allows you to add an address.
-
11
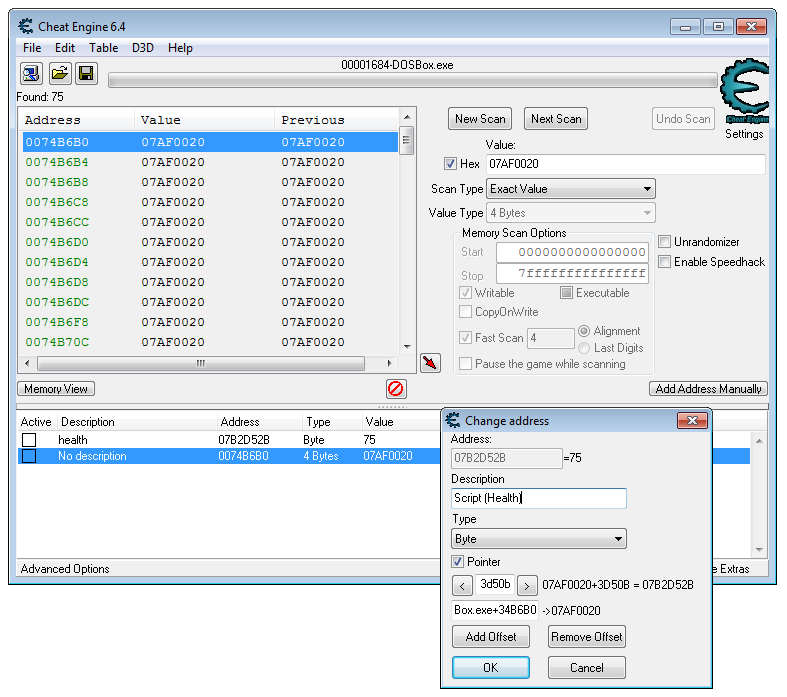
Click the checkbox next to «Pointers». This expands the box and adds a new text field where you can enter a pointer.
-
12
Paste the pointer address in the field below «Pointers» and click Ok. This adds a new address for the pointer that controls the value that you want to change. The address for the pointer you just created will read something like «P—>xxxxxxxx». This indicates that this is a pointer pointing to a specific address.
- If there is an offset number, enter it in the space above the field where you paste the address.
- If there is more than one pointer, click Add offset. This will add more offset number boxes above the area where you paste the address. Enter the correct offset number in each box.
-
13
Click the «Active» boxe next to the pointer address you just added. It’s the box below «Active» in the list address list at the bottom of the screen. This activates pointer.
-
14
Change the value of the address you just added. The value number for the pointer address you just created should be the same as the address of the value you searched for. If the pointer writes to a different location, the original address you scanned for will no longer be valid. However, you can still change the value of the pointer address you just created. That will work no matter where it writes the value location to. Click the number below «value» for the address you just added. Enter a new numeric value and click Ok.


Advertisement
-
1
Scan for a value you want to stop. This part teaches you how to use Code Injections to change how the code writes a value. For example, if you lose health every time you get hit, you can change the code so that it increases your health when you get hit.
-
2
Right-click the address and click Find out what access this address. This opens the Cheat Engine Debugger.
-
3
Click Yes. This confirms that you want to attach the debugger to the Cheat Engine process. This opens the Code debugger. The list will be blank when the window first opens.
-
4
Return to the game and change the value again. Once again, return to your game and do something to change the value you want to stop. This will cause the code that accesses the address you selected to appear in the debugger window.
-
5
Return to the game and change the value again. Once again, return to your game and do something to change the value you want to stop. This will cause the instruction that writes to that address to appear in the debugger window.
-
6
Return to Cheat Engine and click the instruction in the list. There may be more than one address. If that is the case, look for an instruction that has the word «sub» in the instruction to subtract from the value, or the word «add» or «inc» to increase the value.
-
7
Click Show disassembler. This opens the code in the disassembler.
-
8
Select the code that subtracts or increases the value. It is usually the first instruction at the top of the code. It will have wlll most likely have the word «Sub» or «Add» at the start of the code to subtract from the value or add to it.
-
9
Click Tools followed by Auto Assemble. This opens the auto assembler.
-
10
Click Template followed by Full Injection. This displays a pop-up window that confirms the address you want to inject code into.
-
11
Ensure the address is correct and click Ok. Ensure the address in the field is the same address you selected in the Memory Viewer disassembler window. Then click Ok. This opens a new template.
-
12
Replace the code with it’s opposite. Scroll down to where it says «Code». The line below it is the code that changes the value. If the line starts with «sub», change «sub» to «add». If the line starts with «add», change it to «sub». You can also change the value at the end of the line to change how much you want it to change the value by.
-
13
Click Execute followed by Yes twice. The «Execute» button is at the bottom of the Code Injection window. You will be asked if you are sure you want to inject the code. Click Yes to confirm. Then you can click Yes or No to open the new code in the disassembler. If the code injection was successful, values in your game will do the opposite of what they are supposed to do. You can gain ammo by firing your weapon instead of losing ammo. You can gain health when you get hit instead of losing health.


Advertisement
-
1
Scan for a value you want to stop. In some games, multiple objects share the same code. Injecting code into one object will affect all the others too. So you might freeze your own health bar, only to realize that the health of all enemies is also frozen. In this case, you need to find out how to distinguish between different objects and inject a script that only affects the object you want.
- In order to inject scripts for different objects, you need to know some assembly code. However, it’s not too hard to create a basic script.
-
2
Right-click the address and click Find out what writes to this address. Once you’ve determined the address of the values you want to change or stop, find out what writes to those addresses, open up the debugger and find out what writes to that address.
-
3
Select the instruction and click Show disassembler. It’s the instruction that is highlighted when you open the debugger. This displays the instructions in the code disassembler.
-
4
Right-click the top instruction and click Find out what addresses this instruction accesses. This opens a window that displays a list of all the addresses the instruction accesses when it writes to a new address.
-
5
Allow all the objects in the game to change their value. This will show a list of all addresses that the instruction accesses. For example, if you are trying to stop your health bar from changing, you can return to your game and get hit. This will display the instruction that accesses that address in the list of accessed addresses window. If you hit an enemy that also shares that instruction, it will also show in the list of accessed addresses window.
-
6
Select all addresses in the list of accessed addresses window. Once you have an address for all objects that share the same address in the list of accessed addresses, simply click and drag to highlight all of them.
- Alternatively, you can right-click each individual address and click Show register states.[2]
- Alternatively, you can right-click each individual address and click Show register states.[2]
-
7
Disect the data of structure of all the listed addresses. Use the following steps to disect the data structure for the list of addresses:
- Right-click the selected addresses.
- Click Open disect data with selected addresses.
- Click Ok.
- Enter a name for the data structure and click Ok.
- Click Yes.
- Enter a starting size of the struct or leave it as is, and click Ok.
-
8
Find a value that is the same for the player(s), but different for other objects. Whether you are looking at the data structure or the register for each object, you need to find a value that is the same for all allies, but different for the enemies. For example, if Team 1 has two player characters, and Team 2 has two computer-controlled characters, the Team 1 characters may be represented with a value of 1, and Team 2 might have a value of 2.
- If can’t find a value that is the same for allies, but different for enemies, you can make one. Simply right-click one of the values (such as a pointer), and click Add Element. Select «4 Bytes» as the data type and give it an offset number value that is not taken. Offset numbers are listed to the left in the data dissection structure table.
-
9
Note the register for the value. Whether you are looking at the register view or data dissection view, the register value is on the left. In the register view, it will be the actual register the instruction writes to (i.e. RSI, RDX, EDX, etc). If you are looking at a data structure, the register will be an offset number or letter listed to the left.
-
10
Open a new code injection template for the instruction. Return to the Memory Viewer window and open a new code injection template for the instruction that writes to the different addresses. Use the following steps to do so:
- Click the instruction in the Memory Viewer window.
- Click Tools in the menu bar at the top.
- Click Auto Assembler.
- Click Template in the menu bar at the top.
- Click Code Injection.
-
11
Create a new label for the object you want to affect. Labels are listed at the top of the code injection template. Add a new label for the object you want to affect below the existing labels. To add a label, simply type label followed by the name of the label in parenthesis. For example, «label (player)» or «label (enemy)».
-
12
Create a new section for the label you just created. To create a new section for the label, type the name of the label followed by a colon (:) anywhere before or after the original code.
-
13
Add code to the label that changes the value of the object you want to effect. This requires a bit of knowledge of assembly code. You’ll need to add a line of code that changes the value for the object you want to change in the way you want to change it. Then you’ll need to add a line that jumps to the exit, original code, return code.
-
14
Create a comparison code below «newmem». The line that says «newmem:» in the code injection template indicates that the instruction is calling a new memory address. Normally, it will go right into the original code that has a label of (code:) or (originalcode:). Use the «cmp» command to create a line of code that compares the value of the different objects at the registry or registry plus offset number. For example, if RDX with an offset of 14 determines the player team from the computer team, and the player team has a value of 1, you would type cmp [rbx+14],1 to check if an object is a player or not.
-
15
Add a line of code that jumps to section for the object you want to change. Use the «je» command to jump to the section for your comparison command. For example, if your label is called «player», add the line je player to jump to the player section if the value comparison corresponds to the player.
-
16
Add code that jumps to the original code. After you create a line of code that jumps to the section for the object you want to change, you need to add a line of code that jumps to the original code if value doesn’t corrispond to the player or ally. Use the «jmp» command to create a line of code that jumps to the orignal code after the line of code that jumps to the original code (or another set of code you create that does something different).
- One way to keep things simple is not to add any new labels. Just create a comparison code at the end of «newmen:» to differenciate between allies and foes. Then add a line of code that jumps to the exit if it’s an ally. If it’s an enemy, have it jump to the original code. This will make it so that if the player or an ally is attacked (or fires weapons uses consumables, etc), nothing will change, but if an enemy is attacked, the code will execute as normal.
-
17
Click Execute. This executes the code you entered. If all goes well, you will have injected new code that differentiates between allies and foes. The following is an example of a simple script you can use to differentiate between allies and foes:
 alloc(newmem,2048,"Tutorial-x86_64.exe"+2EB6D)
label(returnhere)
label(originalcode)
label(exit)
label(player) //New label for the player.

newmem: //This calls a new memory address.
cmp [rbx+14],1 //This differenciates between ally team members and enemy team
je player //This jumps to the player section if object is on the player's team.
jmp originalcode //This jumps to the original code if object is an enemy team.

player: //This creates a new section for the Player's team
jmp exit //This jumps to the exit and does nothing for the player's team.

originalcode: //This is the original code section
movss [rbx+08],xmm0 //This executes original insturctions (for the enemy team)

exit: //This section ends this script.
jmp returnhere

"Tutorial-x86_64.exe"+2EB6D:
jmp newmem
returnhere:


Advertisement
-
1
Learn how Cheat Engine works. Cheat Engine can access pieces of data stored in your computer’s random access memory (RAM). When you run a piece of software, such as a game, information is transferred from a static storage location such a a hard drive, to your RAM. From there, the information can be read and written. Cheat Engine allows you to scan information stored in your RAM and change the information.
-
2
Understand the terminology. Cheat Engine deals with a lot of high-level computer code. To make things easier to understand, it helps to understand some of the terminology involved. The following are some terms used in Cheat Engine:
- Value: A value is anything in a computer program that has a numeric value attached to it. It games, it can be your health percentage, the number of ammo you have, or the quantity of an object you have. Cheat Engine allows you to scan for variables and make changes to them.
- Address: An address is the location the information is stored within the RAM. Sometimes, the location of a value can change.
- Data Type: A data type is how a value is stored. I can be in bytes (i.e. 2 Bytes, 4 Bytes, or 8 Bytes), it can also be a floating point, or a double.
- Pointer: A pointer is an address that contains a value that was written to by another address. These addresses can change every time you load a game, or sometime in the middle of a game.
-
3
Understand that Cheat Engine won’t work with many games. Any game which has some form of cheat protection or online multiplayer functionality won’t work with Cheat Engine, and attempting to use Cheat Engine will typically result in your account or profile being banned from online play.
- If you are somehow able to use Cheat Engine to obtain resources which are usually purchased with real money, you may be prosecuted for theft.
- Cheat Engine is a high-profile piece of software, so most games have some form of protection against it.
-
4
Know which games may work with Cheat Engine. Older singleplayer games and some Steam singleplayer games should work with Cheat Engine, though the games in question must have some on-screen value that you can view and change.
- Many online flash games which don’t have a community link (e.g., no multiplayer and no high score) are also compatible with Cheat Engine.


Advertisement
Add New Question
-
Question
Is there a speedhack function on Cheat Engine?

Yes, on the right side there’s a tickbox that reads ‘Enable Speedhack’. It allows you to easily speed up or slow down any singleplayer game.
-
Question
How do I do it with money on Gta 5 single player?
Try changing 4 bytes to string or double.
-
Question
I did this in Clash of Kings, and it changes the value in the game, but when I go to buy something, it goes back to what it was before it changed. What do I do?
It’s a multiplayer game, therefore it won’t let you change those values with cheat engine.
See more answers
Ask a Question
200 characters left
Include your email address to get a message when this question is answered.
Submit
Advertisement
-
Start with the interactive tutorial that comes with Cheat Engine. Try using these skills to get through all 9 steps.
-
Cheat Engine is useful for changing minor aspects of a game, though attempting to alter larger features may cause the game to break.
-
To use Cheat Engine effectively, it’s best if you have some knowledge of assembly code.
Thanks for submitting a tip for review!
Advertisement
-
If you use Cheat Engine on a VAC or other anti-cheat protected server, you will get banned.
-
On Roblox you can’t hack with the usual Cheat Engine, if you do you will get kicked off the game you’re trying to hack.
Advertisement
References
About This Article
Article SummaryX
1. Open Cheat Engine.
2. Start the game.
3. Determine the aspect number you want to change.
4. Minimize the game.
5. Click Processes and select the game’s process.
6. Find the aspect number and click First Scan.
7. Repeat until you have 4 or fewer values.
8. Add all remaining values to the address list.
9. Enter the value you want to use and click OK.
Did this summary help you?
Thanks to all authors for creating a page that has been read 1,456,238 times.
Is this article up to date?
#1

Отправлено 03 Dec 2017 — 09:32
SID
Администратор

В этот раз будем искать не известное значение.Пример все тот же туториал CE.
На моем примере,мне необходимо найти неизвестное значение и изменить его на «5000»
В «Туториале» показывают,что диапозон значения от «0» до «500» это все что нам известно.Собственно сейчас и будем его находить.
Не известное значение — Значение которое нам не известно,это часто может встречаться в играх.Но в примере с играм,уже можно точно сказать,что диапазон будет от «0» до «100»
Тоже самое если вы пытаетесь найти адрес «Брони»,»Патронов»,»Способность» Это все пример.
Делаем все так же запускаем CE.Присоединяемся к процессу.
Выставляем тип поиска в диапазоне.Ставим значения от «0» до «500».Выполняем сканирование.
После сканирования.Меняем диапазон на «Значение уменьшилось» или «Не изменилось» в зависимости от ситуации.
Мой выбор пока упал на «Значение уменьшилось»
Наносим себе урон,что бы значение изменилось.Так как у нас уже стоит «Значение уменьшилось» то просто нажимаем «Отсев»
Продолжаем нашу процедуру.
Снова наносим себе урон.Делаем «Отсев»
Продолжаем эту процедуру пока не останется как можно меньше адресов,для проверки.
Если по каким то причинам,при отсеве количество найденых адресов не меняется.
Можно воспользоватся,типом поиска «Значение не изменилось» при этом не нанося себе урон.
Это пример использования между «Значение уменьшилось» и «Значение не изменилось» так же для поиска можно использовать,такой тип как «Значение изменилось»
Конечно же при этом нанося себе урон(Это из моего примера)
Для начала пробуйте ломать не сложные игры.
CheatEngine —
Пожалуйста Логин или Регистрация чтобы увидеть этот скрытый контент
Пожалуйста Логин или Регистрация чтобы увидеть этот скрытый контент
- MS_CHESTER и P45H3 это нравится
|
Cheat Engine мануал |
||||||
|
||||||
|
||||||
|
||||||
|
||||||
|
||||||
|
||||||
|
||||||
|
||||||
|
||||||
|
||||||
|
||||||
|
||||||
|
||||||
|
||||||
|


 мозг мне вынес xD
 вообщем такие мутки,не читерские!)