«Палки и камни» (англ. Sticks and Stones) — побочный квест в игре Darksiders II.
Содержание
- 1 Описание
- 2 Примечания
- 3 Влияние Блэкрута
- 4 Галерея
Описание[]
В локации Фьорд, Смерть встретит Блэкрута — огромного голема, который попросит нас найти особые камни, именуемые камнедолями. За 3 принесенных камня он обещает награду. Всего потребуется:
- Найти 34 мистические камнедоли.
- Найти 25 камнедолей силы.
- Найти 10 камнедолей стойкости.
Примечания[]
- Камнедоли не переносятся в новую игру+, перед финальной битвой потратьте их все.
Влияние Блэкрута[]
|
|
Галерея[]
")
")
")
")
![]()
После встречи с одним из каменных конструктов,квест выдаёт Блэкрут,локация Теснина тени, вам дадут возможность сбивать камни, которые висят в различных локациях. Стреляйте по ним из пистолета, и они засчитаются в вашу копилку. Чтобы завершить квест, нужно найти 34 мистических камней, 25 камней силы и 10 камней сопротивления.
Потом эти камни можно обменять на повышение определённых характеристик ГГ,комбинации представлены ниже.
Комбинации камней
Мистический Мистический Мистический — Магия +5
Мистический Мистический Сила — Критический шанс (Магия) +2%
Мистический Мистический Сопротивление — Критический урон (Магия) +10%
Мистический Сила Сила — Критический шанс +2%
Мистический Сила Сопротивление — Здоровья +30
Мистический Сопротивление Сопротивление — Ярость +20
Сила Сила Сила — Сила +5
Сила Сила Сопротивление — Критический урон +10%
Сила Сопротивление Сопротивление — Защита +20

A Mystic Stonebite in the Ivory Citadel
Sticks and Stones is a side quest in Darksiders II that spans much of the game. It is given, along with the Lure Stone ability, by the construct Blackroot in the Fjord area of the Forge Lands. This quest will task Death with obtaining Stonebites to feed Blackroot. These diamond-shaped stones found throughout the realms are acquired by destroying them (usually by shooting them with Redemption), and can be located via the high pitched «glowing» sound that emanates from them. These magical stones can then be returned to Blackroot in any combination of three in exchange for permanent bonuses to Death’s stats.
There are three varieties of Stonebites:
| Type | Color | Number |
|---|---|---|
| Mystic | Blue | 34 |
| Power | Red | 25 |
| Resistance | Yellow | 10 |
Note that all Stonebites appear to be blue, however they do have a faint aura of blue, red, or yellow depending on their type.
Locations[]
| Type | Realm | Zone |
Description |
|---|---|---|---|
| Mystic | The Forge Lands | The Fjord | South of Blackroot on a cliff face. |
| Mystic | The Forge Lands | Shadow Gorge | Entrance to The Shattered Forge. Northeastern cliff face. |
| Mystic | The Forge Lands | Stonefather’s Vale | Northeastern corner leading to a dead-end. In the area with the first Book of the Dead page. |
| Mystic | The Forge Lands | Tri-Stone | Maker’s Forge, on the backside of the forge chimney. |
| Mystic | The Forge Lands | Baneswood | In small ruin in the NW corner of area. |
| Mystic | The Forge Lands | Baneswood | On north wall of area in a small nook, on cliff face. |
| Mystic | The Forge Lands | Baneswood | In a ruin at the start of the path into The Charred Pass |
| Mystic | The Forge Lands | Weeping Crag | On archway near Vulgrim. |
| Mystic | The Forge Lands | Charred Pass | Above entrance to the Scar. |
| Mystic | The Forge Lands | Charred Pass | In side room of tiny ruins near entrance to The Cauldron. |
| Mystic | The Forge Lands | Charred Pass | In tiny ruins on eastern side of path, NE end of area. |
| Mystic | The Forge Lands | The Fjord | On wall of curved tunnel at entrance to Drenchfort |
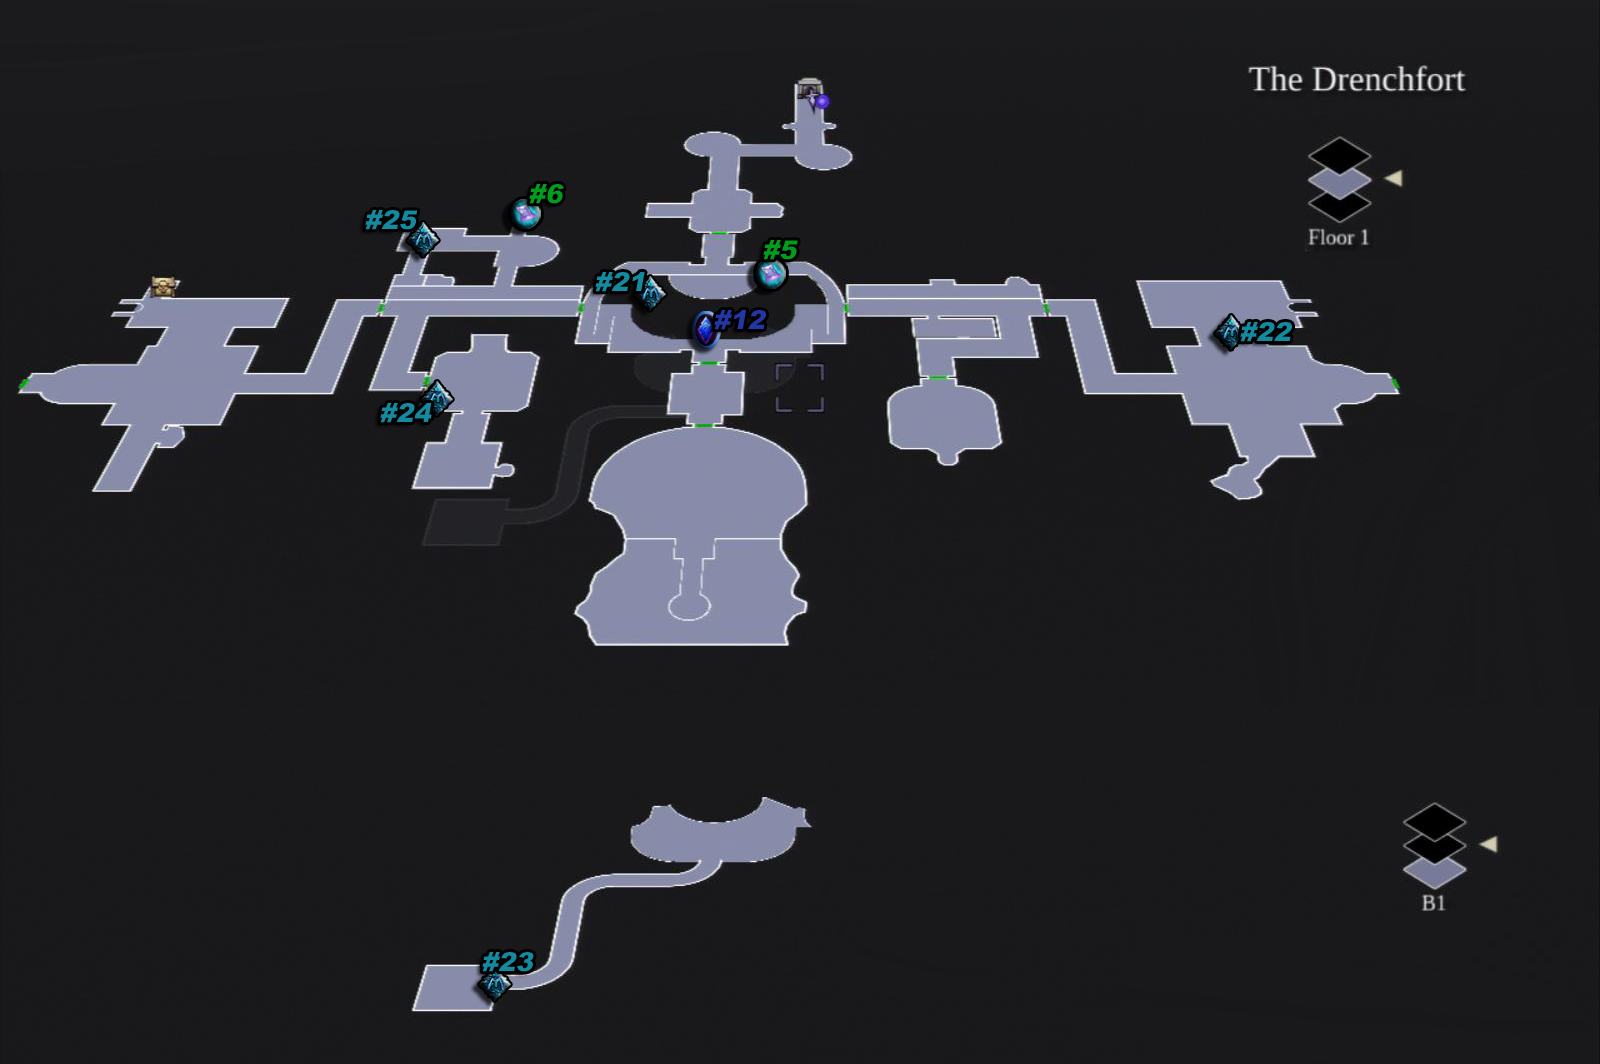
| Mystic | The Forge Lands | The Drenchfort | Above tunnel under south-central door, large room with construct. |
| Mystic | The Forge Lands | The Lost Temple | 1F, on side of hole in floor, S side of first large room. |
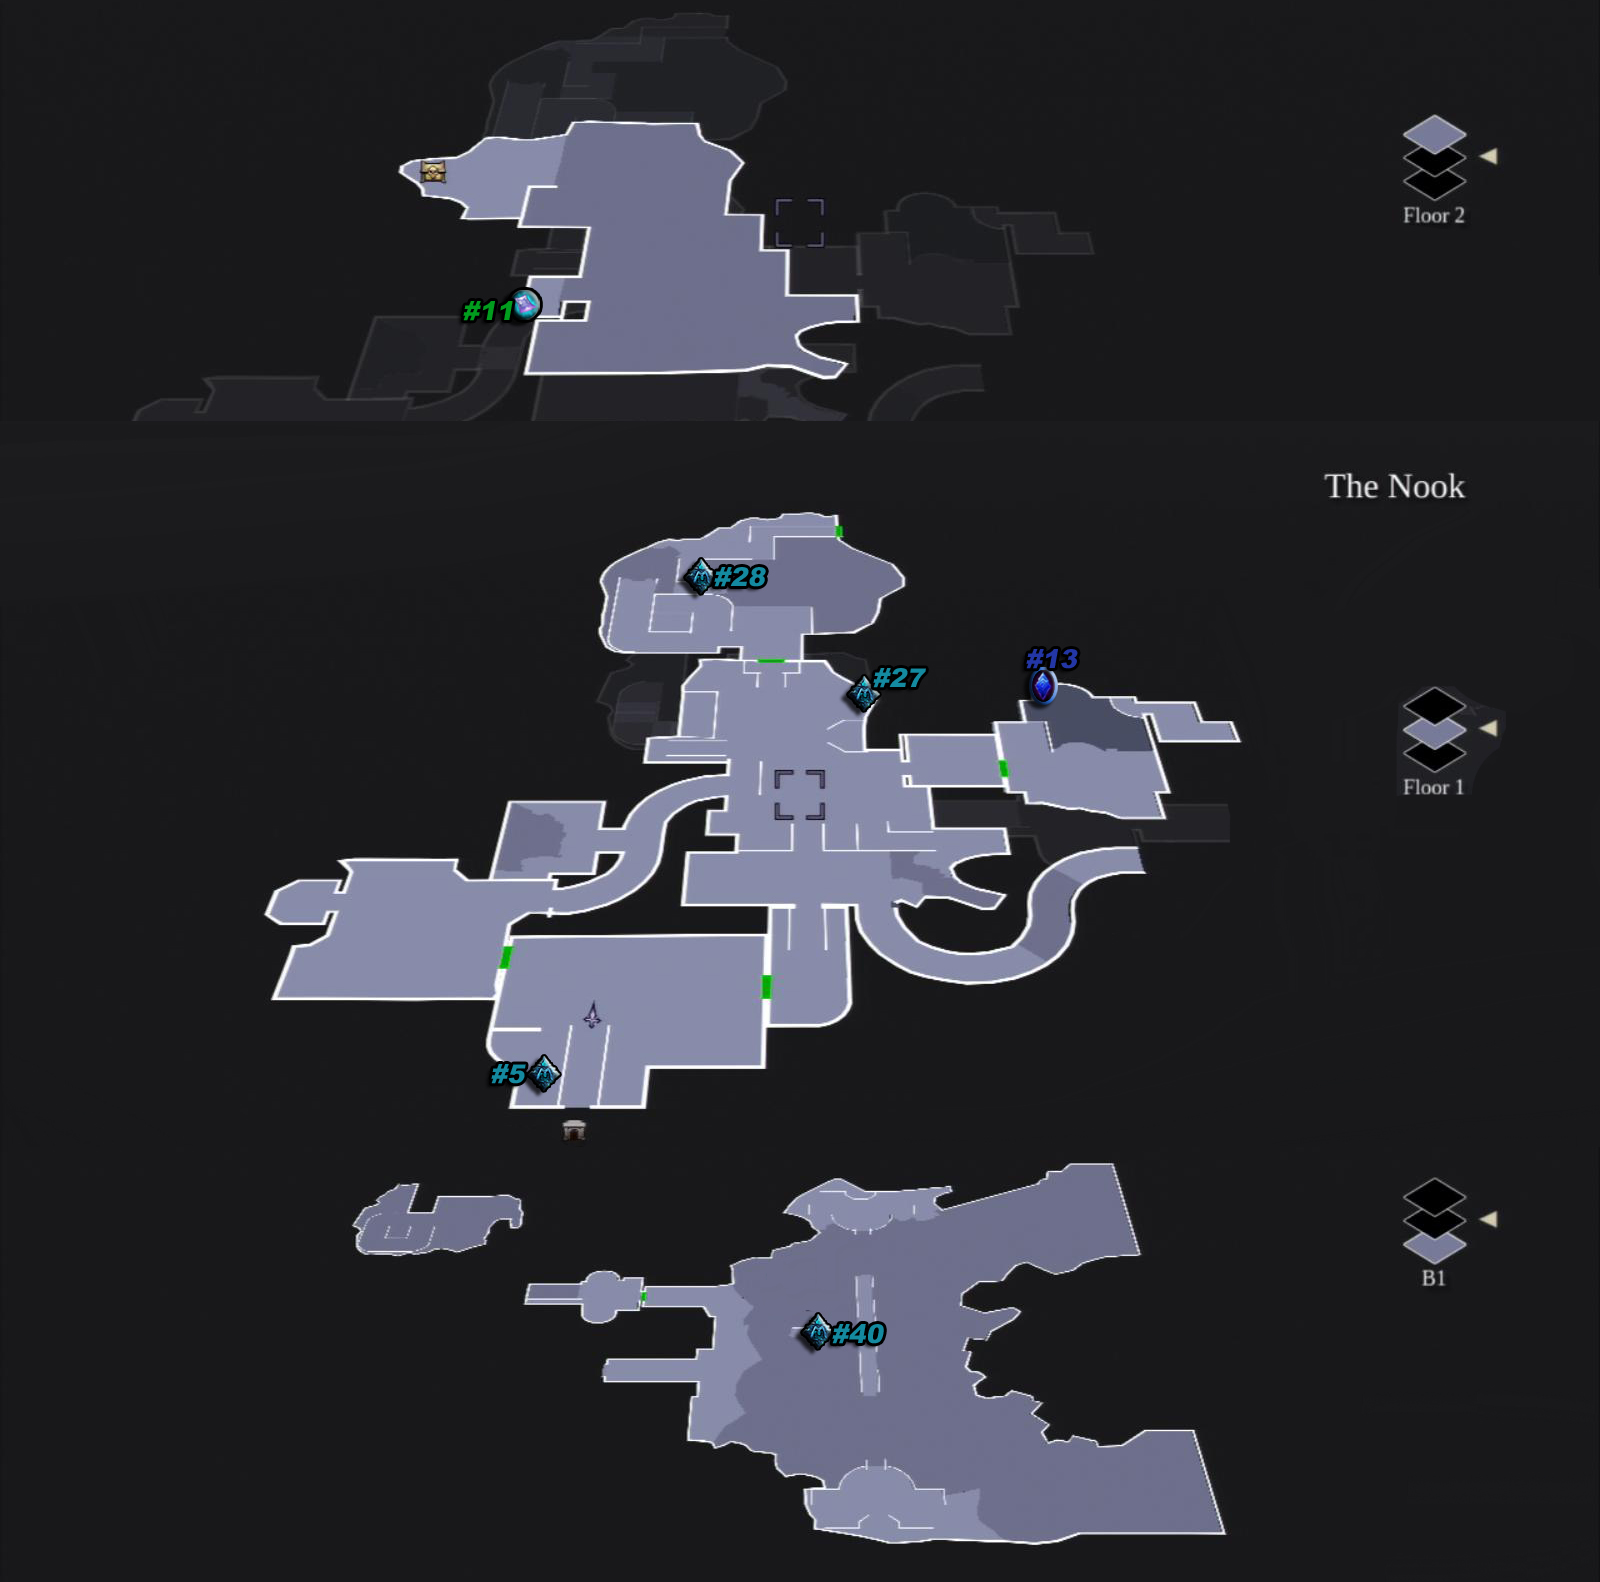
| Mystic | The Forge Lands | The Nook | B1, above northen elevator in exit from Bheithir ‘s Lair. |
| Mystic | The Kingdom of the Dead | Serpent’s Peak | On the very beginning of the road, on the way to Vulgrim’s shop. |
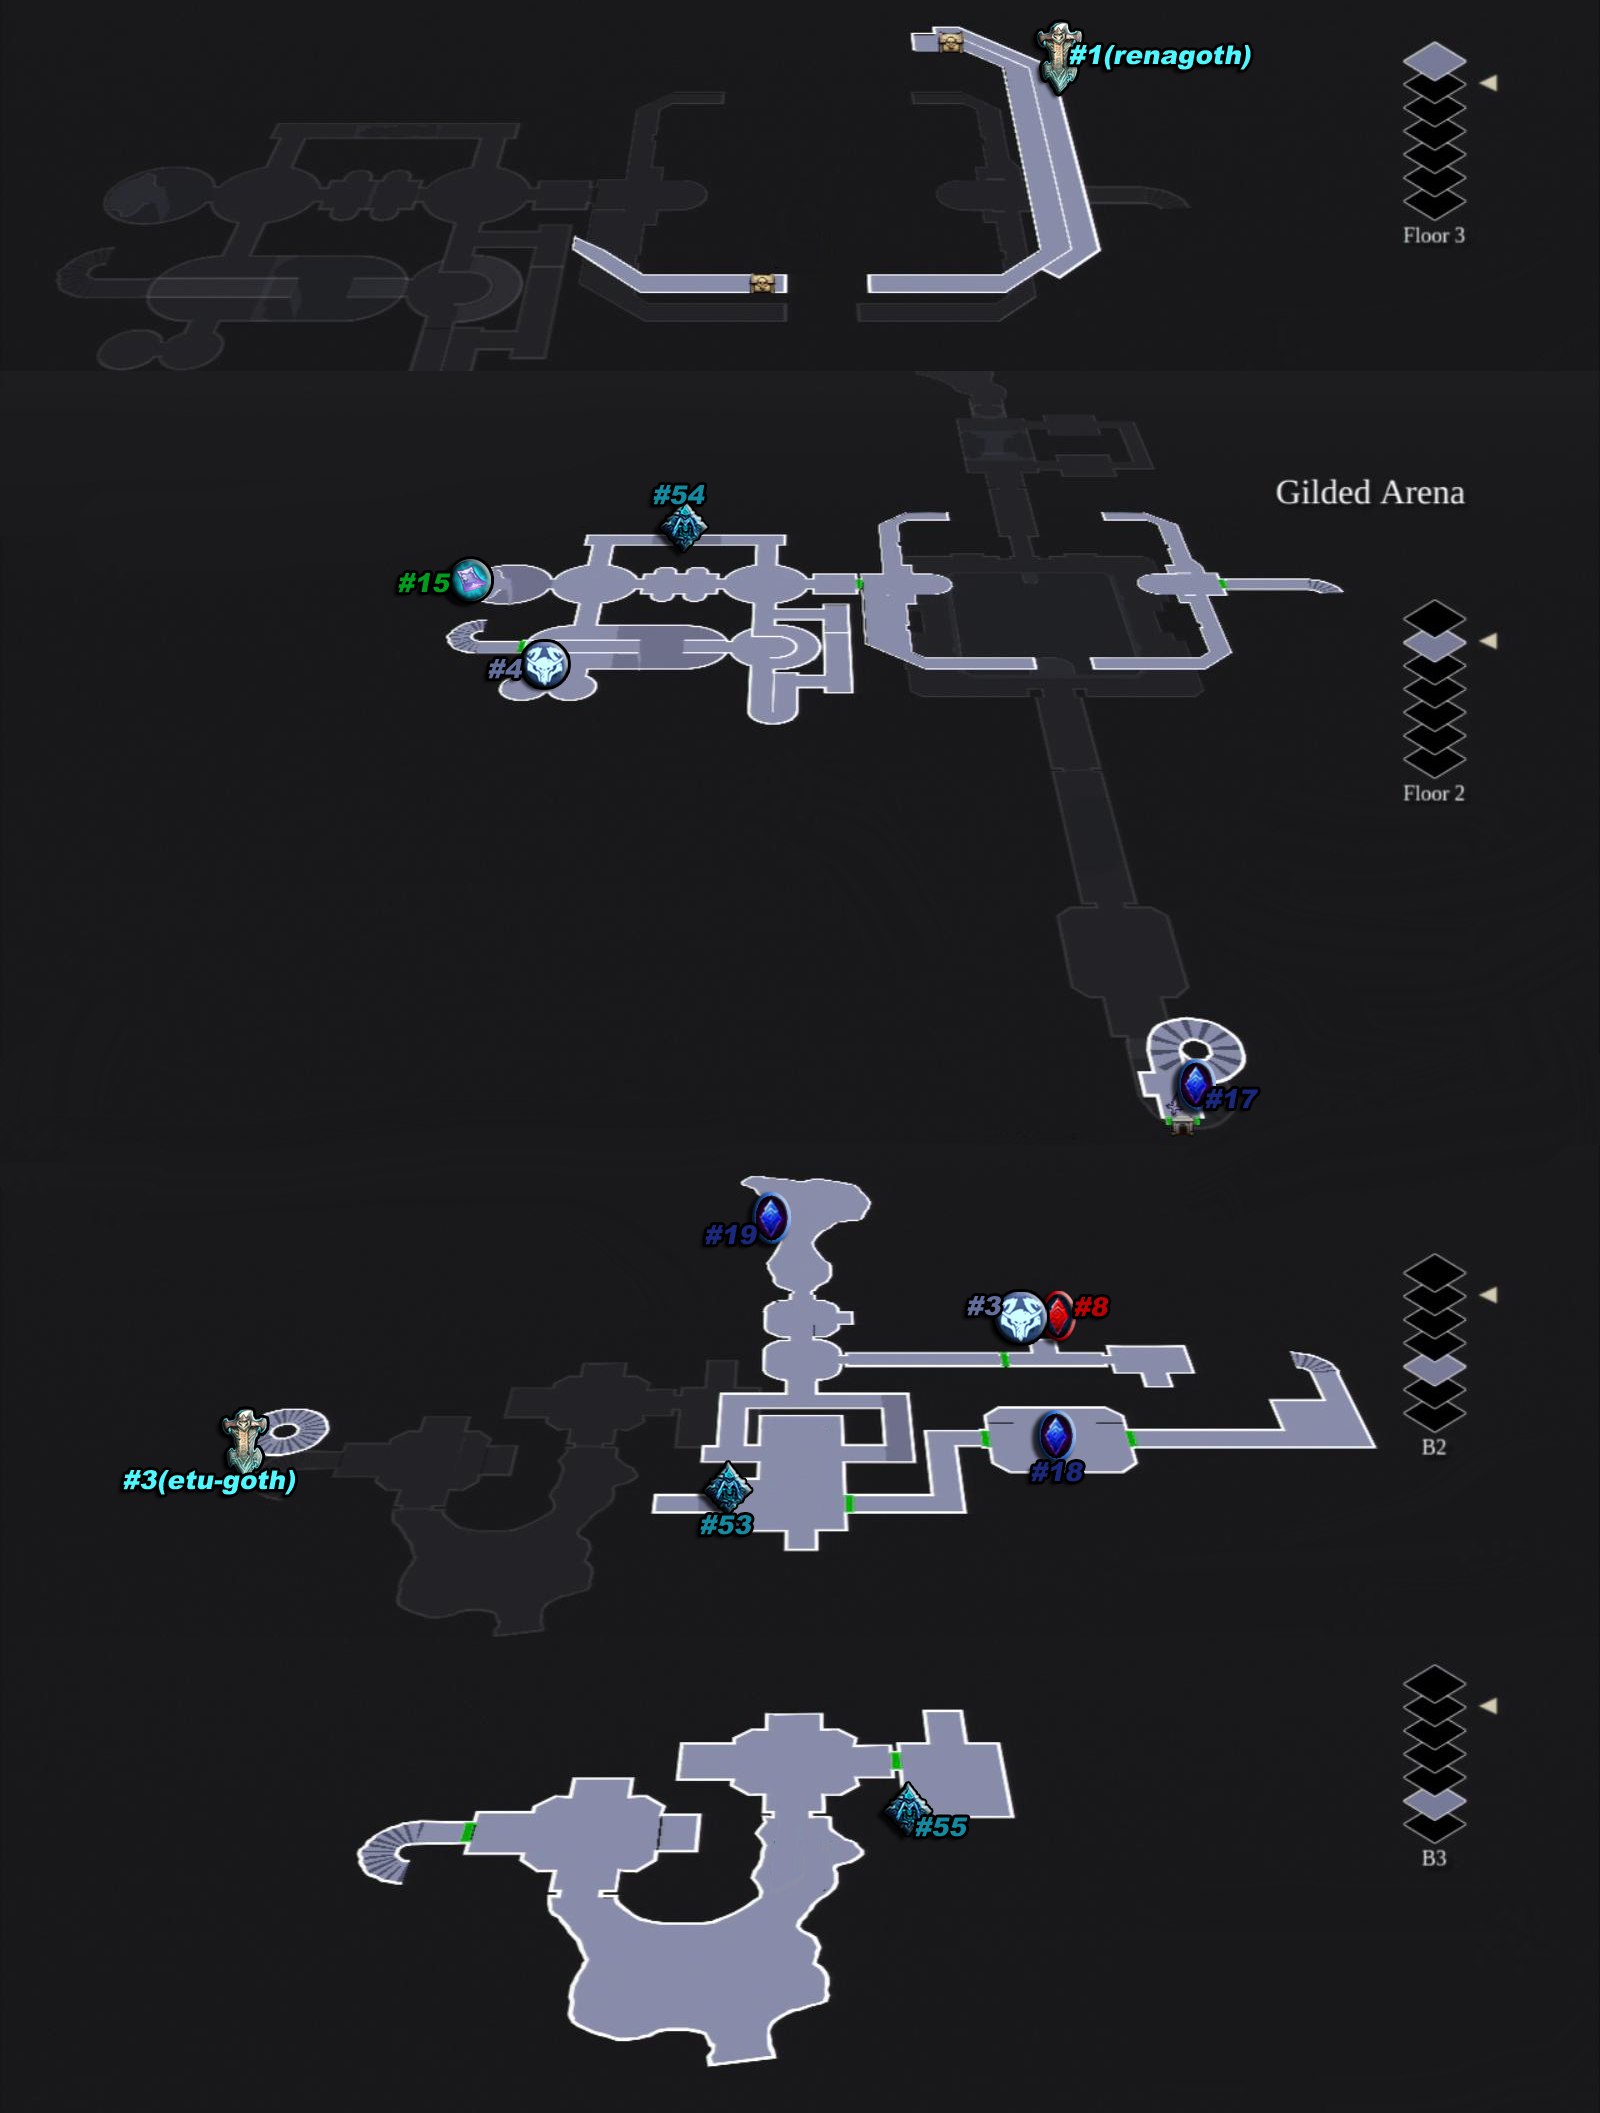
| Mystic | The Kingdom of the Dead | The Gilded Arena | When first entering the arena, the stone is visible on the statue in the right side alcove. |
| Mystic | The Kingdom of the Dead | The Gilded Arena | In the area with the first Animus stone. It is located on one of the hanging cages in the distance. |
| Mystic | The Kingdom of the Dead | The Gilded Arena | Through the grate on the ceiling of the rectangular room on level B2. |
| Mystic | The Kingdom of the Dead | The Maw | Bottom section of Maw, in outside window of building as you head to the Spine and City of the Dead. |
| Mystic | The Kingdom of the Dead | Phariseer’s Tomb | In the stone arch next to the crystal elevator, past the pressure plate puzzle. |
| Mystic | The Kingdom of the Dead | Judicator’s Tomb | In the area with the final soul. It is located up high in one of the alcoves. |
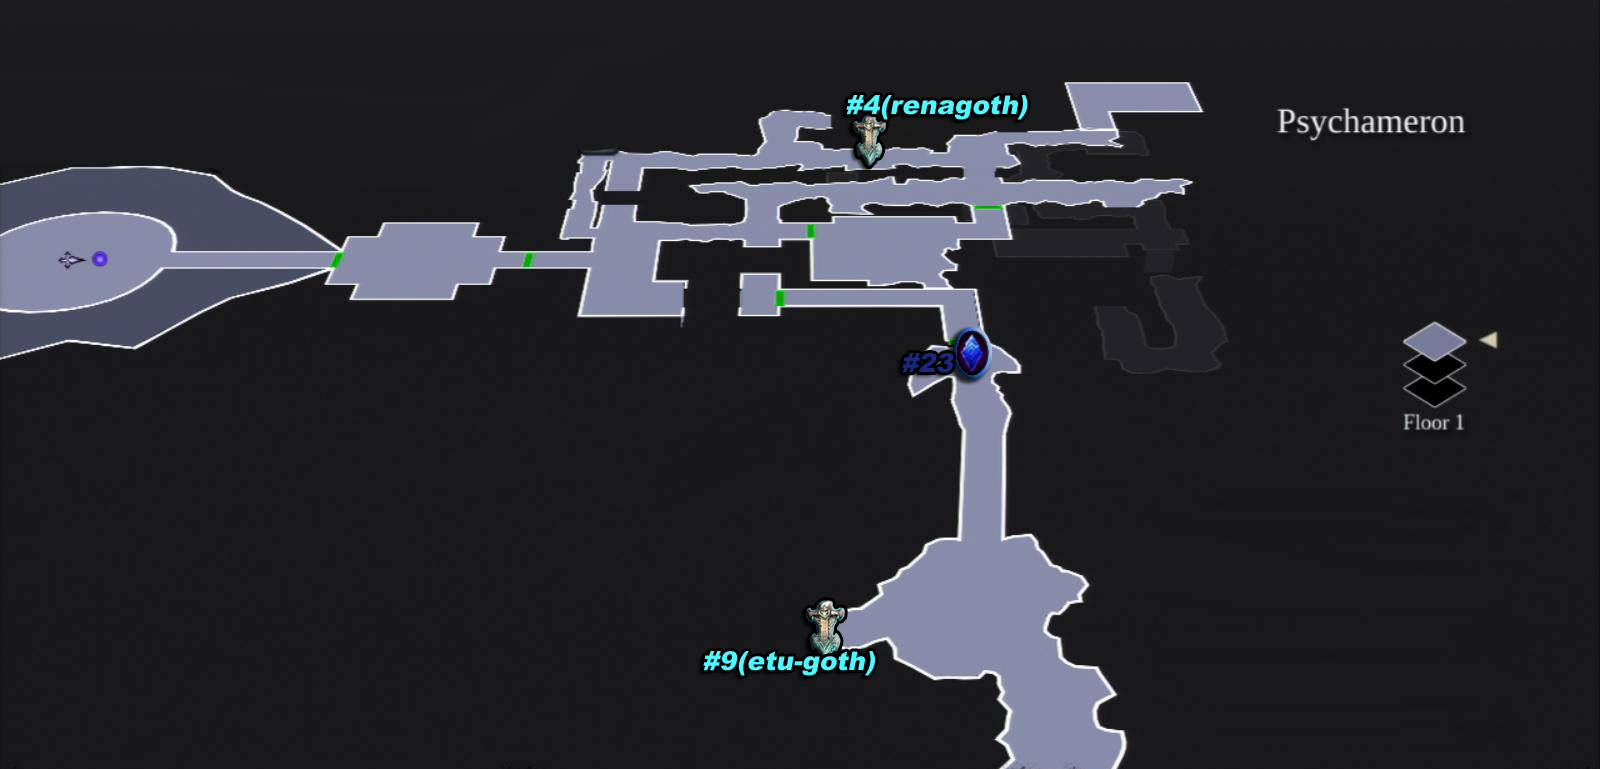
| Mystic | The Kingdom of the Dead | Psychameron | After defeating some mini-bosses, including a Bone Giant, you will push a lever and unlock a door/raise a bridge. After going through this door (which leads to the southern passage), you will reach a wooden bridge. Turn around: the crystal is above the doorway. |
| Mystic | The Kingdom of the Dead | Boneriven | Located on the 2nd floor on a thin rock face above a set of pressure plates. |
| Mystic | The Kingdom of the Dead | Soul Arbiter’s Maze | Between floor 7 and 8. |
| Mystic | Lostlight | Earth | Outside the Death Tomb |
| Mystic | Lostlight | The Crystal Spire | On the sword of the large angel statue (entrance) |
| Mystic | Lostlight | The Crystal Spire | On the sword of the other large angel statue (entrance) |
| Mystic | Lostlight | Earth | First area, near the chain hanging from a building corner |
| Mystic | Lostlight | Earth | On the ceiling, just before finding the Staff of Arafel’s first piece. |
| Mystic | Lostlight | Earth | Just after finding the grenade launcher |
| Mystic | Lostlight | Earth | F1 on the large bridge, after killing the two Suffering, turn around. It is located on the northern side of a bridge pillar. |
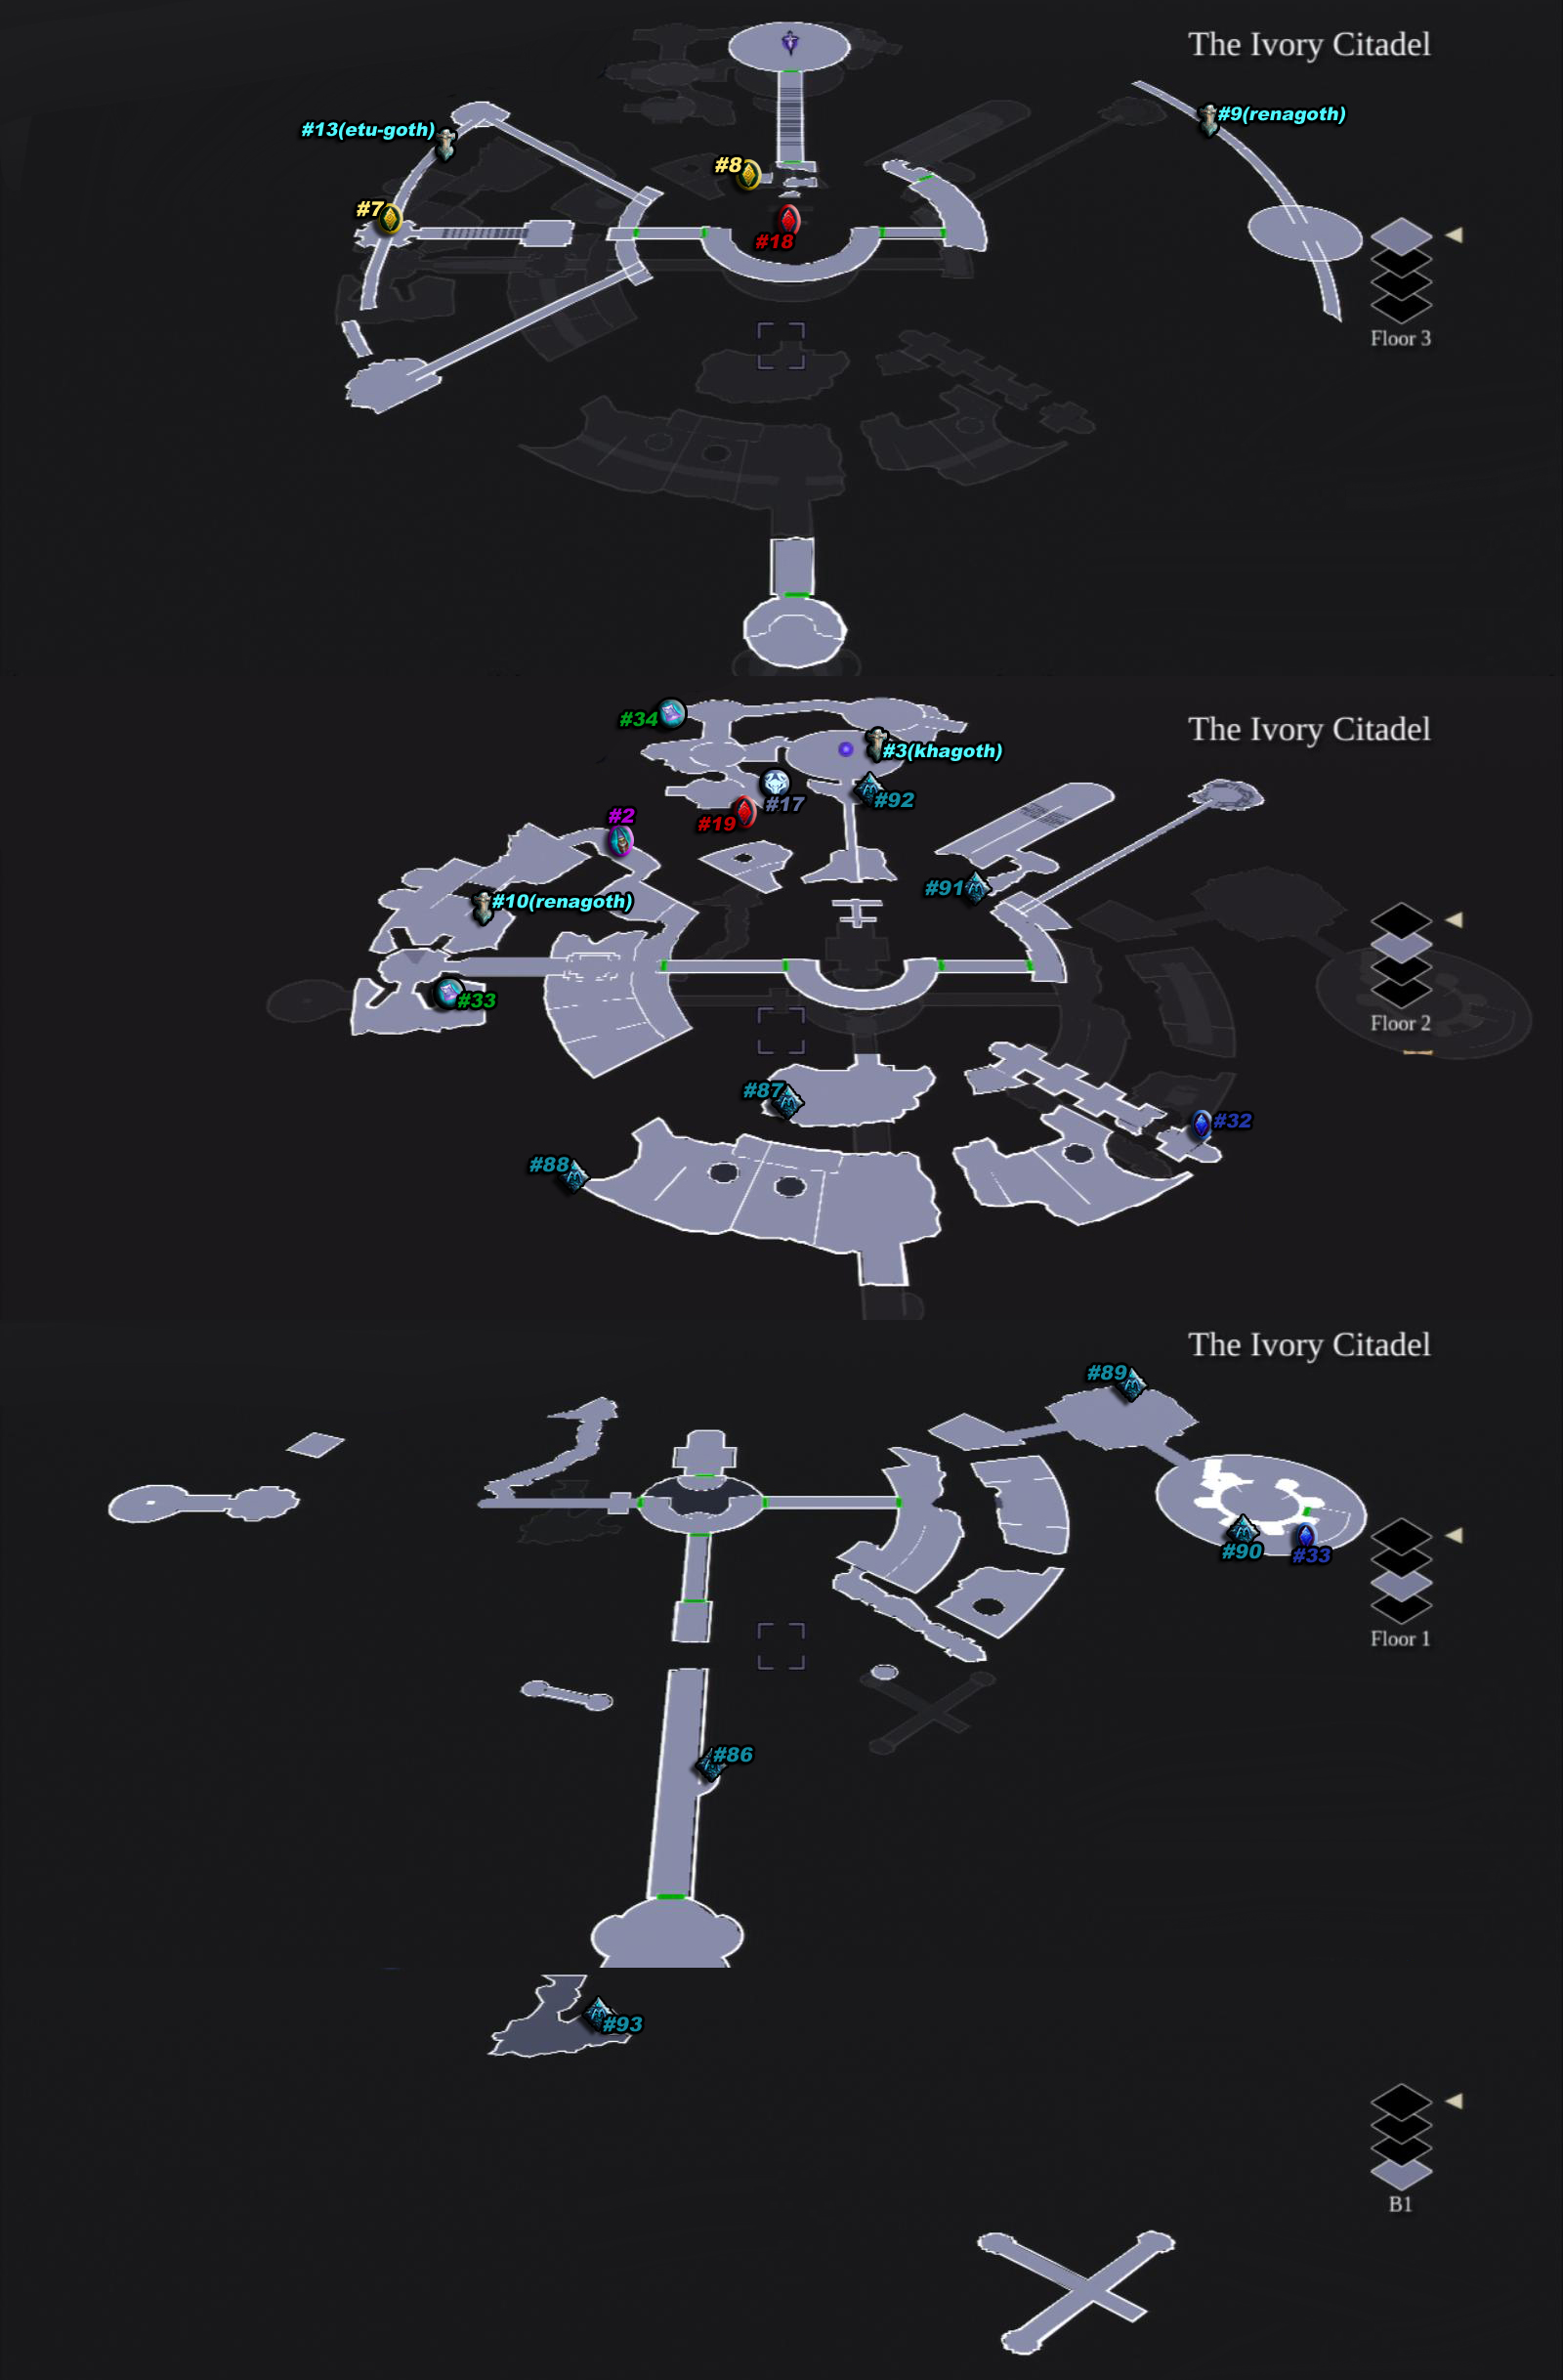
| Mystic | Lostlight | The Ivory Citadel | 2nd floor, south east tiny cut off area. Use wall run to get there. It’s vis-à-vis from the chest. |
| Mystic | Lostlight | The Ivory Citadel | F1 eastern tower after being swarmed by wraith skulls. On an arc above. |
| Power | The Forge Lands | Charred Pass | On inside of Large broken pipe in front of The Scar front door. |
| Power | The Forge Lands | Charred Pass | In small room with chest through underwater passage. |
| Power | The Forge Lands | The Fjord | Small ruin on northern pass at end of Fjord, above inside door. |
| Power | The Forge Lands | The Lost Temple | 2F, on outward-facing corner of small room |
| Power | The Forge Lands | Weeping Crag | B3, Gorewood’s chamber, high on rock E side of room. |
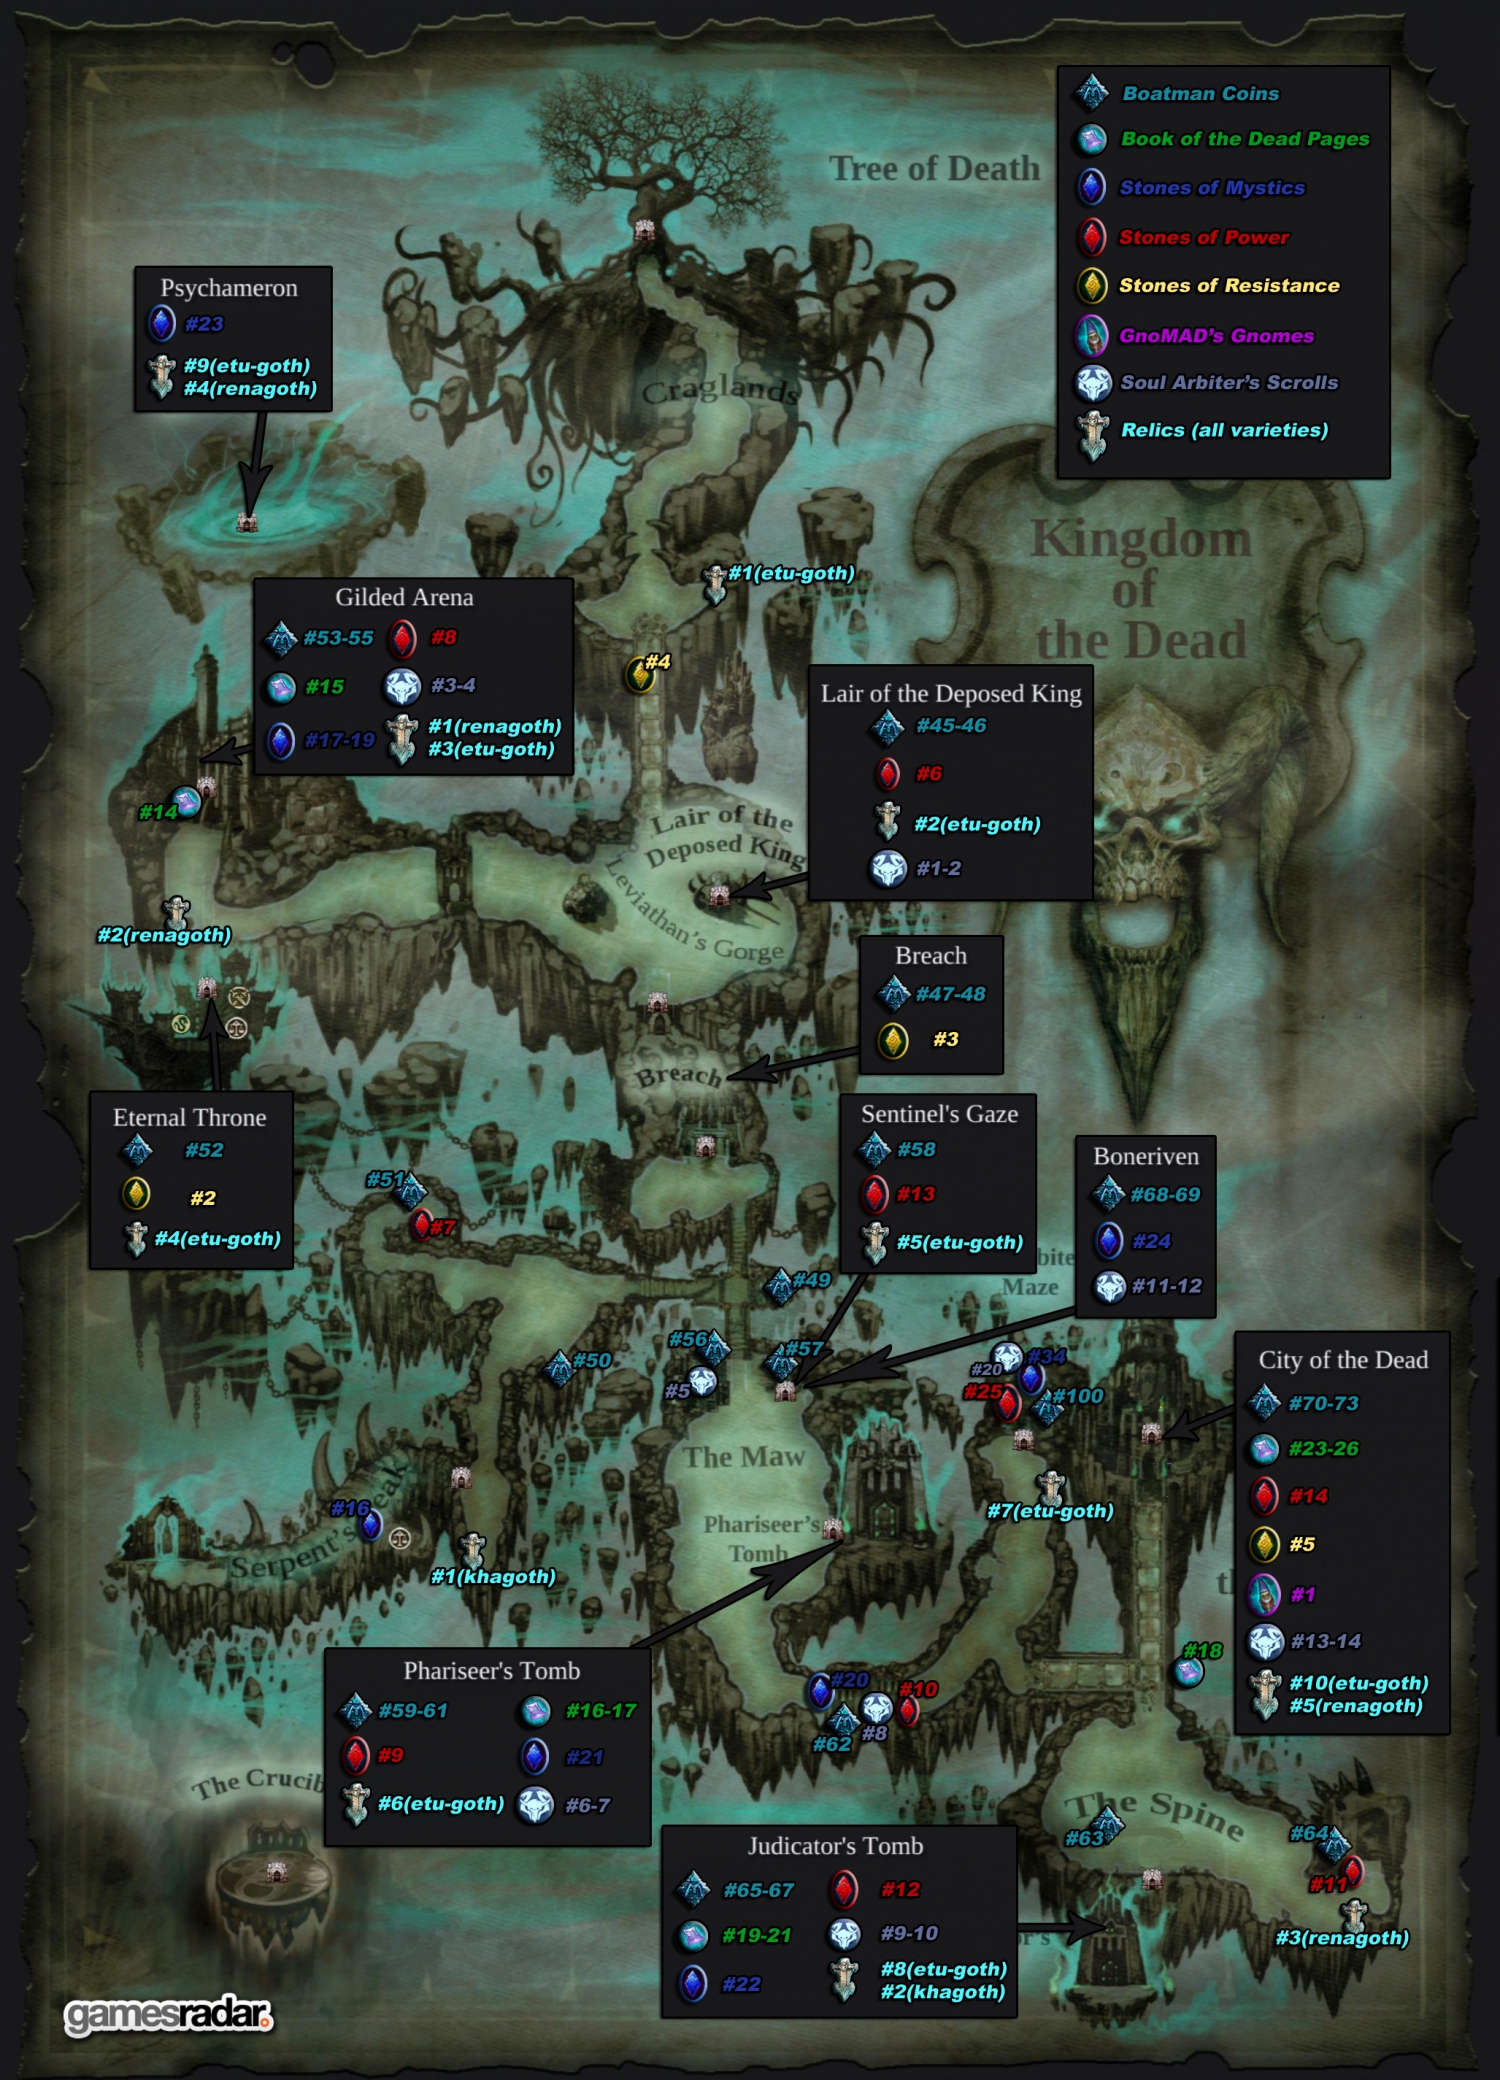
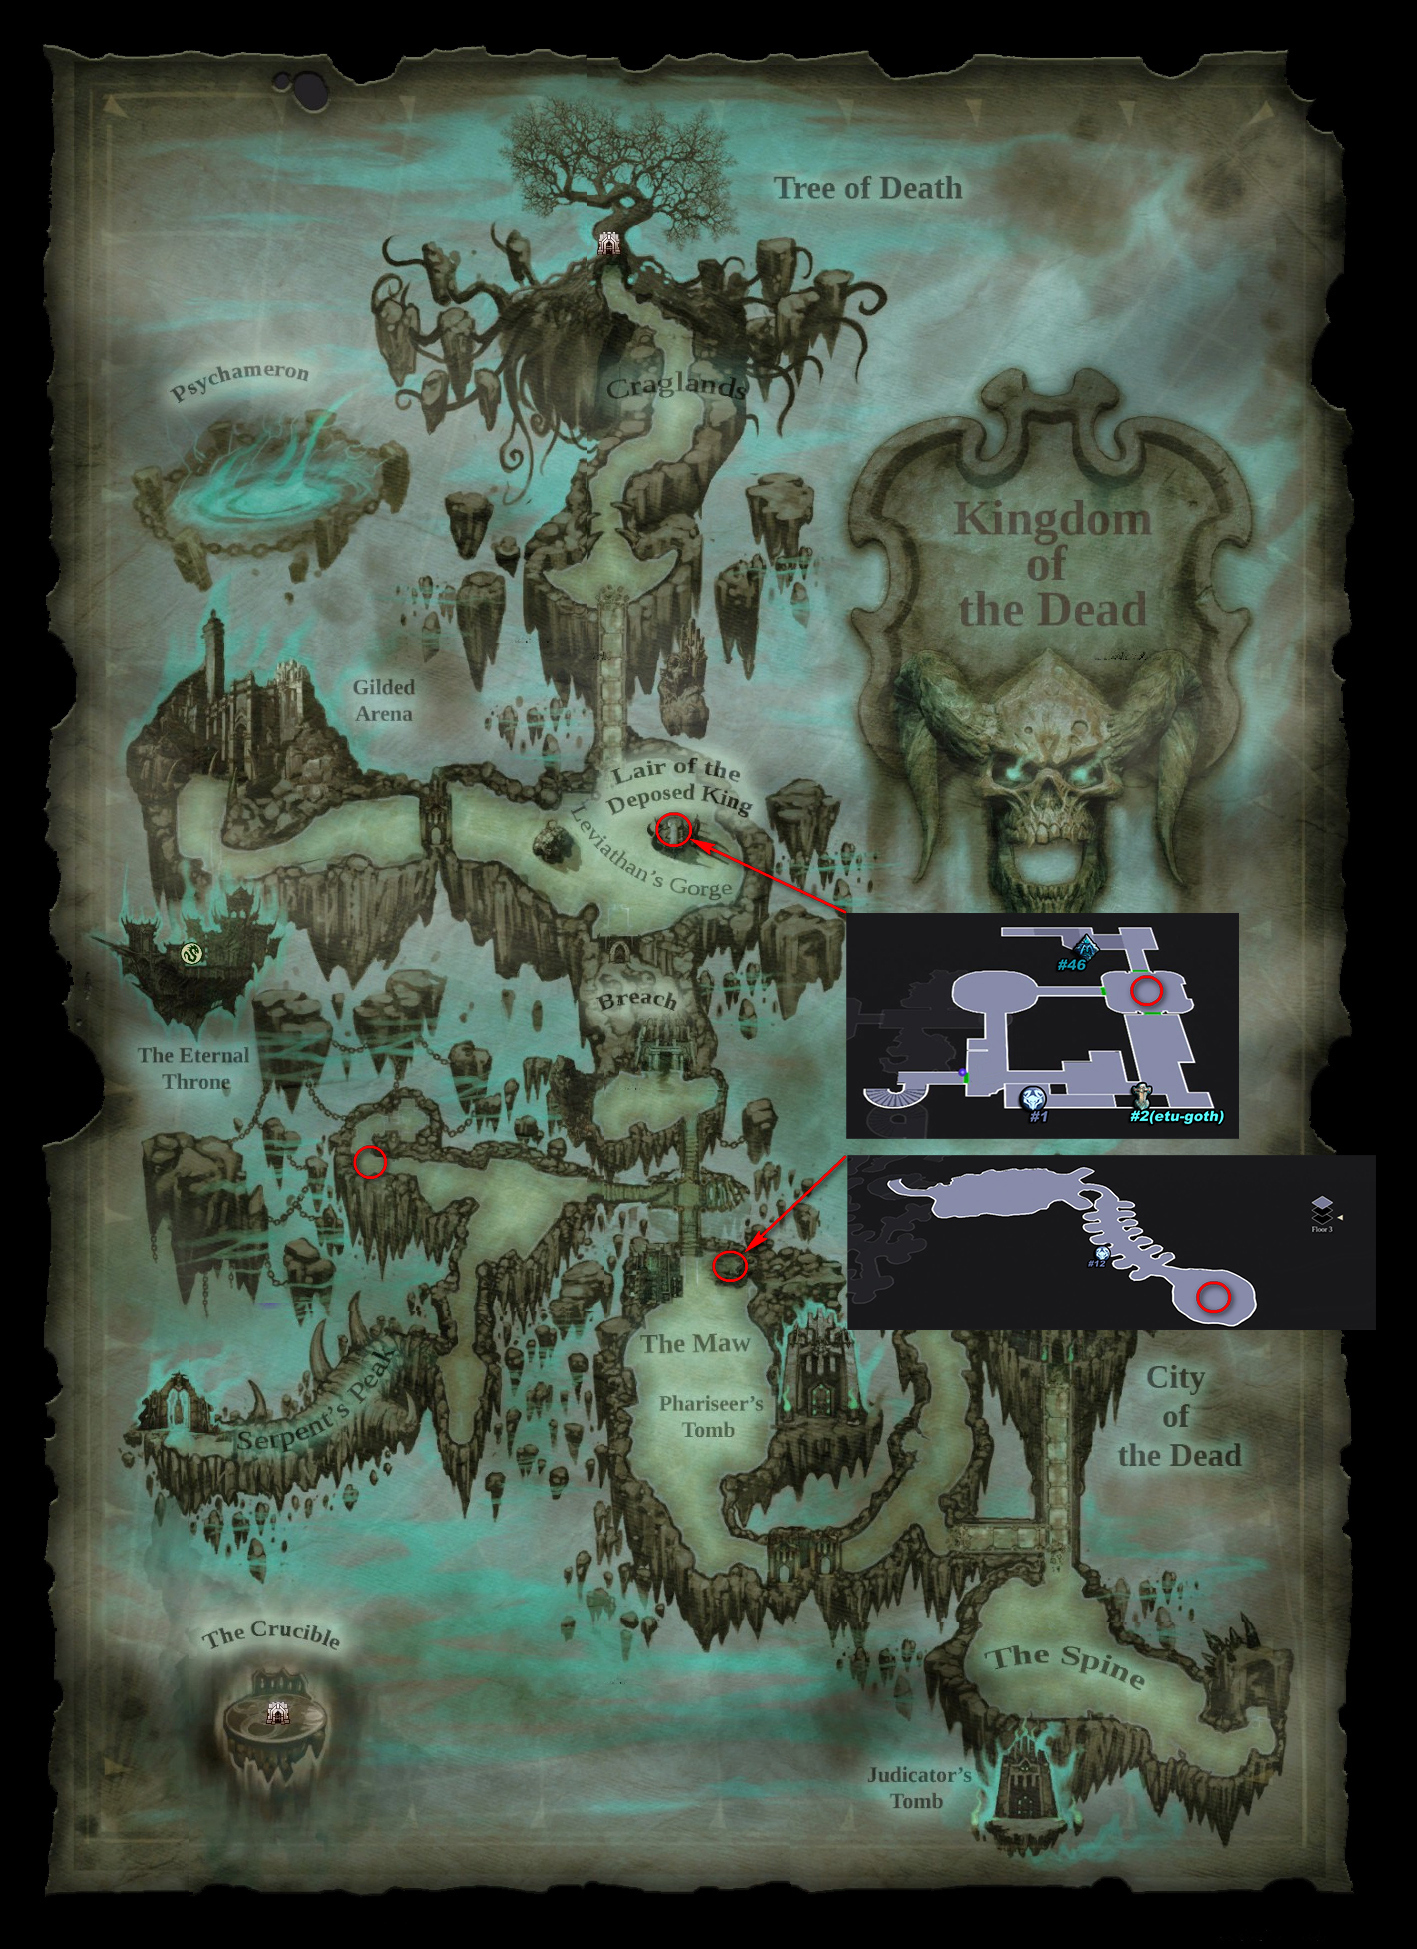
| Power | The Kingdom of the Dead | Lair of the Deposed King | At the bottom of the spiral staircase, above the Vault door |
| Power | The Kingdom of the Dead | The Maw | At the bridge intersection in the Maw, go west. Continue as far west as you can, curving north and dropping down into a ruin. Go into the ruin, look at the portal on the west wall, and from there look up and left. |
| Power | The Kingdom of the Dead | The Gilded Arena | After getting the first Stone, you will exit east through a narrow passage. The stone is being clasped by a skeleton hanging from a grate in the ceiling. |
| Power | The Kingdom of the Dead | Phariseer’s Tomb | On the face of the tall statue on the 3rd floor. |
| Power | The Kingdom of the Dead | The Spine | On the east outer wall of the gatehouse between the Maw and the Spine. Climb the gatehouse exterior and look around next to the chest. |
| Power | The Kingdom of the Dead | The Spine | Top of tower to the east of Judicator’s Tomb |
| Power | The Kingdom of the Dead | Judicator’s Tomb | 3rd large room from enterance. On the bottom of hanging cage. |
| Power | The Kingdom of the Dead | Sentinel’s Gaze | On the back of the head of statue on top of center building. |
| Power | The Kingdom of the Dead | The City of the Dead | In the area with a chest and two Wraiths. It is visible on the wall to the right of the chest. |
| Power | The Kingdom of the Dead | Soul Arbiter’s Maze | Entrance room. |
| Power | Lostlight | The Crystal Spire | Upstairs, on the statue near the bomb |
| Power | Lostlight | Earth | After completing the staff, in the building |
| Power | Lostlight | Earth | F1 in the tunnels on the wall above the chest in the southern most area |
| Power | Lostlight | The Ivory Citadel | 2nd floor in the northern area. At the second crank, look across to a rock face. |
| Power | Lostlight | The Ivory Citadel | large statue in center water room, in chest, get from 3rd floor |
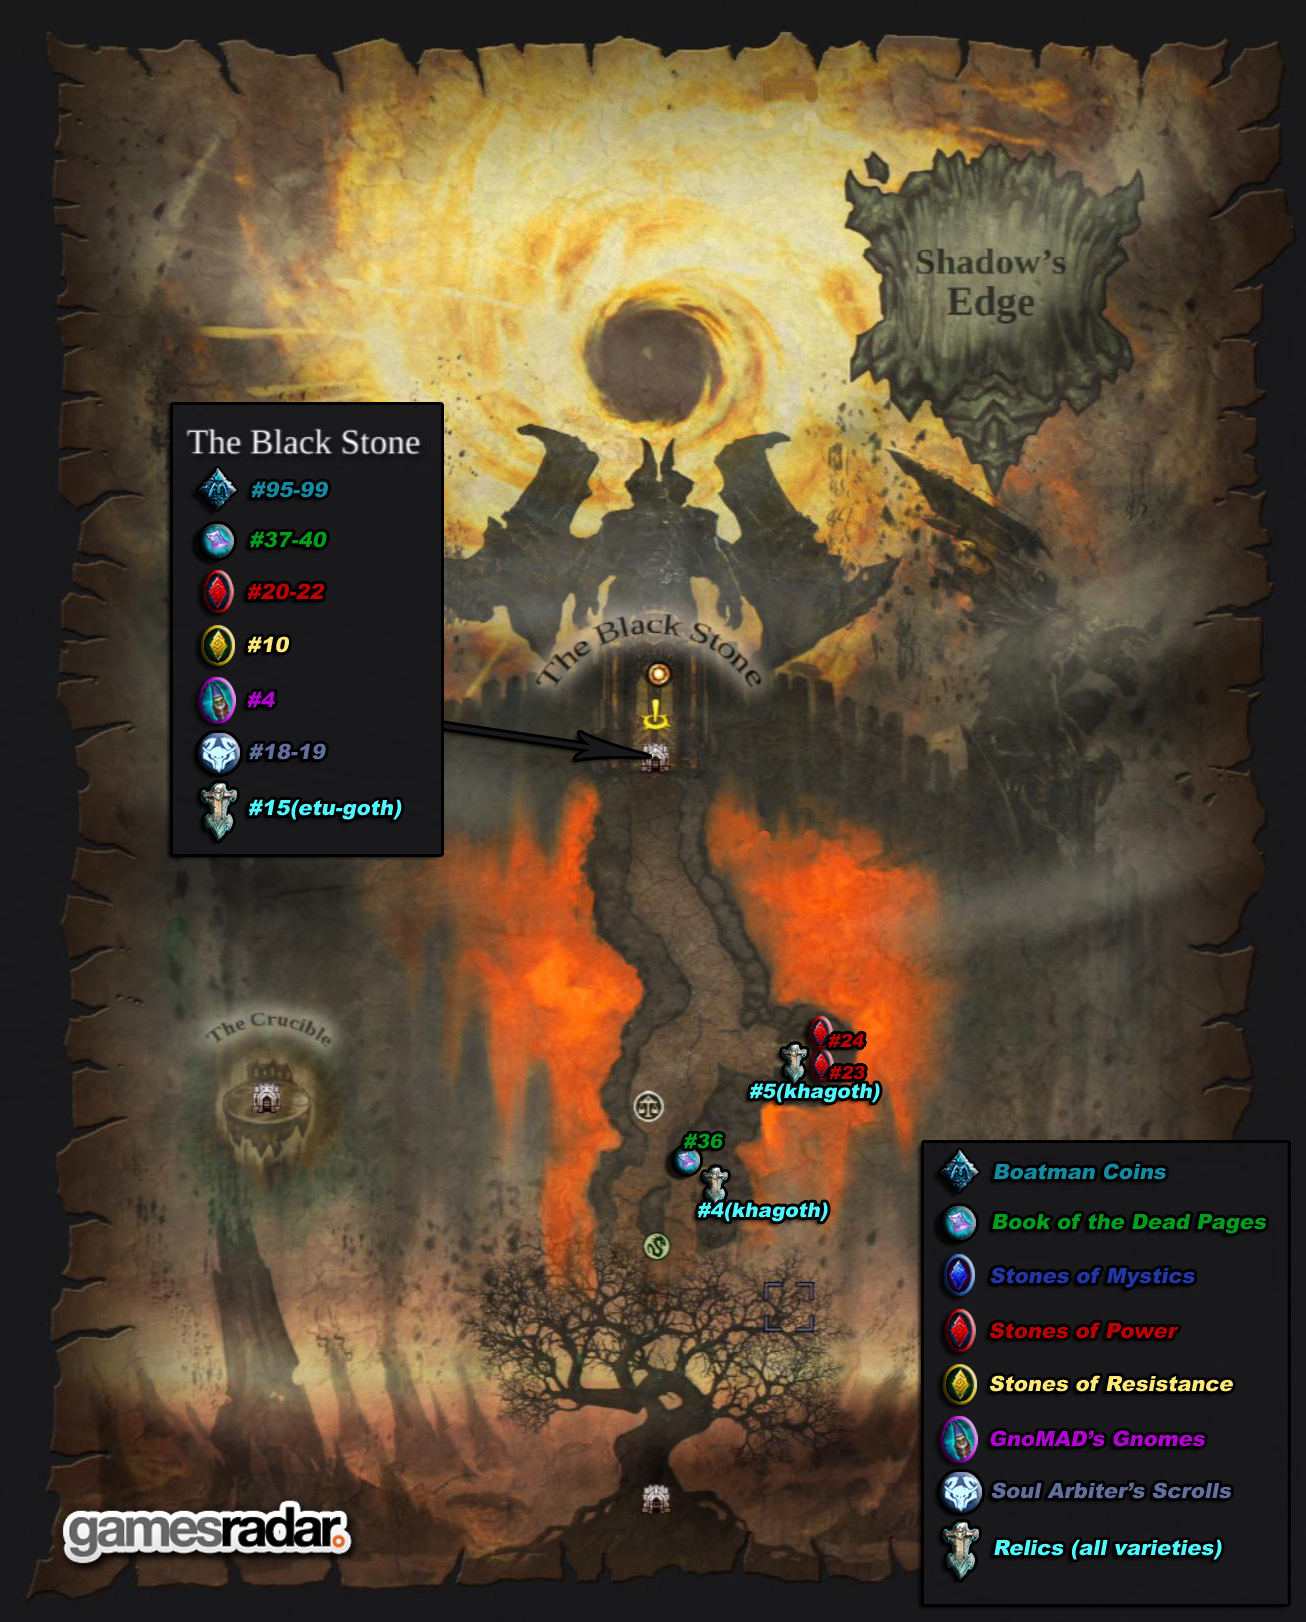
| Power | Shadow’s Edge | The Black Stone (past) | opposite keyed door |
| Power | Shadow’s Edge | The Black Stone (present) | On the left of the keyed door in the western area |
| Power | Shadow’s Edge | The Black Stone (past) | On the stomach of the many armed statue (Lilith) at end of main room |
| Power | Shadow’s Edge | Death Tomb | Above the exit. |
| Power | Shadow’s Edge | Death Tomb | Ceiling. |
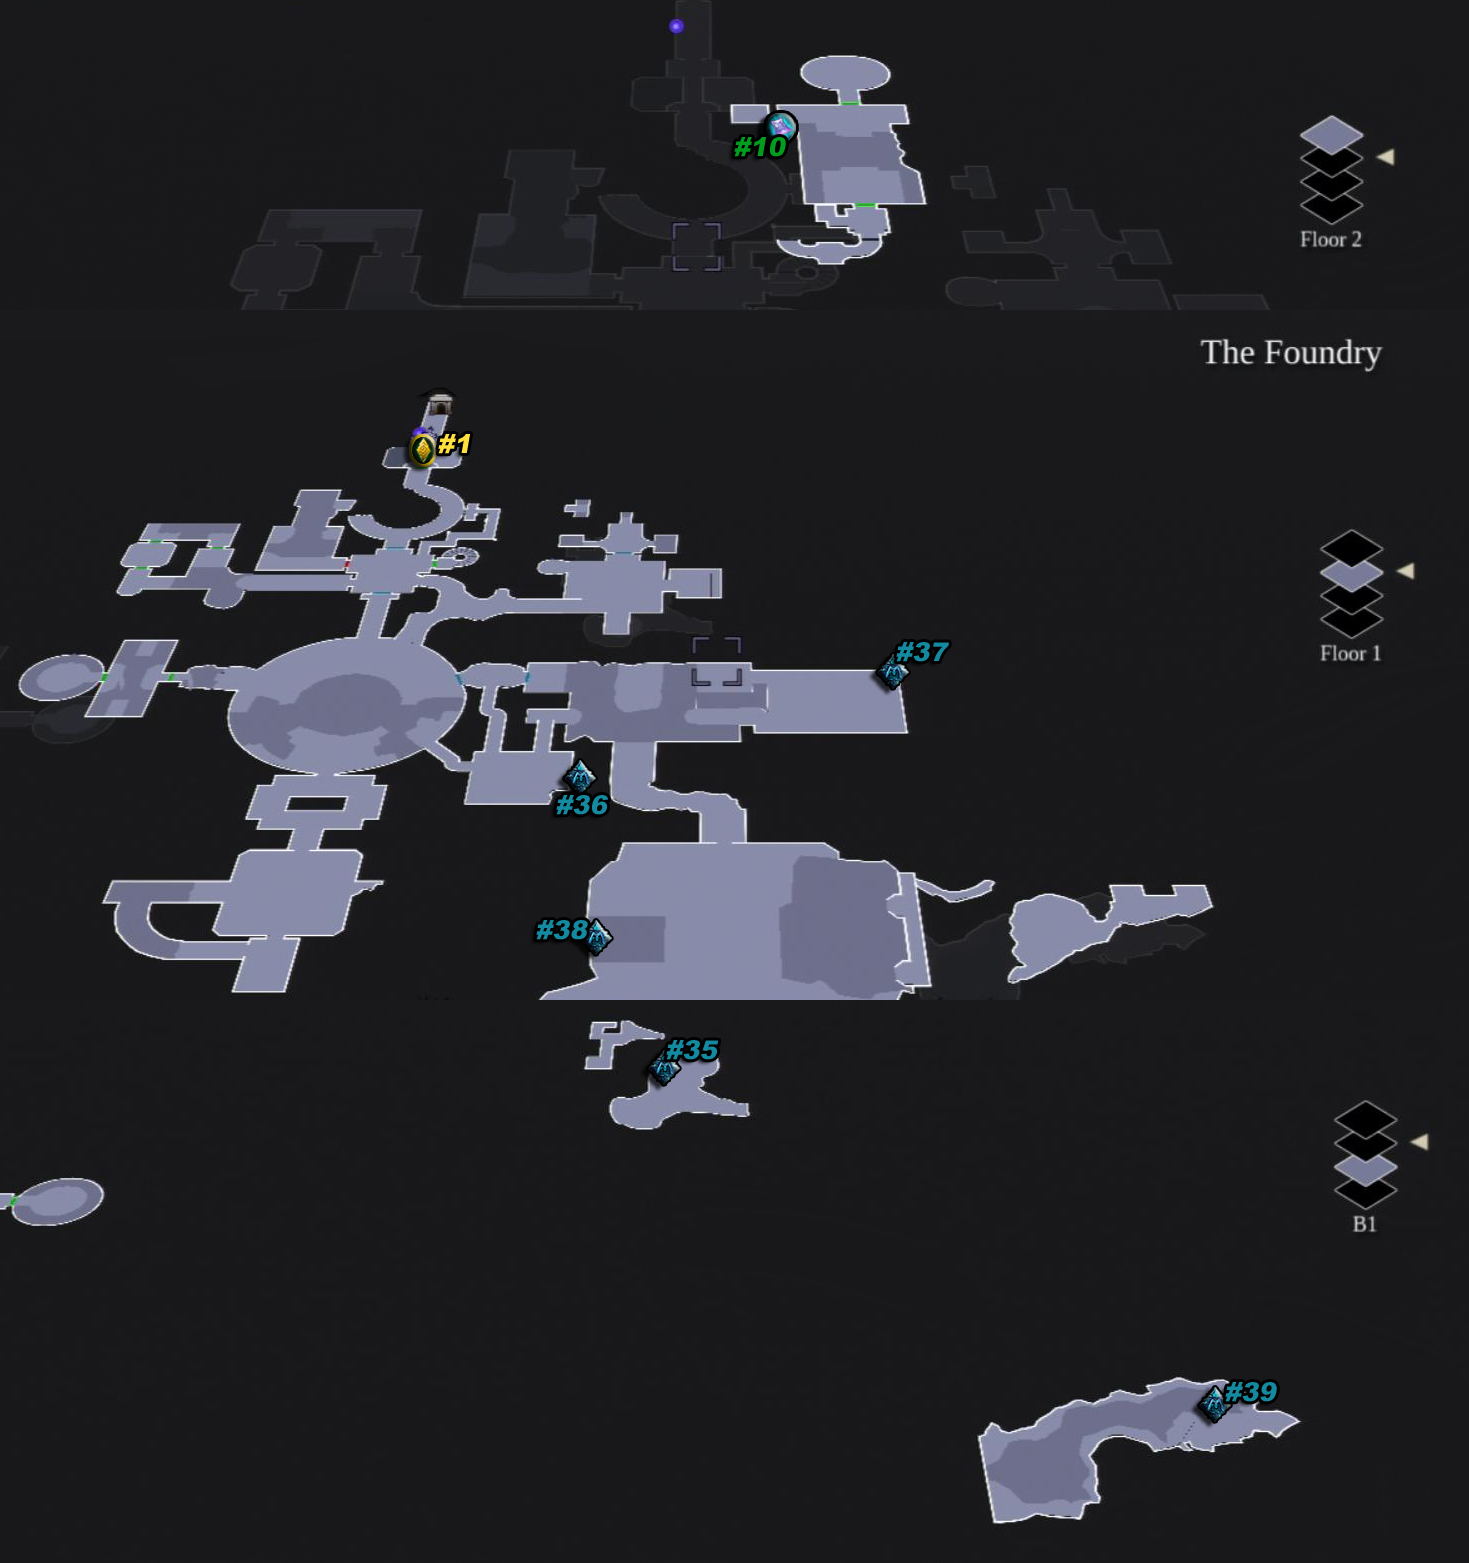
| Resistance | The Forge Lands | The Foundry | 1F, First room, on moving bucket. |
| Resistance | The Forge Lands | The Fjord | Near Vulgrim, requires Voidwalker. |
| Resistance | The Kingdom of the Dead | The Breach | On the 2nd floor, on the rock face north of the chest. Requires the player to turn the lantern statue atop the building opposite the entrance to Sentinel’s Gaze. |
| Resistance | The Kingdom of the Dead | The Eternal Throne | On pillar to the right of Serpent Tome. |
| Resistance | The Kingdom of the Dead | Leviathan’s Gorge | under main bridge |
| Resistance | The Kingdom of the Dead | The City of the Dead | After time rush climb,on 3F, exit the room, There are flying creatures in the sky. The stone is in the window of a tilted tower. on the right |
| Resistance | Lostlight | Earth | Before falling into pit for first Noss encounter, look to right and it’s on the wall |
| Resistance | Lostlight | The Ivory Citadel | Western Tower inside, 3rd Floor on the northern side |
| Resistance | Lostlight | The Ivory Citadel | In the central area, only accessible when casting a portal in the ceiling. In a tiny room with a chest. |
| Resistance | Shadow’s Edge | The Black Stone (past) | In the room before the one where you can find the Demonflame Renders, on the ceiling |
Rewards[]
The stones are returned to Blackroot in sets of three. The combination of the stones will define the reward you will receive. The order in which the stones are given is irrelevant and the combinations are as follows:
| Stone 1 | Stone 2 | Stone 3 | Reward |
|---|---|---|---|
| Mystic | Mystic | Mystic | Arcane +5 |
| Mystic | Mystic | Power | Arcane Critical Chance +2% |
| Mystic | Mystic | Resistance | Arcane Critical Damage +10% |
| Mystic | Power | Power | Critical Chance +2% |
| Mystic | Power | Resistance | Health +30 |
| Mystic | Resistance | Resistance | Wrath +20 |
| Power | Power | Power | Strength +5 |
| Power | Power | Resistance | Critical Damage +10% |
| Power | Resistance | Resistance | Defense +20 |
| Resistance | Resistance | Resistance | Resistance +20 |
Darksiders II Deathinitive Edition Guide
Overview
В этом руководстве я покажу вам место положение всех собирательных предметов в игре.
Введение!
 Монеты лодочника – Они являются вторичной валютой вместе с золотом. Хотя золото может быть потрачен на любого торговца, эти специальные монеты могут использоваться только для торговли с торговцем демоном – Вульгримом. Смерть может их потратить, чтобы купить таинственные коробки, которые при покупке обнаруживают одно случайное оружие выбранного качества. Будьте осторожны, тратя их, считая, что их гораздо труднее получить, чем золото. Существует ограниченное количество их, они разбросанных по всему миру, и они являются единственным средством приобретения Одержимого оружия. Неизвестно, в какой степени они служат Вульгриму, однако они, несомненно, являются частью еще одной из его бесконечных схем.

 Страница Книги Мертвых – Страница Книги Мертвых. Соберите 10 таких страниц, чтобы получить главу, которую можно продать Вульгриму.


 Камнедоли – Бывают 3-х видов: Мистические камнедоли (всего в игре 34 штуки), Камнедоли силы (25 штук), Камнедоли сопротивления (10 штук). Если отдать определённое сочетание из 3-х камнедолей Блэкруту, то он улучшит один из параметров персонажа.
- Примечания
- Камнедоли не переносятся в новую игру+, перед финальной битвой потратьте их все.
 Таинственная статуя гнома – Этот побочный квест подразумевает сбор предметов коллекционирования. В игре необходимо найти 4 фигурки гномов.
 Священный свиток Судьи душ – На протяжении всей игры вы найдете предметы коллекционирования, называемые Священный свиток Судьи душ. Каждый из них даст вам информацию как попасть в сердце лабиринта в игре их десять.


 Утраченные реликвии – Всего в игре 30 реликвий, которые вы можете продать Остеготу – реликвий Эту-Гота в игре 15, реликвий Ренагота – 10, реликвий Кагота – 5.
Найденные реликвии принимает торговец Остегот. Отдав реликвию, получаем соответствующий бонус:
Relic of Etu-Goth – 10 000 золота.
Relic of Renagoth – увеличение характеристик +35 здоровья, +10 энергии.
Relic of Khagoth – 1 очко умения.
Награда за нахождение всех реликвий – 2700 XP, 11 000 Gilt.
Кузнечные Земли / The Forge Lands

The Cauldron / Котел
Tri-Stone / Трекамень


The Drenchfort / Ливневый форт
The Shattered Forge / Ливневый форт

The Nook / Бухточка
The Lost Temple / Затерянный Храм

The Foundry / Плавильня
The Weeping Crag / Плачущий Утес


Королевство мёртвых / Kingdom of the Dead
Lair of the Deposed King / Логово низложенного короля
Breach / Пролом


Eternal Throne / Вечный Трон
Gilded Arena / Золотая арена

Sentinel’s Gaze / Взор Часового
Phariseer’s Tomb / Гробница Фарисира


Judicator’s Tomb / Гробница Вершителя
Psychameron / Псикамерон

Boneriven / Боунрайвен
City of the Dead / Город мертвых


Утерянный Свет / Lostlight

The Ivory Citadel / Цитадель Слоновой кости
Earth / Земля

Грань теней / Shadow’s Edge
The Black Stone / Черный камень

Квесты
Тут показано те предметы и боссы поиск которых займет у вас кучу времени чтоб ни бегать по всей карте искать где они находятся смотрите их место положение ниже на картинке!
“Бродячий камень” (англ. “The Wandering Stone”) – побочный квест мира Кузнечные Земли в игре…
Нужно найти и активировать части тела Орана. Награда: 494 опыта, 2500 золота.

Обескровленные (англ. Bloodless) — побочный квест мира Королевство мёртвых
1-й этап: “Убейте 3 обескровленных в Кузнечных землях.”
Сводка: Земли творцов поражены не только порчей. Отправляйтесь в путь по Кузнечным землями уничтожьте всех встречных обескровленных.
Все обескровленные в Кузнечныч Землях будут Ходоками.
Местонахождение:
1-й: Локация Долина Отца Камней.
2-й: Локация Фьорд.
3-й: Локация Изгарный перевал.

2-й этап: “Убейте 3 обескровленных в Королевстве мертвых.”
Все обескровленные в Королевстве мертвых будут Скарабей-увалень.
Местонахождение:
1-й: Локация Логово низложенного короля.
2-й: Локация Утроба.
3-й: Локация Взор Часового.
Last update: Wednesday, May 11, 2016
The following table should come in handy if you want to look for the stones while progressing through the game, and not after ending the main campaign storyline. If so, I suggest looking at the at it before entering any new location — that way you’ll know exactly how many secrets are there to find.
|
LAND |
LOCATION |
STONES’ AVAILABILITY |
|
Forge Lands |
Stonefather’s Vale |
Mystic Stonebites — 1 |
|
Forge Lands |
Fjord |
Mystic Stonebites — 2 Power Stonebites — 1 Resistance Stonebites — 1 |
|
Forge Lands |
Weeping Crag |
Mystic Stonebites — 1 Power Stonebites — 1 |
|
Forge Lands |
Maker’s Forge |
Mystic Stonebites — 1 |
|
Forge Lands |
Baneswood |
Mystic Stonebites — 3 |
|
Forge Lands |
Foundry |
Resistance Stonebites — 1 |
|
Forge Lands |
Charred Pass |
Mystic Stonebites — 3 Power Stonebites — 2 |
|
Forge Lands |
Drenchfort |
Mystic Stonebites — 1 |
|
Forge Lands |
Shadow Gorge |
Mystic Stonebites — 1 |
|
Forge Lands |
Lost Temple |
Mystic Stonebites — 1 Power Stonebites — 1 |
|
Forge Lands |
Nook |
Mystic Stonebites — 1 |
|
Kingdom of the Dead |
Phariseer’s Tomb |
Mystic Stonebites — 1 Power Stonebites — 1 |
|
Kingdom of the Dead |
Judicator’s Tomb |
Mystic Stonebites — 1 Power Stonebites — 1 |
|
Kingdom of the Dead |
Spine |
Power Stonebites — 2 |
|
Kingdom of the Dead |
Boneriven |
Mystic Stonebites — 1 |
|
Kingdom of the Dead |
Soul Arbiter’s Maze |
Mystic Stonebites — 1 Power Stonebites — 1 |
|
Kingdom of the Dead |
Lair of the Deposed King |
Power Stonebites — 1 |
|
Kingdom of the Dead |
City of the Dead |
Power Stonebites — 1 Resistance Stonebites — 1 |
|
Kingdom of the Dead |
Sentinel’s Gaze |
Power Stonebites — 1 |
|
Kingdom of the Dead |
Maw |
Mystic Stonebites — 1 Power Stonebites — 1 |
|
Kingdom of the Dead |
Psychameron |
Mystic Stonebites — 1 |
|
Kingdom of the Dead |
Leviathan’s Gorge |
Resistance Stonebites — 1 |
|
Kingdom of the Dead |
Serpent’s Peak |
Mystic Stonebites — 1 |
|
Kingdom of the Dead |
Eternal Throne |
Resistance Stonebites — 1 |
|
Kingdom of the Dead |
Breach |
Resistance Stonebites — 1 |
|
Kingdom of the Dead |
Gilded Arena |
Mystic Stonebites — 3 Power Stonebites — 1 |
|
Lostlight |
Lostlight |
Mystic Stonebites — 3 |
|
Lostlight |
Ivory Citadel |
Mystic Stonebites — 2 Power Stonebites — 2 Resistance Stonebites — 2 |
|
Lostlight |
Crystal Spire |
Power Stonebites — 1 |
|
Lostlight |
Earth |
Mystic Stonebites — 4 Power Stonebites — 2 Resistance Stonebites — 1 |
|
Shadow’s Edge |
Black Stone |
Power Stonebites — 3 Resistance Stonebites — 1 |
|
Shadow’s Edge |
Mausoleum |
Power Stonebites — 2 |