dns_probe_finished_bad_config — известная ошибка, которая появляется при доступе в Интернет. Эту проблему можно решить, выполнив сброс настроек браузера, маршрутизатора, DNS, обновление IP-адреса и другие несколько приемов. Это очень распространенная ошибка, связанная с сетью, в которой работает пользователь. Ошибка приводит к появлению пустого экрана с сообщением об ошибке DNS_PROBE_FINISHED_BAD_CONFIG, из-за которого вы не сможете получить доступ к Интернету.

Вы видите сообщение об ошибке DNS_PROBE_FINISHED_BAD_CONFIG при попытке подключения к Интернету? Используйте эти 4 способа решения проблемы с сетью на компьютере с Windows.
Причины ошибки DNS_PROBE_FINISHED_BAD_CONFIG
Существует ряд причин, по которым вы можете получить эту ошибку. Ошибка не относится к какому-либо веб-сайту, а вызвана подключением к вашей сети. Основной причиной этого является изменение настроек вашей сети, которое могло быть сделано с помощью приложения или системного обновления, которое вы могли недавно установить или могли сделать случайно. Этот сетевой параметр может изменить параметры подключения вашего маршрутизатора, что может привести к ошибке.
Для того, чтобы исправить эту ошибку, вы можете использовать ряд методов. Некоторые из них перечислены ниже.
1) Перезагрузите маршрутизатор
Ошибка может возникнуть, если серверная сторона соединения не может зарегистрировать ваш маршрутизатор как часть соединения.
- Чтобы решить эту проблему, выключите маршрутизатор и систему и перезапустите их.
- Просто отключите роутер от питания и подключите через 2 минуты.
2) Сбросить Chrome
Поскольку Chrome является наиболее часто используемым браузером, его сброс может помочь вам избавиться от ошибки.
Как отключить автоматическое обновление Chrome
3) Очистить временные файлы
Когда вы выходите в Интернет, ваш браузер по умолчанию сохраняет несколько временных файлов на вашем компьютере, чтобы ускорить просмотр. Но иногда сохраненные временные файлы повреждены/повреждены и начинают показывать ошибку DNS. В этом случае вам придется очистить и удалить все временные файлы из системы.3
Выполните следующие шаги, чтобы удалить временные файлы из ОС Windows:
Это удалит все временные файлы с вашего компьютера, и браузер начнет хранить свежие временные файлы на компьютере. Скорее всего, этот шаг исправит сообщение об ошибке DNS.
4) Удалить кеш браузера
Точно так же, как временные файлы повреждаются, файлы кеша браузера также повреждаются и начинают показывать ошибку DNS. Чтобы это исправить, вам нужно обязательно удалить все файлы cookie и другие старые файлы. Для этого выполните следующие шаги:
а) Откройте браузер Chrome
б) Нажмите кнопку «Настройки» в правом верхнем углу.
c) Введите «Очистить данные просмотра» в заданном параметре поиска.
d) Нажмите «Очистить данные просмотра» и снова нажмите «Очистить данные».
Этот шаг устранит существующую проблему и позволит вам получить доступ к Интернету без отображения ошибки DNS.
Аналогичная ошибка chrome err_name_not_resolved.
5) Изменить DNS-адрес
Если ошибка вызвана неверным DNS-адресом, вы также можете увидеть ошибку dns_probe_finished_bad_config в операционной системе Windows 7, 10. Вы можете изменить его, чтобы решить проблему, выполнив следующие шаги:
1) Откройте меню Пуск
2) Введите «Сеть и общий доступ» и нажмите на нее.
3) Когда откроются настройки сети, найдите «Изменить настройки адаптера», расположенные слева, и щелкните по нему.
4) Выберите работающее подключение по локальной сети из списка подключений в новом окне, щелкните правой кнопкой мыши и выберите «Свойства».
5) Найдите Интернет-протокол версии 4 (TCP/IPv4) и дважды щелкните по нему.
6) Измените адрес своего DNS-сервера на 8.8.8.8 и введите 8.8.4.4 в поле альтернативного DNS-сервера и сохраните настройки.
Теперь откройте браузер Chrome, Explorer или Mozilla и подключитесь к Интернету. Это должно работать без каких-либо ошибок DNS.
6) Сбросить DNS и обновить IP-адрес
Если ничего не работает, вам придется обновить свой IP-адрес, чтобы решить проблему.
ipconfig /flushdns
ipconfig/обновить
ipconfig/выпуск
ipconfig/все
Теперь перезагрузите компьютер, и ваш браузер должен работать нормально.
dns_probe_finished_bad_config — это наиболее распространенная ошибка, с которой сталкивается пользователь, и ее можно исправить, выполнив описанные выше шаги. Основная идея удалить временные файлы, сбросить настройки браузера по умолчанию, очистить DNS и сбросить DNS на маршрутизаторе, любой из этих приемов может помочь решить проблему.
If you’re a frequent internet user, chances are you’ve encountered the DNS_PROBE_FINISHED_BAD_CONFIG error message. This error can prevent you from accessing websites and can be quite frustrating.
You also might get confused especially if you’re not familiar with DNS (Domain Name System). Which, is a critical component of internet browsing that translates website domain names into IP addresses, allowing you to access the internet.
When you encounter the “DNS_PROBE_FINISHED_BAD_CONFIG” error, there’s no need to worry or panic. This error simply indicates a problem with your DNS configuration, and your DNS is unable to resolve the IP address due to various possible reasons.
But the best part is, like other DNS issues, this DNS_PROBE_FINISHED_BAD_CONFIG error can also be easily fixed with only some simple troubleshooting methods.
In this article, we’ll comprehensively discuss every point related to the “DNS_PROBE_FINISHED_BAD_CONFIG” error, including its meaning, causes, and solutions.
So stay tuned and keep reading this post.
Read Similar DNS errors: 🚩 How To Fix DNS_PROBE_FINISHED_NXDOMAIN Error?
How to fix the DNS_PROBE_STARTED Error? [8 Ways]
To better understand what actually DNS_PROBE_FINISHED_BAD_CONFIG Error means? It is better you must understand the role of DNS first.
- DNS directs traffic on the internet and connects nameservers, URLs, and IP addresses with web servers.
- Websites have unique IP addresses, which can be difficult to remember for all the sites you want to visit. Fortunately, DNS comes to the rescue by making domain names user-friendly and easy to remember.
- When a user inputs a URL into their browser, the DNS begins the process of DNS name resolution to connect it with a web server.
- If the DNS is unable to complete this process successfully, it can return an error message.
DNS_PROBE_FINISHED_BAD_CONFIG is an error message that appears in web browsers when they are unable to access a website due to a problem with the DNS configuration.
It means that the browser was unable to resolve the IP address of the website you’re trying to access. This can happen due to a misconfiguration in your network settings, your router settings, or due to an issue with your ISP’s DNS server.
Note: The DNS_PROBE_FINISHED_BAD_CONFIG error can occur on various browsers and devices, including Google Chrome, Android, iOS, macOS, and Windows. It is not restricted to a particular platform.
What Are The Causes of DNS_PROBE_FINISHED_BAD_CONFIG Error:
The “DNS_PROBE_FINISHED_BAD_CONFIG” error can occur due to various reasons. Here are some common causes:
- Misconfigured DNS Settings: This is the most common cause of the error. If your DNS settings are not configured correctly, your device won’t be able to connect to the internet. This can happen due to incorrect settings or outdated information.
- Outdated Browser: An outdated browser may not be compatible with the latest DNS settings, leading to the error. Make sure to update your browser regularly to avoid this issue.
- Antivirus or Firewall Interference: Sometimes, antivirus or firewall software can interfere with your DNS settings and cause an error. Disable your antivirus or firewall temporarily and check if the issue persists.
- DNS Server Issues: The server you’re trying to connect to may be down or not responding. You can try changing your DNS server to a different one to see if it resolves the issue.
Read: 🚩 How To Fix “DNS Server Not Responding” Error? (12 Methods)
How to Fix DNS_PROBE_FINISHED_BAD_CONFIG Error?
A DNS-related error can trigger due to a variety of reasons, and it would be difficult for you to figure out the exact cause. Hence, the best thing you can do is to try troubleshooting DNS issues directly which can help you to fix DNS_PROBE_FINISHED_BAD_CONFIG Error.
Here are the steps to troubleshoot and fix the “DNS_PROBE_FINISHED_BAD_CONFIG” error:
- Restart your Internet Device or Router
- Purge your Browser’s DNS cache
- Check DNS Settings
- Change DNS Server
- Reset IP and Flush DNS Cache
- Update Network Drivers
- Delete Temporary files
- Disable Antivirus or Firewall
- Scan your System for any malware
- Check Browser Extensions
1. Restart your Internet device or Router
Although your internet device or router may be working fine, one of the quickest and easiest ways to check and fix the DNS_PROBE_FINISHED_BAD_CONFIG error is by restarting it and renewing the IP address.
To do this, simply turn off your router or internet access device for a few minutes, and then turn it back on. Meanwhile, you can also restart your system. Once both devices are turned on, connect your system or PC to the LAN or Wi-Fi and try to access the website. Check if the error has been resolved or not.
2. Purge your Browser’s DNS cache
Browsers are designed to cache DNS records in order to deliver faster response times. Therefore, over time, these DNS records may get corrupted and can be responsible for triggering the DNS_PROBE_FINISHED_BAD_CONFIG error.
Clearing your browser’s cache can resolve the DNS_PROBE_FINISHED_BAD_CONFIG error caused by corrupted DNS records, as browsers cache DNS records to deliver faster response times. However, before trying this troubleshooting method, try accessing the website on an alternate browser.
If you can access the website on an alternate browser, then you should proceed to clear the DNS cache of the faulty browser.
Note: Since Chrome has a major Browser market share, here
On various operating systems including Windows, macOS, and Linux, if you use Google Chrome as your web browser, you have the option to use the feature chrome://net-internals/#dns to clear the DNS cache within the Chrome browser.
Read: 🚩 chrome://net-internals/#dns – Flush DNS Cache on Chrome
All you have to do is,
Step 1: Open your Chrome Browser
Step 2: Enter the chrome://net-internals/#dns to the chrome address bar and hit the “Enter” button to open the interface.
Step 3: Now click the Cler Host cache button as shown in the picture.
 3")
Step 4: After that restart Chrome and go to the link chrome://net-internals/#sockets to flush the socket pools.
 4")
You have successfully been able to flush the DNS cache in Chrome. The above method also works on various platforms and devices such as Windows, Linux, macOS, Android, and iPhone or Ipad.
3. Check DNS Settings
To Check your DNS settings and ensure the settings are up to date and accurate. The following steps outline the process of reviewing DNS settings on a Windows system:
Step 1: Open the Command Prompt > Type “ipconfig /all” and hit enter.
 5")
Step 2: Now Locate the ” DNS servers ” entry to make sure your DNS settings are accurate.
Step 3: If the displayed DNS servers are incorrect, recheck your DNS settings in the “Network and Sharing Center”.
 6")
Step 4: Now Type “nslookup WPOven.com” and hit enter button.
 7")
Step 5: Now confirm that the displayed IP addresses are correct.
 8")
If you receive an error message something like “Host not found,” it may indicate an issue with your DNS servers. Consider changing to a different DNS server and try again.
4. Change DNS servers
For Windows 10 and Windows 11 users:
Step 1: If you are Windows 10 or 11 User, you have to open the control panel by simply typing “Control Panel” in the search bar.
Step 2: In the Control Panel select Network & Internet > Network and Sharing Center.
Step 3: From the menu on the left, select Change adapter settings.
Step 4: Right-click on your network and select Properties.
Step 5: In the window that opens, click on Internet Protocol Version 4 (TCP/IPv4) from the list, then select Properties again.
 9")
Step 6: Click on Use the following DNS server addresses.
Step 7: Enter “8.8.8.8” for the Preferred DNS server and “8.8.4.4” for the Alternate DNS server.
 10")
Step 8: Click on the OK button to save your changes.
Step 9: Close all the windows and try re-accessing the website to see if the error is still present.
If the problem persists, you may need to try other solutions. However, changing your DNS address can often resolve internet connection issues.
For MacOS users:
Step 1: First, navigate to the System Preferences on your Mac. You can find this by clicking on the Apple icon in the top-left corner of your screen, then selecting “System Preferences“.
 11")
Step 2: Once you’re in System Preferences, locate the “Network” icon and click on it. From there, select the network connection that you want to modify (e.g., Wi-Fi or Ethernet).
Step 3: In the Network settings, you should see a button labeled “Advanced“. Click on that, and then navigate to the “DNS” tab.
 12")
Step 4: Here’s where you’ll add the DNS server addresses. Click on the “+” button at the bottom-left of the DNS settings window, and then type in the IPv4 address for Cloudflare’s DNS servers: 1.1.1.1. Press enter, then repeat the process to add another address: 1.0.0.1.
Step 5: Finally, click “OK” to save the changes you’ve made. You should now be all set with your new DNS settings!
5. Reset IP and Flush DNS Cache
The DNS cache stores recent DNS lookup results on a computer or device. It improves the speed and efficiency of web browsing and other network-related tasks by avoiding the need to perform new DNS lookups.
The DNS cache is automatically updated over time, but it may get corrupted and need to be manually cleared to resolve issues with DNS lookups.
Refer to our detailed and comprehensive guide on ‘How to Easily Flush DNS Command Cache (Windows, Mac, Linux).‘ Once you have successfully cleared the system DNS cache, attempt to access the website again to determine if the issue has been resolved.
6. Update Network Drivers or Adaptors
Sometimes, an outdated network Adaptor can also be the culprit for triggering the DNS_PROBE_FINISHED_BAD_CONFIG Error. Hence, if you are still facing the error try uninstalling and reinstalling your network drivers through your Device Manager:
Step 1: Press the Windows key + R on your keyboard.
Step 2: Type “devmgmt.msc” into the Run box and hit Enter.
Step 3: In the Device Manager window, click to expand Network adapters.
Step 4: Right-click on your network adapter, and select Uninstall device.
Step 5: Confirm the action and wait for the process to complete.
Step 6: Close the Device Manager window and restart your computer.
Step 7: Once your computer has restarted, open the Device Manager again and select your network adapter.
 13")
Step 8: Click on Action > Scan for hardware changes from the menu bar. This will reinstall your network driver(s).
 14")
Step 9: Now try loading the website again. If the issue persists, you may need to update your drivers manually or seek further assistance.
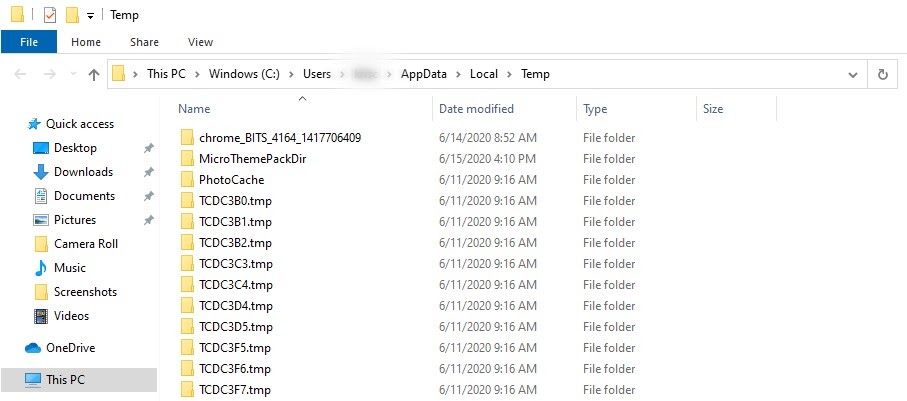
7. Delete System Temporary Files
Most browsers and operating systems store some temporary data on the device for later use. However, if any of these temporary files get corrupted over time, which can conflict with the DNS information and trigger DNS_PROBE_FINISHED_BAD_CONFIG errors.
Therefore, you can resolve this issue, by simply deleting your system’s temporary files. To do this,
For Windows
Step 1: Type %temp% in your Windows search bar and hit Enter.
 15")
Step 2: This will open the “temp” folder, which contains all the temporary files listed.
 16")
Step 3: Select all, and Delete them.
For macOS
- Open the Finder by clicking on the Finder icon in the dock.
- Press the “Command+Shift+G” keys on your keyboard. This will open a search bar.
- In the search bar, type “/Library/Caches” and then press the Enter key.
- This will take you to the Caches folder. Here, you will see several folders with the names of different applications.
- Select the folders that you want to delete.
- Empty the trash bin by right-clicking on the icon and selecting “Empty Trash”.
For Linux
Ubuntu users do not need to follow these steps because all temporary files are automatically deleted with every reboot.
8. Disable Antivirus or Firewall
Antivirus and firewalls are undoubtedly essential tools for protecting your PC against malware and hacking threats. However, sometimes these security tools are configured too strictly and start interfering with your DNS servers, causing connectivity issues.
Therefore, you can try temporarily disabling them and check whether it fixes the DNS_PROBE_FINISHED_BAD_CONFIG error or not.
For Windows users:
Step 1: First, you need to open your computer’s control panel. To do this, click on the “start” menu on your desktop and type in “control” in the search field.
Step 2: Next, select “System and Security” from the control panel options. This will take you to a new page.
Step 3: On the new page, you’ll see an option for “Windows Defender Firewall.” Click on “Allow an app or feature through Windows Firewall.”
 17")
Step 4: In the next window, you’ll see a list of apps and features that are allowed to communicate through your firewall. To change these settings, click on “Change settings.”
 18")
Step 5: If you don’t see your DNS client on the list, you can add it by clicking on the plus (+) icon.
Step 6: To temporarily disable your firewall, uncheck the box next to “Windows Defender Firewall” and click on “OK” to save your changes.
Step 7: Alternatively, you can adjust your firewall settings by finding the DNS client or any other application you want to configure and checking or unchecking the boxes next to the desired settings.
Step 8: Once you’re done adjusting your settings, click on “OK” to save your changes.
Note: It’s important to only disable your firewall temporarily if you need to troubleshoot a connectivity issue. Leaving your computer without a firewall can expose it to potential security threats.
For macOS
- Click on the Apple search bar and type “Firewall”.
- A firewall interface will open where you have to select the “Firewall” tab.
- If the firewall is turned on, you’ll see a message that says “Firewall is on.” Toggle to Turn it Off.
 19")
9. Scan your System for any Malware
Cached DNS records can be infected with by malware, viruses, and other threats. If you suspect that your device has been compromised by malicious software or files, it’s recommended that you must run a complete malware scan of your System.
Attackers often target DNS in order to redirect users to fake websites. To protect your infrastructure from cyber attacks, it’s important to follow DNS security best practices.
Read: 🚩 DNS Poisoning aka DNS Spoofing: Meaning, Prevention, and Fix.
10. Check the Browser’s Extensions
A faulty Browser Extension can create connectivity issues. Try disabling all extensions to see if they are the case. In the Chrome menu, click on Advanced Tools — Extensions. To disable them just uncheck the toggle on each of them. Make sure you disable all the extensions, it is very important to identify the reason.
Then, try to access the website again. If the error does not appear anymore, all you have to do is to find the extension causing the error. Turn on the installed extensions one by one and check the availability of the problem site after each one.
How to Prevent DNS_PROBE_FINISHED_BAD_CONFIG Error?
Preventing the “DNS_PROBE_FINISHED_BAD_CONFIG” error can save you from the frustration of not being able to access the internet. Here are some tips to prevent the error:
- Maintain a Stable Internet Connection: Ensure your internet connection is stable and reliable. Unstable connections can cause DNS-related issues.
- Check DNS Settings Regularly: Check your DNS settings regularly to ensure they are up-to-date and correct.
- Update Software: Keep your software updated to ensure compatibility with the latest DNS settings.
- Secure Your System: Protect your system from malware and viruses that can interfere with your DNS settings.
Conclusion
If you have encountered the DNS_PROBE_FINISHED_BAD_CONFIG error, it can be frustrating for anyone. However, there are several ways to fix it.
In this article, we have explored the causes of the error and provided various basic and advanced troubleshooting steps to resolve it, along with some preventive tips to avoid it in the future.
To summarize, the basic fixes include.
- Restart your Internet Device or Router
- Purge your Browser’s DNS cache
- Check DNS Settings
- Change DNS Server
- Reset IP and Flush DNS Cache
- Update Network Drivers
- Delete Temporary files
- Disable Antivirus or Firewall
- Scan your System for any malware
- Check Browser Extensions
If you have any queries or would like to add any valuable points to it, please do let us know in the comment section below.
Frequently Asked Questions
How do I fix error code dns_probe_finished_bad_config?
How to DNS_PROBE_FINISHED_BAD_CONFIG Error? (10 ways)
1. Restart your Internet Device or Router
2. Purge your Browser’s DNS cache
3. Check DNS Settings
4. Change DNS Server
5. Reset IP and Flush DNS Cache
6. Update Network Drivers
7. Delete Temporary files
8. Disable Antivirus or Firewall
9. Scan your System for any malware
10. Check Browser Extensions
How do I fix DNS probe problems?
1. Reset your Router
2. Flush the DNS cache of your browser, as well as your system.
3. Update your Network Drivers
4. Change DNS server
5. Check DNS settings
When you’re browsing online, encountering an error message that prevents you from accessing a website is incredibly frustrating. One such error is the ‘DNS_PROBE_FINISHED_BAD_CONFIG’ message. It can occur regardless of your browser or Operating System.
If you run into this error when trying to open a site, don’t panic. It simply means that the Domain Name System (DNS) wasn’t able to resolve the IP address properly, which can happen for a variety of reasons.
Fortunately, as with most DNS-related issues, there are some simple solutions you can try to fix this problem.
In this article, we’ll explain what the DNS_PROBE_FINISHED_BAD_CONFIG error code means and some common causes of it. Then we’ll walk you through seven solutions for fixing it in Windows, macOS, Android, and Ubuntu.
Let’s get started!
What Is the DNS_PROBE_FINISHED_BAD_CONFIG Error?
To understand what this error means, it’s helpful to first get a general idea of the important role the DNS plays in helping users access websites. In a nutshell, the DNS directs traffic on the internet and is responsible for translating and connecting nameservers, URLs, and IP addresses with web servers.
All websites have unique IP addresses, such as 218.3.120.12. Rather than requiring you to memorize and enter the IP address any time you want to visit a website, the DNS makes it so you can use a more user-friendly domain name, such as kinsta.com.
When you input the URL into your browser, it begins the process known as DNS name resolution. This is where the DNS essentially looks up the URL/IP address and connects it with a web server. However, if for whatever reason the DNS is not able to successfully complete this process, it can return an error message instead.
DNS_PROBE_FINISHED_BAD_CONFIG is a network connection error that displays when there is a problem with the DNS configuration, which prevents it from connecting to a network. It is not specific to any one browser or system, meaning you could come across it in Google Chrome, Windows, or macOS, on an Android mobile device, etc.
Similar DNS Error Messages
A DNS error message occurs when your DNS or network settings are misconfigured. The DNS_PROB_FINISHED_BAD_CONFIG error is just one of them, and there are other similar messages you may run across.
For example, you might see the DNS_PROBE_FINISHED_NXDOMAIN error:
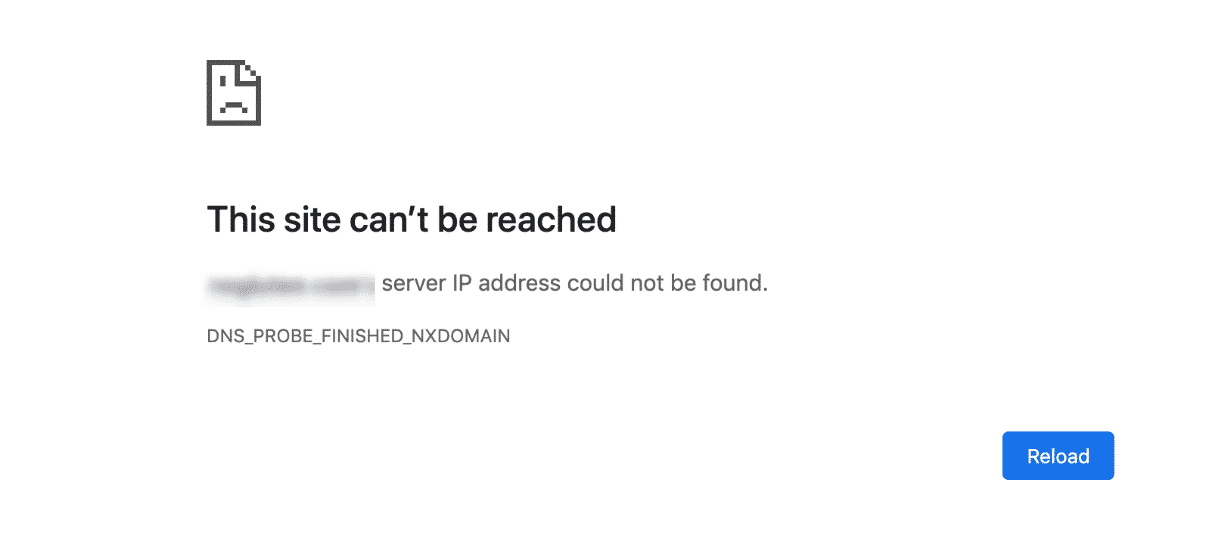
In this error message, “NXDOMAIN” stands for “Non-Existent Domain”. In other words, the domain name that was queried doesn’t exist.
Another similar DNS error is DNS_PROBE_FINISHED_NO_INTERNET:
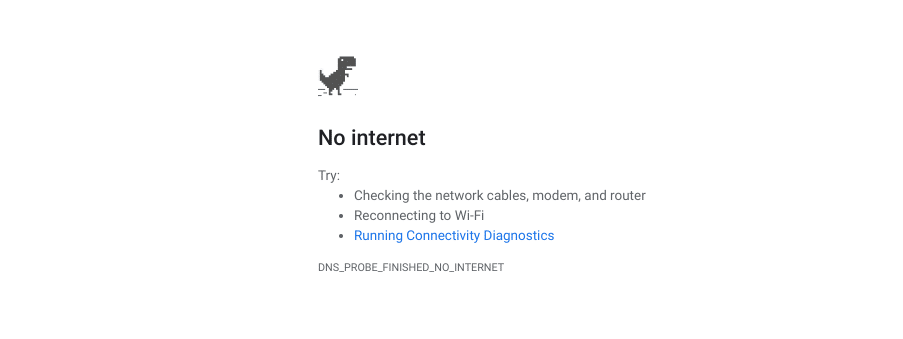
This error message indicates that a problem occurred while establishing an internet connection, or that the connection was lost.
Any of the above DNS errors can vary depending on the browser you’re using. So your message might also include phrases such as:
- This web page is not available.
- This site can’t be reached.
- Safari can’t find the server.
- We’re having trouble finding the site/web page.
- There is no internet connection.
As you can see, although they’re slightly different, all of these errors indicate a DNS or network misconfiguration. Therefore, they share many of the same solutions, as we’ll see shortly.
Common Causes of DNS_PROBE_FINISHED_BAD_CONFIG
While there are a handful of reasons you might be seeing this message, the good news is that you can at least narrow it down to a DNS or network issue. Some of the most common causes of DNS_PROBE_FINISHED_BAD_CONFIG include:
- Network settings that were accidentally changed
- Router settings changed through an unauthorized app
- Browser plugin(s), such as a VPN app, interfering or messing with the IP or DNS address
- Problematic firewall or antivirus software
- Corrupted files on your device
It’s also possible that the underlying issue is much simpler. For example, the error message may stem from a malfunctioning internet cable or a website that’s temporarily down.
How to Fix the DNS_PROBE_FINISHED_BAD_CONFIG Error Code (7 Ways)
Now that you have a better idea of what this error means, it’s time to get to work.
Before attempting any of the following solutions, we recommend first making sure your internet cables, modem, and router are properly connected. It’s also smart to refresh the web page, just to make sure there wasn’t a temporary glitch with the connection.
Once you eliminate those options, you’re ready to dive in. Let’s take a look at seven potential solutions you can use to fix the DNS_PROBE_FINISHED_BAD_CONFIG error.
1. Restart Your Router
Even if your router is securely hooked up, it may need a quick reboot to reset the IP address. Therefore, the first step is to restart your router.
To do so, simply hold down the power. After leaving it off for at least one minute, power it back on. While it’s restarting, you may also want to restart your computer.
Once both devices are back on, connect to your Wi-Fi or LAN network and try accessing the website again. If you’re still seeing DNS_PROBE_FINISHED_BAD_CONFIG, it’s time to move on to the next method.
2. Clear Your Browser Cache
While this likely isn’t what’s causing the DNS error, it doesn’t hurt to eliminate it as an option. You might want to first try accessing the website from a different browser than the one you’re currently using.
If you can do so successfully, the next logical solution is to clear the cache of the problematic browser.
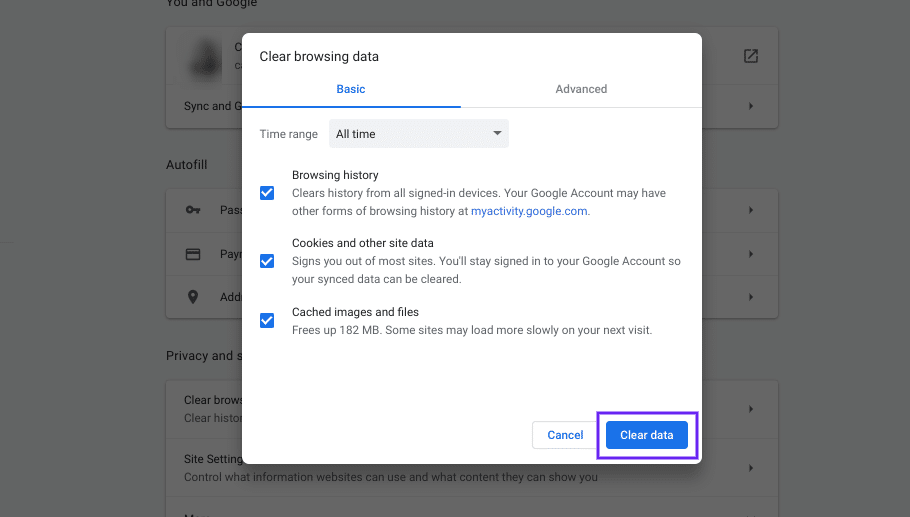
The process for doing so will look slightly different, depending on your OS and browser. For detailed guidance, you can refer to our post on how to clear your browser cache.
3. Flush the DNS Cache and Renew Your IP Address
If there was a change recently made to your DNS, whether maliciously or accidentally, your system could be trying to use the local cache to connect to the network.
When this is the case, it makes sense that you might receive the DNS_PROBE_FINISHED_BAD_CONFIG message.
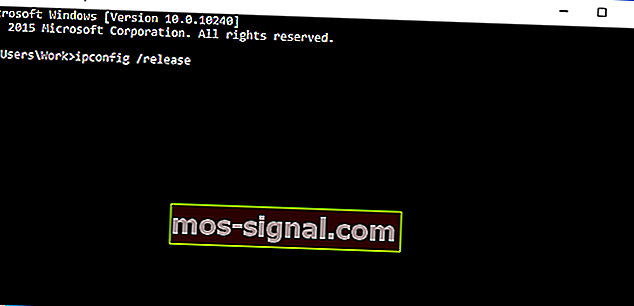
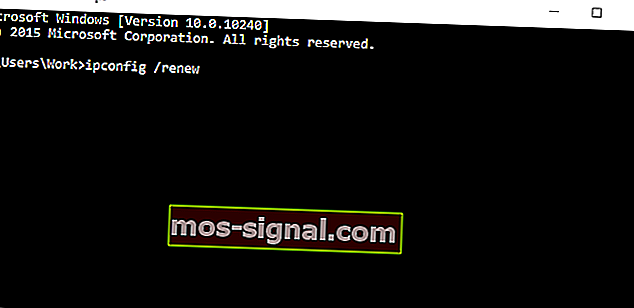
Therefore, the next solution to try is flushing your DNS cache, as well as releasing and renewing your IP address. If you’re using Windows 7 or Windows 10, you can do this through the Command Prompt app.
To open Command Prompt, click on the Windows icon/Start button and type “cmd” into the search field. Under Command Prompt, select Run as administrator:
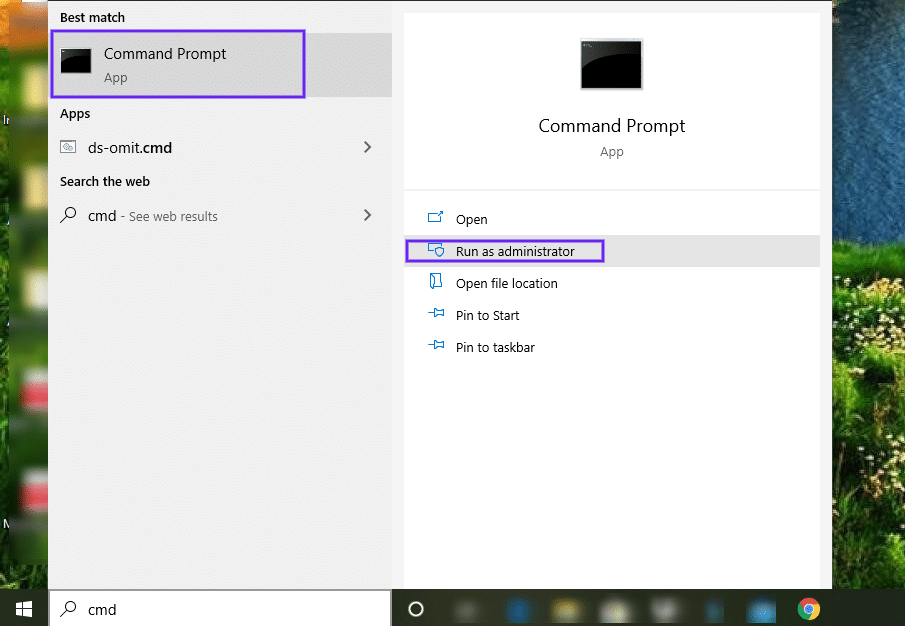
In the Command Prompt window, type in the following commands, hitting the Enter key after each:
ipconfig /flushdns
ipconfig /release
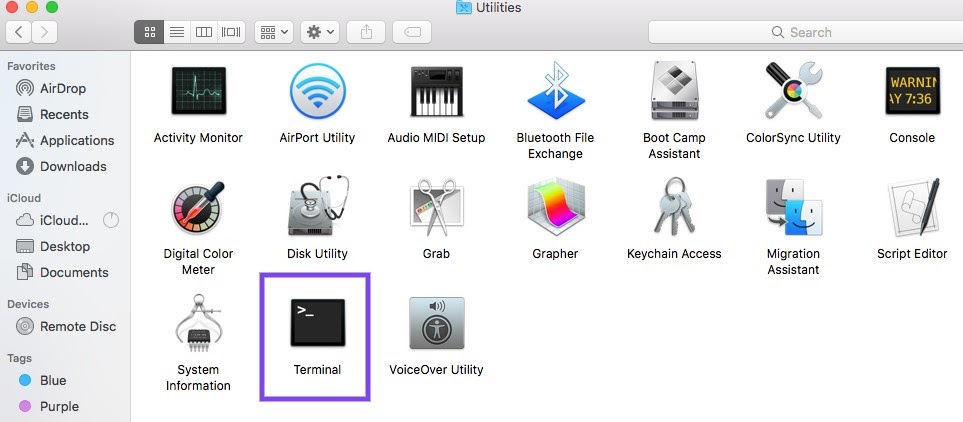
ipconfig /renewOn macOS, you can do this through the Terminal command-line interface. To locate it, click on the Apple icon, followed by Applications > Utilities > Terminal:
In the Terminal interface, the specific command you’ll use varies depending on your macOS version:
-
sudo killall -HUP mDNSResponder(macOS v10.11 or later)
-
sudo discoveryutil mdnsflushcache(Yosemite v10.10 through v10.10.3)
-
sudo killall -HUP mDNSResponder(Mavericks, Mountain Lion and Lion)
-
sudo dscacheutil -flushcache(Snow Leopard)
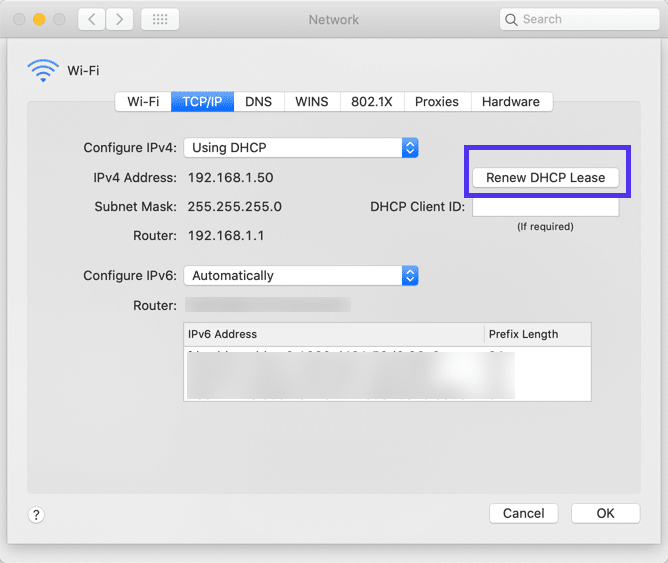
To release and renew the IP address, navigate to the Apple menu icon > System Preferences > Network > Advanced > Renew DHCP:
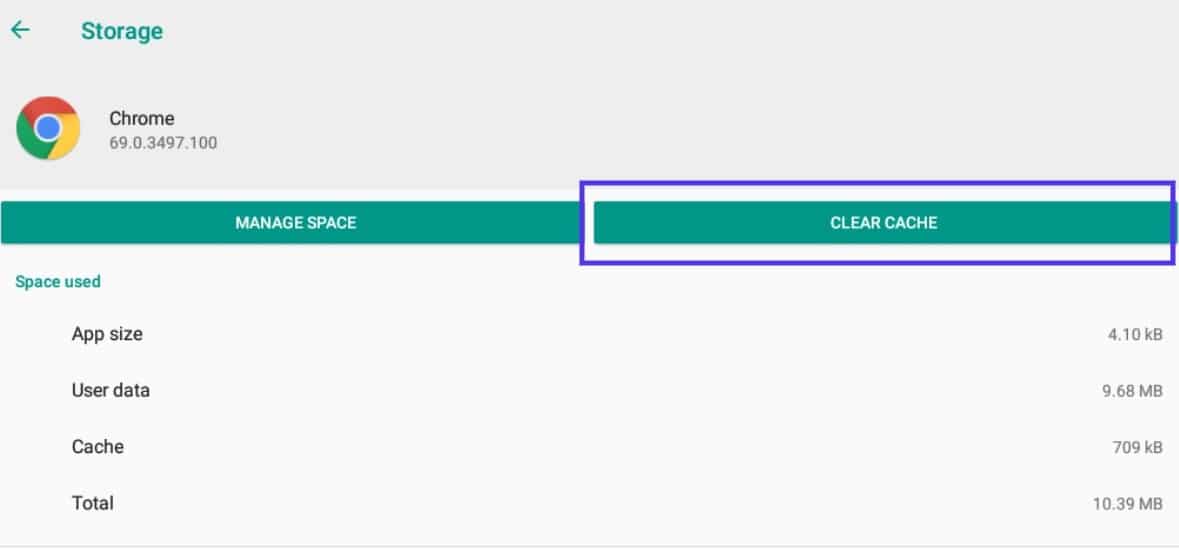
If you’re using an Android device, you can clear your DNS cache by going to Settings > Applications > App info:
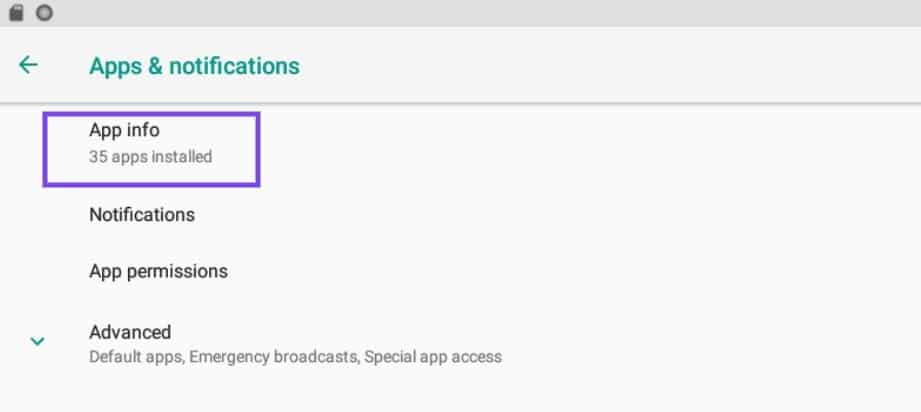
From the list of apps, select Chrome (or whatever browser app you’re using), followed by Storage. On the Storage page, click on the Clear Cache button:
Ubuntu users can launch the command Terminal by pressing CTRL + ALT + T, and then input the following command:
sudo systemd-resolve --flush-cachesFor more detailed guidance, refer to our guide on how to clear your DNS cache.
4. Manually Change the DNS Settings
If you’re still seeing the DNS_PROBE_FINISHED_BAD_CONFIG error message in your browser, the next thing you can try is changing your DNS settings. Your ISP assigns DNS servers by default.
However, you can temporarily switch to a public DNS server such as Google.
To do this in Windows, right-click on the network icon in the bottom right-hand corner of your screen, then select Open Network and Sharing Center.
Once the Network window opens, right-click on your network connection and select Properties from the drop-down menu:

In the panel that opens, under the Networking tab, select “Internet Protocol Version 4 (TCP/IPv4)” followed by the Properties button:
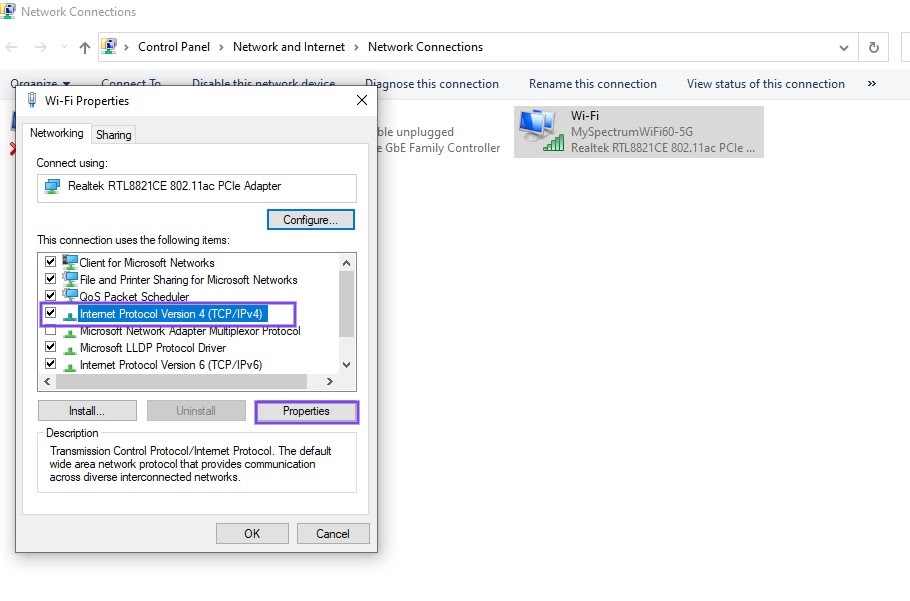
Under “Use the following DNS server addresses”, enter the following:
- Preferred DNS Server: 8.8.8.8
- Alternate DNS Server: 8.8.4.4
When you’re done, click OK. Refresh your browser and try accessing the website again.
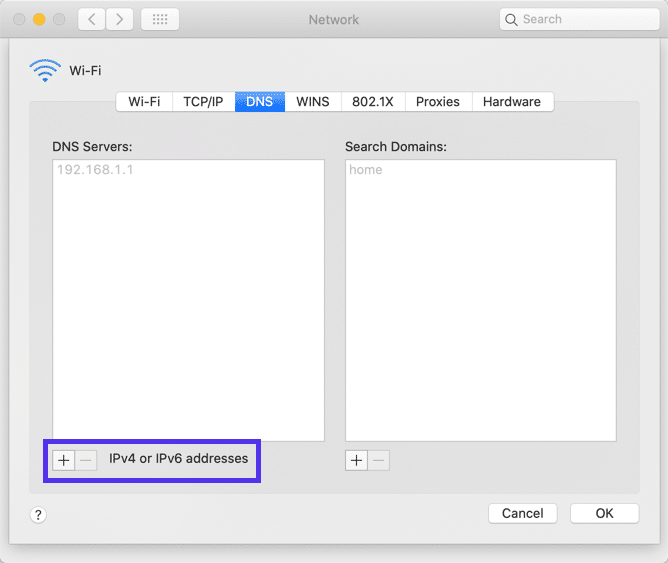
To change your DNS settings for macOS, click on the Apple menu icon, followed by System Preferences > Network. Select your network connection. You can add the new DNS addresses by clicking on the (+) icon:
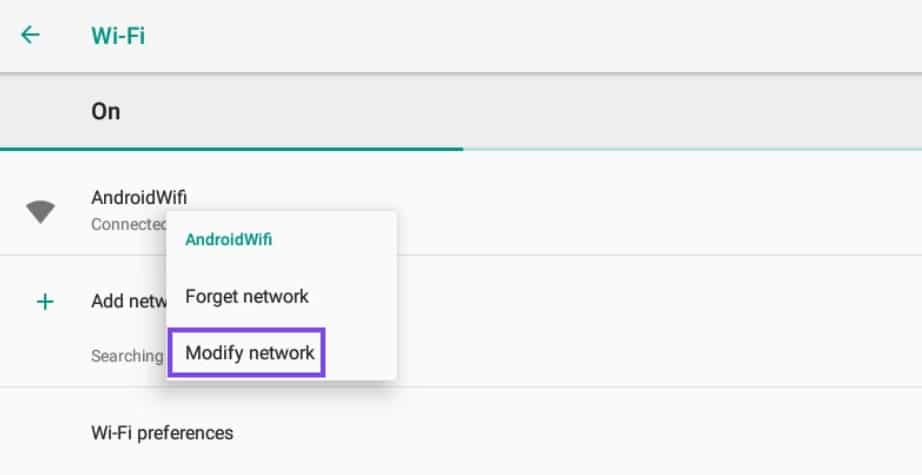
Android users can locate this option by navigating to Settings > WiFi. Press and hold the network, then click on Modify network:
Click on Advanced options, then under IP settings, select Static:
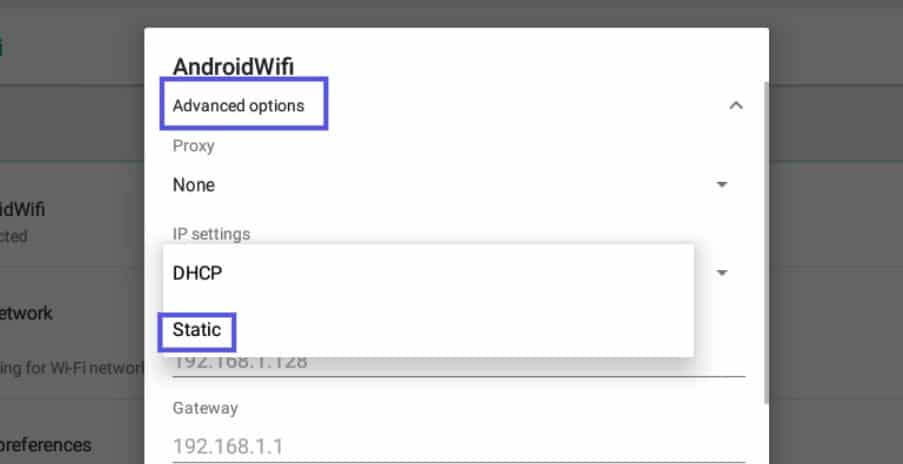
Enter the IP addresses into the respective fields, and save your changes.
If you’re running Ubuntu OS, you can change your DNS settings by clicking on the gear icon next to your network. Under IPv4 tab, there will be a text field to enter new DNS server addresses:

After you enter them, separating each with a comma, click on the Apply button.
5. Trash Temporary Files
Most browsers and systems will save temporary files to your device to use later.
However, if one of those files is corrupted, it may be what’s causing the DNS_PROBE_FINISHED_BAD_CONFIG error. Therefore, another solution we recommend is deleting your temporary files.
To do this in Windows, type “%temp%” into the search field along your desktop toolbar, and then hit Enter:

This will bring you to the “temp” directory on your computer, where you can view a list of temporary files:
Select all of them and delete them.
On macOS, you can do this by first clicking on Finder and selecting Home (this may be your username instead). Next, hit cmd + shift + . (the period key). This should make your hidden files visible, so you can delete them.
Alternatively, you can try opening Finder and using the Shift + Cmd + G keys. Then, in the text field of the window that opens, enter “~Library/caches”, followed by Enter. This should show you the relevant folders, which you can then delete.
Ubuntu users can skip this step entirely, since the /tmp folder is automatically emptied every time the system is rebooted.
6. Disable Antivirus Software and Firewalls
One of the common issues with antivirus software, firewalls, and VPNs is that they can sometimes conflict with network settings. More specifically, they can interfere with your DNS servers.
Therefore, if you’ve reached this point and the DNS_PROBE_FINISHED_BAD_CONFIG error persists, your next course of action should be to temporarily disable your antivirus software and firewall applications.
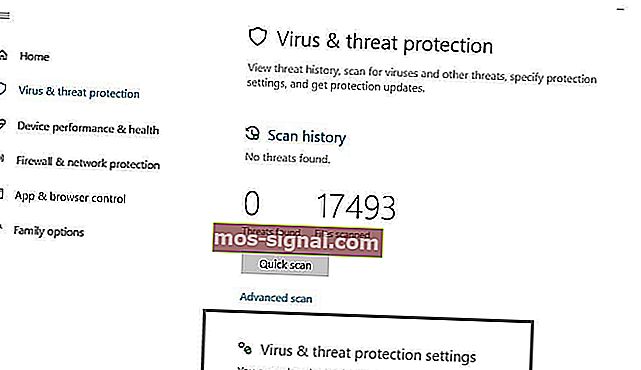
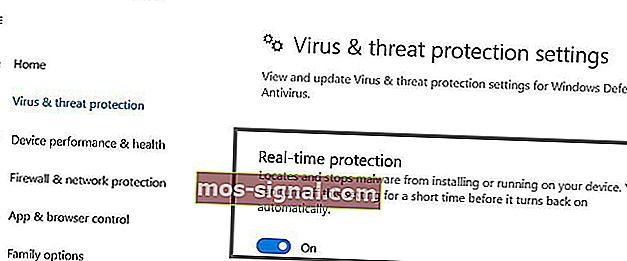
Here’s an example using Windows. Click on the Windows icon, then typing “defender” into the search field. Click on Virus & threat protection:
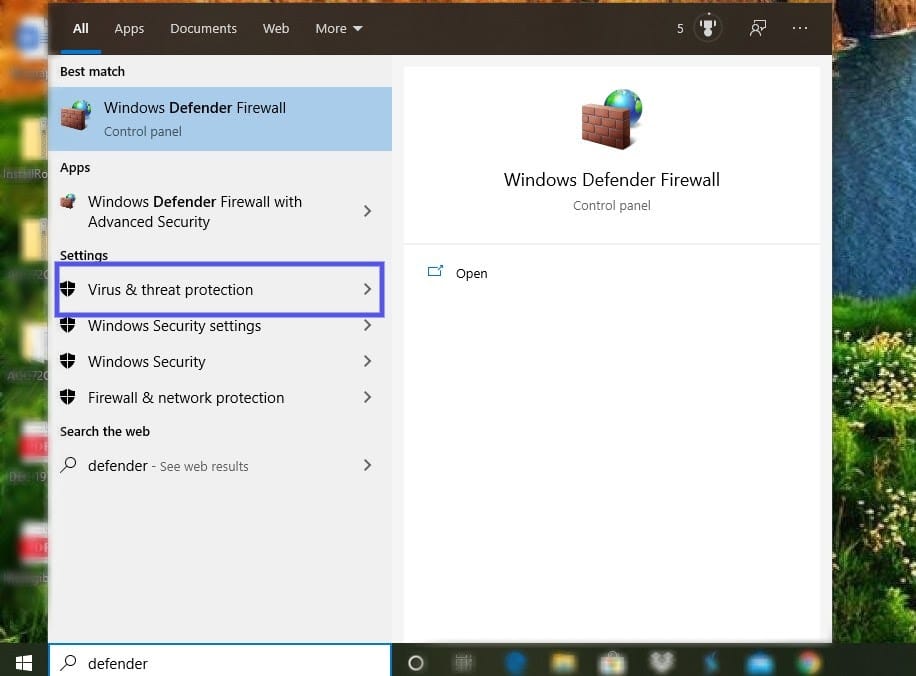
Navigate to Real-time protection, and toggle the switch to Off:
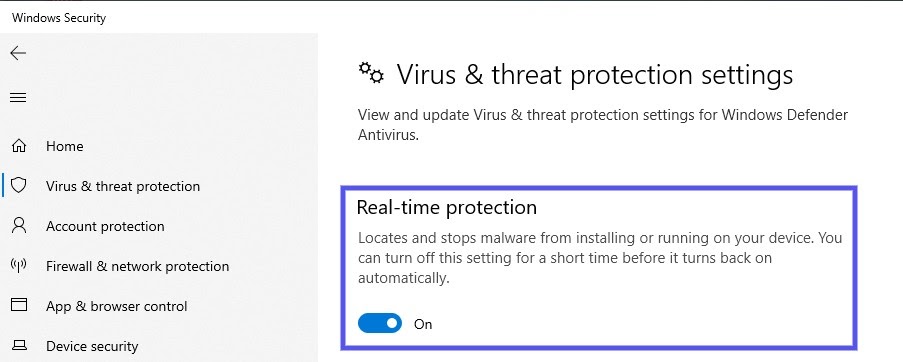
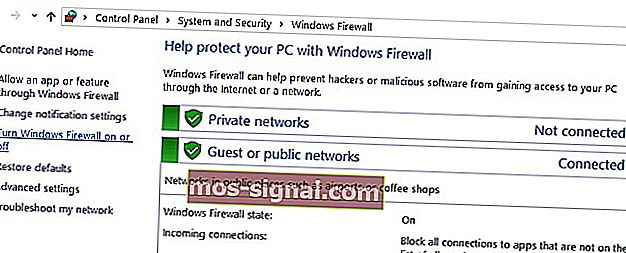
When you’re finished with that, in the left-hand panel, click on Firewall & network protection > Domain network:
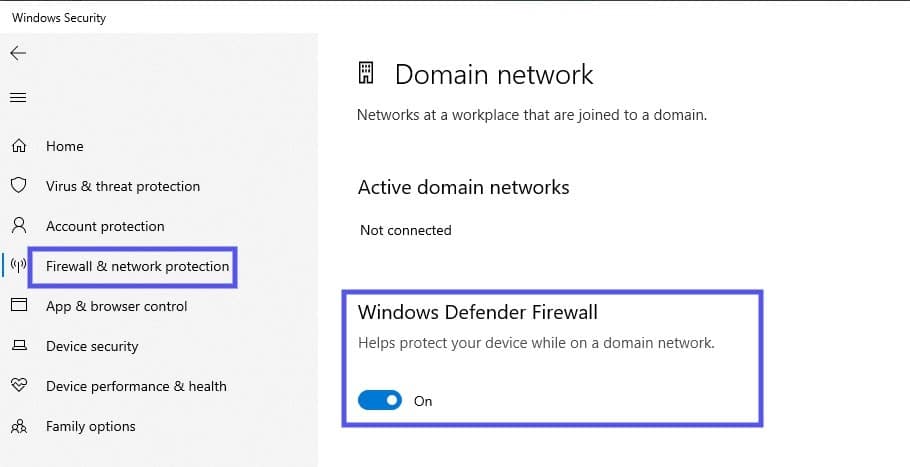
Under Windows Defender Firewall, toggle the switch to disable it. Now try accessing the website again.
Of course, the process for doing this will vary based on what system you’re using, as well as what antivirus and firewall software you have installed. If in doubt, check out the developer documentation for your specific software for more details.
You may also want to disable any WordPress security plugins you’re using, on the off chance that they’re causing an issue while you’re working on your website.
7. Update Your Network Drivers
If you’ve made it to this point on the list, it’s likely because you’re still seeing the DNS_PROBE_FINISHED_BAD_CONFIG error message after trying the above fixes. Fortunately, we have one more solution to try: updating your network drivers.
Outdated or corrupted network drivers can cause a variety of issues, including DNS and network interruptions. Windows Updates typically handle the necessary updates for you. However, you can double-check to see whether you can upgrade to the latest version manually.
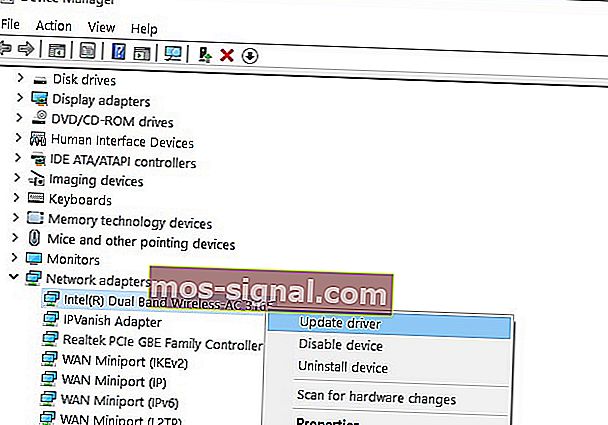
To do so, type “device manager” into the search field of your taskbar, then click on the Device Manager control panel:
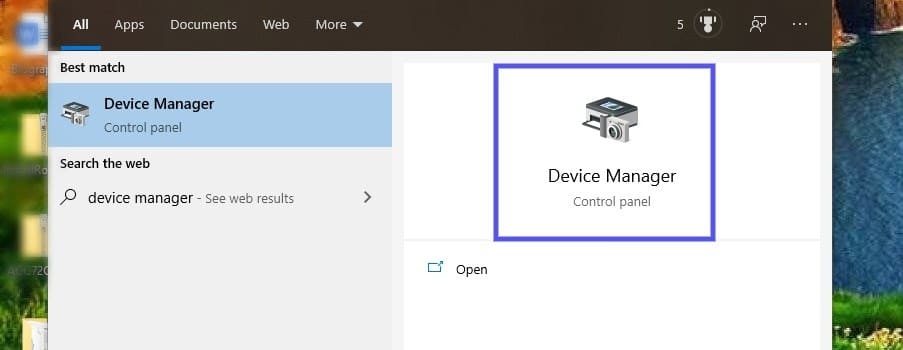
Click on Network adapters, then right-click on the network driver and select Update driver:

Restart your computer, and then try accessing the website again. You should no longer see the DNS_PROBE_FINISHED_BAD_CONFIG message!
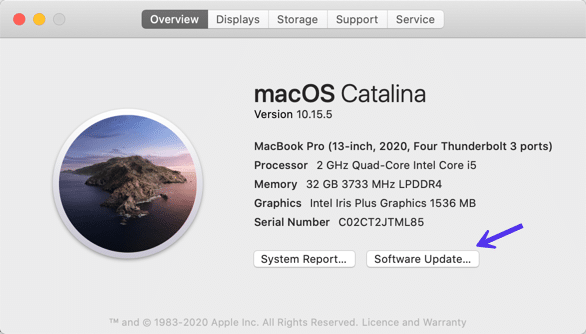
Apple handles system and driver updates as well, so this isn’t something you usually have to worry about on macOS. However, if you want to make sure your system is updated, you can do so by navigating to the Apple menu icon > About this Mac and then clicking on Software Update:
If you’re using Android, you can update your device by going to Settings > About Phone/Tablet/Phone/System > System Updates. The path may look slightly different, depending on the type of device you’re using and your version of Android.
Are you experiencing the DNS_PROBE_FINISHED_BAD_CONFIG error? Well, it means there’s an incorrect DNS configuration preventing access to a web page🚪. Here are 7 ways to fix the issue! ✌️Click to Tweet
Summary
There’s nothing fun about trying to access a website, only to find yourself staring at an error message. While irritating, DNS errors are actually quite common.
Fortunately, they’re also relatively easy to resolve and if you’re dealing with the DNS_PROBE_FINISHED_BAD_CONFIG error, here’s how to fix it:
- Restart your router.
- Clear your browser cache.
- Flush the DNS cache and renew your IP address.
- Manually change the DNS settings.
- Trash temporary files.
- Disable antivirus software and firewalls.
- Update your network drivers.
- Ошибка DNS_PROBE_FINISHED_BAD_CONFIG появляется в браузере Google Chrome, когда ваше интернет-соединение доставляет вам трудности. Первый шаг? Перезагрузите ваш роутер.
- Если простой перезапуск не решил проблему, попробуйте обновить IP-адрес. Вы можете сделать это, используя командную строку и набрав две простые команды. Легко, правда?
- В разделе ошибок подключения к Интернету описаны самые неприятные проблемы вашей системы: отсутствие Интернета.
- Устранить все ошибки не так просто, но в разделе ошибок Windows 10 вы можете узнать, как это сделать, как профессионал.

Ошибка DNS_PROBE_FINISHED_BAD_CONFIG не такая уж редкость, и ее можно увидеть во всех версиях Windows, поэтому неудивительно, что эта ошибка также встречается в Windows 10.
К счастью для вас, эту ошибку довольно легко исправить, и сегодня мы покажем вам, как это сделать.
Ошибка DNS_PROBE_FINISHED_BAD_CONFIG появляется в браузере Google Chrome, когда ваше интернет-соединение вызывает проблемы, и есть несколько простых способов ее исправить.
Содержание:
- Перезагрузите ваш роутер
- Обновить IP-адрес
- Очистить кеш DNS
- Сбросить каталог IP
- Изменить DNS-серверы
- Отключите антивирус
- Установите последние сетевые драйверы
- Отключить блокировщики сайтов
- Проверьте свой браузер
Решение 1. Перезагрузите маршрутизатор.
Это довольно просто, просто нажмите кнопку питания на маршрутизаторе, подождите минуту и снова включите маршрутизатор. Это должно сбросить ваш IP-адрес и решить проблему.
Решение 2. Обновите IP-адрес.
Но если простой перезапуск не решил проблему с ошибкой DNS_PROBE_FINISHED_BAD_CONFIG, вы можете попробовать обновить свой IP-адрес.
И если вы не знаете, как это сделать, просто следуйте этим инструкциям:
- Запустите командную строку, нажав клавишу Windows + R и введя в нее cmd.
- Когда запускается командная строка, введите следующую строку и нажмите Enter, чтобы запустить ее:
- ipconfig / release

- ipconfig / release
- Это освободит ваш IP-адрес.
- Теперь введите эту строку и нажмите Enter, чтобы запустить ее:
- ipconfig / обновить
- ipconfig / обновить
Решение 3. Очистите кеш DNS.
Следующее, что мы собираемся попробовать, это очистить кеш DNS. Для этого следуйте этим инструкциям:
- Откройте командную строку, как мы объясняли в предыдущем решении.
- Когда откроется командная строка, введите эту строку и нажмите Enter, чтобы запустить ее:
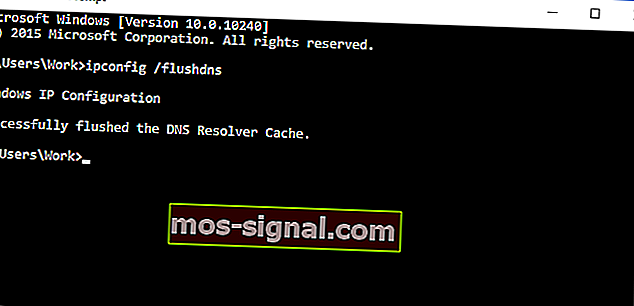
- ipconfig / flushdns
- ipconfig / flushdns
Решение 4. Сбросить каталог IP
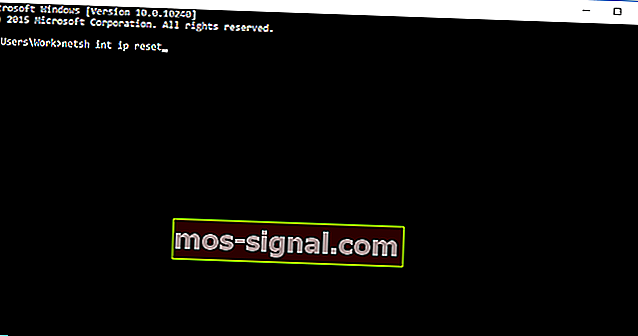
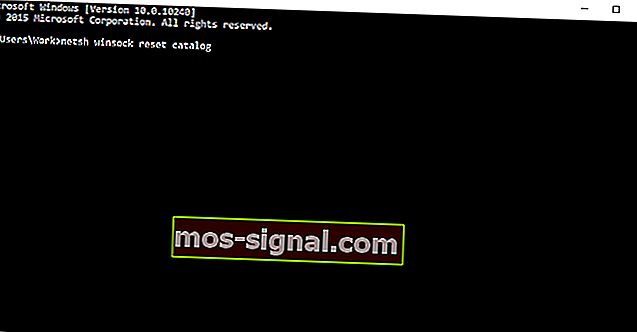
- Откройте командную строку и запустите эту строку:
- netsh int ip сброс
- netsh int ip сброс
- Затем введите эту строку и нажмите Enter, чтобы запустить ее:
- каталог сброса netsh winsock
- каталог сброса netsh winsock
Решение 5.Измените DNS-серверы.
И если ничего из вышеперечисленного не помогло, вы можете попробовать изменить DNS-серверы и посмотреть, решена ли ошибка. Чтобы изменить DNS-серверы, сделайте следующее:
- Нажмите клавишу Windows + R, и когда откроется диалоговое окно «Выполнить», введите ncpa.cpl и нажмите Enter.
- Это должно запустить окно сетевых подключений.
- Найдите свое соединение и щелкните его правой кнопкой мыши. Выберите Свойства.
- Выберите Internet Protocol Version 4 и нажмите Properties.
- В окне свойств Интернет-протокола версии 4 щелкните Использовать следующие адреса DNS-серверов.
- Установите эти значения:
- Предпочтительный DNS-сервер: 8.8.8.8
- Альтернативный DNS-сервер: 8.8.4.4
- Нажмите ОК, чтобы сохранить настройки.
Решение 6. Отключите антивирус.
Если ничего не помогло, попробуйте отключить антивирус. Если вы используете Защитник Windows, выполните следующие действия, чтобы отключить его:
- Перейдите в Пуск, введите defender и щелкните первый результат, чтобы запустить Центр безопасности Защитника Windows.
- Теперь нажмите на настройки защиты от вирусов и угроз.
- Перейдите в Защита в реальном времени и отключите эту опцию.
После того, как вы отключили антивирус, сделайте то же самое с брандмауэром.
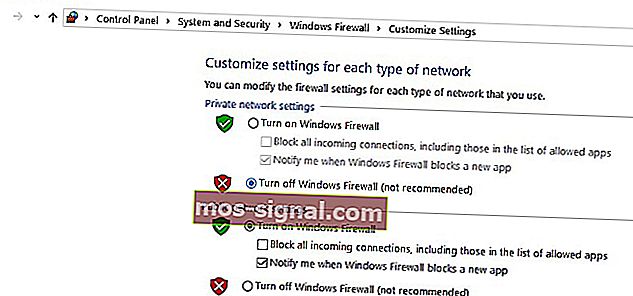
- Перейдите в Пуск> Панель управления> Система и безопасность> Брандмауэр Windows.
- Нажмите на опцию «Включить и выключить брандмауэр Windows».
- Выключите брандмауэр.
После того, как вы отключили антивирус и брандмауэр, проверьте, сохраняется ли ошибка. Не забудьте включить оба решения безопасности после завершения теста.
Решение 7. Установите последние сетевые драйверы.
Если ваши сетевые драйверы устарели или повреждены, это может объяснить, почему вы получаете ошибку DNS_PROBE_FINISHED_BAD_CONFIG.
Перейдите в диспетчер устройств, обновите сетевые драйверы и проверьте, сработало ли это решение для вас.
Решение 8. Отключите программное обеспечение для блокировки веб-сайтов.
Если вы используете блокировщики веб-сайтов, временно отключите эти инструменты, чтобы проверить, решит ли это решение проблему.
Некоторые пользователи подтвердили, что ошибка исчезла после отключения блокировщиков веб-сайтов. Протестируйте это решение, чтобы увидеть, работает ли оно и для вас.
Решение 9. Проверьте свой браузер и удалите временные файлы, кеш и файлы cookie.
И, наконец, последнее решение в нашем списке: убедитесь, что ваш браузер на самом деле не является причиной ошибки. Удалите файлы cookie, временные файлы и кеш и проверьте, помогает ли это.
Для получения дополнительной информации о дальнейших действиях перейдите на официальную страницу поддержки вашего браузера.
Вот и все, я надеюсь, что хотя бы одно из этих пяти решений помогло вам решить проблему с ошибкой DNS_PROBE_FINISHED_BAD_CONFIG в Windows 10.
Если у вас есть какие-либо комментарии или вопросы, просто перейдите в раздел комментариев ниже.
Часто задаваемые вопросы: подробнее об ошибках DNS
- Что вызывает Dns_probe_finished_bad_config?
DNS_PROBE_FINISHED_BAD_CONFIG обычно возникает из-за проблемы с DNS-сервером. Если DNS-сервер недоступен, устраните проблему с помощью нашего профессионального руководства.
- Как исправить ошибку DNS_PROBE_FINISHED_BAD_CONFIG?
Перезагрузите маршрутизатор и обновите свой IP-адрес. Если это не сработает, следуйте нашему руководству экспертов, чтобы исправить эту ошибку.
- Что вызывает ошибку DNS?
Ошибки DNS возникают из-за того, что вы не можете подключиться к IP-адресу, и ошибка означает, что вы могли потерять доступ к сети или Интернету. Вот как исправить проблемы с доступом в Интернет.
Примечание редактора: этот пост был первоначально опубликован в феврале 2018 года и с тех пор был переработан и обновлен в марте 2020 года для обеспечения свежести, точности и полноты.
DNS_PROBE_FINISHED_BAD_CONFIG is a common network connection error faced by any user while opening any website on any browser.
This DNS error points out faulty DNS configurations of the system that prevents it from connecting to any internet. It is this error that we are going to analyze for you and also give the best solutions to fix it.

Why Does the DNS_PROBE_FINISHED_BAD_CONFIG Appear on Your Screen?
Let us make you aware of certain factors that can cause this DNS_PROBE_FINISHED_BAD_CONFIG error in your PC:
- A DNS can be defined as a particular IP address the network assigns to the PC. The failure of the network in translating this IP address because of any faulty configuration causes the DNS error while you try to open any webpage.
- Any third-party unauthorized application might be trying to meddle with your network settings associated with the router.
- The network settings of the system might have been changed by you unknowingly.
- Any browser plug-in might have hijacked your system’s IP address or DNS address. VPN apps can be one example of changing the location, hiding your identity, and causing DNS errors.
PS: here are the top solutions for the errors like ERR_ADDRESS_UNREACHABLE on Google Chrome for your reference.
Does the Error Happen in Any Specific Browser?
The dns_probe_finished_bad_config error does not happen on any particular website; thus, you can expect it to occur while opening any website.
Also, any specific browser doesn’t suffer from it. This error happens over Chrome, Safari, Firefox, Opera, etc.
The main basis of the error is the network, and any problem will become the causal factor. This also means that you might face the issue while opening any website on any internet browser. Remember that the same network is accessed while opening any website or browser.
You might think about why the error happens most frequently with Chrome users. Well, it is because the Google Chrome browser is the most used one by people worldwide, which will give the highest number of issues and complaints related to Chrome only.
The DNS_PROBE_FINISHED_BAD_CONFIG error has also been reported by several Android users, which was mainly the result of faulty router configurations.
Also, click to figure out the best VPN – Speedify Review.
What Can Fix the DNS_PROBE_FINISHED_BAD_CONFIG Error?
The occurrence of this error disables the users from running a lot of system functions and primarily from accessing any website. You might have tried changing the browser that you have been using and yet not been able to remove the DNS error.
If you cannot see any way of getting out of this situation, let us help you with that, as we provide some of the best solutions here in this section of the article.
By the way, for people experiencing the Windows 0xc1900101 error, here are the top solutions for you.
Try Restarting the Router
This can be the primary method to try as it is simple and may remove the error if minor faults are causing it.
Deciding to restart the router will help you eliminate the error in all devices, be it Windows PC, macOS, or an Android Smartphone.
All it takes to restart the router is turning off the power button. Wait for some time, and then you can turn it on.
Once done, you must restart the PC or any other device.
After doing the same process with both devices, establish the network connection again, either with the WiFi provider or the LAN cable.
The method should have successfully troubleshot the device for any problem. You can try opening any website, and the access will be free of issues this time.
However, if the method fails to work out for you, the issue is something else, and move ahead with the other fixes.
Empty the Browser Cache
A full cache with corrupted and old files can become the major cause behind the dns_probe_finished_bad_config error.
A good solution to try in such a situation is to clear the cache of the browser you are using and disable the cookies.
Whether you use any browser like Google Chrome or Firefox, it is a simple method.
Follow the general steps given below to perform the method for any browser:
- Open the particular browser that you have.
- Go to Settings of the browser.
- Navigate and search for the option Browsing data, browser History, or other similar things.
- The option for Opera, Firefox, and Chrome browser would be Browsing data.
- Open it, and you can delete all the cookies and cache data here.
- Tick mark the box against the option related to cookies and hosted application data. Select a time range as well.

Most cases involving the DNS error bugging them have been proven to get solved by this method. In case it doesn’t, follow some other solution.
Delete the Temporary Files
A feature of most browsers allows the storage of some kinds of temporary files that are there to facilitate quick access later and also enhance the browsing experience of the user.
Now, these files can become the potential culprit behind the DNS error if they go corrupt for any reason.
In the Windows OS, these temporary files can be found in a directory named ‘Temp.’ You can gain access to it if you follow the simple steps that we give below.
- Press the keys Windows + R together.
- You can also launch the Run dialogue box by going into the Start menu of Windows and then opening the All Programs option.
- When the Run box emerges up, enter the command %temp%.
- Click Enter now.
- Now you can view all the temporary files that are stored on the PC that you are using.

The macOS has such files stored at a different location, and to find that out; you can follow these steps:
- Press the keys G + CMD + Shift at the same time.
- This will launch a dialogue box.
- Enter the command ~/Library/Caches into the text space.
- All this, when done successfully, will enable you to view the temporary files that were taking up space on your Mac PC.

Now what you need to do after finding all the temporary files stored on the specific PC you are a user of is select all of them and delete them.
Once upon getting rid of all these files, you can expect the resolution of the dns_probe_finished_bad_config problem.
Reset Your Chrome Browser
This step is only meant for users of the Google Chrome browser. If you are a user of other browsers like Opera or Firefox, then you may need to contact their specific support centers, as they will be able to tell you the method for resetting those browsers.
Performing a browser reset changes its settings, which may prove helpful in removing the error. Let us tell you how to do it:
- Launch the browser.
- Open Settings.
- Find and open the option of Show Advanced Settings.
- Click on it and expand its menu.
- You will see an option of Reset Settings over here present at the bottom.
- Click on it, and this will reset the browser.

Refresh the DNS and Change the IP Address
This may be the last option that you will have to resort to, but it can fix every related issue to the DNS since we are adopting a complete cleanout approach with this method.
You can flush out the DNS first to proceed with the method. This method will reset the DNS and performs an overall fixing of the configuration of the DNS.
Follow the steps below to do so:
- Press the keys Windows + R together to launch the Run dialogue box.
- You can do the same by opening the Start menu and clicking the All Programs option.
- Into the box, enter the command cmd. Click Enter to open the Prompt Command.

- Now we have to enter certain commands one by one.
- Enter ipconfig /flushdns. Hit OK.

- Enter ipconfig /renew. Hit OK.

- Enter ipconfig /release. Hit OK.

- Enter ipconfig /all. Hit OK.
- Lastly, restart the PC.
Open the browser on it and try opening the websites again. See if the DNS error is resolved.
Method for Fixing the DNS_PROBE_FINISHED_BAD_CONFIG Error in Windows 7/8/10
By default, the computer systems are configured to run using the DNS associated with your modem or router.
The Internet provider sets this DNS unless you manually change it.
We suggest you use the Public DNS servers as they give better functioning and remain mostly active with an uptime of around 99%.
If all this sounds too techie, don’t worry; just follow the steps we give you.
For manually find the corrupt files and deleting them, follow the given steps below:
- Press the keys Windows + R together.
- In the Run dialogue box that launches up, enter the command cmd. Hit OK.
- A black Command Prompt will open up now. Enter the command given below. Hit Enter.
ipconfig /flushdns

The DNS cache will be removed, which becomes the potential reason for DNS malfunctioning.
It happens due to the system basing upon the old local cache for taking you to open the websites that you want to view.
- Press the keys Windows + R.
- Enter the command ncpa.cpl. Hit OK.

- The window of network connections will open up now.
- You have to modify the DNS settings here to update them.
- Find the network adapter that is connected to the system. Hit a right-click over it. Select Properties.

- Inside this Properties windows pane, select the option of Internet Protocol Version 4 (TCP/IPv4). Make sure that the option gets highlighted and turns grey. Open the Properties again.

- Tick mark the box against the option ‘Use the following DNS server addresses.’ Now enter the given options for the Preferred DNS Server and the Alternate DNS Server, respectively.
8.8.8.8
8.8.4.4

- Hit the button, OK. Close all the windows.
- If the dns_probe_finished_bad_config error persists and you fail to use the internet, try some other DNS addresses we give and see if the problem gets resolved.
Preferred DNS: 208.67.222.222
Alternate DNS: 208.67.220.220

If you think a third-party tool can do all of this better for you, then you can take help from the software Reimage Plus, which aims to scan and find corrupt files and help you delete them easily.
FAQs
Q1: What is DNS_PROBE_FINISHED_BAD_CONFIG?
A1: It’s an error that occurs when your browser can’t establish a connection with a website’s server, usually due to issues with DNS settings or the internet connection.
Q2: What causes DNS_PROBE_FINISHED_BAD_CONFIG?
A2: This error can be caused by problems with your DNS settings, internet connection, network configuration, firewall settings, or even your ISP.
Q3: How does DNS_PROBE_FINISHED_BAD_CONFIG affect my internet usage?
A3: When this error occurs, it prevents you from accessing certain websites, acting as a roadblock in your internet journey.
Q4: How can I resolve DNS_PROBE_FINISHED_BAD_CONFIG?
A4: Several solutions can be employed, including restarting your device, clearing your DNS cache, changing your DNS server, resetting your router, checking your firewall and antivirus software, or contacting your ISP.
Q5: What if none of the solutions work?
A5: If you’ve tried all the suggested solutions and the issue persists, it’s best to contact your ISP. They may have more information or specific solutions to help you.
Conclusion
This was all about the dns_probe_finished_bad_config error, why it occurs, and what can be done to fix it.
We hope our efforts will prove helpful to you and that the methods are the best so you won’t need to go and look for solutions anywhere else.
This website uses cookies to ensure you get the best experience on our website