Loading


-
#2
Эта ветка для вопросов по данному проекту.
Ваши готовые реализации данного проекта с фоточками и видео выкладываем в основную ветку
-
#3
Проблема после переподключения устройства.
Если отключить питание у ардуино и подключить снова, то на телефоне появляется «Error 516: Unable to write: Broken pipe». Отправить на матрицу ничего не получается. Нужно переподключать приложение.
-
#4
Алекс большое спасибо проект просто супер!!!
У меня есть предложение для улучшения аппликации для более безопасной езды — добавить часто используемые фразы ( Привет, пока, спасибо, дай залезть,…)
-
#5
А еще, было бы круто, выводить текст не только голосом, но и по ссылкам, скажем, текущий курс нефти.Было бы круто.

-
#7
Касательно данного проекта и последующих где используется 3д печать. Было бы прекрасно если бы выкладывались не только STL файлы, но и STP. Их гораздо проще импортировать в большинство CAD программ для редактирования.
И, кстати, файлы решеток кривые. Размер решеток 5.5х9мм.
-
#8
Я как понял адресная лента на 60 led применяется
-
#9
Здравствуйте! Подскажите пожалуйста почему я не могу подконнектиться к GyverString? У меня Bluetooth UART модуль на чипе сс2541. Уже и скорость bps меняла и делитель напряжения делала и EN к GND подтягивала. К телефону Bluetooth коннектиться а к проге ни как
-
#10
Проблема решилась тем, что сс2541 не для андроид, а для айфон. Может кому полезно будет!)
-
#11
Мне кажется или с готовыми матрицами на MAX7219 скетч нерабочий?
Точнее так, он работает прекрасно с одной матрицей из 4-х сегментов, попробовал собрать из большего кол-ва, получается фигня. К примеру, собрал из 2-х 4-сегментных модулей, в скетче GyverStringDotmatrix указываю MATR_NUM 8, в результате строка бежит одновременно по двум спаянным модулям, причем от крайнего сегмента каждого модуля строка бежит по трем, по четвертому сегменту бежать не хочет и снова пробегает по третьему, как по последнему. Т.е. по третьему сегменту в обоих модулях пробегает дважды.
Если что-то непонятно, могу записать видео.
И пробовал с 4-мя модулями, указав 16 сегментов в MATR_NUM, так там вся строка пробегает в 3-м сегменте каждого из 4-х модулей.
-
#12
Мне кажется или с готовыми матрицами на MAX7219 скетч нерабочий?
Точнее так, он работает прекрасно с одной матрицей из 4-х сегментов, попробовал собрать из большего кол-ва, получается фигня. К примеру, собрал из 2-х 4-сегментных модулей, в скетче GyverStringDotmatrix указываю MATR_NUM 8, в результате строка бежит одновременно по двум спаянным модулям, причем от крайнего сегмента каждого модуля строка бежит по трем, по четвертому сегменту бежать не хочет и снова пробегает по третьему, как по последнему. Т.е. по третьему сегменту в обоих модулях пробегает дважды.
Если что-то непонятно, могу записать видео.
И пробовал с 4-мя модулями, указав 16 сегментов в MATR_NUM, так там вся строка пробегает в 3-м сегменте каждого из 4-х модулей.
Уже разобрался, в скетче GyverStringDotmatrix.ino, переменную MATR_NUM нужно затолкать сюда
Max72xxPanel matrix = Max72xxPanel(10, MATR_NUM, 1);
-
#13
кто собирал GyverStringDotmatrix на 7219? У меня не работает. Не реагирует на команды по BT. Если сюда String runningText = «» ввести текст то он бежит по круг , но на команды блютуз не реагирует.
-
#14
Поменьше агрессии!
Тут только вопросы? Ответы, в лучшем случае, сам себе?
Я недоперепонял с 2-мя вариантами спайки ленты, с их +ми и -ми. Нельзя, разве, питание припаять параллельно (как во 2-м варианте) а дату последовательно (как в первом)?
-
#15
Разобрался в причине, причина в модуле блютуз. Мой модуль работает на скорость 38400 бод, ставим в исходнике 38400 вместо 9600 . С регулировкой проблемы если яркость ещё так сяк то вот со скоростью вообще беда.
Изменено: 13 Сен 2019
-
#16
может кому пригодится
Для нормально регулировки скорости для dotmatrix в исходнике софта для андройд нужно установить значения от 15 до 250, тогда скорость регулируется нормально. с яркостью еще не разобрался.
В програмировании не силен я больше по железу, обгрыз программу Гайвера для dot string с нормальным управлением скорости. https://yadi.sk/d/lEBzwECKpAK47Q
Test.apk — Яндекс.Диск
Если кому интересно победил регулировку яркости, в скетче ставим matrix.setIntensity(10) , начальная яркость, в софте для ардуино вторую полоску прокрутки ставим значения от 0 до 15. Все работает отлично.
Изменено: 14 Сен 2019
-
#17
Здравствуйте. По паспорту лента 60 д/м потребляет 18 Вт/м. В проекте 8*32, а это около 77 Вт. Достаточно ли такого блока питания 5В 2А и за счёт чего достигается такая маленькая потребляемая мощность в проекте? Светодиоды зажигаются ни все вместе (какое время свечения диода)? И какой ток на максимальной яркости ленты для режима радуга? Заранее спасибо
-
#18
может кому пригодится
Для нормально регулировки скорости для dotmatrix в исходнике софта для андройд нужно установить значения от 15 до 250, тогда скорость регулируется нормально. с яркостью еще не разобрался.
В програмировании не силен я больше по железу, обгрыз программу Гайвера для dot string с нормальным управлением скорости. https://yadi.sk/d/lEBzwECKpAK47Q
Test.apk — Яндекс.ДискЕсли кому интересно победил регулировку яркости, в скетче ставим matrix.setIntensity(10) , начальная яркость, в софте для ардуино вторую полоску прокрутки ставим значения от 0 до 15. Все работает отлично.
Здравствуйте! А нельзя ли не «обгрызенную» версию, но с нормальной регулировкой скорости? «Огрызок» работает отлично, но не хватает голосового ввода.
С яркостью по Вашему совету всё прекрасно! Спасибо!
-
#19
Здравствуйте! А нельзя ли не «обгрызенную» версию, но с нормальной регулировкой скорости? «Огрызок» работает отлично, но не хватает голосового ввода.
С яркостью по Вашему совету всё прекрасно! Спасибо!
Здравствуйте. Поддерживаю,голосового ввода не хватает!)
-
#20
может кому пригодится
Для нормально регулировки скорости для dotmatrix в исходнике софта для андройд нужно установить значения от 15 до 250, тогда скорость регулируется нормально. с яркостью еще не разобрался.
В програмировании не силен я больше по железу, обгрыз программу Гайвера для dot string с нормальным управлением скорости. https://yadi.sk/d/lEBzwECKpAK47Q
Test.apk — Яндекс.ДискЕсли кому интересно победил регулировку яркости, в скетче ставим matrix.setIntensity(10) , начальная яркость, в софте для ардуино вторую полоску прокрутки ставим значения от 0 до 15. Все работает отлично.
Спасибо за бегущую строку! Я в этом деле вообще «никакой» , т.е. даже не видел Ардуинку, но по инструкции все купил, соединил, закачал — и все работает. Но присоединяюсь — как нормально менять скорость и яркость. Т.е —
«…для dotmatrix в исходнике софта для андройд нужно установить значения от 15 до 250» — как это сделать (куда тыкать и что делать)?
«… победил регулировку яркости, в скетче ставим matrix.setIntensity(10) , начальная яркость, в софте для ардуино вторую полоску прокрутки ставим значения от 0 до 15. » — опять же что и куда… Извините , что задаю такие вопрос — не умею, но очень хочется..
Изменено: 26 Сен 2019
-
#21
А меня матрица 7219 горит постоянным цветом и не реагирует на команды, блютуз подключился, прошивка встала нормально
В чем может быть проблема?
Попробовал другие прошивки из интернета, текст выводится
-

159.4 KB
Просмотры: 38

Изменено: 29 Сен 2019
-
#22
По просьбам
Здравствуйте! А нельзя ли не «обгрызенную» версию, но с нормальной регулировкой скорости? «Огрызок» работает отлично, но не хватает голосового ввода.
С яркостью по Вашему совету всё прекрасно! Спасибо!
полная версия с нормальными регулировками для DotString https://yadi.sk/d/de2vXs2HxaDuvg ? вроде все правильно сделал возможности проверить нет, т.к. строки у меня больше нет ушла в такси.
-
#23
А меня матрица 7219 горит постоянным цветом и не реагирует на команды, блютуз подключился, прошивка встала нормально
В чем может быть проблема?
Попробовал другие прошивки из интернета, текст выводится
скорее всего неправильно подключена матрица внимательно читайте обозначения у меня отличалась от матрицы гайвера два вывода были поменяны местами, а если не реагирует на блютуз проверте скорость на которой он работает у меня оказался 38400 вместо 9600
-
#24
По просьбам
полная версия с нормальными регулировками для DotString https://yadi.sk/d/de2vXs2HxaDuvg ? вроде все правильно сделал возможности проверить нет, т.к. строки у меня больше нет ушла в такси.
Работает отлично! Спасибо огроменное!
-
#25
Всем привет.
Появилась большая нужда в такой штуке.
Что пришлось сделать:
1. Заказать Ардуино + БТ (по две штуки, прозапас )
2. Купил паяльник
3. Заказал светодиодную ленту 5м по 60 диодов (4шт итого 20м)
Далее, задумываюсь как грамотнее сделать.
Длину строки в 1м или 1.5м , кто что подскажет?
Какой блок питания взять, чтобы не было проблем ?
Изменено: 6 Окт 2019
Hey again, so I’m still building a bluetooth controlled turret gun, which shoots nerf darts, and I’m having problems with the bluetooth module.
I’m building the gun based on This Project (im on mobile and can’t post any pictures so all the schematics are on the website if you want to look at them).
The problem is that the bluetooth module doesn’t turn on. But when I remove the resistances the module works. But when I try to give any orders through the BT module it says «error 516: unable to write: broken pipe».
People online say I need a divider. The original maker of the project says the resistances i removed are the dividers i need for it to function… Idk how to continue from here.
Can you help me further here?
Although I use a HC-06 in the below examples the HC-05 in slave mode can also be used.
Using MITs app inventor it is fairly easy to create an app that can turn a LED on and off from an Android device.
This is a fairly simply example of sending commands to the Arduino to turn a LED either on or off. The Android app sends ascii codes to the Arduino via the HC-06 BT module; “ON” for on and “OF” for off.
Load the app, connect to the HC-06 and then use the LED button to turn the LED on and off.
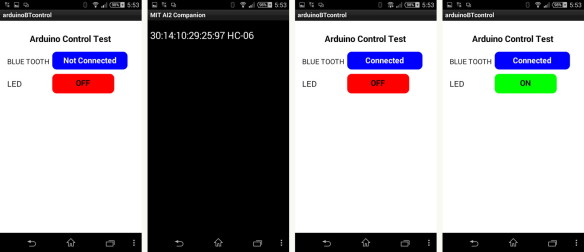
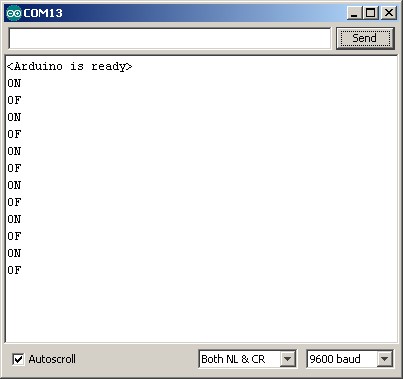
You can also open the serial monitor to see the commands as they are received
The steps involved are:
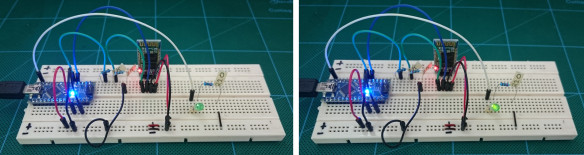
1. create a circuit that includes a Bluetooth module and a LED
2. create an Arduino sketch that can receive commands from the HC-06 and turn a LED on and off
3. create an Android app that sends commands over Bluetooth
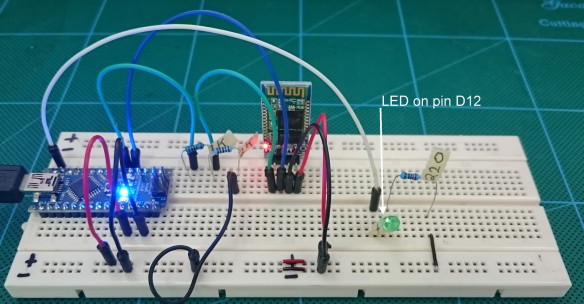
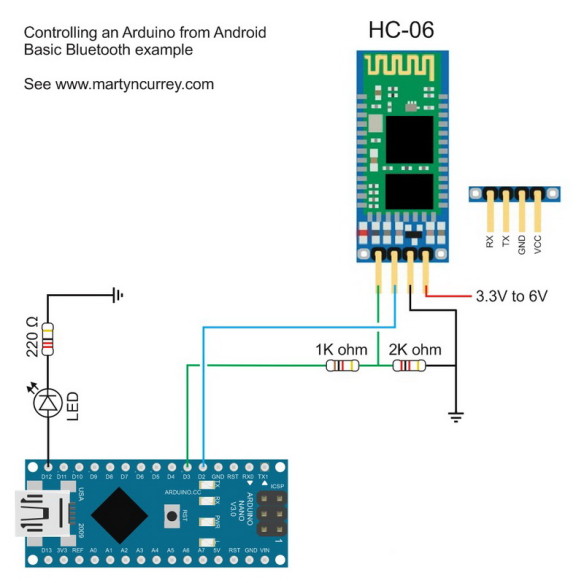
The circuit
The circuit is the same as the one used in Arduino and HC-06 (ZS-040) except the addition of a LED + resistor connected to pin D12. I used a 220 ohm resistor because that is what I had to hand but similar values will be OK.
Based on ohm’s law; using a source of 5V, a green LED with a forward voltage drop of 2.2v and a forward current of 20mA a 150 ohm resistor is recommended. So any value from 180ohm to around 680 ohms will be OK.
Arduino Sketch
The sketch receives data from the Bluetooth module via software serial. It then checks the data for “ON” and “OF” commands. When “ON” is received the LED is turned on and when “OF” is received the LED is turned off.
To ensure that data is received correctly the data is surrounded by start and end markers. This example uses “<» and «>“. I use the function recvWithStartEndMarkers which was posted on the Arduino forum by Robin2. I simply copied the function and did not need to change it.
The recvWithStartEndMarkers() function takes at the data received from the serial connection and copies anything it finds between the start and end markers to the receivedChars variable. When it has found something it sets the newData variable to true.
In the main loop we keep calling the recvWithStartEndMarkers() function until newData has been set. When newData is True we know we have a new command so we call parseData() to deal with it. Inside parseData() we reset newData to false and the process continues.
void loop()
{
     if (BTserial.available() > 0)     {  recvWithStartEndMarkers(); }
     if (newData) { parseData(); }
}
The full sketch:
// Bluetooth sketch HC-06_02
// Turn a LED on and off from an Android app
// App can be downloaded from www.martyncurrey.com
//
// Pins
// 2 Software serial - RX
// 3 Software serial - TX
// 12 LED

boolean debug = true;

#include <SoftwareSerial.h>
SoftwareSerial BTserial(2,3); // RX | TX
// Connect the HC-06 TX to the Arduino RX.
// Connect the HC-06 RX to the Arduino TX through a voltage divider.

// max length of command is 20 chrs
const byte numChars = 20;
char receivedChars[numChars];
boolean newData = false;

byte LEDpin = 12;


void setup()
{
     pinMode(LEDpin, OUTPUT);
     Serial.begin(9600);
     Serial.println("<Arduino is ready>");

     // The default baud rate for the HC-06s I have is 9600. Other modules may have a different speed. 38400 is common.
     BTserial.begin(9600);
}

void loop()
{
     if (BTserial.available() > 0)     {  recvWithStartEndMarkers(); }
     if (newData) { parseData(); }
}


void parseData()
{
        newData = false;
        if (debug) {  Serial.println( receivedChars ); }
        if (receivedChars[0] == 'O'  && receivedChars[1] == 'N' )  { digitalWrite(LEDpin,HIGH);  }
        if (receivedChars[0] == 'O'  && receivedChars[1] == 'F' )  { digitalWrite(LEDpin,LOW);   }
}


void recvWithStartEndMarkers()
{

     // function recvWithStartEndMarkers by Robin2 of the Arduino forums
     // See  http://forum.arduino.cc/index.php?topic=288234.0

     static boolean recvInProgress = false;
     static byte ndx = 0;
     char startMarker = '<';
     char endMarker = '>';
     char rc;

     if (BTserial.available() > 0)
     {
          rc = BTserial.read();
          if (recvInProgress == true)
          {
               if (rc != endMarker)
               {
                    receivedChars[ndx] = rc;
                    ndx++;
                    if (ndx >= numChars) { ndx = numChars - 1; }
               }
               else
               {
                     receivedChars[ndx] = ''; // terminate the string
                     recvInProgress = false;
                     ndx = 0;
                     newData = true;
               }
          }

          else if (rc == startMarker) { recvInProgress = true; }
     }
}
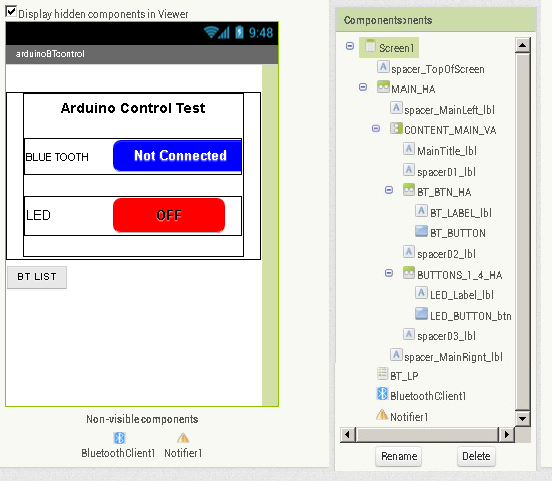
Android App
I created the Android app in MITs app inventor. This was fairly easy once I had figured out how to use Bluetooth.
The app is very basic, it simply sends commands. There are no checks to see if the Arduino has actually received the commands or not. The screen is also very simple; it has a button for connecting to Bluetooth and a on/off button to control the LED. The app uses a ListPicker to store the available Bluetooth devices which is not displayed on screen. It is initiated from the connect button.
The app has 4 blocks and a list:
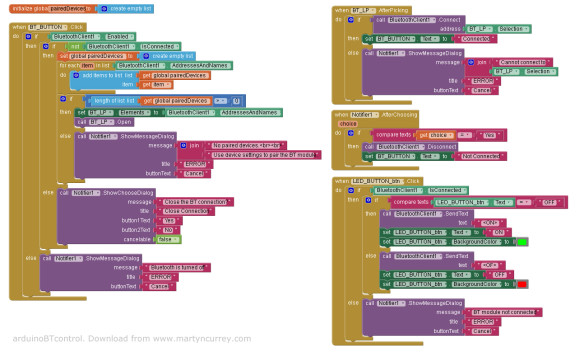
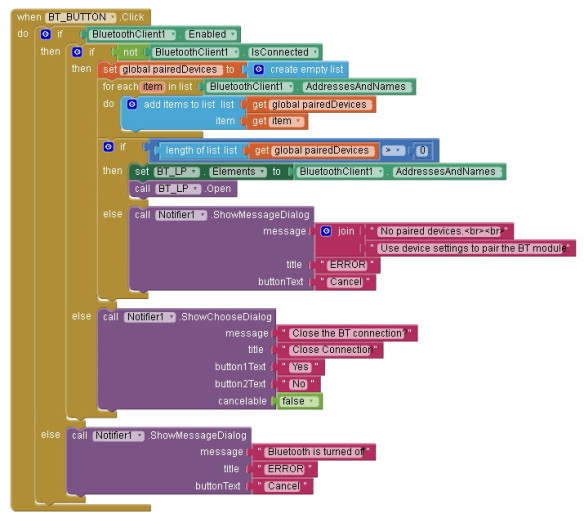
Block 1
This handles the connect button. When the button is clicked the block/function first checks to see if Bluetooth is enabled and then checks to see if there is already a Bluetooth connection. If Bluetooth is not turned on an error message is displayed. If there is already an active connection the user is asked if they would like to close it. The user reply is handled in Block3, Notifier1.AfterChoosing
If Bluetooth is on and there isn’t a current connection the paired Bluetooth devices are copied to the Bluetooth pairedDevices List. If the list has at least 1 item the contents of the list are copied to the ListPicker. The ListPicker is then activated to allow the user to select a Bluetooth device. I use the pairedDevices list so that I can count the number paired devices. I could not find a way of doing this when using just a ListPicker. If the list is empty an error message is displayed saying there are no paired devices.
Block 2
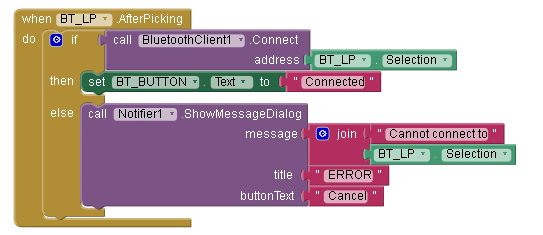
Block 2, BT_LP.AfterPicking handles the List Picker after the user has selected one of the paired Bluetooth devices. It takes the selected item and tries to connect. If successful the text on the Bluetooth button is changed to “Connected”. If a connection cannot be established an error message is displayed.
Once a connection is established the app waits for the LED button to be pressed.
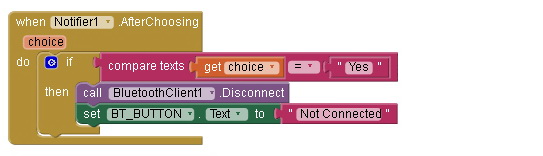
Block 3
Block 3 handles a Notifier dialogue that asks the user if they wish to close the connection
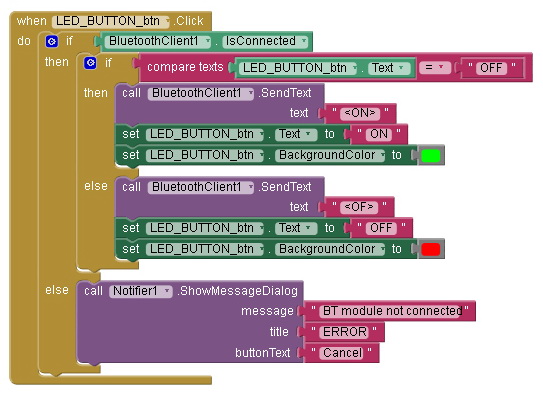
Block 4
Block 4, LED_BUTTON_btn.Click, handles the LED button. By checking the button text we can determine what command to send. If the text says “ON” then the LED is on and we need to turn it off so we send an “OF” command. If the text says “OFF”, the LED is off so we send an “ON” command to turn it on. The actual commands are “<ON>” and “<OF>”. The button text and background colour are updated to reflect the new LED status.
An error message is displayed if the LED button is clicked and there is no active connection.
Download
Download the zip file containing the Arduino sketch, the ardiunoBTcontrol app and the appinventor aia file.
In part 2 we add 2-way communication and the facility to control the LED from the Arduino as well as the app.
Related:
Add an auto-connect function to an App Inventor app. https://www.martyncurrey.com/android-mit-app-inventor-auto-connect-to-bluetooth/
-
#2
Эта ветка для вопросов по данному проекту.
Ваши готовые реализации данного проекта с фоточками и видео выкладываем в основную ветку
-
#3
Проблема после переподключения устройства.
Если отключить питание у ардуино и подключить снова, то на телефоне появляется «Error 516: Unable to write: Broken pipe». Отправить на матрицу ничего не получается. Нужно переподключать приложение.
-
#4
Алекс большое спасибо проект просто супер!!!
У меня есть предложение для улучшения аппликации для более безопасной езды — добавить часто используемые фразы ( Привет, пока, спасибо, дай залезть,…)
-
#5
А еще, было бы круто, выводить текст не только голосом, но и по ссылкам, скажем, текущий курс нефти.Было бы круто.
-
#7
Касательно данного проекта и последующих где используется 3д печать. Было бы прекрасно если бы выкладывались не только STL файлы, но и STP. Их гораздо проще импортировать в большинство CAD программ для редактирования.
И, кстати, файлы решеток кривые. Размер решеток 5.5х9мм.
-
#8
Я как понял адресная лента на 60 led применяется
-
#9
Здравствуйте! Подскажите пожалуйста почему я не могу подконнектиться к GyverString? У меня Bluetooth UART модуль на чипе сс2541. Уже и скорость bps меняла и делитель напряжения делала и EN к GND подтягивала. К телефону Bluetooth коннектиться а к проге ни как
-
#10
Проблема решилась тем, что сс2541 не для андроид, а для айфон. Может кому полезно будет!)
-
#11
Мне кажется или с готовыми матрицами на MAX7219 скетч нерабочий?
Точнее так, он работает прекрасно с одной матрицей из 4-х сегментов, попробовал собрать из большего кол-ва, получается фигня. К примеру, собрал из 2-х 4-сегментных модулей, в скетче GyverStringDotmatrix указываю MATR_NUM 8, в результате строка бежит одновременно по двум спаянным модулям, причем от крайнего сегмента каждого модуля строка бежит по трем, по четвертому сегменту бежать не хочет и снова пробегает по третьему, как по последнему. Т.е. по третьему сегменту в обоих модулях пробегает дважды.
Если что-то непонятно, могу записать видео.
И пробовал с 4-мя модулями, указав 16 сегментов в MATR_NUM, так там вся строка пробегает в 3-м сегменте каждого из 4-х модулей.
-
#12
Мне кажется или с готовыми матрицами на MAX7219 скетч нерабочий?
Точнее так, он работает прекрасно с одной матрицей из 4-х сегментов, попробовал собрать из большего кол-ва, получается фигня. К примеру, собрал из 2-х 4-сегментных модулей, в скетче GyverStringDotmatrix указываю MATR_NUM 8, в результате строка бежит одновременно по двум спаянным модулям, причем от крайнего сегмента каждого модуля строка бежит по трем, по четвертому сегменту бежать не хочет и снова пробегает по третьему, как по последнему. Т.е. по третьему сегменту в обоих модулях пробегает дважды.
Если что-то непонятно, могу записать видео.
И пробовал с 4-мя модулями, указав 16 сегментов в MATR_NUM, так там вся строка пробегает в 3-м сегменте каждого из 4-х модулей.
Уже разобрался, в скетче GyverStringDotmatrix.ino, переменную MATR_NUM нужно затолкать сюда
Max72xxPanel matrix = Max72xxPanel(10, MATR_NUM, 1);-
#13
кто собирал GyverStringDotmatrix на 7219? У меня не работает. Не реагирует на команды по BT. Если сюда String runningText = «» ввести текст то он бежит по круг , но на команды блютуз не реагирует.
-
#14
Поменьше агрессии!
Тут только вопросы? Ответы, в лучшем случае, сам себе?
Я недоперепонял с 2-мя вариантами спайки ленты, с их +ми и -ми. Нельзя, разве, питание припаять параллельно (как во 2-м варианте) а дату последовательно (как в первом)?
-
#15
Разобрался в причине, причина в модуле блютуз. Мой модуль работает на скорость 38400 бод, ставим в исходнике 38400 вместо 9600 . С регулировкой проблемы если яркость ещё так сяк то вот со скоростью вообще беда.
Изменено: 13 Сен 2019
-
#16
может кому пригодится
Для нормально регулировки скорости для dotmatrix в исходнике софта для андройд нужно установить значения от 15 до 250, тогда скорость регулируется нормально. с яркостью еще не разобрался.
В програмировании не силен я больше по железу, обгрыз программу Гайвера для dot string с нормальным управлением скорости. https://yadi.sk/d/lEBzwECKpAK47Q
Test.apk — Яндекс.Диск
Если кому интересно победил регулировку яркости, в скетче ставим matrix.setIntensity(10) , начальная яркость, в софте для ардуино вторую полоску прокрутки ставим значения от 0 до 15. Все работает отлично.
Изменено: 14 Сен 2019
-
#17
Здравствуйте. По паспорту лента 60 д/м потребляет 18 Вт/м. В проекте 8*32, а это около 77 Вт. Достаточно ли такого блока питания 5В 2А и за счёт чего достигается такая маленькая потребляемая мощность в проекте? Светодиоды зажигаются ни все вместе (какое время свечения диода)? И какой ток на максимальной яркости ленты для режима радуга? Заранее спасибо
-
#18
может кому пригодится
Для нормально регулировки скорости для dotmatrix в исходнике софта для андройд нужно установить значения от 15 до 250, тогда скорость регулируется нормально. с яркостью еще не разобрался.
В програмировании не силен я больше по железу, обгрыз программу Гайвера для dot string с нормальным управлением скорости. https://yadi.sk/d/lEBzwECKpAK47Q
Test.apk — Яндекс.ДискЕсли кому интересно победил регулировку яркости, в скетче ставим matrix.setIntensity(10) , начальная яркость, в софте для ардуино вторую полоску прокрутки ставим значения от 0 до 15. Все работает отлично.
Здравствуйте! А нельзя ли не «обгрызенную» версию, но с нормальной регулировкой скорости? «Огрызок» работает отлично, но не хватает голосового ввода.
С яркостью по Вашему совету всё прекрасно! Спасибо!
-
#19
Здравствуйте! А нельзя ли не «обгрызенную» версию, но с нормальной регулировкой скорости? «Огрызок» работает отлично, но не хватает голосового ввода.
С яркостью по Вашему совету всё прекрасно! Спасибо!
Здравствуйте. Поддерживаю,голосового ввода не хватает!)
-
#20
может кому пригодится
Для нормально регулировки скорости для dotmatrix в исходнике софта для андройд нужно установить значения от 15 до 250, тогда скорость регулируется нормально. с яркостью еще не разобрался.
В програмировании не силен я больше по железу, обгрыз программу Гайвера для dot string с нормальным управлением скорости. https://yadi.sk/d/lEBzwECKpAK47Q
Test.apk — Яндекс.ДискЕсли кому интересно победил регулировку яркости, в скетче ставим matrix.setIntensity(10) , начальная яркость, в софте для ардуино вторую полоску прокрутки ставим значения от 0 до 15. Все работает отлично.
Спасибо за бегущую строку! Я в этом деле вообще «никакой» , т.е. даже не видел Ардуинку, но по инструкции все купил, соединил, закачал — и все работает. Но присоединяюсь — как нормально менять скорость и яркость. Т.е —
«…для dotmatrix в исходнике софта для андройд нужно установить значения от 15 до 250» — как это сделать (куда тыкать и что делать)?
«… победил регулировку яркости, в скетче ставим matrix.setIntensity(10) , начальная яркость, в софте для ардуино вторую полоску прокрутки ставим значения от 0 до 15. » — опять же что и куда… Извините , что задаю такие вопрос — не умею, но очень хочется..
Изменено: 26 Сен 2019
-
#21
А меня матрица 7219 горит постоянным цветом и не реагирует на команды, блютуз подключился, прошивка встала нормально
В чем может быть проблема?
Попробовал другие прошивки из интернета, текст выводится
-
159.4 KB
Просмотры: 38
Изменено: 29 Сен 2019
-
#22
По просьбам
Здравствуйте! А нельзя ли не «обгрызенную» версию, но с нормальной регулировкой скорости? «Огрызок» работает отлично, но не хватает голосового ввода.
С яркостью по Вашему совету всё прекрасно! Спасибо!
полная версия с нормальными регулировками для DotString https://yadi.sk/d/de2vXs2HxaDuvg ? вроде все правильно сделал возможности проверить нет, т.к. строки у меня больше нет ушла в такси.
-
#23
А меня матрица 7219 горит постоянным цветом и не реагирует на команды, блютуз подключился, прошивка встала нормально
В чем может быть проблема?
Попробовал другие прошивки из интернета, текст выводится
скорее всего неправильно подключена матрица внимательно читайте обозначения у меня отличалась от матрицы гайвера два вывода были поменяны местами, а если не реагирует на блютуз проверте скорость на которой он работает у меня оказался 38400 вместо 9600
-
#24
По просьбам
полная версия с нормальными регулировками для DotString https://yadi.sk/d/de2vXs2HxaDuvg ? вроде все правильно сделал возможности проверить нет, т.к. строки у меня больше нет ушла в такси.
Работает отлично! Спасибо огроменное!
-
#25
Всем привет.
Появилась большая нужда в такой штуке.
Что пришлось сделать:
1. Заказать Ардуино + БТ (по две штуки, прозапас )
2. Купил паяльник
3. Заказал светодиодную ленту 5м по 60 диодов (4шт итого 20м)
Далее, задумываюсь как грамотнее сделать.
Длину строки в 1м или 1.5м , кто что подскажет?
Какой блок питания взять, чтобы не было проблем ?
Изменено: 6 Окт 2019
Although I use a HC-06 in the below examples the HC-05 in slave mode can also be used.
Using MITs app inventor it is fairly easy to create an app that can turn a LED on and off from an Android device.
This is a fairly simply example of sending commands to the Arduino to turn a LED either on or off. The Android app sends ascii codes to the Arduino via the HC-06 BT module; “ON” for on and “OF” for off.
Load the app, connect to the HC-06 and then use the LED button to turn the LED on and off.


You can also open the serial monitor to see the commands as they are received

The steps involved are:
1. create a circuit that includes a Bluetooth module and a LED
2. create an Arduino sketch that can receive commands from the HC-06 and turn a LED on and off
3. create an Android app that sends commands over Bluetooth
The circuit
The circuit is the same as the one used in Arduino and HC-06 (ZS-040) except the addition of a LED + resistor connected to pin D12. I used a 220 ohm resistor because that is what I had to hand but similar values will be OK.
Based on ohm’s law; using a source of 5V, a green LED with a forward voltage drop of 2.2v and a forward current of 20mA a 150 ohm resistor is recommended. So any value from 180ohm to around 680 ohms will be OK.


Arduino Sketch
The sketch receives data from the Bluetooth module via software serial. It then checks the data for “ON” and “OF” commands. When “ON” is received the LED is turned on and when “OF” is received the LED is turned off.
To ensure that data is received correctly the data is surrounded by start and end markers. This example uses “<» and «>“. I use the function recvWithStartEndMarkers which was posted on the Arduino forum by Robin2. I simply copied the function and did not need to change it.
The recvWithStartEndMarkers() function takes at the data received from the serial connection and copies anything it finds between the start and end markers to the receivedChars variable. When it has found something it sets the newData variable to true.
In the main loop we keep calling the recvWithStartEndMarkers() function until newData has been set. When newData is True we know we have a new command so we call parseData() to deal with it. Inside parseData() we reset newData to false and the process continues.
void loop()
{
     if (BTserial.available() > 0)     {  recvWithStartEndMarkers(); }
     if (newData) { parseData(); }
}
The full sketch:
// Bluetooth sketch HC-06_02
// Turn a LED on and off from an Android app
// App can be downloaded from www.martyncurrey.com
//
// Pins
// 2 Software serial - RX
// 3 Software serial - TX
// 12 LED

boolean debug = true;

#include <SoftwareSerial.h>
SoftwareSerial BTserial(2,3); // RX | TX
// Connect the HC-06 TX to the Arduino RX.
// Connect the HC-06 RX to the Arduino TX through a voltage divider.

// max length of command is 20 chrs
const byte numChars = 20;
char receivedChars[numChars];
boolean newData = false;

byte LEDpin = 12;


void setup()
{
     pinMode(LEDpin, OUTPUT);
     Serial.begin(9600);
     Serial.println("<Arduino is ready>");

     // The default baud rate for the HC-06s I have is 9600. Other modules may have a different speed. 38400 is common.
     BTserial.begin(9600);
}

void loop()
{
     if (BTserial.available() > 0)     {  recvWithStartEndMarkers(); }
     if (newData) { parseData(); }
}


void parseData()
{
        newData = false;
        if (debug) {  Serial.println( receivedChars ); }
        if (receivedChars[0] == 'O'  && receivedChars[1] == 'N' )  { digitalWrite(LEDpin,HIGH);  }
        if (receivedChars[0] == 'O'  && receivedChars[1] == 'F' )  { digitalWrite(LEDpin,LOW);   }
}


void recvWithStartEndMarkers()
{

     // function recvWithStartEndMarkers by Robin2 of the Arduino forums
     // See  http://forum.arduino.cc/index.php?topic=288234.0

     static boolean recvInProgress = false;
     static byte ndx = 0;
     char startMarker = '<';
     char endMarker = '>';
     char rc;

     if (BTserial.available() > 0)
     {
          rc = BTserial.read();
          if (recvInProgress == true)
          {
               if (rc != endMarker)
               {
                    receivedChars[ndx] = rc;
                    ndx++;
                    if (ndx >= numChars) { ndx = numChars - 1; }
               }
               else
               {
                     receivedChars[ndx] = ''; // terminate the string
                     recvInProgress = false;
                     ndx = 0;
                     newData = true;
               }
          }

          else if (rc == startMarker) { recvInProgress = true; }
     }
}
Android App
I created the Android app in MITs app inventor. This was fairly easy once I had figured out how to use Bluetooth.
The app is very basic, it simply sends commands. There are no checks to see if the Arduino has actually received the commands or not. The screen is also very simple; it has a button for connecting to Bluetooth and a on/off button to control the LED. The app uses a ListPicker to store the available Bluetooth devices which is not displayed on screen. It is initiated from the connect button.

The app has 4 blocks and a list:

Block 1
This handles the connect button. When the button is clicked the block/function first checks to see if Bluetooth is enabled and then checks to see if there is already a Bluetooth connection. If Bluetooth is not turned on an error message is displayed. If there is already an active connection the user is asked if they would like to close it. The user reply is handled in Block3, Notifier1.AfterChoosing
If Bluetooth is on and there isn’t a current connection the paired Bluetooth devices are copied to the Bluetooth pairedDevices List. If the list has at least 1 item the contents of the list are copied to the ListPicker. The ListPicker is then activated to allow the user to select a Bluetooth device. I use the pairedDevices list so that I can count the number paired devices. I could not find a way of doing this when using just a ListPicker. If the list is empty an error message is displayed saying there are no paired devices.

Block 2
Block 2, BT_LP.AfterPicking handles the List Picker after the user has selected one of the paired Bluetooth devices. It takes the selected item and tries to connect. If successful the text on the Bluetooth button is changed to “Connected”. If a connection cannot be established an error message is displayed.
Once a connection is established the app waits for the LED button to be pressed.

Block 3
Block 3 handles a Notifier dialogue that asks the user if they wish to close the connection

Block 4
Block 4, LED_BUTTON_btn.Click, handles the LED button. By checking the button text we can determine what command to send. If the text says “ON” then the LED is on and we need to turn it off so we send an “OF” command. If the text says “OFF”, the LED is off so we send an “ON” command to turn it on. The actual commands are “<ON>” and “<OF>”. The button text and background colour are updated to reflect the new LED status.
An error message is displayed if the LED button is clicked and there is no active connection.

Download
Download the zip file containing the Arduino sketch, the ardiunoBTcontrol app and the appinventor aia file.
In part 2 we add 2-way communication and the facility to control the LED from the Arduino as well as the app.
Related:
Add an auto-connect function to an App Inventor app. http://www.martyncurrey.com/android-mit-app-inventor-auto-connect-to-bluetooth/
Примечание: аналогичный вопрос был опубликован несколько лет назад. И все же отладочная процедура, предоставленная длинным ответом, не помогла. И последнее опубликованное, якобы, решение для него очень не интуитивно понятно. Итак, я здесь, опубликуйте вопрос еще раз.
Мой принтер подключен через socket://ip.of.printer:9100. Модель принтера LaserJet P4015n. Мой компьютер работает под управлением Arch Linux. Версия связанных с чашкой модулей:
cups-2.0.4-1-x86_64 cups-filters-1.0.71-1 cups-pk-helper-0.2.5-1 libcups-2.0.4-1 python-pycups-1.9.73-1 Система печати моего компьютера работала нормально. И все же сегодня, когда я пытаюсь распечатать документ, принтер не отвечает. Понижение всех пакетов, связанных с чашками, до самой ранней версии, которую я имею на своем компьютере, не помогает. Также не выполняется переустановка драйвера принтера.
При отладке, # nc -vz ip.of.printer 9100возвращая нормальное соединение,
...[ip.of.printer] 9100 (hp-pdl-datastr) open Проверка /var/log/cups/error_log, только связанное сообщение было
E [22/Aug/2015:01:15:33 +0800] [Job 35] Unable to write print data: Broken pipe И результат, связанный с принтером, tcpdumpпубликуется, как показано ниже (имя локального хоста Saturn, я проследил Saturn.57142из-за его связи с HP LaserJet P4015):
00:42:12.748387 IP Saturn.57142 > NPI7B3356.DynIP.ntu.edu.sg.snmp: GetRequest(28) 25.3.2.1.3.1 00:42:12.753755 IP NPI7B3356.DynIP.ntu.edu.sg.snmp > Saturn.57142: GetResponse(45) 25.3.2.1.3.1="HP LaserJet P4015" 00:42:12.753904 IP Saturn.57142 > NPI7B3356.DynIP.ntu.edu.sg.snmp: GetNextRequest(27) 43.12.1.1.4 00:42:12.758850 IP NPI7B3356.DynIP.ntu.edu.sg.snmp > Saturn.57142: GetResponse(34) 43.12.1.1.4.1.1="black" 00:42:12.758900 IP Saturn.57142 > NPI7B3356.DynIP.ntu.edu.sg.snmp: GetNextRequest(29) 43.12.1.1.4.1.1 00:42:12.763940 IP NPI7B3356.DynIP.ntu.edu.sg.snmp > Saturn.57142: GetResponse(30) 43.12.1.1.5.1.1=8 00:42:12.764116 IP Saturn.57142 > NPI7B3356.DynIP.ntu.edu.sg.snmp: GetRequest(28) 25.3.5.1.2.1 00:42:12.771071 IP NPI7B3356.DynIP.ntu.edu.sg.snmp > Saturn.57142: GetResponse(29) 25.3.5.1.2.1=00 00:42:12.771123 IP Saturn.57142 > NPI7B3356.DynIP.ntu.edu.sg.snmp: GetRequest(29) 43.10.2.1.4.1.1 00:42:12.775906 IP NPI7B3356.DynIP.ntu.edu.sg.snmp > Saturn.57142: GetResponse(32) 43.10.2.1.4.1.1=51928 00:42:12.838656 IP Saturn.57142 > NPI7B3356.DynIP.ntu.edu.sg.snmp: GetNextRequest(27) 43.11.1.1.9 00:42:12.843572 IP NPI7B3356.DynIP.ntu.edu.sg.snmp > Saturn.57142: GetResponse(31) 43.11.1.1.9.1.1=9120 00:42:12.843675 IP Saturn.57142 > NPI7B3356.DynIP.ntu.edu.sg.snmp: GetNextRequest(29) 43.11.1.1.9.1.1 00:42:12.848515 IP NPI7B3356.DynIP.ntu.edu.sg.snmp > Saturn.57142: GetResponse(32) 43.11.1.1.9.1.2=173092 00:42:12.848630 IP Saturn.57142 > NPI7B3356.DynIP.ntu.edu.sg.snmp: GetNextRequest(29) 43.11.1.1.9.1.2 00:42:12.854099 IP NPI7B3356.DynIP.ntu.edu.sg.snmp > Saturn.57142: GetResponse(30) 43.12.1.1.2.1.1=1 00:42:12.854138 IP Saturn.57142 > NPI7B3356.DynIP.ntu.edu.sg.snmp: GetRequest(28) 25.3.5.1.2.1 00:42:12.861080 IP NPI7B3356.DynIP.ntu.edu.sg.snmp > Saturn.57142: GetResponse(29) 25.3.5.1.2.1=00 00:42:13.261306 IP Saturn.57142 > NPI7B3356.DynIP.ntu.edu.sg.snmp: GetNextRequest(27) 43.11.1.1.9 00:42:13.266306 IP NPI7B3356.DynIP.ntu.edu.sg.snmp > Saturn.57142: GetResponse(31) 43.11.1.1.9.1.1=9120 00:42:13.266332 IP Saturn.57142 > NPI7B3356.DynIP.ntu.edu.sg.snmp: GetNextRequest(29) 43.11.1.1.9.1.1 00:42:13.271211 IP NPI7B3356.DynIP.ntu.edu.sg.snmp > Saturn.57142: GetResponse(32) 43.11.1.1.9.1.2=173092 00:42:13.271254 IP Saturn.57142 > NPI7B3356.DynIP.ntu.edu.sg.snmp: GetNextRequest(29) 43.11.1.1.9.1.2 00:42:13.276577 IP NPI7B3356.DynIP.ntu.edu.sg.snmp > Saturn.57142: GetResponse(30) 43.12.1.1.2.1.1=1 00:42:13.276675 IP Saturn.57142 > NPI7B3356.DynIP.ntu.edu.sg.snmp: GetRequest(28) 25.3.5.1.2.1 00:42:13.283540 IP NPI7B3356.DynIP.ntu.edu.sg.snmp > Saturn.57142: GetResponse(29) 25.3.5.1.2.1=00 00:42:13.283623 IP Saturn.57142 > NPI7B3356.DynIP.ntu.edu.sg.snmp: GetRequest(29) 43.10.2.1.4.1.1 00:42:13.288444 IP NPI7B3356.DynIP.ntu.edu.sg.snmp > Saturn.57142: GetResponse(32) 43.10.2.1.4.1.1=51928 Есть идеи, как решить проблему?
1 ответ на вопрос
Chong
2015-10-26 в 14:22
Иногда проблема с оборудованием на самом деле — просто проблема с оборудованием … В моем случае оказалось, что наша школа изменила способ организации заданий на печать. Они заблокировали прямую печать, возможно, через политику брандмауэра. И перенаправить все задания на печать через центральный сервер с протоколом SAMBA. Следовательно, я могу пропинговать офисный принтер, но не могу отправлять данные печати на принтер. В конечном итоге проблема была решена после обращения к ИТ-специалистам и перенастройки моего компьютера в соответствии с их изменениями.
Если вы столкнулись с подобной проблемой и не можете выяснить ее источник с вашей стороны. Возможно, вам следует обратиться к ИТ-персоналу вашей компании / организации. Может быть, они просто изменили некоторые настройки, не сообщая вам.
Благодаря @ColeBusby, одним из способов проверить, действительно ли проблема вызвана ограничением компании / организации на прямое подключение к принтеру через порт 9100, является использование
telnet [ip.of.the.printer] 9100 в вашем терминале. Если вывод
Trying 172.21.48.223... Connected to 172.21.48.223. Escape character is '^]'. И сразу же за ним следует соединение, закрытое сторонним хостом.
Тогда ясно, что вы успешно получили доступ к принтеру, и все же принтер отклонил ваш доступ через порт 9100. Когда это произойдет, попросите ИТ-персонал проверить, не изменилась ли политика, и не указать, как настроить новую систему печати.
Похожие вопросы
-
1
Как я могу получить доступ к принтеру Windows Vista из Ubuntu по сети?
-
1
Полстраничные распечатки на Synology DS207 +
-
3
Печать на Dell V305W с Mac
-
-
2
Как поделиться неподдерживаемым (для Mac) принтером через ПК?
-
1
Citzen Драйверы для принтеров этикеток для Mac
-
2
Принтер с совместимостью с большинством операционных систем Plug-and-Play
-
2
Vista забывает принтер по умолчанию после перезагрузки
-
6
Общий драйвер Post Script для Windows Vista x64?
-
1
Как настроить цветной принтер по умолчанию на черно-белую печать?
-
5
Почему мой текущий принтер недоступен в Office?
Skip to navigation
Skip to main content

Infrastructure and Management
- Red Hat Enterprise Linux
- Red Hat Virtualization
- Red Hat Identity Management
- Red Hat Directory Server
- Red Hat Certificate System
- Red Hat Satellite
- Red Hat Subscription Management
- Red Hat Update Infrastructure
- Red Hat Insights
- Red Hat Ansible Automation Platform
Cloud Computing
- Red Hat OpenShift
- Red Hat CloudForms
- Red Hat OpenStack Platform
- Red Hat OpenShift Container Platform
- Red Hat OpenShift Data Science
- Red Hat OpenShift Online
- Red Hat OpenShift Dedicated
- Red Hat Advanced Cluster Security for Kubernetes
- Red Hat Advanced Cluster Management for Kubernetes
- Red Hat Quay
- OpenShift Dev Spaces
- Red Hat OpenShift Service on AWS
Storage
- Red Hat Gluster Storage
- Red Hat Hyperconverged Infrastructure
- Red Hat Ceph Storage
- Red Hat OpenShift Data Foundation
Runtimes
- Red Hat Runtimes
- Red Hat JBoss Enterprise Application Platform
- Red Hat Data Grid
- Red Hat JBoss Web Server
- Red Hat Single Sign On
- Red Hat support for Spring Boot
- Red Hat build of Node.js
- Red Hat build of Thorntail
- Red Hat build of Eclipse Vert.x
- Red Hat build of OpenJDK
- Red Hat build of Quarkus
Integration and Automation
- Red Hat Process Automation
- Red Hat Process Automation Manager
- Red Hat Decision Manager
All Products
Issue
- Encountered the error «Unable to write print data: Broken pipe» once in awhile while printing to network printer via socket connection
- I’ve had a problem with jetdirect HP printers losing connection with the error: «Unable to write print data: Broken pipe» (in Windows the printers could still be used)
- Unable to write print data: Broken pipe
- We have a printer that continually goes into a stopped state due to a broken pipe
- Printing test pages from either the GTK Window or the CUPS web interface seems to cause it to alternate between getting stuck in «pending» and «broken pipe»
- The printer stops working frequently with the error «Unable to write print data: Broken pipe». how can I stop the error occurring?
- Printers going disabled with «Unable to write print data: Broken pipe» errors
- certain print jobs fail «Backend returned status 1 (failed)»
-
All but a handful of hundreds of printers work. The ones that don’t work get disabled after some minutes with a message similar to:
printer U001 disabled since Thu 06 Sep 2012 04:53:31 PM CDT - Unable to write print data: Broken pipe -
Print jobs are randomly ending with the following error every day:
E [17/Aug/2012:09:03:29 +0200] [Job 35840] Unable to send trailing nul to printer: Broken pipe -
When I try to print from Linux I get this error in cups «Unable to write print data: Broken pipe.» This is a new printer. It used to be connected through a VPN and now it’s connected through an MPLS connection. We are able to telnet to the printer and also use the web interface from both machines.
-
Recently when printing large documents, we’ve been receiving the error
Unable to send trailing nul to printer: Broken pipe
Remote host did not accept data file (32)
Environment
- Red Hat Enterprise Linux
- Printing to a network-connected printer via «socket://» (HP JetDirect) or «lpd://» (LPD Protocol).
Subscriber exclusive content
A Red Hat subscription provides unlimited access to our knowledgebase, tools, and much more.
Current Customers and Partners
Log in for full access
Log In
Note that a push can still freeze (even with postBuffer increased) when its pack files are corrupted (ie pack-objects fails)
That will be fixed in git 2.9 (June 2016). And better managed with Git 2.25 (Q1 2020)
See commit c4b2751, commit df85757, commit 3e8b06d, commit c792d7b, commit 739cf49 (19 Apr 2016) by Jeff King (peff).
(Merged by Junio C Hamano — gitster — in commit d689301, 29 Apr 2016)
«
git push» from a corrupt repository that attempts to push a large number of refs deadlocked; the thread to relay rejection notices for these ref updates blocked on writing them to the main thread, after the main thread at the receiving end notices that the push failed and decides not to read these notices and return a failure.
Commit 739cf49 has all the details.
send-pack: close demux pipe before finishing async processThis fixes a deadlock on the client side when pushing a large number of refs from a corrupted repo.
With Git 2.25 (Q1 2020), Error handling after «git push» finishes sending the packdata and waits for the response to the remote side has been improved.
See commit ad7a403 (13 Nov 2019) by Jeff King (peff).
(Merged by Junio C Hamano — gitster — in commit 3ae8def, 01 Dec 2019)
send-pack: check remote ref status on pack-objects failureHelped-by: SZEDER Gábor
Signed-off-by: Jeff KingWhen we’re pushing a pack and our local pack-objects fails, we enter an error code path that does a few things:
- Set the status of every ref to
REF_STATUS_NONE- Call
receive_unpack_status()to try to get an error report from the other side- Return an error to the caller
If
pack-objectsfailed because the connection to the server dropped, there’s not much more we can do than report the hangup. And indeed, step 2 will try to read a packet from the other side, which willdie()in the packet-reading code with «the remote end hung up unexpectedly«.But if the connection didn’t die, then the most common issue is that the remote
index-packorunpack-objectscomplained about our pack (we could also have a local pack-objects error, but this ends up being the same; we’d send an incomplete pack and the remote side would complain).In that case we do report the error from the other side (because of step 2), but we fail to say anything further about the refs.
The issue is two-fold:
- in step 1, the «
NONE» status is not «we saw an error, so we have no status».
It generally means «this ref did not match our refspecs, so we didn’t try to push it». So when we print out the push status table, we won’t mention any refs at all!
But even if we had a status enum for «pack-objects error», we wouldn’t want to blindly set it for every ref. For example, in a non-atomic push we might have rejected some refs already on the client side (e.g.,REF_STATUS_REJECT_NODELETE) and we’d want to report that.- in step 2, we read just the unpack status.
Butreceive-packwill also tell us about each ref (usually that it rejected them because of the unpacker error).So a much better strategy is to leave the ref status fields as they are (usually
EXPECTING_REPORT)and then actually receive (and print) the full per-ref status.This case is actually covered in the test suite, as t5504.8, which writes a pack that will be rejected by the remote unpack-objects.
But it’s racy. Because our pack is small, most of the time pack-objects manages to write the whole thing before the remote rejects it, and so it returns success and we print out the errors from the remote.
But very occasionally (or when run under--stress), it goes slow enough to see a failure in writing, andgit pushreports nothing for the refs.With this patch, the test should behave consistently.
There shouldn’t be any downside to this approach.
- If we really did see the connection drop, we’d already die in
receive_unpack_status(), and we’ll continue to do so.- If the connection drops after we get the unpack status but before we see any ref status, we’ll still print the remote unpacker error, but will now say «remote end hung up» instead of returning the error up the call-stack.
But as discussed, we weren’t showing anything more useful than that with the current code. And anyway, that case is quite unlikely (the connection dropping at that point would have to be unrelated to the pack-objects error, because of the ordering of events).In the future we might want to handle packet-read errors ourself instead of dying, which would print a full ref status table even for hangups.
But in the meantime, this patch should be a strict improvement.
I just formatted my root partition and installed 12.3 (I kept my home partition as usual).
I have a problem with my network printer hp laserjet 4015n. It used to work seemingslessly before. Now cups gives me a: Unable to write print data: broken pipe.
I have tried restarting cups, even installing the x86 version, but I can’t seem to fix the problem.
I have tried different protocols to connect the printer, currently: socks://ip:9100
Any ideas on how to make this work?
![]()
Anthon
77k42 gold badges159 silver badges217 bronze badges
asked Mar 19, 2013 at 16:46
![]()
«Broken Pipe» with JetDirect printers usually indicates a problem establishing a network connection to the printer. It may come down to enabling debug logging in cups and seeing if that has anything, but here are some ideas:
-
use netcat to see if you can form a TCP-level connection with the printer, this will let you know if there’s a network problem (if this succeeds it could still be a network problem, but this is an easy «first test»):
# nc -vz ip.address.of.printer
-
Pick the generic Postscript driver for HP, and try to print a test page.
-
See if it’s a weird SELinux thing (SELinux does have certain port controls where certain programs can’t listen on certain port numbers), just do a «setenforce 0» as root and try a test page again.
-
Try to set up a new printer instance to see if it works.
-
Check your firewall. To test set the default policy on INPUT to ACCEPT and then «iptables -F» then try a test page again.
-
Start a binary tcpdump, submit a test page from the printer and load it up in wireshark. I have seen some cases where remote routers just won’t like how cups starts the tcp connection and will send an RST as the remote node to kill off the connection. Even if that’s not what’s going on, it would still give you more insight into the dialog that’s going on between the two systems.
If all the above fail, I would enable the debug logging and just try to wade through the results to see if it gave a specific error message explaining what’s going on or if something about WHERE it’s hanging up lets you know more about what’s going on.
answered Mar 19, 2013 at 18:38
![]()
BratchleyBratchley
16.3k12 gold badges60 silver badges100 bronze badges
After a lot of trial and error. The solution was to add the printer with:
hp:/net/HP_LaserJet_P4015?ip=x.x.x.x
answered Mar 20, 2013 at 10:37
![]()
doriendorien
3332 gold badges5 silver badges12 bronze badges
Note: Similar question has been posted years ago. Yet the debugging procudure provided by the long answer didn’t help. And the last posted, supposedly the solution for it is very unintuitive. So here I am, post the question again.
My printer is connected through socket://ip.of.printer:9100. The model of printer is LaserJet P4015n. My computer is running Arch Linux. The version of cup related modules are:
cups-2.0.4-1-x86_64
cups-filters-1.0.71-1
cups-pk-helper-0.2.5-1
libcups-2.0.4-1
python-pycups-1.9.73-1
The printing system of my computer used to be working fine. Yet today when I try to print a document, the printer do not respond. Downgrading all cup related packages to earliest version I have on my computer doesn’t help. Neither does reinstalling the printer driver.
When debugging, # nc -vz ip.of.printer 9100 returning normal connection,
...[ip.of.printer] 9100 (hp-pdl-datastr) open
Checking /var/log/cups/error_log, only related message was
E [22/Aug/2015:01:15:33 +0800] [Job 35] Unable to write print data: Broken pipe
And printer related result of tcpdump is posted as below(localhost name is Saturn, I traced Saturn.57142 due to it’s the connection with HP LaserJet P4015):
00:42:12.748387 IP Saturn.57142 > NPI7B3356.DynIP.ntu.edu.sg.snmp:  GetRequest(28)  25.3.2.1.3.1
00:42:12.753755 IP NPI7B3356.DynIP.ntu.edu.sg.snmp > Saturn.57142:  GetResponse(45)  25.3.2.1.3.1="HP LaserJet P4015"
00:42:12.753904 IP Saturn.57142 > NPI7B3356.DynIP.ntu.edu.sg.snmp:  GetNextRequest(27)  43.12.1.1.4
00:42:12.758850 IP NPI7B3356.DynIP.ntu.edu.sg.snmp > Saturn.57142:  GetResponse(34)  43.12.1.1.4.1.1="black"
00:42:12.758900 IP Saturn.57142 > NPI7B3356.DynIP.ntu.edu.sg.snmp:  GetNextRequest(29)  43.12.1.1.4.1.1
00:42:12.763940 IP NPI7B3356.DynIP.ntu.edu.sg.snmp > Saturn.57142:  GetResponse(30)  43.12.1.1.5.1.1=8
00:42:12.764116 IP Saturn.57142 > NPI7B3356.DynIP.ntu.edu.sg.snmp:  GetRequest(28)  25.3.5.1.2.1
00:42:12.771071 IP NPI7B3356.DynIP.ntu.edu.sg.snmp > Saturn.57142:  GetResponse(29)  25.3.5.1.2.1=00
00:42:12.771123 IP Saturn.57142 > NPI7B3356.DynIP.ntu.edu.sg.snmp:  GetRequest(29)  43.10.2.1.4.1.1
00:42:12.775906 IP NPI7B3356.DynIP.ntu.edu.sg.snmp > Saturn.57142:  GetResponse(32)  43.10.2.1.4.1.1=51928

00:42:12.838656 IP Saturn.57142 > NPI7B3356.DynIP.ntu.edu.sg.snmp:  GetNextRequest(27)  43.11.1.1.9
00:42:12.843572 IP NPI7B3356.DynIP.ntu.edu.sg.snmp > Saturn.57142:  GetResponse(31)  43.11.1.1.9.1.1=9120
00:42:12.843675 IP Saturn.57142 > NPI7B3356.DynIP.ntu.edu.sg.snmp:  GetNextRequest(29)  43.11.1.1.9.1.1
00:42:12.848515 IP NPI7B3356.DynIP.ntu.edu.sg.snmp > Saturn.57142:  GetResponse(32)  43.11.1.1.9.1.2=173092
00:42:12.848630 IP Saturn.57142 > NPI7B3356.DynIP.ntu.edu.sg.snmp:  GetNextRequest(29)  43.11.1.1.9.1.2
00:42:12.854099 IP NPI7B3356.DynIP.ntu.edu.sg.snmp > Saturn.57142:  GetResponse(30)  43.12.1.1.2.1.1=1
00:42:12.854138 IP Saturn.57142 > NPI7B3356.DynIP.ntu.edu.sg.snmp:  GetRequest(28)  25.3.5.1.2.1
00:42:12.861080 IP NPI7B3356.DynIP.ntu.edu.sg.snmp > Saturn.57142:  GetResponse(29)  25.3.5.1.2.1=00


00:42:13.261306 IP Saturn.57142 > NPI7B3356.DynIP.ntu.edu.sg.snmp:  GetNextRequest(27)  43.11.1.1.9
00:42:13.266306 IP NPI7B3356.DynIP.ntu.edu.sg.snmp > Saturn.57142:  GetResponse(31)  43.11.1.1.9.1.1=9120
00:42:13.266332 IP Saturn.57142 > NPI7B3356.DynIP.ntu.edu.sg.snmp:  GetNextRequest(29)  43.11.1.1.9.1.1
00:42:13.271211 IP NPI7B3356.DynIP.ntu.edu.sg.snmp > Saturn.57142:  GetResponse(32)  43.11.1.1.9.1.2=173092
00:42:13.271254 IP Saturn.57142 > NPI7B3356.DynIP.ntu.edu.sg.snmp:  GetNextRequest(29)  43.11.1.1.9.1.2
00:42:13.276577 IP NPI7B3356.DynIP.ntu.edu.sg.snmp > Saturn.57142:  GetResponse(30)  43.12.1.1.2.1.1=1
00:42:13.276675 IP Saturn.57142 > NPI7B3356.DynIP.ntu.edu.sg.snmp:  GetRequest(28)  25.3.5.1.2.1
00:42:13.283540 IP NPI7B3356.DynIP.ntu.edu.sg.snmp > Saturn.57142:  GetResponse(29)  25.3.5.1.2.1=00
00:42:13.283623 IP Saturn.57142 > NPI7B3356.DynIP.ntu.edu.sg.snmp:  GetRequest(29)  43.10.2.1.4.1.1
00:42:13.288444 IP NPI7B3356.DynIP.ntu.edu.sg.snmp > Saturn.57142:  GetResponse(32)  43.10.2.1.4.1.1=51928
Any idea on how to solve the issue?