- Ремонт материнских плат
- Intel Platform (P4+)
Есть плата Asus P5V-VM Ultra, есть процессор Celeron E3300. При включении пишет ucode error, при загрузке windows зависает, даже установщик, а linux после загрузки ядром intel-ucode работает нормально, проходит стресс тесты. Можно как-то в биос добавить ucode от wolfdale?
Перенес в Intel Platform (P4+).
maco
- 506 просмотров
Попробовал открыть BIOS от Asus P5B, чтобы посмотреть изменения. mmtool написал Error loading firmware image (80000001h).
С mmtool разобрался, новые версии для uefi.
В общем заменил через mmtool микрокод, дернув его из p5b. Потом нажал save rom. Завтра попробую прошить. Будут какие-либо подводные камни?
Отправить комментарий
![]()
Loading

Фирменные утилиты AMI MMTool и BCP. Для редактирования микропрограмм системных плат от American Megatrends (AMI) для BIOS и EFI.
Скачать можно по ссылкам ниже:
Скачать MMTool_v3.12.zip
Скачать MMTool_v3.19.zip
Скачать MMTool_v3.22.zip
Скачать MMTool_v4.50.0023.zip
Скачать MMTool_v5.00.0007.zip
Скачать MMTool_v5.02.0024.zip
Скачать MMTool_v5.02.0024_patched.zip
Скачать MMTool_v5.02.0025.zip
Скачать AMIBCP_v3.13.zip
Скачать AMIBCP_v3.37.zip
Скачать AMIBCP_v3.46.zip
Скачать AMIBCP_v4.55.0070.zip
Скачать AMIBCP_v5.01.0014.zip
Скачать AMIBCP_v5.02.0023.zip
Скачать AMIBCP_v5.02.0031.zip
Вы можете также посмотреть другие программы из рубрики Софт.
You’re currently viewing a stripped down version of our content. View the full version with proper formatting.
Pages: 1 2 3 4
Hey there,
Sorry to bother you, I tried all the tools I could get my hands on to try to mod this BIOS but none of them would open the BIN file and I couldn’t figure out why. It’s an AMI BIOS.
I tried modding the A11 BIOS for the Aurora R4, the image is attached and the link is below.
http://www.dell.com/support/home/us/en/0…r4/drivers
[censored], even a point in the right direction would be great. Thanks for your time
(06-26-2014, 05:25 AM)BDMaster Wrote: [ -> ]
(06-25-2014, 04:15 PM)effingterrible Wrote: [ -> ]Hey there,
Sorry to bother you, I tried all the tools I could get my hands on to try to mod this BIOS but none of them would open the BIN file and I couldn’t figure out why. It’s an AMI BIOS.
I tried modding the A11 BIOS for the Aurora R4, the image is attached and the link is below.
http://www.dell.com/support/home/us/en/0…r4/drivers
[censored], even a point in the right direction would be great. Thanks for your time
Hi friend,
here your Bios unpacked :http://rghost.net/56583821
Here MMTool to open It :
http://rghost.net/56583825
Here Andy’s PMTool 2.56 to open it :
http://forums.mydigitallife.info/threads…EFI-BIOSes
Let me know
regards
Thanks for this!
But MMTool just gives ‘error loading firmware image’. Had the same error message previously as well.
Look the attachment !!!
Is your Windows missing some libs or dll !!!
I tried on XP and Win7 and all is right !
You are missing some Dll or libs, so to avoid this issue
You have to install a Big Tool as MS Visual Studio which
contains a lot of libs and Dlls !
Are You using MMTOOL 4.50.0.23, I uploaded above here for You !
Regards
(06-26-2014, 09:34 AM)BDMaster Wrote: [ -> ]Look the attachment !!!
Is your Windows missing some libs or dll !!!
I tried on XP and Win7 and all is right !
You are missing some Dll or libs, so to avoid this issue
You have to install a Big Tool as MS Visual Studio which
contains a lot of libs and Dlls !
Are You using MMTOOL 4.50.0.23, I uploaded above here for You !
Regards
Sorry, stupid mistake on my part. I was opening me.rom, not a11.bin.
Now I just need to figure out what to change >.<
(06-26-2014, 11:45 AM)effingterrible Wrote: [ -> ]
(06-26-2014, 09:34 AM)BDMaster Wrote: [ -> ]Look the attachment !!!
Is your Windows missing some libs or dll !!!
I tried on XP and Win7 and all is right !
You are missing some Dll or libs, so to avoid this issue
You have to install a Big Tool as MS Visual Studio which
contains a lot of libs and Dlls !
Are You using MMTOOL 4.50.0.23, I uploaded above here for You !
RegardsSorry, stupid mistake on my part. I was opening me.rom, not a11.bin.
Now I just need to figure out what to change >.<
Yeah, not sure how to insert the proper information into the bin? I know what hex entry it is (7BB2…) but not what to do with it.
(06-26-2014, 01:06 PM)effingterrible Wrote: [ -> ]
(06-26-2014, 11:45 AM)effingterrible Wrote: [ -> ]
(06-26-2014, 09:34 AM)BDMaster Wrote: [ -> ]Look the attachment !!!
Is your Windows missing some libs or dll !!!
I tried on XP and Win7 and all is right !
You are missing some Dll or libs, so to avoid this issue
You have to install a Big Tool as MS Visual Studio which
contains a lot of libs and Dlls !
Are You using MMTOOL 4.50.0.23, I uploaded above here for You !
RegardsSorry, stupid mistake on my part. I was opening me.rom, not a11.bin.
Now I just need to figure out what to change >.<
Yeah, not sure how to insert the proper information into the bin? I know what hex entry it is (7BB2…) but not what to do with it.
Hi friend,
what do You want to do ?
I cannot help You if I don’t understand what are You doing !
Let me know
Regards
(06-26-2014, 03:46 PM)BDMaster Wrote: [ -> ]
(06-26-2014, 01:06 PM)effingterrible Wrote: [ -> ]
(06-26-2014, 11:45 AM)effingterrible Wrote: [ -> ]
(06-26-2014, 09:34 AM)BDMaster Wrote: [ -> ]Look the attachment !!!
Is your Windows missing some libs or dll !!!
I tried on XP and Win7 and all is right !
You are missing some Dll or libs, so to avoid this issue
You have to install a Big Tool as MS Visual Studio which
contains a lot of libs and Dlls !
Are You using MMTOOL 4.50.0.23, I uploaded above here for You !
RegardsSorry, stupid mistake on my part. I was opening me.rom, not a11.bin.
Now I just need to figure out what to change >.<
Yeah, not sure how to insert the proper information into the bin? I know what hex entry it is (7BB2…) but not what to do with it.
Hi friend,
what do You want to do ?
I cannot help You if I don’t understand what are You doing !
Let me know
Regards
My bad, I just want to change the BIOS splash screen (pic is attached to OP).
Ok friend,
now i understand what You want !
Normaly this image are hidden into FreeForm Module !
So if do You know which one Module contains It We can try to replace It with ne image !
Otherwise We have to get the right module before !
Regards
Ok friend,
I have done this Mod, extracted Logo Dell Module Original, then redimensionate your Logo to the
same dimension as original and then replaced It to the original :
http://rghost.net/56609611
All repacked by Andy’s PMTool 2.56
Let me know
regards
(06-27-2014, 06:21 AM)BDMaster Wrote: [ -> ]Ok friend,
now i understand what You want !
Normaly this image are hidden into FreeForm Module !
So if do You know which one Module contains It We can try to replace It with ne image !
Otherwise We have to get the right module before !
Regards
Not sure which module it is unfortunately…
Pages: 1 2 3 4
Содержание
- Модификация BIOS AMI
- [BIOS/vBIOS — MODS] Prema Mod™ & Stock
- Recommended Posts
- Similar Content
- Модификация BIOS AMI
- Интеграция поддержки загрузки с NVME в legacy систему: идеальный случай
- Интеграция поддержки загрузки с NVME в legacy систему: идеальный случай
Модификация BIOS AMI
Здравствуйте. Не могу установить Windows 7×64 на Asus X553SA. Получаю BSOD 0x7E при инициализации boot.wim. Windows 7 x86 устанавливается нормально. Может ли такое поведение быть вызвано отсутствием переключателя на предыдущую версию ACPI-стандарта в BIOS? Если да, то подскажите, пожалуйста, как модифицировать прошивку. Дамп снял с помощью BIOS Backup ToolKit 2.0. Открыл в AMIBCP4.55.0070, нашел параметр OS Selection поставил в USER, но при сохранении получаю error occurred in bios rebuild #80000015 (и не важно, что бы я правил – даже просто открыть прошивку и сохранить не получается). Попробовал MMTool 3.19, но получаю при попытке загрузки ROM файла сообщение error loading rom image (100000h).
Помогите изменить параметр OS Selection в USER. Или объясните, в чем проблема? Что делаю неправильно?
То есть, проблемы с памятью и жестким диском исключены по каким-то причинам?
Ноутбук из коробки. Memtest и victoria ничего подозрительного не показали. BIOS 205 — последний
Если бы делал себе, то ставил бы 10-ку, но заказчик всегда прав)) Может есть какое-то решение, Win32 устанавливается норм.
НЕ ЗАГРУЖАЙ ЕЁ В UEFI . и USB3!
Как это отключить? В BIOS таких пунктов нет. Можете дамп посмотреть? Может что-то подправить можно?
rom.by/files/bios_10.zip
тоже устанавливаю msdn.. Но даже сборки x64 не устанавливаются.
взял boot.wim от 8-ки, а install.wim соответственно от 7-ки, слепил в образ и начал установку. Тут еще один сюрприз! Дохожу до выбора разделов и получаю: не найден необходимый драйвер для дисковода оптических дисков. Ну, т.к. WAIK уже установлен, закинул еще и нужные дрова на USB 3.0.
После перезагрузки тот же BSOD 0x7E.
Не силен я в перенаписании BIOS ) Я пошел бы по пути наименьшего сопротивления )
Источник
[BIOS/vBIOS — MODS] Prema Mod™ & Stock
By Guest, March 10, 2013 in Clevo
Recommended Posts

Similar Content
UEFI BIOS Version: GJETA4WW (2.54)
UEFI BIOS Date (Year-Month-Day): 2020-03-37
ME Firmware Version: 9.5.60.1952
Embedded Controller Version: GJHT30WW (1.14)
I need Battery Authentication whitelist Removal because my laptop showing «the battery installed is not supported.»
Result.rar & .rom file: https://www.mediafire.com/file/byxsoqpg4j3od25/result_rar_and_rom_file.zip/file
I’ve been searching all over the internet and these forums in particular and I just can’t seem to get any answers regarding GPU upgrades for the Clevo P150HM. Neither can I get any real info on the difference between the HM and the EM model — the EM seems to be the much more talked about model.
Anyway, my current GTX 580M is causing a black screen very occasionally and I decided to purchase a used GTX 980M (N16E-GX-A1) from aliexpress as a replacement.
The seller isn’t giving me much information and I am unsure if they’ve flashed the vbios on this card themselves, regardless of that I cannot seem to find a custom BIOS for this laptop either, the closest I found is P150EM_17_11_PM_v2 which is obviously for a EM not a HM model, again I don’t know much about these two models and if attempting a flash with that BIOS will brick my laptop.
The 980M is the correct form factor, it fits in perfectly and even warms up when I turn the laptop on, I can see the POST screen display but then it simply maxes the fans and beeps out until it shuts down. It would seem to be a pretty clear indication of incompatibility.
Model: Clevo P150HM
MB Series: P150HMx
BIOS Revision: 1.01.14
KBC/EC Firmware Revision: 1.00.12
Another version number listed (not sure for what): 2.10.1208
I understand this is both an old subject and an even older laptop, but I would be extremely thankful for any help available and I am willing to drill down to create my own custom BIOS if necessary but I just need a point in the right direction.
Failing all that, its not the end of the world as they’ve already agreed to a return and refund if I can’t figure this out.
I’ve got a pretty weird problem with my M18x R2. I already searched the web but couldn’t find an answer. A few days ago I changed some settings in the bios, if I remember correctly DMVT Pre-Allocated.
After saving this setting the notebook refuses to even POST. I get no beep errors or anything. If I press the power button the system turns on, the leds turn on and then the system shuts itself off. I already reset the cmos, the IME, tested different configurations and so on. If I remove all the memory sticks I actually get the memory error code. At this point I’m pretty sure that the bios got corrupted for some reason when saving these mentioned settings. Did anyone had a similar problem and got a solution for this? I repaired lot’s of notebook but never had an error like this.
The Bios installed is the a15 unlocked.
Источник
Модификация BIOS AMI
Здравствуйте. Не могу установить Windows 7×64 на Asus X553SA. Получаю BSOD 0x7E при инициализации boot.wim. Windows 7 x86 устанавливается нормально. Может ли такое поведение быть вызвано отсутствием переключателя на предыдущую версию ACPI-стандарта в BIOS? Если да, то подскажите, пожалуйста, как модифицировать прошивку. Дамп снял с помощью BIOS Backup ToolKit 2.0. Открыл в AMIBCP4.55.0070, нашел параметр OS Selection поставил в USER, но при сохранении получаю error occurred in bios rebuild #80000015 (и не важно, что бы я правил – даже просто открыть прошивку и сохранить не получается). Попробовал MMTool 3.19, но получаю при попытке загрузки ROM файла сообщение error loading rom image (100000h).
Помогите изменить параметр OS Selection в USER. Или объясните, в чем проблема? Что делаю неправильно?
То есть, проблемы с памятью и жестким диском исключены по каким-то причинам?
Ноутбук из коробки. Memtest и victoria ничего подозрительного не показали. BIOS 205 — последний
Если бы делал себе, то ставил бы 10-ку, но заказчик всегда прав)) Может есть какое-то решение, Win32 устанавливается норм.
НЕ ЗАГРУЖАЙ ЕЁ В UEFI . и USB3!
Как это отключить? В BIOS таких пунктов нет. Можете дамп посмотреть? Может что-то подправить можно?
rom.by/files/bios_10.zip
тоже устанавливаю msdn.. Но даже сборки x64 не устанавливаются.
взял boot.wim от 8-ки, а install.wim соответственно от 7-ки, слепил в образ и начал установку. Тут еще один сюрприз! Дохожу до выбора разделов и получаю: не найден необходимый драйвер для дисковода оптических дисков. Ну, т.к. WAIK уже установлен, закинул еще и нужные дрова на USB 3.0.
После перезагрузки тот же BSOD 0x7E.
Не силен я в перенаписании BIOS ) Я пошел бы по пути наименьшего сопротивления )
Источник
Интеграция поддержки загрузки с NVME в legacy систему: идеальный случай
Дано:
- ASUS P5E-VM DO
- Intel Optane 16GB
Задача:
- Реализовать загрузку с NVME диска без промежуточных устройств (USB Drive с UEFI/GRUB/etc.)
Информация взята мной в основном из двух источников: первого и второго, за что создателям оных больше спасибо! При этом, потенциального последовавшего по ссылкам я хочу предостеречь от чтения только первого поста.
В любом случае, нам для решения задачи понадобятся инструменты и информация. Инструменты — это собственно BIOS платы, OptionROM загрузчика, оснастка для модификации BIOS и OptionROM, а так же, возможно для прошивки BIOS. Информация — идентификаторы VENDOR_ID и DEVICE_ID нашего NVME устройства.
Начнем с информации!
Добыть информацию можно например, открыв свойства контроллера (не накопителя) в диспетчере устройств Windows: 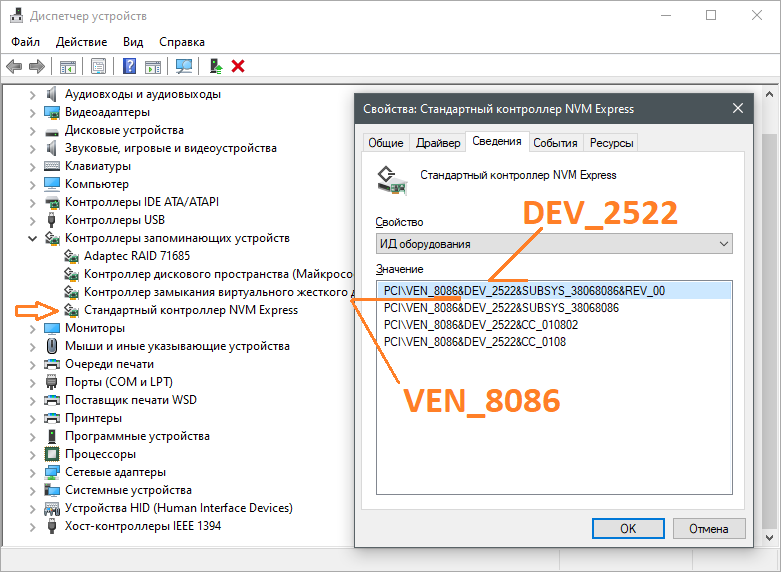
А можно, и открыв свойства накопителя, но тогда надо будет смотреть ID родителя: 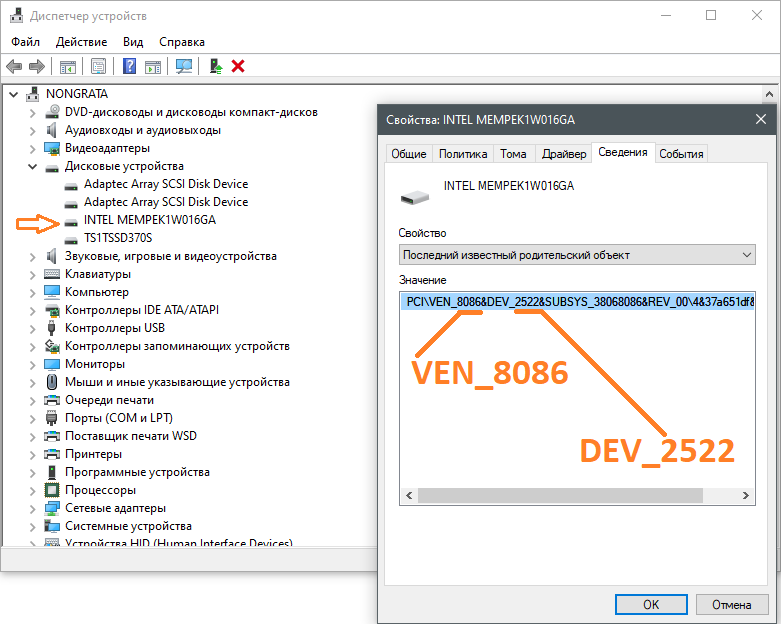
Так же, всегда есть альтернатива в виде консоли:

И конечно же есть GNU/Linux с lspci и огромное количество диагностического софта, который покажет DEVICE_ID и VENDOR_ID устройства NVME (контроллера, не диска!).
Продолжим с инструментами!
Т.к. у нас старый ASUS на Intel, то с долей вероятности 100% мы найдём там AMI BIOS, а значит, нам понадобится MMTOOL. Помимо оного нам понадобится OptionROM и встроенный в материнскую плату EZFLASH. Все инструменты, использованные при написании данного текста, а так же исходные и полученные файлы, доступны по ссылке. Архив содержит оригинальный BIOS версии 0902 (orig), его же, с обновленными микрокодами (771) и его же с обновленными микрокодами и NVME ROM (771NVME). Помимо этого архив содержит NvmeOpRom.bin и MMTOOL.EXE.
Имея информацию и инструменты, давайте же решим задачу и достигнем цели!
Считаю, что читатель немного умеет в MMTOOL. Если нет — стоит остановиться. Если да, то… открываем в MMTOOL образ BIOS: 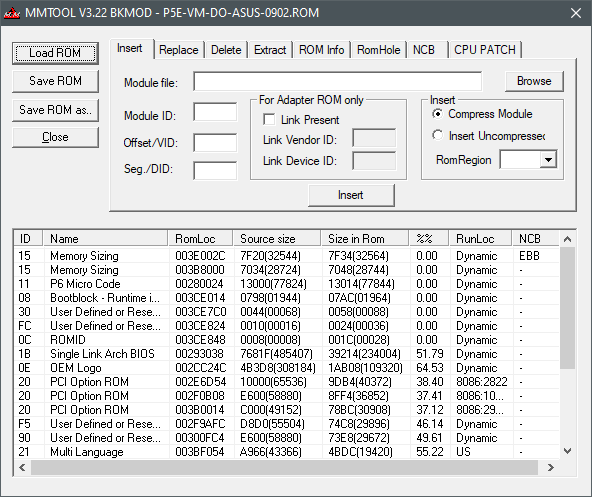
Импортируем в него OPTIONROM с верным Module_ID, DEV_ID и VEND_ID. Здесь важно отметить что Module_ID всегда будет иметь значение 20 (PCI OPTION ROM), а VID (Vendor ID) и DID (Device ID) будут отличаться от накопителя к накопителю: 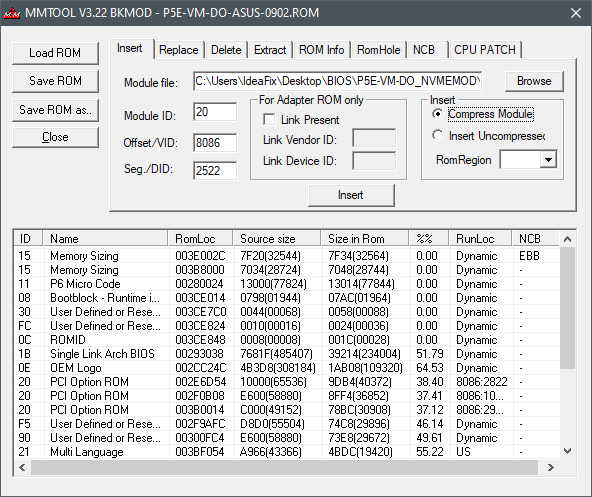
Сохраняемся, зашиваемся, профит: 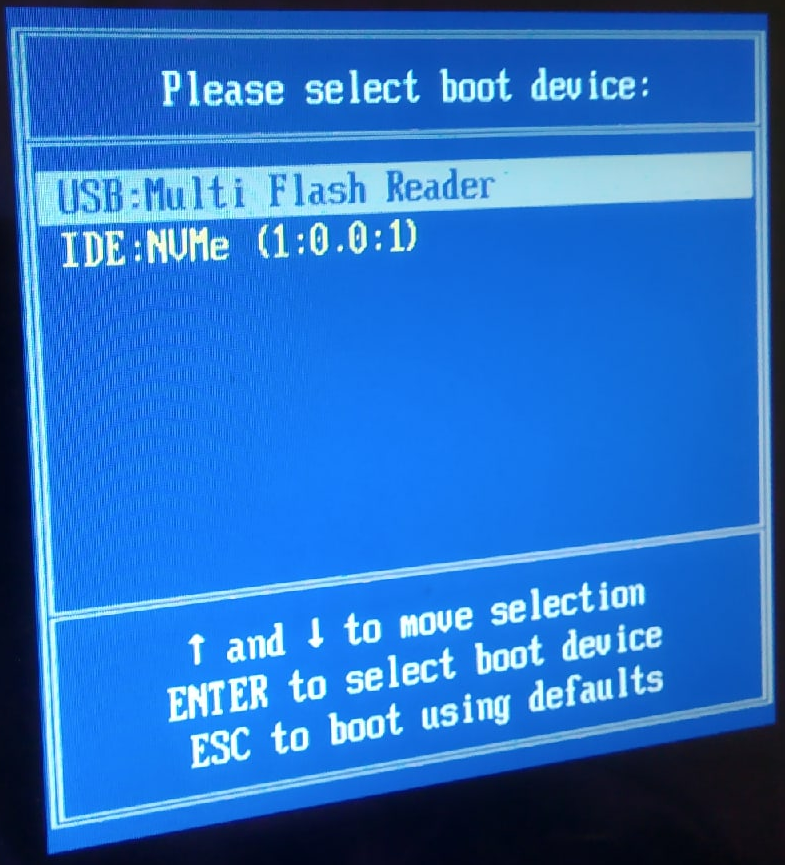
Вместо выводов:
- Это не универсальная инструкция по модификации Legacy AMI прошивок, но на многих платах всё будет аналогично.
- Intel Optane был установлен в пассивный переходник и пробовался как в PCI-E 16x слоте, так и в PCI-E 1x слоте. Работает и там и там, ID не меняются, но я читал про ситуации, когда ID контроллера может зависеть от слота PCI-E (процессорный и чипсетный?).
- Поддержка всего этого хозяйства на Windows XP, эффективность расположения SWAP на OPTANE и пр. остаются за скобками данного повествования.
- В данном конкретном моде данной конкретной платы, доступном по ссылке выше, добавлена поддержка загрузки ТОЛЬКО С ОДНОЙ МОДЕЛИ НАКОПИТЕЛЯ. Т.к. VID и DID задаются жестко, создать универсальный мод таким способом не возможно.
Win10 уместился, и даже осталось место для тестового файла CDM, только вот в процессе теста ОС сообщила, что включила мне оптимизацию памяти: 
Источник
Интеграция поддержки загрузки с NVME в legacy систему: идеальный случай
Дано:
- ASUS P5E-VM DO
- Intel Optane 16GB
Задача:
- Реализовать загрузку с NVME диска без промежуточных устройств (USB Drive с UEFI/GRUB/etc.)
Информация взята мной в основном из двух источников: первого и второго, за что создателям оных больше спасибо! При этом, потенциального последовавшего по ссылкам я хочу предостеречь от чтения только первого поста.
В любом случае, нам для решения задачи понадобятся инструменты и информация. Инструменты — это собственно BIOS платы, OptionROM загрузчика, оснастка для модификации BIOS и OptionROM, а так же, возможно для прошивки BIOS. Информация — идентификаторы VENDOR_ID и DEVICE_ID нашего NVME устройства.
Начнем с информации!
Добыть информацию можно например, открыв свойства контроллера (не накопителя) в диспетчере устройств Windows:
А можно, и открыв свойства накопителя, но тогда надо будет смотреть ID родителя:
Так же, всегда есть альтернатива в виде консоли:
И конечно же есть GNU/Linux с lspci и огромное количество диагностического софта, который покажет DEVICE_ID и VENDOR_ID устройства NVME (контроллера, не диска!).
Продолжим с инструментами!
Т.к. у нас старый ASUS на Intel, то с долей вероятности 100% мы найдём там AMI BIOS, а значит, нам понадобится MMTOOL. Помимо оного нам понадобится OptionROM и встроенный в материнскую плату EZFLASH. Все инструменты, использованные при написании данного текста, а так же исходные и полученные файлы, доступны по ссылке. Архив содержит оригинальный BIOS версии 0902 (orig), его же, с обновленными микрокодами (771) и его же с обновленными микрокодами и NVME ROM (771NVME). Помимо этого архив содержит NvmeOpRom.bin и MMTOOL.EXE.
Имея информацию и инструменты, давайте же решим задачу и достигнем цели!
Считаю, что читатель немного умеет в MMTOOL. Если нет — стоит остановиться. Если да, то… открываем в MMTOOL образ BIOS:
Импортируем в него OPTIONROM с верным Module_ID, DEV_ID и VEND_ID. Здесь важно отметить что Module_ID всегда будет иметь значение 20 (PCI OPTION ROM), а VID (Vendor ID) и DID (Device ID) будут отличаться от накопителя к накопителю:
Сохраняемся, зашиваемся, профит:
Вместо выводов:
- Это не универсальная инструкция по модификации Legacy AMI прошивок, но на многих платах всё будет аналогично.
- Intel Optane был установлен в пассивный переходник и пробовался как в PCI-E 16x слоте, так и в PCI-E 1x слоте. Работает и там и там, ID не меняются, но я читал про ситуации, когда ID контроллера может зависеть от слота PCI-E (процессорный и чипсетный?).
- Поддержка всего этого хозяйства на Windows XP, эффективность расположения SWAP на OPTANE и пр. остаются за скобками данного повествования.
- В данном конкретном моде данной конкретной платы, доступном по ссылке выше, добавлена поддержка загрузки ТОЛЬКО С ОДНОЙ МОДЕЛИ НАКОПИТЕЛЯ. Т.к. VID и DID задаются жестко, создать универсальный мод таким способом не возможно.
Win10 уместился, и даже осталось место для тестового файла CDM, только вот в процессе теста ОС сообщила, что включила мне оптимизацию памяти:
Источник
[BIOS/vBIOS — MODS] Prema Mod™ & Stock
By Guest, March 10, 2013 in Clevo
Recommended Posts
Similar Content
UEFI BIOS Version: GJETA4WW (2.54)
UEFI BIOS Date (Year-Month-Day): 2020-03-37
ME Firmware Version: 9.5.60.1952
Embedded Controller Version: GJHT30WW (1.14)
I need Battery Authentication whitelist Removal because my laptop showing «the battery installed is not supported.»
Result.rar & .rom file: https://www.mediafire.com/file/byxsoqpg4j3od25/result_rar_and_rom_file.zip/file
I’ve been searching all over the internet and these forums in particular and I just can’t seem to get any answers regarding GPU upgrades for the Clevo P150HM. Neither can I get any real info on the difference between the HM and the EM model — the EM seems to be the much more talked about model.
Anyway, my current GTX 580M is causing a black screen very occasionally and I decided to purchase a used GTX 980M (N16E-GX-A1) from aliexpress as a replacement.
The seller isn’t giving me much information and I am unsure if they’ve flashed the vbios on this card themselves, regardless of that I cannot seem to find a custom BIOS for this laptop either, the closest I found is P150EM_17_11_PM_v2 which is obviously for a EM not a HM model, again I don’t know much about these two models and if attempting a flash with that BIOS will brick my laptop.
The 980M is the correct form factor, it fits in perfectly and even warms up when I turn the laptop on, I can see the POST screen display but then it simply maxes the fans and beeps out until it shuts down. It would seem to be a pretty clear indication of incompatibility.
Model: Clevo P150HM
MB Series: P150HMx
BIOS Revision: 1.01.14
KBC/EC Firmware Revision: 1.00.12
Another version number listed (not sure for what): 2.10.1208
I understand this is both an old subject and an even older laptop, but I would be extremely thankful for any help available and I am willing to drill down to create my own custom BIOS if necessary but I just need a point in the right direction.
Failing all that, its not the end of the world as they’ve already agreed to a return and refund if I can’t figure this out.
I’ve got a pretty weird problem with my M18x R2. I already searched the web but couldn’t find an answer. A few days ago I changed some settings in the bios, if I remember correctly DMVT Pre-Allocated.
After saving this setting the notebook refuses to even POST. I get no beep errors or anything. If I press the power button the system turns on, the leds turn on and then the system shuts itself off. I already reset the cmos, the IME, tested different configurations and so on. If I remove all the memory sticks I actually get the memory error code. At this point I’m pretty sure that the bios got corrupted for some reason when saving these mentioned settings. Did anyone had a similar problem and got a solution for this? I repaired lot’s of notebook but never had an error like this.
The Bios installed is the a15 unlocked.
Источник
Модификация BIOS AMI
Здравствуйте. Не могу установить Windows 7×64 на Asus X553SA. Получаю BSOD 0x7E при инициализации boot.wim. Windows 7 x86 устанавливается нормально. Может ли такое поведение быть вызвано отсутствием переключателя на предыдущую версию ACPI-стандарта в BIOS? Если да, то подскажите, пожалуйста, как модифицировать прошивку. Дамп снял с помощью BIOS Backup ToolKit 2.0. Открыл в AMIBCP4.55.0070, нашел параметр OS Selection поставил в USER, но при сохранении получаю error occurred in bios rebuild #80000015 (и не важно, что бы я правил – даже просто открыть прошивку и сохранить не получается). Попробовал MMTool 3.19, но получаю при попытке загрузки ROM файла сообщение error loading rom image (100000h).
Помогите изменить параметр OS Selection в USER. Или объясните, в чем проблема? Что делаю неправильно?
То есть, проблемы с памятью и жестким диском исключены по каким-то причинам?
Ноутбук из коробки. Memtest и victoria ничего подозрительного не показали. BIOS 205 — последний
Если бы делал себе, то ставил бы 10-ку, но заказчик всегда прав)) Может есть какое-то решение, Win32 устанавливается норм.
НЕ ЗАГРУЖАЙ ЕЁ В UEFI . и USB3!
Как это отключить? В BIOS таких пунктов нет. Можете дамп посмотреть? Может что-то подправить можно?
rom.by/files/bios_10.zip
тоже устанавливаю msdn.. Но даже сборки x64 не устанавливаются.
взял boot.wim от 8-ки, а install.wim соответственно от 7-ки, слепил в образ и начал установку. Тут еще один сюрприз! Дохожу до выбора разделов и получаю: не найден необходимый драйвер для дисковода оптических дисков. Ну, т.к. WAIK уже установлен, закинул еще и нужные дрова на USB 3.0.
После перезагрузки тот же BSOD 0x7E.
Не силен я в перенаписании BIOS ) Я пошел бы по пути наименьшего сопротивления )
Источник
Интеграция поддержки загрузки с NVME в legacy систему: идеальный случай
Дано:
- ASUS P5E-VM DO
- Intel Optane 16GB
Задача:
- Реализовать загрузку с NVME диска без промежуточных устройств (USB Drive с UEFI/GRUB/etc.)
Информация взята мной в основном из двух источников: первого и второго, за что создателям оных больше спасибо! При этом, потенциального последовавшего по ссылкам я хочу предостеречь от чтения только первого поста.
В любом случае, нам для решения задачи понадобятся инструменты и информация. Инструменты — это собственно BIOS платы, OptionROM загрузчика, оснастка для модификации BIOS и OptionROM, а так же, возможно для прошивки BIOS. Информация — идентификаторы VENDOR_ID и DEVICE_ID нашего NVME устройства.
Начнем с информации!
Добыть информацию можно например, открыв свойства контроллера (не накопителя) в диспетчере устройств Windows:
А можно, и открыв свойства накопителя, но тогда надо будет смотреть ID родителя:
Так же, всегда есть альтернатива в виде консоли:
И конечно же есть GNU/Linux с lspci и огромное количество диагностического софта, который покажет DEVICE_ID и VENDOR_ID устройства NVME (контроллера, не диска!).
Продолжим с инструментами!
Т.к. у нас старый ASUS на Intel, то с долей вероятности 100% мы найдём там AMI BIOS, а значит, нам понадобится MMTOOL. Помимо оного нам понадобится OptionROM и встроенный в материнскую плату EZFLASH. Все инструменты, использованные при написании данного текста, а так же исходные и полученные файлы, доступны по ссылке. Архив содержит оригинальный BIOS версии 0902 (orig), его же, с обновленными микрокодами (771) и его же с обновленными микрокодами и NVME ROM (771NVME). Помимо этого архив содержит NvmeOpRom.bin и MMTOOL.EXE.
Имея информацию и инструменты, давайте же решим задачу и достигнем цели!
Считаю, что читатель немного умеет в MMTOOL. Если нет — стоит остановиться. Если да, то… открываем в MMTOOL образ BIOS:
Импортируем в него OPTIONROM с верным Module_ID, DEV_ID и VEND_ID. Здесь важно отметить что Module_ID всегда будет иметь значение 20 (PCI OPTION ROM), а VID (Vendor ID) и DID (Device ID) будут отличаться от накопителя к накопителю:
Сохраняемся, зашиваемся, профит:
Вместо выводов:
- Это не универсальная инструкция по модификации Legacy AMI прошивок, но на многих платах всё будет аналогично.
- Intel Optane был установлен в пассивный переходник и пробовался как в PCI-E 16x слоте, так и в PCI-E 1x слоте. Работает и там и там, ID не меняются, но я читал про ситуации, когда ID контроллера может зависеть от слота PCI-E (процессорный и чипсетный?).
- Поддержка всего этого хозяйства на Windows XP, эффективность расположения SWAP на OPTANE и пр. остаются за скобками данного повествования.
- В данном конкретном моде данной конкретной платы, доступном по ссылке выше, добавлена поддержка загрузки ТОЛЬКО С ОДНОЙ МОДЕЛИ НАКОПИТЕЛЯ. Т.к. VID и DID задаются жестко, создать универсальный мод таким способом не возможно.
Win10 уместился, и даже осталось место для тестового файла CDM, только вот в процессе теста ОС сообщила, что включила мне оптимизацию памяти:
Источник
Bios Mods -The Best BIOS Update and Modification Source
effingterrible
Sorry to bother you, I tried all the tools I could get my hands on to try to mod this BIOS but none of them would open the BIN file and I couldn’t figure out why. It’s an AMI BIOS.
I tried modding the A11 BIOS for the Aurora R4, the image is attached and the link is below.
[censored] , even a point in the right direction would be great. Thanks for your time
BDMaster
(06-25-2014, 04:15 PM) effingterrible Wrote: [ -> ] Hey there,
Sorry to bother you, I tried all the tools I could get my hands on to try to mod this BIOS but none of them would open the BIN file and I couldn’t figure out why. It’s an AMI BIOS.
I tried modding the A11 BIOS for the Aurora R4, the image is attached and the link is below.
[censored] , even a point in the right direction would be great. Thanks for your time
Hi friend,
here your Bios unpacked :
Here MMTool to open It :
Here Andy’s PMTool 2.56 to open it :
Let me know
regards
effingterrible
(06-25-2014, 04:15 PM) effingterrible Wrote: [ -> ] Hey there,
Sorry to bother you, I tried all the tools I could get my hands on to try to mod this BIOS but none of them would open the BIN file and I couldn’t figure out why. It’s an AMI BIOS.
I tried modding the A11 BIOS for the Aurora R4, the image is attached and the link is below.
[censored] , even a point in the right direction would be great. Thanks for your time
Hi friend,
here your Bios unpacked :
Here MMTool to open It :
Here Andy’s PMTool 2.56 to open it :
Thanks for this!
But MMTool just gives ‘error loading firmware image’. Had the same error message previously as well.
BDMaster
effingterrible
(06-26-2014, 09:34 AM) BDMaster Wrote: [ -> ] Look the attachment .
Is your Windows missing some libs or dll .
I tried on XP and Win7 and all is right !
You are missing some Dll or libs, so to avoid this issue
You have to install a Big Tool as MS Visual Studio which
contains a lot of libs and Dlls !
Are You using MMTOOL 4.50.0.23, I uploaded above here for You !
Regards
Sorry, stupid mistake on my part. I was opening me.rom, not a11.bin.
Now I just need to figure out what to change >. (06-26-2014, 11:45 AM) effingterrible Wrote: [ -> ]
(06-26-2014, 09:34 AM) BDMaster Wrote: [ -> ] Look the attachment .
Is your Windows missing some libs or dll .
I tried on XP and Win7 and all is right !
You are missing some Dll or libs, so to avoid this issue
You have to install a Big Tool as MS Visual Studio which
contains a lot of libs and Dlls !
Are You using MMTOOL 4.50.0.23, I uploaded above here for You !
Regards
Sorry, stupid mistake on my part. I was opening me.rom, not a11.bin.
Now I just need to figure out what to change >. (06-26-2014, 01:06 PM) effingterrible Wrote: [ -> ]
(06-26-2014, 09:34 AM) BDMaster Wrote: [ -> ] Look the attachment .
Is your Windows missing some libs or dll .
I tried on XP and Win7 and all is right !
You are missing some Dll or libs, so to avoid this issue
You have to install a Big Tool as MS Visual Studio which
contains a lot of libs and Dlls !
Are You using MMTOOL 4.50.0.23, I uploaded above here for You !
Regards
Sorry, stupid mistake on my part. I was opening me.rom, not a11.bin.
Now I just need to figure out what to change >. (06-26-2014, 03:46 PM) BDMaster Wrote: [ -> ]
(06-26-2014, 09:34 AM) BDMaster Wrote: [ -> ] Look the attachment .
Is your Windows missing some libs or dll .
I tried on XP and Win7 and all is right !
You are missing some Dll or libs, so to avoid this issue
You have to install a Big Tool as MS Visual Studio which
contains a lot of libs and Dlls !
Are You using MMTOOL 4.50.0.23, I uploaded above here for You !
Regards
Sorry, stupid mistake on my part. I was opening me.rom, not a11.bin.
Now I just need to figure out what to change >. (06-27-2014, 06:21 AM) BDMaster Wrote: [ -> ] Ok friend,
now i understand what You want !
Normaly this image are hidden into FreeForm Module !
So if do You know which one Module contains It We can try to replace It with ne image !
Otherwise We have to get the right module before !
Regards
Источник
MMTool — Error getting Firmware information


Guten Tag zusammen,
habt Ihr eine Idee was für ein Problem MMTool bei mir hat sobald ich, egal welche, .ffs-Datei integrieren will kommt bei mir der Fehler: «Error getting Firmware information»
Die Datei wird mit dann leider nicht in der Liste angezeigt jedoch im Report als drauf mit aufgenommen,
hab den Report mal in den Anhang gepackt und zum Test einfach mal die Enhanced Fat als weitere Testdatei genommen.
Zu beginn des Reports steht noch Firmware Information und eine lange Liste, aber seht selbst.
Kann mir von Euch da jemand helfen, oder ist das «normal»?
Files
(75.17 kB, downloaded 99 times, last: Jan 1st 2023 )
OS X 10.10 — Intel Core i5 4670K — GA-Z87X-D3H (Ozmosis 1479) — 8 GB Singel Channel DDR3 RAM — BCM94360CD WLAN/Bluetooth Combo
680 Watt beQuiet E9 Straight Power — 500 GB Western Digital HDD — 120 GB OCZ Agility III SSD — Asus GeForce GTX 660 TI


Wie machst du das ganze, du musst unter index auf 01 sein s.Bild!
Images
» Fragen gehören ins Forum und nicht in mein Postfach, kein Support per PN! »
MacPro6,1
Mainboard : Gigabyte Z87X-UD3H
BIOS : Ozmosis
CPU : Intel i7 4770 @ 3,40Ghz
Grafik : XFX Radeon HD 6870 900M 1GB
USB Audio: Terratec AUREON 5.1
WLAN : PCIe Airport Extreme AW-NE771 ( Atheros 9280 )
Ram : Corsair Vengeance 16GB Kit DDR3 1600MHz CL9
SSD: 2 x 120GB SSD Mushkin Chronos Deluxe RAID0
Geekbench 10.9.x
Geekbench 10.10.x
Ich geh ganz normal auf den Tab «Insekt» wähle meine Datei aus (z. B. «Ozmosis.fss»), schaue das der Vol.Index auf «02:01-00» steht und drücke auf Insert. Kurz darauf kommt die Fehlermeldung (siehe Bild).
Images
OS X 10.10 — Intel Core i5 4670K — GA-Z87X-D3H (Ozmosis 1479) — 8 GB Singel Channel DDR3 RAM — BCM94360CD WLAN/Bluetooth Combo
680 Watt beQuiet E9 Straight Power — 500 GB Western Digital HDD — 120 GB OCZ Agility III SSD — Asus GeForce GTX 660 TI
Bei deinem Board dem Z87X-D3H seht in der DB ein Warnhinweis  der dann in der Erklärung hier in verlinkt
  http://hackintosh-forum.de/ind…&postID=101301#post101301 das gilt analog auch für dein BIOS deshalb steht es auch dort
Aber ich versuche das nun mal ausführlicher zu erklären.
Hier mal der Ursprungs Zustand des Z87X-D3H-F8 wir betrachten Volumen 2 und Volumen 1 bei diesem Bios, bei «Normalen» Biosen ist nur Volumen 2 von Interesse hier leider nicht, Erklärung weiter unten.
Normaler weise würden wir nun um Ozmosis dort unter zubringen einfach die Core_dxe unkomprimiert extrahieren und wieder komprimiert einsetzen um Platz im Volumen 2 zu schaffen, ich tue es einfach mal
Wie wir nun sehen ist genug Platz im Volumen 2 nur leider ist der freie Platz in Volumen 1 auch geschrumpft von 141 KB auf 59 KB und genau hier liegt das Problem des ganzen.
Volumen 2 ist ein Teil des Volumens 1 vereinfacht ausgedrückt und schon gepackt. ich vergleiche das gerne mit einer Zip Order1 der einen Zip Order2 enthält (Ist nicht so ganz korrekt, weiss nur nicht wie ich es besser umschreiben soll).
Bei «Normalen» Biosen braucht Volumen 1 nicht beachtet werden bei diesem und einigen anderen leider schon.
So hier mal Volumen 1 wenn ich Core_dxe gelöscht habe
um das mal zu verdeutlichen.
Also alles was ich im Volumen 2 unterbringen möchte verbraucht auch Platz im Volumen 1 und natürlich auch im Volumen 2 man benötigt für Ozmosis minimal diese Dateien
HfsPlus.ffs 14 KB
Ozmosis.ffs 118 KB
OzmosisDefaults.ffs 252 Byte sagen wir einfach 1 KB
PartitionDxe.ffs 6 KB (könnte man auch weglassen bei gewissen Systemen, aber das führt hier zu weit wir packen es einfach mal mit rein.)
SmcEmulatorKext.ffs 34 KB
Ergibt in Summe 173 KB
Wenn ich nun wie gewohnt vorgehe, ist beim Ozmosis.ffs ende und mir wird der Fehler MMTool — Error getting Firmware information angezeigt, der Report ergibt dann dieses Bild
Das Bios ist nun defekt, vereinfacht ausgedrückt geplatzt, wenn man es sich nun versucht zu flashen, wird der Rechner nicht mehr Booten.
Denn die freie große von Volumen 1 beeinflusst auch die Größe der *.ffs Dateien die ich hinzufügen kann, ist nicht mehr genug Platz in Volumen 1 um (vereinfacht ausgedrückt) die *ffs Datei aufzunehmen, um sie dann im Volumen 2 zu Speichern, wird das Bio Platzen.
Wir hatten 59 KB noch frei nachdem ich die Core_DXE gepackt wieder integriert hatte, dann habe ich die HfsPlus.ffs 14 KB in das Bios Integriert, Volumen 1 ist dadurch noch kleiner geworden, die Ozmosis.ffs 118 KB ist aber nun zu groß da größer als der restliche bzw. die anfänglichen 59 KB die frei waren.
Also wie mache ich es nun Richtig bei einem Bios das dieses Verhalten Zeigt wie hier geschrieben löschen wir einen Teil http://hackintosh-forum.de/ind…&postID=101301#post101301
- TcpDxe
- Dhcp4Dxe
- Ip4ConfigDxe
- Ip4Dxe
- Mtftp4Dxe
- Udp4Dxe
- Dhcp6Dxe
- Ip6Dxe
- Mtftp6Dxe
- Udp6Dxe
Nach dem Löschen haben wir nun Platz in Volumen 1 und 2 um Ozmosis hinzu zufügen, die Core_DXE lassen wir einfach so wie sie ist.
Mann kann natürlich noch versuchen das ein oder andere zu löschen um mehr Platz zu schaffen, nur ist das BIOS dann nicht mehr für alle geeignet und so etwas biete ich dann hier auch nicht an.
nach dem Zufügender der oben genanten Files für Ozmosis im Minimum sieht es dann so aus.
So das war es dann auch schon mit dem Hinzufügen wenn gewünscht dann halt noch die DSDT und SSDT seinen Wünschen anpassen, ist ja schon beschrieben hier im Board.
Ich hoffe das hilft dem ein oder anderen hier der selbst sein Bios mit Ozmosis versieht, warum einiges mit dem ein oder andern Bios nicht so einfach möglich ist.
Источник