Сегодня просмотр видео в Интернете стал наиболее потребляемым контентом, поскольку с тех пор видеоконтент заполонил Интернет. После этого просмотр видео в Интернете стал предпочтительной формой контента. При воспроизведении видео возникает ошибка, которая не позволяет воспроизвести видео. При этом, по какой причине возникает ошибка при воспроизведении видео? Эта ошибка обычно возникает из-за расширений, файлов cookie, просмотра видео на собственном веб-сайте с видеоконтентом или иногда из-за неправильной настройки встроенного медиаплеера. Мы воспроизводим видео в Интернете, поэтому для начала:
1. Проверьте подключение к Интернету
-
Убедитесь, что у вас хорошее подключение к Интернету.
-
Если какие-либо видео воспроизводятся на других вкладках, перейдите на все вкладки и избегайте большой нагрузки на ваше интернет-соединение.
-
Воспроизведение видео в формате HD потребляет больше интернета, поэтому избегание буферизации и непрерывное воспроизведение ухудшают качество видео.
-
Воспроизведение видео в других браузерах.
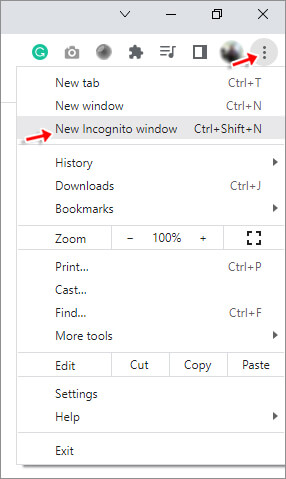
2. Используйте режим инкогнито
Эта ошибка возникает из-за того, что расширения, установленные в браузере, блокируют часть видеоконтента. Поэтому, чтобы избежать проблем с расширением, воспроизводите видео в режиме инкогнито.
Выполните следующие действия, чтобы играть в режиме инкогнито:
-
Откройте Chrome и щелкните значок с тремя точками в правом верхнем углу панели инструментов.
-
Щелкните Новое окно в режиме инкогнито.
ИЛИ
Нажмите клавиши CTRL + Shift + N, чтобы напрямую открыть режим инкогнито.
3. Сброс настроек браузера
Иногда вы пытаетесь решить эту проблему разными способами, но все терпят неудачу. Поэтому, если вам нужна помощь в понимании дальнейших действий, просто сбросьте настройки браузера.
Выполните следующие действия для сброса:
-
Откройте Chrome и щелкните значок с тремя точками в правом верхнем углу панели инструментов.
-
Щелкните Настройки.
-
Спуститесь в нижний левый угол и выберите «Сброс и очистка».
-
Выберите Восстановить исходные настройки по умолчанию.
Все готово! Теперь проверьте, воспроизводится ли видео без ошибок.
4. Обновите версию браузера
В редких случаях ваше видео может не воспроизводиться из-за более старой версии. Итак, чтобы обновить его до новой версии, выполните следующие действия:
-
Откройте Chrome и щелкните значок с тремя точками в правом верхнем углу панели инструментов.
-
Нажмите Настройки
-
Перейдите в нижний левый угол и выберите «О Chrome».
После завершения обновления нажмите «Перезапустить», чтобы завершить обновление.
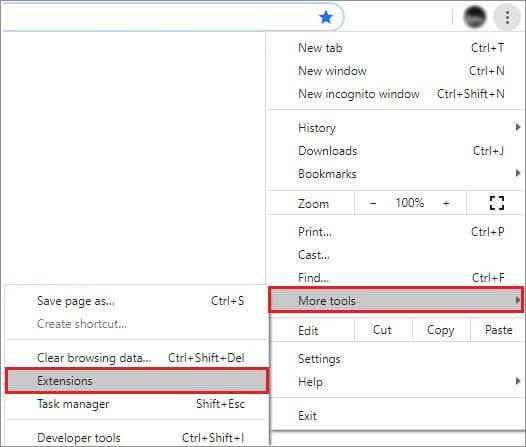
5. Отключить расширения
Вы можете проверить, не вызывают ли расширения браузера ошибку. Вы можете сделать это, воспроизведя видео в режиме инкогнито. Если видео хорошо воспроизводится в режиме инкогнито, значит, ошибка в расширениях. Так что лучше отключить расширения.
Для этого выполните следующие действия:
-
Откройте Chrome и щелкните значок с тремя точками в правом верхнем углу панели инструментов.
-
Переместите курсор к дополнительным инструментам
-
Выберите расширения, найденные в подразделе.
Закройте окно и снова откройте его и проверьте, воспроизводится ли видео (если воспроизводится, значит, ошибка исправлена).
6. Отключить аппаратное ускорение
Аппаратное ускорение — это тип функции, который помогает выполнять задачи с интенсивным использованием графики в браузере для улучшения. Иногда эта функция не работает, что приводит к ошибке при загрузке медиафайла, который невозможно воспроизвести. Если это происходит и в вашем случае, то лучше отключить эту функцию.
Следуйте процессу, чтобы сделать это:
-
Откройте Chrome и щелкните значок с тремя точками в правом верхнем углу панели инструментов.
-
Нажмите Настройки
-
Перейдите в нижний левый угол и выберите «Система».
-
Отключите это (используйте аппаратное ускорение, если оно доступно).
Больно сталкиваться с этим (ошибка загрузки медиафайла не может быть воспроизведена). Но теперь не будет проблем с воспроизведением видео, поскольку мы предоставили вам типы решений для исправления ошибки. Это работает во всех типах браузеров и даже на компьютерах и устройствах Android.
Попробуйте все виды методов, чтобы исправить свои ошибки, иногда один подход не может вам помочь. Итак, как только вы сможете исправить ошибку, теперь прокомментируйте метод, который помог вам исправить ошибку. К сожалению, если ваши видео повреждены, пользователям необходимо выбрать программное обеспечение для восстановления видео.
![]()
![]()
![]()
![]()
Краткий обзор на Error Loading Media File Could Not Be Played
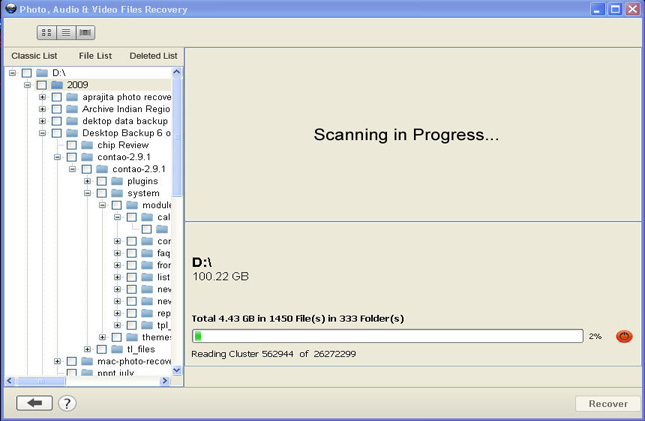
Глядя на решения из Error Loading Media File Could Not Be Played? Это один из основных вопросов, которые почти каждый пользователи могли бы встретить в любом случае их жизни. Цифровые фото и видео можно получить случайно удаленные или может получить поврежден из-за какой-либо конкретной ошибки. В такой ситуации, ранее сохраненные файлы не могут быть доступны в дальнейшем. На данном этапе возникает необходимость фото восстановления программного обеспечения. Это один из самых опытных утилита, которая была разработана для достижения Error Loading Media File Could Not Be Played выпуск удобно. Это лучший инструмент для восстановления поврежденных, удаленных без вести, отформатированных и недоступных изображения и видео с цифровой камеры или любые другие устройства хранения. Это был предназначен исключительно профессионалами, чтобы спасти фотографии, а также видео и преодолеть проблемы коррупции карта памяти независимо от его причины.
Error Loading Media File Could Not Be Played: почему фото становится недоступный
Фотографии становятся недоступными и пользователь может потерять свои ценные картины из запоминающего устройства, по следующим причинам: –
- Когда сохраненные изображения удаляются случайно то Error Loading Media File Could Not Be Played может столкнуться.
- Если вы отформатировали диск.
- В связи с тяжелой вируса атаки.
- Неправильная обработка из Устройство.
- из-за файловой системы коррупция.
- из-за физически поврежденные медиа.
- Файл с коррупцией Заголовок.
Помимо упомянутых выше причин, не может быть также некоторые другие возможности, благодаря которым, необходимые для Error Loading Media File Could Not Be Played решения возникает для пользователей. К сожалению, если вы столкнулись с потерей фотографий по любой из вышеупомянутых причин и не иметь действительный резервного копирования, то лучше сделать выбор в пользу фото восстановление Программное обеспечение к решать Error Loading Media File Could Not Be Played выпуск в то же время.
Избежание типичных ошибок, чтобы предотвратить Error Loading Media File Could Not Be Played вопросов для будущего
Один глупые ошибки или небольшое беспечность достаточно, чтобы стереть все памятные и захватывающие моменты своего прошлого. Недаром сказано, “Профилактика всегда лучше лечения”. В то время как большинство проблем, связанных с Error Loading Media File Could Not Be Played есть решение, но было бы лучше, чтобы не противостоять ему, принимая некоторые меры. Таким образом, пользователям рекомендуется позаботиться о следующих пунктах, указанных ниже, если они не хотят быть в ужасном положении Error Loading Media File Could Not Be Played, который может быть довольно грязным время от времени.
- Никогда не вынимайте карту памяти, когда она находится в использовании.
- Всегда безопасно извлечь карту памяти перед ее извлечением из гнезда.
- Не нажимайте фотографии и записывать видео, когда батарея разряжена, чтобы избежать Error Loading Media File Could Not Be Played.
- Всегда будьте осторожны при удалив ненужные файлы
- избегать использования “Удалить все” кнопки из цифровой камеры
- Не плохо обращаться цифровой камеры или карты памяти.
Примечание: Не используйте карты памяти, если вы удалили все фотографии и видеосюжеты с это. Это не позволит возможности перезаписи и замены данных на карте памяти. После перезаписи, вариант для спасательных данных в случае Error Loading Media File Could Not Be Played будет почти невозможно.
![]()
![]()
![]()
![]()
Лучшее решение для Error Loading Media File Could Not Be Played
фото восстановление Программное обеспечение является одним из надежных и продвинутый инструмент, который обладает способностью, чтобы спасти потерянные или удаленные фотографии. Она была разработана на работающих специалистов, которые имеют большой опыт в этой области. Программное обеспечение имеет сильную технику сканирования и все новейшие функции, которые могут легко разрешить Error Loading Media File Could Not Be Played и восстановления фотографий и видео. Она сканирует устройство хранения глубоко и обнаружить все недостающие файлы. После этого он предоставляет возможность увидеть превью извлекаемых элементов и восстановить их куда вы хотите для быстрого доступа. Сегодня она имеет множество довольных пользователей во всем мире, которые пытались его для того, чтобы исправить Error Loading Media File Could Not Be Played выпуск. Мало того, что у него есть также некоторые удивительные особенности, что делает его популярным в сегменте из фото восстановления. Однако можно сказать, что это единственный безопасный способ, которые обеспечивают полное и мгновенное решение для Error Loading Media File Could Not Be Played в очень меньше времени, не теряя ни одной фотографии во время восстановления. Поэтому можно рассчитывать на программное обеспечение, чтобы получить удовлетворение и впечатляющие результаты.
Преимущества использования фото восстановление Программное обеспечение для Error Loading Media File Could Not Be Played
- это способен решать Error Loading Media File Could Not Be Played и восстановить потерянные, удаленные и поврежденные фотографии, видео с карты памяти.
- Имеет потенциал, чтобы восстановить даже сильно поврежденные файлы, а также отформатированную карту памяти.
- Совместим с ОС Windows и Mac OS.
- Легко восстановить JPEG, PNG, TIFF, MOS, PSP, РСТ, JPG, GIF, BMP и т.д. файлы и исправить Error Loading Media File Could Not Be Played.
- Также восстановить удаленные или поврежденные аудио, видео и другие мультимедийные файлы в удобном виде.
- Обеспечить механизм, чтобы добавить заголовки файлов в списке фото, аудио, видео товары по Просто перетащите метод.
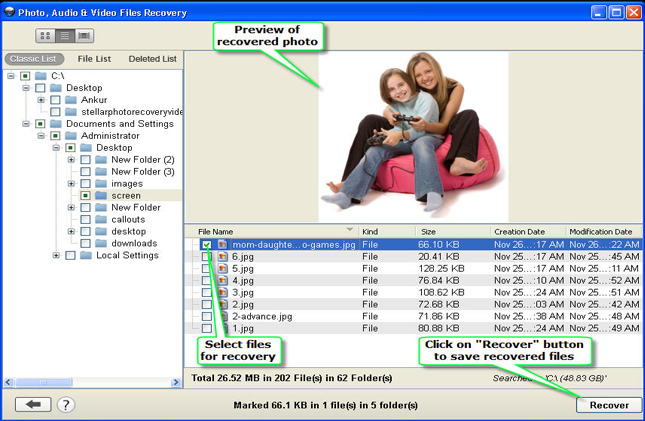
- Генерация превью восстанавливаемых файлов перед его сохранением.
- Удобный графический интерфейс для удобной навигации.
- Наличие различных опций сканирования, как, Advance, быстрый, Полная проверка.
- Совместимость со всеми Mac OS X, а также Windows операционная система.
- Поддерживает различные Mac или Windows, версии, как Mac OS X Tiger, Lion Leopard, Panther и Windows Vista, 7, 8 и т.д. соответственно.
- Поддержка различных файловой системы, такие как HFSX, HFS, HFS +, NTFS, FAT и т.д.
- Возможность восстановить изображения с карты памяти, чтобы преодолеть Error Loading Media File Could Not Be Played на устройствах хранения, таких как микро-SD, CF, XD карты, SDHC и т.д.
- Поддерживает все цифровые камеры, мобильные телефоны, планшеты и т.д.
- Восстановление фотографий с системного жесткого диска, опустели корзины или перестанет загружаться объема.
- Обеспечить полное решение для Error Loading Media File Could Not Be Played, даже не имея технических навыков.
- Доступен как бесплатную пробную версию и лицензионной версии.
Эти несколько характерные особенности фото восстановление Программное обеспечение лучших в этом классе. Если вы хотите, чтобы преодолеть Error Loading Media File Could Not Be Played вопрос, то без каких-либо задержек попробовать этот удивительный инструмент и получить желаемый результат.
Ограничения реализации фото восстановление Программное обеспечение преодолеть Error Loading Media File Could Not Be Played выпуск
Хотя программное обеспечение фото восстановление Программное обеспечение одним из безопасный способ, чтобы удовлетворить потребность в Error Loading Media File Could Not Be Played раствора в очень меньше времени. Тем не менее, пользователи должны знать о своих ограничений, которые рассматриваются ниже: –
- Демо-версия предоставляет с превью удаленных и поврежденных фотографий и видео.
- Пользователи должны воспользоваться лицензионной версии для того, чтобы восстановить удаленные или потерянные фотографии и преодолеть Error Loading Media File Could Not Be Played.
![]()
![]()
Системные требования для фото восстановление Программное обеспечение
Для Windows
- Процессор: – Pentium класса.
- Операционная система: – Windows Vista, Windows7, 8 и т.д.
- Память: – Оперативная память 1 ГБ.
- Жесткий диск: – 100 Мб свободного места на.
Для Mac
- Процессор: – Intel (G5 или его более поздняя версия)
- Память: – Оперативная память должна быть не менее 1 Гб.
- Жесткий диск: – Свободное место должно быть 100 Мб.
- Операционная система: – 10. 4 Tiger, 10.5 Leopard, 10.6 Snow Leopard, 10.7 Lion, 10.8 Mountain Lion, 10.9 Маверицкс или любой другой последнее Mac OS X.
Руководство пользователя к решить Error Loading Media File Could Not Be Played: Следуйте Пошаговый мастер для запуска программного обеспечения
Шаг: 1 Загрузите и установите фото восстановление Программное обеспечение для достижения Error Loading Media File Could Not Be Played вопрос
Шаг: 2 После установки, запустите программу, дважды щелкнув по иконке настоящее время на рабочем столе.
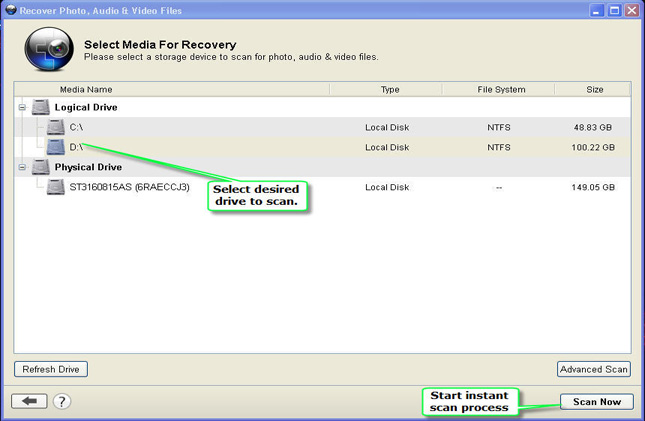
Шаг: 3 Подключите устройство хранения, которые должны быть отсканированы с ПК.
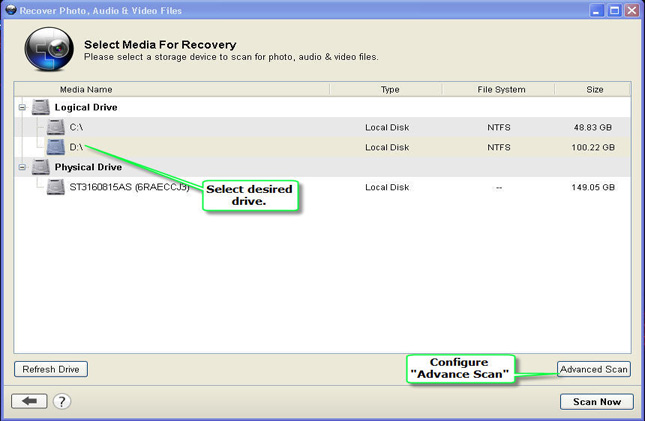
Шаг: 4 После подключения, программа автоматически определит устройство хранения, которое было подключено.
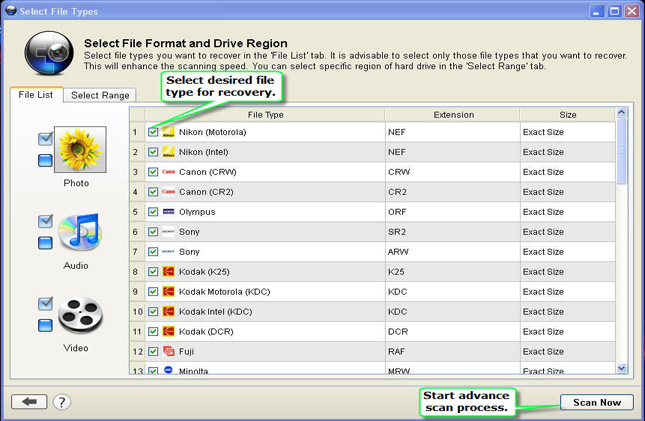
Шаг: 5 Нажмите на кнопку Scan, чтобы начать процесс сканирования. Не забудьте выбрать точный тип файла из списка для быстрого поиска.
Шаг: 6 После того, как проверка завершится, вы получите предварительный просмотр файлов, который был удален, поврежден. Выберите файл для восстановлены и сохранены на нужное место на компьютере. Тем не менее, вы должны иметь лицензионную версию программного обеспечения для реализации Error Loading Media File Could Not Be Played задачу.
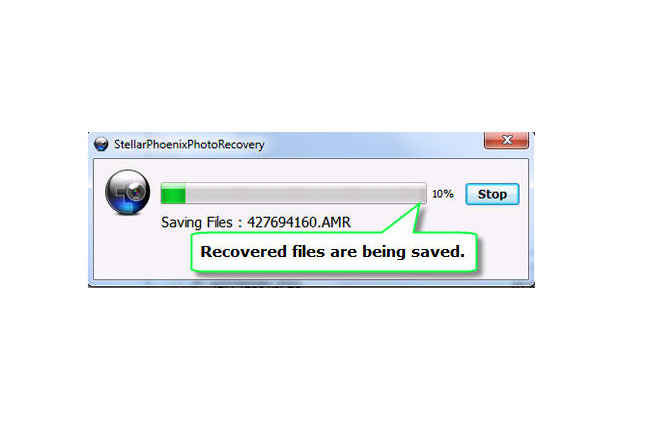
Шаг 7: Наконец, появится индикатор хода выполнения, который показывает продолжающийся процесс хранения фотографий и видео в нужное место, чтобы преодолеть Error Loading Media File Could Not Be Played проблеме
![]()
![]()
![]()
![]()
Многие пользователи Windows 10 сообщали об ошибке « Ошибка загрузки медиафайла». Невозможно воспроизвести файл в Google Chrome. Эта проблема характерна для видеофайлов, блокируя доступ пользователей Chrome к соответствующему контенту.
Кажется, ошибка вызвана конфликтом с медиаплеером или ошибками, вызванными файлами cookie и расширениями.
К счастью, нам удалось создать серию исправлений, которые помогут вам решить эту проблему.
Действия по исправлению ошибки загрузки носителя в Chrome
1. Сбросьте настройки браузера
- Нажмите значок «Три точки» в верхнем правом углу> откройте « Настройки».
- Прокрутите вниз и нажмите « Дополнительно», чтобы развернуть дополнительные параметры.
- В разделе «Сброс и очистка»> нажмите «Сброс».
- Перезагрузите Chrome и убедитесь, что это исправило ошибку.
Мы много писали о видео ошибках. Прочтите это руководство о том, как исправить проблемы с форматом видео в вашем браузере.
2. Отключить аппаратное ускорение
- Нажмите значок «Три точки» в верхнем правом углу Google Chrome> откройте « Настройки».
- Прокрутите вниз и нажмите Дополнительно.
- Найти Используйте аппаратное ускорение, если оно доступно, в разделе « Система » и нажмите переключатель, чтобы отключить его — он отключится, когда цвет станет серым.
- Перезапустите Google Chrome и посмотрите, исправит ли это проблему.
3. Удалить кеш и куки
- Нажмите значок «Три точки» в верхнем правом углу Google Chrome.

- Выберите Дополнительные инструменты > нажмите Очистить данные просмотра.
- Выберите интервал времени для удаления данных, выбрав « Все время», чтобы Chrome работал лучше.
- Выберите тип информации, которую вы хотите удалить.
- Нажмите Очистить данные.
- Перезапустите Chrome, чтобы увидеть, исправила ли она проблему.

4. Обновите Google Chrome
- Нажмите значок «Три кнопки» в верхнем правом углу браузера.
- Выделите раздел справки и разверните его> щелкните « О Google Chrome».
- Процесс обновления начнется сам по себе.
- Нажмите кнопку « Перезапустить» после завершения обновления.
5. Отключить расширения
- Нажмите значок «Три кнопки» в верхнем правом углу браузера.
- Разверните меню « Дополнительные инструменты» > выберите « Расширения».
- Отключите расширения, нажав тумблер рядом с их именем — расширение отключается, когда переключатель становится серым.
- Перезапустите браузер и посмотрите, решило ли решение проблему.
Если вы устали от неспособности Chrome работать должным образом, мы рекомендуем перейти на UR Browser.
Этот браузер, ориентированный на конфиденциальность, приносит много полезного, включая встроенный VPN, 3 режима конфиденциальности, сверхэффективный режим Ninja Incognito и многое другое.
Проверьте это сегодня и посмотрите, каковы возможности этого удивительного браузера, разработанного независимой компанией.
Рекомендация редактора UR Browser
- Быстрая загрузка страницы
- Конфиденциальность на уровне VPN
- Усиленная безопасность
- Встроенный антивирусный сканер
Скачать сейчас UR Browser
Мы надеемся, что хотя бы одно из наших решений помогло вам решить проблему с загрузкой видео в Интернете. Если вы знаете другие рабочие решения, не стесняйтесь оставлять комментарии в разделе комментариев ниже.
ЧИТАЙТЕ ТАКЖЕ:
- Носитель не может быть загружен, потому что формат не поддерживается
- Google Chrome запускается с белым экраном? Исправьте это с этими 6 шагами
- Google Chrome не отвечает, перезапустите сейчас
| Summary: Getting the “Error loading media file” message on the video player? Get to know the primary fixes and check out 4 solutions to fix the issue. We’ll also introduce you to the easiest, simplest, quickest solution: Stellar Repair for Video.
|
|---|


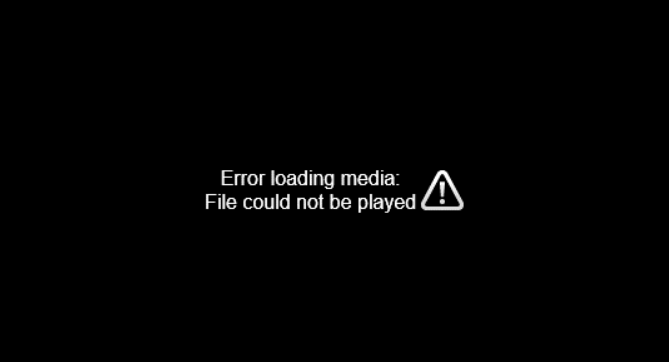
“Error loading media file could not be played” – that’s an error message we’ve all seen. This is how the screen looks like:
The issue usually occurs in Google Chrome. However, the issue can occur in every popular browser such as Mozilla Firefox, Safari, and Opera.
You can check if your internet connection is stable or open only the source video website to fix the issue. However, if that doesn’t fix the issue, the problem lies deeper.
Also Read: How to Fix the Unsupported Video Format Error on Windows 10?
However, don’t worry. This article will tell you how to fix the issue. In the next five minutes, you’ll learn how to fix the issue of “Error loading media: file could not be played.”
Also Read: Fix Error Code: 232011 (This Video Cannot Be Played)
The complete guide will discuss:
- Playing the media file in incognito mode to fix the error
- Disabling browser extensions to fix the error
- Deleting browser history, cookies, and cache to fix the error
- Using Stellar Repair for Video to fix the error
- A final suggestion on which way to fix the error loading media file issue should you choose
Let’s begin.
Error Loading Media File – 4 ways to fix the issue
1. Play the media file in incognito mode
Here’s how you can do the same:
1. Open Google Chrome.
2. Click on the icon with the three dots on the upper-right-hand side of the toolbar.
3. Select a new incognito window.
Alternatively, press CTRL + Shift + N to open a new incognito window.
The reason the process works is that sometimes browser extensions can cause the error loading media file issue. Incognito mode disables all extensions and allows you to browse privately. Thus, the issue fixes itself.
Also Read: Error Code 224003 – ‘This Video File Cannot Be Played’
2. Disable browser extensions
Here’s how to do it on Chrome:
1. Open Google Chrome.
2. Click on the icon with the three dots on the upper-right-hand side of the toolbar.
3. Click on More tools > Extensions.
4. Remove or toggle off each extension.

5. Close the window and reopen the browser to check if the video error is fixed.
Furthermore, here’s how to disable browser extensions on Safari on Mac:
1. Click on Safari > Preferences.
2. Click on Extensions.
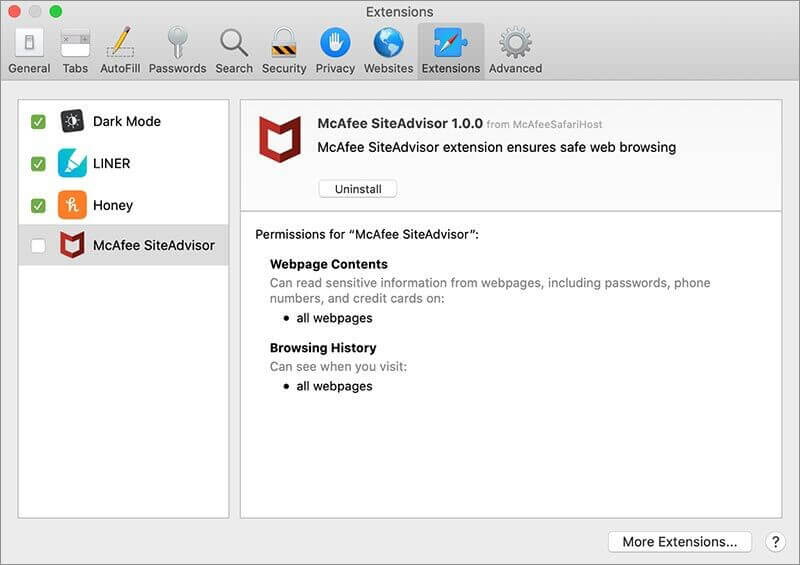
3. Uncheck the box placed to the left beside each extension. If you want to uninstall the extension, select the extension and click on Uninstall.
3. Delete browser history, cookies, and cache
Here’s how you can do it on Chrome:
1. Open Google Chrome.
2. Click on Settings.
3. Select Advanced > Privacy and security.
4. Click on clear browsing data.

5. Select the time range for deleting data.
6. Select download history, browsing history, cookies, cached files and images, and other site data.
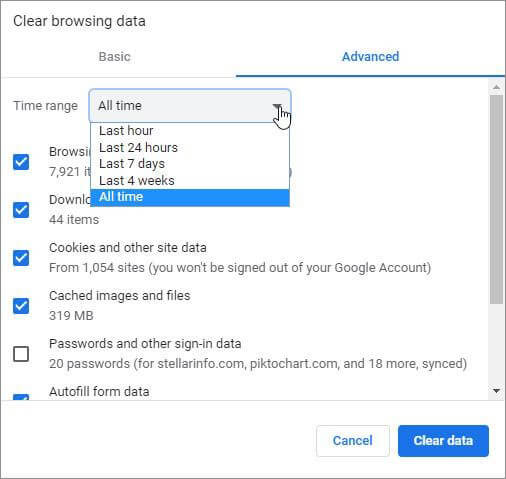
7. Click on clear data.
Furthermore, here’s how to do the same on Android:
- Open Chrome and click on the three dots on the top right.
- Click on Settings > Privacy.
- Select Clear Browsing data.
- Set the time range to All-time.
- Select site data, cached images and files, and cookies.
- Click on clear data.
Also Read: VIDEO DXGKRNL FATAL ERROR in Windows 10 [Fixed]
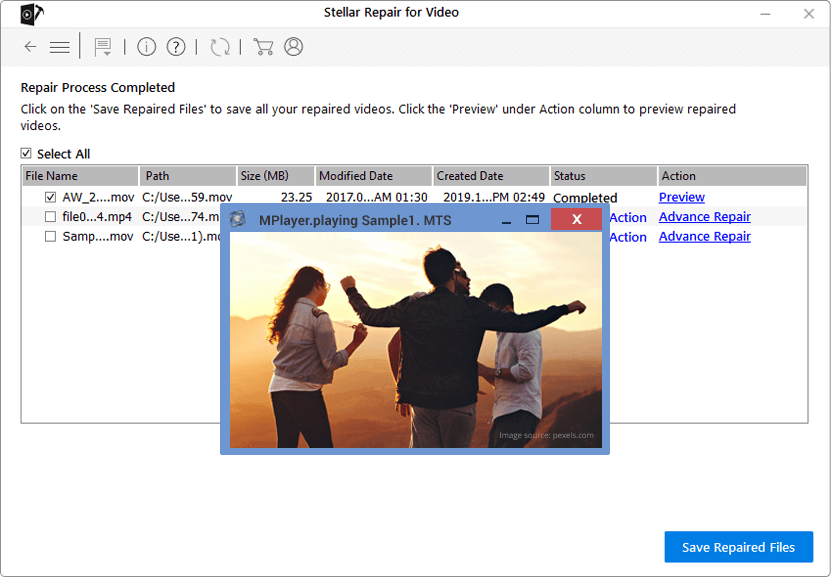
4. Use Stellar Repair for Video – To Fix Error Loading Media File Issue
Stellar Repair for Video is the best video repair software to fix the error loading media file issue.
Also Read: How to Get Activation Key of Stellar Repair for Video?
Check out how you can use the software to fix the issue:
1. Click on Add File
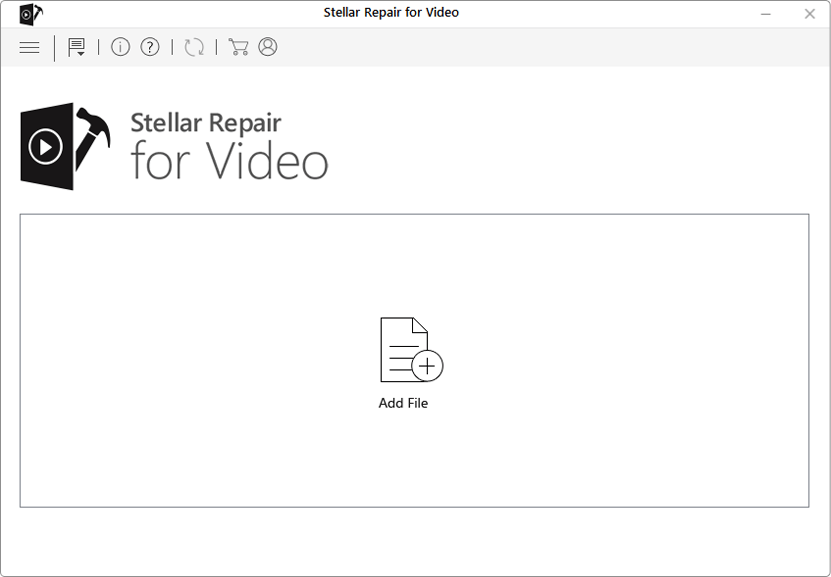
2. Select the option Repair
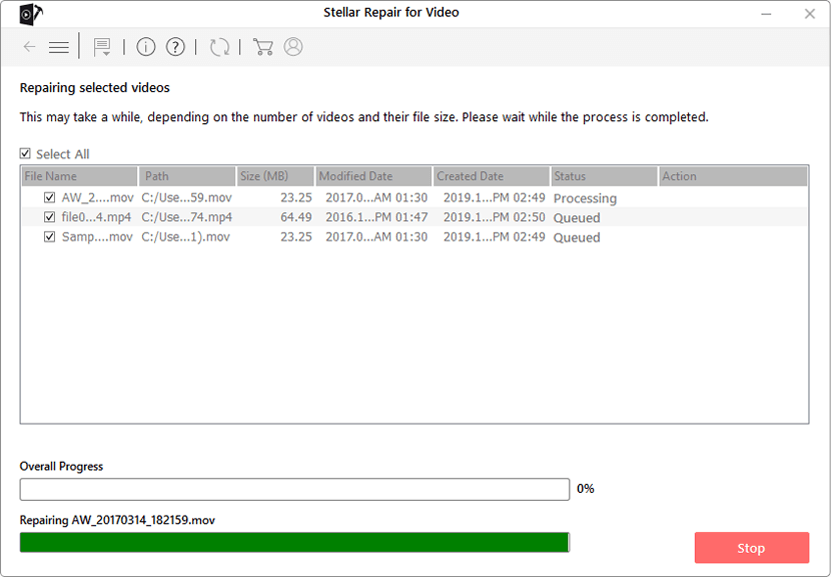
3. Select ‘Save Repaired Files’
Here’s why you should choose Stellar Repair for Video to fix the issue:
Also Read: How to quickly fix Grainy Videos?
- Repairs unlimited corrupt videos.
- Comes with a 30-day money-back guarantee
- Comes with 1 month & 1 year licences
- Compatible with Windows 7, 8, 8.1, 10, 11 and macOS – macOS Monterey, Big Sur, Catalina & older versions
- Recovers corrupt videos from MacBook Pro, MacBook Air, iMac, Mac Mini, and Mac Pro.
- Compatible with all storage drives, SD card, USB flash drive, Fusion drive etc.
- Recovers corrupt videos from all leading smartphone and camera brands including Sony, Canon, GoPro, Nikon, and Apple, among others.
- 4.6/5 ratings with 3,106 reviews on Trustpilot
- Offers previews of repaired files
- Repairs multiple corrupt videos simultaneously
- Repairs movement, slider, header, and sound corruption of video files.
- Repairs UHD, HD, 8K, 4K, VR, and 360-degree videos
- Compatible with popular file formats such as MP4, MOV, FLV, and MPEG, among others.
- Repairs videos from drones, DSLRs, smartphones, and CCTVs
- Comes with the backing of 30+ years of experience and expertise of Stellar and over 3 million happy customers
Also Read: How to Fix the Unsupported Video Format Error on Windows 10?
A word on compatibility
Stellar Repair for Video works for all major OS, photography device types, and file formats. Here’s the complete list.
Mac Version
- Fixes corrupt videos recovered from MacBook Pro, MacBook Air, iMac, Mac Mini, & Mac Pro.
- Supports all storage drives/ media-Mac volumes, Time Machine, Fusion drive, SD card, USB flash drive, etc.
- Repairs videos created from iPhone, DSLR, Drones, Dash Cam, Point and Shoot Camera, Mirrorless Camera, Android Phones, etc.
Also Read: How to Repair Corrupt Video Files on Mac OS?
Windows Version
Repairs corrupt video files from leading camera and smartphone brands, including
- Canon®
- Sony®
- Go Pro®
- Olympus®
- Nikon®
- Fuji®
- Samsung®
- Panasonic®
- Apple®
- DJI®
- Parrot®
- Skydio®
- Blackmagic®
- Garmin®
- and many more
Also Read: How to recover deleted videos from Flip Camera?
Repairs corrupted header and data of video and movie files Compatible with:
- high quality 4K/ 8K/ 12K
- HD, UHD, Full HD
- H.265, HEVC, 360
- VR videos
Supports video repair for popular file formats like:
- MP4, MOV, AVI
- MKV, AVCHD, MJPEG
- WEBM, ASF, WMV
- FLV, DIVX, MPEG
- MTS, M4V, 3G2
- 3GP, and F4V
FAQs
1. Why does the error loading media file issue occur?
The error usually occurs when the media player is tasked with loading a .mov or .wmv video that doesn’t use the H264 video codec.
The issue occurs most prominently on Chrome. However, the issue can occur in any popular browser including Mozilla Firefox, Safari, Internet Explorer, and Opera.
2. How to fix the error loading media file issue?
You can try these 3 ways to fix the issue:
- Use Stellar Repair for video software (The most efficient way)
- Play the media file in incognito mode
- Delete browser history, cookies, and cache
3. What’s the best video repair software to fix error loading media file issues?
Stellar Repair for video is the best video repair software to fix error loading media file issues. This revolutionary tool from Stellar is your one-stop solution for any and all video file format errors. With its availability on both Windows and Mac PCs, you can easily restore corrupted files in no time – regardless of the operating system!
4. What are the ways to fix the error loading media file issue?
We’ve shared the 4 best ways to fix the issue in this article. Furthermore, here are 3 more ways to fix the issue:
- Update to the latest browser version
- Fix your internet connection
- Play media file in incognito mode
5. Why should I choose the Stellar repair for video software to fix the error loading media file issue?
Check out the reasons you should choose Stellar Repair for video:
- Repairs unlimited corrupt videos
- Supports Windows 7, 8, 8.1, 10, and 11 and macOS
- Offers previews of repaired videos
- Offers ‘Advance repair’ feature that uses sample file for severe video corruption
- Repairs VR, HD, UHD, 360-degree, 4K, and 8K videos.
Error Loading Media File Could Not be Played – one final suggestion
We have gathered all the information about how to fix the issue of error loading media file. However, you might still be confused about which of the options you should go with.
That’s why here’s one final suggestion to help you decide.
Go for the Stellar Repair for Video.
However, don’t take our word for it. Check out the 5 reasons you should go for the software:
- Repairs videos from smartphones, DSLR, CCTV, and drones
- Repairs multiple videos simultaneously
- Allows to save repaired video files to an external hard drive
- Repairs sound, movement, header, and slider corruption of video files
- Comes with 24X7 free technical support
Now that you know all about how to fix the error loading media file issue, the knowledge will help you make the most informed decision.
The “Error Loading Media File Could Not Be Played” is an error extensively experienced by chrome users while trying to watch an online video. This error is also seen across mobile applications and streaming platforms that use their native embedded browsers.
This type of media playback error occurs when browsers fail to handle embedded media players. It is seen that the browsers, most commonly Chrome, cannot handle the JW player, an HTML5-based online video player. This problem can also be caused by incompatible browser extensions or if the website’s javascript is disabled.
In today’s article, we’ll go over how to fix this error and get the videos to play normally again.
The first thing to do is check your internet connection. Sometimes due to poor internet, the media player might fail to load properly, and you can receive this error message. Ensure that the internet is stable and that no connectivity issues are leading to this error.
Reset Browser
Generally, resetting the browser solves this media player issue. Resting a browser will reset its default settings and delete the cookies and temporary site data.
Here, we are resting the Chrome browser.
- Open the Browser
- Click on the three vertical dots in the upper right corner of the browser.
- Go to Settings.
- Navigate to the Reset and clean up section.

- Select Restore settings to their original defaults.
- Click on the Reset settings button.


Here’s how you can do it on Safari,
- Go to Preference.
- Go to the Privacy tab.
- Click on Manage Website Data.

- Click on Remove All, and choose the Remove Now option.

Delete Browser Cache
The browser cache contains the website contents in order to enhance faster loading time and reduce data usage. Clearing the cache regularly can help users resolve the issue brought on by broken links and poor web page formatting. Browser cache can also occupy a decent amount of space on your device; cleaning it would free it.
- Go to Chrome Settings.
- Go to the Privacy and Security Section.
- Click on Clearing Browsing Data.

- Check on the Cached images and files option and click on the Clear data button.

- Restart the browser and check if the problem exists.


To delete the Browser cache on Safari, follow these steps,
- Open the Browser.
- Click on the Safari button on the top left corner of the screen.
- Select Preferences.
- Go to the Privacy Section.
- Click on Manage Website Data.
- Click on Remove All and give your confirmation.


Update the Web Browser
This is a glitch in the browser, which has been solved in the newer versions of the Chrome Browser. Therefore, it is wise to keep the browser up to date to get rid of glitches and also improve performance.
The chrome browser notifies the users when there is a new update release. The three dots on the upper right corner of the screen will turn into different colors (Green, Orange, and Red) depending upon the time since the browser was updated.
Here’s how to update the browser.
- Go to Chrome Settings
- Go to the About Google Chrome section from the panel.
- Click on the Update Google Chrome button. If the button is missing, the browser is already up to date. The recent versions of Google chrome automatically download and install the update when you go to this section.

- Click on the Relaunch button. The browser will restart, and you will see a prompt saying Chrome is up to date.


Follow these steps to update Safari on Mac.
- Click on the Apple logo in the Upper left corner side of the Screen.
- Go to System Preferences > Software Update.

- The system will start searching for the available updates. If it finds some update, Click on Update Now.

- To install the latest updates when they are available, check on the option Automatically keep my Mac up to date.
- This will keep your Mac OS and the safari browser up to date.


Uninstall Extensions
Extensions in chrome can sometimes generate some functional issues, especially if they are from unknown sources. You are advised to uninstall such extensions, which affect the browser’s performance and threaten your data privacy.
You can also check which extensions are causing the issue for you. To do this, disable an extension and then open the video from the website where you get the error message. If you do not get the error message this time, it indicates that the extension is the culprit for the problem.
Here’s how to disable the extension on chrome:
- Click on the Puzzle icon on the toolbar of the browser.
- Click on Manage extensions.

- Locate the extension you want to delete from the list and click on Remove.
- Again, click on Remove to give final confirmation to delete it.


Disable Hardware Acceleration
Enabling the hardware acceleration shifts some portion of the workload of the CPU to the GPU and makes the Browser performance much more efficient. However, on some devices, the hardware acceleration might not be handled well, which might result in an error during online Video playbacks.
Here’s how to disable the Hardware Acceleration on Chrome.
- Go to the Settings.
- Go to the Systems Section.
- Click on the slider for the Use Hardware acceleration when available to turn it off.

- Click on Relaunch.
- The browser will reboot, and Hardware acceleration will be disabled. Now, go to the website where you encountered such an error and check if the issue still persists.


On Mac devices, the Hardware acceleration feature is automatically enabled, and there is no way to disable it.
Allow sites to use Java Script
Usually, javascript is by default, enabled for all the sites on most browsers these days. However, they also provide the flexibility to disable it or turn it off for a specific website. Disabling the javascript access to a website can prevent you from seeing the media contents such as videos, photos, and other graphical materials on it.
Here’s how you can enable it on the chrome browser.
- Go to Chrome Settings.
- Go to Privacy and security > Site Settings.

- Scroll down to the Content section and click on the option.

- Select the Sites can use the Javascript option if you want to give javascript access to all the websites.
- If you have previously set up a website in the Not allowed to use javascript list, click on the three buttons on the side of the restricted website and click on remove.
- Finally, go back to the website and try accessing the video.


Here are the steps you need to follow to enable the javascript on Safari for Mac Devices.
- Click on the Safari button in the Upper left corner of the screen.
- Select Preferences.
- Go to the Security section.
- Select Allow Plug-ins
- Click on Manage Website Settings.
- Check Enable JavaScript Option.

- Restart the Browser and see if the issue is resolved.

Clear Application Cache
This error is very commonly seen in mobile-based applications that use an embedded browser to play videos and open links. Facebook Messenger and Youtube app are such apps where users face this issue.
If you are getting similar issues with the application, you can get them resolved by clearing the application’s cache.
Here’s how to clear the app cache on Android Devices.
- Go to Settings.
- Select Manage Apps.
- Find Messenger or any other apps where you are facing this issue in the list.
- Tap on Clear cache.


On IOS, go to Settings> General > iPhone Storage > Manage Storage. Find the messenger app and select Offload app.