[UPDATED July 2017]
 If you replaced the system or CPU fans, or moved the hardware contents of your HP computer to a new case, you might be getting an “F2 fan error” on boot. Thankfully there seems to be a solution.
After I upgraded my computer to a new case I started getting the following error during startup/reboot:
Error: System Fan Has Failed! Service PC to prevent damage to the system. Press F2 to continue.
The case I am using has two stock fans on the back, and I replaced the stock CPU heasink and fan with a Cooler Master Hyper heatsink/fan combo. The system originally came with a 3-pin CPU fan that was connected to a slot labeled on the motherboard as “SYS_FAN1,” but the new CPU fan that came with the over-sized heat sink has a 4-pin connector that I plugged in into the slot marked as “CPU_FAN“. From what I can tell the SYS_FAN1 slot monitors the fan speed, so it had been asking me for the system fan ever since because there’s nothing connected to that 3-pin slot.
Before continuing, please note that if you haven’t changed any parts and you suddenly started getting that message, then make sure the fans are really working. You don’t have to change the settings if all you need is to replace a fan, so make sure you check your motherboard’s fans configuration to try to isolate the problem. Also, if you did change fans, then you can always reconnect the old fan or a new fan or equal size and speed to the SYSFAN slot. If none of that works, or you just don’t want to deal with that message, then continue reading.
Pretty much every computer troubleshooting forum or website tells you to go into BIOS and look for “Hardware Monitor” and disable the one that’s causing you problems. The problem is that, for most HP computers, that option is hidden. After months of looking and finding the same guides over and over again, I finally found the right answer. I re-wrote it to what I think is easier to understand.
There are two ways to go about this depending on what sends you to System Recovery.
- If F10 is your System recovery, then boot your system and press the F11 key when HP splash screen shows up. The F2 error will probably still show up, so keep pressing F11 repeatedly until it gets passed it and starts loading the list of hardware components.
- If F11 is your System recovery, then press Ctrl+F10. If for some reason it displays the F2 error again, press Ctrl+F10 again, or press F2 and then resume Ctrl+F10 as soon as you move on from the error screen.
Note: A commenter right here pointed out that he had do use both Ctrl keys at the same in while hitting F10 to make it into the advanced BIOS page, so try that in case pressing either of the Ctrl keys doesn’t do the job.
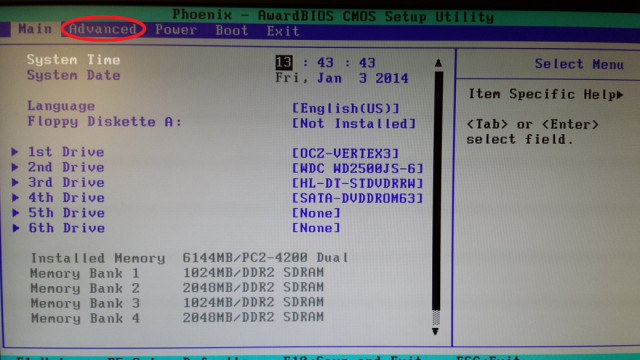
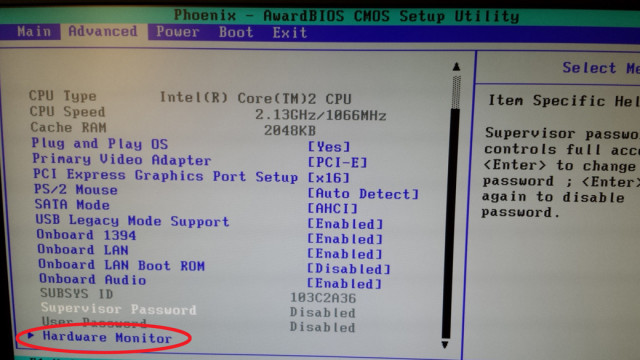
If it worked, then an option called Hardware Monitor will show up under the Advanced tab. I took some pictures of my system BIOS to better illustrate the process, but your system might have the tabs in a different order.

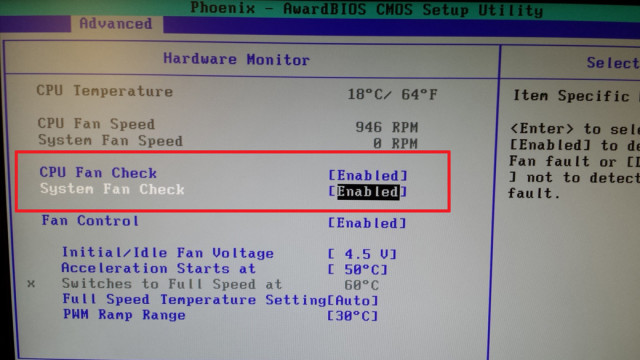
Before you do anything here, make sure you only disable the setting that is giving you trouble, so if the error says “System Fan Has Failed!” then ONLY disable the System Fan Check , DO NOT DISABLE BOTH.
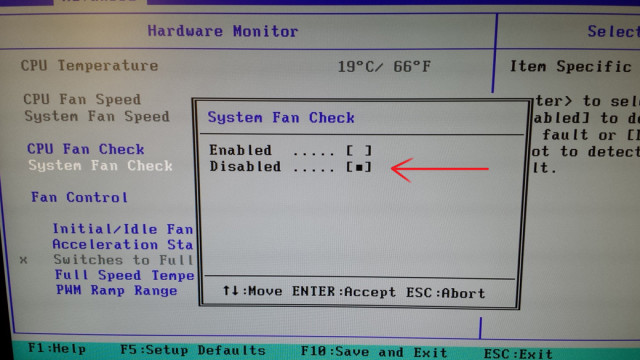
After that press the option on the bottom on the screen that says “Save and Exit.”
This is from this thread on Tom’s Hardware. For some users F11 works, and for others Ctrl+F10, so it’s just a matter of finding out what key sends your computer to System Recovery beforehand.
This was done on an old HP Pavilion Media Center TV m7680n with a P5BW-LA (Basswood) motherboard. I’m glad to say I was finally able to get rid of that message for good.
I’d like to thank those of you who have commented and confirmed the use of Ctrl+10. If somebody else found another way to do it, please leave a comment. Also, if possible add your HP desktop series and motherboard name if you know them.
It’s an inevitable result of our reliance on electronics — if we want to run powerful hardware, we need to find better and more efficient ways of keeping that hardware cool.
When a CPU fan error strikes upon booting up your computer, we’ve got a few accessible tips and tricks that will show you how to get things back in working order. No matter how powerful of a rig you’re operating — desktop or laptop, it doesn’t matter — it’s extremely important that your computer’s fan not only works properly but be operating in line with your recorded CPU cycles.
You can see a bunch of users over on Twitter experiencing this hardware malfunction:
“CPU Fan Error! Press F1 to Run SETUP.”
*shuts down, opens case…* pic.twitter.com/I0KWBU3RyC
— Paradox Red Wolf → MCFC (@ctcwired) August 1, 2018
Having to configure hardware like this might seem somewhat intimidating, but as long as you’re willing to follow us to your computer’s BIOS settings, we can manually configure your fan settings. Read on, to find out how!
Quick Video Fix
The following video fixed the problem for a lot of people:
One YouTube user commented that he thinks a lot of people are just plugging their air cooler into the wrong place. If you look carefully at your mobo, you may see CPU_OPT, CPU_FAN, CPU_AIO. Make sure you have your fan plugged into the correct slot. For air cooling, it would be the CPU_FAN one.
Cooling Systems
Almost every single computer has some board of onboard cooling hardware. Laptop, desktop, even some of the rare, more powerful tablets have fans built into them, to help with the heat that’s produced by active electronics. If the machine you’re looking at doesn’t have any built-in cooling, then you can trust that it’s not powerful enough to require it. Not hearing a fan spin up in your iPad? That’s because it’s an underpowered device compared to your average laptop or desktop computer, and the same goes for your smartphone.
any tech gurus wanna help me out, I get CPU Fan error on boot and temp rises to 80+… CPU cooler is a h100i v2. pic.twitter.com/rZll1P8YbO
— Envy Fire (@Fire_OW) September 24, 2017
Nevertheless, your can is critical to the continued functioning of your computer. Encountering CPU fan errors when you boot up your machine is never good news.
Desktop Computers
You’re probably familiar with the most talked-up pieces of hardware inside of your computer tower. The CPU, motherboard, hard drive, RAM, or GPU. They all play critical roles, of course, but operating in the background of all that hardware is your CPU cooler. Given that your CPU is the beating heart of your PC, you might imagine that the fan responsible for keeping it cool is sort of critical to your computer’s operation.
Laptop Computers
A thinner profile doesn’t mean that your computer is going to be absent a complex cooling system. In fact, the build of most laptop computers means that cooling is going to be even more important. Trapped heat will wreak all kinds of havoc on your electronics, and the skinny chassis of most laptop computers means that heat has more opportunity to damage your hardware.

Which is not what anyone wants, of course. Thankfully, the same exact problem-solving steps that we use for desktop computers are going to work for your laptop, too. You might not have as much modular control over what type of cooling system goes into your computer — that’s going to be dependant on your manufacturer — but the method of repair is going to be relatively the same.
This particular error isn’t exactly uncommon, and it’s almost uniquely relegated to the fan that you’ve installed to cool your CPU. Your computer’s case might have separate fans installed, and if you have a dedicated GPU it almost certainly has attached fans; the one that’s going to give you a BIOS error is the separate piece of hardware that you (or the manufacturer) have chosen to keep that baby chilly.
We’re less concerned with the reason it’s happening than the method we’ll use to fix it. Don’t worry, however — we’ll talk about both. A remedy is going to precede a diagnosis.
Disclaimer: It’s important to know, up front, that you’re going to have to access your PC’s BIOS settings if you want to resolve this. If you’re not comfortable delving into that, the best solution might be to visit a local PC repair technician, instead of going the DIY route. As long as you’re comfy with the concept, though, we can get started!
Fix! CPU Fan Error
Below, we’re going to go through a few necessary steps to get your CPU fan working. We’ll start with the easiest solutions first, and then proceed to those that will require some disassembly of your computer’s case. Remember that if you do not feel comfortable working with your computer’s internal hardware, it might be best to consult a repair professional.
CPU Temperatures
The average CPU temperature that you should be shooting for is going to depend on quite a few different factors. The ambient temperature where you’ve stored your computer is going to be a factor as if the type of work that you’re asking your computer to do. For example — a machine meant purely for office productivity isn’t going to be as much of a heat monster as the gaming machine with its dedicated CPU. However, the “idle temperatures” that you should be aiming for are anywhere between 32 and 40 Celsius degrees.
Debugging Fan Errors
We’re going to look at your computer’s hardware, first, and then take a look at some of the software fixes you can employ to get your fan working properly. Usually, this error pops up when your computer boots up. The message, “CPU Fan Error” or “Error: CPU Fan Has Failed!” usually pops up under these circumstances. As long as your BIOS is properly configured, this error will cause your computer to automatically shut down unless specifically prompted to continue operating.
Hardware Errors
To make sure that your computer’s fan is spinning correctly, you’re going to have to access the inside of the case. For most desktop computers, this is a simple task. Laptop owners should usually be dissuaded from this; many laptop models will automatically have a voided warranty if the case is opened by anyone other than a repair source chosen by the manufacturer.

Therefore, the step is probably for desktop owners, only. Though, if you own a laptop without warranty and are comfortable working with smaller parts, go right ahead!
- Work in a static-free environment. Your computer’s fan connects directly to the motherboard, and static electricity can wreck hell on your PC’s innards. If possible, wear a grounding wrist strap, and work on a non-static surface. Carpet is a big no-no.
- Expose your computer’s fan. Remove the necessary piece of your computer’s case to expose the CPU fan. Remember, while your PC might have other fans installed into the chassis, it’s the one responsible for cooling your CPU that we’re looking at. (Some laptop users say that a laptop cooling pad is a good investment to keep their computers from overheating.)
- Check your connections. Your CPU fan is powered in the same way that everything else is, on your PC. Check to make sure that it’s connected to the motherboard.
- Spin the fan. Using a static-free object (or your finger, but only if you’re properly grounded) give your fan a spin. Make sure that it’s able to do so smoothly, without obstruction.
- Boot up your computer. With the panel still removed, boot up your computer. Be very careful while operating your PC with internal components exposed, as any physical interference with them could cause irreparable damage.
- Is your fan spinning? If your computer’s fan is spinning on boot, then it’s something that can be fixed with additional troubleshooting. If it does not, however, then you may need to replace your CPU’s fan.
With us so far? Good. If the mechanical functions of your fan are up to par, and it’s connected to your motherboard, we can keep working through our troubleshooting steps.
«ERROR: System Fan Has Failed!
Service PC to prevent damage to the system.
Press <F2> to continue»
Naturally, there has to be a capacitor right next to the 3-pin header for the system fan, but of course that doesn’t stop me from connecting a CPU fan 🤔. pic.twitter.com/xBEKIQdk95— Stephan van Schaik (@themadstephan) February 20, 2019
Software Errors
As long as you’re running a recent version of Windows (version 7 or newer) you can hit F10 upon booting up your computer to open the BIOS setup utility. Here, you can reconfigure most of your computer’s hardware functions, including your CPU fan. In addition to diagnosing it, we can also modify the speed at which the fan spins.
- Access the BIOS Setup Utility. Hit F10 when your computer boots up. As long as you do it swiftly, you’ll be brought to the BIOS Utility screen, where we can configure the CPU fan.
- Access Advanced Settings. Use the left and right arrows to navigate your way to the advanced settings.
- Select Hardware Monitor. This will display a comprehensive list of your computer’s installed hardware.
- Select CPU Fan. Then, cross-reference the following values, to ensure that your CPU Fan is properly configured:
- Active Heat Sink: Enabled
- Passive Heat Sink: Disabled
- Fan Duct with Fan: Enabled
- Fan Duct without Fan: Disabled
- Save your configuration changes. If you did make any changes to your CPU Fan in the BIOS, save your changes and exit. Your computer will restart.
As long as there isn’t a physical obstruction in your fan or a specific hardware error, this should allow you to debug the CPU fan and get past the error. However, you likely also saw an option in the BIOS Setup Utility for adjusting your fan speed. If your fan is now spinning (double check!) but you’re still getting the error, try adjusting the RPMs to a value between 300 and 600.
If the error persists past these attempts to fix it, you may have to replace the CPU fan inside of your computer. A persistent CPU fan error that shows up every time you boot up your computer is definitely a sign that something is wrong, and being that the temperature regulation of your CPU is critical to your computer’s performance, it’s worth looking into immediately. Hopefully, the steps above have shown you how to fix this problem. If you’re still struggling, toss us your questions in the comments below!

Ryan is a computer enthusiast who has a knack for fixing difficult and technical software problems. Whether you’re having issues with Windows, Safari, Chrome or even an HP printer, Ryan helps out by figuring out easy solutions to common error codes.
Проблема с кулером или материнкой
При включении компа на экране появляется надпись:«ERROR: System Fan Has Failed. Service PC to prevent damage to the system. Press F2 to continue».Кулер охлаждения процессора работает со скоростью 2290 об.мин. При этом температура процессора 41 градус.Хотел отключить данное предупреждение в биосе.Но там нет даже такого пункта.(Биос Setup Utility American Megatrends Inc версия 6.05 от 12.08.2010.)Системная плата FOXCONN Модель 2A8C (CPU 1)Думал что кулер подключен не в тот разъем, но их на плате всего два и до другого он просто не дотягивается.И что самое главное разъем под кулер на материнке на 4 пиня, а подключен к нему кулер на 3 пиня.Получается один (контакт не задействован)Выкладываю фото моего биоса.Инструкции к материнке нет.Как решить данную проблему?Спасибо!!!
http://pixs.ru/showimage/foto0334jp_7274356_12359433.jpg
http://pixs.ru/showimage/foto0335jp_7661672_12359440.jpg
http://pixs.ru/showimage/foto0336jp_1502199_12359443.jpg
http://pixs.ru/showimage/foto0337jp_2256253_12359446.jpg
http://pixs.ru/showimage/foto0338jp_2090944_12359447.jpg
|
0 / 0 / 0 Регистрация: 12.04.2011 Сообщений: 5 |
|
|
1 |
|
|
12.04.2011, 23:47. Показов 19084. Ответов 10
помагите включаю комп
0 |

|
Почетный модератор
28040 / 15773 / 982 Регистрация: 15.09.2009 Сообщений: 67,752 Записей в блоге: 78 |
|
|
13.04.2011, 10:26 |
2 |
|
ну не подключен вентилятор системный, или подключите или отключите в БИОС-е предупреждение.
1 |
|
21297 / 12107 / 653 Регистрация: 11.04.2010 Сообщений: 53,466 |
|
|
13.04.2011, 10:46 |
3 |
|
или жмите f2 каждый раз
1 |
")
|
0 / 0 / 0 Регистрация: 12.04.2011 Сообщений: 5 |
|
|
13.04.2011, 12:49 [ТС] |
4 |
|
тобиш какойто винтилятор мозг парит
0 |
|
Почетный модератор
28040 / 15773 / 982 Регистрация: 15.09.2009 Сообщений: 67,752 Записей в блоге: 78 |
|
|
13.04.2011, 12:50 |
5 |
|
не какой то а вполне конкретный system fan
0 |
|
0 / 0 / 0 Регистрация: 12.04.2011 Сообщений: 5 |
|
|
13.04.2011, 12:54 [ТС] |
6 |
|
у меня их два,один на проце а другой на корпусе вот тот что на корпусе он при запуске компа то крутится то нет если его заменить всё исправится
0 |
|
21297 / 12107 / 653 Регистрация: 11.04.2010 Сообщений: 53,466 |
|
|
13.04.2011, 12:55 |
7 |
|
который должен ставиться на заднюю стенку. если его там нет, то отключите в биосе функцию мониторинга этот пропеллера
0 |
|
0 / 0 / 0 Регистрация: 12.04.2011 Сообщений: 5 |
|
|
13.04.2011, 12:56 [ТС] |
8 |
|
он есть но тупит то работает то нет
0 |
|
Почетный модератор
28040 / 15773 / 982 Регистрация: 15.09.2009 Сообщений: 67,752 Записей в блоге: 78 |
|
|
13.04.2011, 12:57 |
9 |
|
другой на корпусе вот тот что на корпусе он при запуске компа то крутится то нет поменять.
0 |

|
0 / 0 / 0 Регистрация: 12.04.2011 Сообщений: 5 |
|
|
13.04.2011, 12:58 [ТС] |
10 |
|
спасибо
0 |
|
21297 / 12107 / 653 Регистрация: 11.04.2010 Сообщений: 53,466 |
|
|
13.04.2011, 13:05 |
11 |
|
менять на ТРЕХПРОВОДНОЙ иначе будет тупить
0 |
The system fan is not the CPU fan… it is a case fan. If you have case fans without speed sensors or they are just connected to the power supply and not the motherboard, your system will display an error.
Frank
***** Please click the «White Kudos» Thumbs Up to say THANKS for helping *****
***** Please click the «Accept As Solution» on my post, if my help solved your issue *****
***** This is a user supported forum. I am a volunteer and I don’t work for HP *****
HP a1632x — Windows 7, 4GB RAM, AMD Radeon HD 6450
HP p6130y — Windows 7, 8GB RAM, AMD Radeon HD 6450
HP p6320y — Windows 7, 8GB RAM, NVIDIA GT 240
HP p7-1026 — Windows 7, 6GB RAM, AMD Radeon HD 6450
HP p6787c — Windows 7, 8GB RAM, NVIDIA GT 240
HP ENVY x360 m6-w103dx — Windows 10, 8GB RAM, Intel HD 520