")
A year or two back, in the good old days, I was trying to wipe the cache partition of my girlfriend’s Nexus 5. I powered off the phone as it was taking too long to clear the cache partition. So when I tried to reboot the phone. It got stuck on the start screen, where the logo kept on loading, but the phone won’t start. It took me a while to figure out its fix. When I went back to the recovery menu. There I saw this error failed to mount cache (Invalid Argument). I spent some time looking for its fix, and in the end, I was successful. If you face the same issue, try the guide below to fix the failed to mount cache error.
Fix Failed to Mount Cache (Invalid Argument) error on Android Phone:
When this error (Failed to mount cache) occurred on my girlfriend’s LG Nexus 5, I didn’t have any clue on how to fix it. I tried a lot of things; one thing I didn’t try was factory reset, as it would have deleted all her data. She didn’t even have a backup of the data, so a factory reset wasn’t an option. It had all our memories and messages we couldn’t afford to lose. Finally, I came across failed to mount cache error while trying to wipe the cache partition of her nexus phone. So I was sure there must be some issue with the cache formatting.
To fix failed to mount cache issue, you have to go to the recovery menu, mount the system, and then clear the cache again. Then, it will fix the problem.
Suppose you don’t know how to do that. Then, follow the step-to-step guide below to fix failed to mount cache invalid argument error:
Note: The following guide won’t erase your data from the phone. So don’t worry about losing your pictures and contacts while trying the fix below.
- First of all, you will have to get into the recovery menu from the boot menu.
- Press and hold the volume down and the power button.
- A screen will appear with Android on the back and “Start” written inside the box, which is pointing towards the power button.
- Now press the volume down button twice. It will show the recovery menu inside the box.
- Press the power button to select.
- Now your phone will reboot, showing you an Android icon on the back.
- Press and hold the Power button and tap on the volume Up button.
- Now you will see the recovery menu. On the bottom of the screen, you will see this error Failed to Mount Cache (invalid argument)
- Now use volume buttons to navigate to Mount System/Cache. Next, press the power button to select it.
- Now navigate to Wipe Cache Partition and press the power button.
- Wait for a while. It will wipe your cache partition even if it fails to clear the cache partition. Then, you will be good to go.
Note: This step can take up to 30 minutes, depending on your phone. So just hold your horses and let it clear wipe the partition.
- Now select the option “Reboot System Now” from the same screen.
Note: If your phone fails to clear cache again. Just mount the system/cache and reboot system. It will work out.
Update (August 24th,2020): I used the above guide to fix my phone when I had the same error. If it is not working for you, then you should try flashing stock firmware/software on your phone:
- Use this guide to flash stock firmware on Nexus phones.
- Use this guide to install stock firmware on Samsung Galaxy phones.
- For the latest Samsung smartphones, use this guide to install stock firmware in order to fix failed to mount cache errors on your Android smartphone.
Your phone will reboot, and it will start working correctly. I have personally used this method to fix failed to mount cache partition on my Nexus 5. I hope this works for you guys as well.
Use ADB commands to Mount Cache Partition:
So if the above solution didn’t work for you, you could manually mount the cache partition using ADB commands. For that, you need to have the know-how of ADB commands and ADB and Fastboot tools installed on your Windows PC.
- First of all, you need to install ADB and Fastboot tool on your Windows or Mac computer.
- Once installed, connect your phone and make sure your phone is detected by using the following command.
-
adb devices
-
- If you see your phone is connected and displayed as in the screenshot below.
- Enter the following command:
-
adb shell "mount /cache ; mkdir -p /cache/recovery"
-
- Now restart your Android device.

If none of the above steps work, the issue may be hardware-related, in which case you should contact the manufacturer or take the device to a professional for repair.
I personally had this issue on LG Nexus 5. I have seen many people asking me how to fix failed to mount cache errors in several different Android devices like ASUS and Samsung, which I have no clue about. You guys can try the guide above. If it doesn’t work and your phone is still bricked, try to flash stock firmware on your phone. There are cases when this error arises because of some hardware issue; you can not fix it by tweaking the software or operating system.
If you have any issue or query regarding how to fix failed to mount cache. Let me know in the comments if this guide fixed the error. Don’t forget to drop feedback in the comments below. If you know of another method to help fix this issue, please let us know so we can update the guide.
Failed to Mount Cache error is bad news. This error occurs when the cache partition of Android phone damages & phone fails to boot up. This error can come up with any Android phone and once it happens, your phone will just get stuck on the boot screen. The error isn’t easy to handle is it requires multiple workarounds to get tackled. You can find this error on your phone when you boot into the recovery mode of your Android phone, you will find out few lines of text appearing at the bottom of the screen identifying the aforementioned error.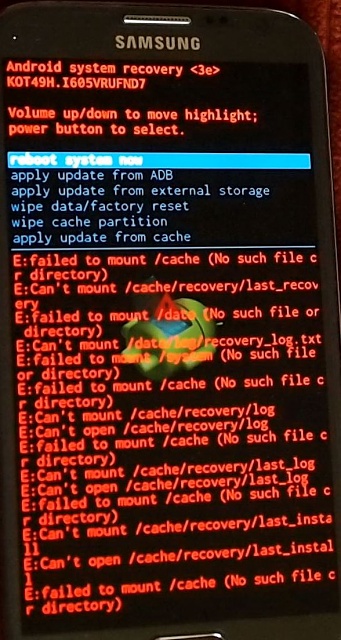
If you have just reached here while looking for a solution to this error, I would like to tell you that you have found the right place. You just have to follow a few steps to get rid of this error. During the process of fixing this issue, you will not loose your messages, contacts, call logs or any other data. We will not touch the data partition of the phone and we will try to fix it without involving ourselves in any complexity. Follow this method to fix Failed To Mount Cache (Invalid Argument) error now.
The fix given here is not supposed to work on a particular Android powered handset. It will work for all Android phones facing the Mount /Cache error. Have a look on the easy steps now to wipe off this annoying error from your Android smartphone.
- In order to kill this error, you need to boot into the recovery menu of your Android smartphone.
- If you have a Google Nexus, Volume Down + Power button will bring up the bootloader and then you can choose the recovery mode to boot int. If you have a Samsung Galaxy, Volume Up + Home + Power Key will boot you into the recovery mode. For most of the Android phones, Volume Down + Power or Volume Up + Down + Power combination will take you into the recovery mode.
- Once you are in the recovery mode, use Volume Up and Down keys to navigate to “Mount System/Cache” option and then press Power button to select it.
- Once done, navigate to Wipe Cache Partition option in the recovery using Volume Up/Down and then press power key and wipe it.
- After wiping cache, reboot your phone.
- It should boot up fine now. In case if it doesn’t, go back to recovery mode again, once again select Mount System/Cache and then reboot your phone.
- That’s all.
In case the above method fails to work for you, then unfortunately, your only option is to perform a factory reset or to flash a new stock firmware on your phone. For that, you can find several guides regarding your smartphone on our site.
I have a Asus Zenfone 2 and a few days ago it ran out of battery and turned off. Then after I charged it up and restarted it, it wouldn’t turn on. It gets to the logo and the loading circle and just gets stuck there forever.
I can get into recovery, but can’t do anything in recovery, because everything gives this error:
E:failed to mount /cache (invalid argument)
Trying to wipe cache, factory reset the phone, mount /system, flash a ROM from SD card, ADB sideload, everything gives the error multiple times. Factory reset formats /data fine, but when it gets to /cache, gives the error and aborts.
Same thing with fastboot. I tried to flash TWRP (I have stock recovery) and I tried to erase and format cache through fastboot, but both give this error:
FAILED (remote: ‘Can not mount the necessary partition’)
fastboot: error: Command failed
Is there anything I can do to format the phone or somehow rebuild the partitions without being able to flash anything via recovery or fastboot?
I don’t know if tools like AFT or xfstk can do anything for me.
Edit: I don’t think the EMMC chip is dead, because the recovery partition is still fine, I can still boot into recovery and when I did a factory reset, it formatted /data without any errors, only had an error when it started formatting /cache.
When I was looking for a solution to this problem, I read somewhere that sometimes when the device gets interrupted, like when it shuts down suddenly, to prevent data loss android would change permissions on the /cache partition to read only or something like that. This would certainly explain what happened to my phone. Just need to think of a way to access ADB shell on it to try to change permissions. Shell doesn’t work in ADB sideload mode, that’s the only ADB thing the stock recovery has. Is that a similar thing in fastboot by any chance?
If you are versed with Android devices, there must have been a time when you sure have come across this error message in your device recovery — E: failed to mount /cache (invalid argument). I recently got a Tecno F1 Pro stock on boot and immediately formatted with NCK pro box, but the issue still persisted. At this point, I decided to flash to stock firmware but couldn’t find any firmware online for its particular build. All four firmware builds I downloaded for this model failed to load.

If you are versed with Android devices, there must have been a time when you sure have come across this error message in your device recovery — E: failed to mount /cache (invalid argument). I recently got a Tecno F1 Pro stuck on boot and immediately formatted with NCK pro box, but the issue still persisted. At this point, I decided to flash to stock firmware but couldn’t find any firmware online for its particular build. All four firmware builds I downloaded for this model failed to load.
I was really confused about the situation. I had almost given up on it until I said to myself «oh! I haven’t checked the recovery to see if everything was ok». And that is how I found out it had a corrupted cache partition. Now that I knew where the problem was coming from, fixing it was as simple as ABC without any data loss 😃.
Before we dive into how to solve the above-mentioned system error in the subsequent paragraphs, we will, first of all, enumerate some of the symptoms of this system problem.
Symptoms of a corrupted cache partition
- When the cache partition on your Android device gets corrupted so much such that the system can no longer mount it, your device will boot and get stuck at the boot logo.
- In some cases, your device may power on normally, but all apps will keep crashing.
- With the Tecno F1, I had in my possession, I couldn’t flash any other stock firmware since all I tried gave me the following error message

Although using the latest version of the flash tool, could not load firmware to the phone. This doesn’t seem to be the owing to the corrupted cache though, but a flash tool version problem.
- [message]
- ##info-circle## INFO
- We will discuss how to fix this sp flash tool error message in an upcoming article
How to fix your Tecno F1 corrupted cache partition and boot problem without data loss
When you encounter the above problem on your Tecno F1 Android or any other Android device, for I am pretty sure it should work on some other Android phones, What you need to do is mount the system and clear cache partition in recovery.
Don’t know how to do this or your phone is stuck on boot and you want to know if it’s owing to the cache partition being corrupted? Proceed as follows;
- [message]
- ##download## Download Tecno F1 stock rom
- Download for different builds Tecno F1 stock rom
- Remove your phone’s battery, reinsert and then press hold the Vol+ key and the power button.
- Release both keys when you see the factory menu below

- While in the above menu, use the Vol+ key to select and Vol- to confirm. Select recovery and wait. After a couple of seconds, you should see the Android robot and the «no command» message. At his point, press the power button, then vol+ to enter the recovery. If in your recovery menu, you see the error message
- [message]
- ##warning## ERROR MESSAGE
- E: failed to mount /cache partition (invalid argument)
Then what you need to do is;
- Click on the «mount system» option.
- After that, clear the cache partition and reboot your device.
- Your device will now power on normally and you won’t lose any data.
A word of advice
If your device is stuck at boot and there is no cache partition error, if formatting does not fix the problem, then all you have to do is flash to stock firmware.
But before you flash your device, always make sure to check the build number and get only the appropriate firmware build for your device.
While flashing some MTK Android devices, with the firmware build you downloaded, you may come across the message
- [message]
- ##exclamation-triangle## Flash tool message
- PMT changed for ROM, it must be downloaded
This message mostly occurs when flashing the firmware of different build from your device current build. When you see this message, avoid using the «format all + download» option for it will brick your device.
To proceed with the flashing in such a scenario, use the «firmware upgrade» option.
My Nexus 5 just failed yesterday. In recovery mode I get this message:
Code:
Supported API: 3
E: Failed to mount /cache (Invalid argument)
I followed this tutorial step by step by whenever I try to «flashboot flash» something (cache, system, etc.) I get this error message:
Code:
FAILED (remote: flash write failure)I can confirm the bootloader is unlocked:
Code:
fastboot oem unlock
>> unlocked: yes
>> finished. total time: -0.000s
More details:
Code:
fastboot getvar all
(bootloader) max-download-size:         0x40000000
(bootloader) version-hardware: rev_11
(bootloader) version-baseband: M8974A-2.0.50.2.30
(bootloader) version-bootloader: HHZ20h
(bootloader) version-cdma: N/A
(bootloader) variant: hammerhead D821(H) 16GB
(bootloader) serialno: (not displayed in the forum)
(bootloader) carrier: None
(bootloader) secure-boot: yes
(bootloader) unlocked: yes
(bootloader) product: hammerhead
(bootloader) partition-size:aboot: 80000
(bootloader) partition-type:aboot: emmc
(bootloader) partition-size:boot: 1600000
(bootloader) partition-type:boot: emmc
(bootloader) partition-size:recovery: 1600000
(bootloader) partition-type:recovery: emmc
(bootloader) partition-size:system: 40000000
(bootloader) partition-type:system: ext4
(bootloader) partition-size:userdata: 3321fa800
(bootloader) partition-type:userdata: ext4
(bootloader) partition-size:cache: 2bc00000
(bootloader) partition-type:cache: ext4
(bootloader) partition-size:persist: 1000000
(bootloader) partition-type:persist: ext4
all:
finished. total time: 0.037s
Following this thread I suspected a problem of size so tried to increase max size:
Code:
fastboot -S 2048M flash system system.img
erasing 'system'...
OKAY [  0.126s]
sending 'system' (1020657 KB)...
OKAY [ 32.239s]
writing 'system'...
FAILED (remote: flash write failure)
finished. total time: 32.537s
Code:
fastboot -S 2048M flash cache cache.img
erasing 'cache'...
FAILED (remote: failed to erase partition)
finished. total time: 0.217s
Code:
fastboot -S 2048M flash recovery recovery.img
sending 'recovery' (10014 KB)...
OKAY [  0.521s]
writing 'recovery'...
FAILED (remote: flash write failure)
finished. total time: 0.708s
I am now clueless… This is a 5 year-old phone so it could possibly be a hardware failure but I really really want to make sure I tried everything I could to save the guy!! (even though data is long dead by now).
Any thoughts?