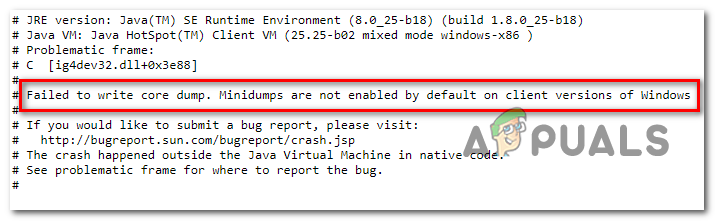
Mojang Studios выпустила Minecraft в ноябре 2011 года и эта игра вскоре стала успешной. Каждый месяц в нее заходит около девяноста одного миллиона игроков, что является самым большим числом игроков по сравнению с другими онлайн-играми. Она поддерживает устройства MacOS, Windows, iOS и Android, а также Xbox и PlayStation. Однако многие игроки сообщают об ошибке: не удалось записать дамп ядра. Минидампы по умолчанию не включены в Windows. Прочтите наше руководство, чтобы узнать, как исправить ошибку Minecraft: Не удалось записать дамп ядра на ПК с Windows 10. Более того, эта статья также поможет с тем, как включить минидампы в Windows 10.

Как исправить ошибку Minecraft: не удалось записать дамп ядра в Windows 10
Давайте сначала разберемся в причинах этой ошибки, а затем перейдем к решениям, чтобы исправить ее.
- Устаревшие драйверы: вы можете столкнуться с ошибкой Minecraft: Не удалось записать дамп ядра, если системные драйверы устарели или несовместимы с лаунчером игры.
- Поврежденные/отсутствующие файлы программного обеспечения AMD: из-за этого вы можете столкнуться с ошибкой при записи дампа ядра. Минидампы не включены по умолчанию в Windows, поэтому такая ошибка может иметь место из-за поврежденных файлов в программе установки программного обеспечения AMD.
- Вмешательство стороннего антивируса: блокирует жизненно важные функции игры и вызывает проблемы.
- Устаревшая операционная система Windows: это также может вызвать данную проблему.
- Настройки NVIDIA VSync и тройной буферизации: если этот параметр не включен, текущие настройки видеокарты не будут поддерживать эти функции, что приведет к ошибке записи дампа ядра.
- Файлы Java не обновлены: Minecraft основан на программировании на Java. Таким образом, если файлы Java не обновляются в соответствии с лаунчером, это приведет к ошибке Minecraft: не удалось записать дамп ядра в Windows 10.
- Отсутствующий или поврежденный файл дампа: файл дампа поддерживает цифровую запись данных, соответствующих любому сбою. Если в вашей системе отсутствует файл дампа, вероятность ошибки при записи дампа ядра выше.
В этом разделе мы собрали и упорядочили все возможные решения для исправления ошибки Minecraft: не удалось записать дамп ядра для удобства пользователя.
Метод 1. Обновите/переустановите драйвер видеокарты
Чтобы избежать этой проблемы, обновите или переустановите драйверы видеокарты, чтобы они соответствовали лаунчеру.
Метод 1A: обновите драйверы
1. Нажмите клавиши Windows + X и выберите Диспетчер устройств.
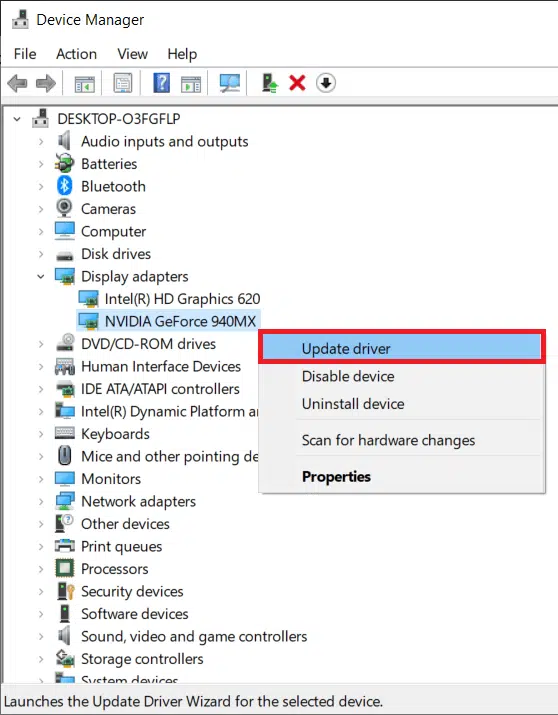
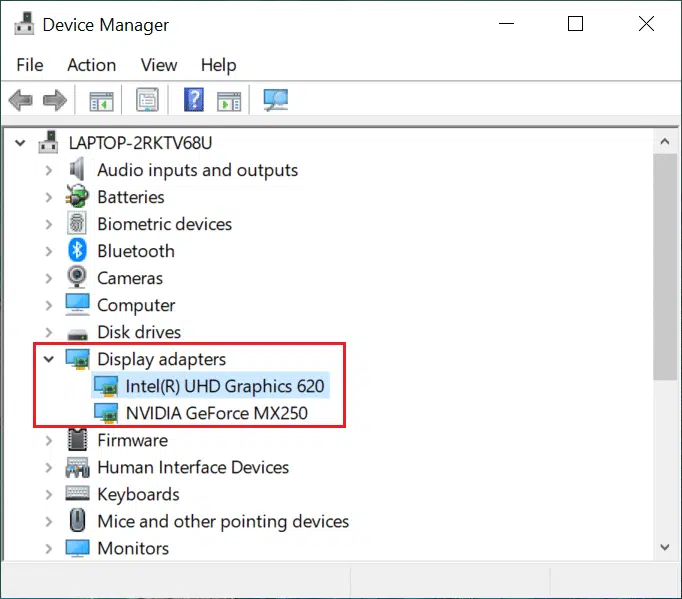
2. Дважды щелкните Видеоадаптеры, чтобы развернуть запись.
3. Теперь щелкните правой кнопкой мыши драйвер видеокарты и выберите Обновить драйвер.
4. Затем нажмите Найти драйверы на этом компьютере, чтобы найти и установить драйвер вручную.
5. Щелкните Обзор…, чтобы выбрать каталог установки Minecraft. Затем нажмите Далее.

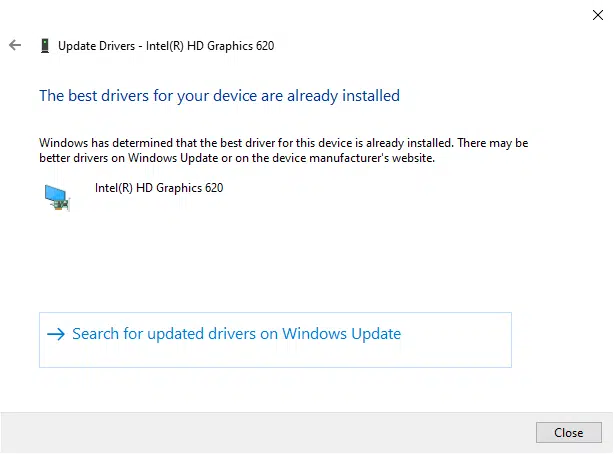
6А. Если драйверы не обновлены, они будут обновлены до последней версии.
6Б. Если они уже находятся в обновленном состоянии, на экране отобразится, что Windows определила, что лучший драйвер для этого устройства уже установлен. Более качественные драйверы могут быть найдены в Центре обновления Windows или на веб-сайте производителя устройства.
7. Нажмите кнопку Закрыть, чтобы закрыть окно.
Метод 1B: переустановите видеодрайверы
1. Запустите Диспетчер устройств и разверните Видеоадаптеры, выполнив указанные выше действия.
2. Теперь щелкните правой кнопкой мыши драйвер видеокарты и выберите Удалить устройство.
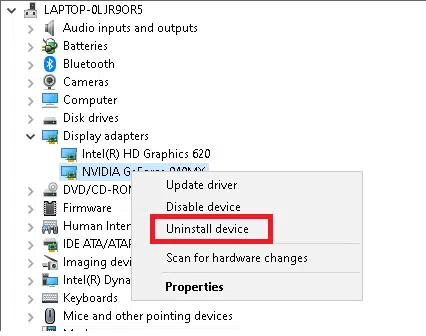
3. Теперь на экране отобразится предупреждение. Установите флажок Удалить драйвер для этого устройства и нажмите Удалить.
4. Загрузите и установите драйверы через веб-сайт производителя, например: NVIDIA.

5. Затем следуйте инструкциям на экране, чтобы завершить установку и запустить исполняемый файл.
Примечание. При установке нового драйвера видеокарты система может перезагрузиться несколько раз.
Метод 2: Обновите Java
Существенный конфликт возникает, когда вы используете лаунчер Minecraft в последней версии, когда файлы Java устарели. Это может привести к ошибке Не удалось записать дамп ядра. Минидампы по умолчанию не включены в клиентских версиях Windows. Единственное решение — обновить файлы Java в соответствии с лаунчером.
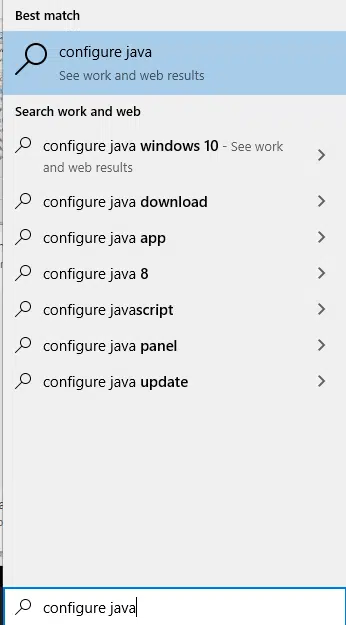
1. Запустите приложение Configure Java, выполнив поиск в строке поиска Windows.
2. Перейдите на вкладку Update в окне панели управления Java.
3. Установите флажок рядом с параметром Check for Updates Automatically.
4. В раскрывающемся списке Notify Me выберите параметр Before Downloading, как показано.

Отныне Java будет автоматически искать обновления и уведомлять вас перед их загрузкой.
5. Затем нажмите кнопку Update Now, как показано на рисунке выше.
6. Если доступна новая версия Java, загрузите и установите ее.
7. Разрешите Java Updater вносить изменения в компьютер.
8. Следуйте инструкциям на экране, чтобы завершить процесс.
Способ 3: Обновите Windows
Если текущая версия Windows ошибочна или несовместима с игрой, вы можете столкнуться с ошибкой Minecraft Не удалось записать дамп ядра в Windows 10. В этом случае можно выполнить обновление Windows, как описано ниже.
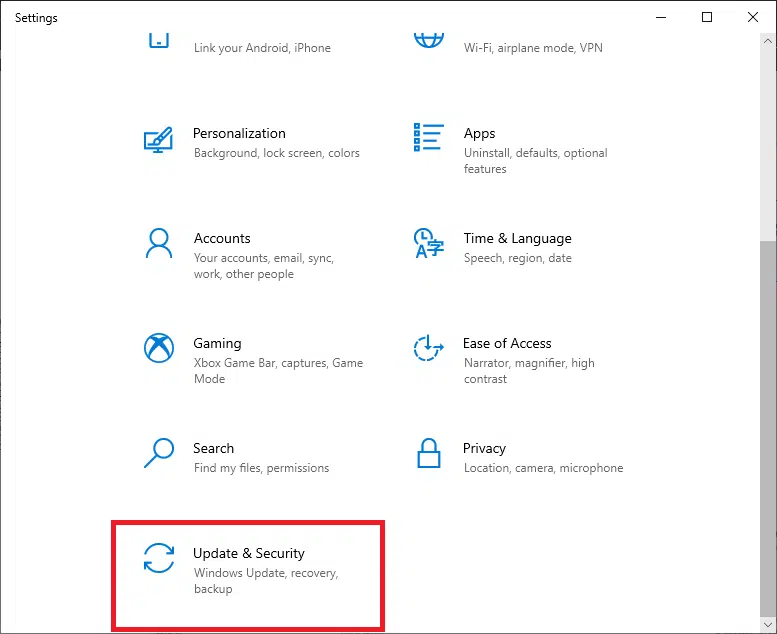
1. Щелкните значок Пуск в левом нижнем углу и выберите Параметры.
![]()
2. Здесь нажмите Обновление и безопасность.
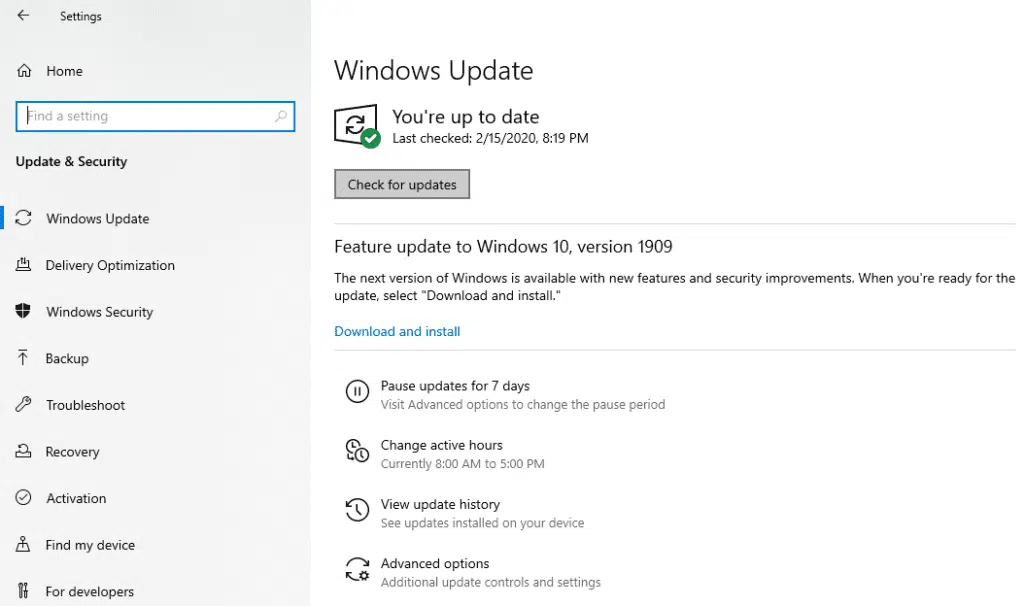
3. Щелкните Центр обновления Windows, а затем Проверить наличие обновлений.

4А. Если для вашей системы ожидается обновление, следуйте инструкциям на экране, чтобы загрузить и установить обновление.
4Б. Если система уже находится в обновленной версии, отобразится следующее сообщение: У вас установлены все последние обновления.
5. Перезагрузите систему после обновления и запустите Minecraft, чтобы убедиться, что ошибка Minecraft: не удалось записать дамп ядра устранена.
Примечание. Кроме того, вы можете откатить обновление Windows до предыдущих версий с помощью процесса восстановления системы.
Метод 4: Включите VSync и тройную буферизацию (для пользователей NVIDIA)
Частота кадров игры синхронизируется с частотой обновления системы с помощью функции VSync. Она используется для обеспечения бесперебойного игрового процесса для тяжелых игр, таких как Minecraft. Кроме того, можно увеличить частоту кадров с помощью функции тройной буферизации. Вот как исправить ошибку Minecraft: не удалось записать дамп ядра в Windows 10:
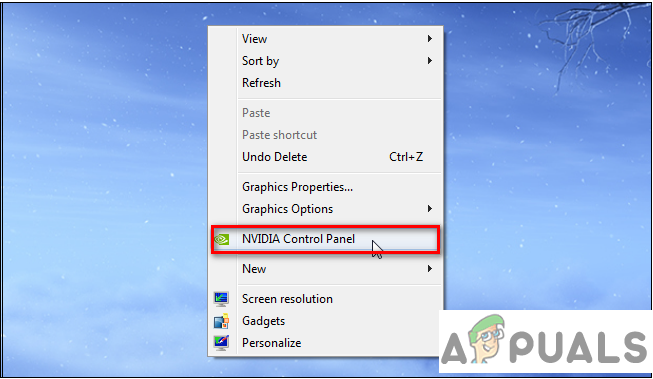
1. Щелкните правой кнопкой мыши пустое место на рабочем столе и выберите Панель управления NVIDIA.
2. Теперь перейдите к левой панели и нажмите Управление настройками 3D.
3. Здесь перейдите на вкладку Настройки программы.
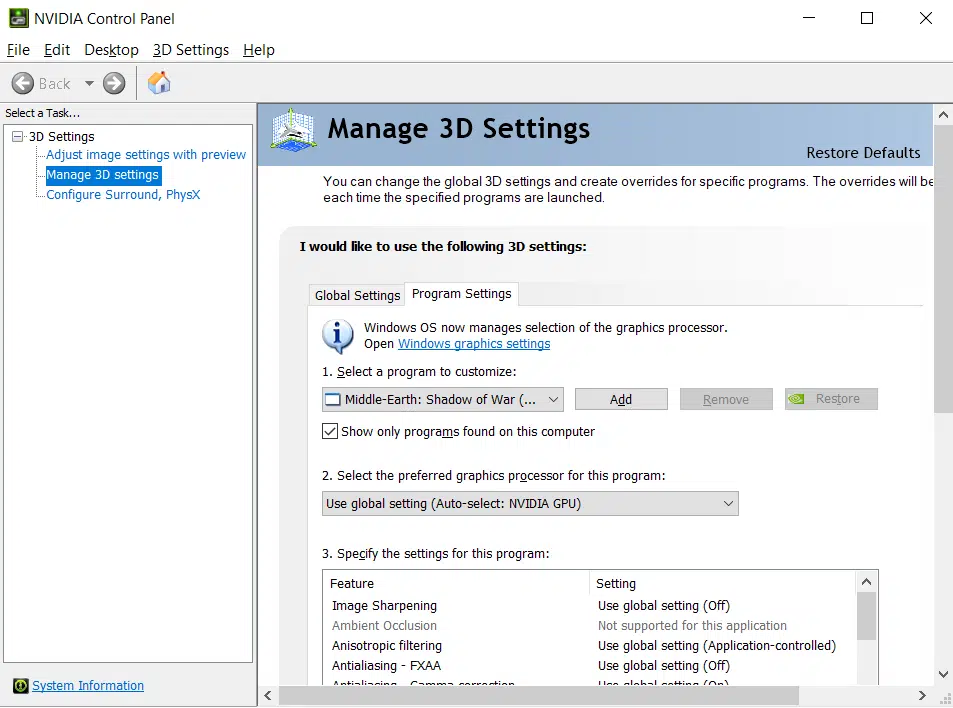
4. Щелкните Добавить.
5. Затем нажмите Обзор….
6. Теперь перейдите в папку установки Java и щелкните файл javaw.exe. Выберите Открыть.
Примечание. Используйте указанное по умолчанию расположение, чтобы найти указанный выше исполняемый файл Java:
C:/Program Files/Java/jre7/bin/ или C:/Program Files (x86)/Java/jre7/bin/
7. Теперь дождитесь загрузки файла Java. Затем нажмите Вертикальная синхронизация.
8. Здесь измените настройку с Выкл на Вкл.

9. Повторите шаги 6–7 также для параметра Тройная буферизация.
10. Наконец, нажмите Применить, чтобы сохранить изменения и закрыть экран.
Метод 5: Создайте файл дампа
Данные в файле дампа сообщают вам о программах и приложениях, которые использовались во время сбоя. Эти файлы создаются автоматически ОС Windows и приложениями, в которых произошел сбой. Однако они также могут быть созданы пользователем вручную. Если файл дампа в вашей системе отсутствует или поврежден, вы столкнетесь с ошибкой при записи дампа ядра. Минидампы не включены по умолчанию в Windows. Вот как включить минидампы в Windows 10, создав файл дампа, как показано ниже:
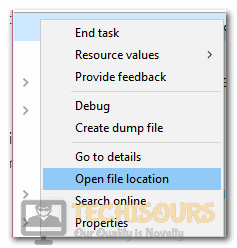
1. Запустите диспетчер задач, щелкнув правой кнопкой мыши пустое место на панели задач и выбрав его.

2. Найдите здесь Java(TM) Platform SE Binary на вкладке Процессы.
3. Щелкните его правой кнопкой мыши и выберите Создать файл дампа.
4. Просто подождите, пока система создаст файл дампа, и запустите Minecraft, так как это исправит ошибку Minecraft: не удалось записать дамп ядра.
Метод 6: Переустановите утилиту AMD Catalyst (для пользователей AMD)
Если установка AMD была неполной или выполнена неправильно, это приведет к ошибке Minecraft: не удалось записать дамп ядра в Windows 10. Вы можете исправить эту ошибку, переустановив утилиту AMD Catalyst следующим образом:
1. Запустите Панель управления через меню поиска.
2. Настройте режим просмотра, выбрав Просмотр > мелкие значки и щелкните Программы и компоненты.
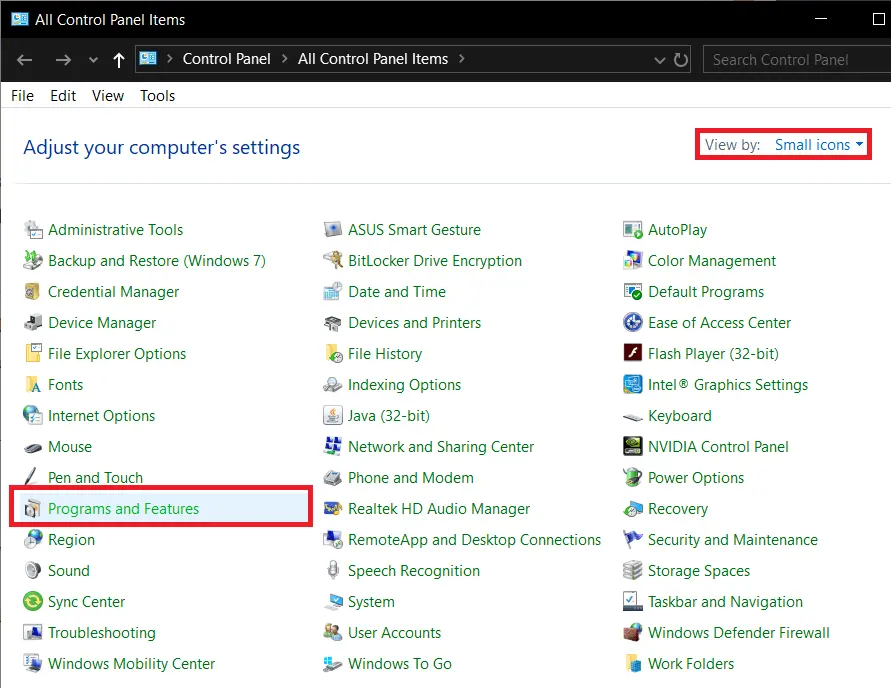
3. Появится служебная программа Программы и компоненты. Здесь найдите AMD Catalyst.
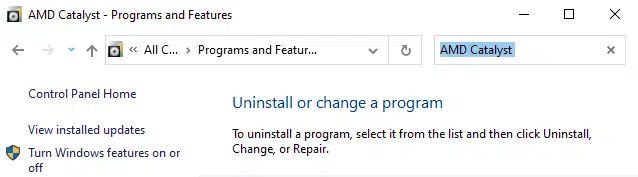
4. Теперь щелкните AMD Catalyst и выберите параметр Удалить.
5. Подтвердите запрос Вы действительно хотите удалить AMD Catalyst? нажав Да в запросе.
6. Наконец, перезагрузите компьютер, чтобы выполнить удаление.
7. Загрузите драйвер AMD для 32- или 64-разрядной версии Windows 10, в зависимости от вашей версии.
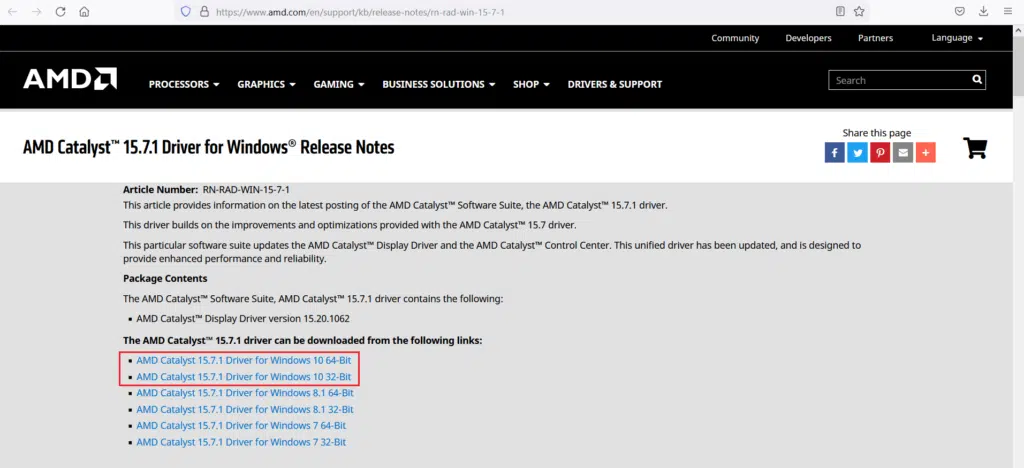
8. Дождитесь завершения загрузки. Затем перейдите в Загрузки в проводнике.
9. Дважды щелкните загруженный файл, чтобы открыть его, и нажмите Установить.
10. Следуйте инструкциям на экране, чтобы завершить процесс установки.
Перезагрузите систему Windows 10 и запустите игру. Ошибка к настоящему моменту должна быть исправлена.
Совет профессионала: вы также можете устранить вылет игры, выделив для Minecraft дополнительную оперативную память.
The “Failed to Write Core Dump. Minidumps are not Enabled by Default on Client Versions of Windows” is mostly triggered while hosting or joining a Minecraft server and it is triggered mostly due to Java. Therefore, we suggest that you try out the fixes and solutions that we have listed in this article to fix the issue. Also, go through the reasons due to which the issues occur in the first place that we have listed below.

Why the Failed to Write Code Dump Issue is triggered?
After investigating the issue, we concluded that the following have to be the most crucial reasons due to which the Core Dump cannot be written on your computer.
- Outdated Java: If the Java installed on your system has been outdated, you will be getting the Failed to Write Core Dump issue with Minecraft and with Java as well. Therefore, we suggest that you try to make sure that the latest version of Java is being used on your computer as we have indicated in the steps below.
- Outdated Operating System: In certain cases, the outdated installation of Windows might not be able to run Minecraft properly. Therefore, we suggest that you try to update to the latest available version by following the steps that have been listed below.
- Memory Errors: Sometimes, memory-related errors might prevent the Core Dump from being written. Therefore, we suggest that you check your PC for any such errors and fix them using the utility available in the solution below.
Now that you have been familiarized with the reasons behind the error, you can finally start implementing the solutions for this issue.
Fix 1: Updating Java to the latest version
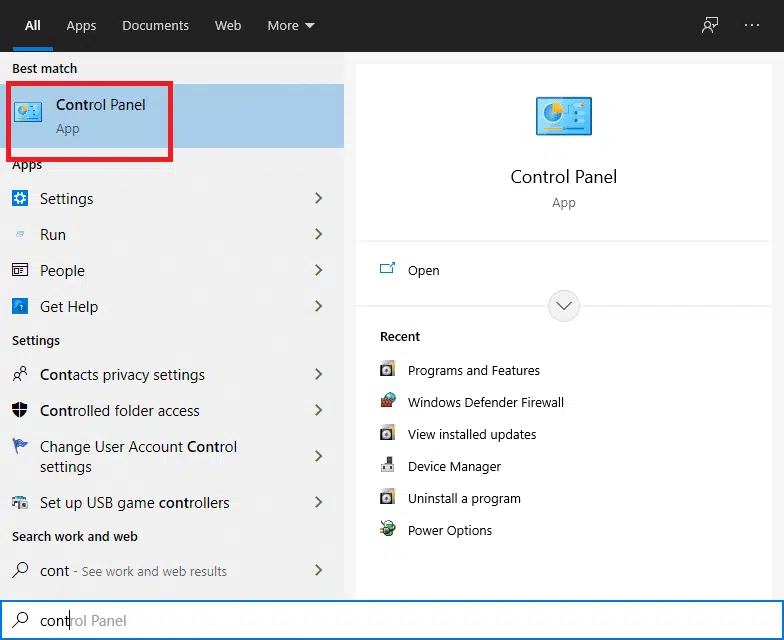
- Press “Windows + R” to launch the Run prompt, type in “Control Panel” and press “Enter” to launch the control panel.

Typing in Control Panel - From there, click on “Programs” and select “Java” from the list.
- Once in the Java Control Panel, go to the “Java” tab and select “View”. After that, “Java Runtime Environment Settings” will appear. Ensure that the latest “Java Runtime” is Enabled. If not, then tick the checkbox below “Enabled” and press “OK”
- Restart your PC and see if the “Failed to Write Core Dump. Minidumps are not Enabled by Default on Client Versions of Windows issue” is now resolved

Fix 2: Checking for Windows Updates
- Press the “Window + S”, type in “Check for updates” and press Enter on your keyboard.
- Click on the “Check for updates” button, if updates are available, Windows will automatically download and install them.

Check for updates - If they are not automatically downloaded and installed, click “Download and install”.
- Restart your PC once the update is complete and see if the issue is resolved now.

Fix 3: Restarting your PC
This is the most simple way in which you might be able to fix this issue. A simple restart of the computer might get rid of any launch configuration issues that the PC might have acquired during the startup and fix this issue.
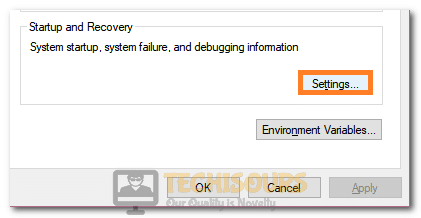
Fix 4: Enabling Small Memory Dump
- Press “Window + S”, type in “View advanced system settings” and press Enter on your keyboard.
- In the “Advanced” tab, click on the “Settings” option under the “Startup and Recovery” tab.

Selecting Startup and Recovery Settings - Under the “Write debugging information” tab, select the “Small memory dump” option and press “OK”.
- Restart your PC and see if the Failed to Write Core Dump issue is resolved.
Fix 5: Updating Graphics Drivers
It is possible in some cases that the GPU drivers that your computer is using have been outdated due to which you are running into this particular issue. Therefore, we strongly suggest that you try to update the GPU drivers installed on your computer by downloading them through the Nvidia Geforce Experience or the AMD Catalyst software depending upon your GPU.
Fix 6: Deleting the .metadata Folder
Head on over to the “C:Users(user)Documentsworkspace.metadata” folder which contains your Project References. Make sure to delete the “.metadata” folder and import the current projects to your workspace. After doing so, check to see if the Failed to Write Core Dump issue is resolved.
Fix 7: Reverting to a Previous Version of JDK
- Press “Window + S”, type in “Apps & features” and press Enter on your keyboard.
- Look for the “Java” app here, click on it and select “Uninstall”.
- Once uninstalled, Go to Java’s official website, and download the desired version of Java.
- Install it, restart your PC, and see if the issue is resolved now.
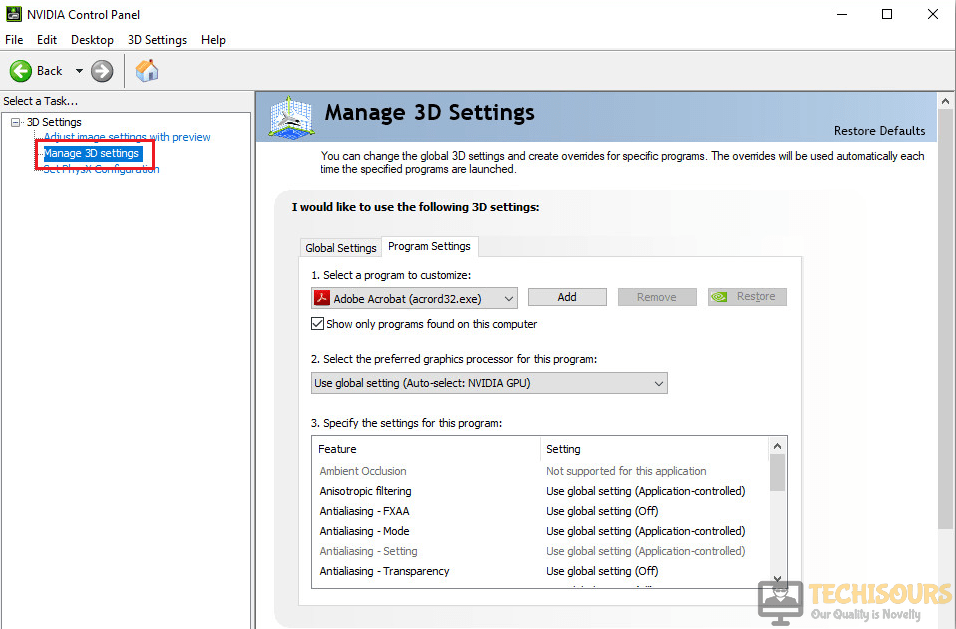
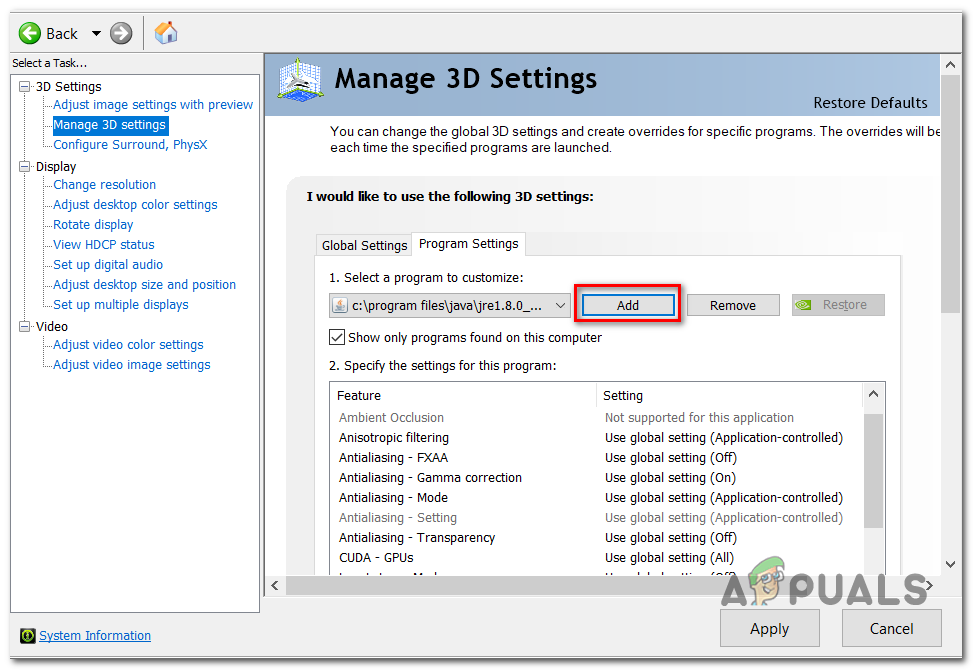
Fix 8: Change GPU Configuration (Nvidia GPUs Only)
- Right-click on Desktop and select “Nvidia Control Panel”.
- Once the Control Panel opens, head over to “Manage 3D Settings” under the “3D Settings” category.

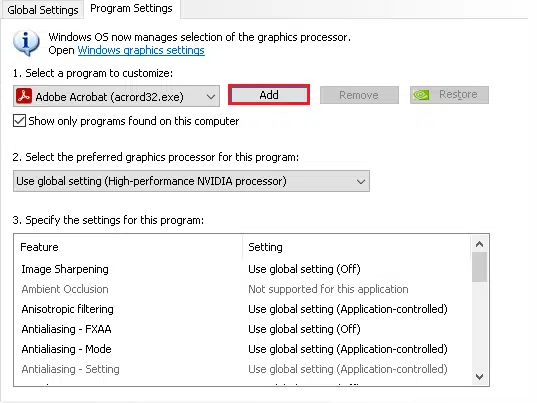
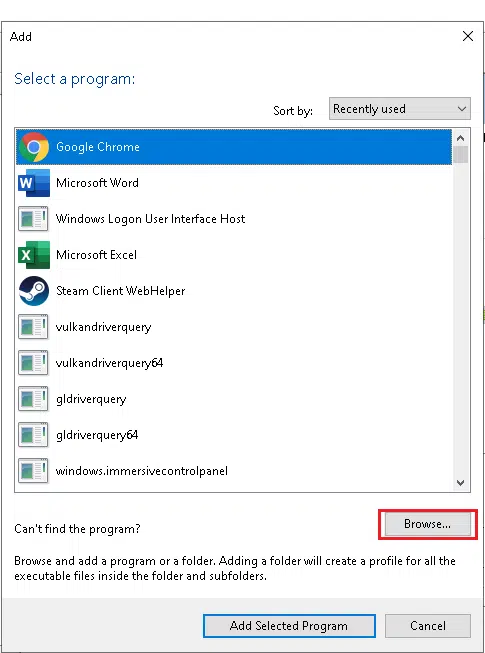
Manage 3D Settings - Click “Program Settings”, click “Add” and select “Browse”.
- Navigate to the following path: C:/Program Files/Java/jre7/bin/.
- Select “Java” which should have the logo of JAVA.
- Once added, look for the following settings and change them accordingly:.
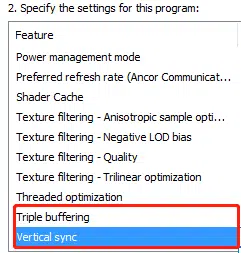
Triple Buffering – On

Vertical Sync – On
- Check to see if making these changes resolve the Failed to Write Core Dump issue.
Fix 9: Running the Game as Administrator
- Go to Minecraft’s Install folder and look for the launcher.
- Right-click on it and select “Properties”.
- In the “Compatibility” tab, tick the option “Run this program as an administrator” and press “Apply” followed by “OK”.

Run this program as an administrator - Launch the game and see if the Failed to Write Core Dump issue is resolved now.

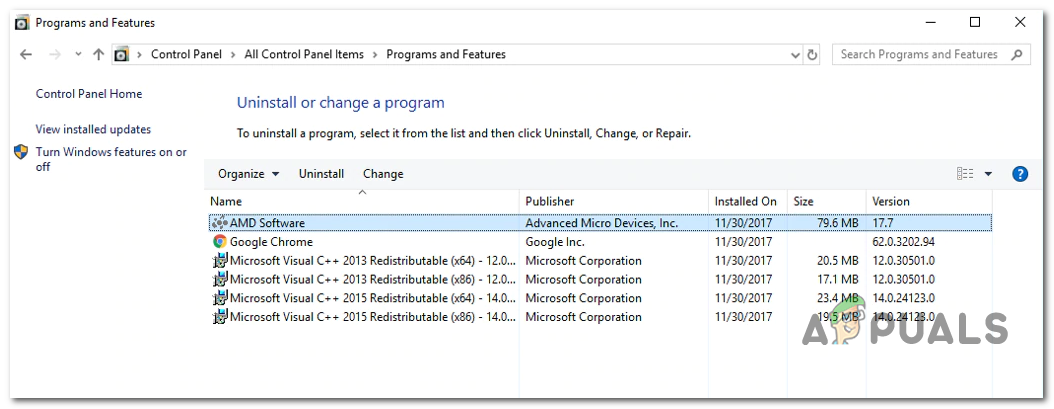
Fix 10: Clean Installing AMD Catalyst (AMD GPUs Only)
- Press “Window + S”, type in “Apps & features” and press Enter on your keyboard.

Selecting Apps & Features - Look for “AMD Software” from the list of programs and click on it.
- Select “Uninstall” and follow the on-screen instruction to complete the process.
- Once complete restart your PC and visit AMD’s website to download the latest drivers.
- Install these drivers and restart your PC and check to see if the issue is resolved now.

Fix 11: Creating Dump File for Minecraft
- Launch Minecraft.
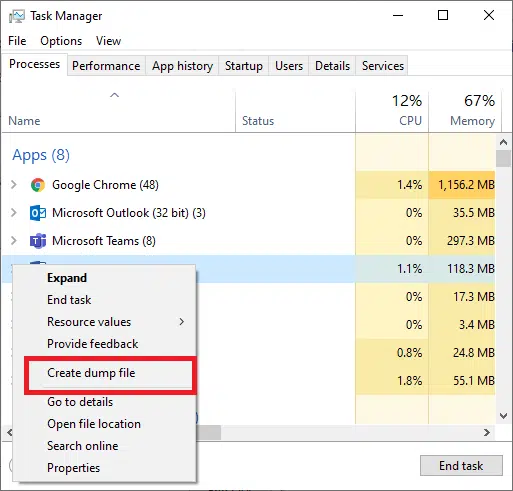
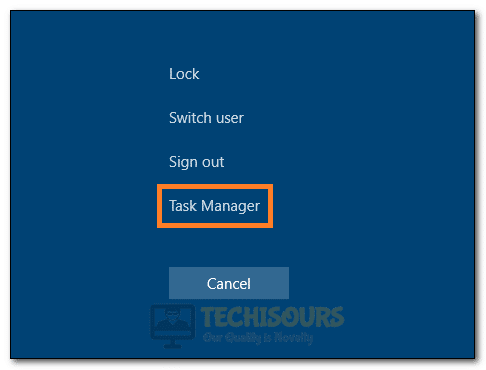
- Press “Ctrl + Shift + Esc” to open the Task Manager.

Launching Task Manager - In the “Processes” tab, look for “Minecraft Launcher” and right-click it.
- Select “Create Dump File” from the menu and wait for the process to finish.
- Restart your PC and see if the issue has now been resolved.
Fix 12: Reverting to Vanilla Version
If you are using mods in Minecraft, that can probably cause issues as well. Try reverting to the Vanilla (Base) version of the game which might resolve your issue.
Fix 13: Enabling Core/Mini Dumps Manually
For JDK 9 and above follow the steps below:
- Press “Window + S”, type in “java” and right-click the best match that pops up.
- Select “Open File Location”, right-click “java” and click “Create shortcut”.

Selecting the “Open File Location” button - Java should now appear on desktop, right-click it, and select “Properties”.
- In the “Target” text box, write the following command at the end:
java -jar crasher.jar -XX:+CreateCoredumpOnCrash
- Press “Apply” and “OK”
For JDK 8, the rest of the process will be identical except the command added in step 4, which will be replaced with the following command:
java -jar crasher.jar -XX:+CreateMinidumpOnCrash
On Unix, Linus and macOS you need to use the following commands to enable minidumps:
ulimit -c unlimited

java -jar crasher.jar -XX:+CreateCoredumpOnCrash
Moreover, you can enter the following command in the terminal:
defaults write com.apple.finder AppleShowAllFiles TRUE
Fix 14: Modifying Minecraft’s Files
- Right-click the Minecraft shortcut on your Desktop and click “Open file location”.
- Click on “.minecraft” from the address path and open the “options” file.
- Look for “fboEnable” and change its value to “false” instead of “true”.
- Save the file and close it.
- Launch the game and make sure your profile name and username are similar and check if the issue is now resolved.
Fix 15: Uninstall/Reinstall any recently Installed Software
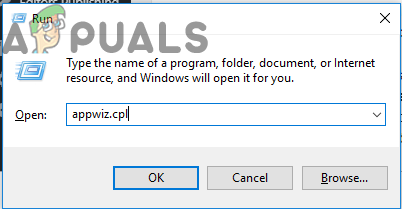
- Press “Windows + R” to launch into the Run prompt.
- Type in “Appwiz.cpl” and press “Enter” to launch into the application management window.

Typing in “Appwiz.cpl” and pressing “Enter” - From here, right-click on any recently installed software and select “Uninstall” to remove it from your computer.
- Check to see if doing so fixes the “Failed to Write Core Dump. Minidumps are not Enabled by Default on Client Versions of Windows” error on the game.

Fix 16: Reinstalling the game
- Press “Windows + R” to launch into the Run prompt.
- Type in “Appwiz.cpl” and press “Enter” to launch into the application management window.
Typing in “Appwiz.cpl” and pressing “Enter” - Right-click on “Minecraft” and select the “Uninstall” button to remove it from your computer.
- Now, download the game again from their website and check to see if doing so fixes the issue.
Fix 17: Checking for Memory Errors
- Download the app from here.
- Move its data into an empty USB Flash Drive and restart your PC.
- Head over to the BIOS and in the “Boot Priority” select the USB Flash Drive as the first to take the boot from.
- Now restart your PC again and you should now see the MemTest utility.
- Run the default memory test and wait for it.
- Look for errors such as “bad memory” or “High CPU overclock” or “Wrong memory voltage” all of these can cause issues. However, “Bad memory” basically means the RAM has issues and will need replacing.
If all of these fixes are unable to eradicate the issue for you, contact us for further troubleshooting of the issue.

Alan is a hardcore tech enthusiast that lives and breathes tech. When he is not indulged in playing the latest video games, he helps users with technical problems that they might run into. Alan is a Computer Science Graduate with a Masters in Data Science.
Some Windows 10 users are encountering the ‘Failed to write core dump. Minidumps are not enabled by default on client versions of Windows‘ error when attempting to join or create a server. This error is occurring with various different Minecraft builds.
If you’re running the game with an integrated Intel graphics card, it’s likely that the error is triggered by a Dynamic Link Library file (ig9icd64.dll). In this case, you should be able to fix the issue by using the Intel Update Assistant utility to install the latest drivers compatible with the integrated GPU.
On the other hand, if you’re using a high-end Nvidia GPU, you might need to force Vsync and Triple buffering directly on javaw.exe in order to make the game run in a stable matter.
In case you’re using an AMD card, try reinstalling the Catalyst or AMD Software. A partially corrupted installation might be facilitating the apparition of this issue.
Updating to the latest Intel Graphics Card Driver (if applicable)
If you’re using an integrated Graphics card supplied by Intel, chances are you’re dealing with an issue originating from the ig9icd64.dll. This file belongs to the OpenGL Driver for Intel Graphics Accelerator.
In case this scenario is applicable to your current situation, you will be able to fix the issue by updating the entire set of Graphics drivers using the Intel Update Assistant utility.
A lot of affected users that were previously unable to join and create Minecraft servers have confirmed that this operation finally made the game stable.
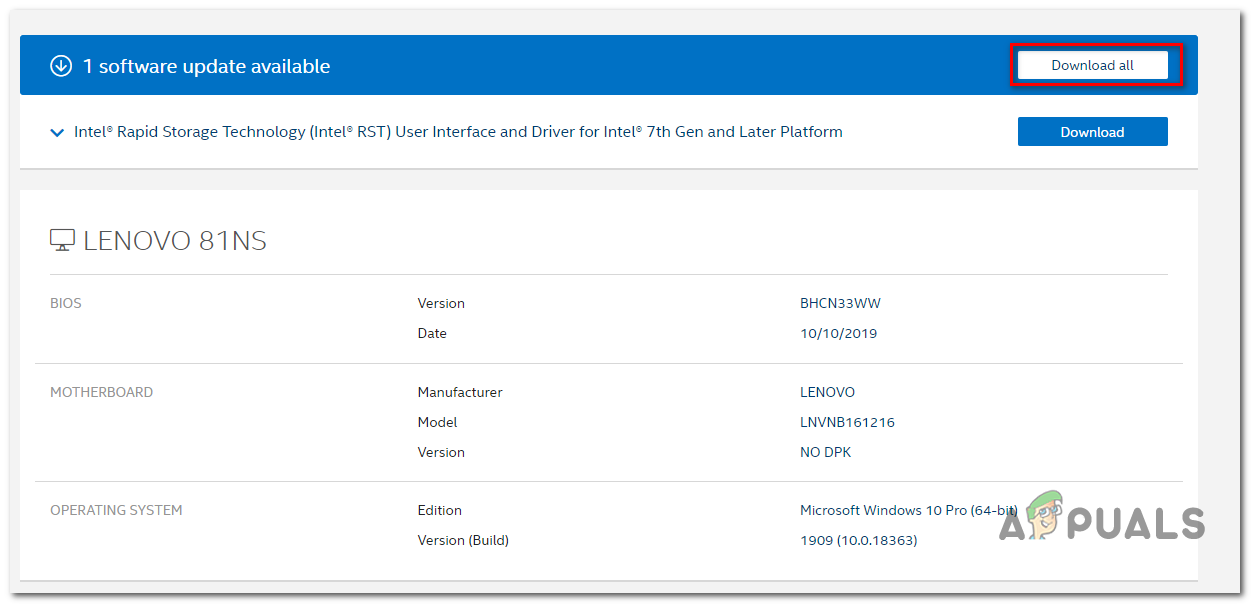
Here’s a quick guide on updating your Intel Graphics drivers to the latest version:
- Visit this link (here) and click on the Get Started button.

Starting the Intel Auto-Update utility - After you do this, wait until the initial scan is complete. Once the process is finished, click on the Download All button and wait for the download to complete.

Downloading every compatible Intel driver update - Once every download is complete, double-click on each installation executable and follow the on-screen prompts to complete the driver installation.
- After you manage to install every new update, restart your computer and see if the ‘Failed to Write Core Dump’ is resolved by trying to join or create a Minecraft server.

Forcing Vsync & Triple Buffering on Minecraft (Nvidia Only)
If you’re using a medium to high-end Nvidia GPU, it’s very likely that you’re seeing the ‘Failed to Write Core Dump’ error due to the fact that your current graphics card settings are not enforcing VSync when you’re playing Minecraft.
This setting can also be enforced from the Game settings, but the ideal way to do it is from the Nvidia Control Panel. In order to fix the issue, you will need to navigate to your Java path and add Javaw.exe to the list of managed items.
After you do this, you can force the two settings to be used by every program that makes use of Javaw.exe (including Minecraft).
Here’s a quick step-by-step guide on enabling VSync and Triple Buffering from the Manage 3D Settings menu of Nvidia Control Panel:
- Right-click on an empty space on your desktop and click on Nvidia Control Panel from the newly appeared context menu.

Access Nvidia Control Panel. - Once you’re inside Nvidia Control Panel, use the left-hand menu to select Manage 3D settings (under 3D Settings).
- Next, move over to the right-hand side menu and select the Program Settings menu. Inside, click on Add > Browse and navigate to the location of your Java installation, select the javaw.exe file and click on Open.

Leading up javaw.exe in Nvidia Control Panel Note: Here’s a list of default locations depending on which Java version you’re using:
Java 7
- C:/Program Files/Java/jre7/bin/
OR
- C:/Program Files (x86)/Java/jre7/bin/

Java 6
- C:/Program Files/Java/jre6/bin/
OR
- C:/Program Files (x86)/Java/jre6/bin/
- Next, once the executable is loaded, scroll down through the list of program settings and locate Vertical Sync and Triple Buffering. Once you see them, use the drop-down menu associated with each one to change the default setting to ON for both.

Changing the default Program Settings for both - Once the two settings are enforced, hit the Apply button to make the changes permanent.
- Attempt to join or create a Minecraft server once again and see if the issue is now resolved.

Reinstalling the AMD Catalyst Utility (AMD Only)
If you’re using an AMD GPU, it’s possible that you’re seeing the ‘Failed to write core dump. Minidumps are not enabled by default on client versions of Windows‘ error due to a partially corrupted AMD Software installation.
In case these same circumstances apply to you, you should be able to get the issue fixed by uninstalling your current AMD Software or AMD Catalyst installation and reinstalling the latest version again through the official channels.
Here’s a quick step by step guide that will show you how to do this:
- Press Windows key + R to open up a Run dialog box. Next, type ‘appwiz.cpl’ and press Enter to open up the Programs and Features menu.

Typing in “appwiz.cpl” in the Run prompt - Once you’re inside the Programs and Features screen, scroll down through the list of installed applications and locate the AMD installation that you wish to uninstall. When you locate your AMD installation, right-click on it and choose Uninstall from the context menu.

Uninstalling the AMD Software - At the confirmation prompt, click Ok and follow the on-screen prompts to complete the uninstallation process.
- Restart your computer and wait for the next startup to complete.
- Visit this link (here) and download the latest version of AMD Catalyst. Once the download is complete, open the installation executable and follow the on-screen prompts to complete the installation.
- Once the new version is installed, reboot again and see if the issue is resolved at the next startup by attempting to join or create a Minecraft server.
Try making the Dump File Manually
Sometimes you can try to force Windows to make a dump file through task manager which can potentially fix this issue. You have to follow these steps in order to create a dump file:-
1. Open Minecraft or Minecraft Launcher.
2. Right-click on your Taskbar and then click “Task Manager” (Alternatively you can press and hold Ctrl+Shift+Esc keys together)
3. Once the Task Manager is opened Right-click on “Java(TM) Platform SE Binary” (If you can’t find it simply right click on your “Minecraft Launcher“)
4. Now press the “Create Dump File” Option.
5. Wait till Windows is creating the Dump file for the selected process.
Now restart your computer and try to play Minecraft again.

Kevin Arrows
Kevin Arrows is a highly experienced and knowledgeable technology specialist with over a decade of industry experience. He holds a Microsoft Certified Technology Specialist (MCTS) certification and has a deep passion for staying up-to-date on the latest tech developments. Kevin has written extensively on a wide range of tech-related topics, showcasing his expertise and knowledge in areas such as software development, cybersecurity, and cloud computing. His contributions to the tech field have been widely recognized and respected by his peers, and he is highly regarded for his ability to explain complex technical concepts in a clear and concise manner.
-
Partition Wizard
-
Partition Magic
- Minecraft Failed to Write Core Dump Windows 10? [Easily Fix]
By Ariel | Follow |
Last Updated April 28, 2021
When trying to join or create a server on Minecraft, many Windows 10 users received “Failed to write core dump. Minidumps are not enabled by default on client versions of Windows” error. Don’t worry. This post of MiniTool summarizes several tested solutions.
What causes Minecraft failed to write core dump error? According to user reports, this error is often related to an integrated Intel graphics card. In addition, improper graphic card settings, a missing dump file, and corrupt AMD installation are responsible for Minecraft failed to write core dump Windows 10.
Fix 1. Install the Latest Intel Graphics Card Driver
If you are using an integrated Intel graphics card, you may encounter the “Failed to write core dump. Minidumps are not enabled by default on client versions of Windows” error due to a Dynamic Link Library file. To fix the issue, you can try updating the Intel graphics card driver.
Step 1. Press the Win + R key to open the Run dialog box, and then type devmgmt.msc in the box and hit Enter to open Device Manager.
Step 2. Expand the Display adapters category, and then right-click the Intel graphics card driver and select Update driver.

Step 3.Select the Search automatically for updated driver software option and follow the on-screen instruction to update the driver automatically.
Tip: Alternatively, you can click here to open the official website of Intel GPU drivers, and then download the updated Intel drivers and install them on your computer.
Once installed, you can restart the computer and check if the “Failed to write core dump Minecraft” error persists.
Fix 2. Enable VSync and Triple Buffering from NVidia Control Panel
Some users reported that they can’t be unable to update the Minecraft runtime environment on a medium to high-end NVidia GPU. This may be caused by improper graphics card settings. To fix the issue, you can follow the steps below to enable the VSync and Triple Buffering settings.
Step 1. Right-click on your desktop and select the NVidia Control Panel from the context menu. Also, you can find the control panel from the Taskbar.
Step 2. Select Manage 3D settings from the left pane and navigate to the Program Settings tab.
Step 3. Click on the Add > Browse buttons, and then navigate to the directory folder of your Java installation and select the javaw.exe file, and click on Open.
Step 4. Once the Java file is loaded, select the Vertical Sync and Triple Buffering options from the list of Features, and then change their default setting to On from the Setting pane.
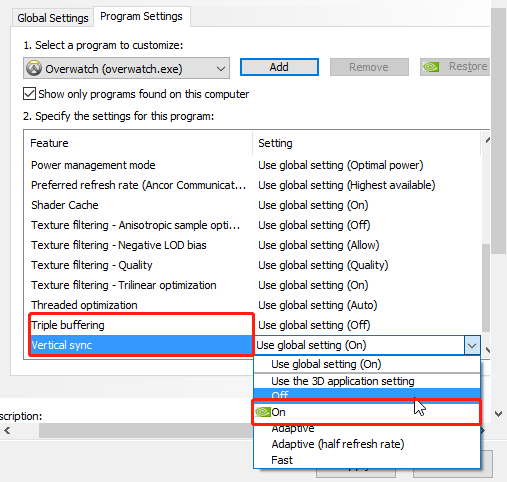
Step 5. Click on Apply to execute the changes. After that, the 2 features will be used by every program that utilizes Javaw.exe including Minecraft.
Now, you can try joining a server again and see if the “Failed to write core dump. Minidumps are not enabled by default on client versions of Windows” error disappears.
Fix 3. Enforce Windows to Create a Dump File
As mentioned above, the “Failed to write core dump Minecraft” error can occur if a dump file is missing or get corrupted. In this case, you can force Windows to create a dump file. Here’s how:
Step 1. Open you Minecraft Launcher.
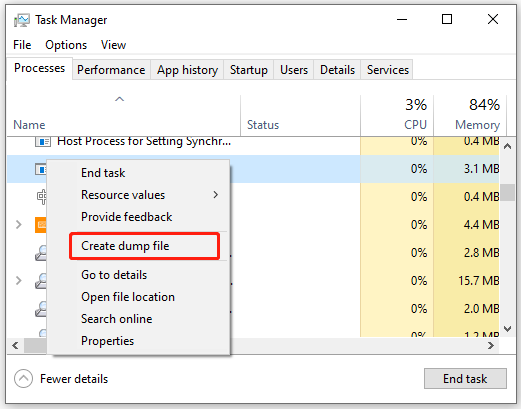
Step 2. Press Ctrl + Shift + Esc keys together to open Task Manager. Also, you can right click the Taskbar at the bottom of your computer screen and select Task Manager.
Step 3. Right click the Java(TM) Platform SE Binary process and select Create Dump File. If you can’t find it, expand the Minecraft Launcher category.
Wait for Windows to create a Dump file. After that, restart your computer and see if the “Failed to write core dump. Minidumps are not enabled by default on client versions of Windows” error is fixed.
Fix 4. Reinstall the AMD Software or AMD Catalyst Utility
Some AMD GPU users encounter the Minecraft failed to write core dump Windows 10 error. This can be caused by a partially corrupted AMD software installation. For that, you can try reinstalling the ADM program or AMD Catalyst utility.
Step 1. Press Win + R keys to open the Run dialog box, and then type appwiz.cpl in the box and hit Enter.

Step 2. Inside the Programs and Features window, scroll down the list of installed programs to the AMD software/AMD Catalyst, and then right-click it and select Uninstall.
Step 3. Click on OK to confirm this uninstallation and wait for it to complete.
Step 4. Once uninstalled, re-download it from the official website of the AMD software and follow the on-screen prompts to complete the reinstallation.
Now, you can reboot your computer and join a server to check if the “Failed to write core dump. Minidumps are not enabled by default on client versions of Windows” error is resolved.
About The Author

Position: Columnist
Ariel has been working as a highly professional computer-relevant technology editor at MiniTool for many years. She has a strong passion for researching all knowledge related to the computer’s disk, partition, and Windows OS. Up till now, she has finished thousands of articles covering a broad range of topics and helped lots of users fix various problems. She focuses on the fields of disk management, OS backup, and PDF editing and provides her readers with insightful and informative content.
Содержание
- Исправлена ошибка Minecraft ‘Не удалось записать дамп ядра’
- Создать файл дампа
- Ноябрьское обновление 2022:
- Обновите Java до последней версии
- Обновление Windows
- Обновление последней версии драйвера графической карты Intel
- Как исправить ошибку Minecraft «Не удалось записать основной дамп» в Windows 10
- Обновление до последней версии драйвера видеокарты Intel (если применимо)
- Принудительная синхронизация и тройная буферизация в Minecraft (только Nvidia)
- Переустановка утилиты AMD Catalyst (только для AMD)
- Попробуйте создать файл дампа вручную
- Не удалось записать дамп ядра. Minidumps не включены по умолчанию на клиентских версиях Windows, в то время как callin dll от java
- 1 ответ
- Обновление до последней версии драйвера видеокарты Intel (если применимо)
- Принудительная синхронизация и тройная буферизация в Minecraft (только Nvidia)
- Переустановка утилиты AMD Catalyst (только AMD)
- Попробуйте создать файл дампа вручную
- Настройка minidump Windows 10
- Где находится minidump
- Windows 10 создает только minidump файл
Исправлена ошибка Minecraft ‘Не удалось записать дамп ядра’
Обновление: Перестаньте получать сообщения об ошибках и замедляйте работу своей системы с помощью нашего инструмента оптимизации. Получите это сейчас на эту ссылку
Если вы много играете в Minecraft и продолжаете модифицировать свою систему, возможно, вы получили эту ошибку / цитату через определенное время работы Minecraft:
«Не удалось записать дамп ядра. Минидампы не включены по умолчанию в клиентских версиях Windows ».

Некоторые пользователи Windows 10 могут столкнуться со следующей ошибкой: «Не удалось записать дамп ядра«. Минидампы не включены по умолчанию в клиентских версиях Windows, когда они пытаются присоединиться к серверу или создать его. Эта ошибка возникает в нескольких сборках Minecraft.
Если вы используете игру со встроенной видеокартой Intel, возможно, ошибка вызвана файлом в библиотеке динамических ссылок (ig9icd64.dll). В этом случае вы сможете решить проблему с помощью мастера обновлений Intel для установки последней версии. драйверы совместим со встроенным графическим процессором.
С другой стороны, если вы используете высокопроизводительный графический процессор Nvidia, вам может потребоваться принудительная Vsync и тройная буферизация непосредственно в javaw.exe для стабильной работы игры.
Если вы используете карту AMD, попробуйте переустановить программное обеспечение Catalyst или AMD. Частично поврежденная установка может вызвать эту проблему.
Создать файл дампа
Ноябрьское обновление 2022:

Обновите Java до последней версии
У вас есть проблема в нативном коде. Обновление Java, вероятно, не поможет в этой ситуации.

Обновление Windows
Это полезно только в том случае, если используемый вами собственный код обновляется Windows Updates.

Этот параметр предназначен для сбоев режима ядра (синий экран), а не сбоев приложений (режим пользователя). Существует также параметр для сбоев приложения (параметр реестра, называемый LocalDumps), но он не работает для Java, поскольку Java выполняет свою собственную обработку исключений.
Чтобы получить аварийные дампы из Java 9 и выше, используйте следующий параметр командной строки:
-XX: + Создать аварийный дамп ядра
В Java 8 и более ранних версиях используйте специальную командную строку Windows
Обновление последней версии драйвера графической карты Intel

Если вы используете встроенную графическую карту Intel, у вас, вероятно, возникла проблема с файлом ig9icd64.dll. Этот файл является частью OpenGL водитель для графического ускорителя Intel.
Если этот сценарий применим к вашей текущей ситуации, вы можете решить эту проблему, обновив набор графических драйверов с помощью мастера обновлений Intel.
Многие пострадавшие пользователи, которые раньше не могли создавать серверы Minecraft, подтвердили, что это, наконец, сделало игру стабильной.

CCNA, веб-разработчик, ПК для устранения неполадок
Я компьютерный энтузиаст и практикующий ИТ-специалист. У меня за плечами многолетний опыт работы в области компьютерного программирования, устранения неисправностей и ремонта оборудования. Я специализируюсь на веб-разработке и дизайне баз данных. У меня также есть сертификат CCNA для проектирования сетей и устранения неполадок.
Источник
Как исправить ошибку Minecraft «Не удалось записать основной дамп» в Windows 10
Некоторые пользователи Windows 10 сталкиваются с ошибкой « Не удалось записать дамп ядра. Минидампы не включены по умолчанию в клиентских версиях Windows. Ошибка при попытке присоединиться к серверу или создать его. Эта ошибка возникает в различных сборках Minecraft. 
С другой стороны, если вы используете высокопроизводительный графический процессор Nvidia, вам может потребоваться принудительная Vsync и тройная буферизация непосредственно в javaw.exe, чтобы игра работала стабильно.
Если вы используете карту AMD, попробуйте переустановить программное обеспечение Catalyst или AMD. Частично поврежденная установка может способствовать возникновению этой проблемы.
Обновление до последней версии драйвера видеокарты Intel (если применимо)
Если вы используете интегрированный Видеокарта, поставляемая Intel, скорее всего, вы столкнулись с проблемой, связанной с файлом ig9icd64.dll. Этот файл принадлежит к драйверу OpenGL для Intel Graphics Accelerator.
Многие затронутые пользователи, которые ранее не могли присоединиться и создать серверы Minecraft, подтвердили, что эта операция наконец-то сделала игру стабильной. /p>
Вот краткое руководство по обновлению драйверов Intel Graphics до последней версии:
Принудительная синхронизация и тройная буферизация в Minecraft (только Nvidia)
Если вы используете графический процессор Nvidia среднего или высокого класса, очень вероятно, что вы видите ‘ Ошибка записи Core Dump ‘ из-за того, что текущие настройки видеокарты не поддерживают VSync, когда вы играете в Minecraft..
Этот параметр также можно принудительно установить в настройках игры, но в идеале это можно сделать через панель управления Nvidia. Чтобы решить эту проблему, вам нужно будет перейти по пути к Java и добавить Javaw.exe в список управляемых элементов.
После этого вы можете принудительно установить оба параметра. используется каждой программой, использующей Javaw.exe (включая Minecraft).
Вот краткое пошаговое руководство по включению VSync и Triple Buffering из меню Управление настройками 3D в Панели управления Nvidia :
Примечание. Вот список местоположений по умолчанию в зависимости от какую версию Java вы используете:
Переустановка утилиты AMD Catalyst (только для AMD)
Если вы используете графический процессор AMD, возможно, вы видите сообщение « Не удалось записать дамп ядра. Минидампы не включены по умолчанию в клиентских версиях Windows. Ошибка из-за частично поврежденной установки программного обеспечения AMD.
Если эти же обстоятельства применимы к вам, вы сможете получить проблема устранена путем удаления текущего программного обеспечения AMD или установки AMD Catalyst и повторной установки последней версии по официальным каналам..
Вот краткое пошаговое руководство, которое покажет вам, как это сделать:
Попробуйте создать файл дампа вручную
Иногда вы можете попытаться заставить Windows создать дамп файл через диспетчер задач, который потенциально может решить эту проблему. Вы должны выполнить следующие шаги, чтобы создать файл дампа: —
Источник
Не удалось записать дамп ядра. Minidumps не включены по умолчанию на клиентских версиях Windows, в то время как callin dll от java
Я вызываю DLL (скомпилированный с GCC) через Java, используя JDK 1.7.0_40 на Windows 7. Я скопировал сгенерированный hello.dll в мой java/bin каталог и выполняю HelloJNI.java из консоли.
Я получаю эту ошибку:
1 ответ
Вот мое решение этого вопроса.
Я решил эту проблему на cygwin32 с gcc 4.9.3.
И java версия здесь
скомпилировать исходный код
gcc-Wl, — add-stdcall-alias-D__int64= «long long» — C HelloJNI.C-O HelloJNI.o-I / where / java1.7 / include-Iwhere / java1.7/include / win32
dlltool — output-def HelloJNI.def — kill-at — add-stdcall-alias —dllname HelloJNI.dll HelloJNI.o
измените файл def для этого примера HelloJNI.защита
вы можете увидеть содержимое файла выглядит следующим образом
; dlltool — output-def HelloJNI.def — kill-at — add-stdcall-alias —dllname HelloJNI.dll HelloJNI.o
ПОСТАВЛЯЕМЫЙ
Java_com_tobee_jni_test_HelloJNI_message = Java_com_tobee_jni_test_HelloJNI_message@8 @ 1
Java_com_tobee_jni_test_HelloJNI_message@8 @ 2
Вы нашли некоторые странные вещи, проходя через линии.
Я только что определил только один статический метод JNI, но два метода там.
Итак, уберите вторую строку и левую часть равной (‘= ‘ ) первой строки
тогда оно должно быть ниже.
С командой dlltool, я думаю, что я могу настроить свою dll с def файл я изменил выше, как dllexport в программировании windows.
dlltool — output-lib libHelloJNI.A — input-def HelloJNI.def — kill-at — add-stdcall-alias —dllname HelloJNI.dll HelloJNI.o
Последнее, что делает библиотеку с именем, что вы хотите
Источник
Некоторые пользователи Windows 10 сталкиваются с «Не удалось записать дамп ядра. Минидампы не включены по умолчанию в клиентских версиях Windows.‘Ошибка при попытке присоединиться к серверу или создать его. Эта ошибка возникает с различными сборками Minecraft.

Не удалось записать дамп ядра. Минидампы не включены по умолчанию в клиентских версиях Windows.
Если вы запускаете игру со встроенной видеокартой Intel, вполне вероятно, что ошибка вызвана Файл библиотеки динамической компоновки (ig9icd64.dll). В этом случае вы сможете решить проблему, используя утилиту Intel Update Assistant для установки последних версий драйверов, совместимых со встроенным графическим процессором.
С другой стороны, если вы используете высокопроизводительный графический процессор Nvidia, вам может потребоваться принудительная Vsync и тройная буферизация непосредственно в javaw.exe, чтобы игра работала стабильно.
Если вы используете карту AMD, попробуйте переустановить программное обеспечение Catalyst или AMD. Частично поврежденная установка может способствовать возникновению этой проблемы.
Обновление до последней версии драйвера видеокарты Intel (если применимо)
Если вы используете встроенную видеокарту, поставляемую Intel, скорее всего, вы столкнулись с проблемой, связанной с файлом ig9icd64.dll. Этот файл принадлежит драйверу OpenGL для Intel Graphics Accelerator.
Если этот сценарий применим к вашей текущей ситуации, вы сможете решить проблему, обновив весь набор графических драйверов с помощью Помощник по обновлению Intel утилита.
Многие затронутые пользователи, которые ранее не могли присоединиться и создать серверы Minecraft, подтвердили, что эта операция, наконец, сделала игру стабильной.
Вот краткое руководство по обновлению драйверов Intel Graphics до последней версии:


Принудительная синхронизация и тройная буферизация в Minecraft (только Nvidia)
Если вы используете графический процессор Nvidia среднего и высокого класса, вполне вероятно, что вы видите «Не удалось записать дамп ядра»ошибка из-за того, что текущие настройки вашей видеокарты не поддерживают VSync, когда вы играете в Minecraft.
После этого вы можете принудительно использовать эти две настройки каждой программой, использующей Javaw.exe (включая Minecraft).
Вот краткое пошаговое руководство по включению VSync и Тройная буферизация из Управление настройками 3D меню Панель управления Nvidia:


Запуск javaw.exe в панели управления Nvidia
Примечание: Вот список местоположений по умолчанию в зависимости от того, какую версию Java вы используете:

Переустановка утилиты AMD Catalyst (только AMD)
Если вы используете графический процессор AMD, возможно, вы видите значок «Не удалось записать дамп ядра. Минидампы по умолчанию не включены в клиентских версиях Windows.«Ошибка из-за частично поврежденной установки программного обеспечения AMD.
Если эти же обстоятельства применимы к вам, вы сможете решить проблему, удалив текущее программное обеспечение AMD или установку AMD Catalyst и повторно установив последнюю версию по официальным каналам.
Вот краткое пошаговое руководство, которое покажет вам, как это сделать:


Попробуйте создать файл дампа вручную
1. Открыть Minecraft или Minecraft Launcher.
2. Щелкните правой кнопкой мыши на панели задач и выберите «Диспетчер задач» (также вы можете одновременно нажать и удерживать клавиши Ctrl + Shift + Esc).
3. После открытия диспетчера задач щелкните правой кнопкой мыши на «Java (TM) Платформа SE Binary»(Если вы не можете его найти, просто щелкните правой кнопкой мыши на значке«Пусковая установка Minecraft“)
4. Теперь нажмите опцию «Создать файл дампа».
5. Подождите, пока Windows создаст файл дампа для выбранного процесса.
Теперь перезагрузите компьютер и попробуйте поиграть Шахтерское ремесло очередной раз.
Источник
Настройка minidump Windows 10
Определим причину и затем предоставим возможное решение проблемы устройства, работающего под управлением операционной системы Windows 10, создающего только файл minidump. Минидамп Виндовс — это небольшой файл, который сохраняется на вашем устройстве каждый раз, когда система неожиданно зависает, например, когда появляется BSOD (синий экран смерти).
Где находится minidump
minidump находится в каталоге C:Windowsminidump или C:Winntminidump в зависимости от вашей версии ОС и имеют имена файлов, такие как «Mini031120-01.dmp» — 03 — это месяц, 11 — день, 20 — год, а 01 — номер файла дампа.
Windows 10 создает только minidump файл
Термин eMMC — сокращение от «Embedded Multi-Media Controller» («Встроенный мультимедийный контроллер») и относится к пакету, состоящему из флэш-памяти и контроллера.
Если файл минидамп сохраняется в каталог %systemroot%minidump, а не в стандартное расположение C:windowsminidump. То эта проблема вызвана тем, что из-за управления питанием на устройствах SD eMMC, Windows всегда создает дамп и игнорирует параметры дампа памяти, настроенные администратором.
Чтобы переопределить сохранение по умолчанию, на устройстве должен быть настроен специальный параметр реестра.
Вы можете выполнить действия, описанные ниже, чтобы переопределить функцию энергосбережения Windows eMMC во время BugCheck (также известную как ошибка остановки или ошибка синего экрана), чтобы создать дамп памяти ядра или полный дамп памяти.

После того, как вы приняли необходимые меры предосторожности, вы можете действовать следующим образом:
1. Нажмите клавишу Windows + R. В диалоговом окне «Выполнить» введите «control system» и нажмите «Enter», открываем «Дополнительные параметры системы» > «Загрузка и восстановление». Для параметра «Запись отладочной информации» должно быть задано «Дамп памяти ядра» или «Полный дамп памяти».
2. Затем перейдите к запуску редактора реестра, чтобы создать и настроить следующий раздел реестра:
ForceF0State: REG_DWORD: 0x1
Этот параметр реестра позволяет записать файл дампа.
Перейдите к пути реестра:
HKLMSYSTEMCurrentControlSetservicessdbusParameters
3. Затем создайте и настройте следующий раздел реестра:
AlwaysKeepMemoryDump: REG_DWORD: 1
Этот параметр реестра гарантирует, что файл дампа не будет удален при перезагрузке, даже если у вас мало свободного места на диске.
Перейдите к пути реестра:
HKEY_LOCAL_MACHINESYSTEMCurrentControlSetControlCrashControl
4. Убедитесь, что максимальный размер файла подкачки больше, чем объем оперативной памяти, используемой на компьютере.
5. Перезагрузите устройство.
Источник