Get rid of the stop code Hypervisor error on Windows 11 in 4 steps
by Sonia Martin
Sonia is a tech enthusiast that fell in love with Windows after having experienced working on a different OS. Being above all, a down-to-earth kind of person, she… read more
Updated on May 19, 2023
Reviewed by
Alex Serban

After moving away from the corporate work-style, Alex has found rewards in a lifestyle of constant analysis, team coordination and pestering his colleagues. Holding an MCSA Windows Server… read more
- Powered by Microsoft, Hyper-V is the go-to technology to create and manage virtual machines with ease.
- However, users reported that the Hypervisor is not running in Windows 11 as it should.
- It might be anything from incorrect settings to missing updates that trigger the Windows 11 Hypervisor error.
- Don’t worry, we’ll show you how to promptly identify the culprit and apply the proper fixes.
XINSTALL BY CLICKING THE DOWNLOAD FILE
This software will keep your drivers up and running, thus keeping you safe from common computer errors and hardware failure. Check all your drivers now in 3 easy steps:
- Download DriverFix (verified download file).
- Click Start Scan to find all problematic drivers.
- Click Update Drivers to get new versions and avoid system malfunctionings.
- DriverFix has been downloaded by 0 readers this month.
The hypervisor is Microsoft’s very own technology that enables users to create and manage virtual machines.
From creating and removing virtual machines, and backups, to maintaining performance, and allocating resources, this miraculous tool does it all. Let’s take a closer look.
What is Hypervisor error?
A hypervisor is a piece of software that can generate and operate virtual machines. It is often referred to as a virtual machine monitor, or VMM (VMs).
By essentially dividing up the host computer’s resources, like as memory and processing power, a hypervisor makes it possible for a single computer to host numerous guest virtual machines.
What causes Hypervisor error?
- Outdated Drivers
- Missing or failed Windows updates
- Bad disk sectors
- Corrupted Files
- Incorrect or conflictual settings
How can I fix the Hypervisor error in Windows 11?
- What causes Hypervisor error?
- How can I fix the Hypervisor error in Windows 11?
- 1. Check if your CPU supports virtualization and enable it in BIOS
- 2. Update your drivers
- 3. Restart the corresponding service
- 4. Use Command Prompt
Before moving on to more complex troubleshooting steps, try the following:
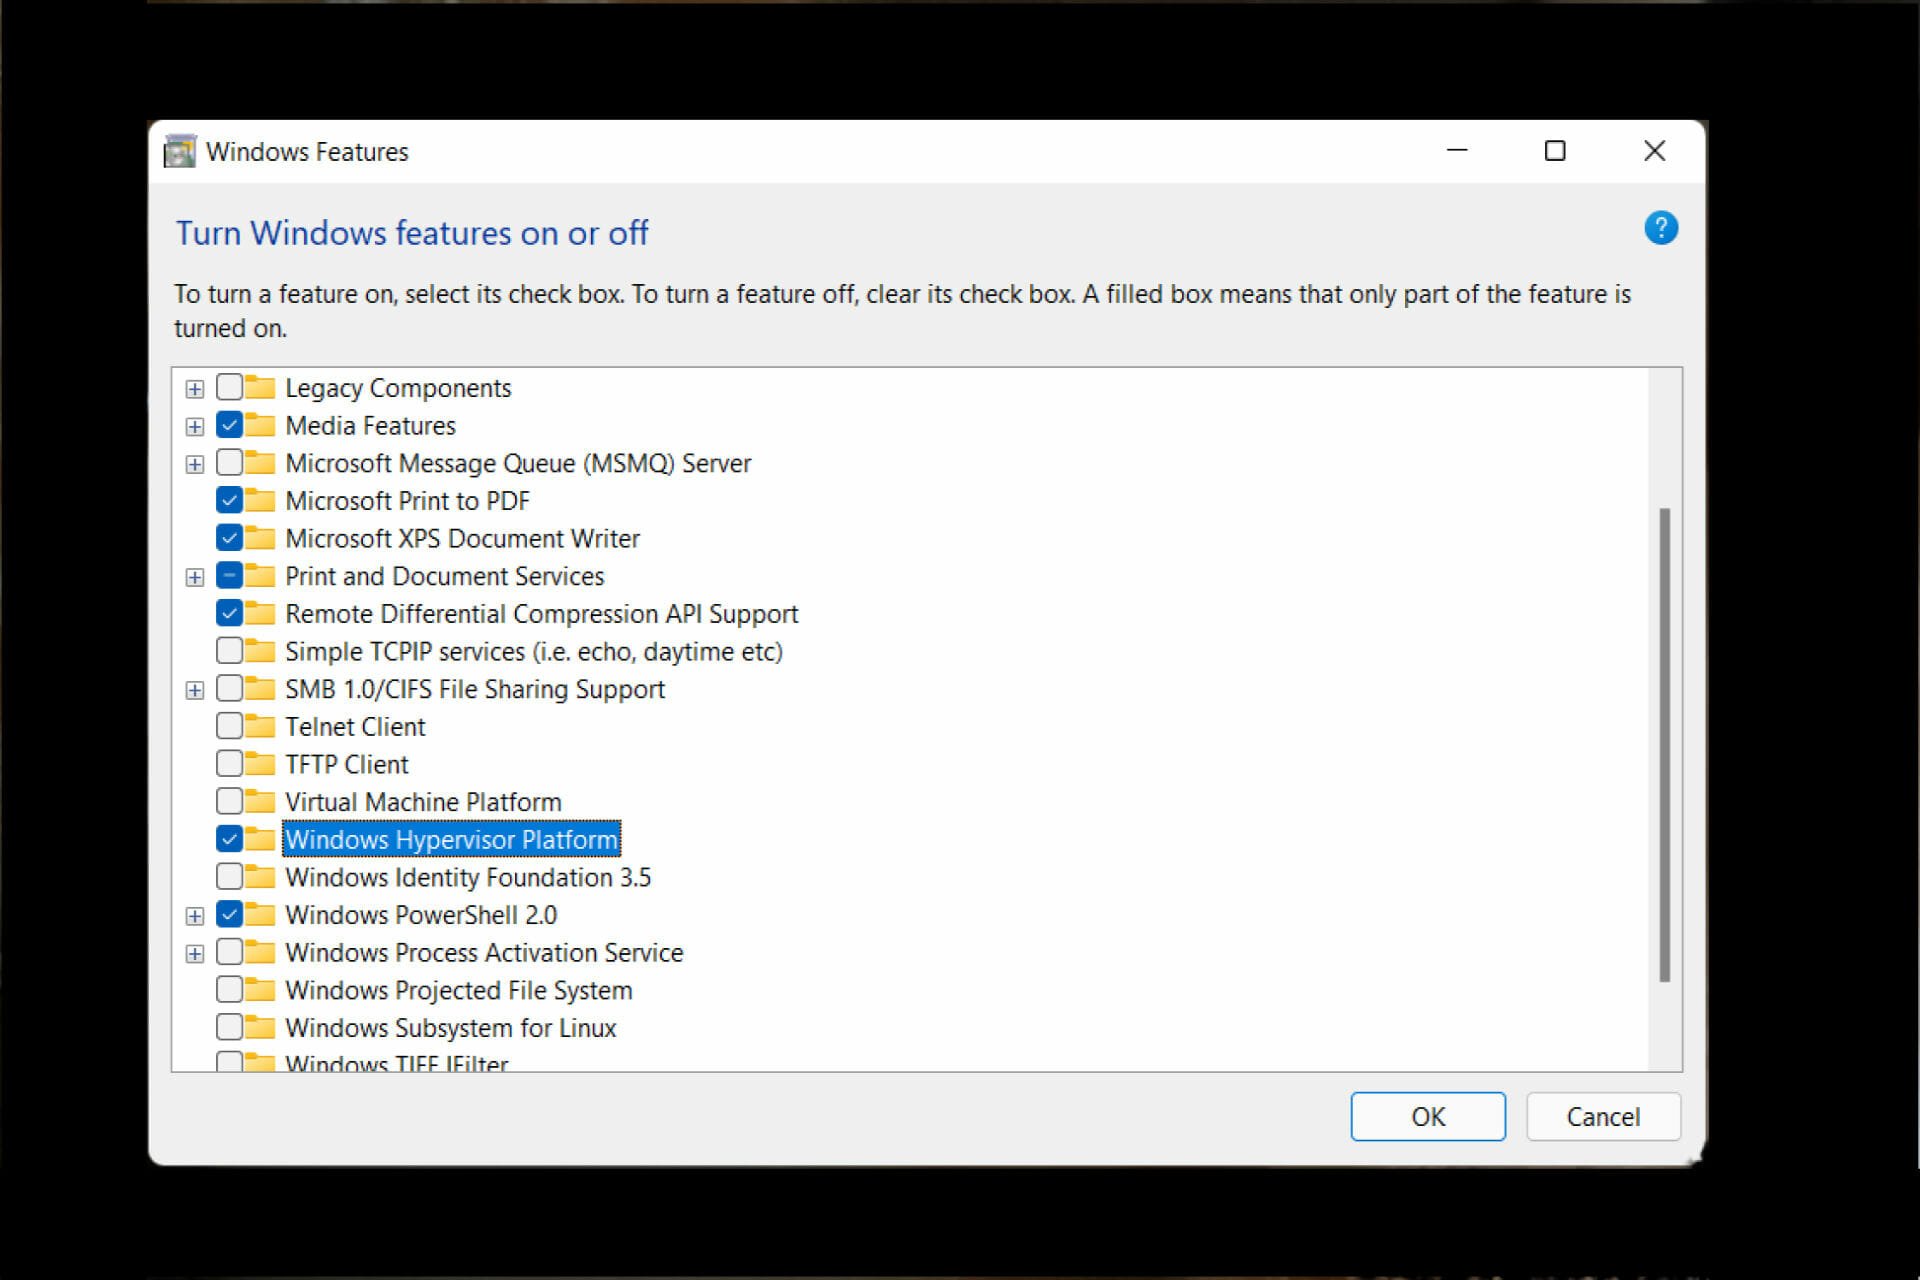
- Reinstall the Hyper-V feature from Windows Features
- Install the latest Windows updates or on the contrary, uninstall problematic updates if the Hypervisor error appeared after performing this operation (Here’s how to easily uninstall updates in Windows 11)
- Update your BIOS (If you need help, we prepared a step-by-step guide to show you how to enter and update your BIOS in Windows 11)
- Use the built-in tools to scan your disks for signs of corruption: chkdsk C: /f /r /x
- Use System Restore to turn Windows to a previous state in which the Hypervisor worked
- Try a third-party solution such as WMware Workstation and forget all about Hyper-V not running in Windows 11
1. Check if your CPU supports virtualization and enable it in BIOS
An easy way to fix Hypervisor error in Windows 11 is to check if your CPU supports virtualization and then to enable it in BIOS. Here’s how to do it:
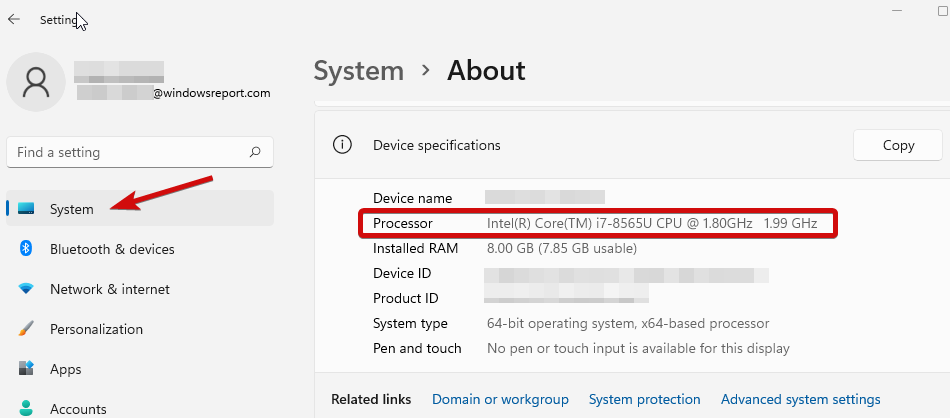
- To fix the Windows 11 Hypervisor error blue screen, open the Settings app and head over to the System section.
2. Under Device specifications, check the details corresponding to your processor.
3. Next, go to the manufacturer’s site and check that your CPU supports virtualization (use the exact details you obtained during the previous step).
Outdated drivers are the main reason for errors & system issues. If some of your files are missing or crashing, an automated solution like DriverFix can solve these problems in just a couple of clicks. And it’s also lightweight on your system!
4. If it does, you’ll need to make sure that virtualization is enabled in your BIOS.
5. To do that, access your BIOS (If you need help, here’s how to enter BIOS on a Windows PC).
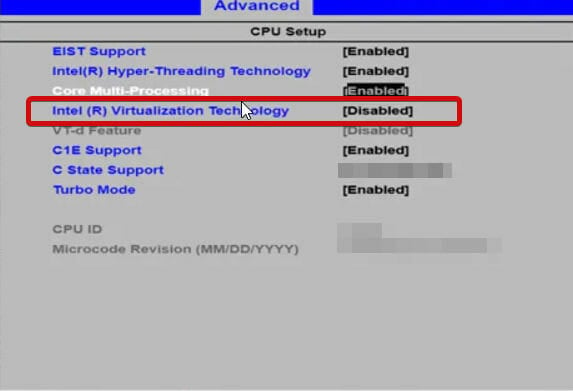
6. Click on Advanced Mode, then go to the Advanced tab.
7. Select CPU Setup/Configuration and set Intel R Virtualization Technology (for Intel) or SVM Mode (for AMD) to Enabled.
8. Make sure you save the changes before you exit this screen.
2. Update your drivers
Missing or otherwise faulty drivers are notorious suspects when it comes to system errors such as stop code Hypervisor error in Windows 11. Keeping them in good shape is essential regardless of the version of Windows you’re currently running.
Now, there are numerous methods to update your drivers in Windows 11, but we reckon nothing beats an automatic tool that does the job for you. It’s quicker, more accurate and it saves you a lot of headaches.
Various errors are the result of a malfunctioning driver. When this is the case, you may need to update or reinstall completely this specific component. As the process is not straight-forward to complete, we recommend using an automated tool for the job. Here’s how to do it:
- Download and install DriverFix.
- Launch the app.
- Wait for the software to detect all your faulty drivers.
- You will now be presented with a list of all the drivers that have issues, and you just need to select the ones you’d liked fixed.
- Wait for DriverFix to download and install the newest drivers.
- Restart your PC for the changes to take effect.

DriverFix
Keep your Windows safe from any type of errors caused by corrupted drivers, by installing and using DriverFix today!
Disclaimer: this program needs to be upgraded from the free version in order to perform some specific actions.
3. Restart the corresponding service
- Hold the Windows key and type R to open the Run dialog box.
- Type in services.msc and hit Enter.
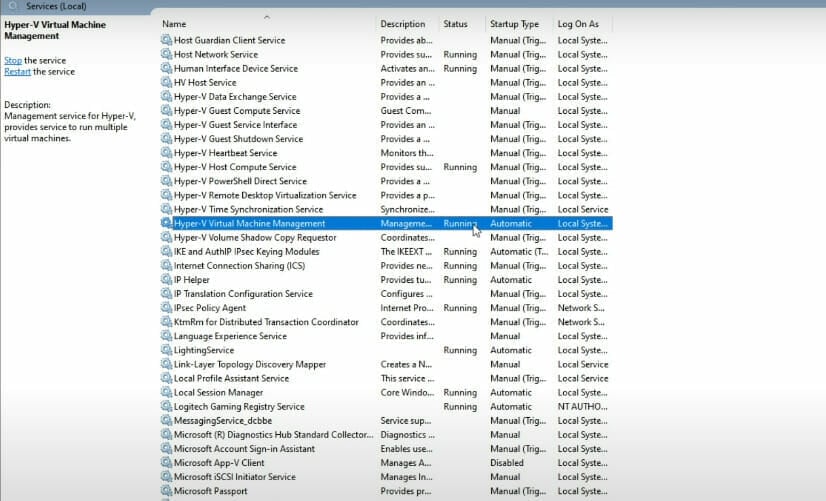
- In the list, locate the Hyper-V Virtual Machine Management.

- Right-click on this entry and if it is running, select Stop.
- Finally, restart the service and check it it helped solve the Can’t start because Hypervisor is not running in Windows 11.
- Fix: Hypervisor is not running on Windows 10
- How to install Hyper-V in Windows 11
- How to disable Hyper-V in Windows 11
- 5+ best virtual machines for Windows 10/11
- Fix: Can’t Install Hyper-V in Windows 10
4. Use Command Prompt
- Open the Command prompt with administrative priviledges.

- In the new window, type the following command and press Enter:
bcdedit /set hypervisorlaunchtype auto
- Restart and check to see if it is working correctly.

After that is how you can easily fix the hypervisor_error on Windows 11. While it’s a common error, sometimes it can be challenging to properly solve it. If you encounter any connection errors on the way, be sure to check our article about Hyper-V not connecting on Windows 11.
We’ve also dealt with the hypervisor error on Windows 10 and solved it in just a few steps, but if you’ve found a simpler fix, please leave it in the comments section below and we’ll be sure to check it out.
![]()
Newsletter
Summary: The Hypervisor error is an annoying issue, affecting a lot of Windows 11 users trying to run virtual machines on their computers. This article will discuss the causes behind this issue and methods to fix it. We shall also be looking at a complete data recovery solution for recovering data from a corrupted virtual machine image.

Contents
- What is the Hypervisor Error?
- What Causes the Hypervisor Error in Windows 11?
- What are the Methods to Fix the Hypervisor Error?
- Pro Tip
- Conclusion
The Hypervisor is Microsoft’s in house technology that enables users to run virtual machines on their systems. This versatile technology is used by many application developers and advanced users to create and manage virtual machines easily. But like any other piece of code, this too has its flaws. Many users have recently reported encountering the Hypervisor error BSoD on their Windows 11 systems. Let’s look at this issue in detail.
What is the Hypervisor Error?
The Hypervisor error is a BSoD associated with Windows virtual machine platform. This error screen is generated when the Hypervisor stops working or crashes with a stop code HYPERVISOR_ERROR, having a bug check value of 0x00020001. This can happen due to outdated or incompatible device drivers, bad drive sectors, corrupted virtual machine image files, and more. It can also affect users using Windows Sandbox or any other third party virtual machine software. Let’s look at the causes behind the occurrence of this error screen in more detail.
What Causes the Hypervisor Error in Windows 11?
- Outdated device drivers/windows OS
- Bad drive sectors
- Corrupted system files
- Incorrect/conflicting settings
What are the Methods to Fix the Hypervisor Error?
Now that we know about the causes behind the Hypervisor error blue screen, let’s dive deeper and learn the methods to fix it. But before moving forward, do the following –
- Reinstall Hyper-V from Windows features.
- Update BIOS
- Run Windows Driver Verifier
Method 1: Check if Your System Supports Virtualization
This is a basic check to see if your Windows 11 system supports virtualization. This is an easy way to fix the hypervisor error BSoD in Windows 11 computers. If your system supports Hyper-V, you can check if it is enabled or not. To do this –
- Open the Settings app.
- Click on System and then About in the left pane.
- Copy the details of your processor and search for its specification on the internet to check if the manufacturer’s website lists virtualization under its specifications.

- If it does, make sure the virtualization is enabled on your system.
- If not, to enable virtualization, you need to access your system’s BIOS.
- Once inside system BIOS, go to the Advanced tab, and check the status of Intel (R) Virtualization Technology.

- If it is disabled, enable it.
- Save the changes and exit the BIOS.
Notes –
- BIOS key is different for each device. Check yours by looking at the boot sequence. On some computers, virtualization is in the Performance section.
- The above method, however, is for intel users. AMD users will find different terminologies for this method. You can refer to the motherboard’s manual to learn more.
Method 2: Update Device Drivers & Windows OS
This is another simple way to eliminate the Hypervisor error BSoD on your Windows 11 computer. Outdated device drivers and OS can cause the system to generate this error screen, thereby hampering your work. Simply follow the steps mentioned below to update system drivers and Windows OS.
To update device drivers –
- Press WIN + X and click on Device Manager from the list.
- Double-click on all the devices to expand them.
- Find all the entries with an exclamation mark.
- Right-click on each of them one-by-one and click on Properties.
- Under the Driver tab, click on Update driver.
To update Windows OS –
- Press WIN + I to open Settings.
- Click Update & Security.
- Click Windows Update and then Check for updates.
Method 3: Use Command Prompt (Administrator)
Sometimes, the Hypervisor blue screen error is caused due to missing or damaged system files. This can lead to several other glitches and BSODs. Users can use the following commands in elevated command prompt to deal with this issue –
Chkdsk and Deployment Imaging Servicing and Management scans check and repair the existing installed OS files along with the system files. Once inside, type chkdsk C: /f /r /x and hit Enter. Once done, restart your system and see if this resolves the issue.
After this, type the following commands and run them one by one –
- DISM.exe /Online /Cleanup-image /Scanhealth and hit Enter.
- DISM.exe /Online /Cleanup-image /Restorehealth and hit Enter.
Finally, type the following command to ensure that Hyper-V service launches when the system boots up.
- bcdedit /set hypervisorlaunchtype auto
Method 4: Restart the Corresponding Service
Sometimes, when a user tries to run a virtual machine on the computer, it fails to do so and generates the hypervisor error blue screen, which leads to system crash. This can be fixed by starting the corresponding service related to Microsoft virtual machine platform. To do so –
- Press WIN + R.
- Type services.msc and hit Enter.
- Locate Hyper-V Virtual Machine Management in the list and select it.

- Right-click on this entry and check its status. If it is running, stop it.

- Restart the service to see if this fixes the issue.
Pro Tip
If you are still encountering the HYPERVISOR_ERROR BSoD, then your virtual machine image might be corrupted. In such a case, you can use an all-in-one data recovery toolkit to recover your data.
Stellar Toolkit for Data Recovery is a highly advanced data recovery software, which is used by industry experts to recover data from crashed NAS, RAID, Virtual machines, and other storage devices. This software offers a simple and clean UI, which makes it highly user friendly.
Its advanced data recovery algorithms easily help you recover data lost in numerous data loss scenarios like accidental deletion, drive crash, malware attack, and more. You can use it to recover data from your corrupted virtual machine in a couple of few easy to follow steps. To use this software –
- Download Stellar Toolkit for Data Recovery from its official website and install it.
- Launch it and select the type of data you wish to recover.

- Select the location from where you wish to recover your lost data and click Scan.

- The software will scan for lost data and display it on the screen.

- You can preview the files to check them and if satisfied with the results, you can save them onto your desired storage media by clicking Recover.
Note – If you are unable to find the desired files, you can perform Deep scan. During this, the software performs in-depth check in each sector of the drive and previews all the data that can be recovered.
Conclusion
The Hypervisor error blue screen on Windows 11 computers is a pestering issue, which is mostly generated in the case of when a virtual machine either doesn’t start or its image get corrupted. In this article, we discussed the causes behind this error and the ways to fix this issue. We also shared an ingenious way to recover lost data from a corrupted virtual machine image. We hope you found this article helpful and recovered your VM data easily using the above mentioned methods.
About The Author
Keshav Katyal
A passionate person driven by his interest in everything related to technology, Keshav Katyal has always been captivated by the latest gadgets since his childhood. His passion for gadgets grew when he got his first gaming console, the Nintendo Game Boy Advanced as a gift. His tinkering nature with old gadgets developed his interest in tinkering with software to learn new things.
Windows продолжает получать новые функции и исправления безопасности с каждым обновлением, и это причина, по которой пользователям это нравится. Что ж, это действительно отличная ОС, но все же бывают случаи, когда пользователи сталкиваются с различными проблемами и сталкиваются с ошибками. Здесь мы говорим об одной такой ошибке, которая называется HYPERVISOR_ERROR BSOD Stop Code Error.
В большинстве случаев эта ошибка возникает, когда пользователь пытается запустить песочницу Windows, а также какую-либо другую виртуальную машину. Не только это, но иногда это происходит при выполнении некоторых более простых задач, таких как просмотр веб-страниц. Кроме того, использование сторонней антивирусной программы, отсутствие файлов DLL и компонентов Windows, запуск двух или более похожих приложений, повреждение реестра также может вызвать ошибку.
Наконец, в некоторых случаях ошибка BSOD HYPERVISOR_ERROR возникает, когда вредоносное ПО захватывает элементы системы. Какой бы ни была причина, в этой статье мы даем вам решения для всех возможных причин этой ошибки.

Содержание страницы
-
1 Как исправить ошибку кода остановки BSOD HYPERVISOR_ERROR
- 1.1 Метод 1: обновить Windows
- 1.2 Метод 2: обновите драйверы
- 1.3 Метод 4: используйте средство устранения неполадок Windows, чтобы исправить ошибку кода остановки BSOD HYPERVISOR_ERROR
- 1.4 Метод 5: запустите средство диагностики памяти, чтобы исправить проблемы с ОЗУ
- 1.5 Метод 6: используйте утилиту очистки диска, чтобы удалить ненужные файлы и освободить место
- 1.6 Метод 6. Удалите стороннее антивирусное программное обеспечение.
- 2 Заключение
Как исправить ошибку кода остановки BSOD HYPERVISOR_ERROR
Это один из необходимых шагов, прежде чем перейти к решениям. Поскольку мы получали отчеты от пользователей, в большинстве случаев ваши окна перезапускаются автоматически, как только вы сталкиваетесь с этой ошибкой. Это происходит не со всеми пользователями, но большинство пользователей сталкиваются с этим.
Чтобы исправить это, сначала нажмите Windows + D, а затем щелкните правой кнопкой мыши на ЭТОМ ПК и выберите в меню Свойства. Откроется новое окно, в котором выберите Дополнительные параметры системы.
В-третьих, нажмите на опцию Advance, чтобы перейти на вкладку Advanced. Теперь найдите область «Запуск и восстановление» и нажмите «Настройки» под ней.

Откроется окно настроек. Теперь в окне настроек вам нужно снять флажок с опции Автоматический перезапуск, как показано на следующем изображении. Нажмите ОК, чтобы завершить процесс.
Метод 1: обновить Windows
Как мы уже говорили ранее, обновления Windows содержат различные исправления. Не каждый раз сталкиваешься с ошибкой по указанным выше причинам. Чтобы быть более конкретным, могут быть некоторые ошибки, которые вызывают такие ошибки, и в таких случаях последнее обновление — это все, что вам нужно. Поэтому обновите свои окна, чтобы предотвратить ошибку.
Метод 2: обновите драйверы
Это простой и эффективный способ решения этой ошибки. Если причиной этой ошибки является несовместимость драйверов или какая-либо ошибка драйвера, их обновление является способом решения ошибки.
Чтобы обновить драйверы, сначала нажмите Windows + R, введите «devmgmt.msc» в диалоговом окне и нажмите Enter.

Теперь вы увидите здесь окна диспетчера драйверов. Вы можете обновить все драйверы вручную. Для этого щелкните правой кнопкой мыши драйвер, который вы хотите обновить, и выберите вариант обновления драйвера.

С помощью этого метода вы можете обновлять все драйверы один за другим, и если драйвер вызывает ошибку, она будет устранена. Вы также можете использовать сторонние пакеты драйверов для обновления драйверов.
Метод 4: используйте средство устранения неполадок Windows, чтобы исправить ошибку кода остановки BSOD HYPERVISOR_ERROR
Как я уже сказал, Microsoft стремится решать проблемы своих пользователей. Поскольку многие пользователи столкнулись с ошибкой кода остановки BSOD HYPERVISOR_ERROR, Microsoft представила служебный инструмент под названием Windows Blue Screen Troubleshooter. Все, что вам нужно, это последнее обновление Windows 10, чтобы использовать эту утилиту.
Чтобы использовать эту утилиту, сначала нажмите Windows + I, чтобы открыть приложение настроек.

Во-вторых, щелкните параметр «Обновление и безопасность», а затем выберите параметр устранения неполадок.
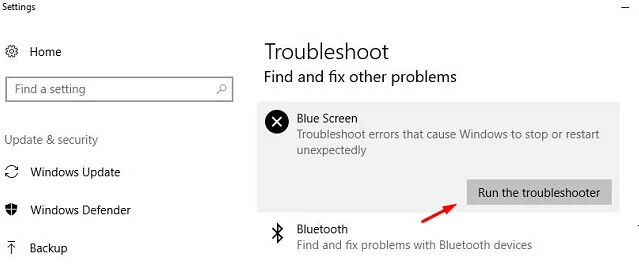
В-третьих, найдите вариант синего экрана и выберите вариант запуска средства устранения неполадок.
Наконец, дайте утилите завершить свою работу. Это автоматический процесс, поскольку он обнаруживает проблему и начинает ее исправлять. Так что расслабьтесь и расслабьтесь, пока выполняет работу.
Метод 5: запустите средство диагностики памяти, чтобы исправить проблемы с ОЗУ
Поврежденная оперативная память и неправильное выделение памяти играют активную роль в возникновении BSOD HYPERVISOR_ERROR. В Windows есть средство диагностики памяти по умолчанию, которое может помочь вам в решении этих проблем с памятью.
Чтобы запустить инструмент диагностики памяти, прежде всего откройте приложение настроек так же, как мы делали в последнем методе.

Во-вторых, введите «Память» в строке поиска окна настроек и выберите «Диагностика проблем с памятью вашего компьютера» в результатах поиска. Откроется окно средства диагностики.
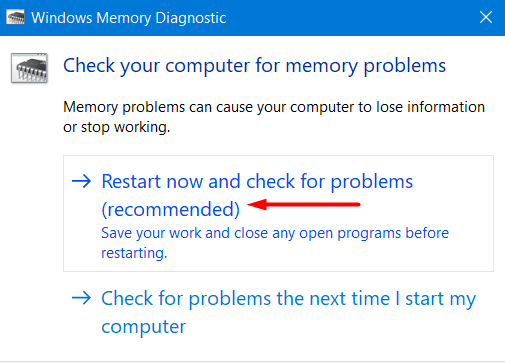
В-третьих, нажмите кнопку «Перезагрузить сейчас и проверьте наличие проблем» (рекомендуется) в окне.
Теперь ваша система перезагрузится автоматически, и после перезапуска инструмент начнет свою работу. Вы увидите процентный индикатор, и как только этот показатель достигнет 100%, ваш компьютер снова перезагрузится.
Наконец, после второй перезагрузки вы увидите результат диагностики на экране. Надеюсь, вы больше не столкнетесь с кодом остановки BSOD HYPERVISOR_ERROR.
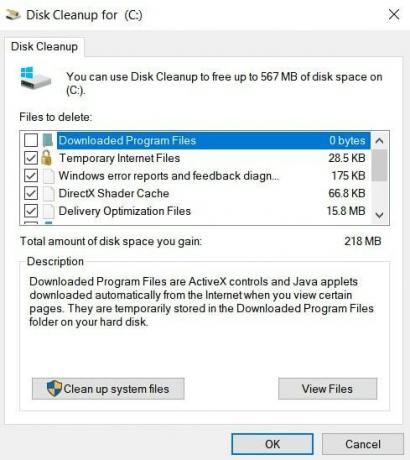
Метод 6: используйте утилиту очистки диска, чтобы удалить ненужные файлы и освободить место
Если у вас мало места и вы столкнулись с кодом остановки BSOD HYPERVISOR_ERROR, то это ваше решение. Windows создает ненужные файлы, когда мы выполняем с ними задачи. Со временем эти файлы будут становиться все больше и больше, если мы не будем их удалять. Эти файлы не опасны для вашего ПК, но если у вас мало памяти, рекомендуется их удалить. Это легко сделать с помощью утилиты очистки диска.
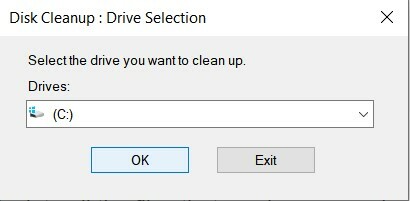
Для этого сначала нажмите Windows + S, чтобы открыть окно поиска, после чего напишите «cleanmgr» в поле поиска и нажмите Enter.

Откроется диалоговое окно, в котором вас попросят выбрать диск для очистки. Выберите диск C оттуда, используя раскрывающееся меню, и нажмите ОК.
Как только вы нажмете ОК, инструмент вычислит все файлы, которые можно удалить, и покажет вам всплывающее окно. Нажмите на опцию Очистить системные файлы.
Когда вы это сделаете, вы увидите новое всплывающее окно с просьбой указать предпочтительный диск. Выберите C и нажмите Enter.
После этого вы снова увидите окно очистки диска для C. Теперь проверьте все элементы в разделе «Файлы для удаления», кроме «Загрузить». После этого нажмите «ОК», чтобы запустить очистку.
Это запустит очистку. Это долгий процесс, и потребуется немало времени, чтобы набраться терпения и не останавливать процесс на середине. Как только процесс будет завершен, перезагрузите компьютер и, надеюсь, вы больше не столкнетесь с HYPERVISOR_ERROR.
Метод 6. Удалите стороннее антивирусное программное обеспечение.
Все мы используем то или иное антивирусное программное обеспечение, чтобы обеспечить безопасность нашей системы. Однако есть антивирусное программное обеспечение, которое портит системные файлы и, таким образом, может вызывать код остановки BSOD HYPERVISOR_ERROR.
Такое случается редко, поэтому мы предлагаем вам попробовать другие методы перед этим, и если ни один из них не работает, то. Используйте только этот метод. Вам не нужно беспокоиться о безопасности вашей системы, поскольку Windows уже имеет свой инструмент безопасности, то есть безопасность Windows.
Заключение
Подводя итог, это были все возможные решения для устранения ошибки кода остановки BSOD HYPERVISOR_ERROR. Вы можете использовать любой из этих методов для решения вашей ошибки. Кроме того, вы можете обратиться в службу поддержки Windows, если столкнетесь с ошибкой даже после попытки всех решений. Служба поддержки Windows предоставит вам необходимое решение, чтобы помочь вам с ошибкой. Мы надеемся, что это развеет все ваши сомнения по этому поводу.
Выбор редактора:
- Исправить ошибку ОЗУ при проверке безопасности ядра в Windows 10
- Как исправить BSOD повреждения кучи режима ядра в Windows 10
- Исправить ошибку BSOD кода остановки управления памятью
- Исправлено: Неустранимая системная ошибка C000021A в Windows 7 и 8.1.
- Как включить или отключить диалоговое окно подтверждения удаления в Windows 10?
Рекламные объявления В этом уроке мы покажем вам, как исправить код ошибки Steam 2: Серверы…
Рекламные объявления В последнее время цифровой мир заполнен многочисленными пользователями ПК, которые заявляют о том, что «сканирование DISM завершается неудачно с…
Рекламные объявления Windows 10 — самая продвинутая и умная версия Microsoft Windows, которая порождает большие ожидания…

Гипервизор — это технология Microsoft, которая позволяет получать виртуальные машины и управлять ими.
От создания и извлечения машин и резервных копий до использования производительности и распределения ресурсов — этот чудесный инструмент делает все. Давайте посмотрим поближе.
Что такое ошибка гипервизора?
Гипервизор — это часть программного обеспечения, которая может создавать и управлять виртуальными машинами. Его часто называют монитором постоянной машины или VMM (VM).
По существу разделяя ресурсы главного компьютера, такие как память и вычислительная мощность, гипервизор позволяет одному компьютеру встречать множество гостевых виртуальных машин.
Что вызывает ошибка гипервизора?
По словам пользователей, гипервизор вообще не работает или внезапно падает с кодом остановки BSOD. Но почему это происходит?
- Устаревшие водители
- Отсутствующие или неудачные обновления Windows
- Плохие сектора диска
- Поврежденные файлы
- Неправильные или конфликтующие модификации
Как исправить ошибку гипервизора в Windows 11?
Прежде чем перейти к более частому действию по устранению неполадок, рекомендуется установить:
- Переустановите функцию Hyper-V из компонентов Windows.
- Установить последние обновления Windows или, наоборот, удалить проблемные обновления, если после выполнения этой операции появилась ошибка гипервизора (Вот как легко удалить обновление в Windows 11)
- Обновите BIOS.
- сочетать встроенные инструменты для жестких дисков с признаками повреждений: chkdsk C: / f / r / x
- установить систему восстановления, чтобы вернуть Windows в предыдущее состояние, в котором работал гипервизор.
- Попробуйте стороннее решение, такое как рабочая станция WMware, и предположение о том, что Hyper-V не работает в Windows 11.
1. Встречается, поддерживает виртуализацию вашего процессора и загружает ее в BIOS.
Простой способ исправить ошибку гипервизора в Windows 11 — проверить, поддерживает виртуализацию вашего процессора, а затем включить ее в BIOS. Вот как это сделать:
- Чтобы исправить ошибки синего экрана гипервизора Windows 11, приложение приложений «Настройки» и обязательно в разделе «система.
2. В разделе Особенности устройства проверьте информацию, касающуюся вашего процессора.

3. Далее на сайте производителя и проверьте, поддерживает ли ЦП виртуализацию (используйте точные данные, найдите на шаге).
4. Если это так, вам необходимо ожидать, что виртуализация будет включена в следующий BIOS.
5. Для этого войдите в BIOS (если вам нужна помощь, вот как войти в BIOS на ПК с Windows).
6. Нажмите «Расширенный режим», затем нажмите «Дополнительно».
7. Выберите «Настройка/конфигурация ЦП» и установите для параметра «Технология виртуализации Intel R» (для Intel) или «Режим СВМ» (для AMD) значение «Включено».

8. Убедитесь, что вы обнаружили изменения перед выходом из этого экрана.
2. Обновите драйверы
Отсутствующие или иным речевым ненормальным драйвером являются печально развивающиеся заболевания, когда происходят системные ошибки, такие как ошибка гипервизора стоп-кода в Windows 11. Поддержание их в хорошем состоянии независимо от версии Windows, которое вы испытываете в настоящее время.
3. Перезапуск соответствующей службы
- Удержать Windows key и нажмите R, чтобы открыть окно «Выполнить диалог».
- Ввести services.msc и нажмите Enter.
- В списке найдите Управление виртуальными машинами Hyper-V.

- Щелкните правой кнопкой мыши эту запись и, если она запущена, выберите «Стоп.
- В конце концов, перезапуска службы и, вероятно, она помогла решить проблему «Нереализуемость, поскольку гипервизор не работает в Windows 11».

4. собрать командную строку
- Откройте командную строку с правами администратора.

- В новом окне Enter :
bcdedit /set hypervisorlaunchtype auto
- Перезапустите и проверьте, правильно ли он работает.


Есть ли в гипервизоре Windows 11?
- Переносимость. Виртуальные машины, работающие без физического компьютера, переносимые машины. Этот независимый характер гипервизора позволяет пользователям его работать с многочисленными операционными случаями на одном конкретном компьютере и встречать приложения, подходящие для каждой группы пользователей.
- Эффективность. Несколько возможных машин могут работать только на одном последующем сервере, что является серьезным риском несоответствия аппаратных ресурсов серверов приложений. Кроме того, было доказано, что это экономично и энергоэффективно.
- Скорость: Виртуальные машины внезапного заражения с таким подозрением, что увеличивает фактор скорости.
- Масштабируемость. Инфраструктура с многочисленными виртуальными машинами приобретает гибкость и увеличивает масштабируемость по сравнению с любой другой ситуацией из-за ее склонности к работе с многочисленными виртуальными машинами одновременно.
- Расширенная емкость: получить управление лучшим пространством и емкостью ресурсов для хранения виртуальных машин. Он загружает хранилище для приложений на виртуальных машинах.
- Простота восстановления. Одним из преимуществ гипервизора является то, что он восстанавливает центр обработки данных в случае опасности. Виртуализация серверов обеспечивает устойчивость бизнеса более быстрыми и быстрыми способами.
Несмотря на то, что его использование дает бесчисленное множество преимуществ, вы можете столкнуться с операциями со страхами, установив их в качестве исправления гипервизора Windows 11.
Ну вот, теперь вы знаете, как поступают в случаях, когда гипервизор не работает. Сообщите нам, какой из методов сработал для вас.
Похожие темы
Hypervisor along with Virtual Machine Platform allows you to run virtual machines on your Windows PC. It is responsible for resource allocation management. However, many users are facing an error with it rendering the Virtual Machine unusable.
The Hypervisor could throw out an error or not perform its job properly if you have outdated drivers, bad sectors on your primary or secondary storage drives, corrupted system files, interfering third-party apps, conflictual settings, or an outdated Windows version.
Fortunately, since Hypervisor is a piece of software that has no special hardware components installed just for it to work, you can resolve this issue on your own using the list of methods mentioned in this guide.
That being said, do keep in mind you might have to try more than one method to resolve the issue on your system.
1. Run Memory Diagnostics
Windows Memory Diagnostic tool helps you diagnose and find issues with the RAM module installed physically on your computer. If the issue is hardware-based, this will significantly help you pinpoint the issue.
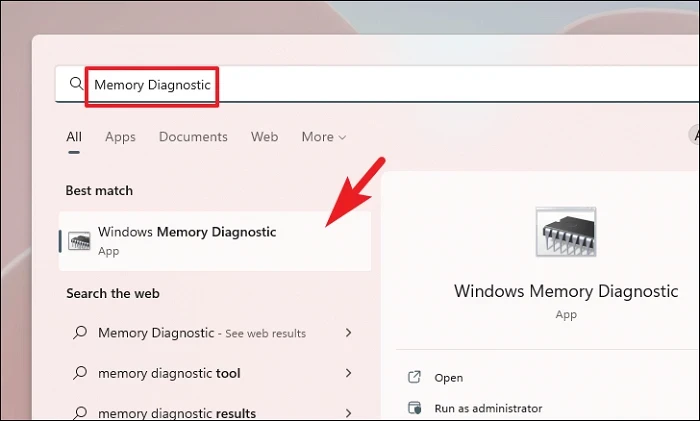
Head to the Start Menu and type Memory Diagnostic to perform a search. After that, from the search results, click on the ‘Windows Memory Diagnostic’ tile to proceed.
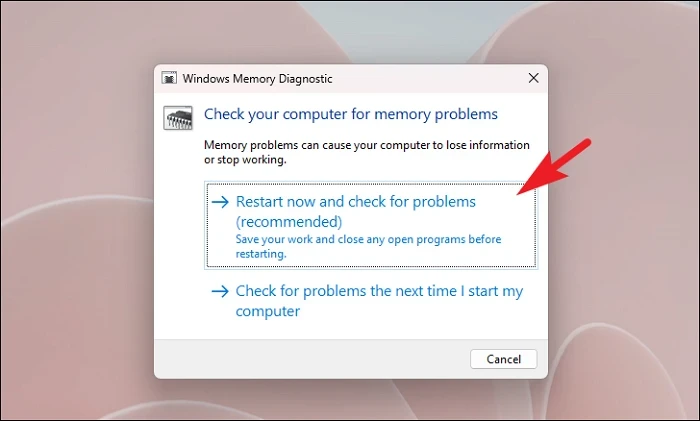
Then, either click on the ‘Restart Now and check for problems’ option to restart the PC immediately or click on the ‘Check for problems the next time I start my computer’ option based on when you are comfortable with performing the check.
2. Install Missing Drivers or Update Device Drivers
Hypervisor errors can also surface due to outdated, missing, or corrupt drivers. A simple fix to the situation is to update all the drivers installed on your computer.
Note: You can follow the below-mentioned process for both installing the missing driver and updating drivers on your Windows PC.
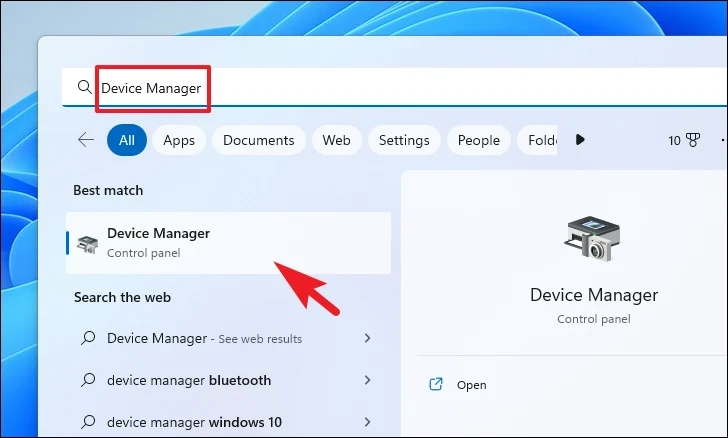
First, head to the Start Menu and type Device Manager to perform a search. Then, from the search results, click on the ‘Device Manager’ tile.
Now, on the device manager screen look for the ‘question mark’ icon on any of the categories in the list. Then, click on the chevron (downward arrow) preceding the said option to expand it.
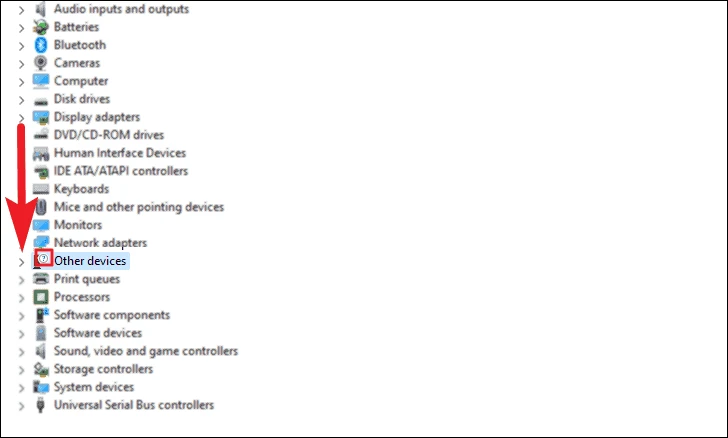
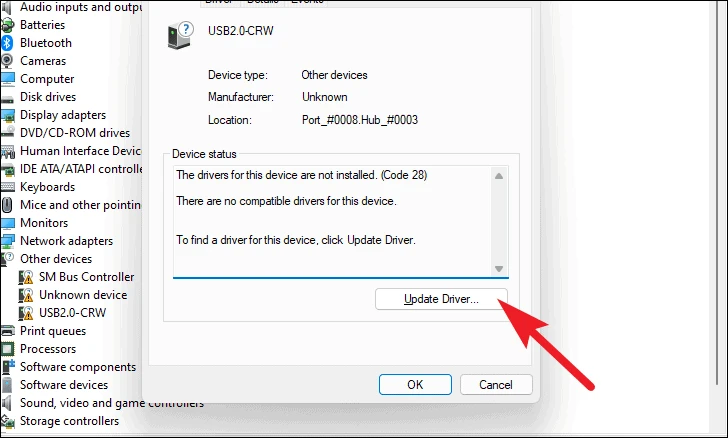
Then, from the list of components, double-click on the option having the exclamation mark.

After that, the issue will be displayed in the ‘Device Status’ text area. Now, click on the ‘Update Driver’ option to continue. This will open a separate window.
Now, from the separate window, click on the ‘Search automatically for drivers’ option to let Windows search for a driver for you. Otherwise, if you already have a driver package in your local storage, click on the ‘Browse my computer for drivers’ option.
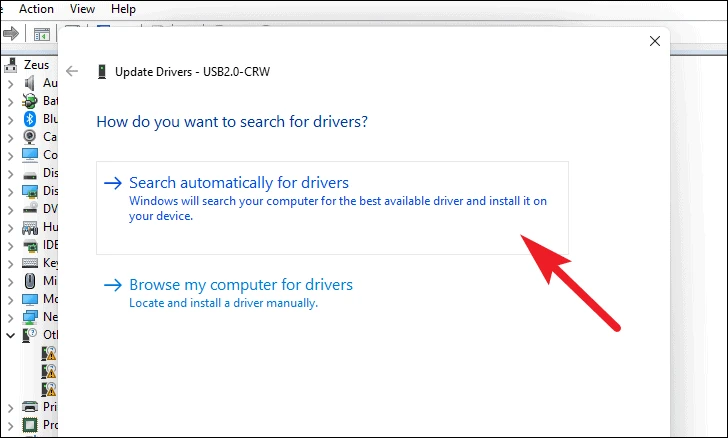
Note: If you are updating a driver, skip the next step and manually head to the ‘Windows Update’ tab in the ‘Settings’ app and follow the method.
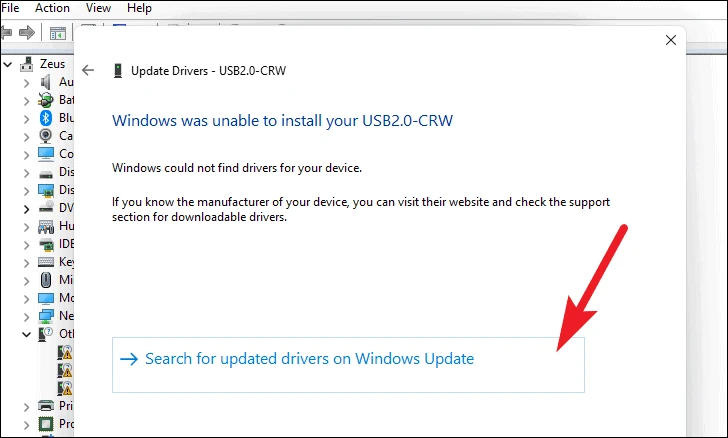
Though it is rare, it is a possibility that Windows might not be able to find a driver for it. If that’s the case, click on the ‘Search for updated drivers on Windows Update’ option. This will open a Settings window.
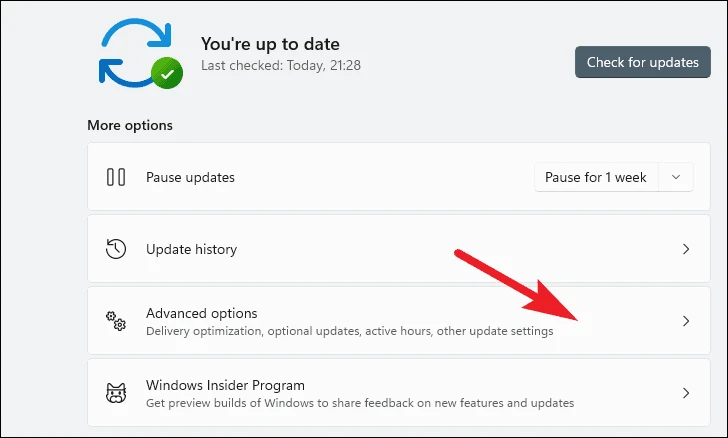
After that, on the ‘Windows Update’ screen, click on the ‘Advanced options’ tile present in the list.
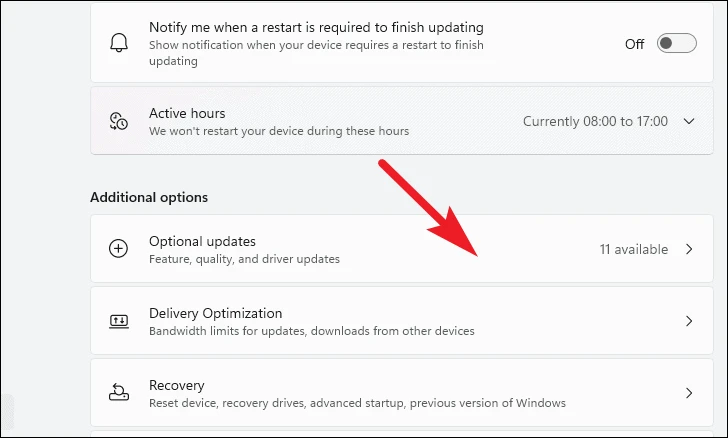
Then, scroll down to locate and click on the ‘Optional Updates’ tile.
After that, select all available drivers by clicking on the individual checkbox preceding each option in the list. Then, click on the ‘Download & install’ button.
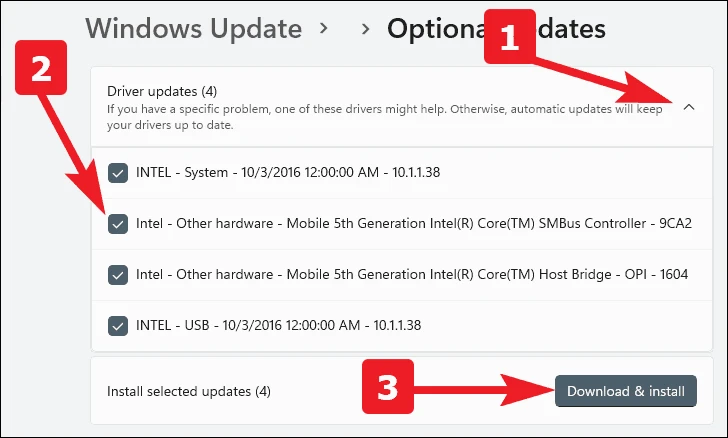
Once downloaded, all the drivers will be installed on your next boot-up or restart depending upon the nature of the said updates.
3. Run CHKDSK
CHKDSK scan will check your hard disk for the physical bad sector and logical errors as well. This will help you to pinpoint problems with your secondary storage device.
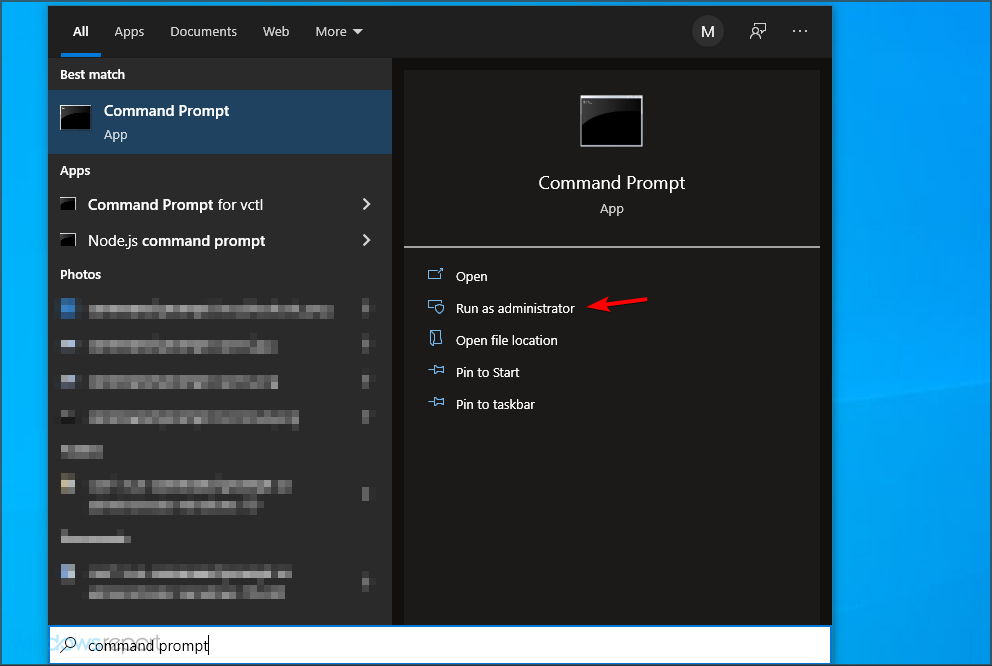
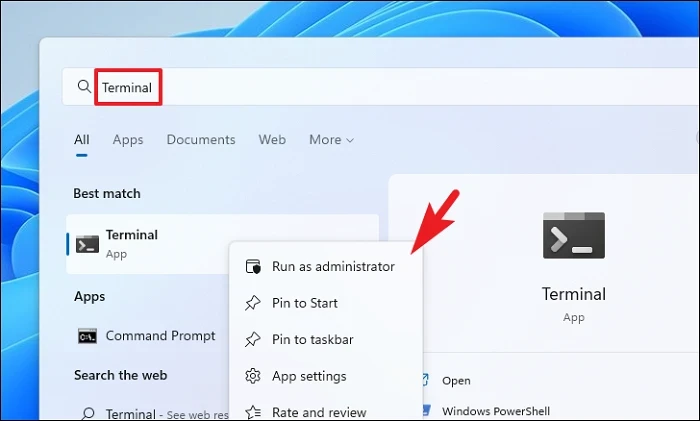
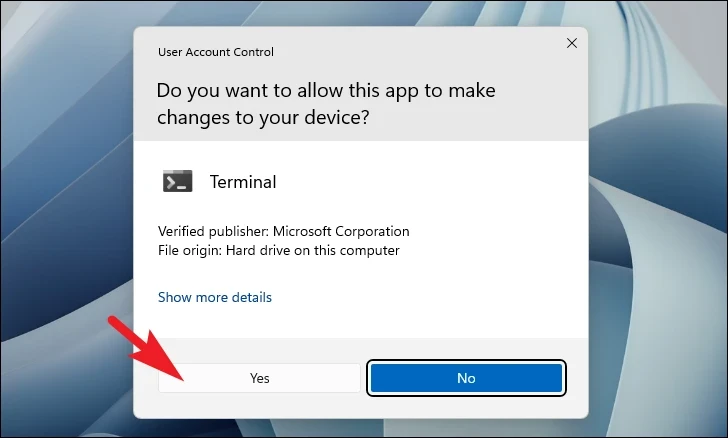
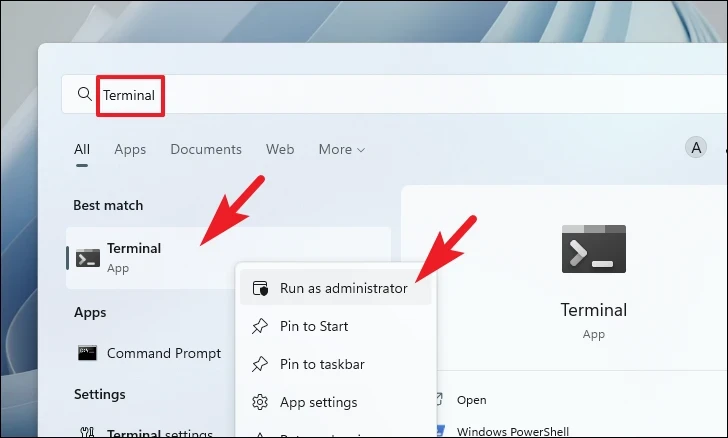
First, head to the Start Menu and type Terminal to perform a search for it. After that, right-click on the ‘Terminal’ tile and choose the ‘Run as administrator’ option to proceed.
Then, enter credentials for admin on the UAC screen if not logged in with an admin account. Otherwise, click on the ‘Yes’ button to proceed.

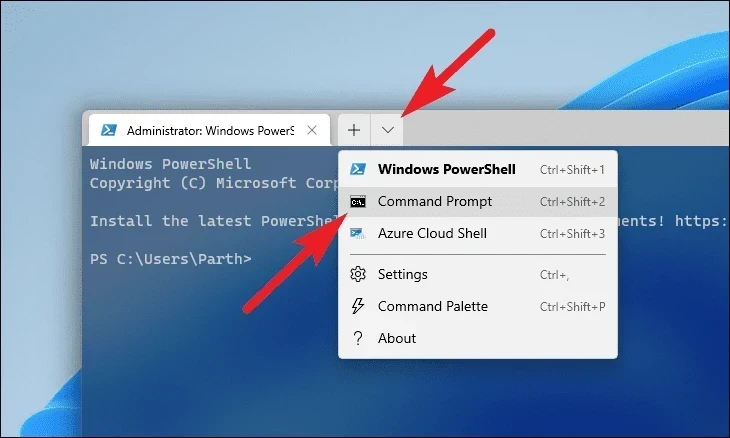
After that, click on the chevron (downward arrow) and then choose the ‘Command Prompt’ option to continue. This will open the Command Prompt in a separate tab.
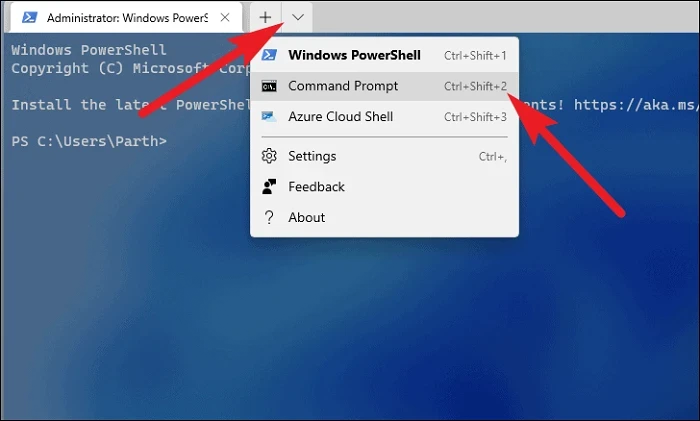
Next, type or copy+paste the below-mentioned command and hit Enter on your keyboard to execute the command.
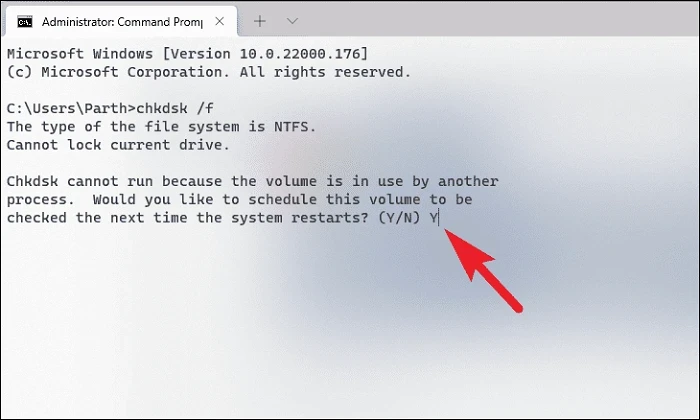
chkdsk /f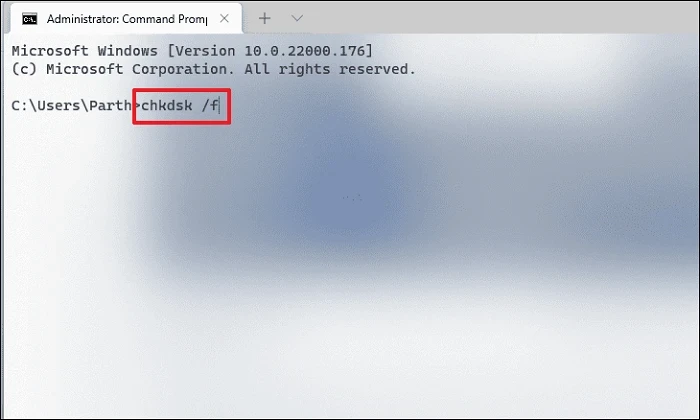
After that, press the Y key to schedule the scan to be initiated when you boot up your PC next time.
4. Run SFC and DISM Scan
System File Checker and Deployment Image Servicing and Management scans will check and repair the existing operating system files installed on your device along with other system files.
First, head to the Start Menu and type Terminal to search for it. Then, right-click on the ‘Terminal’ tile and choose the ‘Run as administrator’ option to proceed.

Next, if you are not logged in with an admin account, enter the credentials for one. Otherwise, click on the ‘Yes’ button to proceed.
After that, click on the ‘chevron’ (downward arrow) icon and click on the ‘Command Prompt’ option.
Then, type or copy+paste the below-mentioned command and hit Enter on your keyboard. This will restore your currently installed OS image on your device.
DISM/ Online /Cleanup-Image /RestoreHealth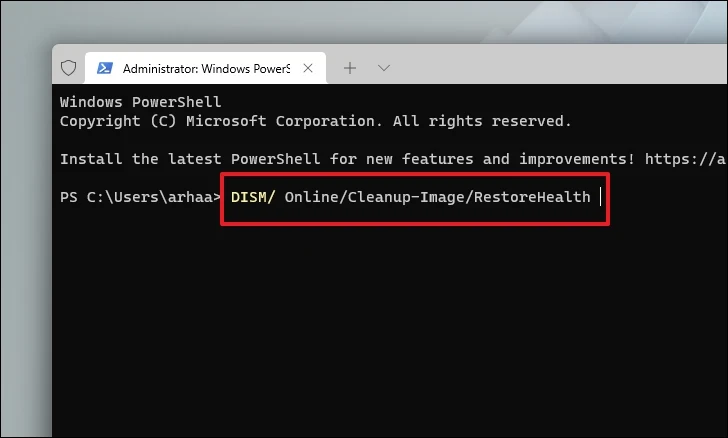
Once completed, type or copy+paste the following command to check and repair the system files on your PC.
SFC /scannow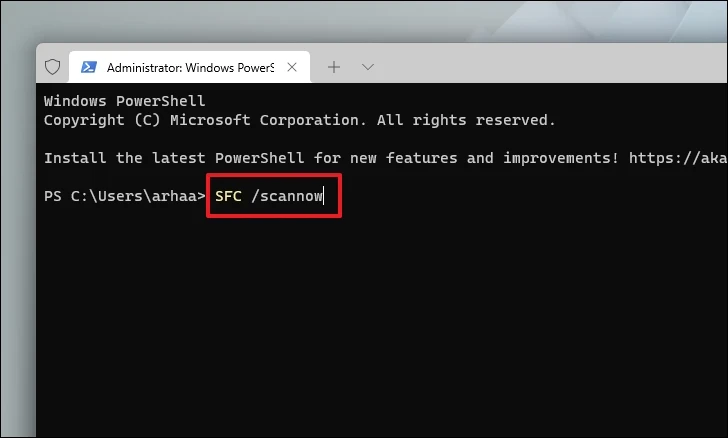
If after the scan, you get the message that the scan was successful, see if you’re still getting the error. If it finds corrupted files in the scan, remove those files and the error should be resolved by now.
5. Disable and Re-enable Hypervisor
Many times, a simple service behind the process is stuck or is in a deadlock which in turn prevents the Hypervisor to work correctly on your computer. To resolve this scenario, simply disable the Hypervisor and re-enable it.
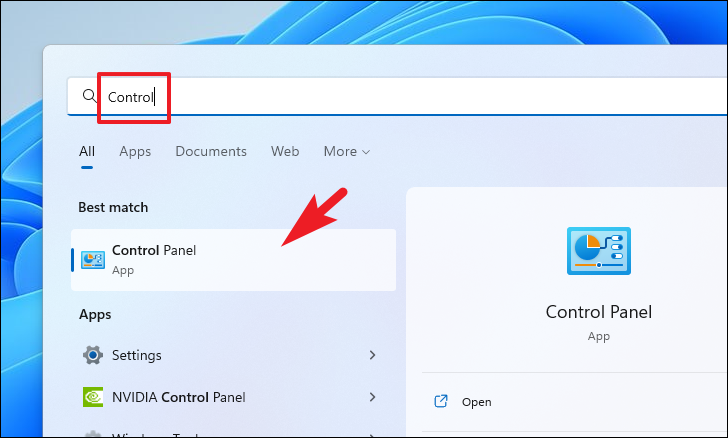
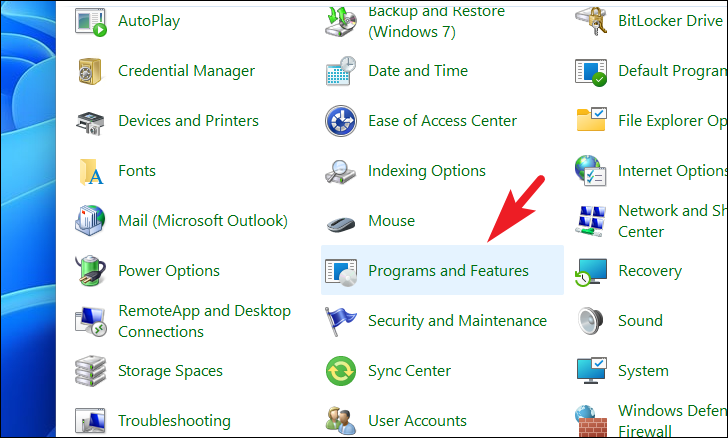
First, head to the Start Menu and type Control to perform a search. After that, click on the ‘Control Panel’ tile to open it.
Then, click on the ‘Programs and Features’ option from the grid.
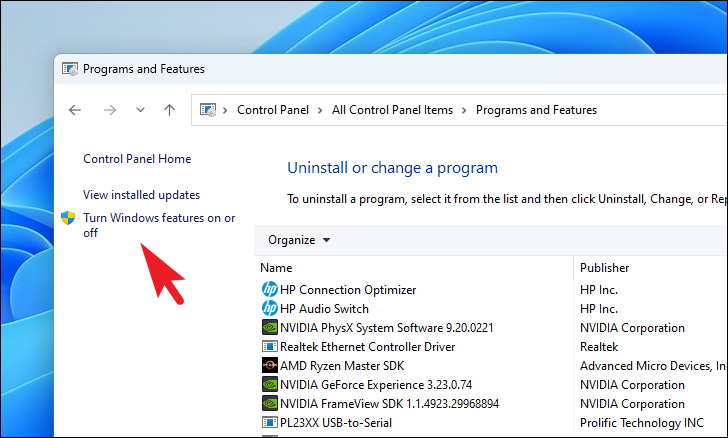
Next, click on the ‘Turn Windows features on or off’ option to continue. This will open a separate window on your screen.
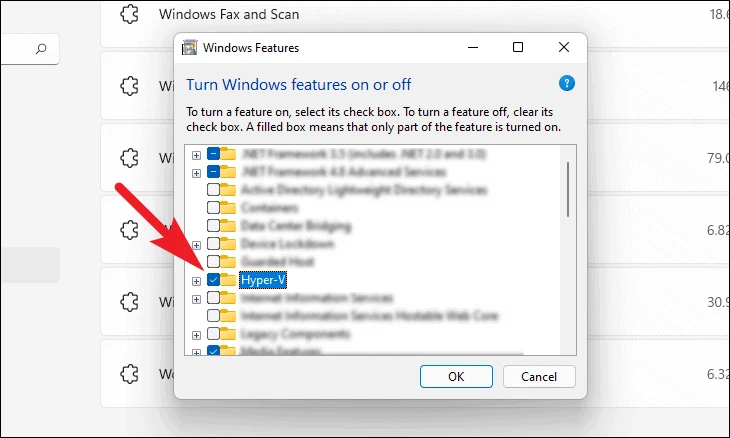
Then, locate and click on the checkbox preceding the ‘Hyper-V’ option to uncheck it.
After that, click on the checkbox preceding the ‘Virtual Machine Platform’ option to uncheck it. Then, click on the ‘OK’ button to proceed.
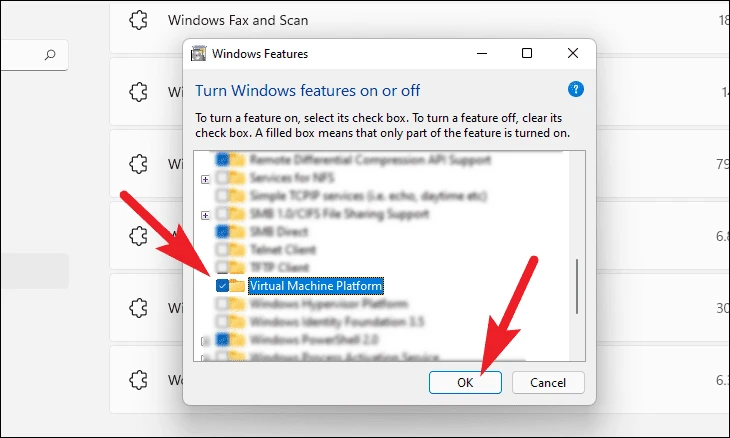
Windows will then apply the settings to your PC. Once the process has been completed, click on the ‘Restart now’ button to apply the changes.
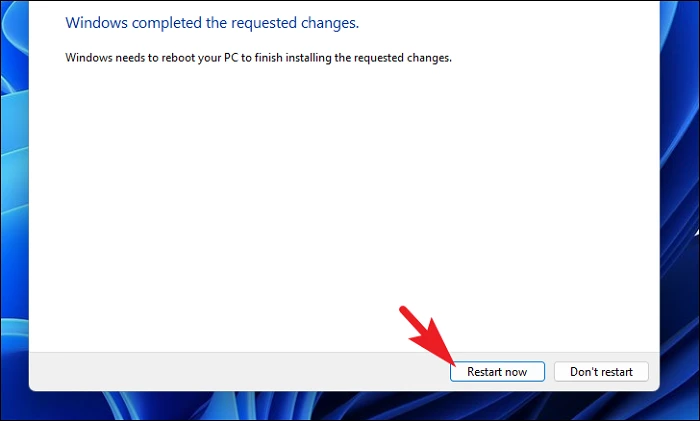
Once the PC has restarted, repeat the process again to turn on the Hypervisor on your PC.
6. Turn on Driver Verifier
Driver verifier is a built-in utility of Windows that allows you to scan and fix deep-rooted issues with an installed driver on your computer.
First, head to the Start Menu and type Terminal to perform a search. Then, from the search results, right-click on the ‘Terminal’ tile and click on the ‘Run as administrator’ option.
Now, a UAC (User Account Window) will appear on your screen. If you are not logged in with an admin account, enter the credentials for it. Otherwise, click on the ‘Yes’ button to proceed.

After that, click on the ‘chevron’ on the title bar and select the ‘Command Prompt’ option.

Now, on the ‘Command Prompt’ tab, type or copy+paste the below-mentioned command and hit Enter to execute. This will open a separate window on your screen.
verifier
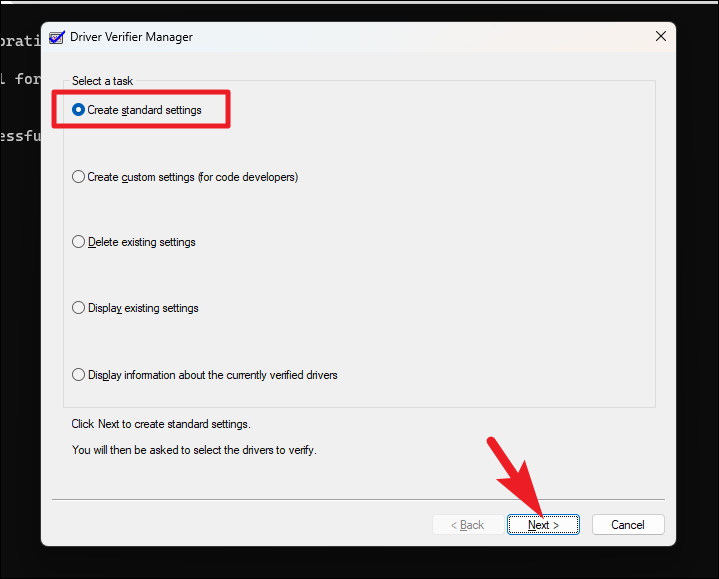
Next, click on the radio button preceding the ‘Create standard settings’ option and then click on the ‘Next’ button to continue.
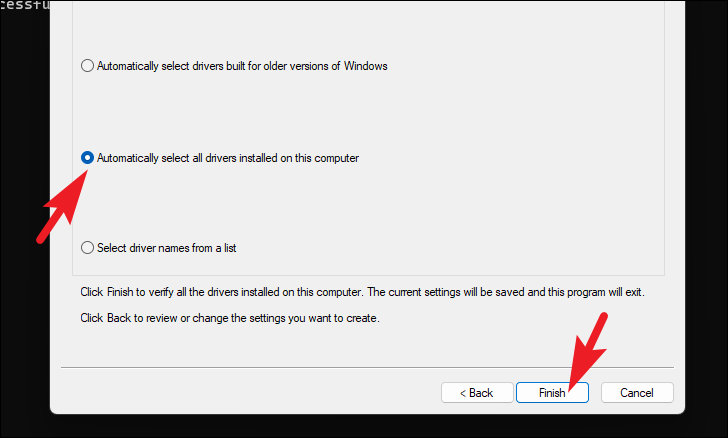
On the next screen, click on the ‘Automatically select all drivers installed on this computer’ option. Then, click on the ‘Finish’ button.
After that, restart your PC. The driver verifier will now run in the background and diagnose the drivers.
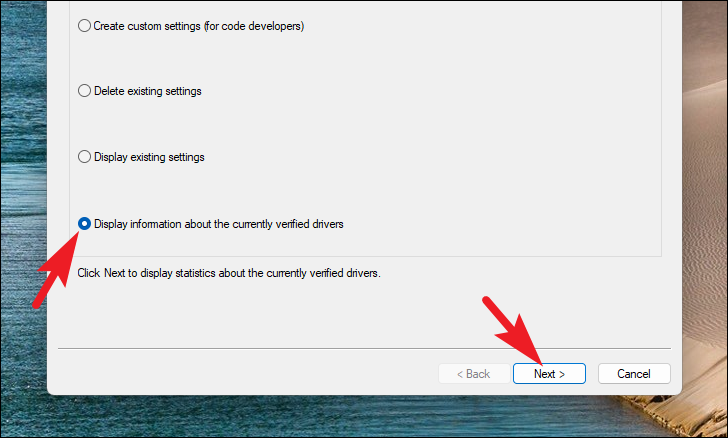
To learn which driver caused the issue on your computer, open the Driver Verifier Manager again using the steps showcased earlier in this section. Then, click on the ‘Display information about the currently verified drivers’ option and then click on the ‘Next’ button.
Once you have fixed faulty drivers, you will need to stop Driver Verifier as it will keep on running in the background after every sign in to your computer which may cause an overload and will unnecessarily hog resources.
To do so, head to the ‘Command Prompt’ on the Terminal using the steps showcased previously. Then, type or copy+paste the below-mentioned command and hit Enter to execute.
verifier/reset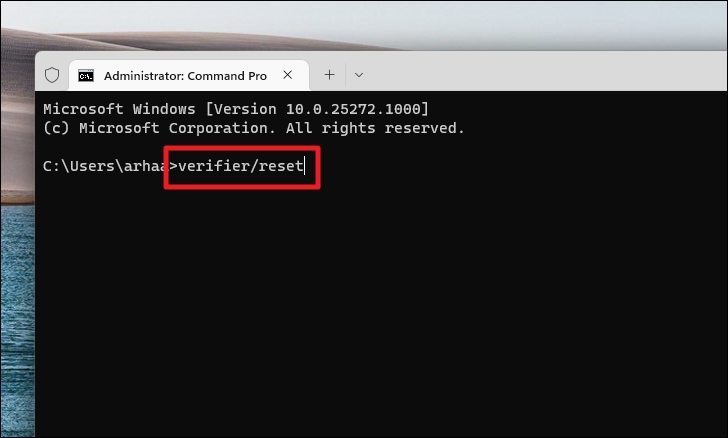
7. Perform a Clean Boot
A third-party software/service often interferes with the system and generates this error. Hence, starting the system in the clean boot can help you determine if the actual culprit behind the issue is a third-party software/service.
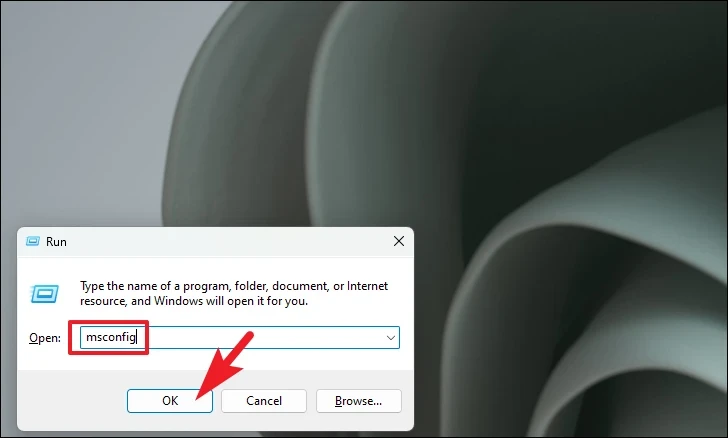
First, press the Windows+R keys together on your keyboard to bring up the Run utility. Then, type msconfig and press Enter on the keyboard to continue.
From the General tab, click on the radio button preceding the ‘Selective startup’ option and then click on the checkbox preceding the ‘Load system services’ option to proceed.

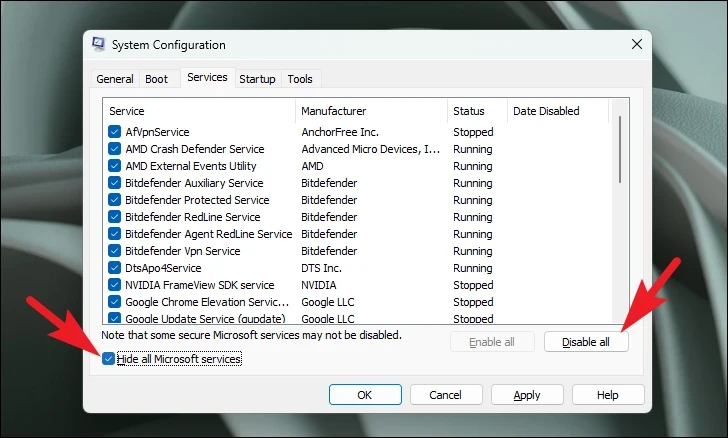
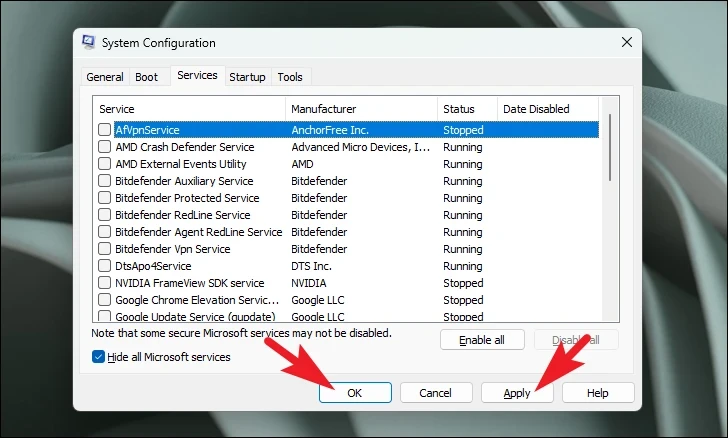
Then, head to the ‘Services’ tab and click on the checkbox preceding the ‘Hide all Microsoft services’ option. Then, click on the ‘Disable all’ button. Finally, click the ‘Apply’ button and then click on the ‘OK’ button to close the window.
Now, restart the PC from the Start Menu. Once the PC is restarted in the clean boot environment, you can check if you are still facing the issue. If not, you can enable processes one by one and check which one is causing the issue.
8. Update your BIOS
An out-of-date BIOS version is one of the culprits for this issue since BIOS handles the primary input/output of your PC along with the kernel systems.
Since BIOS entry methods, BIOS interfaces, and BIOS settings vary greatly from one motherboard manufacturer to another, it is impossible to provide you with detailed steps.
Thus, enter safe mode on your Windows 11 PC. Then, follow the steps to update the BIOS from your manufacturer’s website. After that, check if the issue was resolved.
9. Roll Back to a System Restore Point
If you have a reason to believe that a recent software upgrade or a third-party software installation might be the culprit behind the issue, you can roll back to a system restore point if you have created one.
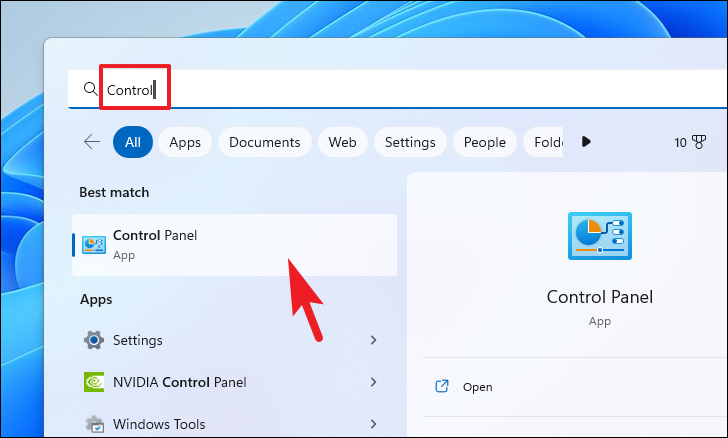
First, head to the Start Menu and type Control to perform a search. Then, from the search results, click on the ‘Control Panel’ tile to proceed.
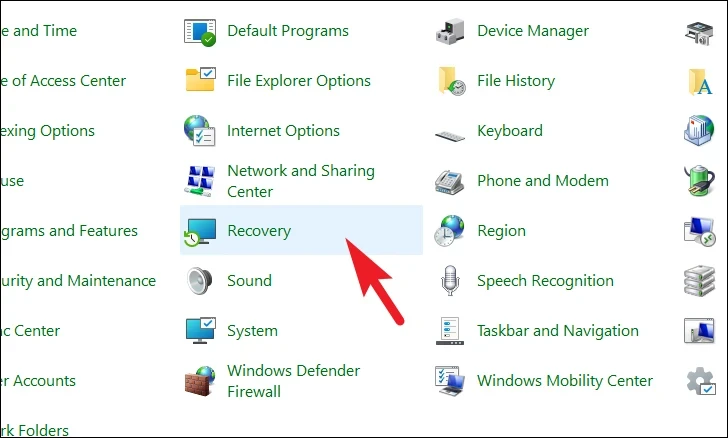
After that, locate and click on the ‘Recovery’ tile from the grid of icons.
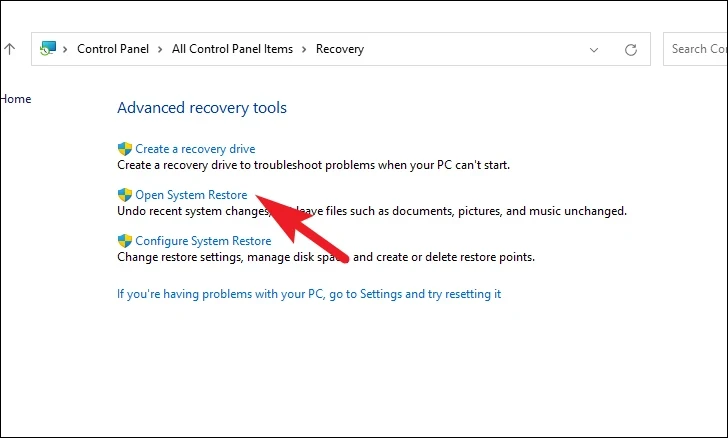
Next, click on the ‘Open System Restore’ option from the list. This will open a separate window on your screen.
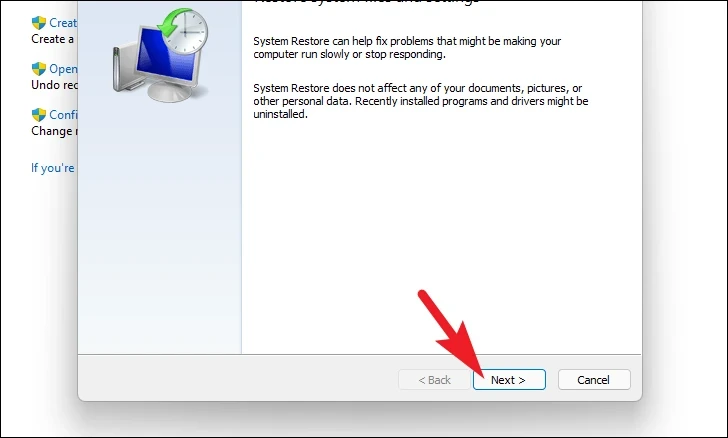
From the separately opened window, click on the ‘Next’ button.
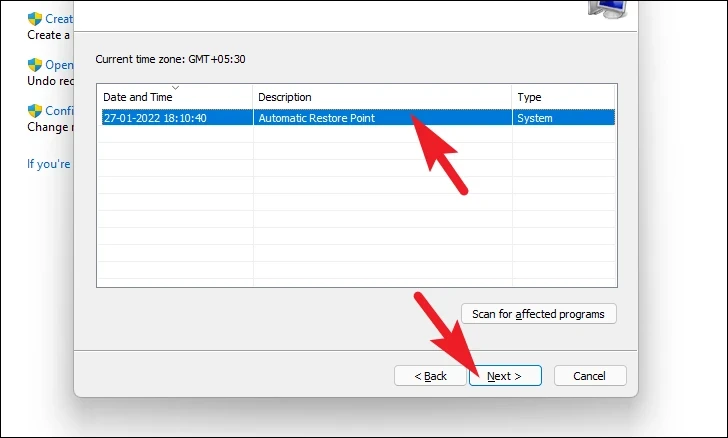
All created system restore points will be listed on the screen. Click to select the desired one and then click on the ‘Next’ button to initiate the rolling back process.
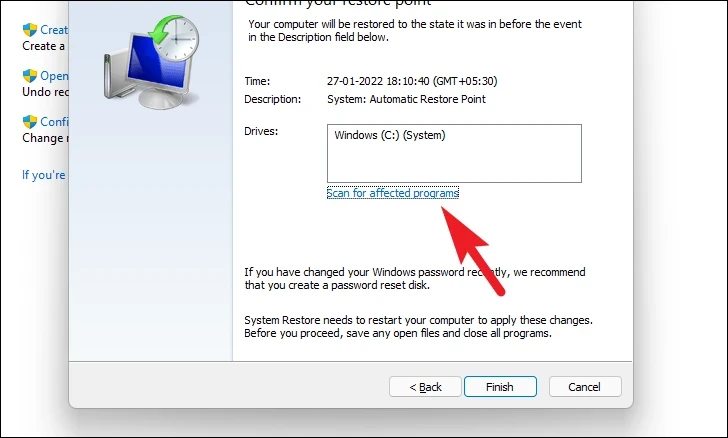
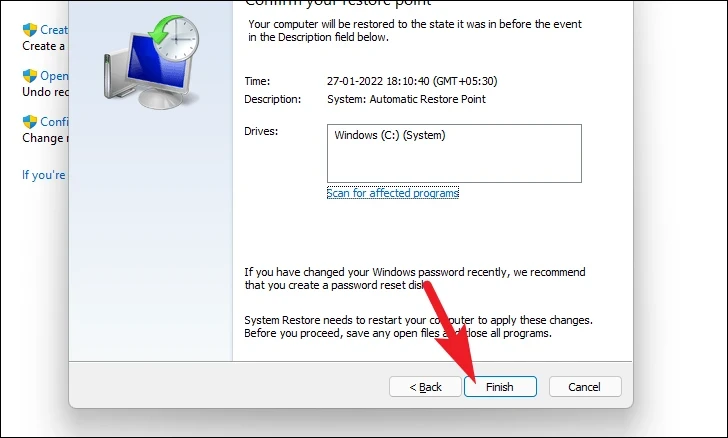
Next, a list of drives that the rollback will impact will be displayed along with the timestamp of the restore point created. You can also check the programs that will be affected; click on the ‘Sca for the affected programs’ button. A new window will appear on the screen.
On the new window, you can view the programs that will be deleted and the ones that will be restored (since no programs will be affected on the test PC, the list in the screenshot below is empty). Click on the ‘Close’ button to navigate to the previous window.
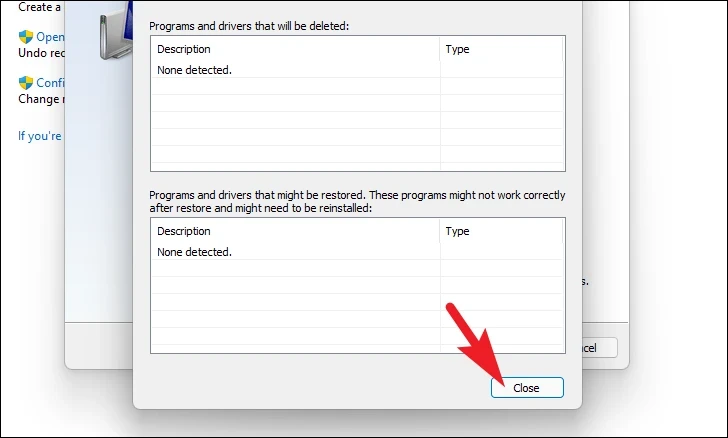
Finally, click on the ‘Finish’ button to initiate the rollback process
Once the rollback is complete, check if you the error is gone. Otherwise, move on to the next fix.
10. Reset your PC
In case no method has been able to fix the issue on your PC, the last resort is to reset your PC. Thankfully, you will not lose your personal files and folders. However, resetting your PC will remove all the programs that you have installed and also bring all the settings to their default configurations.
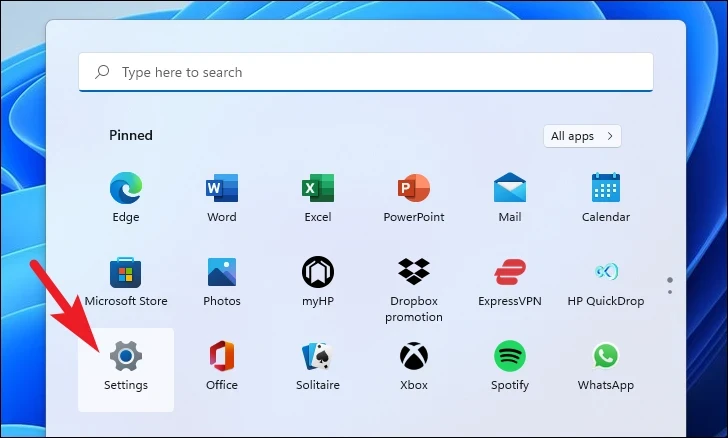
To reset your PC, head to the Start Menu, and click on the ‘Settings’ icon. Alternatively, type Settings in the menu to perform a search.
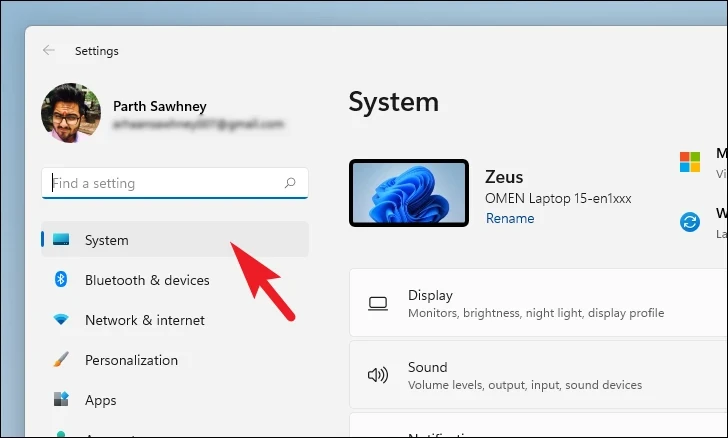
After that, from the Settings window, make sure you have selected the ‘System’ tab present on the left sidebar.
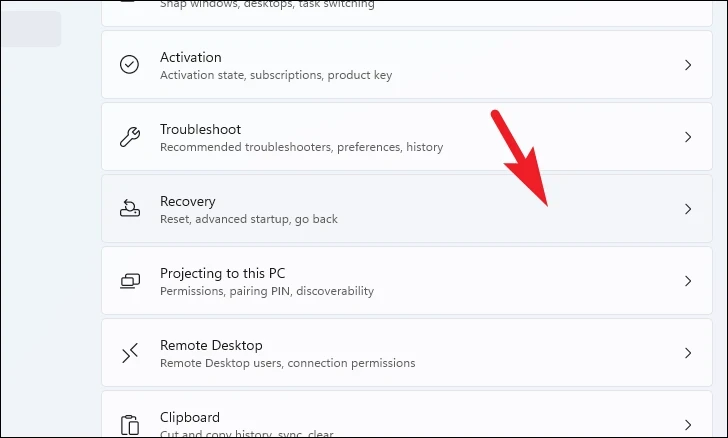
Then, from the right section of the window, scroll down to locate and click on the ‘Recovery’ tile to proceed.
Next, on the ‘Recovery’ settings screen, locate the ‘Reset this PC’ tile and click on the ‘Reset PC’ button present on the far right edge of the tile. This will open a separate window on your screen.

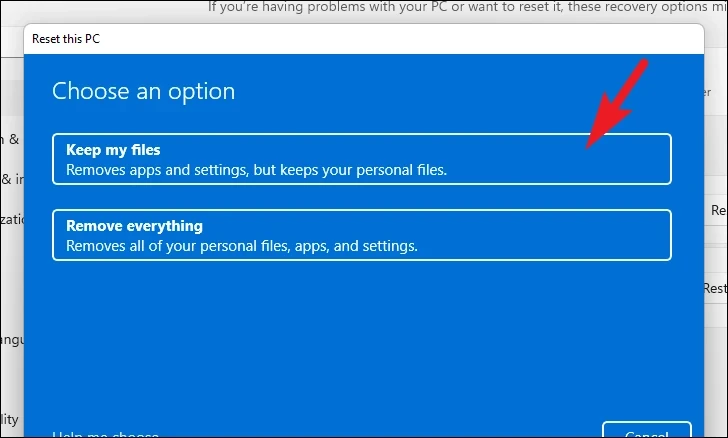
Now, from the separately opened window, click on the ‘Keep my files’ tile to proceed. In case you wish to remove all your personal files as well when resetting, click on the ‘Remove everything’ option.
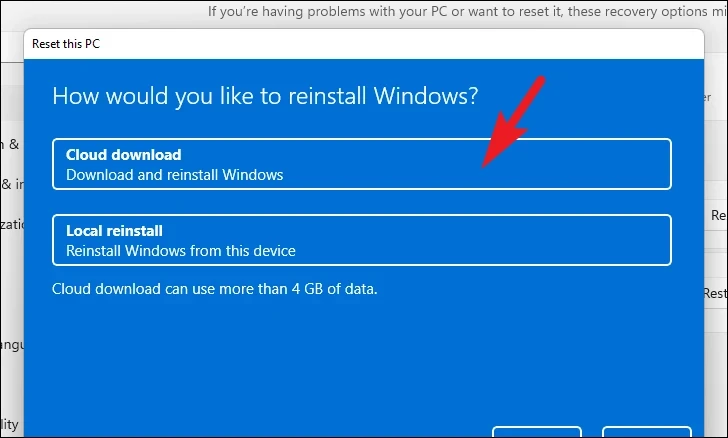
On the next screen, you will need to choose a method for reinstalling the operating system on your machine. Since there could be an issue with the copy already present on your system, it is recommended that you click on the ‘Cloud downloads’ option.
Note: ‘Cloud download’ will require an active internet connection and will consume upwards of 4GB of data.
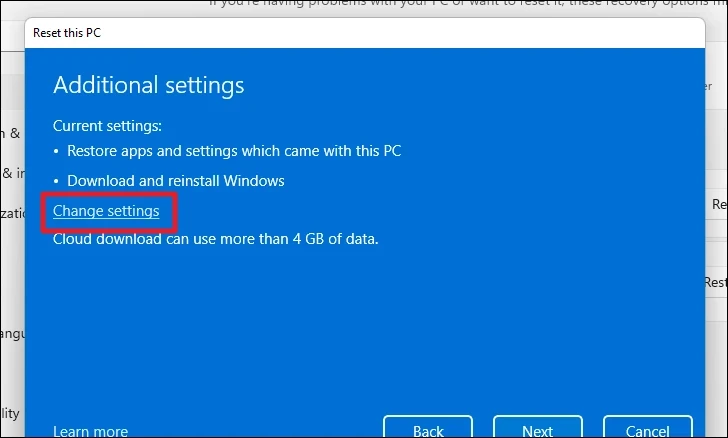
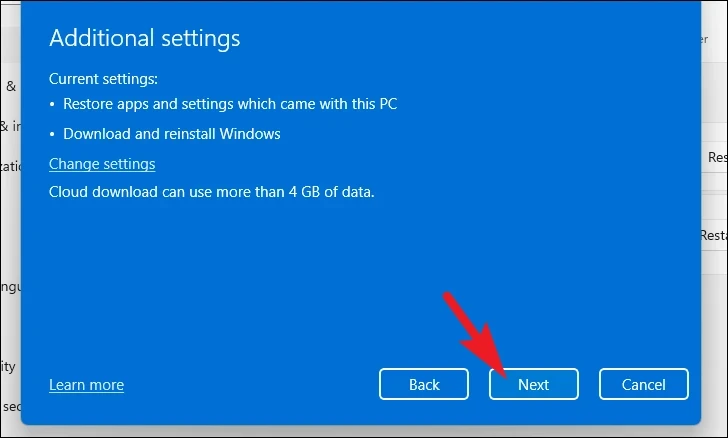
After that, Windows will list the settings that you have chosen. In case you wish to change any of them, click on the ‘Change settings’ option to continue.
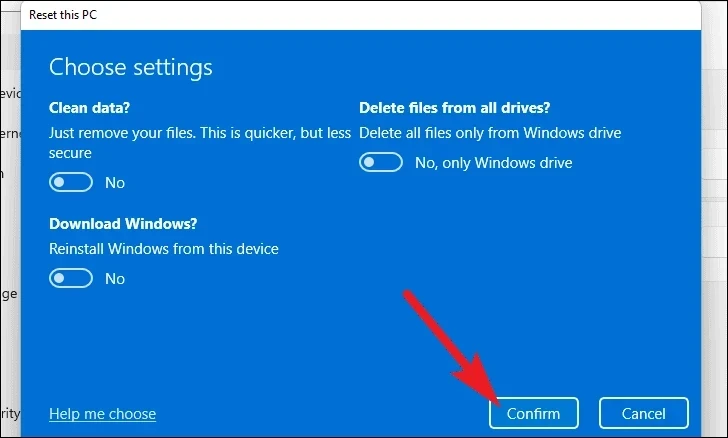
If you chose to change the settings, you can configure the following settings on the next screen, You can choose to not restore the apps and settings by clicking on the toggle switch present under the ‘Restore preinstalled apps?’ option and bringing it to the ‘No’ position. You can even switch from the cloud download to local installation by clicking on the toggle switch present under the ‘Download Windows?’ option to change the installation method. Once adjusted according to your preference, click on the ‘Confirm’ button to proceed.
After that, from the main window, click on the ‘Next’ button to continue.
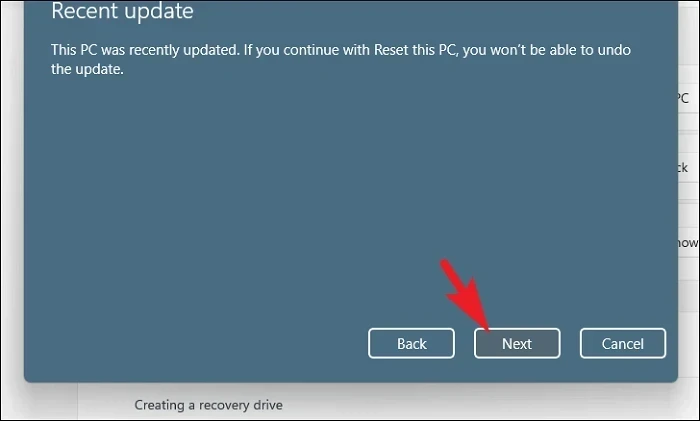
In case your PC was updated recently, you will receive a message on the screen stating that you will not be able to roll back once you reset the PC. To continue, click on the ‘Next’ button.
After that, Windows will list out all the impacts resetting your PC will have on your system. Read them carefully and click on ‘Reset’ to commence the resetting process.

That’s about it. One of the methods mentioned above is bound to resolve the Hypervisor error on your PC.