Прошу помощи местных специалистов по компьютерным сетям или дайте ссылку куда лучше обратиться с данными вопросами.
Я простой пользователь, поэтому постараюсь объяснить в силу своих скудных знаний по данной теме. Интернет 100 м/б. Нареканий к закачке и прочему никаких нет. Но люблю я потненько так в онлайн FPS шутеры погонять и вот тут начинается проблема. Давно замечал, что информация от моего персонажа в соревновательных онлайн играх идёт будто с запозданием или вообще пропадает и не регает. В «Insurgency Sandstorm» есть возможность отобразить статистику соединения и порой отображается потеря пакетов на Upload до 25%, но даже при 10% играть уже невозможно и мои попадания даже в упор просто не регает. Иногда даже в ко-опе с ботами. И с другими онлайн играми бывает точно так же. Начал курить тему и искать в чём беда с пакетами. Зашел мерять Bufferbloat на спец. сайты:
www.dslreports.com/speedtest
speedtest.net
https://www.waveform.com/tools/bufferbloat
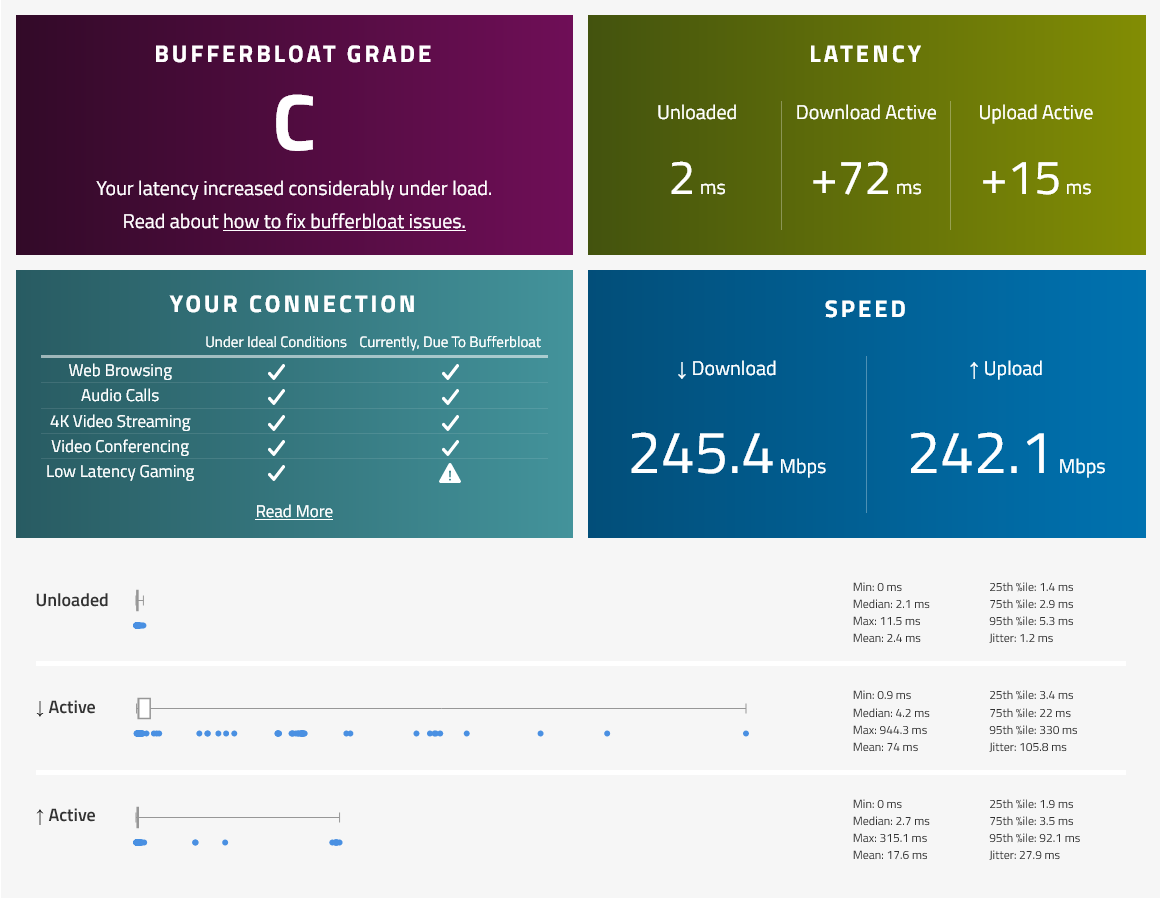
Вот такой печальный результат получился:
На других сайтах не лучше:
Читаю форумы и нахожу тему в стиме про потери пакетов в CSGO. Вот ссылка, кому интересно:
Если коротко, то чел рекомендует ограничить MTU и выключить Автотюнинг Винды. Копание с MTU особых результатов не дало и оставил их на 1500. А вот сама команда для Автотюнинга пакетов Винды сотворила какие-то чудеса.
«netsh int tcp set global autotuninglevel=disabled» (=normal возвращает всё взад)
Ну как чудеса, она вроде как сильно ограничила мне скорость инета (по идее), но потери пакетов пропали вообще и на Download и на Upload. Зашел на радостях в любимую стрелялку и это прямо вообще другая игра. С включенным Автотюнингом пакетов я буд-то в каком-то киселе играл. Сейчас ощущение, что каждый выстрел попадает именно в цель и каждый промах заметен и не вызывает вопросов. Играть одно удовольствие. Но что самое интересное, попробовал грузить игры в стиме и что-нибудь через торрент и скорость почему-то вообще не упала. Как такое может быть? Все сайты открываются так же быстро и без проблем. Из того что успел затестить, только стримы на твиче подлагивают в FullHD качестве.
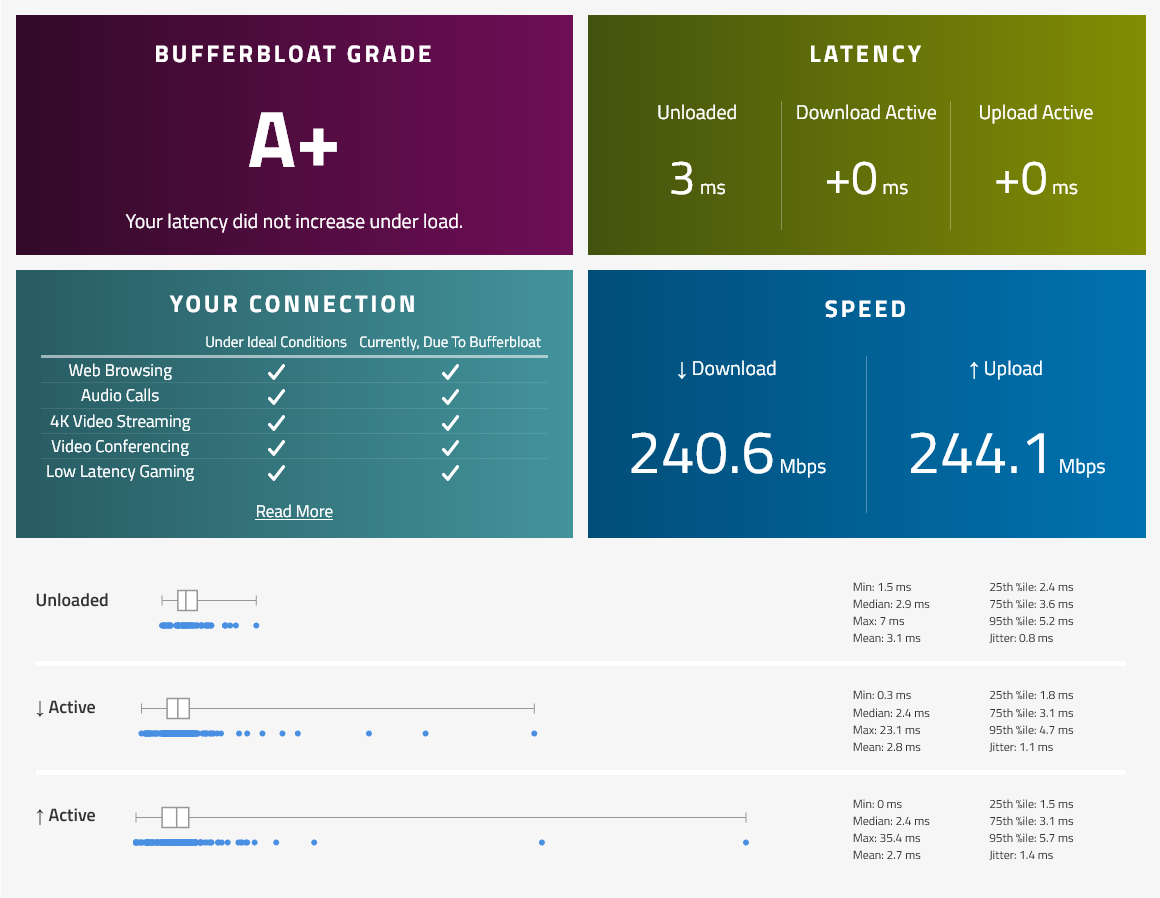
Для примера данные после отключения Автотюнинга Винды:
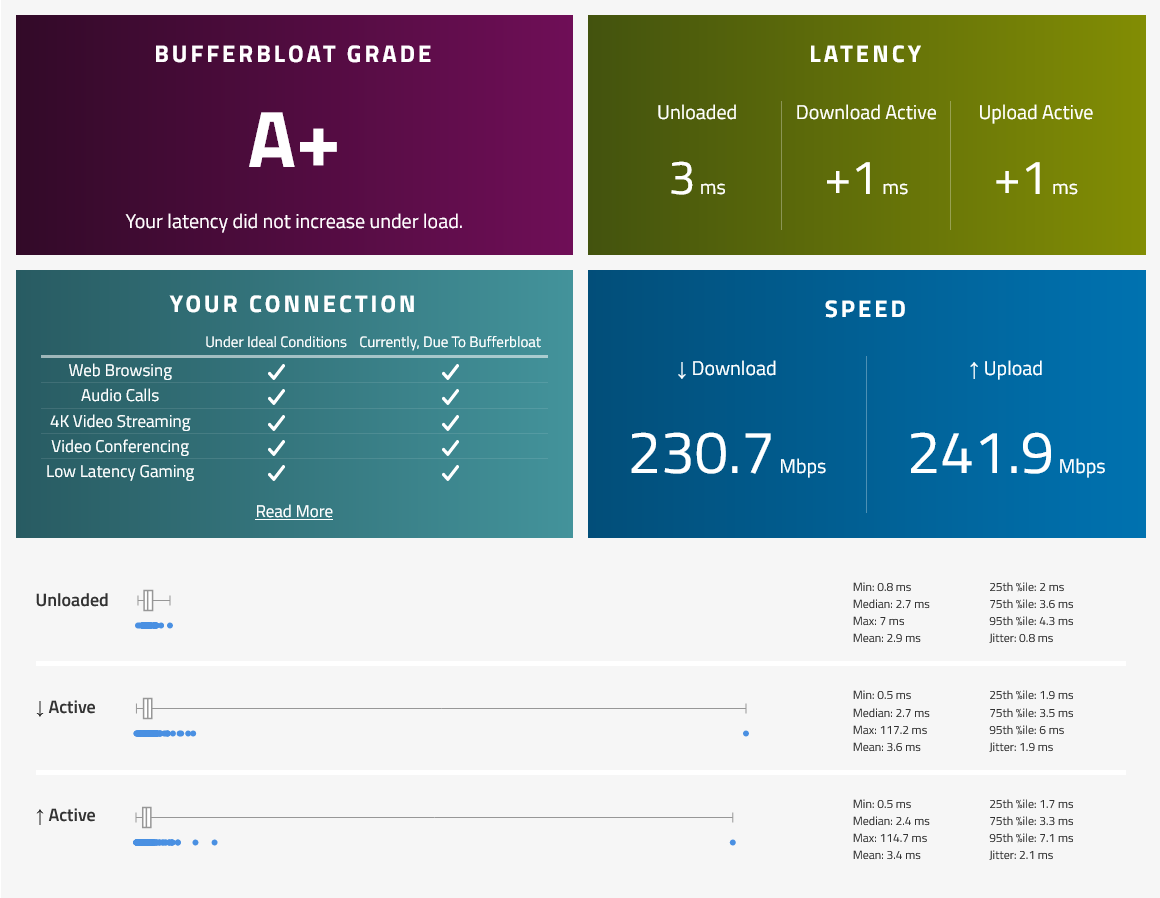
Сейчас ограничил скорость в самом роутере до 90 мб/с и с включенным Автотюнингом винды тестирую в играх. Судя по замерам — золотая середина по потерям пакетов. Можно ограничить только общую скорость, отдельно на Upload не выставить. При ограничении скорости в самом роутере почему-то вырастает ещё и лаг на Download в два раза. То-есть на последней картинке будет не 14-25, а 31-31. На других сайтах задержка ещё больше, но уже не такая сильная как при включенной команде винды. Вот и получается, что:
С включенной командой — сильные лаги в онлайн играх.
С выключенной — режет скорость (но почему-то не во время загрузок).
С ограничением скорости роутера — костыли и результат похоже где-то по середине (хотя буду ещё тестить).
А теперь собственно главное: что это за зверь такой — Автотюнинг пакетов винды и почему без него вообще нет задержек и лагов в играх? Есть ли какой-нибудь нормальный способ избавиться от задержек без ограничения скорости, постоянного клацанья Автотюнинга пакетов Винды на disabled и normal через cmd.exe или покупки специализированного роутера с поддержкой SQM QoS?
Буду благодарен за помощь и советы.
Did you experience bufferbloat problem on your network? Let me show you how to solve this menacing issue.
But firstly, do you know what bufferbloat is all about?
What Is Bufferbloat?
You may be wondering what exactly the word Bufferboat means when it comes to your Internet speed. Moreover, some people may associate this with cyber threats. In practice, Bufferbloat is actually when your router is becoming overloaded and makes your connection slow. This can be especially noticeable when undergoing heavy bandwidth activities such as voice calls, video chats, online gaming, and upload of heavy documents.
Check out: Best Antivirus For 2022
What Causes Bufferbloat?
Bufferbloat is caused by a myriad of factors. However, bufferbloat occurs because Internet algorithms that control Internet speeds are congested due to the latest routers that have large buffers. Improper buffering by your router can lead to bufferbloat since buffering enables the congested network to be arranged in a particular place so that your Internet service doesn’t crash.
Why it is important to test for bufferbloat?
If you are experiencing slow Internet speeds, it is imperative to check for bufferbloat. Since Bufferbloat causes network performance problems. It is important for you to test your Internet service for bufferbloat. There are several websites that enable you to test for bufferbloat.
However, the tool I recommend is Flent. This is because of Flent checks various parts of your network alongside external servers. You can also read performance charts and graphs. These charts and graphs are well detailed and give an indication of bufferbloat problems on your servers.
Note: you can also use a ping test to know if your network is affected by bufferbloat. This is best done when you start experiencing the buffer bloating problem. Bufferbloat is indicated when your network latency has increased from normal. This can be a simple and easy method to diagnose Bufferbloat problems.
Alternatively, you can also use the DSL Reports speed test; this can be an alternative to the two tests mentioned above, as it provides good results.
There is no specific method for reducing Bufferbloat problems; however, there are several steps you can undergo which can reduce the effects. Meanwhile, you can use the solutions I have highlighted below when you experience bufferbloat problems
-
Reconfigure your Router
This solution works well since you have to reconfigure your Internet router; this can reduce bufferbloat problems drastically. This is not difficult to perform, just follow the steps given below:
- Launch your web browser
- Visit a speed test website (speedofme is recommended for this test)
- Run speed tests several times (This enables you to know your average download and upload speed).
- Multiply your speed test result by 0.95 and write your values down.
- Multiply your speed test result by 1000 and write your values down as well.
- Click on your QoS settings on your router
- Configure your packet queue discipline to FQ_CODEL or CODEL depending on what you have.
- Input the upload speed result number to the “Upload link” value
- Input the download link result written down to the “Download link” value
- Click save and apply your settings
- This should do the trick.
Note: you would need to access the quality of service (QSW) menu in your router settings to perform this process.
-
Locate the best possible location for your router
The location of your Internet router is quite important for your network connection. For the best connection signal, it is vital you keep your router in an open location. You can use tools such as wall mounts or mounting holes to locate your router in the best position. You can use the following procedures to reduce bufferbloat problems.
Here’s how to do this:
- Always fix your router in an elevated position or on surfaces such as tables or mounts.
- Ensure your antennas are pointed to positions that would give you the best possible signals.
- Make sure your router is placed centrally in your house; this ensures the Wi-Fi connection signal is spread evenly in your home.
- This solution would improve your connection speed thereby reducing buffer bloating.
-
Reset your Router settings using UNPP
This is a command-based solution, which can be performed using the following steps:
The first step in this process is to connect your system to the web
- Go to the download site for namebench
- Download the program and install it.
- After installation, run the program
Note: this could last for up to 30 minutes. It would list the best DNS servers available to your system. You can sidestep this initial process by running your server through the Google public DNS (8.8.8.8 and 8.8.4.4); however, it is recommended that you use namebench.
After this step, you would need to set up your DMZ server. DMZ server (DeMitarized Zone Server) allows the entire portion of your network to be opened when devices are connected. UNPP enables your devices across your router to connect quickly with each other reducing bufferbloat.
To configure your UNPP follow these steps.
- Log in to your router settings this can be done by typing 192.168.1.1 or 192.168.1.0 on your browser
- Your router address would usually start with the subnet numbers 192.168.X.X.
- To know your subnet just follow the following steps.
- Launch Command Prompt by typing “cmd” and then hit the “Enter” key.
- When the command line displays enter C:>ipconfig
Use the default subnet 192.168.X.X.
Some Private subnets include:
10.0.0.0 – 10.255.255.255
172.16.0.0 – 172.31.255.255
192.168.0.0 – 192.168.255.255
To figure out your subnet, on windows launch command prompt (run, type cmd, press enter). On the command line, type
- C:>ipconfig
- This would display the subnet address of your router.
You may see something like this below
Connection-specific DNS Suffix. : mydomain.com
Link-local IPv6 Address . . . . . : abcd::1234:1234:1234:1234
IPv4 Address. . . . . . . . . . . : 10.2.110.20
Subnet Mask . . . . . . . . . . . : 255.255.354.0
Default Gateway . . . . . . . . . : 10.2.120.1
After checking this you would see UPnP tab
Enable this option
You are good to go as this could reduce bufferbloat
-
Use DD-WRT to eliminate bufferbloat
This is usually used by tech geniuses and requires some complex work. However, if you follow my step by step process, you would achieve the same result.
Note: you would need to have DD-WRT installed on your router. DD-WRT is a Linux open-source firmware used by the latest Routers and Wireless Systems. The firmware essentially gives a wide range of features that enables several functions within the respective hardware router. The whole point of DD-WRT is to convert your simple router to a router with more advanced features.
DD-WRT comes with latest functions such as support for the advanced quality of service, radio output power control, overclocking capability Kai network, daemon-based services, IPv6, and Wireless Distribution System
These steps listed below works only on routers with DD-WRT installed in it.
First step
- Log into your DD-WRT interface after which you click on the MTU section in the Setup menu.
- Change the MTU setting to 1492; this is ideal as it manages your router packet fragmentation and the raw latency increase
- Save your changes and exit
- Install Namebench Utility and run the program.
- Namebench would check your DNS servers for the best one using speed and proximity parameters.
- Write down the name of the DNS servers indicated by Namebench.
- Log back in your DD-WRT interface and click on the static DNS section.
- Input the two best DNS servers provided by our earlier Namebench analysis.
- After this step, uncheck the boxes stating Use DNSMasq for DHCP/DNS.
Note: this last step is important as it helps to regulate your router’s processor cycles used for Internet speed performances.
- Click on save settings and exit.
Note: You should refresh your Internet connection by unplugging your router cable from your PC. It is however recommended that you use CAT6 Ethernet cable; this helps to prevent connectivity and latency problems.
Second step
- Log into your DD-WRT settings
- Click on the NAT/QoS tab, specifically the UPnP section.
- Enable UPnP service and also enable the clear port forward at the Startup box. This ensures every port forwarded is a new port.
- Save your settings
- Click on the NAT/QoS tab, access the DMX menu, and check the enable box.
- After which you place the IP assigned to your PC within the router’s range.
- Save the settings.
3rd step
You may be wondering about the many steps involved in this process. However, this solution has proven to be efficient in eliminating buffer bloat.
This step is very vital in completing the process.
- It is essential you know your download speed and Uplink speed. This can be done with simple calculations.
- Let’s assume your download speed is 20mbbps and your upload is 10mbps.
- You first convert both values from mbps to kbps
- This is quite easy as 1mbps equals 1000kbps so 20mbps (download)= 200000kbps and 10mbps (upload) = 10000
- After knowing your values subtract it by 25 percent of the value
downlink 20000- 25% = 15000
uplink 10000-25% = 7500
- You then insert your obtained values in the boxes indicated.
- Also, tick all boxes in the TCP-Packet priority section, this enables reduced throttling of bandwidth speed.
- Apply and save settings.
Step 4
- Enter the Administration tab and click on the IP filter settings
- Scroll to the TCP congestation Control
- Change the default congestion control setting from Vegas to Westwood.
- Also, remember to leave the Maximum ports section values at 4096
- Set your TCP/UDP timeout setting value at 120
- Save and apply settings
Note: Restart your PC Internet connection to confirm the new changes.
Step 5
- Enter your administrator settings
- Enter the command menu and input the following command prompt in the command search tab
- ifconfig eth0 txqueuelen 2 and ifconfig eth1 txqueuelen 2
- Save and apply those settings.
This series of steps would relieve your PC from Bufferbloat problems due to improper broadband or wireless connections.
-
Purchase a new wireless router
If you have tried the solutions listed above, it is advisable that you change your router. You can always purchase a new router with the latest anti buffer bloating technology. The router recommended is the Netgear Nighthawk R7800 X4S. This high-end router uses a 1.7 GHz Broadcom processor. This gives the router excellent performance which drastically reduces the chances of buffer bloat. It also gives amazing connection speeds and a wide range signal from any location in your house.
Have you experienced bufferbloat problems before? What method did you apply in fixing the problem? Let us know by commenting below.
There’s a dreaded disease that’s plagued Internet Service Providers for years. OK, there’s probably several diseases, but today we’re talking about bufferbloat. What it is, how to test for it, and finally what you can do about it. Oh, and a huge shout-out to all the folks working on this problem. Many programmers and engineers, like Vint Cerf, Dave Taht, Jim Gettys, and many more have cracked this nut for our collective benefit.
When your computer sends a TCP/IP packet to another host on the Internet, that packet routes through your computer, through the network card, through a switch, through your router, through an ISP modem, through a couple ISP routers, and then finally through some very large routers on its way to the datacenter. Or maybe through that convoluted chain of devices in reverse, to arrive at another desktop. It’s amazing that the whole thing works at all, really. Each of those hops represents another place for things to go wrong. And if something really goes wrong, you know it right away. Pages suddenly won’t load. Your VoIP calls get cut off, or have drop-outs. It’s pretty easy to spot a broken connection, even if finding and fixing it isn’t so trivial.
That’s an obvious problem. What if you have a non-obvious problem? Sites load, but just a little slower than it seems like they used to. You know how to use a command line, so you try a ping test. Huh, 15.0 ms off to Google.com. Let it run for a hundred packets, and essentially no packet loss. But something’s just not right. When someone else is streaming a movie, or a machine is pushing a backup up to a remote server, it all falls apart. That’s bufferbloat, and it’s actually really easy to do a simple test to detect it. Run a speed test, and run a ping test while your connection is being saturated. If your latency under load goes through the roof, you likely have bufferbloat. There are even a few of the big speed test sites that now offer bufferbloat tests. But first, some history.
History of Collapse
The Internet in the 1980s was a very different place. The Domain Name System replaced hosts.txt as the way hostname to IP resolution was done in 1982. January 1st, 1983, the ARPANET adopted TCP/IP — the birthday of the Internet. By 1984, there was a problem brewing, and in 1986 the Internet suffered a heart attack in the form of congestion collapse.
In those days, cutting edge local networks were running at 10 megabits per second, but the site-to-site links were only transferring 56 kilobits per second at best. Late 1986, links suddenly saw extreme slowdowns, like the 400 yard link between Lawrence Berkeley Laboratory and the University of California at Berkeley. Instead of 56 Kbps, this link was suddenly transferring at an effective 40 bits per second. The problem was congestion. It’s a very similar model to what happens when too many cars are on the same stretch of highway — traffic slows to a crawl.
The 4.3 release of BSD had a TCP implementation that did a couple interesting things. First, it would start sending packets at full wire speed right away. And second, if a packet was dropped along the way, it would resend it as soon as possible. On a Local Area Network, where there’s a uniform network speed, this works out just fine. On the early internet, particularly this particular Berkeley link, the 10 Mb/s LAN connection was funneled down to 32 kbps or 56 kbps.
To deal with this mismatch, the gateways on either side of the link has a small buffer, roughly 30 packets worth. In a congestion scenario, more than 30 packets back up at the gateway, and the extra packets were just dropped. When packets were dropped, or congestion pushed the round trip time beyond the timeout threshold, the sender immediate re-sent — generating more traffic. Several hosts trying to send too much data over the too-narrow connection results in a congestion collapse, a feedback loop of traffic. The early Internet unintentionally DDoS’d itself.
The solution was a series of algorithms added to BSD’s TCP implementation, which have now been adopted as part of the standard. Put simply, in order to send as quickly as possible, traffic needed to be intelligently slowed down. The first technique introduced was slow start. You can see this still being used when you run a speed test, and the connection starts at a very slow speed, and then ramps up quickly. Specifically, only one packet is sent at the start of transmission. For each received packet, an acknowledgement packet (an ack) is returned. Upon receiving an ack, two more packets are sent down the wire. This results in a quick ramping up to twice the maximum rate of the slowest link in the connection chain. The number of packets “out” at a time is called the congestion window size. So another way to look at the issue is that each round-trip success increase the congestion window by one.
Once slow-start has done its job, and the first packet is dropped or times out, the TCP flow transitions to using a congestion avoidance algorithm. This one has a emphasis on maintaining a stable data rate. If a packet is dropped, the windows is cut in half, and every time a full window’s worth of packets are received, the window increases by one. The result is a sawtooth graph that is constantly bouncing around the maximum throughput of the entire data path. This is a bit of an over-simplification, and the algorithms have been developed further over time, but the point is that rolling out this extension to TCP/IP saved the internet. In some cases updates were sent on tape, through the mail, something of a hard reboot of the whole network.
Fast-Forward to 2009
The Internet has evolved a bit since 1986. One of the things that’s changed is that the price of hardware has come down, and capabilities have gone up dramatically. A gateway from 1986 would measure its buffer in kilobytes, and less than 100 at that. Today, it’s pretty trivial to throw megabytes and gigabytes of memory at problems, and router buffers are no exception. What happens when algorithms written for 50 KB buffer sizes are met with 50 MB buffers in modern devices? Predictably, things go wrong.
When a large First In First Out (FIFO) buffer is sitting on the bottleneck, that buffer has to fill completely before packets are dropped. A TCP flow is intended to slow-start up to 2x available bandwidth, very quickly start dropping packets, and slash it’s bandwidth use in half. Bufferbloat is what happens when that flow spends too much time trying to send at twice the available speed, waiting for the buffer to fill. And once the connection jumps into its stable congestion avoidance mode, that algorithm depends on either dropped packets or timeouts, where the timeout threshold is derived from the observed round-trip time. The result is that for any connection, the round-trip latency increases with the number of buffered packets on the path. And for a connection under load, the TCP congestion avoidance techniques are designed to fill those buffers before reducing the congestion window.
So how bad can it be? On a local network, your round trip time is measured in microseconds. Your time to an Internet host should be measured in miliseconds. Bufferbloat pushes that to seconds, and tens of seconds in some of the worst cases. Where that really causes problems is when it causes traffic to time out at the application layer. Bufferbloat delays all traffic, so it can cause DNS timeouts, make VoIP calls into a garbled mess, and make the Internet a painful experience.
The solution is Smart Queue Management. There’s a lot of work that’s been done on this concept since 1986. Fair queuing was one of the first solutions, making intermediary buffers smart, and splitting individual traffic flows into individual queues. When the link was congested, each queue would release a single packet at a time, so downloading an ISO over Bittorrent wouldn’t entirely crowd out your VoIP traffic. After many iterations, the the CAKE algorithm has been developed and widely deployed. All of these solutions essentially trade off a little bit of maximum throughput in order to ensure significantly reduced latency.
Are You FLENT in Bufferbloat?
I would love to tell you that bufferbloat is a solved problem, and that you surely don’t have a problem with it on your network. That, unfortunately, isn’t quite the case. For a rough handle on whether you have a problem, use the speed tests at dslreports, fast.com, or speedtest.net. Each of these three, and probably others, give some sort of latency under load measurement. There’s a Bufferbloat specific test hosted by waveform, and seems to be the best one to run in the browser. An ideal network will still show low latency when there is congestion. If your latency spikes significantly higher during the test, you probably have a case of bufferbloat.
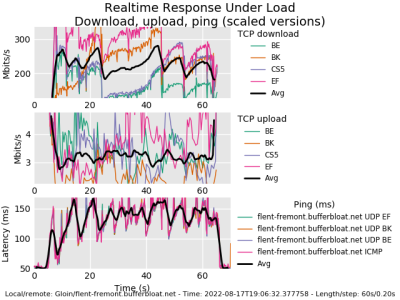
For the nerdier of us, there is a command line tool, flent, that does an in-depth bufferbloat test. I used the command, flent rrul -p all_scaled -H flent-fremont.bufferbloat.net to generate this chart, and you see the latency scaling quickly over 100 ms under load. This is running the Real Time Response under Load test, and clearly indicates I have a bit of a bufferbloat problem on my network. Problem identified, what can I do about it?
You Can Have Your Cake
Since we’re all running OpenWrt routers on our networks… You are running an open source router, right? Alternatively there are a handful of commercial routers that have some sort of SQM built-in, but we’re definitely not satisfied with that here on Hackaday. The FOSS solution here is CAKE, a queue management system, and it’s already available in the OpenWrt repository. The package you’re looking for is luci-app-sqm. Installing that gives you a new page on the web interface — under Network -> SQM QoS.
On that page, pick your WAN interface as Interface name. Next, convert your speed test results into Kilobits/second, shave off about 5%, and punch those into the upload and download speeds. Flip over to the Queue Discipline tab, where we ideally want to use Cake and piece_of_cake.qos as the options. That last tab requires a bit of homework to determine the best value, but Ethernet with overhead and 22 seem to be sane values to start with. Enable the SQM instance, and then save and apply.
And now we tune and test. On first install, the router may actually need a reboot to get the kernel module loaded. But you should see an immediate difference on one of the bufferbloat tests. If your upload or download bufferbloat is still excessive, tune that direction’s speed a bit lower by a couple percent. If your bufferbloat drops to 0, try increasing the speed slightly. You’re looking for a minimal effect on maximum speed, and a maximum effect on bufferbloat. And that’s it! You’ve slain the Bufferbloat Beast!
“Thompson Router” by Simeon W is licensed under CC BY 2.0 ![]()
![]() .
.
Enable/Setup FQ-CoDel or CAKE SQM on RouterOS using Queue Tree
Bufferbloat is a problem for many of us gamers and users that need low latency internet just because the counters at the supermarket don’t want to let someone with a single item to cut into the queue of people with multiple items in the cart.1
We aim to fix that problem by letting someone with a single item in the checkout lane cut though the line using Smart Queue Management (SQM)2.

FastTrack is a feature in MikroTik RouterOS that packets that are marked “fast-tracked” will bypass some of a processing in the router (firewall, connection tracking, etc.)3, this will reduce processing overhead and allow to have higher speeds achievable on the router.4
The problem is that FastTrack bypasses simple queues, which are used for SQM. Queue tree that are parented to global also bypasses FastTrack. We will instead use queue tree that are parented to interface and apply SQM there.
Take note that queue tree requires packet marks, so we set packet-mark to no-mark so packets without mark will go to the queue tree. Any packets that are marked will bypass the queue tree, requiring you to add the name of the mark in packet-mark= option.
There are 2 algorithms that we can use for SQM in MikroTik, Fair/Flow Queueing Controlled Delay (FQ-CoDel)5 and Common Applications Kept Enhanced (CAKE).6 You can use either of those, but I recommend using FQ-CoDel, since it is “fair” (got it?).
RouterOS v7.1 and up supports FQ-CoDel and CAKE.
Enabling Smart Queue Management
-
Measure your internet speed on Speedtest.net and know your advertised speed on your ISP.
Choose how much speed to sacrifice for SQM. Some people recommend 90% of speed,7 for example my internet is 250 Mbps, I will set max-limit to 225 Mbps, sacrificing 25 Mbps.
But for my setup, I sacrifice 1 Mbps, so I set max-limit to 249 Mbps. Remember that max-limit must not be equal or higher than your internet speed, or else it will not work.
For asymmetrical internet speed, specify max-limit depending on the upload and download speed. For example, upload speed is 50 Mbps, download speed is 100 Mbps, max-limit on upstream should be 49 Mbps, downstream should be 99 Mbps. -
Measure Bufferbloat on your internet using Waveform Bufferbloat Test to check for Bufferbloat before SQM has been enabled.
Fair/Flow Queueing Controlled Delay (FQ-CoDel)
- Add FQ-CoDel on Queue Types.
/queue type add kind=fq-codel name=fq-codel - Add Queue Tree on upstream (from your router going to the internet) by specifying the WAN interface in parent. My WAN interface is ether1. Set the max-limit to your chosen speed upstream, I chosen 249 Mbps, so it will be 249M.
/queue tree add max-limit=249M name=queue-upload packet-mark=no-mark parent=ether1 queue=fq-codel - Add Queue Tree on downstream (from the internet going to your router) by specifying the LAN interface in parent. My LAN interface is bridge. Set the max-limit to your chosen speed downstream, since I have symmetrical internet speed, it will be the same as upstream.
/queue tree add max-limit=249M name=queue-download packet-mark=no-mark parent=bridge queue=fq-codel - Measure Bufferbloat on your internet using Waveform Bufferbloat Test to check if there is any changes in latency after SQM has been enabled.
Common Applications Kept Enhanced (CAKE)
Configuration is the same with FQ-CoDel except the algorithm.
- Add CAKE on Queue Types.
/queue type add kind=cake name=cake - Add Queue Tree on upstream.
/queue tree add max-limit=249M name=queue-upload packet-mark=no-mark parent=ether1 queue=cake - Add Queue Tree on downstream.
/queue tree add max-limit=249M name=queue-download packet-mark=no-mark parent=bridge queue=cake
Benchmarks
Before SQM | FQ-CoDel | CAKE


Last Updated on August 8, 2022 by
As bufferbloat.net defines it, “Bufferbloat is the undesirable latency that comes from a router or other network equipment buffering too much data. It is a huge drag on Internet performance created, ironically, by previous attempts to make it work better. The one-sentence summary is “Bloated buffers lead to network-crippling latency spikes. The bad news is that bufferbloat is everywhere, in more devices and programs than you can shake a stick at. The good news is, bufferbloat is now, after 4 years of research, development and deployment, relatively easy to fix”.
Indeed, this is easily fixed on pfSense and I will show you how in the next sections.
Performing a health check on your Internet
Before jumping to the solution, let’s first make sure you are suffering from it. Make sure nobody is using internet (to don’t interfere with the testing). Visit http://www.dslreports.com/speedtest and click on your connection type (e.g. Gigabit/Fiber, Cable, DSL, Satellite, etc). The speed test/buffer bloat tests will start and should finish in a minute. Once it completes, if you get A or A+ grades on the BufflerBloat metric, you are probably good. If you get anything less, I recommend following the next steps to fix it. Take note of both download and upload speeds from this test as we will need it later.
Fixing the bloat
Now that you diagnosed the BufferBloat, let’s fix it. We will configure both download and upload bloats individually.
Fixing Download speed first
On your pfSense, go to Firewall >> Traffic Shaper >> Limiters, click on New limiter button and do as follows:
- Limiters
- Enable: checked
- Name: WAN_Down
- Bandwidth: Set this to 95% of download speed from your test. If the reported speed was higher than what your pay for, take 95% of the contracted download speed to be safe. Pay attention to the proper Bw type and set Schedule to None
- Mask: None
- Description: Fix bufferbloat for download
- Queue
- Queue Management Algorithm: CoDel
- Scheduler: FQ_CODEL
- Queue length: 1000
- ECN: checked
- Advanced
- Leave everything at their default values
Click Save to create the limiter. Now we need to add a queue to that limiter before applying this setting. On the same page, click on “WAN_Down” on the left table and then click on Add new queue button at the bottom of the page and do as follows:
- Limiters
- Enable: checked
- Name: WAN_Down_Queue
- Mask: None
- Description: Fix bufferbloat for download
- Queue
- Queue Management Algorithm: CoDel
- Queue length: empty
- ECN: checked
- Advanced
- Leave everything at their default values
Click Save and Apply changes to complete the process for the download bloat.
Fixing Upload speed
Repeat the steps above, but for upload this time. Go to Firewall >> Traffic Shaper >> Limiters, click on New limiter button and do as follows:
- Limiters
- Enable: checked
- Name: WAN_Up
- Bandwidth: Set this to 95% of upload speed from your test. If the reported speed was higher than what your pay for, take 95% of the contracted upload speed to be safe. Pay attention to the proper Bw type and set Schedule to None
- Mask: None
- Description: Fix bufferbloat for upload
- Queue
- Queue Management Algorithm: CoDel
- Scheduler: FQ_CODEL
- Queue length: 1000
- ECN: checked
- Advanced
- Leave everything at their default values
Click Save to create the limiter. Now we need to add a queue to that limiter before applying this setting. On the same page, click on “WAN_Up” on the left table and then click on Add new queue button at the bottom of the page and do as follows:
- Limiters
- Enable: checked
- Name: WAN_Up_Queue
- Mask: None
- Description: Fix bufferbloat for upload
- Queue
- Queue Management Algorithm: CoDel
- Queue length: empty
- ECN: checked
- Advanced
- Leave everything at their default values
Click Save and Apply changes to complete the process for the upload bloat.
Create firewall rule to deploy BufferBloat fix
Now that we have the settings fro BufferBloat in place, we need to deploy them by creating a floating firewall rule. Go to Firewall >> Rules >> Floating and click on Add to add a rule at the top of all others:
- Edit Firewall Rule
- Action: Pass
- Disabled: unchecked
- Quick: checked
- Interface: WAN
- Direction: Out
- Address family: IPv4
- Protocol: Any
- Source
- Any
- Destination
- Any
- Extra Options
- Leave everything on their default values
- Advanced
- Gateway: Selection your WAN gateway, probably something like WAN_DHCP.
- DO NOT SELECT ‘Default’
- In / Out pipe:
- Select WAN_Up_Queue for In (right dropdown)
- Select WAN_Down_Queue for Out (left dropdown) and;
- Gateway: Selection your WAN gateway, probably something like WAN_DHCP.
Click Save and Apply changes to put deploy the firewall rules
Verifying your bloat is gone
As before, make sure nobody is using your internet (to don’t interfere with the testing), visit http://www.dslreports.com/speedtest and click on your connection type (e.g. Gigabit/Fiber, Cable, DSL, Satellite, etc). If you did everything right, you should get a grade A or A+ for your BufferBloat!
That is it, folks. Happy streaming/gaming!