Local folder or tarball paths
This section provides information on the following issues:
| Type of error: | Error message: |
|---|---|
| General startup issues | — Error messages in the Package Manager window — Package Manager missing or window doesn’t open — Problems after upgrading Unity to new version — Resetting your project’s package configuration |
| Package installation issues | — Package installation fails — Packages not recognized — Unable to add package from Git URL |
| Problems installing git dependencies | — No ‘git’ executable was found — git-lfs: command not found — Repository not found — Could not read Username: terminal prompts disabled — Can’t update Git version |
| Asset StoreA growing library of free and commercial assets created by Unity and members of the community. Offers a wide variety of assets, from textures, models and animations to whole project examples, tutorials and Editor extensions. More info See in Glossary packages (My Assets) |
— ‘Failed to parse Http response’ in My Assets context |
| Scoped registries | — Missing ‘My Registries’ in the Package Manager window |
| Issues when building packages | — Missing MonoBehaviour errors — Loading error for hostfxr.dll on Windows |
You can also run the Unity Package Manager Diagnostics tool if you are experiencing problems that might be network-related. For more information, see Diagnose network issues.
Error messages in the Package Manager window
The Package Manager displays error indicators in the Package Manager window when it encounters problems.
System-wide issues
-
Network connection issues
Error messages appear in the status bar when the Package Manager has detected an issue that isn’t related to a specific package. For example, if the Package Manager can’t access the package registry server, it displays this message in the status bar:

Network error message -
Error refreshing assets (or Error refreshing packages)
If your network can’t reach the package registry server, it’s probably because there is a connection problem with the network. When you or your system administrator diagnose and fix the network error, the status bar clears.
If your network connection is working, but you aren’t signed into your Unity account, the Package Manager doesn’t display any Asset Store packages. When you try to use the My Assets context, the Package Manager displays an error in the status bar:
Logged out of Unity account Click the Sign in button inside the list view to sign into your Unity account through the Unity Hub.


Package-specific issues
-
If a specific package has a problem when loading or installing (for example, when determining which package versions to load), the error icon (
) appears in the package list next to the compromised package (A). To find out what the problem is, open the compromised package’s details view to see the detailed error message (B):Dependency error message
 ) appears in the package list next to the compromised package (A). To find out what the problem is, open the compromised package’s details view to see the detailed error message (B):
Package Manager missing or window doesn’t open
The Package Manager window might get moved offscreen or hidden by another window. When this happens, it looks like the Package Manager window failed to open. In this case, you can try to reset the window layout (Window > Layouts > Default) and reopen the Package Manager window again.
If the Package Manager window still doesn’t appear, check your Unity Console windowA Unity Editor window that shows errors, warnings and other messages generated by Unity, or your own scripts. More info
See in Glossary:
Failed to resolve packages: The file [<project-path>/Packages/manifest.json] is not valid JSON:
  Unexpected token '}' at 44:1
  }
This error message indicates that your manifest.json file is malformed. It also tells you the line number where the Package Manager failed to parse the file, so you can fix the JSON. There are a number of online validators that you can use to try to correct the problem. Once you save the corrected file, Unity reloads the Package Manager window.
If you upgraded from an early version of the Unity Editor, there may be other problems with your package manifestEach package has a manifest, which provides information about the package to the Package Manager. The manifest contains information such as the name of the package, its version, a description for users, dependencies on other packages (if any), and other details. More info
See in Glossary file:
-
As of 2019.3, your
manifest.jsonfile should not contain any references to the com.unity.package-manager-ui package. You can either reset your project’s package configuration or remove the following line from the manifest’s dependencies list:"com.unity.package-manager-ui": "2.1.1", -
Check to see if your project manifestEach Unity project has a project manifest, which acts as an entry point for the Package Manager. This file must be available in the
<project>/Packagesdirectory. The Package Manager uses it to configure many things, including a list of dependencies for that project, as well as any package repository to query for packages. More info
See in Glossary uses “exclude” as a package version. This is an obsolete value for the dependencies property. If you find any lines like these, remove the entire line. Package Manager only installs packages that are explicitly included as a dependency in your project, so once you remove that entry, Package Manager ignores the package and doesn’t install it.
If the Package Manager still fails to load, follow the procedures under Packages not recognized and Resetting your project’s package configuration.
Problems after upgrading Unity to new version
When you upgrade a project to a newer Unity version, the Package Manager automatically updates incompatible packages to newer compatible versions. However, if your package doesn’t compile, the Package Manager displays error messages in the Console.
To correct these messages, read the error messages and fix any problems you can. For example, a package might be missing a dependency on another package or version. In that case, you can try and install the package yourself.
You can also try the following sequence of solutions until you find something that works:
- Back up and then delete the
Packagesfolder under your project. - Back up and then delete the package sources in your project’s
Packagesfolder, leaving only themanifest.jsonfile. Then try to reload the project. - Create a new empty project. If the Package Manager window loads successfully, replace the
Library/PackageCache/com.unity.package-manager-ui@<version>folder in the failing project with the same folder from the newly created project. - As a last resort, you can reset your project to the default packageUnity automatically pre-installs a select number of default packages (for example, the Analytics Library, Unity Timeline, etc.) when you create a new project. This differs from a bundled package because you don’t need to install it and it differs from a built-in package because it extends Unity’s features rather than being able to enable or disable them.
See in Glossary configuration and add back packages one at a time until it works.
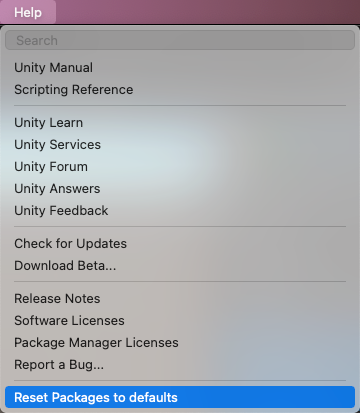
Resetting your project’s package configuration
If a project has too many package issues, you can reset your project back to the default package configuration for the Editor’s version of Unity. This operation resets all packages in your project. This might not fix the source of the problem, but it can help you figure out what the problem is.
Note: You can’t undo resetting your package configuration, so make sure you back up the manifest.json file first or make sure your project is under source control. You can also take extra precautions by cloning your project and testing out the operation on the clone before proceeding.
To return to the default package configuration, select Reset Packages to defaults from the Help menu.
Resetting a clone of your project
You can also test the return to the default packages before you perform the final change:
-
Clone your project by copy-pasting your project folder and renaming it so that it is easy to find (for example, if your project is called
MyProjectthen you could use something likeclone_MyProject). -
Load your newly cloned project.
-
From the Help menu, select Reset Packages to defaults.
Depending on the size of your project, this might take a few minutes.
-
Check that it successfully reset the packages. If so, you can perform the operation safely on the original project.
Package installation fails
If you are trying to install a new package from the registry and it is not working, it might be due to permission problems.
You must have full permissions on the cache folder:
- Windows:
C:UsersyournameAppDataLocalUnitycache - macOS:
~/Library/Unity/cache - Linux:
~/.config/unity3d/cache
It might be a problem with the network. Check your firewall and proxy settings.
Sometimes institutional environments, such as schools, government offices, or network-protected workplaces set up proxy servers to control traffic between the network and the Internet, and use their own server certificates which are not recognized by Unity or the Package Manager. Talk to your network administrator.
Packages not recognized
If you see a lot of compilation errors, this might indicate that Unity is not recognizing the packages in your existing project. In this case, you might be missing a .NET component.
For Windows:
- Download and install Visual Studio 2017 version 15.9.0 or higher with the .NET Core cross-platform development workload selected under Other Toolsets.
- Download and install the .NET SDK v2.2.101 component.
For MacOS:
-
Download and install the .NET SDK v2.2.101 component.
-
Install any recommended updates in Visual Studio
-
Use homebrew to brew and install mono:
brew update brew install mono # optional brew upgrade mono -
If necessary, delete the
Library/obj/tempfolder under your project and restart Unity. -
If you are still experiencing difficulties, try rebooting your computer as well.
Unable to add package from Git URL
See Repository not found.
No ‘git’ executable was found
If you try to install a package from a git URL, a message similar to this appears:
Cannot perform upm operation: Unable to add package
[https://github.example.com/myuser/myrepository.git]:
No 'git' executable was found. Please install Git on your system and restart Unity [NotFound]
UnityEditor.EditorApplication:Internal_CallUpdateFunctions()
git-lfs: command not found
If you are trying to download a package that uses Git LFS (Large File Storage), you might see this error message:
Error when executing git command. git-lfs filter-process: command not found.
This indicates that Git LFS is probably not installed on your machine. To make sure, you could test it on the command line:
git lfs --version
If you see something like this, Git LFS is installed:
git-lfs/2.8.0 (GitHub; darwin amd64; go 1.12.7)
Otherwise, you can install it by following the Bitbucket GitHub instructions.
Repository not found
If you specify a location that does not exist, a message similar to this one appears in the Unity Console:
Cannot perform upm operation: Unable to add package [https://mycompany.github.com/gitproject/com.mycompany.mypackage.git]:
  Error when executing git command. fatal: repository 'https://mycompany.github.com/gitproject/com.mycompany.mypackage.git/' not found
 [NotFound]
UnityEditor.EditorApplication:Internal_CallUpdateFunctions() (at /Users/builduser/buildslave/unity/build/Editor/Mono/EditorApplication.cs:310)
Check your spelling. To make sure you are using the correct URL, go to the repository’s page and copy the URL from the Clone button:
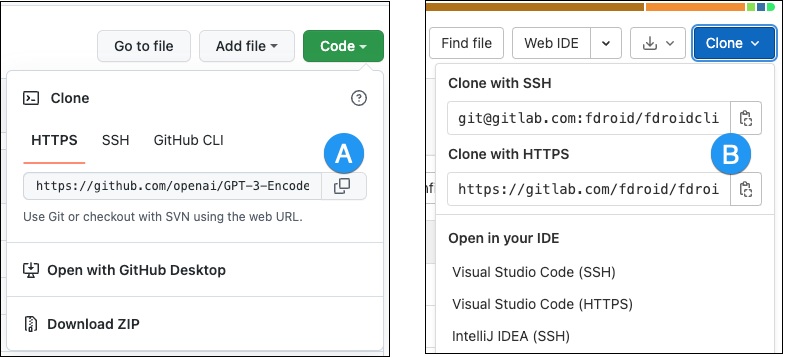
Click the button to the right of the URL on GitHub (A) or GitLab (B) to copy the URL to your clipboard.
If the location of the repository is correct, there may be another problem with the URL:
- If you are targeting a specific revision, make sure your revision comes last. For example:
https://github.example.com/myuser/myrepository1.git#revision - If you are targeting a revision and the package is not at the root, make sure the
pathquery parameter precedes the revision anchor. For example:https://github.example.com/myuser/myrepository.git?path=/example/folder#v1.2.3
Could not read Username: terminal prompts disabled
If you are trying to install a package from a private repository that requires authentication, a message similar to this one appears in the Unity Console:
Cannot perform upm operation: Unable to add package [https://mycompany.github.com/gitproject/com.mycompany.mypackage.git]:
  Error when executing git command. fatal: could not read Username for 'https://mycompany.github.com': terminal prompts disabled
 [NotFound]
UnityEditor.EditorApplication:Internal_CallUpdateFunctions() (at /Users/builduser/buildslave/unity/build/Editor/Mono/EditorApplication.cs:310)
This message is likely due to the fact that Package Manager does not provide an interactive terminal or dialog where you can enter your username and password for HTTP, or your passphrase to unlock your SSH key:
-
With HTTP(S), every time you log onto BitBucket, GitHub or GitLab you need to enter your username and password in a terminal or a dialog box. However, the Package Manager does not provide an interactive terminal or dialog where you can enter your username and password for HTTP(S).
To bypass this, use one of the workarounds suggested in Solutions for HTTPS.
-
SSH uses a pair of public and private SSH keys. You can add your public SSH key to Bitbucket, GitHub or GitLab and then access repositories without having to enter a username and password.
However, if you have set up a passphrase to keep your SSH key safe, you still have to enter that passphrase in a terminal or a dialog box in order to authorize your key. In that case, you can use an SSH agent that can unlock your SSH key to authenticate with the Package Manager on your behalf.
Solutions for HTTPS
The Package Manager does not provide an interactive terminal or dialog where you can enter your HTTP(S) username and password. To bypass this, use one of these workarounds:
- Use a credential manager (Git Credential Manager for Windows or OSXKeyChain). Credential managers handle sending the password without having to use a terminal or a command prompt.
- Use git-credentials from a terminal or command prompt. Then launch the Hub from the same terminal so that Unity has access to the cached or stored credentials.
- Use SSH to authenticate instead. If you set up your SSH key without a passphrase, the Package Manager doesn’t have to decrypt it in order to authenticate with the Git server. If you decide to use a passphrase for added security, you can still get around the authentication problem by using the ssh-agent on either macOS or Windows.
Solutions for SSH
If you are using the SSH protocol to install a package by Git URL, you might get an authentication error from Git. This typically happens when you set up a private SSH key on your local machine that is protected by a passphrase.
The solution to this problem is to set up an SSH agent that can unlock your SSH key to authenticate with the Package Manager on your behalf. Follow the instructions in the section that corresponds to your operating system:
- Setting up OpenSSH for Windows
- Adding SSH keys to your SSH Agent for macOS
Setting up OpenSSH for Windows
The native Windows OpenSSH version of the ssh-agent works better than the version available by default with Git for Windows. This procedure explains how to set up the OpenSSH client and add your key to its ssh-agent. If you are using Git for Windows, you can also prioritize the native Windows OpenSSH over the Git for Windows SSH agent:
-
Make sure the OpenSSH Client is installed by searching for it in the Windows Settings Optional features window (Start > Settings, then search for “Optional features”). This applies to Windows 10+.
-
Check your
%PATH%environment variable to make sure the native Windows OpenSSH location appears (for example,C:WINDOWSSystem32OpenSSH).Note: If you are already using Git for Windows, make sure the native Windows OpenSSH location appears before the Git for Windows SSH location in your
%PATH%variable. This ensures that Windows uses the native Windows OpenSSH agent over the Git for Windows SSH agent. -
In a PowerShell terminal, start the
ssh-agentprocess and make sure it starts automatically:# Set the ssh-agent service to start automatically and manually start it now Get-Service ssh-agent | Set-Service -StartupType Automatic # Run the ssh-agent process to start the ssh-agent service ssh-agent -
Import your key into the ssh-agent by running
ssh-addon the command line and then following the instructions. By default, the agent adds the%USERPROFILE%.sshid_rsakey and prompts you for the password.# Import the key ssh-addTo use a different key, you can specify it as an argument:
# Set the ssh-agent service to start automatically and manually start it now
ssh-add <your-secure-ssh-key-name>
If you can’t remember the name of your key, you can ask the agent to list them:
ssh-add -l -
If you installed Git for Windows, reset the
%GIT-SSH%environment variable to make sure that Git always uses the native Windows OpenSSH version of the ssh-agent:[Environment]::SetEnvironmentVariable("GIT_SSH", "$((Get-Command ssh).Source)", [System.EnvironmentVariableTarget]::User)
Adding SSH keys to your SSH Agent for macOS
Use the ssh-add command to add your SSH keys to the ssh-agent running on your macOS system. The command parameter you use depends on your version of macOS:
-
Prior to macOS 12, use:
ssh-add -K ~/.ssh/<your-secure-ssh-key-name> -
Starting with macOS 12, use:
ssh-add --apple-use-keychain ~/.ssh/<your-secure-ssh-key-name>
After you run this command, the terminal asks for the password to unlock your SSH key and then adds it to the macOS keychain. However, once you restart your system, every key stored in the ssh-agent is reset.
To prevent re-entering your password after restarting your system, open the ~/.ssh/config file (or create one if you don’t find it), and add the following:
Host *
    UseKeychain yes
    AddKeysToAgent yes
    IdentityFile ~/.ssh/<your-secure-ssh-key-name>
Restart your machine to apply these changes.
Can’t update Git version
If you are trying to update your Git dependencyThe Package Manager retrieves Git dependencies from a Git repository directly rather than from a package registry. Git dependencies use a Git URL reference instead of a version, and there’s no guarantee about the package quality, stability, validity, or even whether the version stated in its package.json file respects Semantic Versioning rules with regards to officially published releases of this package. More info
See in Glossary to a newer version from the repository, but it’s not working, it’s probably because your Git dependency is locked. If you want to update your Git dependency to a newer version from the repository, use the Add package from git URL button and enter a Git URL. For more information, see Locked Git dependencies.
‘Failed to parse Http response’ in My Assets context
If you see the following message in the Console window when trying to download an Asset Store package, there might be a problem with your Asset Store cache:
[PackageManager] Error Failed to parse response. UnityEditor.AsyncHTTPClientone(State, Int32)
To solve this problem, delete all downloaded assets from the Asset Store package directory and then try downloading the assets again.
Warning: If your project contains a lot of asset data, this might take a lot of time and bandwidth to re-download everything.
Missing ‘My Registries’ in the Package Manager window
Not all registry providers are compatible with Unity’s Package Manager. If the package registry server you added does not implement the /-/v1/search or /-/all endpoints, your scoped registry is not compatible with Unity’s Package Manager, and doesn’t appear in the My Registries context in the Package Manager window.
Missing MonoBehaviour errors
While building, if there are a lot of errors about Missing Behavior, the UnityLinker might be mistakenly stripping out a component that it thinks is unreferenced. It often does this because the stripping level is too aggressive. For example, if you have a prefabAn asset type that allows you to store a GameObject complete with components and properties. The prefab acts as a template from which you can create new object instances in the scene. More info
See in Glossary in an AssetBundle that references the SpriteShape component in the 2D SpriteShape package, the object might be missing and might generate compiler warnings.
To fix this, you can either lower the stripping level for the UnityLinker or declare the package’s assemblies inside the link.xml file in order to preserve them from being stripped:
<linker>
    <assembly fullname="Unity.2D.SpriteShape.Runtime" preserve="all"/>
    <assembly fullname="Unity.2D.Common.Runtime" preserve="all"/>
 </linker>
For more information on stripping levels and the UnityLinker, see Managed code stripping.
Loading error for hostfxr.dll on Windows
If the Console reports that the hostfxr.dll library was found, but Unity failed to load it from C:<path_to_app>hostfxr.dll, you can fix this error on Windows 7 or Windows Server 2008 R2 by installing both KB2999226 and KB2533623 patches.
Local folder or tarball paths
В следующих разделах объясняется, как устранять и предотвращать проблемы с редактором Unity в различных ситуациях. В общем, убедитесь, что ваш компьютер соответствует всем системным требованиям, обновлен и у вас есть необходимые права пользователя в вашей системе. Также регулярно делайте резервные копии, чтобы защитить свои проекты.
Версии
Вы можете установить разные версии редактора в разные папки. Однако обязательно сделайте резервную копию своих проектов, так как они могут быть обновлены более новой версией, и вы не сможете открыть их в более старой версии Unity. Дополнительную информацию см. на странице руководства по установке Unity.
Лицензии надстроек действительны только для версий Unity с одинаковым старшим номером, например 3.x и 4.x. Если вы обновите Unity до второстепенной версии, например с 4.0 до 4.1, надстройки будут сохранены.
Активация
Интернет-активация является предпочтительным способом получения лицензии Unity. Но если у вас возникли проблемы, выполните следующие действия:
- Отключите компьютер от сети, иначе вы можете получить ошибку «tx_id недействителен».
- Выберите активацию вручную.
- Нажмите «Сохранить запрос лицензии».
- Выберите известное место для сохранения, например папку «Загрузки».
- Повторно подключитесь к сети и откройте https://license.unity3d.com/
- В поле файла нажмите «Обзор» и выберите файл запроса лицензии.
- Выберите необходимую лицензию для Unity и заполните требуемую информацию.
- Нажмите «Загрузить лицензию» и сохраните файл.
- Вернитесь в Unity и выберите «Активация вручную», если требуется.
- Нажмите «Прочитать лицензию», а затем выберите загруженный файл лицензии.
Если у вас по-прежнему возникают проблемы с регистрацией или входом в учетную запись пользователя, обратитесь по адресу support@unity3d.com.
Не удалось запустить
Если при запуске Unity происходит сбой, сначала убедитесь, что ваш компьютер соответствует минимальным системным требованиям. Также обновите графические и звуковые драйверы до последней версии.
Если вы получаете ошибки записи на диск, вам следует проверить ограничения вашей учетной записи пользователя. Обратите внимание, что в MacOS использование «пользователя root» не рекомендуется, и Unity не тестировалась в этом режиме. Unity всегда должна иметь права на запись для своих папок, но если вы предоставляете их вручную, проверьте эти папки:
В Windows:
- Папка установки Unity
-
%AllUsersProfile%Unity(обычно C:ProgramDataUnity) C:Documents and Settings\Local SettingsApplication DataUnityC:Users\AppDataLocalUnity
MacOS:
- Содержимое пакета Unity.app
/Library/Application Support/Unity~/Library/Logs/Unity
Некоторые пользователи сталкивались с трудностями при использовании жестких дисков, отформатированных с нестандартными разделами, и использовании определенного программного обеспечения для преобразования данных между устройствами хранения.
Шрифты
Поврежденные шрифты могут привести к сбою Unity. Вы можете найти поврежденные файлы, выполнив следующие действия:
В Windows:
- Откройте папку шрифтов на своем компьютере, расположенную в папке «Windows».
- Выберите «Подробности» в меню «Вид».
- Проверьте столбец «Размер» шрифтов с размером «0», что указывает на проблемный файл.
- Удалите поврежденные шрифты и переустановите их.
В MacOS:
- Запустите приложение Font Book.
- Выберите все шрифты.
- Откройте меню «Файл» и выберите «Проверить шрифты» -> проблемные шрифты будут отображаться как недействительные.
- Удалите поврежденные шрифты и переустановите их.
Ресурсы системы могут быть ограничены, например, работа на виртуальной машине. Используйте диспетчер задач, чтобы найти процессы, потребляющие много памяти.
Повреждённый проект или установка
Unity может попытаться открыть поврежденный проект, в том числе пример проекта по умолчанию. В таком случае переименуйте или переместите папку проекта. После того, как Unity запустится правильно, вы можете восстановить папку проекта, если хотите.
В случае некорректной установки вам может потребоваться переустановить Unity. См. приведенные ниже инструкции.
В Windows могут возникнуть такие проблемы, как ошибки установки, повреждение реестра, конфликты и т. д. Например, ошибка 0xC0000005 означает, что программа пыталась получить доступ к памяти, чего не должна делать. Если вы недавно добавили новое оборудование или драйверы, удалите и замените оборудование, чтобы определить, не является ли оно причиной проблемы. Запустите программу диагностики и проверьте информацию по устранению неполадок в операционной системе.
Производительность и сбои
Если редактор работает медленно или дает сбой, особенно в сборках, это может быть вызвано потреблением всех доступных системных ресурсов. Закройте все другие приложения при сборке проекта. Очистите систему с помощью ее утилит и обратитесь к диспетчеру задач (Windows) или монитору активности (MacOS), чтобы узнать, есть ли процессы, использующие много ресурсов, например памяти. Иногда программное обеспечение для защиты от вирусов может замедлить или даже заблокировать файловую систему в процессе сканирования.
Убыток проекта
Существует множество факторов, которые могут разрушить проект, поэтому вам следует постоянно создавать резервные копии своих проектов, чтобы предотвратить несчастные случаи. В MacOS активируйте TimeMachine, используя внешний жесткий диск, зарезервированный исключительно для этой цели. После потери вы можете попробовать любую из существующих утилит для восстановления файлов, но иногда это необратимо.
Переустановка
Выполните следующие действия, чтобы переустановить редактор:
-
Удалите Unity. В MacOS перетащите приложение Unity в корзину.
-
Удалите эти файлы, если они есть:
- Windows:
-
%AllUsersProfile%Unity(обычно C:ProgramDataUnity)
-
- MacOS:
/Library/Application Support/Unity/
- Windows:
-
Перезагрузите компьютер.
-
Загрузите последнюю версию с нашего веб-сайта, поскольку исходная установка может быть повреждена: http://unity3d.com/unity/download/archive
-
Переустановите Unity.
Продолжайте говорить о проблеме проверки ошибок при написании кода в Unity. Для новичков, старых птиц, пожалуйста, пропустите ее автоматически.
Некоторые пользователи Unity, имеющие относительно слабую программную основу, часто сталкиваются с проектом, который не может быть запущен, или с результатами, которые они хотят получить при запуске. В настоящее время весьма вероятно, что код проекта сообщил об ошибке или код был написан неправильно. Самым прямым проявлением ошибки кода является ошибка печати. Как правило, в нижней части окна Unity будет печататься ошибка, но появится только одна строка. Мы можем открыть окно распечатки Unity, чтобы определить, есть ли ошибка.

Откройте консоль на вкладке «Окно», чтобы открыть окно вывода:
Например:

В окне консоли также есть некоторые параметры работы, например, слева есть несколько параметров:
Очистить: щелкните один раз, чтобы очистить всю существующую печать.
Свернуть: можно свернуть распечатки в одном месте и отобразить только один отпечаток того же типа.
Очистить при воспроизведении: очищать последний выходной отпечаток при каждом запуске проекта.
Пауза при ошибке: при возникновении ошибки печати уровня ошибки проект будет приостановлен.
Также есть три маленькие кнопки справа: одна — значок белого пузыря, одна — значок желтого треугольника, а третья — значок красного пузыря, за которым следует число.
Эти три кнопки соответствуют трем уровням печати Unity: журнал, предупреждение и ошибка. Число позади — это количество отпечатков этого типа. Если вы хотите скрыть определенный уровень печати, вы можете сделать это здесь.
После представления окна распечатки давайте поговорим о двух типах ошибок кода. Первая — это ошибка компиляции. Вторая — ошибка работы
1. Ошибка компиляции:
Это означает, что в коде проекта есть синтаксическая ошибка, из-за которой он редактируется во время компиляции.

Многие новички, возможно, спрашивали других, что означает подсказка на картинке выше? Почему мой проект не запускается?
Значение здесь заключается в том, что в вашем коде есть ошибки на уровне компиляции, и вам нужно устранить ошибку на месте, прежде чем вы сможете продолжить работу.
В этот раз нам нужно открыть окно консоли, чтобы увидеть, где код неправильный:

Вот четкое описание, в какой строке какого класса появляется ошибка. Например, приведенный выше пример отображается в строке 9 класса DebugTest.

Я написал такой код. Мне не нужно было объявлять переменную param1, поэтому я использовал ее напрямую. Затем код не смог найти объявление param1 при его компиляции, поэтому было сообщено об ошибке. Просто измените его на int param1 = 1 + 2; и об ошибке не будет. Ошибки на уровне компилятора также могут быть вызваны вводом точки с запятой или круглых скобок, поэтому будьте осторожны.
Другой тип ошибки — это логическая ошибка, которая возникает только во время выполнения.
Например, я пишу такой код:

Затем компиляция прошла, но во время выполнения была обнаружена ошибка:

Мой отчет об ошибке представляет собой преднамеренное моделирование ошибки, охватывающей множество вызовов методов, поэтому при сообщении об ошибке появляется стек, показывающий каждый процесс вызова метода, в котором сообщается об ошибке, и стек ошибок похож на красную стрелку Показано снизу вверх.
Выше были упомянуты две распространенные ситуации, когда возникают ошибки. Ошибки компиляции легко проверить, и они появляются перед запуском. Если это неправильно, проверьте код, чтобы изменить его. То, что сложно проверить, — это вообще логическая ошибка. Когда мы работаем, нам нужно знать, что переменная изменяется при вызове метода, являются ли входные и выходные параметры ненормальными и т. Д., Чтобы определить местонахождение проблемы.
В настоящее время обычно существует два способа проверки ошибок: первый — это точки останова программы, а другой — распечатать.
Как проверить проблему с точками останова в Unity, я написал статью в 2013 году, процесс аналогичен, поэтому я не буду повторять его, вы можете прыгнуть, чтобы увидеть:
http://liweizhaolili.blog.163.com/blog/static/162307442013214485190/
Важно отметить, что многие друзья не знают, что такое точка останова. В среде, где могут быть созданы точки останова, точки останова — это самый быстрый способ найти проблемы и один из самых основных навыков программистов. Конкретное значение точек останова может быть Baidu. Мое простое резюме состоит в том, что вы можете щелкнуть определенную строку, в которой вы пишете код, а затем, когда программа перейдет к этой строке, она автоматически остановится и позволит вам увидеть текущую запущенную программу Когда, каково конкретное значение каждого параметра. Затем вы можете продолжить выполнение кода строка за строкой, продолжить наблюдение за изменениями переменных и, наконец, найти проблему.
Это хорошее время, чтобы иметь возможность устанавливать точки останова, но иногда вы не можете их установить. Например, после выпуска окончательной версии установочного пакета вы больше не можете подключаться к редактору для точек останова или при написании сценариев Lua Хотя для определения точек останова можно использовать некоторые специальные методы, я все еще нахожу это неприятным, поэтому я привык печатать, чтобы найти проблему.
Как упоминалось ранее, Unity имеет три уровня печати, которые можно активно печатать в коде:

Например, если я напишу так, результат будет:

Unity распечатает содержимое в соответствии с указанным мной уровнем печати.
В некоторых случаях из-за большого количества отпечатков вы обнаружите, что нет возможности легко найти то, что вы хотите распечатать. Здесь я рекомендую плагин ConsolsE.

Интерфейс этого подключаемого модуля аналогичен общему интерфейсу консоли, но есть дополнительное поле фильтра, и максимальное количество из трех типов печати справа больше не 999+, а фактическое количество отпечатков .
Когда я хочу просмотреть печатное содержание определенного ключевого слова, я могу ввести в поле фильтра:


В это время отображаемый контент будет только напечатанным результатом, содержащим введенные мной ключевые слова.
При этом содержимого на самом деле очень мало. Подводя итог, можно сказать, что есть два случая ошибок кода: первый — это ошибка компиляции, а второй — логическая ошибка. Где сообщается об ошибке компиляции? Где сообщается об ошибке? Есть два способа проверить наличие логических ошибок: точка останова и печать.
Мы собираем ошибки в Юнити и их решение.
Ошибка
Решение
Не работает запись в Timeline. Не записывает анимацию объекта.
Перезагрузите Unity
Не работает скрипт. Не выполняется его код или часть работает, а часть нет.
Проверьте, чтобы в скрипт были помещены все элементы и объекты.
TextureImporterInspector.OnInspectorGUI must call ApplyRevertGUI to avoid unexpected behaviour.
Перезагрузить Unity
NullReferenceException: Object reference not set to an instance of an object
Перезагрузить Unity
An object reference is required for the non-static field, method, or property ‘…’
Забыли объявить этот элемент («…») и Unity не понимает что это
Only assignment, call, increment, decrement, await, and new object expressions can be used as a statement
Написано «==» вместо «=»
Subnautica Below Zero наконец-то смогла выйти из раннего доступа и уже официально запущена на ПК и консолях. Игра отличилась оригинальным геймплеем и неплохой оптимизацией, но и жалоб на работу игры хватает, особенно у пользователей компьютерной версии. Среди прочих проблем, часто упоминают сбой при создании или загрузке сохранения, ошибку «UnityPlayer.dll Caused Access Violation (0xc0000005)», посторонние звуки в динамиках, вылеты, лаги, невозможность запуска и т. п. Мы подготовили список частых неполадок Subnautica Below Zero и постараемся помочь их исправить.
Содержание
- Как исправить ошибки в Subnautica Below Zero?
- Игра не сохраняется
- Сбой при попытке загрузить сохранение
- Зависания, потрескивания звука
- Subnautica Below Zero не запускается или вылетает при старте
- UnityPlayer.dll Caused Access Violation (0xc0000005)
- Черный или белый экран на Mac
- Черный экран или компьютер не отвечает Windows
- Не работают контроллеры PS, Xbox, Switch на Mac и Windows
- Мир пуст или игрок не может в нем двигаться
- Низкий fps, лаги
Subnautica Below Zero снова переносит нас на планету 4546B, которую мы уже исследовали в оригинальной части. Однако теперь здесь много новых испытаний и масса важных дополнений к сюжету. Те, кто ее уже успел испытать, положительно отзываются о графике, геймплее и атмосфере. Есть и те, кто столкнулся с трудностями, вроде проблем с загрузкой сохранений, ошибки 0xc0000005, сбоями при запуске, зависаниями и т. п. Здесь вы найдете все, что нам удалось найти о неполадках игры и способах их исправления.
Игра не сохраняется
Судя по комментариям и логам игроков, дело в том, что игра зависает с событием опасности. Когда вы находитесь в состоянии боя, сохраниться не получится. Таким образом весь игровой прогресс, пройденный с момента предыдущего сохранения, будет утрачен. Лучшее, что мы можем предложить – предотвратить проблему в следующий раз. Для этого следует перейти в C:Program Files (x86)SteamsteamappscommonSubnauticaZeroSNAppDataSavedGamesslot0001 и удалить папки .BatchObjects и CellsCache. Должно сработать.
Сбой при попытке загрузить сохранение
Одна из самых частых проблем Subnautica Below Zero заключается в том, что пользователей выбрасывает из игры при попытке загрузить сохранение. Благо, исправить это весьма просто.
Инструкция:
- Открываем папку, в которую установили Steam и ищем в одном из подразделов – SavedGames. Обычно путь выглядит так: C:Program Files (x86)SteamsteamappscommonSubnauticaZeroSNAppDataSavedGames.
- Внутри конечной папки удаляем файл autocloud.vdf и можем запускать игру.
- Еще разработчики советуют удалить файлы из каталогов SavesDir и SavesDir2, а также – всю директорию CellsCache из каталога «AppData».
Теперь все должно работать, при этом само сохранение не пострадает.
Зависания, потрескивания звука
Subnautica Lower Zero «грешит» тем, что нередко воспроизводит звук с лагами, заиканиями, а также может слышаться неприятный треск, он особенно отчетлив в моменты нападения хищников.
Причины и способы исправления проблем со звуком:
- Настройка вертикальной синхронизации. Самый простой способ избавления от сбоя – выключить v.sync полностью. Однако, чтобы не терять четкость и плавность работы игры, ее нужно просто настроить. Это применимо только в том случае, если установлена видеокарта хотя бы серии GTX 1xxx или выше. Для этого открываем «Панель управления Nvidia», в блоке «Управление настройками 3D» выбираем «Настройки программы». Делаем активной Subnautica и для «Вертикальной синхронизации» устанавливаем значение «Быстро».
- Проверка контактов наушников или колонок с разъемом на системном блоке.
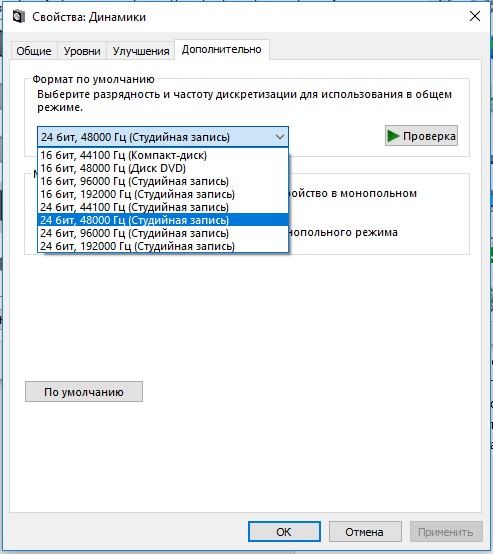
- Меняем частоты дискретизации. Для этого в «Панели управления» идем в раздел «Звук», жмем ПКМ по активному устройству (где наблюдаются проблемы со звуком) и выбираем «Свойства». На странице «Дополнительно» путем проб выставляем правильные частоты.
Subnautica Below Zero не запускается или вылетает при старте
Подобное поведение может быть следствием нескольких причин:
- Недостаточно привилегий. Следует выдать игре полномочия администратора в свойствах ярлыка.
- Обновляем Microsoft Visual C++, особенно при наличии ошибок «vcruntime140_1.dll или MSVCP140.dll не найден».
- Отключаем антивирус и Защитник Windows.
- Проверяем, что в пути к игре нет папок с русскими символами.
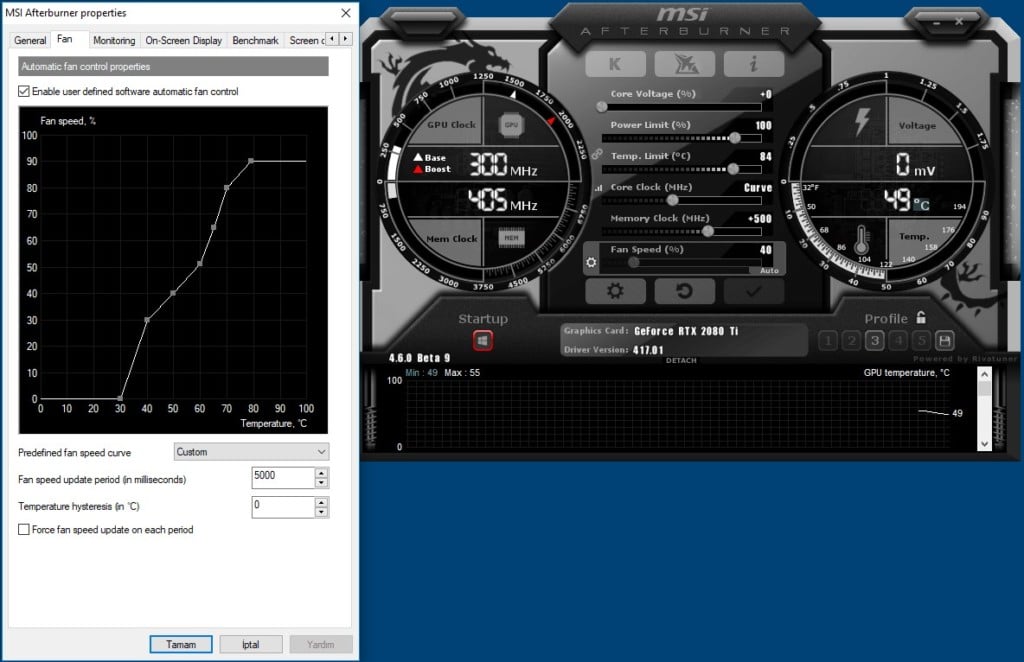
- Снижаем частоту работы графического процессора. У многих это сработало, поэтому очень советую попробовать. Достаточно через MSI Afterburner снизить частоту на 100 МГц. Эта игра не любит разгон и отказывается с работать с оборудованием на повышенных частотах.
UnityPlayer.dll Caused Access Violation (0xc0000005)
Бывает, что Subnautica Below Zero указывает на нарушение прав доступа и пишет ошибку 0xc0000005, которая препятствует запуску игры.
Как это исправить:
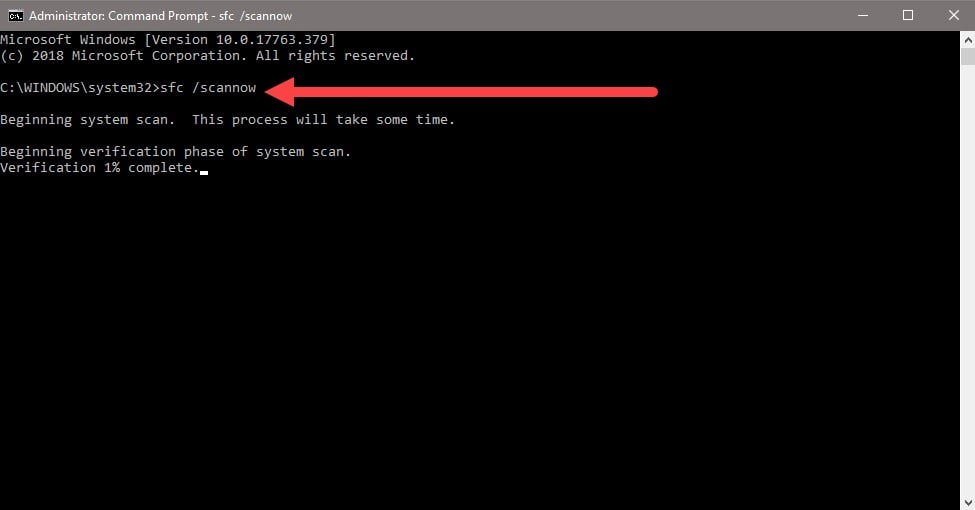
- Выключаем средства защиты Windows и проверяем файлы игры с помощью функции в Steam (проверка целостности файлов).
- Активируем сканирование системы. Для этого достаточно в командную строку вставить sfc /scannow.
Черный или белый экран на Mac
После перехода с OpenGL на Metal появляются баги графики, при чем много у кого. Это распространено в новых компьютерах Mac, у которых установлен процессор M1 вместо Intel. В определенный момент времени экран становится белым или черным, в зависимости от направления взгляда. Единственный способ это исправить – установить экспериментальную версию игры.
Инструкция:
- Открываем Steam, а в нем «Свойства» для Subnautica: Lower Zero.
- Идем на вкладку «Бета-версии» и отписываемся от беты.
- В списке выбираем пункт «Экспериментальная – автоматические ежедневные обновления. Множество ошибок!».
- Ждем загрузки новых файлов и запускаем игру.
Черный экран или компьютер не отвечает Windows
Если в один момент игра становится черной, вылетает или перестает реагировать, а в «Диспетчере задач» написано «Не отвечает», мы вам поможем. Также одной из разновидностей проблемы является ошибка GPU Crash (Сбой графического процессора). Ничего страшного нет, вы сохраните свое прохождение. Дело в проблемах с ультра-широкоформатными экранами.
Как исправить черный экран:
- Удаляем папку с кэшем CellsCache.
- Снижаем разрешение экрана до FHD или даже немного меньше.
- Если не сработало, можно попробовать оконный режим.
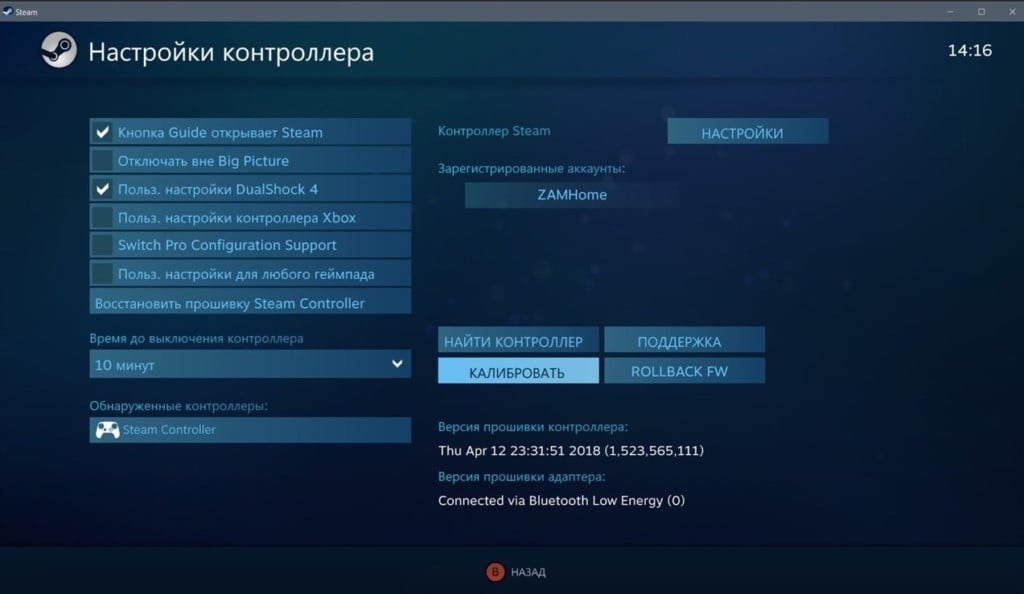
Не работают контроллеры PS, Xbox, Switch на Mac и Windows
Много пользователей сообщают, что их геймпады отказываются нормально работать в игре. Они то ли позволяют перемещать камеру по одной оси, то ли не обрабатывают действия в меню и т. п. Скорее всего это недоработка разработчиков, которую со временем поправят. Можно попробовать это исправить вручную.
Руководство:
- Запускаем Steam и идем в «Свойства» игры.
- Переходим на страницу «Контроллеры» и выключаем все активные пункты.
Мир пуст или игрок не может в нем двигаться
Бывает, что после запуска игры, в ней нет ни одного существа или другого объекта. Еще одна разновидность сбоя – игрок не может пошевелиться. Что характерно, проблема возникает при новой генерации мира. Дело в моде Qmod, вместе с которым запускается BepinEx (возможно, для оригинальной версии Subnautica). Следует удалить эту папку из каталога с игрой и все заработает.
Низкий fps, лаги
Больших проблем с производительностью игра не испытывает, поэтому первым делом следует проверить, что ваша система удовлетворяет требования Subnautica Below Zero. Если это так, рекомендуем снизить качество графики и заблокировать fps на меньшем уровне. Операции с корректировкой графических настроек можем выполнить в «Панели управления» для конкретной игры.
Это все распространенные и частые проблемы Subnautica Lower Zero, а также действия, которые могут помочь пользователям, столкнувшимся с ними. В руководстве есть методы решения для ошибок при сохранении или загрузки сейва, 0xc0000005, черного или белого экрана, проблем с запуском, лагами и т. п. Практически все жалобы пользователей указывают на перечисленные проблемы, поэтому скорее всего вы найдете среди списка свою неполадку и сможете ее исправить.