0x800703f1 — это ошибка, возникающая во время обновления операционной системы Windows 10. Ошибка не уникальна, способна появляться при установке самых разных апдейтов, первые сообщения о ней начали всплывать в Интернете еще где-то в 2017-2018 гг. К счастью, избавиться от ошибки можно с помощью универсального набора «фиксов» для Центра обновления Windows 10.
В сегодняшней статье мы посмотрим, как устранить 0x800703f1 и вернуть себе возможность нормально обновлять Windows 10.
Содержание
- Методы решения ошибки 0x800703f1
- Метод №1 Автоматическое средство
- Метод №2 Проверка на вирусы и вредоносное ПО
- Метод №3 Удаление последних обновлений
- Метод №4 Восстановление поврежденных системных файлов
- Метод №5 Перезапуск службы Центра обновления
- Метод №6 Сброс компонентов Центра обновления
Методы решения ошибки 0x800703f1
Метод №1 Автоматическое средство
Когда у вас на компьютере возникают проблемы с обновлением системы, первым делом вы должны обратиться за помощью к автоматизированному средству устранения неполадок. Подобное средство является встроенным, а поэтому никаких внешних программ вам качать не придется. Итак, чтобы пустить средство в работу, вам нужно сделать следующее:
- откройте Параметры Windows 10 (Win+I);
- перейдите в разделы Обновление и безопасность → Устранение неполадок;
- кликните на пункт Центр обновления Windows, затем — на Запустить средство устранения неполадок;
- далее следуйте инструкциям на своем экране, чтобы попытаться исправить проблемы с обновлением ОС.
Метод №2 Проверка на вирусы и вредоносное ПО
Крайне маловероятно, но некоторые пользователи утверждают, что у них проблемы с апдейтом Windows 10 иногда возникают по вине проникшего в систему вируса или вредоносного программного обеспечения. Возможно, вы тоже имеете дело с каким-то незваным гостем. Тут вам на выручку приходит Защитник Windows — системный антивирус.
Чтобы запустить антивирусное сканирование Защитника Windows 10, нужно сделать вот что:
- откройте системную поисковую строку (Win+S);
- вбейте запрос Защитник Windows и выберите найденный результат;
- выберите раздел Защита от вирусов и угроз;
- перейдите в Параметры сканирования;
- выберите Полное сканирование и нажмите на кнопку Выполнить сканирование сейчас.
Удалите зараженные и подозрительные файлы из своей системы, если такие будут найдены. После этого еще раз запустите обновление Windows 10 и проверьте, появится ли ошибка 0x800703f1.
Метод №3 Удаление последних обновлений
Ранее некорректно установленный апдейт может стать причиной возникновения проблем с обновление Windows 10. В таком случае вам нужно пройти в журнал обновлений и удалить последний апдейт. Делается это следующим образом:
- вызовите поисковую строку (Win+S);
- впишите Просмотр журнала обновлений и выберите найденный результат;
- кликните на пункт Удалить обновления;
- выберите в списке самое последнее обновление, нажмите на него ПКМ и выберите Удалить;
- удалив подходящий апдейт, перезагрузите компьютер;
- запустите обновление ОС Windows 10.
Если проблема действительно заключалась в неправильно установленном апдейте, то ошибка 0x800703f1 должна будет исчезнуть.
Метод №4 Восстановление поврежденных системных файлов
Возможно, ошибка 0x800703f1 возникла в результате поврежденных системных файлов и компонентов Windows 10. Как не сложно догадаться, обновление ОС будет невозможным, если какая-то из ее составляющих работает не так, как положено. К счастью, все можно исправить с помощью такой утилиты, как DISM (служба обслуживания образов развертывания и управления ими). Утилита запускается через командную строку.
- нажмите ПКМ на Пуск и выберите пункт Командная строка (от администратора);
- впишите команду DISM.exe /Online /Cleanup-image /Restorehealth и нажмите Enter;
- подождите окончания работы утилиты и перезагрузите свой ПК.
Стоит отметить, что на работу DISM может уйти вплоть до 10 минут.
Метод №5 Перезапуск службы Центра обновления
По тем или иным причинам служба Центра обновления Windows 10 может перестать работать. Решение — ручной перезапуск службы. Сделайте следующее:
- нажмите Win+S;
- впишите в поисковую строку Службы и выберите найденный результат;
- опуститесь вниз и найдите службу Центр обновления Windows;
- нажмите на службу ПКМ и выберите Перезапустить;
- зайдите в Центр обновления Windows (в Параметрах) и запустите процесс обновления своей системы.
Стоит отметить, что именно вот этот метод зачастую и помогает с подобными проблемами.
Метод №6 Сброс компонентов Центра обновления
Вот мы и подошли к «тяжелой артиллерии». Если ничего из вышеуказанного вам не помогло, то, скорее всего, какие-то компоненты вашего Центра обновления были повреждены. Сейчас мы займемся восстановлением этих самых компонентов. Итак, создайте у себя на Рабочем столе самый обычный текстовый файл. Откройте этот текстовик и вставьте в него следующий ряд команд:
:: Run the reset Windows Update components.
:: void components();
:: /*************************************************************************************/
:components
:: —— Stopping the Windows Update services ——
call :print Stopping the Windows Update services.
net stop bitscall :print Stopping the Windows Update services.
net stop wuauservcall :print Stopping the Windows Update services.
net stop appidsvccall :print Stopping the Windows Update services.
net stop cryptsvccall :print Canceling the Windows Update process.
taskkill /im wuauclt.exe /f
:: —— Checking the services status ——
call :print Checking the services status.sc query bits | findstr /I /C:»STOPPED»
if %errorlevel% NEQ 0 (
echo. Failed to stop the BITS service.
echo.
echo.Press any key to continue . . .
pause>nul
goto :eof
)call :print Checking the services status.
sc query wuauserv | findstr /I /C:»STOPPED»
if %errorlevel% NEQ 0 (
echo. Failed to stop the Windows Update service.
echo.
echo.Press any key to continue . . .
pause>nul
goto :eof
)call :print Checking the services status.
sc query appidsvc | findstr /I /C:»STOPPED»
if %errorlevel% NEQ 0 (
sc query appidsvc | findstr /I /C:»OpenService FAILED 1060″
if %errorlevel% NEQ 0 (
echo. Failed to stop the Application Identity service.
echo.
echo.Press any key to continue . . .
pause>nul
if %family% NEQ 6 goto :eof
)
)call :print Checking the services status.
sc query cryptsvc | findstr /I /C:»STOPPED»
if %errorlevel% NEQ 0 (
echo. Failed to stop the Cryptographic Services service.
echo.
echo.Press any key to continue . . .
pause>nul
goto :eof
):: —— Delete the qmgr*.dat files ——
call :print Deleting the qmgr*.dat files.del /s /q /f «%ALLUSERSPROFILE%Application DataMicrosoftNetworkDownloaderqmgr*.dat»
del /s /q /f «%ALLUSERSPROFILE%MicrosoftNetworkDownloaderqmgr*.dat»:: —— Renaming the softare distribution folders backup copies ——
call :print Deleting the old software distribution backup copies.cd /d %SYSTEMROOT%
if exist «%SYSTEMROOT%winsxspending.xml.bak» (
del /s /q /f «%SYSTEMROOT%winsxspending.xml.bak»
)
if exist «%SYSTEMROOT%SoftwareDistribution.bak» (
rmdir /s /q «%SYSTEMROOT%SoftwareDistribution.bak»
)
if exist «%SYSTEMROOT%system32Catroot2.bak» (
rmdir /s /q «%SYSTEMROOT%system32Catroot2.bak»
)
if exist «%SYSTEMROOT%WindowsUpdate.log.bak» (
del /s /q /f «%SYSTEMROOT%WindowsUpdate.log.bak»
)call :print Renaming the software distribution folders.
if exist «%SYSTEMROOT%winsxspending.xml» (
takeown /f «%SYSTEMROOT%winsxspending.xml»
attrib -r -s -h /s /d «%SYSTEMROOT%winsxspending.xml»
ren «%SYSTEMROOT%winsxspending.xml» pending.xml.bak
)
if exist «%SYSTEMROOT%SoftwareDistribution» (
attrib -r -s -h /s /d «%SYSTEMROOT%SoftwareDistribution»
ren «%SYSTEMROOT%SoftwareDistribution» SoftwareDistribution.bak
if exist «%SYSTEMROOT%SoftwareDistribution» (
echo.
echo. Failed to rename the SoftwareDistribution folder.
echo.
echo.Press any key to continue . . .
pause>nul
goto :eof
)
)
if exist «%SYSTEMROOT%system32Catroot2» (
attrib -r -s -h /s /d «%SYSTEMROOT%system32Catroot2»
ren «%SYSTEMROOT%system32Catroot2» Catroot2.bak
)
if exist «%SYSTEMROOT%WindowsUpdate.log» (
attrib -r -s -h /s /d «%SYSTEMROOT%WindowsUpdate.log»
ren «%SYSTEMROOT%WindowsUpdate.log» WindowsUpdate.log.bak
):: —— Reset the BITS service and the Windows Update service to the default security descriptor ——
call :print Reset the BITS service and the Windows Update service to the default security descriptor.sc.exe sdset wuauserv D:(A;;CCLCSWLOCRRC;;;AU)(A;;CCDCLCSWRPWPDTLOCRSDRCWDWO;;;BA)(A;;CCDCLCSWRPWPDTLCRSDRCWDWO;;;SO)(A;;CCLCSWRPWPDTLOCRRC;;;SY)S:(AU;FA;CCDCLCSWRPWPDTLOCRSDRCWDWO;;WD)
sc.exe sdset bits D:(A;;CCLCSWLOCRRC;;;AU)(A;;CCDCLCSWRPWPDTLOCRSDRCWDWO;;;BA)(A;;CCDCLCSWRPWPDTLCRSDRCWDWO;;;SO)(A;;CCLCSWRPWPDTLOCRRC;;;SY)S:(AU;FA;CCDCLCSWRPWPDTLOCRSDRCWDWO;;WD)
sc.exe sdset cryptsvc D:(A;;CCLCSWLOCRRC;;;AU)(A;;CCDCLCSWRPWPDTLOCRSDRCWDWO;;;BA)(A;;CCDCLCSWRPWPDTLCRSDRCWDWO;;;SO)(A;;CCLCSWRPWPDTLOCRRC;;;SY)S:(AU;FA;CCDCLCSWRPWPDTLOCRSDRCWDWO;;WD)
sc.exe sdset trustedinstaller D:(A;;CCLCSWLOCRRC;;;AU)(A;;CCDCLCSWRPWPDTLOCRSDRCWDWO;;;BA)(A;;CCDCLCSWRPWPDTLCRSDRCWDWO;;;SO)(A;;CCLCSWRPWPDTLOCRRC;;;SY)S:(AU;FA;CCDCLCSWRPWPDTLOCRSDRCWDWO;;WD):: —— Reregister the BITS files and the Windows Update files ——
call :print Reregister the BITS files and the Windows Update files.cd /d %SYSTEMROOT%system32
regsvr32.exe /s atl.dll
regsvr32.exe /s urlmon.dll
regsvr32.exe /s mshtml.dll
regsvr32.exe /s shdocvw.dll
regsvr32.exe /s browseui.dll
regsvr32.exe /s jscript.dll
regsvr32.exe /s vbscript.dll
regsvr32.exe /s scrrun.dll
regsvr32.exe /s msxml.dll
regsvr32.exe /s msxml3.dll
regsvr32.exe /s msxml6.dll
regsvr32.exe /s actxprxy.dll
regsvr32.exe /s softpub.dll
regsvr32.exe /s wintrust.dll
regsvr32.exe /s dssenh.dll
regsvr32.exe /s rsaenh.dll
regsvr32.exe /s gpkcsp.dll
regsvr32.exe /s sccbase.dll
regsvr32.exe /s slbcsp.dll
regsvr32.exe /s cryptdlg.dll
regsvr32.exe /s oleaut32.dll
regsvr32.exe /s ole32.dll
regsvr32.exe /s shell32.dll
regsvr32.exe /s initpki.dll
regsvr32.exe /s wuapi.dll
regsvr32.exe /s wuaueng.dll
regsvr32.exe /s wuaueng1.dll
regsvr32.exe /s wucltui.dll
regsvr32.exe /s wups.dll
regsvr32.exe /s wups2.dll
regsvr32.exe /s wuweb.dll
regsvr32.exe /s qmgr.dll
regsvr32.exe /s qmgrprxy.dll
regsvr32.exe /s wucltux.dll
regsvr32.exe /s muweb.dll
regsvr32.exe /s wuwebv.dll:: —— Resetting Winsock ——
call :print Resetting Winsock.
netsh winsock reset:: —— Resetting WinHTTP Proxy ——
call :print Resetting WinHTTP Proxy.if %family% EQU 5 (
proxycfg.exe -d
) else (
netsh winhttp reset proxy
):: —— Set the startup type as automatic ——
call :print Resetting the services as automatics.
sc.exe config wuauserv start= auto
sc.exe config bits start= delayed-auto
sc.exe config cryptsvc start= auto
sc.exe config TrustedInstaller start= demand
sc.exe config DcomLaunch start= auto:: —— Starting the Windows Update services ——
call :print Starting the Windows Update services.
net start bitscall :print Starting the Windows Update services.
net start wuauservcall :print Starting the Windows Update services.
net start appidsvccall :print Starting the Windows Update services.
net start cryptsvccall :print Starting the Windows Update services.
net start DcomLaunch:: —— End process ——
call :print The operation completed successfully.echo.Press any key to continue . . .
pause>nul
goto :eof
:: /*************************************************************************************/
Ничего не меняйте! Как есть, так и вставляйте. Теперь сохраните внесенные изменения и измените расширение файла с TXT на BAT. Далее дважды кликните ЛКМ на созданный файл и наблюдайте за процессом сброса компонентов Центра обновления Windows 10. Процесс быстрый, занимает всего несколько секунд. После окончания работы созданного «батника» перезагрузите ПК и проверьте наличие ошибки 0x800703f1.
Check out the most effective solutions on the web
by Ivan Jenic
Passionate about all elements related to Windows and combined with his innate curiosity, Ivan has delved deep into understanding this operating system, with a specialization in drivers and… read more
Updated on December 20, 2022
Reviewed by
Vlad Turiceanu

Passionate about technology, Windows, and everything that has a power button, he spent most of his time developing new skills and learning more about the tech world. Coming… read more
- The 0x800703f1 error prevents users from installing the latest Windows updates.
- It’s usually caused by file corruption, critical services not running, and conflicts due to the installed antivirus.
- To fix things, run the SFC and DISM scan, roll back installed drivers, or try the other solutions here.

XINSTALL BY CLICKING THE DOWNLOAD FILE
This software will repair common computer errors, protect you from file loss, malware, hardware failure and optimize your PC for maximum performance. Fix PC issues and remove viruses now in 3 easy steps:
- Download Restoro PC Repair Tool that comes with Patented Technologies (patent available here).
- Click Start Scan to find Windows issues that could be causing PC problems.
- Click Repair All to fix issues affecting your computer’s security and performance
- Restoro has been downloaded by 0 readers this month.
Despite the frequent updates, users still get troubled with issues like the Windows update error 0x800703f1 while trying to do the needful.
This issue is connected to Service registration failure and leads to an update stuck. Until Microsoft sorts this issue out, we have a few valuable pieces of advice and workarounds for you.
Why does the error 0x800703f1 appear on Windows?
This error is quite similar to the 0x8007012a install error in Windows 11, and it’s caused by certain glitches in the system. However, in most cases, these can be fixed with a built-in troubleshooter.
If this issue occurs, it’s likely that you’ll get We couldn’t complete the updates message, and you’ll be reverted back to the previous build.
A common cause for this is a system or file corruption, and we covered how to fix corrupted files in Windows in one of our previous guides, so be sure to check it out.
Here are a few similar issues reported by users:
- System Restore error 0x800703f1 – This error can also appear while using System Restore, and if that happens, be sure to scan your system for file corruption and check if that helps. You can also try to solve the problem by disabling your antivirus.
- 0x800703f1 Windows 8 – According to users, this error can affect older versions of Windows as well. Even if you’re using Windows 8 or 7, you should know that most of our solutions can be applied to them as well, so feel free to try them.
How do I fix the install error 0x800703F1?
- Why does the error 0x800703f1 appear on Windows?
- How do I fix the install error 0x800703F1?
- 1. Rollback malfunctioning drivers
- 2. Use the SFC and DISM tools
- 3. Remove Nvidia drivers and Nvidia GeForce experience
- 4. Check your antivirus
- 5. Disable Windows Defender
- 6. Run Windows Update Troubleshooter
- 7. Restart all Windows Update components
- 8. Perform a clean reinstall of Windows PC
1. Rollback malfunctioning drivers
The next useful guide shows you how to roll back the broken drivers using the Device Manager tool on your Windows PC.
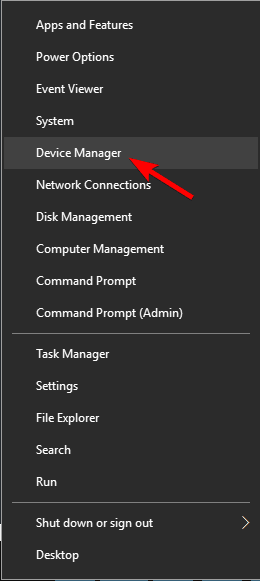
- Right-click Start and open Device Manager.
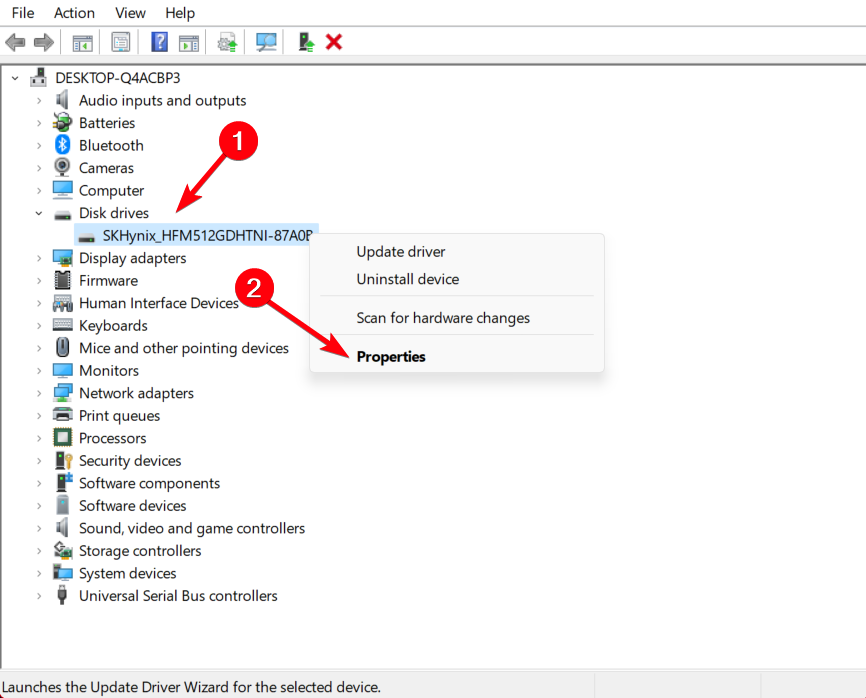
2. Find problematic devices or peripherals on the list.
3. Right-click and open Properties.
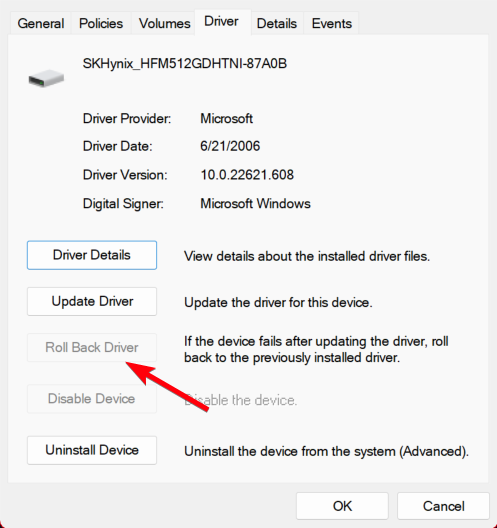
4. Open Driver tab.
5. Click Roll Back driver.
Drivers are the core of this issue. While most of the drivers functioned seamlessly before the upgrade, Windows 10 somehow corrupted them.
So, your first step is to try and roll back drivers to their previous state. In case that hasn’t changed anything, move on to the next step.
2. Use the SFC and DISM tools
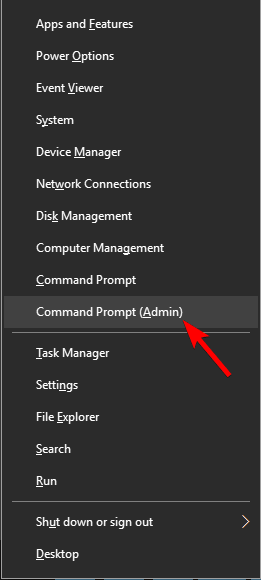
- Press Windows Key + X to open the Win + X menu. Now choose Command Prompt (Admin) from the list. If Command Prompt isn’t available, you can also use PowerShell (Admin).

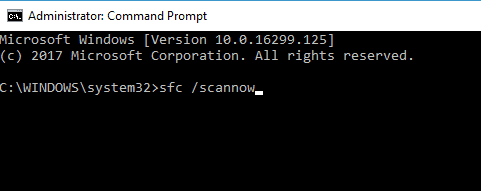
- When Command Prompt starts, enter sfc /scannow and press Enter.

- SFC scan will now start and try to repair your system. This scan can take about 15 minutes, so don’t interfere with it.
If you keep getting error 0x800703f1, the issue might be caused by file corruption. This can occur for various reasons and cause your Windows installation to become corrupted. However, you can fix the corruption problems simply by running an SFC scan.
Once the scan is finished, check if the problem is resolved. If SFC scan didn’t fix the problem, or if you couldn’t start SFC scan at all, you might want to use DISM instead.
To use DISM to repair your computer, follow these steps:
- Press Windows key + X and run Command Prompt (Admin).
- Copy and paste the following command on the command line:
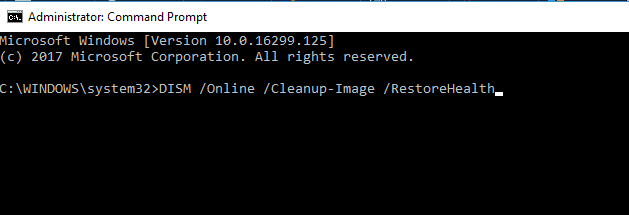
- DISM.exe /Online /Cleanup-image /Restorehealth

- DISM.exe /Online /Cleanup-image /Restorehealth
- In case the DISM can’t obtain files online, try using your installation USB or DVD. Insert media and type following command:
- DISM.exe /Online /Cleanup-Image /RestoreHealth /Source:C:RepairSourceWindows /LimitAccess
- Be sure to replace ”C:RepairSourceWindows” path of your DVD or USB.
After the DISM scan is done, check if the error 0x800703f1 with 21h2 still persists. If the issue is still present, or if you couldn’t run DISM scan before, be sure to run it again and check if that solves the issue.
3. Remove Nvidia drivers and Nvidia GeForce experience
Often your drivers can cause error 0x800703f1 and prevent you from updating your PC. According to users, this issue can be caused by Nvidia drivers.
If that’s the case, you need to remove both nVidia drivers and nVidia GeForce Experience from your PC.
There are several ways to uninstall Nvidia drivers and nVidia software, but the best way is to use uninstaller software. In case you are not familiar with it, uninstaller software can remove any application from your PC.
Some PC issues are hard to tackle, especially when it comes to missing or corrupted system files and repositories of your Windows.
Be sure to use a dedicated tool, such as Fortect, which will scan and replace your broken files with their fresh versions from its repository.
In addition to removing the application, the uninstaller software will also remove all files and registry entries associated with it, so it will be as if the software was never installed.
If you want a good and safe utility, we recommend getting a driver removal software or a full-featured uninstaller with an integrated driver removal feature.
Once you remove Nvidia drivers and software, reinstall Nvidia drivers and check if that solves your issue.
4. Check your antivirus
According to users, sometimes your antivirus can interfere with your system and cause error 0x800703f1 while trying to update your system.
If that’s the case, we advise you to disable certain antivirus features and check if that helps. In case the issue is still there, you need to completely disable your antivirus and check if that helps.
- Fix: 0x800f0805 Windows Update error in Windows 10 & 11
- Fix Windows 10/11 update error 0x8024ce0e [Easy Guide]
- Fix: We couldn’t complete the Updates/Undoing changes
If the problem appears even with your antivirus disabled, you should consider removing your antivirus. Once you remove it, try to perform the upgrade again.
If removing the antivirus solves the issue, it might be a good time to consider switching to a different antivirus.
There are many great Windows 10 compatible antivirus software that are proven to have a low error rate and not interfere with other apps or system processes.
5. Disable Windows Defender
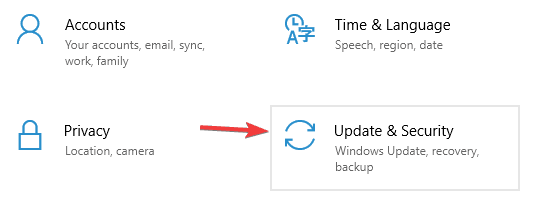
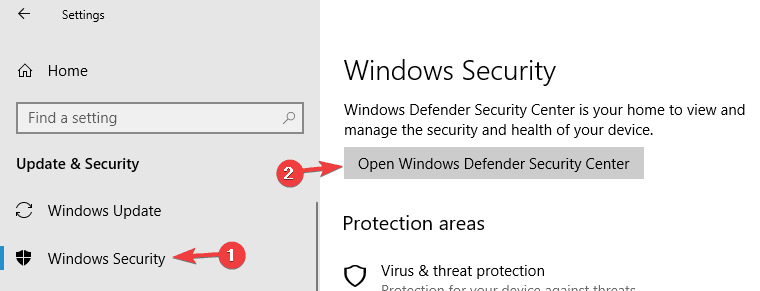
- Press Windows Key + I to open the Settings app. Go to Update & Security section.

- Go to Windows Security in the left pane. In the right pane click Open Windows Defender Security Center.

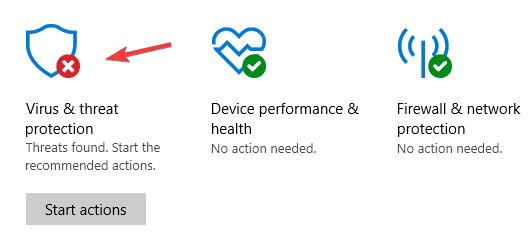
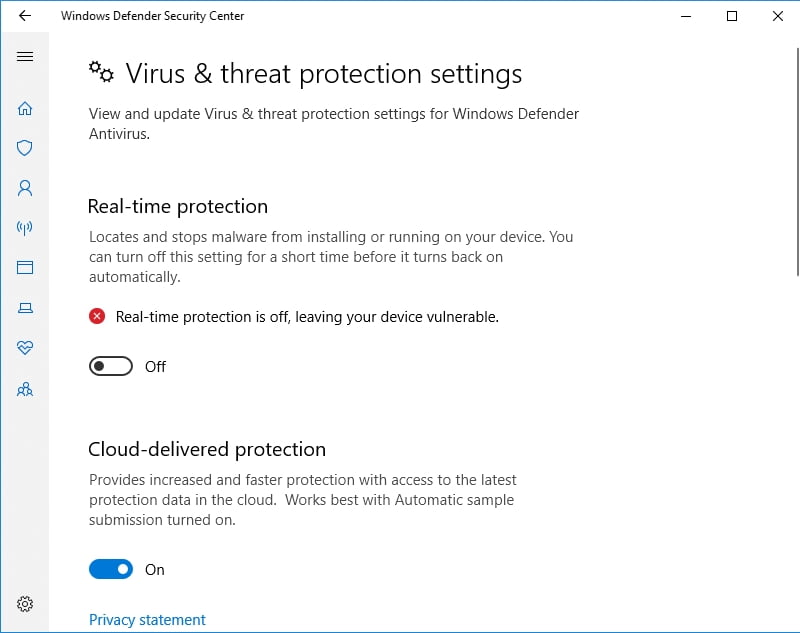
- Select Virus & threat protection.

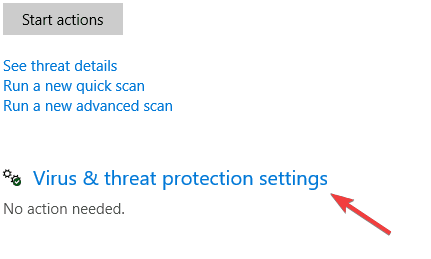
- Now click Virus & threat protection settings.

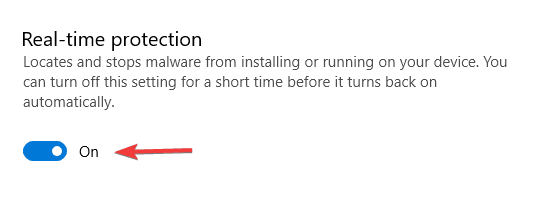
- Locate Real-time protection feature and turn it off.

After doing that, try to perform the upgrade again.
If you don’t have a third-party antivirus on your PC, it’s rather likely that you have Windows Defender running in the background. This is a solid antivirus software, and in most cases, it won’t interfere with your system in any way.
However, few users reported that sometimes Windows Defender could lead to this issue. To fix the problem, it’s advised to disable real-time protection in Windows Defender.
Keep in mind that by turning off real-time protection you’ll keep your system vulnerable, so don’t visit any suspicious websites while the real-time protection is off.
6. Run Windows Update Troubleshooter
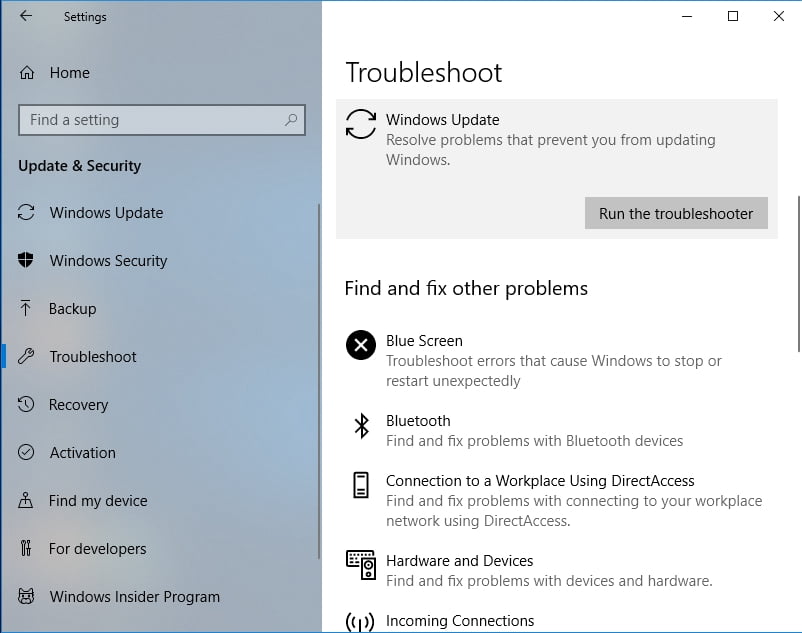
- Open the Settings app and navigate to Update & Security section.
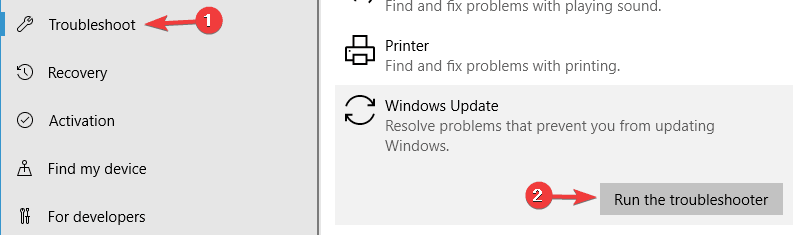
- From the menu on the left select Troubleshoot. In the right pane, select Windows Update and click Run the troubleshoot button.

- Now follow the instructions on the screen to complete the troubleshooter.
If you can’t update your system due to the Windows update error 0x800703f1 0x800703f1 error, the issue might be related to your system. Fortunately, Windows 10 comes with various troubleshooters that can fix common problems on your PC with ease.
Once the troubleshooter is finished, check if the problem is still there.
7. Restart all Windows Update components
- Start Command Prompt as an administrator.
- When Command Prompt starts, run the following commands:
- net stop wuauserv
- net stop cryptSvc
- net stop bits
- net stop msiserver
- ren C:WindowsSoftwareDistribution SoftwareDistribution.old
- ren C:WindowsSystem32catroot2 Catroot2.old
- net start wuauserv
- net start cryptSvc
- net start bits
- net start msiserver
According to users, sometimes the Windows update error 0x800703f1 problem can be caused by Windows Update components. To fix the issue, you need to restart all Windows Update components manually.
After running these commands, try to perform Windows Update again and check if the problem is still there.
Another common error is 0x8024402f, and we have a dedicated guide on it in case you ever encounter it.
8. Perform a clean reinstall of Windows PC
In the end, if your problem is somehow still there, you should perform a clean Windows 10 install. You’ll only lose installed programs and apps, while everything else can be backed up on other partitions.
So, use already prepared USB/DVD drive and reinstall your system. We can promise you that everything will work much better.
That should wrap it up. With this, you should be able to fix the Windows update error 0x800703f1. If you have any questions or alternative workarounds, feel free to post them in the comments.
For more Windows Update workarounds, and additional info, make sure to check our Windows Update hub.
Still experiencing issues?
SPONSORED
If the above suggestions have not solved your problem, your computer may experience more severe Windows troubles. We suggest choosing an all-in-one solution like Fortect to fix problems efficiently. After installation, just click the View&Fix button and then press Start Repair.
![]()
Newsletter
Question
Issue: How to fix update Error Code 0x800703f1 on Windows 10?
Hello, I have an issue which I hope you could help me with. Recently my Windows updates fail to be applied, as the system returns the error 0x800703f1. Any advice on this please?
Solved Answer
0x800703f1 Error Code is Windows OS-specific and only occurs when trying to run updates – this is particularly prevalent when major updates are to be applied from Microsoft. As evident, even if Windows 10 is considered to be the safest and advanced operating system, users might face errors that put them at risk of cyberattacks,[1] stability, and performance issues, etc.
Windows update errors like 0x800703f1 are fairly common, but usually, they can be fixed by performing a variety of troubleshooting. While this might be pretty annoying to many users who are not that familiar with the process, we promise that the steps provided below will help you fix 0x800703f1 safely and easily, although you should view these instructions on a different device or print them out, as some solutions involve a PC restart, during which you won’t be able to view the website.
0x800703f1 error could be caused by various issues, as each Windows PC is unique due to different configuration settings, installed programs, enabled services, and so much more. While the amount of customization is great and appreciated by many computer users, this is precisely a reason why errors like 0x800703f1 occur.
 Learn how to fix 0x800703f1 error manually
Luckily, error code can pinpoint users to potential solutions that can be acquired via the official Microsoft or other support services. The good news is that you can follow the steps below and aim to fix 0x800703f1 error yourself, even if you are not a proficient PC user. For automatic Windows repair, we highly recommend trying RestoroMac Washing Machine X9.
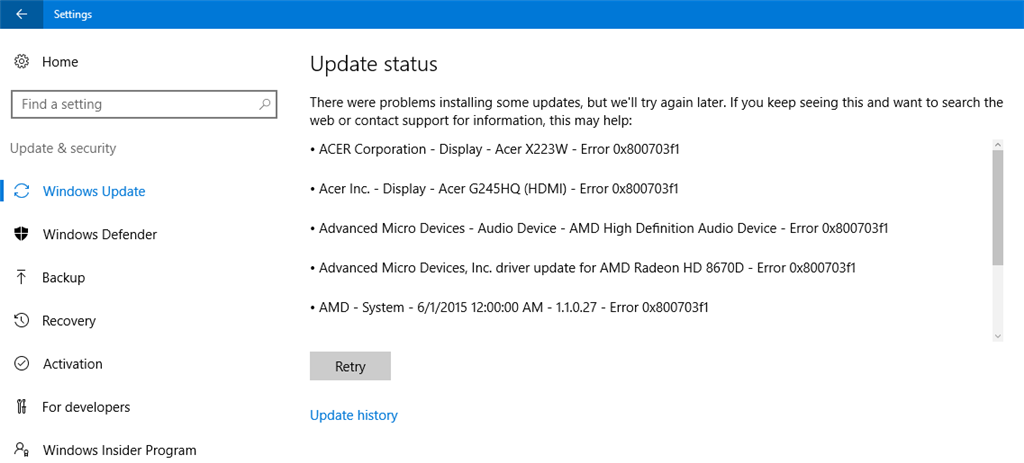
When trying to update Windows to the latest version, users face error 0x800703f1 in the Settings panel. It states the following:
There were problems installing some updates, but we’ll try again later. If you keep seeing this and want to search the web or contact support for information, this may help:
Error 0x800703f1
Unfortunately, 0x800703f1 error fix might not be successful even after applying the basic solutions, such as running Windows Update Troubleshooter, checking for corrupted system files, disabling anti-virus, etc. In such a case, we recommend backing up all your personal data and then proceeding with the reinstallation on Windows operating system, which should not be that difficult as long as you follow our instructions below carefully.
Solution 1. Run Windows Update Troubleshooter
Fix it now!
Fix it now!
To repair damaged system, you have to purchase the licensed version of Restoro Mac Washing Machine X9.
When errors like 0x800703f1 occur, the very first and basic thing you should try is running the built-in troubleshooter. Here’s how to find it:
- Right-click on Start button and select Settings
- Select Troubleshoot on the left
- On the right site, scroll down until you see Windows Update entry
- Click on it once and pick Run the troubleshooter
 Run Windows Update Troubleshooter
 - Wait till Windows diagnoses errors and reports back

Solution 2. Check for malware with a full system scan
Fix it now!
Fix it now!
To repair damaged system, you have to purchase the licensed version of Restoro Mac Washing Machine X9.
Malware[2] can cause a variety of issues on a Windows machine, including the update failure errors. Thus, it is important to make sure that no malware is involved. If you do not use any third-party anti-virus, initiate a scan with Windows Defender:
- Type in Security into Windows search and select Windows Security
- Pick Virus & Threat protection
- Go to Scan options
- Select Full scan and then click on Scan now
Scan computer for malware

Note: some anti-malware applications might be overly aggressive and might prevent connections even from legitimate sources such as Microsoft. Therefore, even if it is unlikely, we recommend temporarily disabling anti-malware software and then trying to apply Windows updates.
Solution 3. Uninstall latest Windows updates
Fix it now!
Fix it now!
To repair damaged system, you have to purchase the licensed version of Restoro Mac Washing Machine X9.
In some cases, new updates fail to apply because of previous ones that failed to be implemented properly. Therefore, you might want to try uninstalling the latest updates:
- Type in Control Panel into Windows search and hit Enter
- Go to Program > Uninstall a program
- On the left side, pick View installed updates
- Select the most recent Windows updates
- Right-click and pick Uninstall
Uninstall latest Windows updates
- Reboot Windows and try to apply updates once again

Solution 4. Run SFC and DISM scans
Fix it now!
Fix it now!
To repair damaged system, you have to purchase the licensed version of Restoro Mac Washing Machine X9.
0x800703f1 error might be cause by Windows OS file corruption. To fix this, you should run System File Checker via Command Prompt:
- Type in cmd into Windows search
- Right-click on Command Prompt search result and select Run as administrator
- In the newly opened window, type in the following command and press Enter:
sfc /scannow
- Wait till Windows finishes the scan and fixes system errors
Run SFC scan in Command Prompt

If that does not help, you should employ the DISM tool – it can perform a cleanup and recovery of the operating system:
- Open Command Prompt with administrative privileges once again
- Type in the following command and hit Enter:
DISM /Online /Cleanup-Image /RestoreHealth
- The scan might run for awhile so be patient
Solution 5. Restart Windows Update service
Fix it now!
Fix it now!
To repair damaged system, you have to purchase the licensed version of Restoro Mac Washing Machine X9.
Restarting Windows Update service might help you resolve the issue causing error 0x800703f1:
- Press Win + R
- Type in services.msc and hit Enter
- Scroll down to Windows Update
- Right-click and select Restart
Restart Windows Update service
- Reboot your PC

Solution 6. Reset Windows Update components via Command Prompt
Fix it now!
Fix it now!
To repair damaged system, you have to purchase the licensed version of Restoro Mac Washing Machine X9.
This step requires heavy usage of Command Prompt commands. You should try the following, pressing Enter after each:
- Access Command Prompt (Admin) as explained in the solution no. 4
- Type in each of these commands, pressing Enter after each:
net stop wuauserv
net stop cryptSvc
net stop bits
net stop msiserver
ren C:WindowsSoftwareDistribution SoftwareDistribution.old
ren C:WindowsSystem32catroot2 Catroot2.old
net start wuauserv
net start cryptSvc
net start bits
net start msiserver
If that does not help, you could try more solutions listed in this Microsoft article.
Solution 7. Check your drivers
Fix it now!
Fix it now!
To repair damaged system, you have to purchase the licensed version of Restoro Mac Washing Machine X9.
Drivers[3] are vital for any Windows system operation. In case they get corrupted, they might cause all types of problems. Thus, you should try to look for drivers that are marked with a yellow exclamation mark and reinstall them. In other cases, it is known that reinstalling Nvidia drivers helped users to fix error 0x800703f1. Here’s what to do:
- Right-click on Start and pick Device Manager
- Expand Display adapters section
- Right-click on NVIDIA driver and select Uninstall Device
- Select the Delete the driver software for this device
- Click Uninstall
- Reboot the machine and launch Device Manager once again
- At the top of the window, click on Scan for hardware changes
Reinstall drivers
- Wait till Windows installs new device drivers

Solution 8. Reinstall Windows
Fix it now!
Fix it now!
To repair damaged system, you have to purchase the licensed version of Restoro Mac Washing Machine X9.
If everything else fails, you can try to reinstall Windows. There are several ways you could do that, so we suggest you follow the guide provided in this article: How to reset Windows 10 to factory settings?.
Repair your Errors automatically
ugetfix.com team is trying to do its best to help users find the best solutions for eliminating their errors. If you don’t want to struggle with manual repair techniques, please use the automatic software. All recommended products have been tested and approved by our professionals. Tools that you can use to fix your error are listed bellow:
do it now!
Download Fix
Happiness
Guarantee
do it now!
Download Fix
Happiness
Guarantee
Compatible with Microsoft Windows
Compatible with OS X
Still having problems?
If you failed to fix your error using RestoroMac Washing Machine X9, reach our support team for help. Please, let us know all details that you think we should know about your problem.
Restoro — a patented specialized Windows repair program. It will diagnose your damaged PC. It will scan all System Files, DLLs and Registry Keys that have been damaged by security threats.Mac Washing Machine X9 — a patented specialized Mac OS X repair program. It will diagnose your damaged computer. It will scan all System Files and Registry Keys that have been damaged by security threats.
This patented repair process uses a database of 25 million components that can replace any damaged or missing file on user’s computer.
To repair damaged system, you have to purchase the licensed version of Restoro malware removal tool.To repair damaged system, you have to purchase the licensed version of Mac Washing Machine X9 malware removal tool.
A VPN is crucial when it comes to user privacy. Online trackers such as cookies can not only be used by social media platforms and other websites but also your Internet Service Provider and the government. Even if you apply the most secure settings via your web browser, you can still be tracked via apps that are connected to the internet. Besides, privacy-focused browsers like Tor is are not an optimal choice due to diminished connection speeds. The best solution for your ultimate privacy is Private Internet Access – be anonymous and secure online.
Data recovery software is one of the options that could help you recover your files. Once you delete a file, it does not vanish into thin air – it remains on your system as long as no new data is written on top of it. Data Recovery Pro is recovery software that searchers for working copies of deleted files within your hard drive. By using the tool, you can prevent loss of valuable documents, school work, personal pictures, and other crucial files.
Исправить ошибку обновления Windows 10 0x800703F1 (05.28.23)
Первый вопрос, который вы можете задать себе: что такое код ошибки 0x800703f1 в Windows 10? Это ошибка, указывающая на то, что Windows 10 не может установить Центр обновления Windows. Обновления Windows содержат необходимые обновления и исправления ошибок, которые обеспечивают безопасность вашего компьютера и помогают ему бесперебойно работать. Следовательно, необходимо как можно скорее исправить эту ошибку.
Как исправить ошибку обновления Windows 10 0x800703F1
Такие проблемы, как ошибка 0x800703F1 в Windows 10, довольно распространены, но существуют различные варианты устранения неполадок, которые могут помочь вы их исправляете. Для этой конкретной ошибки могут оказаться полезными следующие варианты восстановления ПК.
Вариант 1. Запустите средство устранения неполадок Центра обновления Windows
Это первый шаг, который вы должны попробовать.
Вариант 2. Выполните чистую загрузку, а затем запустите Центр обновления Windows
Вы можете использовать состояние чистой загрузки для диагностики и устранения сложных проблем Windows. Компьютер в состоянии чистой загрузки использует минимальный набор предварительно выбранных драйверов и программ. Это помогает устранить любые конфликты программного обеспечения, которые могут быть причиной того, что обновление не устанавливается. Выполните следующие действия, чтобы выполнить чистую загрузку:
Совет для профессионалов: просканируйте свой компьютер на наличие проблем с производительностью, нежелательных файлов, вредоносных приложений и угроз безопасности
, которые могут вызвать системные проблемы или снижение производительности.
Бесплатное сканирование для ПК: проблемы с загрузкой 3.145.873Совместимость с: Windows 10, Windows 7, Windows 8
Специальное предложение. Об Outbyte, инструкции по удалению, лицензионное соглашение, политика конфиденциальности.
Вариант 3 : Обновите Windows с помощью каталога Центра обновления Майкрософт
Если два вышеуказанных шага не помогли, попробуйте следующее:
Вариант 4. Загрузите и установите .Net Framework
Если .Net Framework является причиной зависания ваших обновлений, рассмотрите возможность установки его отдельно. После установки попробуйте загрузить Центр обновления Windows еще раз.
Вариант 5. Перезапустите компоненты Центра обновления Windows
Если в компонентах Центра обновления Windows возникнут проблемы, вы можете перезапустить их вручную, чтобы устранить проблему. Вот как их перезапустить:
net stop wuauserv
net stop cryptSvc
net stop биты
net stop msiserver
ren C: WindowsSoftwareDistribution SoftwareDistribution.old
ren C: WindowsSystem32catroot2 Catroot2.old
net start wuauserv
net start cryptSvc
net start биты
net start msiserver
Вариант 6. Проверьте драйверы.
Поврежденные драйверы могут быть причиной ошибки. Чтобы проверить, не повреждены ли драйверы, выполните следующие действия:
Вариант 7. Перезапустите службы Windows Update
Перезапуск служб Windows — это еще один способ устранить код ошибки Windows 10 0x800703f1. Вот как перезапустить службы Центра обновления Windows:
Вариант 8: переустановите Windows
Если все остальное не помогло, вам может потребоваться переустановить операционную систему Windows до последней версии.
Перед тем, как сделать это, сначала сделайте резервную копию ваших данных. Разные методы переустановки восстанавливают разные вещи. Вам доступны пять вариантов переустановки.
- Используйте функцию Windows 10 «Сбросить этот компьютер». Этот вариант не требует загрузки. Вы также можете выбрать, хотите ли вы сохранить свои файлы или нет.
- Переустановите Windows прямо из файла ISO без компакт-диска или USB. Вы можете выбрать, что хотите сохранить.
- Переустановите Windows 10 из раздела, содержащего файл ISO. Вы можете потерять все свои данные.
- Переустановите Windows 10 с компакт-диска или USB. Эта опция удалит все ваши данные.
- Переустановите Windows 10 с помощью образа системы. Это восстановит все ваши данные и приложения.
Переустановка Windows — последнее средство для исправления ошибки 0x800703F1. Прежде чем сделать это, попробуйте эти и другие варианты в Интернете.
05, 2023
Contents
- 1. Use Windows Update Troubleshooter
- 2. Disable your antivirus software
- 3. Fix your driver issues
- Here is what you are supposed to do:
- 4. Run an SFC scan
- 5. Run DISM
- 6. Clean install Windows 10
‘Failure is success in progress’
Albert Einstein
Although Windows 10 is the most polished and tuned operating system that Microsoft has developed so far, some of its components still leave a lot to be desired. For instance, the Windows Update feature is by all accounts prone to error, causing Win 10 users to keep bombarding tech and support forums with trenchant complaints and criticisms.
For now, let’s focus on how to get rid of Windows 10 update error 0x800703f1 since this persistent issue is the reason why you are here. To help you, we have collected a whole list of proven tips what to do when Windows updates fail with the error code 800703f1.
So, here are our top 6 ways how to fix Error Code 0x800703f1 when installing updates:
1. Use Windows Update Troubleshooter
Fortunately, Microsoft engineers are aware of the fact that Win 10 update problems spring up every now and then. That is why they have designed Windows Update Troubleshooter: this built-in tool will come in very handy if Windows updates fail with the error code 800703f1.
To run this solution, follow the instructions below:
- Press the Windows logo key + I letter key shortcut on your keyboard to open the Settings app.
- Proceed to the Update & Security section.
- Navigate to the left pane and select Troubleshoot.
- Go to the right pane and select Windows Update.
- Locate and click Run the troubleshooter button. The wizard will walk you through the troubleshooting process.
After getting the all-clear to proceed, restart your PC and see if your issue has been resolved.
2. Disable your antivirus software
Whether you use Windows Defender or a third-party security solution, your antivirus program can be behind the error 0x800703f1. To check if that is your case, you should temporarily disable your antivirus product and see if the issue persists.
If you use a non-Microsoft product, check its manual and disable the software. If this manoeuvre works, you should contact the vendor and report the issue.
If you have entrusted your PC’s safety to Windows Defender, here is how you can turn it off in Windows 10:
- Open the Settings app, using the Windows logo + I keyboard shortcut.
- Go to the Update & Security section.
- Navigate to the left pane and select Windows Security.
- Then move to the right pane and select Open Windows Defender Security Center.
- Click Virus & threat protection. Then open Virus & threat protection settings.
- Turn off Real-time protection.
After disabling Windows Defender, try to perform an update. If the error 800703f1 keeps reoccurring, proceed to the following fix. However, if the problem has been fixed, update your OS via Windows Update.
If Windows Defender is your only security tool, please be careful: we recommend you to avoid suspicious websites since your PC is vulnerable while Defender is off.
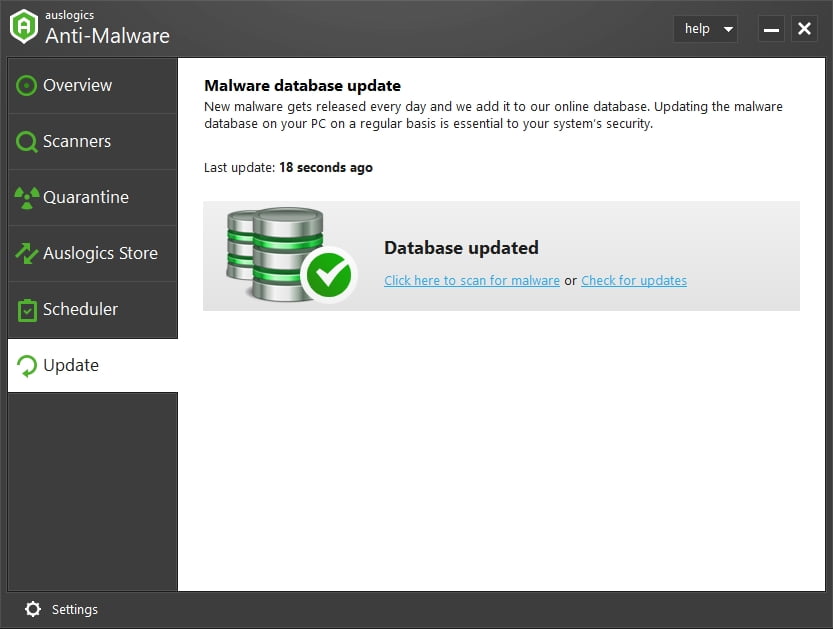
Moreover, it would be wise to add an extra layer of protection and install a powerful anti-malware tool. We advise using Auslogics Anti-Malware to keep nefarious entities out: this tool updates its database on a regular basis and is therefore able to bring down even the latest threats from the world of malware. In addition, this tool is designed to work hand in hand with your main antivirus tool without conflict or confrontation.
3. Fix your driver issues
Problematic drivers are a common cause of update issues in Windows 10. So, if you are still looking for a way how to get rid of Windows 10 update error 0x800703f1, the best course of action will be to check your drivers. Naturally, the easiest way to do that is to employ a special tool to get the job done. For example, you can make use of Auslogics Driver Updater – this solution will scan all your drivers in just one click and update them to the latest manufacturer-recommended versions that are compatible with your operating system. As a result, you will be able to enjoy a fast and stable computer.
Nevertheless, you can resolve your driver problems yourself – notably, this option requires more time and effort. However, it is up to you to decide how to get your problematic drivers back on track. That is why we have prepared the necessary instructions for you.
To start with, updating your drivers via Device Manager may prove successful under the circumstances in question.
Here is what you are supposed to do:
- Locate the Start icon on your taskbar (the Windows logo icon) and right-click on it.
- Locate Device Manager and click on it.
- Select the device which driver you wish to update.
- Right-click on the device and select Update driver software.
- Configure Device Manager to search for new drivers online.
You should carry out the procedures above for every piece of hardware which driver needs updating. Unfortunately, Device Manager may fail to find the versions needed, so be ready to update your drivers manually. Bear in mind that this method is exceptionally time consuming and should be carried out with utmost precision – you may end up installing a wrong driver and damaging your operating system.
To update your drivers manually, make sure you know the exact model of your device and what particular driver is needed for your piece of hardware to function properly. We recommend that you start your search from the official website of the device’s manufacturer. To be precise, you should search the support section for the necessary software. Reboot your PC after installing new drivers and check for the error 0x800703f1.
In a situation when the 0x800703f1 issue persists, you might need to roll back your current drivers: chances are they are incompatible with your system. To do that in Windows 10, use the following guide:
- Right-click on your Windows logo icon in the taskbar.
- Select Device Manager from the list of available options.
- Find a problematic device and right-click on it.
- Select Properties from the drop-down menu.
- Navigate to the Driver tab and click Roll Back Driver.
After restoring your drivers, restart your PC and check your Windows Update center. If your updates keep getting stuck, you should navigate to the following solution.
4. Run an SFC scan
It is possible that your Windows updates fail with the error code 0x800703f1 due to missing or corrupt system files. In such a case, it is advisable to run System File Checker. This tool comes as part of your operating system and is designed to fix your system file issues in a safe and effective way.
To run an SFC scan in Windows 10, take the following steps:
- Press the Windows logo key + X shortcut on your keyboard.
- Select Command Prompt (Admin) (or PowerShell (Admin) if Command Prompt is not available) from the list of options.
- Type sfc /scannow into the Command Prompt window and press Enter.
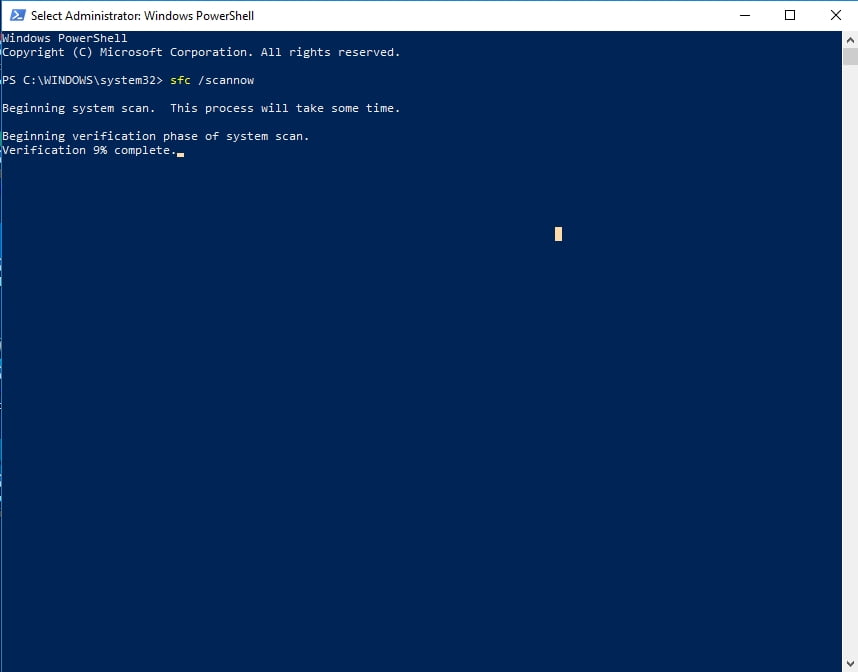
Wait for the scan to finish – it may take a while, so be patient. On no account should you abort the process!
Once the scan is complete, exit Command Prompt, restart your computer, and check your Windows Update. No success yet? Anyway, there is no need to despair. Keep working your way down – the following fix might be your triumph.
5. Run DISM
If running System File Checker has been to no avail, it is time for you to let the Deployment Image Servicing and Management (DISM) tool have a go. This set of instructions is here to help you:
- Open Command Prompt as an administrator (use the guidelines from the previous fix).
- Input DISM.exe /Online /Cleanup-image /Restorehealth and click Enter.
- If the command above does not work, insert your installation media and run the following command: DISM.exe /Online /Cleanup-Image /RestoreHealth /Source:C:RepairSourceWindows /LimitAccess. Make sure to replace C:RepairSourceWindows with the location of your media. Hit Enter.
Wait for the DISM scan to finish and try to update your OS. No luck so far? If so, you can resort to the nuclear option.
6. Clean install Windows 10
Performing a clean installation of Windows 10 is the last fix in line since this option is quite drastic. First and foremost, back up your important files to avoid permanent data loss. Make sure you have the installers for your third-party apps available – you will lose all your non-Microsoft software.
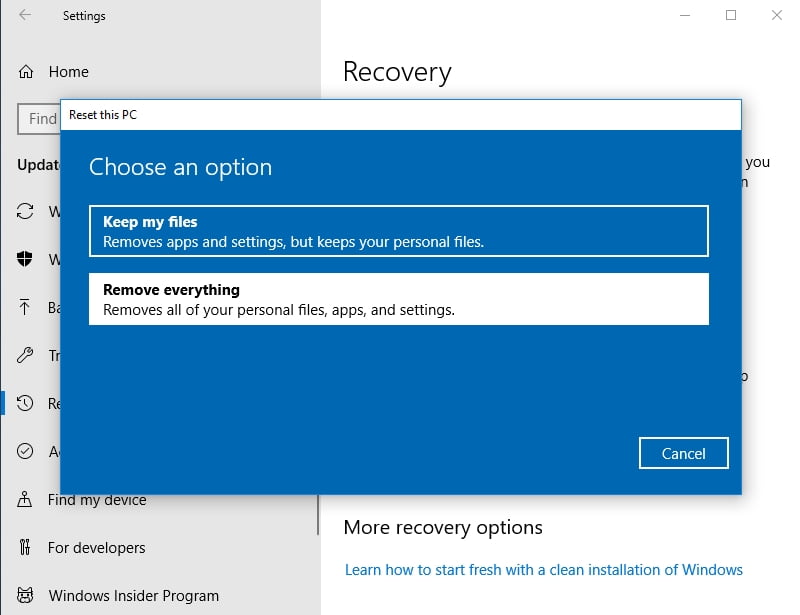
To give your Windows 10 a fresh start, do the following:
- Open the Settings app by clicking the Windows logo key and I key simultaneously.
- Enter Update & security and select Reset this PC.
- Click on Get started and select Remove everything.
Now you know how to fix Error Code 0x800703f1 when installing updates.
Have our tips proved useful?
We are looking forward to your ideas and comments.