В новом SQL Server 2011 (Denali) расширяются возможности команды Order By с помощью двух долгожданных дополнительных команд:
- Offset (смещение)
- Fetch First или Fetch Next (взять первые… или взять следующие…)
Использование данной команды позволяет пропустить указанное количество строк перед тем как выводить результаты запроса. Что под этим подразумевается: Допустим, у нас есть 100 записей в таблице и нужно пропустить первые 10 строк и вывести строки с 11 по 100. Теперь это легко решается следующим запросом:
Select *
From  <SomeTable>
Order by  <SomeColumn>
Offset 10 Rows
Для тех товарищей, которые практикуют .Net должен быть знаком метод расширения для коллекций Skip, который пропускает указанное количество строк. Так вот выражение Offset работает точно так же. После того как данные упорядочены каким-либо образом, можно применять выражение Offset.
Ситуации, в которых может быть использовано выражение Offset
Во всех последующих примерах на Offset будет использовать набор данных построенных в результате данного скрипта:
-- объявление табличной переменной
Declare @tblSample Table
(
	 [Person Name] Varchar(50)
	,Age int
	,Address Varchar(100)
)

-- заполнение данными
Insert into @tblSample
Select
	 'Person Name' + CAST(Number AS VARCHAR)
	, Number
	,'Address' + CAST(Number AS VARCHAR)
From master..spt_values
Where Type = 'p'
And Number Between 1 and 50
Задача 1. Пропустить первые 10 записей и показать остальные.
Скрипт будет простой.
Select *
From @tblSample
Order by Age
Offset 10 Row
Или
Select *
From @tblSample
Order by Age
Offset (10) Rows
Вывод результатов будет таким:
Person Name      Age      Address
Person Name11    11       Address11
Person Name12    12       Address12
. . . . .  . . . . . . . . .
. . . . . .. . . . . . . . .
Person Name49    49       Address49
Person Name50    50       Address50
Неважно, какое слово использовать после указания количества строк: Row или Rows – они синонимы в данном случае.
Задача 2. Передать количество строк для пропуска в виде переменной
-- Объявляем переменную в которой будет содержаться кол-во строк для пропуска
Declare @RowSkip As int
-- Выставляем количество строк для пропуска
Set @RowSkip = 10

-- получаем результат
Select *
From @tblSample
Order by Age
Offset @RowSkip Row
Задача 3. Задать количество строк для пропуска в виде выражения
-- получить строки с 14 по 50
Select *
From @tblSample
Order by Age
Offset (select MAX(number)/99999999 from  master..spt_values) Rows
Выражение select MAX(number)/99999999 from master..spt_values вернет число 14.
Задача 4. Задать количество строк для пропуска в виде пользовательской функции
Select *
From @tblSample
Order by Age
Offset (select dbo.fn_test()) Rows
Код для скалярной пользовательской функции
CREATE FUNCTION fn_test()
RETURNS int
AS
BEGIN
Declare @ResultVar as int

Select @ResultVar = 10

RETURN @ResultVar
END
GO
Задача 5. Использование Offset с Order by внутри представлений (view), функций, подзапросах, вложенных таблицах, общих выражениях для таблиц (Common Table Expressions — CTE).
Например, использование в общих выражениях.
;With Cte As
(
	Select *
	From @tblSample
	Order By Age
	Offset 10 Rows)

Select *
From Cte
Пример ниже показывает использование Offset и Order by внутри вложенной таблицы.
Select *
From
	(Select *
	 From @tblSample
	 Where Age >10
	 Order By Age
	 Offset 10 Rows) As PersonDerivedTable
И еще пример на работу Offset и Order с представлениями.
-- Создание view
Create View vwPersonRecord AS
Select * FROM tblSample
GO

-- выборка данных из view
Select *
From vwPersonRecord
Where Age > 10
Order By Age
Offset 10 Rows
Когда Offset не будет работать
1. Так как это «метод расширения», то без выражения order by ничего работать не будет.
Select *
From @tblSample
Offset (10) Rows
Сообщит об ошибке
Msg 102, Level 15, State 1, Line 21 Incorrect syntax near ’10’.
2. Нельзя задавать отрицательное значение для Offset.
Select *
From @tblSample
Order by Age
Offset (-10) Rows
Движок SQL сервера выдаст
Msg 10742, Level 15, State 1, Line 22 The offset specified in a OFFSET clause may not be negative.
3. Нельзя задавать значения отличные от целочисленного типа.
Select *
From @tblSample
Order by Age
Offset 10.5 Rows
или
Select *
From @tblSample
Order by Age
Offset Null Rows
Выдаст нам
Msg 10743, Level 15, State 1, Line 24 The number of rows provided for a OFFSET clause must be an integer.
4. Не может быть использован внутри выражения Over().
;With Cte As
(
	Select
		*,
		Rn = Row_Number() Over(Order by Age Offset 10 Rows)
	From @tblSample
)

Select * from Cte
Во время выполнения запроса получим сообщение
Msg 102, Level 15, State 1, Line 22 Incorrect syntax near ‘Offset’.
Использование Fetch First / Fetch Next
Эти ключевые слова используются для уточнения количества возвращаемых строк после пропуска массива строк по выражению Offset. Представьте, что у нас есть 100 строк и нам надо пропустить первые 10 и получить следующие 5 строк. Т.е. надо получить строки с 11 по 15.
Select *
From  <SomeTable>
Order by  <SomeColumn>
Offset 10 Rows
Fetch Next 5 Rows Only; -- или Fetch First 5 Rows Only
Такой запрос вернет ожидаемое кол-во строк. Программисты на .Net тут же припомнят метод расширения Take.
Далее рассмотрим ситуации, где можно применить эти ключевые слова.
Задача 1. Пропустить первые 10 записей и получить следующие 5
Select *
From @tblSample
Order by Age
Offset 10 Row
Fetch First 5 Rows Only
Результат будет таким:
Person Name      Age      Address
Person Name11    11       Address11
Person Name12    12       Address12
Person Name13    13       Address13
Person Name14    14       Address14
Person Name15    15       Address15
Задача 2. Задать количество строк для вывода с помощью переменной
-- переменная для указания смещения
Declare @RowSkip As int
-- переменная для указания кол-ва возвращаемых строк
Declare @RowFetch As int

-- кол-во строк для пропуска
Set @RowSkip = 10
-- кол-во строк для возврата
Set @RowFetch = 5

-- вывод строк с 11 по 15
Select *
From @tblSample
Order by Age
Offset @RowSkip Row
Fetch  Next @RowFetch Rows Only;
В целом и общем, с этими ключевыми словами можно делать все то же самое, что и с Offset. Подзапросы, представления, функции и т.д.
Когда Fetch First / Fetch Next не будут работать
Ограничения на эти ключевые слова полностью совпадают с ограничениями на Offset.
Симуляция Offset и Fetch Next для Sql Server 2005/2008
В предыдущих версиях SQL сервера можно было получить тот же функционал путем применения функции ранжирования Row_Number(). Конечно код получался не такой изящный и лаконичный, например:
-- Переменная для указания строк смещения
Declare @RowSkip As int
-- Переменная для указания кол-ва строк для возврата
Declare @RowFetch As int

-- Задание переменных
Set @RowSkip = 10
Set @RowFetch = 5

;With Cte As
(
	Select
		rn=ROW_NUMBER()
		Over(Order by (Select 1) /* генерируем служебную колонку */ )
		,*
	From @tblSample
)
-- забираем записи с 11 по 15
Select
	[Person Name]
	,Age
	,Address
From Cte

-- симуляция поведения Offset и Fetch First/Fetch Next
Where rn Between  (@RowSkip+1) -- симуляция Offset
	And  (@RowSkip+ @RowFetch) -- симуляция Fetch First/Fetch Next Clause
Внутри CTE идет генерация служебной колонки которая просто нумерует строки, после чего строки фильтруются по этому полю. Способ не самый быстрый как вы понимаете.
Симуляция Offset и Fetch Next для Sql Server 2000
Для этих древних серверов не было функций ранжирования, но и тогда можно было повторить обсуждаемый функционал. Тогда в ход шли временные таблицы с авто инкрементальным полем. Пример скрипта:
Declare @RowSkip As int
Declare @RowFetch As int

Set @RowSkip = 10
Set @RowFetch = 5

--если временная таблица существует, то удалить ее
IF OBJECT_ID('tempdb..#Temp') IS NOT NULL
BEGIN
	Drop Table #Temp
END

--создание временной таблицы
Create Table #Temp
(
	 Rn int Identity
	,[Person Name] Varchar(50)
	,Age int
	,Address Varchar(100)
)

-- заполнение временной таблицы
Insert Into #Temp([Person Name],Age,Address)
Select  [Person Name],Age,Address
From @tblSample

-- получение строк с 11 по 15
Select
	 [Person Name]
	,Age
	,Address
From #Temp

-- симуляция поведения Offset и Fetch First/Fetch Next
Where Rn Between  (@RowSkip+1) -- симуляция Offset
	And  (@RowSkip+ @RowFetch) -- симуляция Fetch First/Fetch Next
В этом скрипте сначала создается временная таблица, куда перезаписываются данные из целевой таблицы. Причем во временной таблице есть автоинкрементальное поле, по которому потом и осуществляется запрос нужных строк.
Практическое применение Offset и Fetch с замерами времени и ресурсов
Я уверен, что всё предыдущее объяснение об использовании и назначении Offset и Fetch подвело вас к ясному пониманию, зачем они нужны и где их можно использовать. Родились идеи по оптимизации существующего кода. Далее мы рассмотрим пример из реальной практики, когда может пригодиться Offset. Так же будут приведены результаты замеров производительности на разных SQL серверах. Тесты будут прогоняться на выборке из 1 миллиона строк.
Для начала создадим счет-таблицу по следующему скрипту.
-- удалить таблицу tblSample, если она существует
IF OBJECT_ID('tblSample','U') IS NOT NULL BEGIN
	DROP TABLE tblSample
END
GO

-- создать таблицу
Create Table tblSample (
	 [Person ID]      Int Identity
	,[Person Name] Varchar(100)
	,Age Int
	,DOB Datetime
	,Address Varchar(100)
)
GO

-- заполнить таблицу миллионом записей
Insert into tblSample
Select
	'Person Name' + CAST(N AS VARCHAR)
	, N
	,DATEADD(D,N, '1900-01-01')
	,'Address' + CAST(N AS VARCHAR)
From dbo.tsqlc_Tally
Where  N Between 1 and 1000000

-- вывести данные
Select *
From tblSample
Постраничный просмотр данных на стороне сервера
Постраничный просмотр является наиболее часто встречающейся функцией в системах просмотра записей из каких-либо баз. Теперь это возможно проделывать как на стороне клиента, так и на стороне сервера. Пэйджинг на стороне клиента подразумевает загрузку всей таблицы или же очень большой ее части в память, с тем, чтобы программными средствами делать постраничный просмотр. С другой стороны это может быть произведено на стороне сервера, тогда приложение получит только те данные, которые оно запросило для отображения нужной страницы. При таком подходе сокращается время на пересылку данных, постобработку и хранение их в памяти. Т.е. происходит существенное ускорение производительности приложения.
В целях эксперимента мы пропустим первые 20 000 записей и возьмем следующие 50 000.
Подход для SQL Server 2000
-- сброс буфера и кэша статистики
DBCC DROPCLEANBUFFERS
DBCC FREEPROCCACHE

USE TSQLDB;
GO

SET STATISTICS IO ON;
SET STATISTICS TIME ON;
GO

-- Переменные для пэйджинга
Declare @RowSkip As int
Declare @RowFetch As int

-- Установка значений постраничного просмотра
Set @RowSkip = 20000
Set @RowFetch = 50000

--Удаление временной таблицы, если она есть
IF OBJECT_ID('tempdb..#Temp') IS NOT NULL
BEGIN
	Drop Table #Temp
END

-- создание временной таблицы
Create Table #Temp
(
	 Rn int Identity
	,[Person ID] int
	,[Person Name] Varchar(50)
	,Age int
	,DOB datetime
	,Address Varchar(100)
)

-- Занесение данных во временную таблицу
Insert Into #Temp([Person ID],[Person Name],Age,DOB,Address)
Select  [Person ID],[Person Name],Age,DOB,Address
From dbo.tblSample

-- выборка данных с 20 000 по 70 000
Select
	 [Person ID]
	,[Person Name]
	,Age
	,DOB
	,Address
From #Temp

-- симуляция поведения Offset и Fetch First/Fetch Next
Where Rn Between  (@RowSkip+1) -- симуляция Offset
	And  (@RowSkip+ @RowFetch) -- симуляция Fetch First/Fetch Next

GO

SET STATISTICS IO OFF;
SET STATISTICS TIME OFF;
GO
Я думаю что предыдущих примеров и комментариев хватает, чтобы понять работу скрипта.
Время выполнения:
SQL Server Execution Times:
CPU time = 110 ms, elapsed time = 839 ms.
Статистика вводавывода:
Scan count 1,
logical reads 8037,
physical reads 0,
read-ahead reads 0,
lob logical reads 0,
lob physical reads 0,
lob read-ahead reads 0.
Подход для SQL Server 2005/2008
DBCC DROPCLEANBUFFERS
DBCC FREEPROCCACHE

USE TSQLDB;
GO

SET STATISTICS IO ON;
SET STATISTICS TIME ON;
GO

Declare @RowSkip As int
Declare @RowFetch As int

Set @RowSkip = 20000
Set @RowFetch = 50000

;With Cte As
(
	Select
		rn=ROW_NUMBER()
		Over(Order by (Select 1))
		,*
	From dbo.tblSample

)

Select
	 [Person ID]
	,[Person Name]
	,Age
	,DOB
	,Address
From Cte

Where rn Between  (@RowSkip+1) <em> </em>
	And  (@RowSkip+ @RowFetch)

GO

SET STATISTICS IO OFF;
SET STATISTICS TIME OFF;
GO
Время выполнения:
SQL Server Execution Times:
CPU time = 78 ms, elapsed time = 631 ms.
Статистика вводавывода:
Scan count 1,
logical reads 530,
physical reads 0,
read-ahead reads 1549,
lob logical reads 0,
lob physical reads 0,
lob read-ahead reads 0.
Подход для SQL Server 2011
DBCC DROPCLEANBUFFERS
DBCC FREEPROCCACHE

USE TSQLDB;
GO

SET STATISTICS IO ON;
SET STATISTICS TIME ON;
GO

Declare @RowSkip As int
Declare @RowFetch As int

Set @RowSkip = 20000
Set @RowFetch = 50000

Select *
From dbo.tblSample
Order by (Select 1)
Offset @RowSkip Row
Fetch  Next @RowFetch Rows Only;
GO

SET STATISTICS IO OFF;
SET STATISTICS TIME OFF;
GO
Время выполнения:
SQL Server Execution Times:
CPU time = 47 ms, elapsed time = 626 ms.
Статистика вводавывода:
Scan count 1,
logical reads 530,
physical reads 0,
read-ahead reads 1549,
lob logical reads 0,
lob physical reads 0,
lob read-ahead reads 0.
Наиболее интересен результат по использованию процессорного времени (CPU Time) и время выполнения (Elapsed Time — время потребовавшееся запросу на выполнение). Сравнение замеров представлено ниже:
| Sql Server Version | CPU Time | Elapsed Time |
| 2000 | 110ms | 839 ms |
| 2005/2008 | 78ms | 631 ms |
| 2011 | 46ms | 626 ms |
В таблице наглядно представлено, что новый SQL Server работает заметно быстрее по сравнению с предыдущими версиями. Естественно, что для вашей машины замеры времени могут отличаться, но производительность нового сервера будет всегда выше.
Альтернатива выражению TOP
Новые возможности Denali в некоторых ситуациях могут стать заменой выражению TOP.
Для примера возьмем ситуацию, когда необходимо получить первые 10 записей отсортированные по убыванию какого-либо параметра.
Подходы на предыдущих версиях
Select Top(10)
	 [Person ID]
	,[Person Name]
	,Age
	,DOB
	,Address
From dbo.tblSample
Order By Age Desc
Подход возможный в SQL Server Denali
Select
	 [Person ID]
	,[Person Name]
	,Age
	,DOB
	,Address
From dbo.tblSample
Order By Age Desc
Offset 10 Rows
Как заметили в комментариях это неверный код и вернет результат обратный Top(10).
Переводы из цикла:
MS SQL Server 2011: Автономные базы данных, новый объект Sequence, оператор Offset, обработка ошибок, конструкция With Result Set, новое в SSMS.
In this article we explore the OFFSET and FETCH clauses. OFFSET and FETCH are used in conjunction with the SELECT statement ORDER BY clause to provide a means to retrieve a range of records. The starting row to return is determined by the OFFSET value and the maximum number of rows to return from that point on by FETCH.
All the examples for this lesson are based on Microsoft SQL Server Management Studio and the AdventureWorks2012 database. You can get started using these free tools using my Guide Getting Started Using SQL Server.
Table of contents
- Using OFFSET and FETCH with the ORDER BY clause
- OFFSET
- FETCH
- Uses for OFFSET and FETCH
- Paging
- Getting Top Records
- Getting Bottom Records
- Sampling Data in the middle of a result set
- Effect of ORDER BY on OFFSET and FETCH
- Boundary Cases
Using OFFSET and FETCH with the ORDER BY clause
Returning rows from a SQL statement can be an all or nothing affair. In many cases the number of rows returned is very large and this can cause issues if you only need to part of the result set.
When results are sorted using the ORDER BY clause, then some options come into play to limit the number of rows returned:
- You can use TOP to return a specified number of rows.
- You can use OFFSET and FETCH.
Need to Learn More About Sorting? Then read our article Use SQL ORDER BY to Sort Results
OFFSET
The OFFSET argument is used to identify the starting point to return rows from a result. OFFESET is called an argument since it is technically part of the ORDER BY clause. The OFFSET is the number of rows to skip before including them in the result.
The general form for the OFFSET argument is:
SELECT   columns
FROM     table
ORDER BY columns OFFSET rows-to-skip ROWS
Where the rows-to-skip is an value greater than or equal to zero.
For example, to show the all but the first 10 employees, ordered by HireDate you could write
SELECT   NationalIDNumber,
         JobTitle,
         HireDate
FROM     HumanResources.Employee
ORDER BY HireDate
         OFFSET 10 ROWS
Here are some things to consider about OFFSET
- OFFSET is part of the ORDER BY clause. It cannot be used on its own.
- OFFSET values must be zero or greater. A negative number results in an error.
- When OFFSET is 0, then no rows are skipped.
- If OFFSET is greater than the number of rows in the ordered results, then no rows are returned.
Still confused? Then check out this video I’ve put together on SQL OFFSET and FETCH.
FETCH
The FETCH argument is used to return a set number of rows. FETCH can’t be used by itself, it is used in conjunction with OFFSET.
Continuing with our example, we can show the 11th through 15th employees hired using this statement
SELECT   NationalIDNumber,
         JobTitle,
         HireDate
FROM     HumanResources.Employee
ORDER BY HireDate
         OFFSET 10 ROWS
         FETCH NEXT 5 ROWS ONLY
In the following diagram you can see OFFSET and FETCH at work. OFFSET is being used to skip the first 10 rows and FETCH is then used to display the next 5.
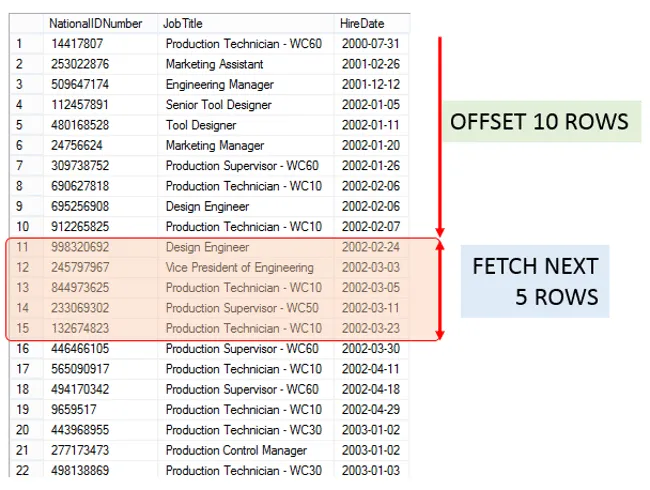
The combination of OFFSET and FETCH make it easy to retrieve a “sliding” window of rows. The start of the window is determined by OFFSET and the height by FETCH.
Uses for OFFSET and FETCH
Paging
One of the most popular uses for OFFSET and FETCH is paging. No doubt you have visited website where you see a list of items and at the bottom there is a list of page numbers or a next button.
We use paging all the time on the web. The most popular example I can think of is Google:
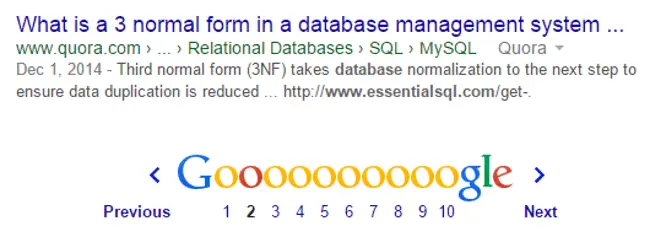
The numbers below Google represent page numbers. A portion of the search results are returned with each click.
In similar fashion, suppose we have a web page displaying employees by HireDate. If we wanted to display 20 employees on a page, and we were displaying the 3rd page (employees 21-30), we could use the following query:
SELECT   NationalIDNumber,
         JobTitle,
         HireDate
FROM     HumanResources.Employee
ORDER BY HireDate
         OFFSET 20 ROWS
         FETCH NEXT 10 ROWS ONLY
This query instructs SQL to:
- Select the employee information
- Order the information by HireDate
- Skip 20 rows and start display results from the 21st
- Display the next 10 rows of results.
Getting Top Records
If you wish to get the top ten rows in a query, then you can do so by setting OFFSET to 0. Remember the OFFSET specifies the number of rows to skip. By setting it to zero, we’re telling SQL to start at the first row.
Once OFFSET is set, the next order of business is to set FETCH. Since we’re looking for the top ten, we set FETCH NEXT to 10.
SELECT   NationalIDNumber,
         JobTitle,
         HireDate
FROM     HumanResources.Employee
ORDER BY HireDate
         OFFSET 0 ROWS
         FETCH NEXT 10 ROWS ONLY
If you’re familiar with the TOP clause you may have noticed there are similarities between these two methods. For instance to above example using TOP would look like
SELECT   TOP 10 NationalIDNumber,
         JobTitle,
         HireDate
FROM     HumanResources.Employee
ORDER BY HireDate
There are aspects to TOP that don’t apply to OFFSET and FETCH; such as being allowed in statements without an ORDER BY, but as you can see for this example, they return equivalent results.
Getting Bottom Records
To get the bottom records in a result set there are two ways. The first is to order the result in descending order as opposed to ascending. This is places the bottom results to the top. Then you can use fetch as normal.
SELECT   NationalIDNumber,
         JobTitle,
         HireDate
FROM     HumanResources.Employee
ORDER BY HireDate DESC
         OFFSET 0 ROWS
         FETCH NEXT 10 ROWS ONLY
If you don’t wish to alter the order of the results, you can use a sub query to get the record count. This can then be used to set the offset accordingly.
SELECT   NationalIDNumber,
         JobTitle,
         HireDate
FROM     HumanResources.Employee
ORDER BY HireDate
         OFFSET (SELECT COUNT(*)
                 FROM   HumanResources.Employee)-10 ROWS
         FETCH NEXT 10 ROWS ONLY
There is a certain danger in this method as the the expression to calculate OFFSET may result in a value less than zero. In our example this could happen if the total number of rows was less than ten. To defend against this condition would you want to incorporate a CASE statement into your logic to check against this condition.
Sampling Data in the middle of a result set
One nice feature of FETCH and OFFSET you’re able to write SQL to sample or test data from the middle of result. This is a really handy if you need to see take a peek at the middle of a result set, perhaps one containing millions of rows, without displaying all the rows up to the point you wish to review.
To sample in the middle you would use the same logic as you would for paging. Of course, the number of rows you fetch in this case may be much larger.
Effect of ORDER BY on OFFSET and FETCH
OFFSET and FETCH only work in conjunction with an ORDER BY clause. In effect, SQL first retrieves the data you specified, such as columns, then order the data in ascending or descending order.
Only after this step has completed are rows skipped and the results produced.
Boundary Cases
Since some values can result in an error, such as a negative OFFSET, let’s explore various combinations of values which may exceed the number of rows in a table to understand which values are safe to use, and which values would throw an SQL error.
We’ll base our examples off of the HumanResources.Employee table, which contains 290 rows.
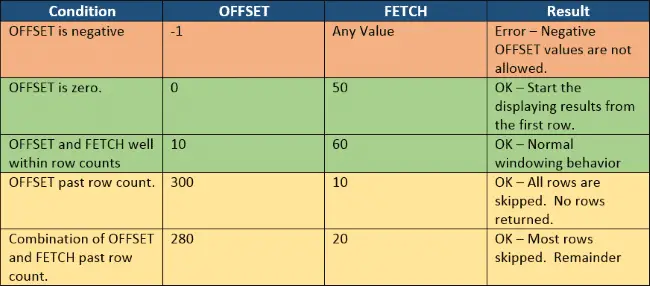
The only case that results in an error is when the OFFSET is negative. There are cases that don’t return rows, or may return less rows than you think, but those cases don’t throw errors. For the most part, those situations occur when either the OFFSET value is greater than the number of rows in the result (all the rows are skipped), or you are trying to fetch “past” then end of the result.
After implementing a pipelined top-N
query to retrieve the first page efficiently, you will often also
need another query to fetch the next pages. The resulting challenge is
that it has to skip the rows from the previous pages. There are two
different methods to meet this challenge: firstly the offset
method, which numbers the rows from the beginning and uses a
filter on this row number to discard the rows before the requested page.
The second method, which I call the seek method,
searches the last entry of the previous page and fetches only the
following rows.
The following examples show the more widely used offset
method. Its main advantage is that it is very easy to handle—especially
with databases that have a dedicated keyword for it (offset). This keyword was even taken into the
SQL standard as part of the fetch first
extension.
- DB2
-
DB2 supports
offsetsince release 11.1.
The standard conforming alternative usingROW_NUMBER()window
function (see next section) works in earlier releases. There are two other
ways to get offset functionality, none of them
recommendable: (1) usingdb2setto enable
DB2_COMPATIBILITY_VECTOR=MYSlimitandoffsetlike MySQL supports it. This
does, however, not allow to combinefetchwith
firstoffset;
(2) usingdb2set DB2_COMPATIBILITY_VECTOR=ORAto get
Oracle’sROWNUMpseudo column (see Oracle
example). - MySQL
-
MySQL and PostgreSQL offer the
offsetclause for
discarding the specified number of rows from the beginning of a
top-N query. Thelimitclause
is applied afterwards.SELECT * FROM sales ORDER BY sale_date DESC LIMIT 10 OFFSET 10 - Oracle
-
The Oracle database supports
offsetsince release 12c. Earlier releases provide the pseudo column
ROWNUMthat numbers the rows in the result set
automatically. It is, however, not possible to apply a greater
than or equal to (>=
filter on this pseudo-column. To make this work, you need to first
“materialize” the row numbers by renaming the column with an
alias.SELECT * FROM ( SELECT tmp.*, rownum rn FROM ( SELECT * FROM sales ORDER BY sale_date DESC ) tmp WHERE rownum <= 20 ) WHERE rn > 10Note the use of the alias
RNfor the lower
bound and theROWNUMpseudo column itself for the
upper bound (thanks to Tom
Kyte). - PostgreSQL
-
The
fetch firstextension
defines anoffset ... rows
clause as well. PostgreSQL, however, only acceptsoffsetwithout therowskeyword. The previously used
limit/offsetsyntax still works
as shown in the MySQL example.SELECT * FROM sales ORDER BY sale_date DESC OFFSET 10 FETCH NEXT 10 ROWS ONLY - SQL Server
-
SQL Server does not have an “offset” extension for its
proprietarytopclause but
introduced thefetch first
extension with SQL Server 2012. Theoffsetclause is mandatory although the
standard defines it as an optional addendum.SELECT * FROM sales ORDER BY sale_date DESC OFFSET 10 ROWS FETCH NEXT 10 ROWS ONLY
Besides the simplicity, another advantage of this method is that you
just need the row offset to fetch an arbitrary page. Nevertheless, the
database must count all rows from the beginning until it reaches the
requested page. Figure 7.2 shows that the scanned index range
becomes greater when fetching more pages.
Figure 7.2 Access Using the Offset Method

This has two disadvantages: (1) the pages drift when inserting new
sales because the numbering is always done from scratch; (2) the response
time increases when browsing further back.
On my Own Behalf: My Next Training
My next online training “Analysis and Aggregation” starts on February 14 2023. This training goes down to the lesser known aspects of the GROUP BY and HAVING clauses and explains window functions and the OVER clause from grounds up. Four sessions of two hours each — no more than four participants. Everything is live. More about this and other SQL trainings at winand.at.
The seek method avoids both problems because it uses the
values of the previous page as a delimiter. That
means it searches for the values that must come
behind the last entry from the previous page. This can be
expressed with a simple where clause.
To put it the other way around: the seek method simply doesn’t select
already shown values.
The next example shows the seek method. For the sake of
demonstration, we will start with the assumption that there is only one
sale per day. This makes the SALE_DATE a unique key. To
select the sales that must come behind a particular date you must use a
less than condition (<) because of the descending sort
order. For an ascending order, you would have to use a greater than
(>) condition. The fetch clause is just used to limit the result to ten
first
rows.
SELECT *
  FROM sales
 WHERE sale_date < ?
 ORDER BY sale_date DESC
 FETCH FIRST 10 ROWS ONLY
Instead of a row number, you use the last value of the previous page
to specify the lower bound. This has a huge benefit in terms of
performance because the database can use the SALE_DATE < ?
condition for index access. That means that the database can truly skip
the rows from the previous pages. On top of that, you will also get stable
results if new rows are inserted.
Nevertheless, this method does not work if there is more than one
sale per day—as shown in Figure 7.2—because using the last date from the
first page (“yesterday”) skips all results from
yesterday—not just the ones already shown on the first page. The problem
is that the order by clause does not
establish a deterministic row sequence. That is, however, prerequisite to
using a simple range condition for the page breaks.
Without a deterministic order by
clause, the database by definition does not deliver a deterministic row
sequence. The only reason you usually get a
consistent row sequence is that the database usually
executes the query in the same way. Nevertheless, the database could in
fact shuffle the rows having the same SALE_DATE and still
fulfill the order by clause. In recent
releases it might indeed happen that you get the result in a different
order every time you run the query, not because the database shuffles the
result intentionally but because the database might utilize parallel query
execution. That means that the same execution plan can result in a
different row sequence because the executing threads finish in a
non-deterministic order.
Important
Paging requires a deterministic sort order.
Even if the functional specifications only require sorting “by date,
latest first”, we as the developers must make sure the order by clause yields a deterministic row
sequence. For this purpose, we might need to extend the order by clause with arbitrary columns just to
make sure we get a deterministic row sequence. If the index that is used
for the pipelined order has additional columns, it is a good start to add them to the
by
order by clause
so we can continue using this index for the pipelined order by. If this still
does not yield a deterministic sort order, just add any unique column(s)
and extend the index accordingly.
In the following example, we extend the order by clause and the index with the primary
key SALE_ID to get a deterministic row sequence. Furthermore,
we must apply the “comes after” logic to both columns
together to get the desired result:
CREATE INDEX sl_dtid ON sales (sale_date, sale_id)SELECT *
FROM sales
WHERE (sale_date, sale_id) < (?, ?)
ORDER BY sale_date DESC, sale_id DESC
FETCH FIRST 10 ROWS ONLYThe where clause uses the
little-known “row values” syntax (see the box entitled “SQL Row Values”). It
combines multiple values into a logical unit that is applicable to the
regular comparison operators. As with scalar values, the less-than
condition corresponds to “comes after” when sorting in descending order.
That means the query considers only the sales that come after the given
SALE_DATE, SALE_ID pair.
Even though the row values syntax is part of the SQL standard, only
a few databases support it. SQL Server 2017 does not support
row values at all. The Oracle database supports row values in principle,
but cannot apply range operators on them (ORA-01796). MySQL evaluates row
value expressions correctly but cannot use them as access predicate during
an index access. DB2 (only LUW, since 10.1) and PostgreSQL (since 8.4),
however, have a proper support of row value predicates
and uses them to access the index if there is a
corresponding index available.
Nevertheless it is possible to use an approximated variant
of the seek method with databases that do not properly support the row
values—even though the approximation is not as elegant and efficient as
row values in PostgreSQL. For this approximation, we must use “regular”
comparisons to express the required logic as shown in this Oracle
example:
SELECT *
  FROM ( SELECT *
           FROM sales
          WHERE sale_date <= ?
            AND NOT (sale_date = ? AND sale_id >= ?)
          ORDER BY sale_date DESC, sale_id DESC
       )
 WHERE rownum <= 10
The where clause consists of two
parts. The first part considers the SALE_DATE only and uses a
less than or equal to (<=) condition—it selects more rows
as needed. This part of the where
clause is simple enough so that all databases can use it to access the
index. The second part of the where
clause removes the excess rows that were already shown on the previous
page. The box entitled “Indexing Equivalent Logic” explains why the where clause is expressed this way.
The execution plan shows that the database uses the first part of
the where clause as access
predicate.
---------------------------------------------------------------
|Id | Operation                      | Name    |  Rows | Cost |
---------------------------------------------------------------
| 0 | SELECT STATEMENT               |         |    10 |    4 |
|*1 |  COUNT STOPKEY                 |         |       |      |
| 2 |   VIEW                         |         |    10 |    4 |
| 3 |    TABLE ACCESS BY INDEX ROWID | SALES   | 50218 |    4 |
|*4 |     INDEX RANGE SCAN DESCENDING| SL_DTIT |     2 |    3 |
---------------------------------------------------------------

Predicate Information (identified by operation id):
---------------------------------------------------
   1 - filter(ROWNUM<=10)
   4 - access("SALE_DATE"<=:SALE_DATE)
       filter("SALE_DATE"<>:SALE_DATE
           OR "SALE_ID"<TO_NUMBER(:SALE_ID))
The access predicates on SALE_DATE enables the database
to skip over the days that were fully shown on previous pages. The second
part of the where clause is a filter
predicate only. That means that the database inspects a few entries from
the previous page again, but drops them immediately. Figure 7.3 shows the respective access
path.
Figure 7.3 Access Using the Seek Method

Figure 7.4 compares the
performance characteristics of the offset and the seek methods. The
accuracy of measurement is insufficient to see the difference on the left
hand side of the chart, however the difference is clearly visible from
about page 20 onwards.
Figure 7.4 Scalability when Fetching the Next Page

Of course the seek method has drawbacks as well, the difficulty
in handling it being the most important one. You not only have to phrase
the where clause very carefully—you
also cannot fetch arbitrary pages. Moreover you need to reverse all
comparison and sort operations to change the browsing direction. Precisely
these two functions—skipping pages and browsing backwards—are not needed
when using an infinite scrolling mechanism for the user interface.
Figure 7.5 Database/Feature Matrix

17 авг. 2022 г.
читать 1 мин
Одна ошибка, с которой вы можете столкнуться при использовании R:
Error in lm.fit(x, y, offset = offset, singular.ok = singular.ok, ...) :
 NA/NaN/Inf in 'y'
Эта ошибка возникает, когда вы пытаетесь использовать функцию lm() для подбора модели линейной регрессии в R, но предиктор или переменная ответа содержат значения NaN или Inf .
В следующем примере показано, как исправить эту ошибку на практике.
Как воспроизвести ошибку
Предположим, у нас есть следующий фрейм данных в R, который содержит информацию о сыгранных минутах и очках, набранных различными баскетболистами:
#create data frame with some NA, NaN, Inf values
df <- data.frame(minutes=c(4, NA, 28, 12, 30, 21, 14),
 points=c(12, NaN, 30, Inf, 43, 25, 17))

#view data frame
df

 minutes points
1 4 12
2 NA NaN
3 28 30
4 12 Inf
5 30 43
6 21 25
7 14 17
Обратите внимание, что фрейм данных содержит некоторые значения NaN и Inf .
Теперь предположим, что мы пытаемся подобрать модель линейной регрессии, используя «минуты» в качестве переменной-предиктора и «точки» в качестве переменной отклика:
#attempt to fit regression model
lm(points ~ minutes, data=df)

Error in lm.fit(x, y, offset = offset, singular.ok = singular.ok, ...) :
 NA/NaN/Inf in 'y'
Мы получаем ошибку, потому что во фрейме данных присутствуют значения NaN и Inf .
Как исправить ошибку
Стоит отметить, что значения NA во фрейме данных не являются проблемой. Фактически, R просто игнорирует значения NA при подборе модели линейной регрессии.
Настоящая проблема вызвана значениями NaN и Inf .
Самый простой способ решить эту проблему — заменить значения NaN и Inf значениями NA :
#Replace NaN & Inf with NA
df[is.na(df) | df==" Inf "] = NA

#view updated data frame
df

 minutes points
1 4 12
2 NA NA
3 28 30
4 12 NA
5 30 43
6 21 25
7 14 17
Теперь мы можем подогнать регрессионную модель:
#fit regression model
lm(points ~ minutes, data=df)

Call:
lm(formula = points ~ minutes, data = df)

Coefficients:
(Intercept) minutes
 5.062 1.048
Выходные данные показывают коэффициенты регрессионной модели.
Обратите внимание, что мы не получаем никаких ошибок, так как мы заменили значения NaN и Inf во фрейме данных.
Дополнительные ресурсы
В следующих руководствах объясняется, как исправить другие распространенные ошибки в R:
Как исправить в R: непредвиденная строковая константа
Как исправить в R: неверная формула модели в ExtractVars
Как исправить в R: аргумент не является числовым или логическим: возвращается na
Когда вы работаете с массивами в PHP, вы можете столкнуться с ошибкой «Notice: Undefined offset». Эта ошибка указывает на то, что вы пытаетесь получить доступ к несуществующему элементу массива. В этой статье мы рассмотрим, почему возникает эта ошибка и как ее исправить.
Почему возникает ошибка Notice: Undefined offset
Ошибка Notice: Undefined offset возникает, когда вы пытаетесь получить доступ к элементу массива, который не существует. Например, если вы пытаетесь получить доступ к $array[10], но массив имеет только 9 элементов, то произойдет ошибка.
Как исправить ошибку Notice: Undefined offset
Существует несколько способов исправить ошибку Notice: Undefined offset в PHP. Рассмотрим самые распространенные из них.
1. Проверка существования элемента массива
Самый простой способ исправить ошибку Notice: Undefined offset — это проверить существование элемента массива перед его использованием. Например, если вы хотите получить доступ к $array[10], то перед этим проверьте, существует ли этот элемент массива:
if(isset($array[10])){
    // Делайте что-то с элементом массива $array[10]
}
2. Использование функции count()
Еще один способ предотвратить ошибку Notice: Undefined offset — использовать функцию count() для определения количества элементов массива. Например, если вы хотите получить доступ к $array[10], то можете использовать следующий код:
if(count($array) > 10){
    // Делайте что-то с элементом массива $array[10]
}
3. Использование цикла foreach
Если вы хотите обработать все элементы массива, но не знаете заранее, сколько их будет, то вы можете использовать цикл foreach. В этом случае вы можете быть уверены, что обрабатываете только существующие элементы массива:
foreach($array as $key => $value){
    // Делайте что-то с элементом массива $array[$key]
}
4. Отключение вывода ошибок
Если вы знаете, что ваш код может порождать ошибки Notice: Undefined offset, и вы не хотите их видеть, то вы можете отключить вывод таких ошибок. Для этого вы можете добавить следующую строку в начало вашего скрипта:
error_reporting(E_ERROR);
Эта строка отключает вывод всех ошибок, кроме фатальных.
Заключение
Ошибка Notice: Undefined offset очень распространена при работе с массивами в PHP. Но вы можете легко исправить ее, используя один из вышеописанных способов. Главное — не игнорировать эту ошибку, чтобы избежать нежелательного поведения вашего скрипта.
Помогите разобраться пожалуйста, есть php код, распечатываю массив, цель не суть. В конце выполнения получаю ошибку Warning: Illegal string offset
<?php
 foreach ($arr as $v){
        foreach ($v as $k=>$v2){
            echo $v2['id']."<br>";
        }
    }
?>
Если распечатать массив $arr имеем это
Array
(
    [data] => Array
        (
            [0] => Array
                (
                    [id] => 17861306822371551
                    [media_url] =>
                    [permalink] =>
                    [username] =>
                    [timestamp] => 2021-01-21T06:55:30+0000
                    [media_type] => IMAGE
                )

            [1] => Array
                (
                    [id] => 17881664000038207
                    [media_url] =>
                    [permalink] =>
                    [username] =>
                    [timestamp] => 2021-01-20T04:31:03+0000
                    [media_type] => IMAGE
                )

            [2] => Array
                (
                    [id] => 17910378847579805
                    [media_url] =>
                    [permalink] =>
                    [username] =>
                    [timestamp] => 2021-01-19T03:51:58+0000
                    [media_type] => IMAGE
                )

        )

    [paging] => Array
        (
            [cursors] => Array
                (
                    [before] => QVFIUmFTNUNWMDhFVHpOaS0xalAzOU91TWJURkM3THRWdDVMSnhHVk1rOWpjS29oc3lmZA3hxYXItYmJVMy0tNHFDT3AtSFo5dXRJZAlFYSTJjNzk5NUM2SThR
                    [after] => QVFIUk1WWEE2YjJfVG1KdHNfX3dxNXQ1NHlJOHhvNVRnaFgtYjViMkJXX1oydXVFc2wtdjg5S2VKcTc4RC1qV0ZAJY0JfMDFTZAXVMcGQydk52SHRXMlBVR2F3
                )

            [next] => https://graph.instagram.com/v1.0/17841400422310153/media?access_token=.......&fields=id%2Cmedia_url%2Cpermalink%2Cusername%2Ctimestamp%2Cmedia_type&limit=3&after=QVFIUk1WWEE2YjJfVG1KdHNfX3dxNXQ1NHlJOHhvNVRnaFgtYjViMkJXX1oydXVFc2wtdjg5S2VKcTc4RC1qV0ZAJY0JfMDFTZAXVMcGQydk52SHRXMlBVR2F3
        )

)
Ошибка:
Warning: Illegal string offset ‘id’ in ……page.php on line 93
h
Подскажите пожалуйста, как пофиксить ошибку? PHP только изучаю. Ошибку понял, где то не массив, как ожидается, а простая строка. Гуглил куча примеров, но как я понял все зависит от конкретного кода. Помогите разобраться.
Системные ошибки, такие как ERROR_OFFSET_ALIGNMENT_VIOLATION, могут возникать практически в любой операционной системе, и Windows 10 не является исключением. Эта ошибка также приходит с командой, указавшей смещение данных, которое не выравнивается с сообщением гранулярности / выравнивания устройства, и сегодня мы собираемся показать вам, как это исправить.
Как исправить ошибку ERROR_OFFSET_ALIGNMENT_VIOLATION?
Исправить — ERROR_OFFSET_ALIGNMENT_VIOLATION
Решение 1. Проверьте свой антивирус
Частой причиной системных ошибок может быть ваше антивирусное программное обеспечение. Сторонние антивирусные инструменты могут иногда взаимодействовать с вашей системой, вызывая появление этой и других ошибок. Чтобы решить эту проблему, рекомендуется проверить настройки антивируса и отключить потенциально проблемные функции. Если вы не можете найти проблемную функцию, попробуйте полностью отключить антивирус.
Если отключение антивируса решает проблему, вы можете использовать это как временное решение. Однако, если вы ищете долгосрочное решение, вам следует рассмотреть возможность удаления антивирусного программного обеспечения. Даже если вы удалите антивирус, вы будете защищены Защитником Windows, поэтому вам не придется беспокоиться о своей безопасности.
Мы должны отметить, что антивирусные инструменты, как правило, оставляют некоторые файлы и записи реестра даже после их удаления. Эти файлы также могут вызывать проблемы, поэтому мы настоятельно рекомендуем вам использовать специальный инструмент удаления от производителя антивируса для удаления любых оставшихся файлов.
После полного удаления антивируса проверьте, не исчезла ли проблема. Если нет, вы можете установить последнюю версию антивирусного программного обеспечения или перейти на другое антивирусное решение.
Решение 2. Убедитесь, что Windows обновлена
Windows 10 — это надежная операционная система, но в ней есть несколько ошибок и сбоев, которые могут вызвать системные ошибки. Чтобы это исправить, настоятельно рекомендуется поддерживать вашу систему в актуальном состоянии. Этот процесс оптимизирован в Windows 10, и все обновления загружаются в фоновом режиме автоматически. Однако иногда вы можете пропустить важное обновление, поэтому рекомендуется проверять наличие обновлений вручную. Для этого вам необходимо выполнить следующие простые шаги:
- ЧИТАЙТЕ ТАКЖЕ: Исправлено: «Файл данных Outlook не доступен» в Windows 10
- Нажмите клавишу Windows + I, чтобы открыть приложение «Настройки».
- После открытия приложения «Настройки» перейдите в раздел « Обновление и безопасность ».

- Теперь нажмите кнопку Проверить наличие обновлений.


Если доступны какие-либо обновления, Windows автоматически загрузит их в фоновом режиме и установит после перезагрузки компьютера. После обновления вашей системы проверьте, появляется ли сообщение об ошибке.
Решение 3 — Использование командной строки
Несколько пользователей сообщили об этой ошибке при попытке установить определенные драйверы. Чтобы решить эту проблему, вам нужно остановить определенные службы и переименовать несколько папок. Это может быть утомительным процессом, но вы можете ускорить его с помощью командной строки. Чтобы внести необходимые изменения, сделайте следующее:
- Нажмите Windows Key + X, чтобы открыть меню Win + X и выберите Командную строку (Admin) из списка. Если командная строка недоступна, вы также можете использовать PowerShell.
- Введите следующие команды одну за другой:
- чистая остановка wuauserv
- стоповые биты
- чистая остановка cryptsvc
- cd% SystemRoot% System32
- ren catroot2 catroot2_BackUp
- компакт диск..
- ren SoftwareDistribution SoftwareDistribution_BackUp
- чистый старт wuauserv
- чистые стартовые биты
- чистый старт cryptsvc
- После выполнения всех команд закройте командную строку.
Теперь проблема должна быть решена, и вы сможете без проблем установить драйверы. Пользователи сообщили о большом успехе с этим решением, поэтому обязательно попробуйте его.
Решение 4 — Выполните Чистую загрузку
Сторонние приложения могут иногда мешать работе вашей системы и вызывать появление этой и других ошибок. Некоторые приложения и службы, как правило, запускаются автоматически с Windows, вызывая проблему, как только ваш компьютер запускается. Чтобы решить эту проблему, вам нужно отключить все службы запуска и приложений. Это относительно просто, и вы можете сделать это, выполнив следующие действия:
- Нажмите Windows Key + R и введите msconfig. Нажмите Enter или нажмите ОК.
- Откроется окно конфигурации системы. Перейдите на вкладку « Службы » и установите флажок « Скрыть все службы Microsoft». Теперь нажмите Отключить все.
- Перейдите на вкладку « Автозагрузка » и нажмите « Открыть диспетчер задач».
- Когда откроется диспетчер задач, вы увидите список всех запускаемых приложений. Выберите первую запись в списке и нажмите кнопку « Отключить». Повторите этот шаг для всех приложений в списке.
- После отключения всех запускаемых приложений закройте диспетчер задач и вернитесь в окно « Конфигурация системы». Нажмите Apply и OK, чтобы сохранить изменения.
- Перезагрузите компьютер, чтобы применить изменения.


После этого проверьте, появляется ли проблема по-прежнему. Если нет, вам нужно повторить те же шаги и включить приложения и службы по одному или в группах. Помните, что вам необходимо перезагрузить компьютер после включения группы приложений или служб. После того, как вы найдете проблемное приложение, вы можете оставить его отключенным, удалить его или попытаться обновить его до последней версии.
- Читайте также: Исправлено: «Мы не смогли загрузить модель данных» в Windows 10
Решение 4 — Выполнить восстановление системы
Если эта проблема появилась недавно, вы можете исправить ее, восстановив систему. Это довольно просто, и вы можете сделать это благодаря приложению Восстановление системы. Мы должны предупредить вас, что этот процесс может удалить некоторые из ваших недавно сохраненных файлов, поэтому обязательно сделайте их резервную копию. Чтобы восстановить вашу систему, сделайте следующее:
- Нажмите Windows Key + S и введите восстановление системы. Выберите Создать точку восстановления из меню.
- Откроется окно « Свойства системы». Нажмите на кнопку восстановления системы.
- Когда появится окно « Восстановление системы», нажмите « Далее». Установите флажок Показать больше точек восстановления и выберите нужную точку восстановления. Нажмите Далее, чтобы продолжить.
- Следуйте инструкциям на экране для завершения сброса.


После завершения сброса проверьте, сохраняется ли проблема. В большинстве случаев Восстановление системы должно быть в состоянии отменить любые недавние изменения и проблемы, поэтому обязательно попробуйте.
Решение 5 — Сброс Windows 10
Если другие решения не могут решить проблему, вы можете рассмотреть возможность перезагрузки Windows 10. Мы должны предупредить вас, что этот процесс удалит все файлы с вашего системного диска, включая ваши приложения и документы, поэтому мы настоятельно рекомендуем вам сделать резервную копию важные файлы. Кроме того, вам может потребоваться установочный носитель Windows 10 для завершения этого процесса, поэтому обязательно создайте его. После создания носителя для резервного копирования и установки вы можете сбросить Windows 10, выполнив следующие действия:
- Откройте меню «Пуск» и нажмите кнопку питания. Нажмите и удерживайте клавишу Shift и нажмите « Сброс».
- Список вариантов появится. Нажмите на Устранение неполадок> Сбросить этот компьютер> Удалить все. На этом этапе может потребоваться вставить установочный носитель, поэтому убедитесь, что он готов.
- Выберите свою версию Windows и выберите Только диск, на котором установлена Windows> Просто удалите мои файлы.
- Вы увидите список файлов, которые будут сброшены при сбросе. Когда вы будете готовы начать, нажмите кнопку сброса.
- Следуйте инструкциям на экране для завершения сброса.

После сброса Windows 10 проверьте, сохраняется ли проблема. Если нет, установите все свои приложения и переместите файлы из резервной копии.
ERROR_OFFSET_ALIGNMENT_VIOLATION — системная ошибка, которая может помешать вам установить определенные приложения. Это не серьезная ошибка, и вы должны быть в состоянии решить ее с помощью одного из наших решений.
ЧИТАЙТЕ ТАКЖЕ:
- Исправлено: ошибка обновления Windows 10 0xc0000017
- Обновление Windows 10 через WSUS застряло на 0%
- Исправлено: ошибка при подключении к этому сайту
- Исправлено: «Папка OneDrive не может быть создана в выбранном вами месте»
- Как исправить сообщение об ошибке «E: недоступен, доступ запрещен»