Troubleshooting a ‘This application could not be started’ error message

Error causes
This error typically indicates one of the following conditions:
How to fix the error
To address this issue so that you can run your application, do the following:


If your application runs successfully, select the Finish button. Otherwise, select the Next button.

| Windows version | .NET Framework installation |
|---|---|
| Windows 10 Anniversary Update and later versions | .NET Framework 4.8 Runtime |
| Windows 10, Windows 10 November Update | .NET Framework 4.6.2 |
| Windows 8.1 | .NET Framework 4.8 Runtime |
| Windows 8 | .NET Framework 4.6.1 |
| Windows 7 SP1 | .NET Framework 4.8 Runtime |
| Windows Vista SP2 | .NET Framework 4.6 |
.NET Framework 4.8 is preinstalled on Windows 11 and Windows 10 May 2019 Update and later versions.
Attempt to launch the application.
Источник
Comments
antdude commented Jun 9, 2019
The text was updated successfully, but these errors were encountered:
mika76 commented Jun 9, 2019 •
antdude commented Jun 9, 2019
antdude commented Jun 9, 2019
mika76 commented Jun 9, 2019 •
Seems the latest paint.net uses 4.7. I would have thought that would work with mamesaver too. You could always try install 4.6 and see what happens. Shouldn’t give a you any problems.
mika76 commented Jun 9, 2019
Or maybe you have an older paint.net with an older framework? Here Microsoft’s instructions on how to determine which is installed : https://docs.microsoft.com/en-us/dotnet/framework/migration-guide/how-to-determine-which-versions-are-installed
antdude commented Jun 9, 2019
From my regedit.exe:
Windows Registry Editor Version 5.00
[HKEY_LOCAL_MACHINESOFTWAREMicrosoftNET Framework SetupNDPv4]
[HKEY_LOCAL_MACHINESOFTWAREMicrosoftNET Framework SetupNDPv4Client]
«Version»=»4.7.02558»
«TargetVersion»=»4.0.0»
«Install»=dword:00000001
«MSI»=dword:00000001
«Servicing»=dword:00000000
«InstallPath»=»C:WindowsMicrosoft.NETFramework64v4.0.30319»
«Release»=dword:000709fe
[HKEY_LOCAL_MACHINESOFTWAREMicrosoftNET Framework SetupNDPv4Client1033]
«Version»=»4.7.02558»
«TargetVersion»=»4.0.0»
«Install»=dword:00000001
«Servicing»=dword:00000000
«Release»=dword:000709fe
[HKEY_LOCAL_MACHINESOFTWAREMicrosoftNET Framework SetupNDPv4Full]
«Version»=»4.7.02558»
«TargetVersion»=»4.0.0»
«Install»=dword:00000001
«MSI»=dword:00000001
«Servicing»=dword:00000000
«InstallPath»=»C:WindowsMicrosoft.NETFramework64v4.0.30319»
«Release»=dword:000709fe
[HKEY_LOCAL_MACHINESOFTWAREMicrosoftNET Framework SetupNDPv4Full1033]
«Version»=»4.7.02558»
«TargetVersion»=»4.0.0»
«Install»=dword:00000001
«Servicing»=dword:00000000
«Release»=dword:000709fe
antdude commented Jun 9, 2019
I am using paint.net v4.1.6. BTW, I’m going to sleep soon.
mika76 commented Jun 9, 2019
Seems you have 4.7 which should run it without problems. Hmm I’ll have to play around with it a bit and see if I can figure it out.
antdude commented Jun 9, 2019
I was able to reproduce it in a clean, updated 64-bit W7 HPE SP1 in a virtual machine (VM) with VirtualBox. Its registry shows:
Windows Registry Editor Version 5.00
[HKEY_LOCAL_MACHINESOFTWAREMicrosoftNET Framework SetupNDPv4]
[HKEY_LOCAL_MACHINESOFTWAREMicrosoftNET Framework SetupNDPv4Client]
«Version»=»4.6.01055»
«TargetVersion»=»4.0.0»
«Install»=dword:00000001
«MSI»=dword:00000001
«Servicing»=dword:00000000
«Release»=dword:0006041f
«InstallPath»=»C:WindowsMicrosoft.NETFramework64v4.0.30319»
[HKEY_LOCAL_MACHINESOFTWAREMicrosoftNET Framework SetupNDPv4Client1033]
«Version»=»4.6.01055»
«TargetVersion»=»4.0.0»
«Install»=dword:00000001
«Servicing»=dword:00000000
«Release»=dword:0006041f
[HKEY_LOCAL_MACHINESOFTWAREMicrosoftNET Framework SetupNDPv4Full]
«Version»=»4.6.01055»
«TargetVersion»=»4.0.0»
«Install»=dword:00000001
«MSI»=dword:00000001
«Servicing»=dword:00000000
«InstallPath»=»C:WindowsMicrosoft.NETFramework64v4.0.30319»
«Release»=dword:0006041f
[HKEY_LOCAL_MACHINESOFTWAREMicrosoftNET Framework SetupNDPv4Full1033]
«Version»=»4.6.01055»
«TargetVersion»=»4.0.0»
«Install»=dword:00000001
«Servicing»=dword:00000000
«Release»=dword:0006041f
Источник
Go to here C:Program Files (x86)SteamsteamappscommonFINAL FANTASY FFX&FFX-2 HD Remaster or where ever you install it at. Run FFX.exe, or run as admin on FFX.exe if it works, then you have a launcher problem, it could be a number things.
Software conflicting with your game, as there was a case with Avest would remove some of the files for the game that was needed and was read as a false virus scan. Could have missing, out of date update/firmware, or bad installs of the content of the software, or hardware support. There a number of things it could be, but for now can you share your specs, or the model of your PC?
If you don’t want to use CPUID CPU-Z then tell me your PC model number if it’s pre-build, this is a how to video how to find the model number.
https://www.youtube.com/watch?v=OsrZS1SoSNA
Run as admin didn’t worked.
Here we go:
CPU: Intel Core i5 750 2.67GHz
GPU: Nvidia GeForce 750 Ti 2GB
Memory: 8GB DDR3
Mainboard: ASUSTeK Computer INC, Model: P7H55-M BR
Verifying the game cache for now, it gonna take some time! But really thank you for the help!
Источник
ServerManager.exe – This application could not be started
The Windows Server Manager enables the IT staff to keep a tab on all the servers hosted on a network. The Server Manager tool gives IT staff the ability to manage server roles without having physical access to the servers. If you’re unable to get the Server Manager working, whereby when you click on Server Manager, you encounter the error message ServerManager.exe – This application could not be started, then the solutions presented in this post are intended to help you resolve the issue.

When you encounter this issue, you’ll receive the following full error message;
ServerManager.exe – This application could not be started. L?.
This application could not be started.
Do you want to view Information about this issue?
ServerManager.exe – This application could not be started
Let’s take a look at the description of the process involved concerning each of the listed solutions.
1] Run DISM command
Afterward, the server manager application should open without the error.
2] Manually delete user.config file
3] Edit the ServerList.xml
If you have multiple server OS installations running, you may discover that one of the servers is responsible for the Server Manager error. You can determine this by opening Server Manager on the other servers and try adding servers. All goes well until you try doing the same on a particular server, that’s when the server manager would crash and stop working again. In this case, you can edit the ServerList.xml, and remove the problematic server. The Server Manager should work fine now.
4] Perform System Restore
Similar to the client operating system Windows 10, you can perform a system restore and see if that helps. This is applicable if you are unable to start Server Manager only recently and that things worked fine prior to that.
5] Perform In-place Upgrade Repair
Also, similar to the client OS Windows 10, you can perform an In-place Upgrade Repair and see if that helps.
6] Format and clean install Server OS
As a last resort, you can format and clean install the server OS.
Hope something here helps you.
Date: February 26, 2021 Tags: Errors, Server
Источник
How to Fix the Error «This App Can’t Run On Your PC»?
Read this article to learn how to fix the problem with running an application on PC, and we will find out why this error appears and how to solve the problem.

The core of the problem
On the Internet, there are lots of websites offering to install various applications and programs. At an early stage, Windows 10 operating system can detect and warn the user of possible issues, or even block a harmful application or program at once.
For this purpose, Microsoft has improved greatly the built-in defense component, SmartScreen. Its main task is to protect the user from apps provided by questionable developers. SmartScreen helps to reveal any previously detected malware, applications or websites created for malicious purposes, and takes informed decisions on blocking their access, download or use on your personal computer or another computing device.
At the first stage, SmartScreen analyzes all applications, programs and webpages for any suspicious activities. The next step will be to compare suspicious apps and webpages with the list of programs and websites recognized to be harmful. In case of a coincidence, SmartScreen will block download or installation for such a program, and display a corresponding notification for the user.
Obviously, SmartScreen is quite a useful feature in Windows 10 and using it seems absolutely justified. However, frequent error messages or warning notifications displayed while you are working with an application or website that you trust can become quite irritating. In that case, SmartScreen is easy to disable – if you know the app we are talking about is absolutely safe.
This security feature can display quite a number of various warnings and error messages, but most of these can be sorted out on your own. Mostly, these are issues related to providing additional permissions or signing in to an account with administrator’s rights.
Still, cases when you see a SmartScreen message saying This app can’t run on your PC are totally different. Such messages only suggest that you contact the program’s developer for advice – and that’s all. Also, you can face such messages when apps that used to run seamlessly on your computer, suddenly can’t start, for no evident reason. Yet don’t worry: even if you see the error This app can’t run on your PC in Windows 10, here’s what you can do.
The error This app can’t run on your PC
If you see such a message, it means there is a compatibility error. The application you are trying to install is incompatible with your operating system, Windows 10. You may also encounter this error if the application requires special permissions to run – and the current user account lacks them. This error only appears when you are trying to install an application, and never does when you start one. If an application is already installed to your computer, starting it will never trigger this error. There are two ways to fix it.

Use your account with administrator rights
When you see this error message, it might be due to your signing in to an account which doesn’t have administrator rights. To exclude this one out, check the account you are using now. If the current account is not the administrator’s one, switch to that account, and try installing the application again. If this method doesn’t work, try another one on the list.
32-bit or 64-bit application
If you’re using the 32-bit version of Windows 10 and trying to run a 64-bit version of the program, the error should have been expected. Similarly, if you’re trying to install a 32-bit program onto a 64-bit version of Windows 10, this error may also take place. If the problem comes from bitness, there’s only one solution – you’ve got to find the proper version of the necessary application and install it.
Disable SmartScreen in Windows 10
Sometimes, the error This app can’t run on your PC may be false. That’s why if the advice I have given you in this article didn’t help you and you still face this error, and you still need to run this app despite the warning, try disabling SmartScreen filter. In this tutorial, we will show you three ways to disable the security feature, as it is applied to the entire Windows 10 operating system, to applications received from Microsoft Store, and to the system’s featured browser, Microsoft Edge.
Disable SmartScreen in Windows 10 with Windows Defender Security Center
In this case, you should open Windows Defender Security Center. It can be done in a few ways.
Click on the Start button on the Taskbar, and open the main Windows menu, then click the gearwheel symbol. Alternatively, drag the scroll bar down until you find the line Settings.

In the application window, drag the slider down and select the section Update and Security.

On the left, select Windows Security, and on the right click on Open Windows Defender Security Center.

It opens the main window of Windows Defender Security Center.

In the side menu on the right, select App & browser control. You will be redirected to the page where you can configure SmartScreen for applications and browsers.

Here, you can disable Check apps & files, SmartScreen for Microsoft Edge and SmartScreen for Microsoft Store apps. Check the Off option in corresponding sections.
When the pop-up notification from Windows User Account Control asks Do you want to allow this app to make changes to your device? click Yes for the changes to take effect.
Disable SmartScreen in Windows 10 with the Registry Editor
Note: It is important to remember that anything you do to the registry is on your own responsibility. Any actions involving the registry may cause irreversible consequences. Windows 10 may begin working with errors, some apps or programs may not be able to start, the operating system can crash or have problems when booting. Before you start modifying the registry, we strongly recommend backing it up, just in case. To do it, open the Registry Editor, choose the File tab in the main menu, and select Export. The operating system will suggest you to give a name to the registry backup and select the directory where to save it. Choose a name that will help you to remember when exactly this backup was created. The best name would be the date of creation, for example, 02-04-2019. After that, click Save. Now you will have a registry backup file which you can use to restore it if necessary.
One more time, open the Run dialogue box in any of the ways described in this article (for example, by pressing the keyboard shortcut Windows + R for quick access to the Runwindow). In the command prompt field, type the command for opening the Registry Editor (regedit) and click ОК to perform the command.

When the pop-up notification from Windows User Account Control asks Do you want to allow this app to make changes to your device? click Yes and open the Registry Editor window.

In the left-side part of the window, follow the path:
You can also use a different method for accessing this particular section of the registry. Just copy and paste it into the address bar of the Registry Editor (it’s under the main menu). This way, you can avoid possible errors when selecting the registry section, as the left panel displays many similar directories, and this specific method helps you make sure you use the correct address.

Right-click on an empty area on the right, select New from the context menu that appears, and click on the nested menu option DWORD value (32 bit).

Give the new DWORD value the name EnableSmartScreen. Double-click on it, or right-click on it and select Modify from the menu.

In the window Edit DWORD value (32 bit) set the Value data to0 (this value data will be used by default). Click ОК or press Enter on your keyboard to save the changes to the value.

Now close the Registry Editor window and restart your computer. After that, SmartScreen will be disabled.
Disable SmartScreen in Windows 10 with the Local Group Policy Editor
If your computer is running Windows 10 Home Edition, you won’t be able to use the functionality of the Local Group Policy Editor, as this utility is not excluded into this particular version of the operating system. For other versions of Windows 10, do the following.
Open the Run dialogue box in any of the ways described in today’s article (for example, right-click on the Start button in the Taskbar, and select the Run dialogue box in the menu that opens). In the Command Prompt window, type the command gpedit.msc.

Click ОК or press Enter on your keyboard to confirm your action, and the Local Group Policy Editor window will appear.

In the left-side panel, follow this path:
Computer Configuration – Administrative Templates – Windows Components – Windows Defender SmartScreen.

There are two subsections, Explorer and Microsoft Edge. Each of them contains a policy setting Configure Windows SmartScreen that allows you to enable or disable the filter as you like. Double-click on it, or right-click on it and select Edit from the menu.

In the window that opens, check the option for Disabled, then click Apply and ОК to save the changes you have made.

Apply this algorithm to every subsection: Explorer and Microsoft Edge. In the first subsection, it disables checking files in Windows 10, and in the second subsection it turns off SmartScreen in Microsoft Edge. After saving the changes, close the Local Group Policy Editor, and the SmartScreen feature will be disabled.
There is also a way to disable SmartScreen in Microsoft Edge in the browser settings. Open Microsoft Edge and click on the three-dot button in the top right corner to open the main menu.


Then click View advanced settings.

Scroll down to find the line Help protect me from malicious sites and downloads with Windows Defender SmartScreen and set the slider to Off.

Finally, when the SmartScreen feature is disabled, make sure that your application starts and works correctly now. If you see the error again, the problem must be in the application itself, not in the security feature.
Then all you can do is to wait for another update to fix this issue, or find another program to replace the faulty app. If you disabled the SmartScreen feature, make sure you turn it on again after the necessary application is installed. It’s not a good idea to leave your system open to threats and without protection, so turn the feature on again and improve the security of your operating system.
See the full article with all additional video tutorials. If you still have any questions, please ask in a comments. Also visit our Youtube channel, there are over 400 video tutorials.
Источник
Содержание
- Устранение неполадок при получении сообщения об ошибке «Не удалось запустить это приложение» Troubleshooting a ‘This application could not be started’ error message
- Application windows не может
- Описание ситуации
- Причины ошибки: Windows не удается получить доступ к указанному устройству, пути или файлу
- Ошибка при удалении приложения
- Ошибка запуска из-за UAC (User Account Control)
- Просмотр разрешений на exe и lnk файлы и их блокировка
- Ошибка «Windows не удается получить доступ к указанному устройству, пути или файлу» при запуске файла .exe с флешки или другого USB-носителя
- Если не запускается ярлык программы или игры
- Отключите антивирусное программное обеспечение
- Восстановите файл, который был удален, удален или поврежден
- Проверка политики ограниченного использования программ SRP
Устранение неполадок при получении сообщения об ошибке «Не удалось запустить это приложение» Troubleshooting a ‘This application could not be started’ error message
Для приложений, разработанных для .NET Framework, обычно требуется, чтобы на компьютере была установлена определенная версия .NET Framework. Applications that are developed for .NET Framework typically require that a specific version of .NET Framework be installed on your system. В некоторых случаях вы можете попытаться запустить приложение без установленной или ожидаемой версии .NET Framework. In some cases, you may attempt to run an application without either an installed version or the expected version of .NET Framework present. В результате этого часто выводится примерно такое диалоговое окно с сообщением об ошибке: This often produces an error dialog box like the following:
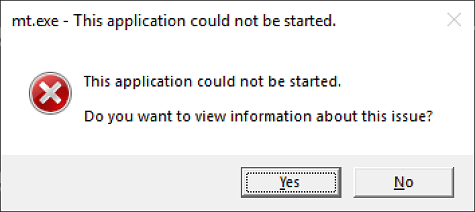
Эта ошибка указывает на то, что выполняется одно из следующих условий: This error typically indicates one of the following conditions:
установка .NET Framework в системе повреждена; A .NET Framework installation on your system has become corrupted.
не удалось обнаружить версию .NET Framework, необходимую для приложения. The version of .NET Framework needed by your application cannot be detected.
Чтобы устранить эту проблему и запустить приложение, сделайте следующее: To address this issue so that you can run your application, do the following:
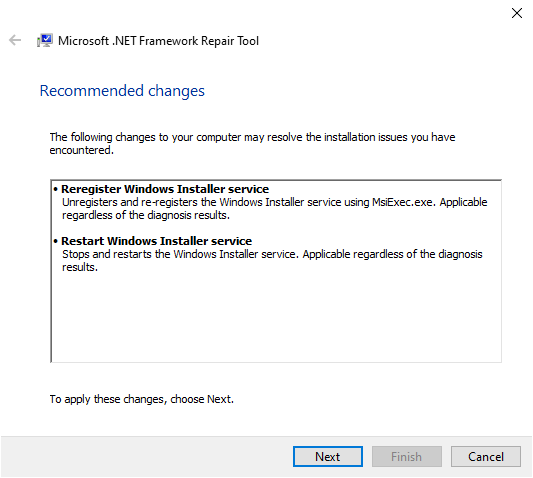
Скачайте средство восстановления .NET Framework (NetFxRepairTool.exe). Download the .NET Framework Repair Tool (NetFxRepairTool.exe). Средство запускается автоматически после завершения скачивания. The tool runs automatically when the download completes.
Если средство восстановления .NET Framework рекомендует какое-либо дополнительное действие, подобное показанному на следующем рисунке, нажмите кнопку Далее. If the .NET Framework Repair Tool recommends any additional action, such as those shown in the following figure, select Next.
В средстве восстановления .NET Framework отображается диалоговое окно, показанное на следующем рисунке, в котором указано, что изменения внесены. The .NET Framework Repair Tools displays a dialog box shown in the following figure to indicate that changes are complete. Не закрывайте диалоговое окно, пока выполняется повторная попытка запуска приложения. Leave the dialog box open while you to try rerun your application. Запуск должен быть выполнен успешно, если средство восстановления .NET Framework обнаружило и устранило поврежденную установку .NET Framework. This should succeed if the .NET Framework Repair Tool has identified and corrected a corrupted .NET Framework installation.
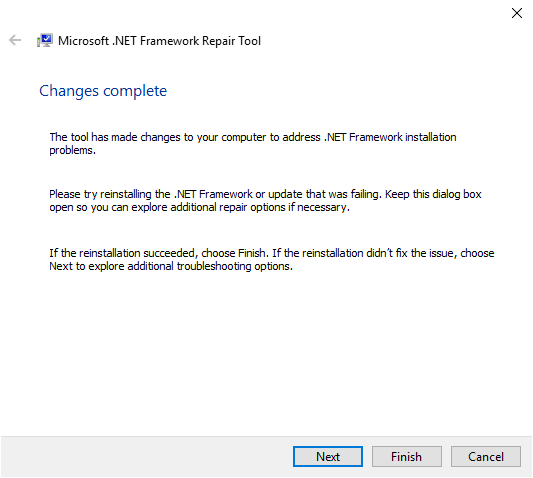
Если приложение успешно запускается, нажмите кнопку Готово. If your application runs successfully, select the Finish button. В противном случае нажмите кнопку Далее. Otherwise, select the Next button.
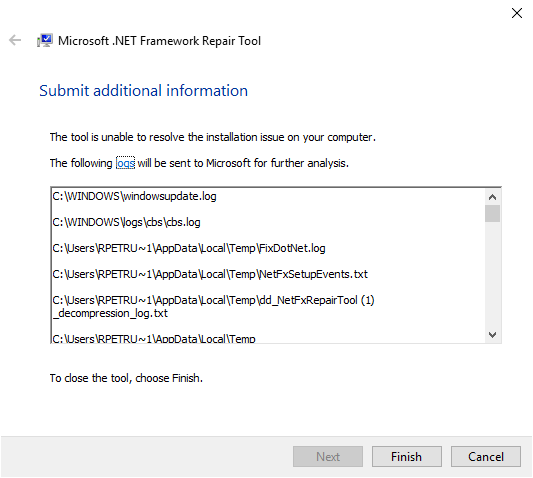
Если вы нажали кнопку Далее, в средстве восстановления .NET Framework отобразится диалоговое окно, как показано ниже. If you selected the Next button, the .NET Framework Repair Tool displays a dialog box like the following. Нажмите кнопку Готово, чтобы отправить диагностические данные в корпорацию Майкрософт. Select the Finish button to send diagnostic information to Microsoft.
Если по-прежнему не удается запустить приложение, установите последнюю версию .NET Framework, поддерживаемую вашей версией Windows, как показано в следующей таблице. If you still cannot run the application, install the latest version of .NET Framework that’s supported by your version of Windows, as shown in the following table.
| Версия Windows Windows version | Установка .NET Framework .NET Framework installation |
|---|---|
| Юбилейное обновление Windows 10 или более поздние версии Windows 10 Anniversary Update and later versions | Среда выполнения .NET Framework 4.8 .NET Framework 4.8 Runtime |
| Windows 10, Windows 10 с обновлением за ноябрь Windows 10, Windows 10 November Update | .NET Framework 4.6.2 .NET Framework 4.6.2 |
| Windows 8.1 Windows 8.1 | Среда выполнения .NET Framework 4.8 .NET Framework 4.8 Runtime |
| Windows 8 Windows 8 | .NET Framework 4.6.1 .NET Framework 4.6.1 |
| Windows 7 с пакетом обновления 1 (SP1) Windows 7 SP1 | Среда выполнения .NET Framework 4.8 .NET Framework 4.8 Runtime |
| Windows Vista SP2 Windows Vista SP2 | .NET Framework 4.6 .NET Framework 4.6 |
.NET Framework 4.8, предустановленная в Windows 10 с обновлением за май 2019 г. .NET Framework 4.8 is preinstalled on Windows 10 May 2019 Update.
Попытайтесь запустить приложение. Attempt to launch the application.
В некоторых случаях отображается диалоговое окно, подобное приведенному ниже, с предложением установить .NET Framework 3.5. In some cases, you may see a dialog box like the following, which asks you to install .NET Framework 3.5. Выберите Скачать и установить этот компонент, чтобы установить .NET Framework 3.5, а затем запустите приложение еще раз. Select Download and install this feature to install .NET Framework 3.5, then launch the application again.
Application windows не может
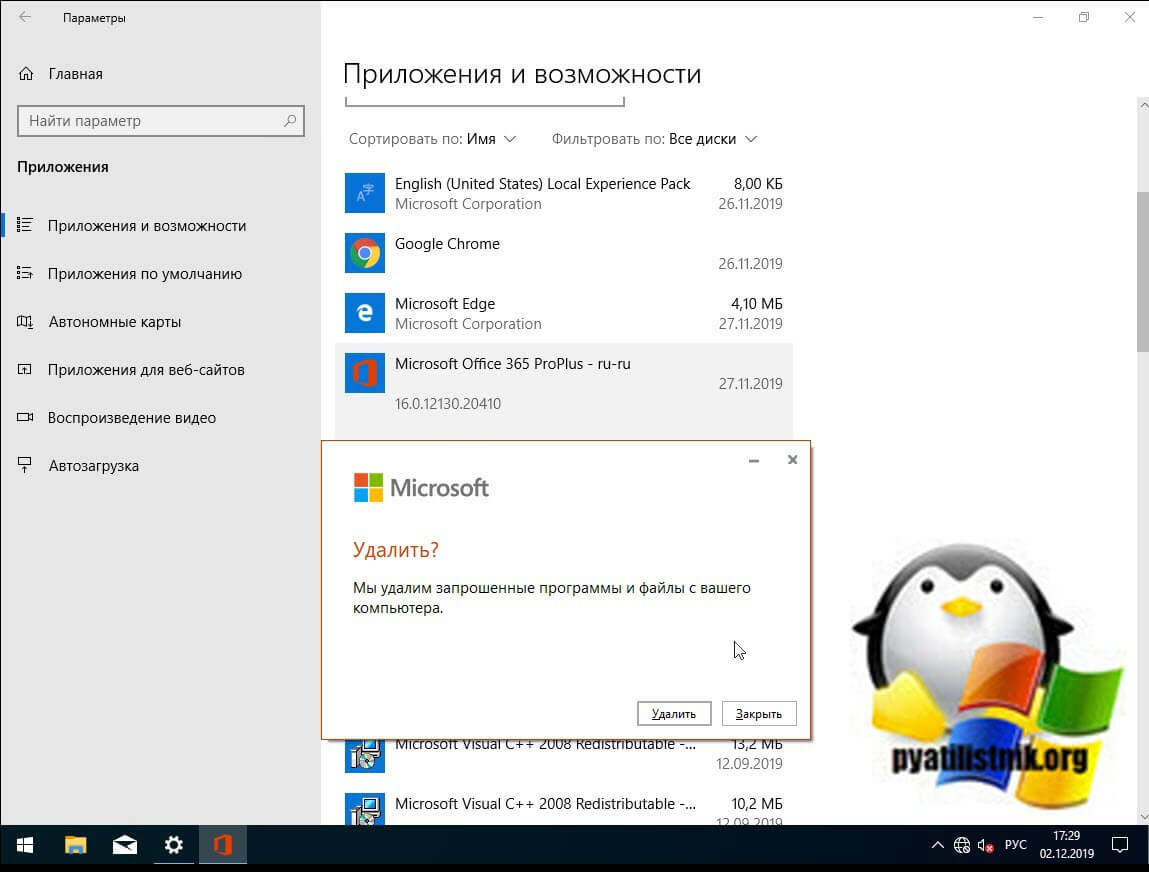
Добрый день! Уважаемые читатели и гости одного из крупнейших IT блогов на просторах рунета Pyatilistnik.org, В прошлый раз я вам подробнейшим образом рассказал, как устанавливается и используется утилита Iperf для проверки вашей локальной сети. В сегодняшней статье я хочу рассмотреть частую ошибку в операционной системе Windows 10 при попытке удалить приложение в моем случае office 365, звучит она вот так: Windows не удается получить доступ к указанному устройству, пути или файлу. Возможно у вас нет нужных разрешений для доступа к этому объекту. Давайте разбираться в чем дело.
Описание ситуации
И так есть операционная система Windows 10, мне необходимо было удалить Office 365, при попытке это сделать из параметров Windows я получил ошибку
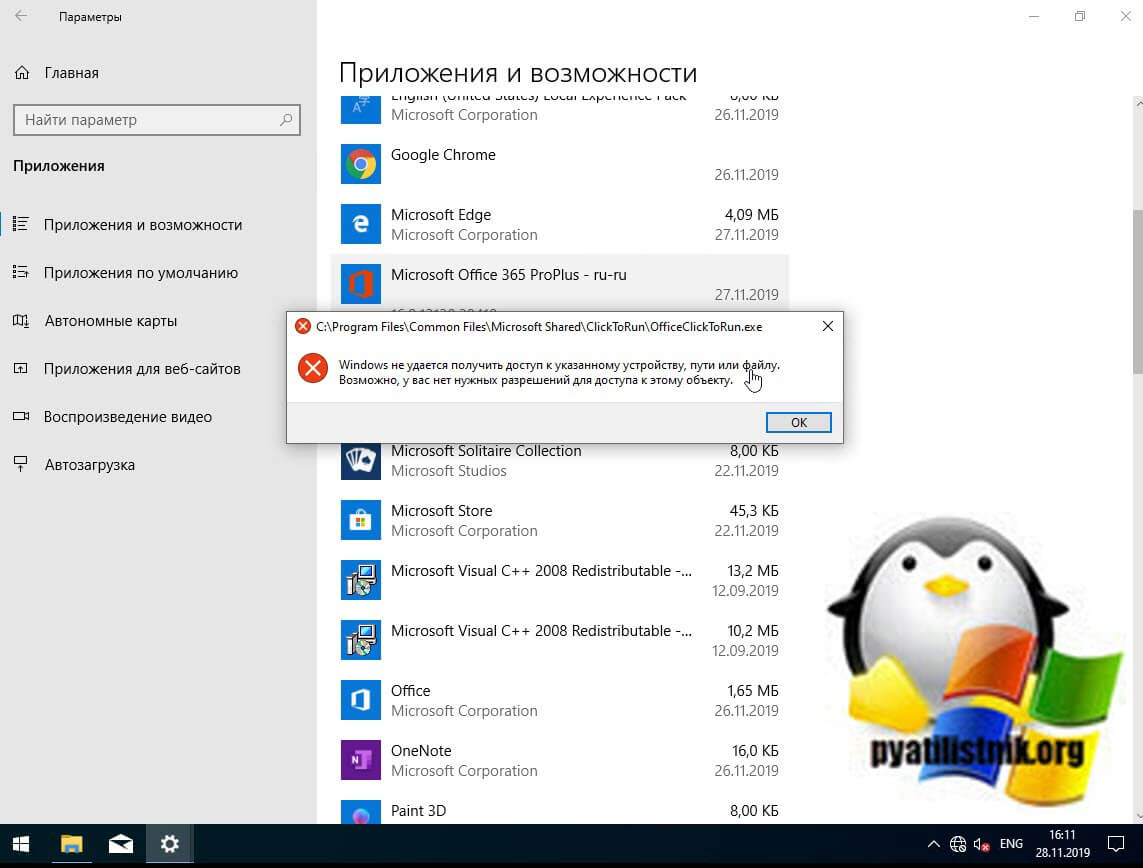
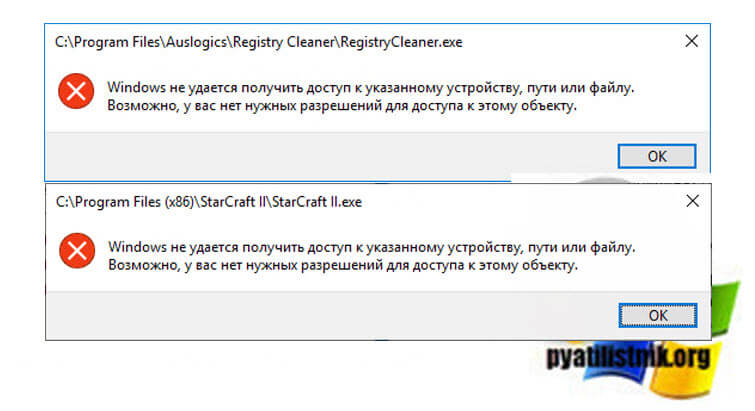
На своей богатой практике данную ошибку я встречал в разных вариантах и на разных операционных системах. 90% это запуск исполняемых файлов в формате exe или ярлыка lnk, 10%, например при удалении приложений. Вот вам несколько примеров:
- Registry Cleaner
- StarCraft 2
- Steam
- Файлы офисного пакета MS Office, например Word или Exel
- Ярлыки различных приложений
Причины ошибки: Windows не удается получить доступ к указанному устройству, пути или файлу
Если детально разобрать текст ошибки, то из нее видно, что у вашей учетной записи либо нет прав на файл, либо самого файла уже просто нет, поэтому он и не доступен. Из совсем специфичных причин, это повреждение самого файла, а так же его блокировка.
Ошибка при удалении приложения
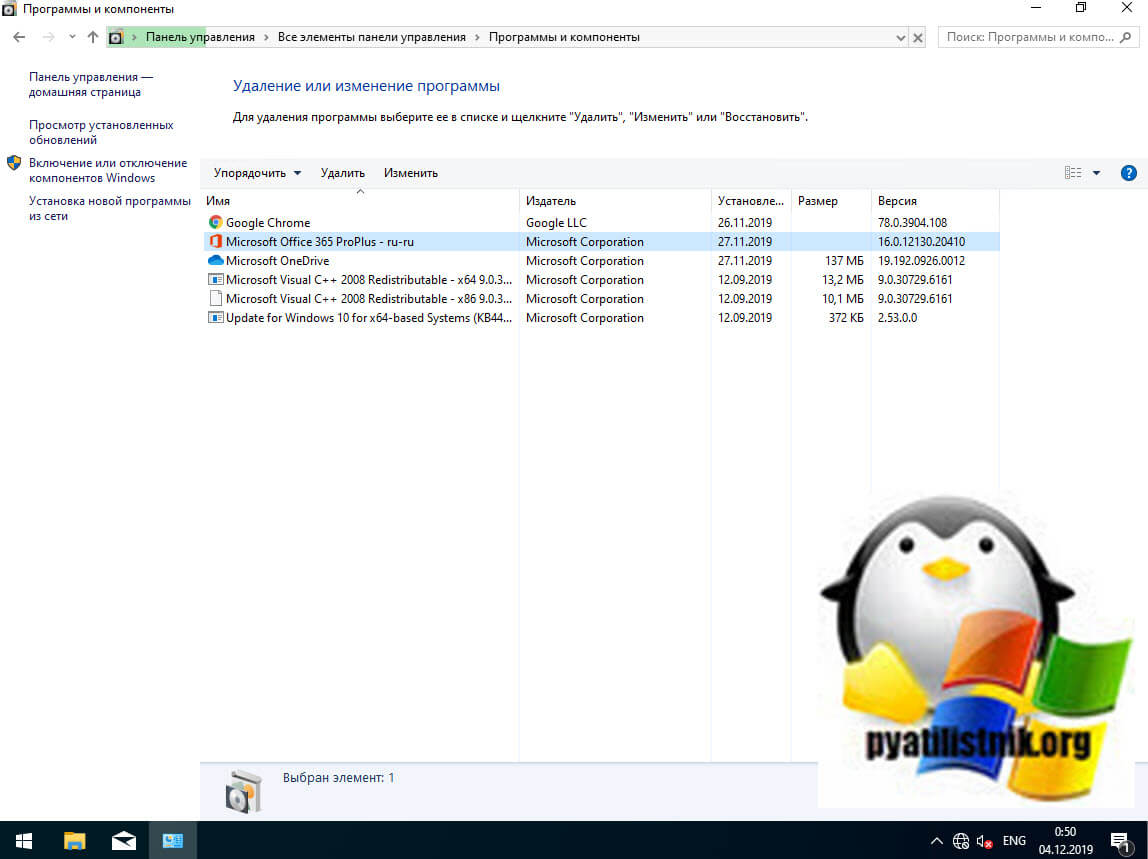
В самом начале я вам показал ситуацию, когда я обладая административными правами в операционной системе Windows 10, не могу элементарно удалить приложение из окна параметров Windows. Перед тем как начинать шаманство с правами или настройками политик, я вам советую попробовать окно «Программы и компоненты«. Открыть его можно вызвав окно «Выполнить» и введя appwiz.cpl.
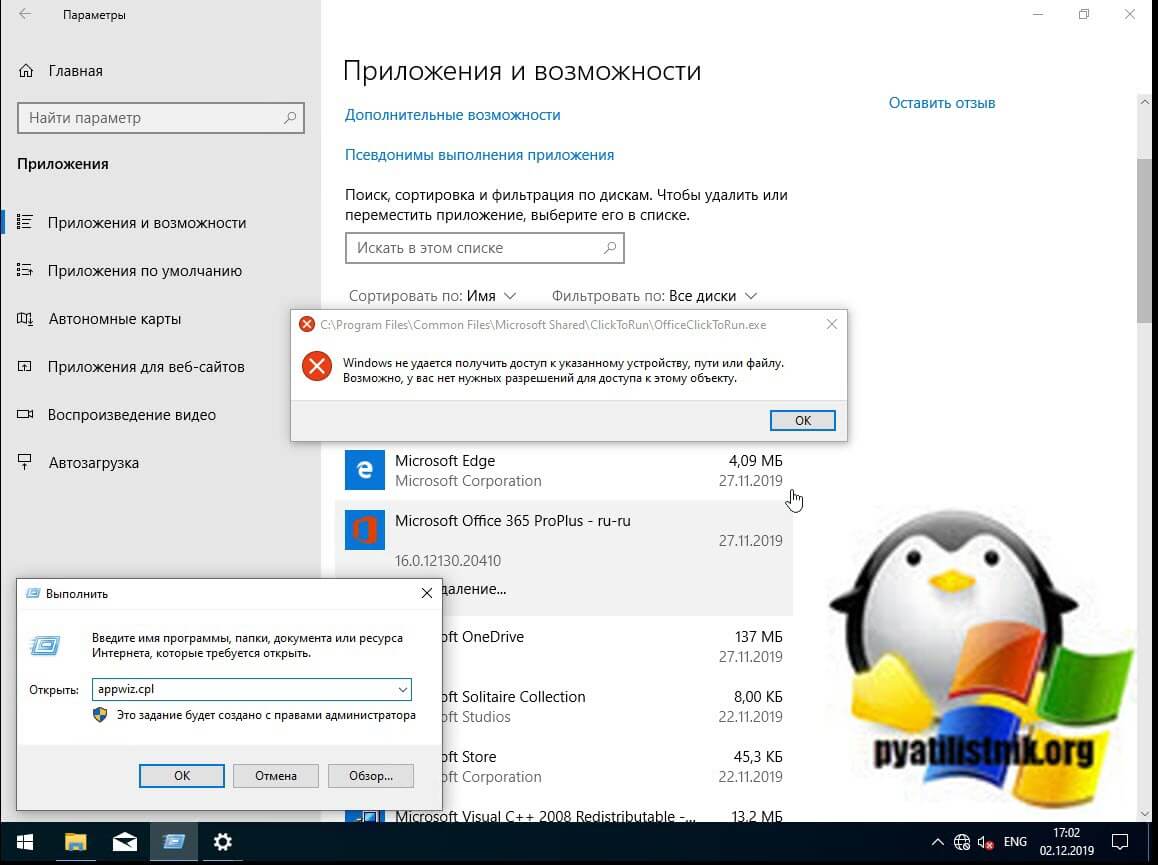
В списке найдите нужное приложение и попробуйте его деинсталлировать, в 99% случаев у вас не возникнет проблем.
Ошибка запуска из-за UAC (User Account Control)
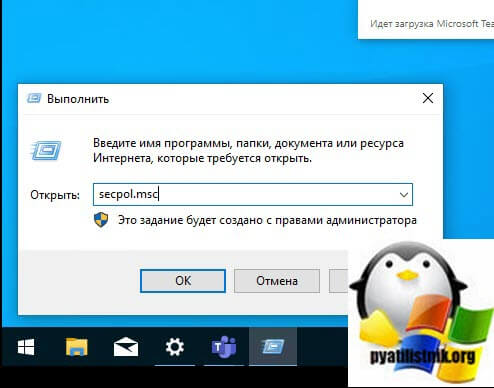
Если у вас доменный компьютер, то вы легко можете иметь некоторые ограничения из-за политик и конкретно UAC (User Account Control). Я авторизовался в системе под встроенной, локальной учетной записью «Администратор» и увидел, что из под нее проблема не наблюдается. Имея данную информацию, можно точно утверждать, что дело в политике. Откройте окно выполнить и введите secpol.msc.
Посмотрите внимательно на ошибку запуска вашего приложения, в самом верху вы увидите полный путь до его месторасположения.
Далее вам необходимо перейти в раздел «Локальная политика — Параметры безопасности«, где необходимо найти пункт «Контроль учетных записей: использование режима одобрения администратором для встроенной учетной записи администратора (User Account Control: Admin Approval Mode for the Built-in Administrator account)»
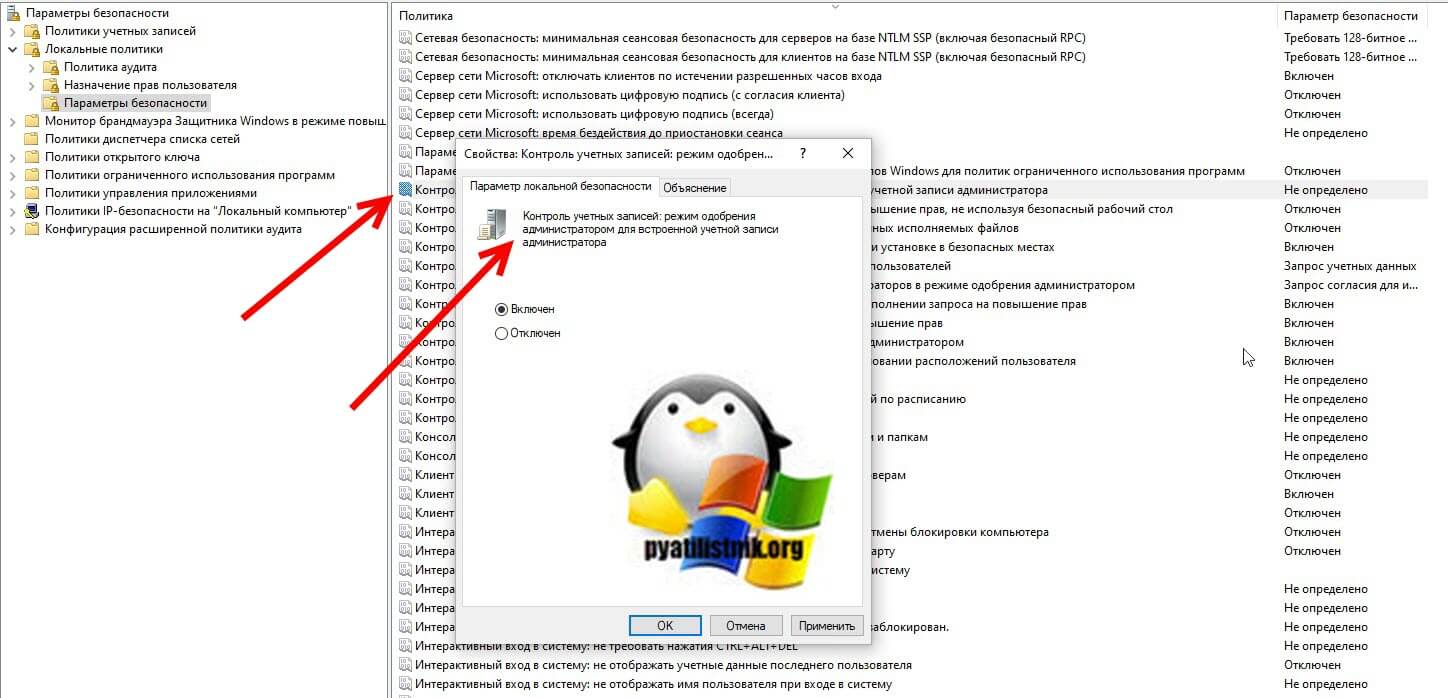
• Включено. Для встроенной учетной записи администратора используется режим одобрения администратором. По умолчанию любая операция, требующая повышения привилегий, предлагает пользователю подтвердить операцию.
• Отключено (по умолчанию). Встроенная учетная запись администратора выполняет все приложения с полными привилегиями администратора.
Далее я советую вам произвести выход из системы и заново залогиниться. После входа в ОС проверьте появилась ли возможность запуска приложения или его удаление, в моем случае сработало.
Просмотр разрешений на exe и lnk файлы и их блокировка
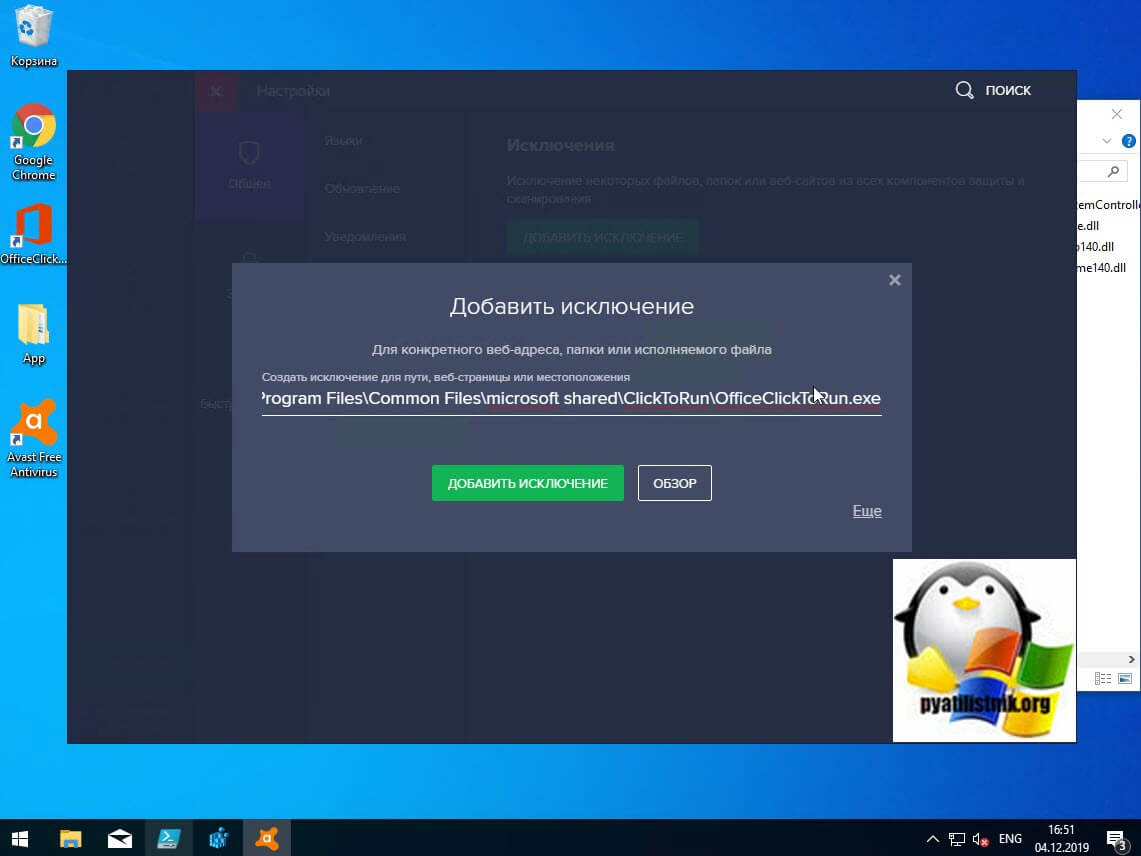
Если по каким-то причинам вам не помогли первые два метода и вы до сих под при запуске исполняемого файла exe или ярлыка, получаете окно с ошибкой «Windows не удается получить доступ к указанному устройству, пути или файлу», то следует посмотреть какие разрешения выставлены в его свойствах, это очень важно. В моем примере, это файл OfficeClickToRun.exe. Открываем его месторасположение и смотрим его свойства.
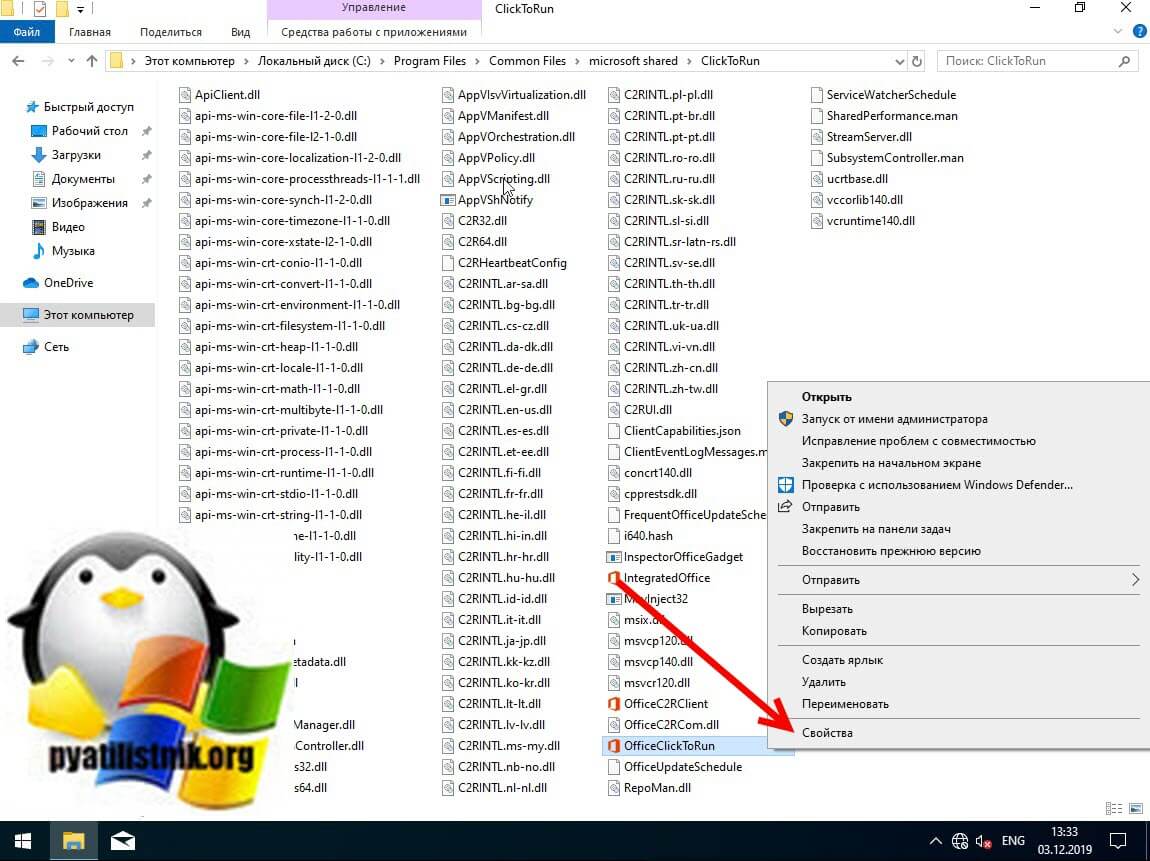
далее открываете вкладку «Безопасность» и смотрите права доступа и запрета на все объекты перечисленные в списке ACL (Access Control List). В моем примере есть такие фигуранты доступа:
- Все пакеты приложений
- Все ограниченные пакеты приложений
- Система
- Администраторы
- Пользователи
Обратите внимание, что для того чтобы просто запустить исполняемый exe файл, относящийся к определенному приложению, у вас должны быть минимум права на чтения, в редких случаях на запись. Удостоверьтесь, что они присутствуют для всех участников. Так же нужно проверить, что у системы и администраторов, были полные права, И САМОЕ ГЛАВНОЕ нет запретов.

У вас вполне может быть ситуация, что для группы «Администраторы» у вас могут быть полные права, а вот на уровне пользователя запрет, а так как пользователь может являться членом группы «Администраторы» и вроде бы иметь права на доступ, но его явные запреты перевесят и будут вызывать ошибку «Windows не удается получить доступ к указанному устройству, пути или файлу»
Понимая принцип работы приоритетов на доступ, вам необходимо снять ограничения запрета на данный файл, для этого нажмите кнопку «Изменить«. В открывшемся окне найдите нужную группу или пользователя и назначьте ему полный доступ на данный файл (или снимите явные запрещения).

Пробуем теперь запустить файл с которым были проблемы, у вас должно все получиться.
Как я и писал ваш файл или ярлык могут находиться в режиме блокировки, это ограничивает его открытие, подобное мы видели в ситуации когда скачали из интернета ISO образ и при его открытии наблюдали сообщение с ошибкой «К сожалению при подключении файла возникла проблема». Чтобы проверить блокировку файла нужно так же пройти в его свойства на вкладку «Общие». Как видно из моего примера он имеет статус:
Справа у вас будет возможность поставить галочку «Разблокировать«, дабы снять это ограничение запуска. Нажмите применить и закройте окно.
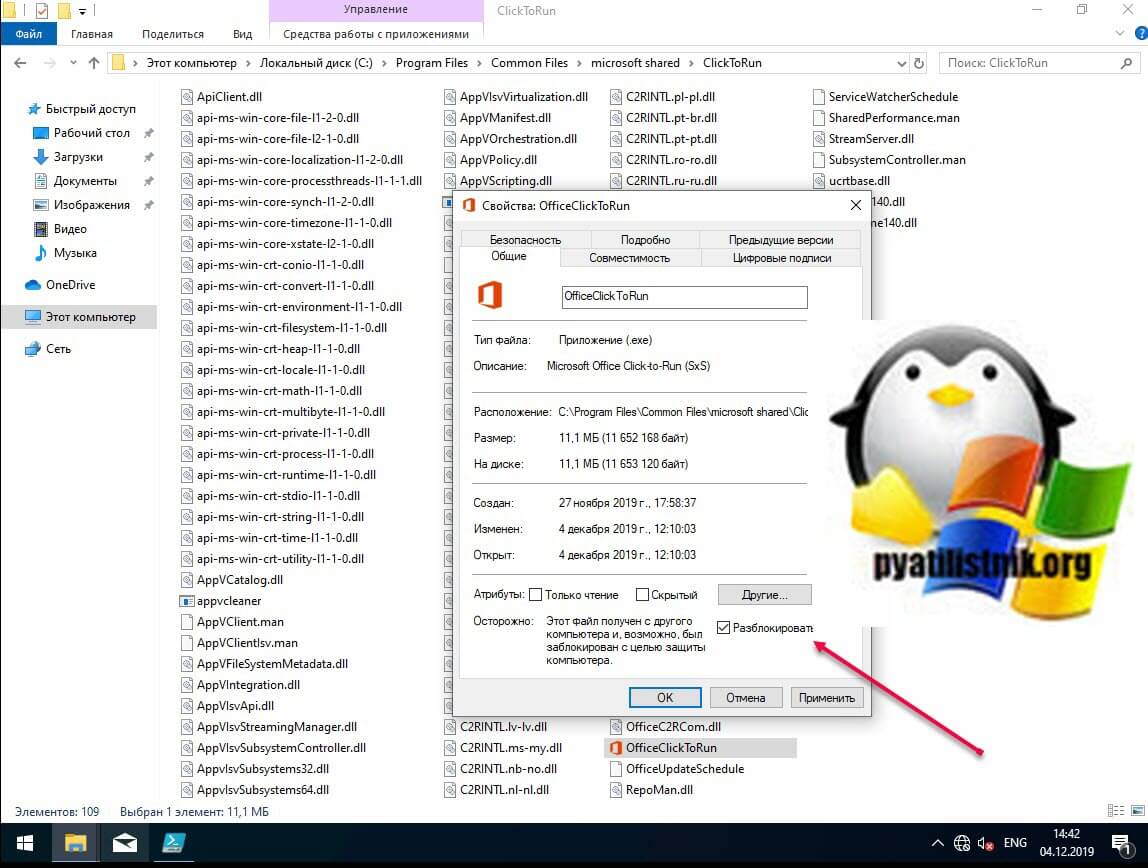
Повторно откройте свойства exe файла или ярлыка и удостоверьтесь, что сообщение о блокировке отсутствует. После чего попробуйте запустить ваше приложение или игру, ошибка запуска «Windows не удается получить доступ к указанному устройству, пути или файлу» должна пропасть.
Ошибка «Windows не удается получить доступ к указанному устройству, пути или файлу» при запуске файла .exe с флешки или другого USB-носителя
У всех из нас есть съемные носители, это удобно держать нужные данные всегда под рукой. Очень часто на них могут присутствовать портативные программы, которые запускаются не требуя установки, мини игры, проекты у программистов. Всех их объединяет запуск через исполняемые файлы exe. Предположим, что в вашей системе Windows 8.1 или другой не наблюдается проблем с запуском встроенных и установленных в нее приложений, которые чаще всего лежат на диске C:, а вот с флешки вы получаете пресловутую, где якобы нет доступа, вы проверили блокировки, права и все они присутствуют, но вот эффекта нет. В такой ситуации вы можете действовать таким образом:
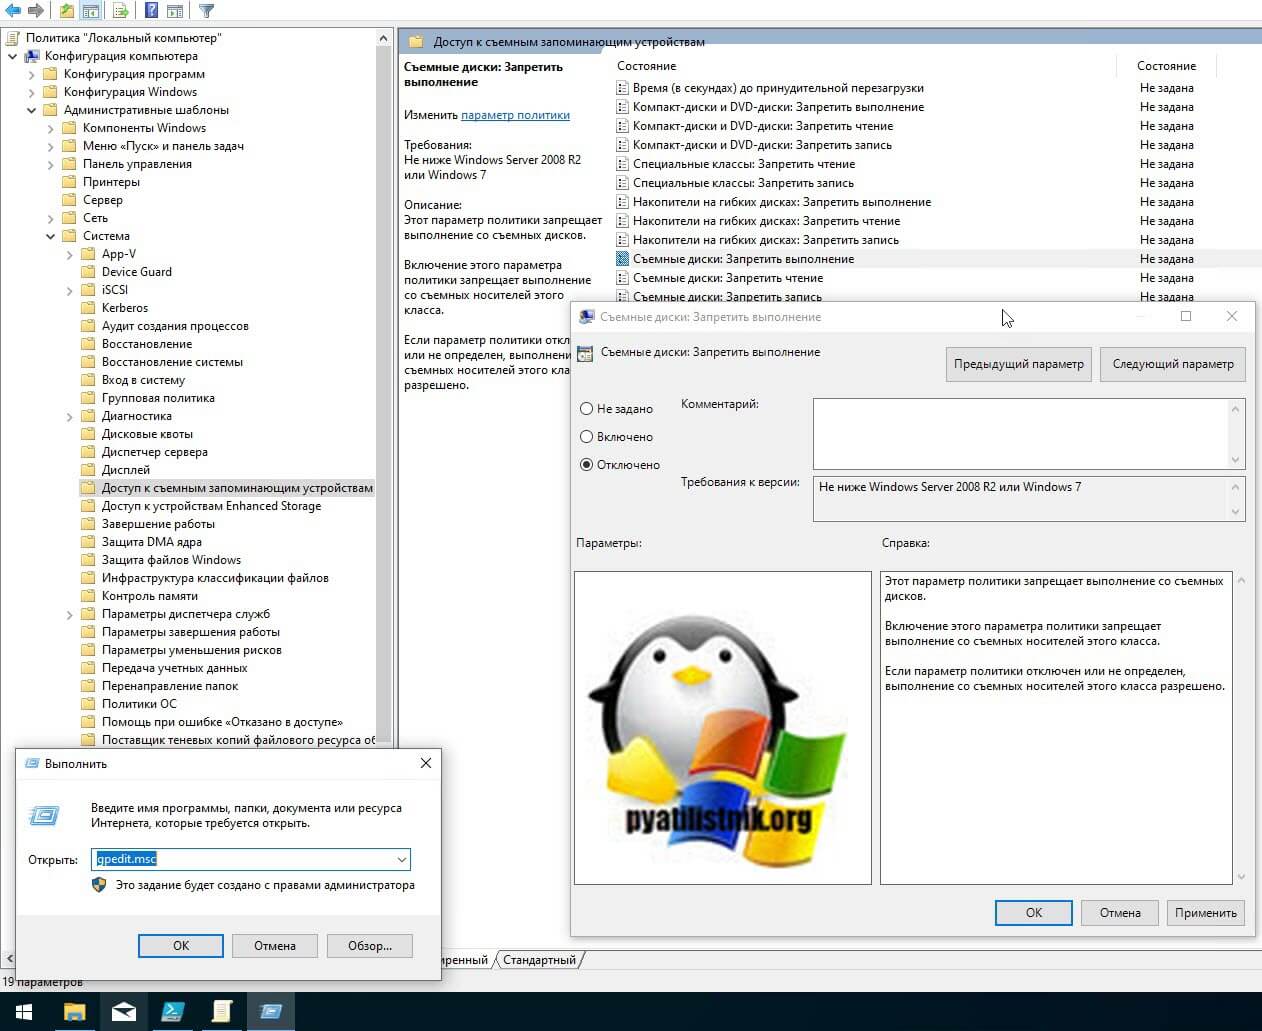
- Для операционных систем Windows 7 до 10 с редакцией Максимальная, PRO или корпоративная вы открываете окно выполнить вводите знакомый нам уже gpedit.msc.
- Далее перейдите в раздел «Конфигурация компьютера — Административные шаблоны — Система — Доступ к съемным запоминающим устройствам«. Убедитесь, что политика «Съемные диски: Запретить выполнение» и других политик, связанных со съемными дисками» имеет статус не задано или отключено. Если же она активирована, то вы не сможете запускать с USB носителей исполняемые файлы exe.
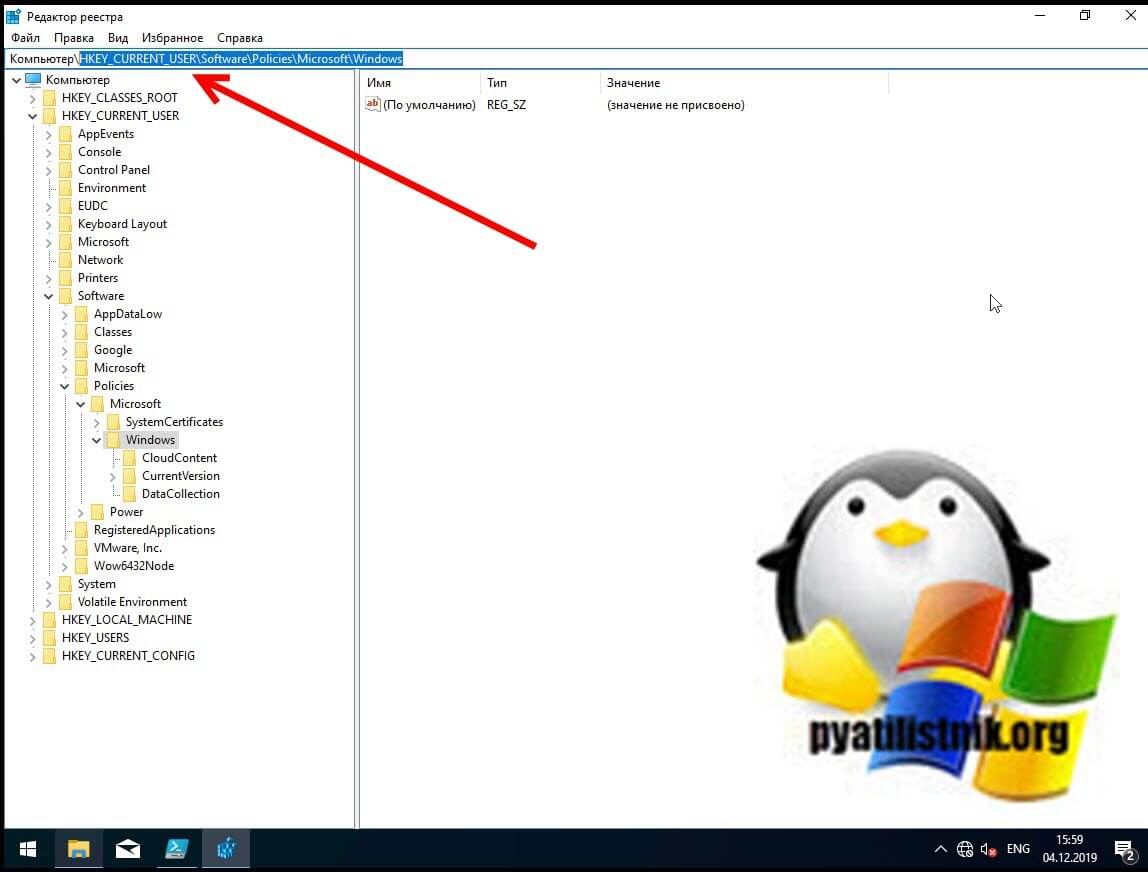
описанный выше метод подходил для старших редакций «Максимальная», «Корпоративная», «Профессиональная», но они есть не у всех, у многих людей дома редакции «Home (Домашняя)» и в ней нет редактора локальных политик, его конечно можно вернуть, я об этом рассказывал, но не всем это нужно. Чтобы убрать запрет на запуск exe файлов со съемных носителей мы воспользуемся редактором реестра. Запустите редактор реестра Windows (Нажмите WIN и R, в окне введите regedit).
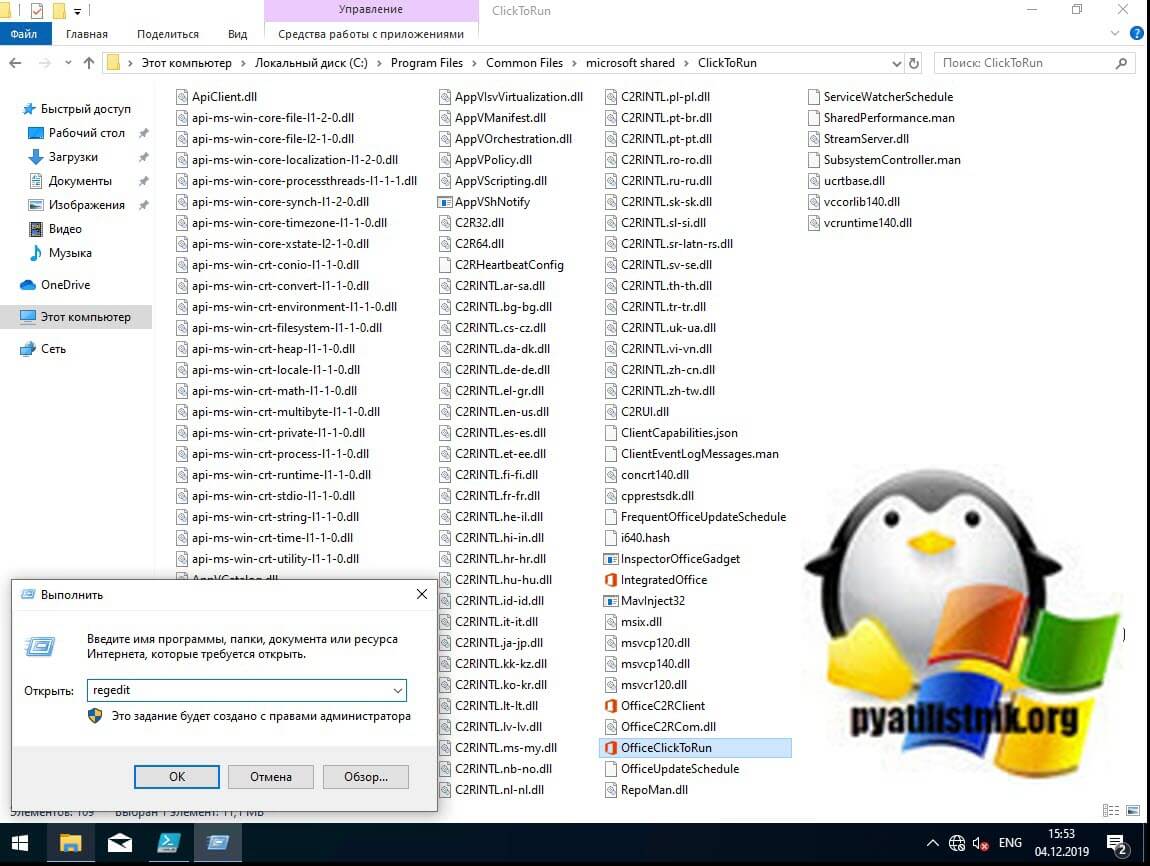
Переходите там по пути:
Убедитесь, что в нем нет раздела RemovableStorageDevices. Если раздел RemovableStorageDevices присутствует, то просто щелкаем по нему правой кнопкой мыши и удаляем его.
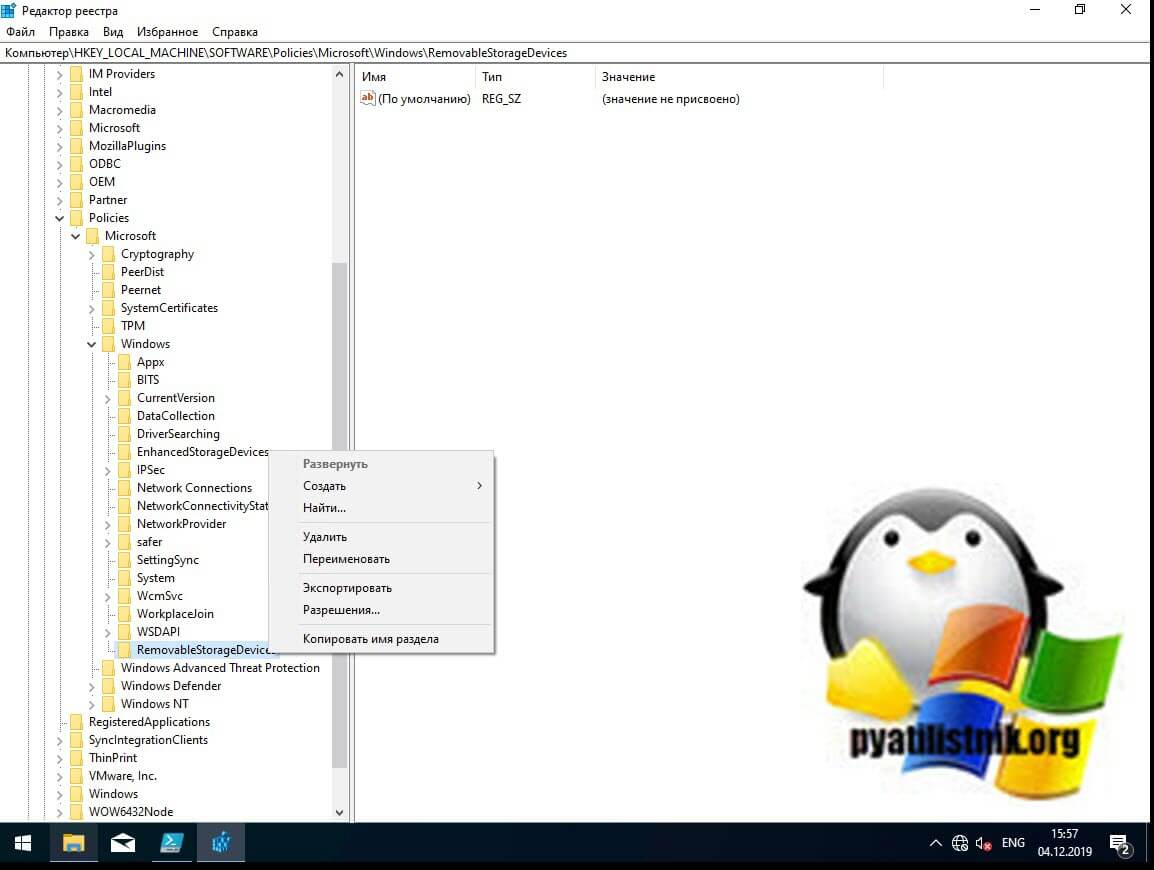
Подтверждаем удаление раздела.
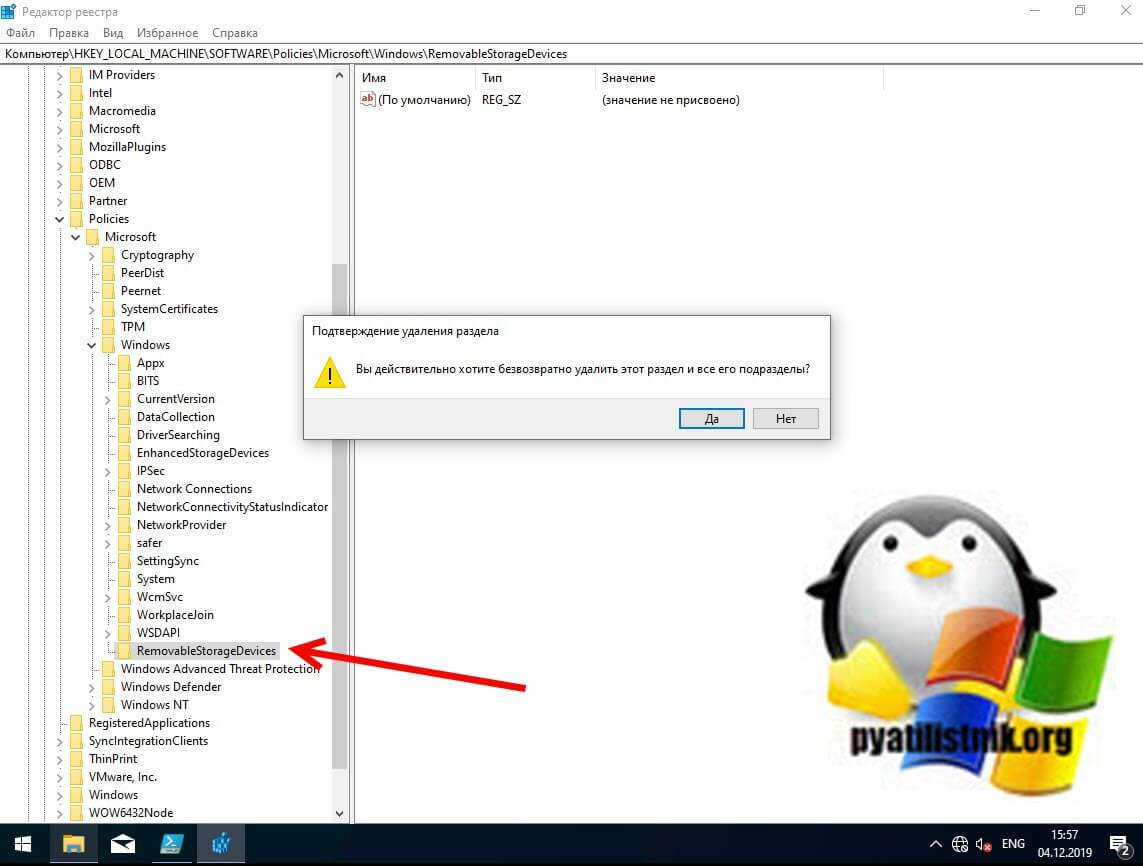
Как только вы произвели манипуляции с реестром, то настройки вступят в силу сразу .но я советую перезагрузить систему или как минимум правильно извлечь ваш съемный носитель, после чего заново подключить. Пробуем запускать с USB исполняемые файлы exe, это должно было устранить ошибку с доступом.
Если не запускается ярлык программы или игры
Как я упоминал ранее, Windows не может запустить программу или открыть файл с внешнего или сетевого диска, который в данный момент не подключен. Поэтому, если вы получили ошибку при нажатии на ярлык, проверьте местоположение его целевого файла и посмотрите, находится ли файл в недоступном месте. Чтобы это проверить, откройте свойства и перейдите на вкладку «Ярлык». Убедитесь, что пути в строке «Объект» и «Рабочая папка» ведут к нужному файлу, чуть ниже вы можете это проверить, нажав на кнопку «расположение файла», что в результате вызовет месторасположение файла в проводнике Windows.

Если путь в ярлыке ведет не туда, то логично получение сообщения с ошибкой доступа к объекту.
Отключите антивирусное программное обеспечение
Антивирусное программное обеспечение также может блокировать ваши файлы. Поэтому вы можете временно отключить антивирусное программное обеспечение на своем компьютере, а затем попытаться открыть файл.
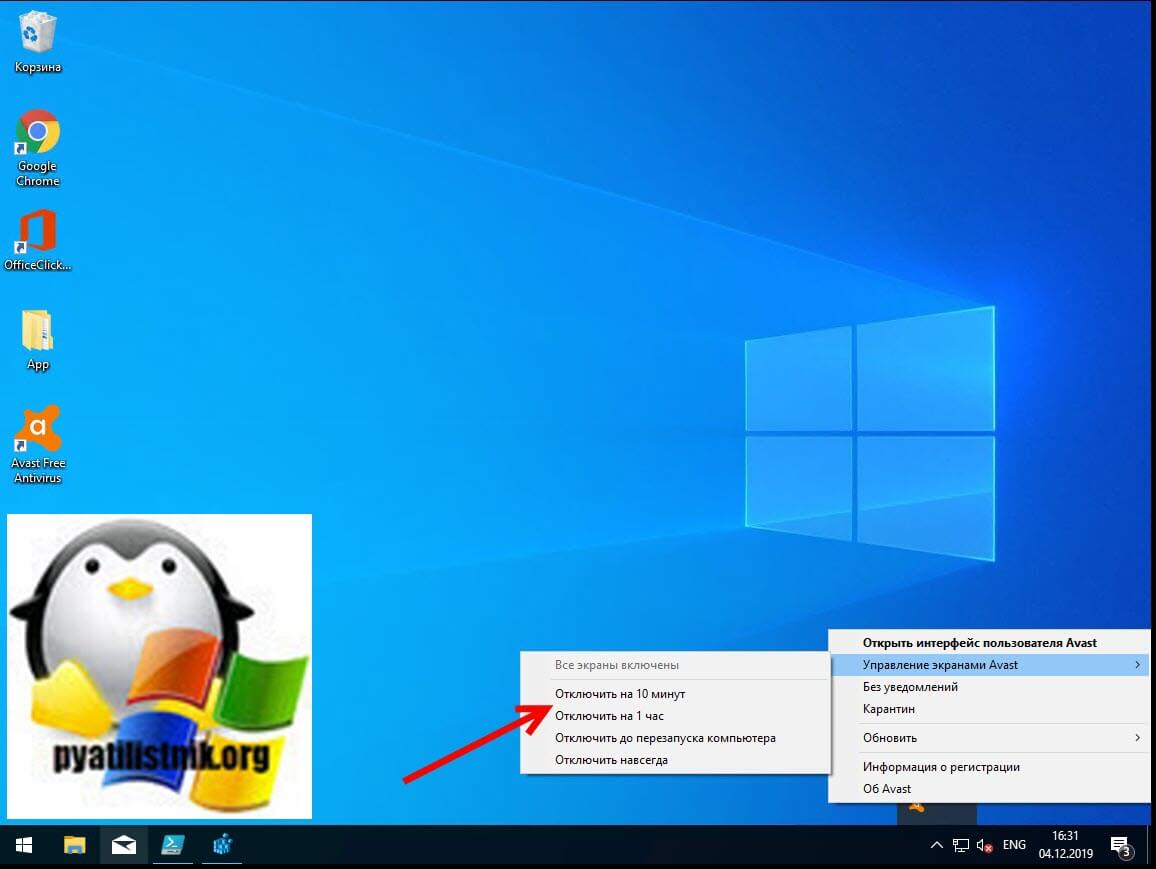
Если вы можете получить доступ к файлу, когда антивирусное программное обеспечение отключено, оно явно блокирует файл. Вы можете удалить антивирусное программное обеспечение или отключить программное обеспечение, когда вам нужно использовать файл. Например у Avast, приостановка делается очень просто, в области уведомлений Windows щелкаете по значку антивируса и из контекстного меню выбираете пункт «Управление экранами Avast — отключить на 10 минут или час», этого достаточно понять в нем дело или нет.
Далее если блокировку вызывал антивирус, в моем примере Avast, то идем в его настройки и добавляем исключение, путь до нашего файла, чтобы антивирус его не трогал и признавал за своего.
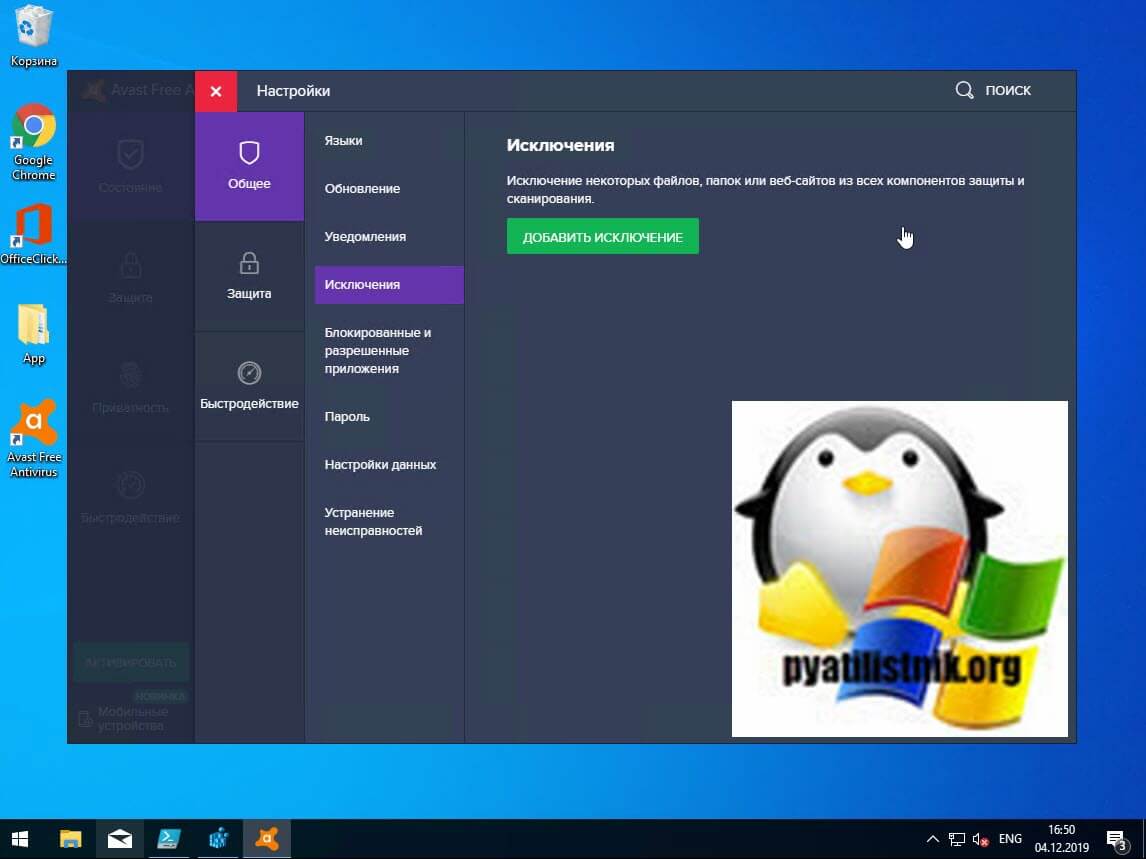
Через кнопку обзор найдите свой exe файл и добавьте его.
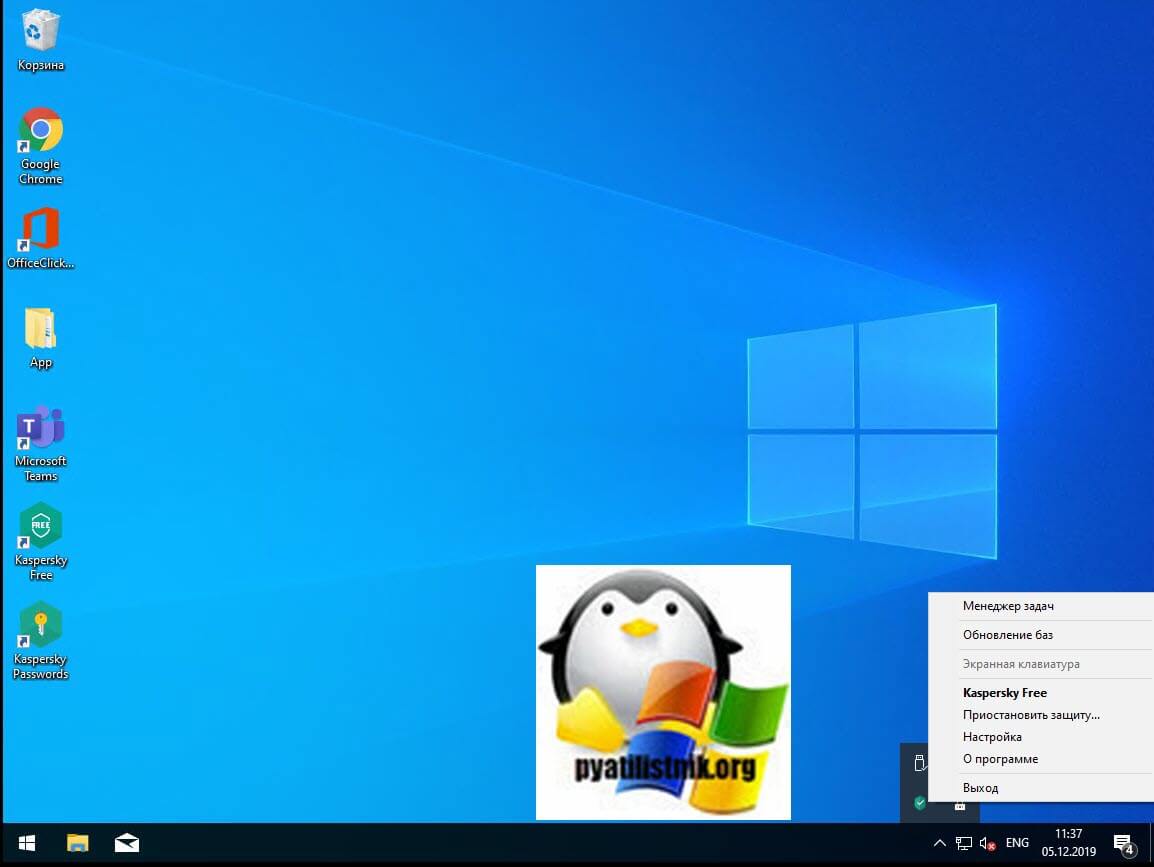
То же самое можно осуществить и в распространенном антивирусе Kaspersky, для этого также в области системных уведомлений найдите его значок и из контекстного меню выберите пункт «Приостановить защиту».
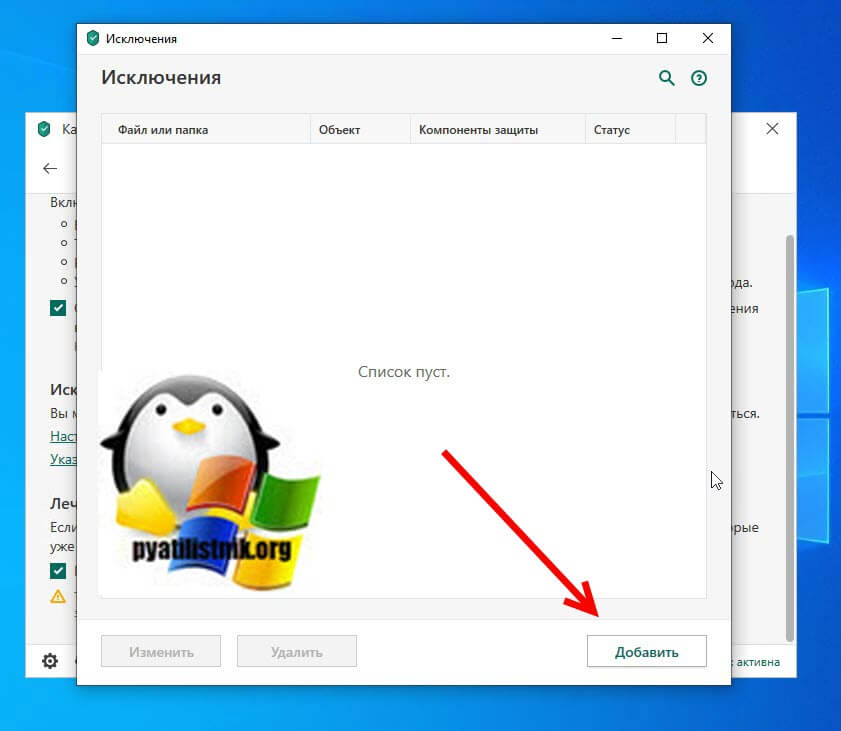
Чтобы исключить нужный исполняемый файл вам необходимо открыть настройки Kaspersky, перейти в раздел «Дополнительно» и выбрать там пункт «Угрозы и исключения».

Далее в разделе «Исключения» нажмите на пункт «Настроить исключения»

Далее нажимаем кнопку «Добавить»
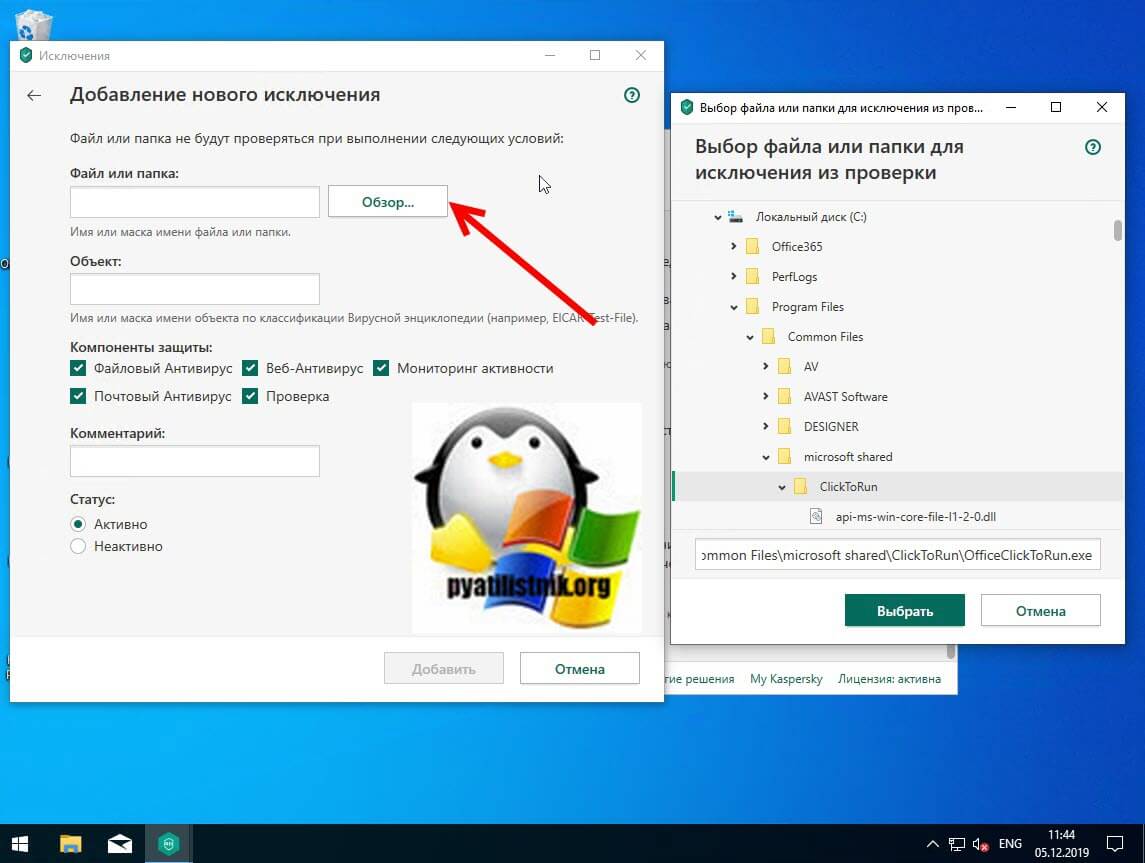
Через кнопку обзор укажите путь до вашего файла.
У любого антивируса есть свои системные события, которые он записывает к себе в лог, там будут и упоминания, о блокировке файла. Если ошибка «Windows не удается получить доступ к указанному устройству, пути или файлу. Возможно, у вас нет нужных разрешений для доступа к этому объекту» появилась, то смотрим журнал угроз. Если причина была в антивирусе, то подобным методом вы устраните ошибку запуска exe файла и вызов ошибки «Windows не удается получить доступ к указанному устройству, пути или файлу».
Восстановите файл, который был удален, удален или поврежден
Если доступ к файлу невозможен из-за того, что файл поврежден или удален, внешний диск поврежден или поврежден вирусом, вы можете восстановить потерянный файл с помощью различных программ, например, DiskGenius, EaseUS Data Recovery Wizard, FonePaw Data Recovery.
Проверка политики ограниченного использования программ SRP
Есть такая политика Software Restriction Policies (Политики ограниченного использования программ) — это функция, основанная на групповых политиках, которая определяет программы, работающие на компьютерах в домене Active Directory, и управляет возможностью их запуска. Политики ограничения программного обеспечения являются частью стратегии безопасности и управления Microsoft, которая помогает предприятиям повысить надежность, целостность и управляемость своих компьютеров.
Вы также можете использовать политики ограниченного использования программ для создания сильно ограниченных конфигураций для компьютеров, в которых вы разрешаете запускать только специально определенные приложения. Политики ограниченного использования программ интегрированы с Microsoft Active Directory и групповой политикой. Вы также можете создавать политики ограниченного использования программ на автономных компьютерах. Политики ограниченного использования программ — это политики доверия, которые представляют собой правила, установленные администратором для ограничения работы сценариев и другого кода, который не является полностью доверенным.
Вы можете определить эти политики с помощью расширения политик ограниченного использования программ редактора локальной групповой политики или оснастки «Локальные политики безопасности» в консоли управления (MMC).
Проверить наличие на компьютере политики SRP можно через RSOP или реестр, давайте я покажу какую ветку реестра нужно изучить.
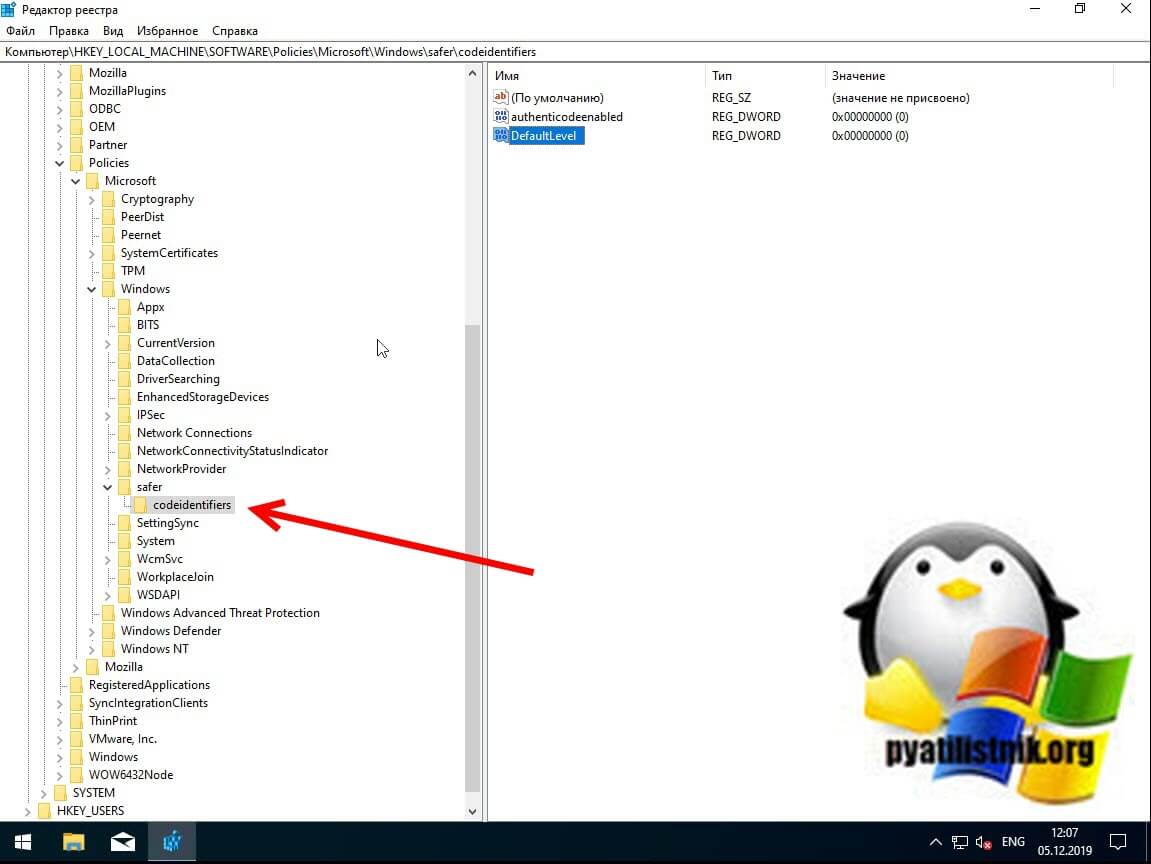
Наличие раздела safercodeidentifiers уже говорит, о применении политик SRP. Регулируется она ключом DefaultLevel. Чтобы приостановить действие политики SRP установите у ключа DefaultLevel значение .
Последнее обновление: 07/09/2022
[Среднее время чтения: 4,5 мин.]
Файлы Registry Repair Wizard Scheduler, такие как RCHelper.exe, считаются разновидностью файла Win32 EXE (Исполняемое приложение). Они соотносятся с расширением EXE, разработанным компанией SmartPCTools для Registry Repair Wizard.
Файл RCHelper.exe изначально был выпущен с Registry Repair Wizard 2012 6.72 06/10/2012 для ОС Windows 10.
Это не только самый последний выпуск от компании SmartPCTools, но и, насколько известно, единственная существующая версия.
Ниже приведены исчерпывающие сведения о файле, инструкции для простого устранения неполадок, возникших с файлом EXE, и список бесплатных загрузок RCHelper.exe для каждой из имеющихся версий файла.
Что такое сообщения об ошибках RCHelper.exe?
RCHelper.exe — ошибки выполнения
Ошибки выполнения — это ошибки Registry Repair Wizard 2012, возникающие во время «выполнения». Термин «выполнение» говорит сам за себя; имеется в виду, что данные ошибки EXE возникают в момент, когда происходит попытка загрузки файла RCHelper.exe — либо при запуске приложения Registry Repair Wizard 2012, либо, в некоторых случаях, во время его работы. Ошибки выполнения являются наиболее распространенной разновидностью ошибки EXE, которая встречается при использовании приложения Registry Repair Wizard 2012.
В большинстве случаев ошибки выполнения RCHelper.exe, возникающие во время работы программы, приводят к ненормальному завершению ее работы. Большинство сообщений об ошибках RCHelper.exe означают, что либо приложению Registry Repair Wizard 2012 не удалось найти этот файл при запуске, либо файл поврежден, что приводит к преждевременному прерыванию процесса запуска. Как правило, Registry Repair Wizard 2012 не сможет запускаться без разрешения этих ошибок.
Таким образом, крайне важно, чтобы антивирус постоянно поддерживался в актуальном состоянии и регулярно проводил сканирование системы.
Поиск причины ошибки RCHelper.exe является ключом к правильному разрешению таких ошибок. Несмотря на то что большинство этих ошибок EXE, влияющих на RCHelper.exe, происходят во время запуска, иногда ошибка выполнения возникает при использовании Registry Repair Wizard. Причиной этого может быть недостаточное качество программного кода со стороны SmartPCTools, конфликты с другими приложениями, сторонние плагины или поврежденное и устаревшее оборудование. Кроме того, эти типы ошибок RCHelper.exe могут возникать в тех случаях, если файл был случайно перемещен, удален или поврежден вредоносным программным обеспечением. Таким образом, крайне важно, чтобы антивирус постоянно поддерживался в актуальном состоянии и регулярно проводил сканирование системы.
Как исправить ошибки RCHelper.exe — 3-шаговое руководство (время выполнения: ~5-15 мин.)
Если вы столкнулись с одним из вышеуказанных сообщений об ошибке, выполните следующие действия по устранению неполадок, чтобы решить проблему RCHelper.exe. Эти шаги по устранению неполадок перечислены в рекомендуемом порядке выполнения.
Шаг 1. Восстановите компьютер до последней точки восстановления, «моментального снимка» или образа резервной копии, которые предшествуют появлению ошибки.
Чтобы начать восстановление системы (Windows XP, Vista, 7, 8 и 10):
- Нажмите кнопку «Пуск» в Windows
- В поле поиска введите «Восстановление системы» и нажмите ENTER.
- В результатах поиска найдите и нажмите «Восстановление системы»
- Введите пароль администратора (при необходимости).
- Следуйте инструкциям мастера восстановления системы, чтобы выбрать соответствующую точку восстановления.
- Восстановите компьютер к этому образу резервной копии.
Если на этапе 1 не удается устранить ошибку RCHelper.exe, перейдите к шагу 2 ниже.

Шаг 2. Если вы недавно установили приложение Registry Repair Wizard 2012 (или схожее программное обеспечение), удалите его, затем попробуйте переустановить Registry Repair Wizard 2012.
Чтобы удалить программное обеспечение Registry Repair Wizard 2012, выполните следующие инструкции (Windows XP, Vista, 7, 8 и 10):
- Нажмите кнопку «Пуск» в Windows
- В поле поиска введите «Удалить» и нажмите ENTER.
- В результатах поиска найдите и нажмите «Установка и удаление программ»
- Найдите запись для Registry Repair Wizard 2012 6.72 и нажмите «Удалить»
- Следуйте указаниям по удалению.
После полного удаления приложения следует перезагрузить ПК и заново установить Registry Repair Wizard 2012.
Если на этапе 2 также не удается устранить ошибку RCHelper.exe, перейдите к шагу 3 ниже.
![]()
Registry Repair Wizard 2012 6.72
SmartPCTools
Шаг 3. Выполните обновление Windows.
Когда первые два шага не устранили проблему, целесообразно запустить Центр обновления Windows. Во многих случаях возникновение сообщений об ошибках RCHelper.exe может быть вызвано устаревшей операционной системой Windows. Чтобы запустить Центр обновления Windows, выполните следующие простые шаги:
- Нажмите кнопку «Пуск» в Windows
- В поле поиска введите «Обновить» и нажмите ENTER.
- В диалоговом окне Центра обновления Windows нажмите «Проверить наличие обновлений» (или аналогичную кнопку в зависимости от версии Windows)
- Если обновления доступны для загрузки, нажмите «Установить обновления».
- После завершения обновления следует перезагрузить ПК.
Если Центр обновления Windows не смог устранить сообщение об ошибке RCHelper.exe, перейдите к следующему шагу. Обратите внимание, что этот последний шаг рекомендуется только для продвинутых пользователей ПК.

Если эти шаги не принесут результата: скачайте и замените файл RCHelper.exe (внимание: для опытных пользователей)
Если ни один из предыдущих трех шагов по устранению неполадок не разрешил проблему, можно попробовать более агрессивный подход (примечание: не рекомендуется пользователям ПК начального уровня), загрузив и заменив соответствующую версию файла RCHelper.exe. Мы храним полную базу данных файлов RCHelper.exe со 100%-ной гарантией отсутствия вредоносного программного обеспечения для любой применимой версии Registry Repair Wizard 2012 . Чтобы загрузить и правильно заменить файл, выполните следующие действия:
- Найдите версию операционной системы Windows в нижеприведенном списке «Загрузить файлы RCHelper.exe».
- Нажмите соответствующую кнопку «Скачать», чтобы скачать версию файла Windows.
- Скопируйте этот файл в соответствующее расположение папки Registry Repair Wizard 2012:
Windows 10: C:Program Files (x86)SmartPCToolsRegistry Repair Wizard
- Перезагрузите компьютер.
Если этот последний шаг оказался безрезультативным и ошибка по-прежнему не устранена, единственно возможным вариантом остается выполнение чистой установки Windows 10.
СОВЕТ ОТ СПЕЦИАЛИСТА: Мы должны подчеркнуть, что переустановка Windows является достаточно длительной и сложной задачей для решения проблем, связанных с RCHelper.exe. Во избежание потери данных следует убедиться, что перед началом процесса вы создали резервные копии всех важных документов, изображений, установщиков программного обеспечения и других персональных данных. Если вы в настоящее время не создаете резервных копий своих данных, вам необходимо сделать это немедленно.
Скачать файлы RCHelper.exe (проверено на наличие вредоносного ПО — отсутствие 100 %)
ВНИМАНИЕ! Мы настоятельно не рекомендуем загружать и копировать RCHelper.exe в соответствующий системный каталог Windows. SmartPCTools, как правило, не выпускает файлы Registry Repair Wizard 2012 EXE для загрузки, поскольку они входят в состав установщика программного обеспечения. Задача установщика заключается в том, чтобы обеспечить выполнение всех надлежащих проверок перед установкой и размещением RCHelper.exe и всех других файлов EXE для Registry Repair Wizard 2012. Неправильно установленный файл EXE может нарушить стабильность работы системы и привести к тому, что программа или операционная система полностью перестанут работать. Действовать с осторожностью.
Файлы, относящиеся к RCHelper.exe
Файлы EXE, относящиеся к RCHelper.exe
| Имя файла | Описание | Программа (версия) | Размер файла (байты) | Расположение файла |
|---|---|---|---|---|
| OneDriveUpdaterService… | Updater Service | Microsoft OneDrive (19.222.1110.0006) | 2485096 | C:UsersTesterAppDataLocalMicrosoftOneDriv… |
| FileSyncHelper.exe | Microsoft OneDriveFileSyncHelper | Microsoft OneDrive (19.222.1110.0006) | 2134376 | C:UsersTesterAppDataLocalMicrosoftOneDriv… |
| OneDrive.exe | Microsoft OneDrive | Microsoft OneDrive (19.222.1110.0006) | 1584488 | C:UsersTesterAppDataLocalMicrosoftOneDrive |
| RCleaner.exe | Registry Repair Wizard | Registry Repair Wizard (2012, 6, 7, 2) | 3537688 | C:Program Files (x86)SmartPCToolsRegistry Re… |
| unins000.exe | Setup/Uninstall | Registry Repair Wizard 2012 6.72 | 754970 | C:Program Files (x86)SmartPCToolsRegistry Re… |
Другие файлы, связанные с RCHelper.exe
| Имя файла | Описание | Программа (версия) | Размер файла (байты) | Расположение файла |
|---|---|---|---|---|
| setupact.log | Log | Registry Repair Wizard 2012 6.72 | 62521 | C:WindowsPantherUnattendGC |
| setupact.log | Log | Registry Repair Wizard 2012 6.72 | 24622 | C:WindowsSystem32SysprepPanther |
| setupapi.dev.log | Log | Registry Repair Wizard 2012 6.72 | 684126 | C:Windowsinf |
| WmiApRpl.ini | Windows Initialization | Registry Repair Wizard 2012 6.72 | 29736 | C:WindowsinfWmiApRpl009 |
| api-ms-win-core-synch-… | ApiSet Stub DLL | Microsoft® Windows® Operating System (10.0.17134.12) | 13160 | C:UsersTesterAppDataLocalMicrosoftOneDriv… |
Вы скачиваете пробное программное обеспечение. Для разблокировки всех функций программного обеспечения требуется покупка годичной подписки, стоимость которой оставляет 39,95 долл. США. Подписка автоматически возобновляется в конце срока (Подробнее). Нажимая кнопку «Начать загрузку» и устанавливая «Программное обеспечение», я подтверждаю, что я прочитал (-а) и принимаю Лицензионное соглашение и Политику конфиденциальности компании Solvusoft.
В нашей базе содержится 3 разных файлов с именем rshelper.exe . You can also check most distributed file variants with name rshelper.exe. Чаще всего эти файлы принадлежат продукту RemoteStation Helper Application. Наиболее частый разработчик — компания BUFFALO INC.. Самое частое описание этих файлов — RemoteStation Helper. Это исполняемый файл. Вы можете найти его выполняющимся в диспетчере задач как процесс rshelper.exe.

- Продукт:
- RemoteStation Helper Application
- Компания:
- BUFFALO INC.
- Описание:
- RemoteStation Helper
- Версия:
- 1, 1, 1, 0
- MD5:
- ae5f4be374f63ce8067f1fcfeeadb12d
- SHA1:
- 13ec2e2b9de2a0c3a61dc1865dd2f0f174cddbda
- SHA256:
- d6809ce73e1791f4671d08d1726304fa07c0c08b9868a7e77c5a9ef2f0a35e0f
- Размер:
- 32768
- Папка:
- %PROGRAMFILES%BUFFALORemoteStation
- ОС:
- Windows XP
- Частота:
- Низкая

Процесс «rshelper.exe» безопасный или опасный?
Последний новый вариант файла «rshelper.exe» был обнаружен 3611 дн. назад. В нашей базе содержится 1 шт. вариантов файла «rshelper.exe» с окончательной оценкой Безопасный и ноль вариантов с окончательной оценкой Опасный . Окончательные оценки основаны на комментариях, дате обнаружения, частоте инцидентов и результатах антивирусных проверок.
 Процесс с именем «rshelper.exe» может быть безопасным или опасным. Чтобы дать правильную оценку, вы должны определить больше атрибутов файла. Самый простой способ это сделать — воспользоваться нашей бесплатной утилитой для проверки файлов посредством нашей базы данных. Эта утилита содержит множество функций для контролирования вашего ПК и потребляет минимум системных ресурсов.
Щёлкните здесь, чтобы загрузить System Explorer.
Комментарии пользователей для «rshelper.exe»
У нас пока нет комментариев пользователей к файлам с именем «rshelper.exe».
Добавить комментарий для «rshelper.exe»
Для добавления комментария требуется дополнительная информация об этом файле. Если вам известны размер, контрольные суммы md5/sha1/sha256 или другие атрибуты файла, который вы хотите прокомментировать, то вы можете воспользоваться расширенным поиском на главной странице .
Если подробности о файле вам неизвестны, вы можете быстро проверить этот файл с помощью нашей бесплатной утилиты. Загрузить System Explorer.
Проверьте свой ПК с помощью нашей бесплатной программы
System Explorer это наша бесплатная, удостоенная наград программа для быстрой проверки всех работающих процессов с помощью нашей базы данных. Эта программа поможет вам держать систему под контролем. Программа действительно бесплатная, без рекламы и дополнительных включений, она доступна в виде установщика и как переносное приложение. Её рекомендуют много пользователей.
Вопрос
Проблема: как исправить ошибку «Не удалось запустить приложение из-за того, что не удалось инициализировать подключаемый модуль платформы Qt» в Windows?
Привет. Недавно после обновления Windows мне не удалось заставить OneDrive работать. Каждый раз, когда мой компьютер загружается, я получаю сообщение об ошибке «Не удалось запустить приложение, потому что не удалось инициализировать подключаемый модуль платформы Qt». Есть какие-нибудь советы, как решить эту проблему? Заранее спасибо.
Решенный ответ
Операционная система Windows состоит из множества компонентов — некоторые из них уже предустановлены, а другие необходимо реализовать вручную. Например, Node.js является одним из сторонних компонентов, которые вы можете увидеть практически на любом компьютере с Windows.
Qt основан на C ++[1] фреймворк, предназначенный для создания приложений на Windows, Android, Linux,[2] и другие платформы. Хотя это не язык программирования сам по себе, приложения, основанные на нем, должны иметь установленную платформу на своих машинах, чтобы иметь возможность работать. К сожалению, эти зависимости могут создавать определенные проблемы по той или иной причине.
Когда что-то пойдет не так с платформой Qt, пользователи могут получить сообщение об ошибке «Не удалось запустить приложение, потому что не удалось инициализировать подключаемый модуль платформы Qt».
Эта ошибка может затронуть несколько приложений, включая такие игры, как Apex Legends,[3] автономные компоненты (Dllhost) или часто используемые приложения, такие как OneDrive. Последний находится на каждом компьютере с Windows и является чрезвычайно полезным приложением, обычно используемым для резервного копирования системы / файлов или дополнительного хранилища для пользовательских файлов.
Вот полное сообщение, которое пользователи получают при обнаружении ошибки (текст сообщения об ошибке может отличаться в некоторых случаях):
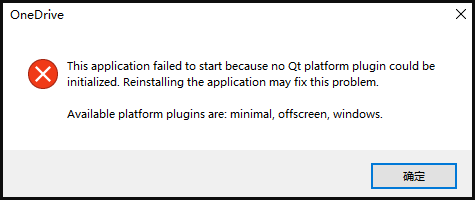
Это приложение не удалось запустить, потому что не удалось инициализировать подключаемый модуль платформы Qt. Переустановка приложения может решить проблему.
Доступные плагины платформы: минимальные, закадровые, окна.
Хотя может показаться, что включение или установка платформы Qt исправит ошибку «Не удалось запустить приложение, потому что не удалось инициализировать подключаемый модуль платформы Qt», это не так. Однако переустановка приложения, у которого возникают проблемы с обнаружением плагина, может помочь.

К сожалению, это не всегда возможно, поскольку пользователи сообщали, что при попытке сделать это они получили ошибку «Не удается найти». Причина этого в том, что более новая версия приложения может уже присутствовать на устройстве, поэтому удаление невозможно. Есть способ обойти это.
В некоторых случаях причины ошибки могут быть не связаны с упомянутыми выше. Например, повреждение системного файла также может вызвать эту ошибку, поэтому мы рекомендуем попробовать запустить сканирование с помощью ReimageСтиральная машина Mac X9 программное обеспечение для ремонта, которое может автоматически устранять основные проблемы Windows. В противном случае используйте следующие методы, которые должны помочь вам навсегда решить эту ошибку.
Способ 1. Скопируйте соответствующую папку в другое место
Исправить это сейчас!Исправить это сейчас!
Для восстановления поврежденной системы необходимо приобрести лицензионную версию Reimage Reimage.
Способ 2. Проверить системные файлы на наличие повреждений
Исправить это сейчас!Исправить это сейчас!
Для восстановления поврежденной системы необходимо приобрести лицензионную версию Reimage Reimage.
- Введите cmd в поиске Windows
- Щелкните правой кнопкой мыши на Командная строка и выберите Запустить от имени администратора
- Здесь введите sfc / scannow и нажмите Входить

- Дождитесь завершения сканирования и начать сначала ваша машина
- Если SFC вернула ошибка заявив, что не удалось восстановить поврежденные файлы, выполните следующие команды, нажав Входить каждый раз:
DISM / Онлайн / Очистка-Образ / CheckHealth
DISM / Онлайн / Очистка-Изображение / ScanHealth
DISM / Онлайн / Очистка-Образ / RestoreHealth

Способ 3. Попробуйте чистую загрузку
Исправить это сейчас!Исправить это сейчас!
Для восстановления поврежденной системы необходимо приобрести лицензионную версию Reimage Reimage.
- Тип msconfig в поиске Windows нажмите Входить
- Перейти к Услуги вкладка
- Проверить Скрыть все службы Microsoft флажок и выберите Отключить все
- Перейти к Запускать вкладка и выберите Открыть диспетчер задач
- Здесь щелкните правой кнопкой мыши каждую запись и выберите Запрещать и закройте диспетчер задач
- Перейти к Ботинок вкладка, отметьте Безопасная загрузка и выберите Применить + ОК.

После загрузки обратно в Windows попробуйте запустить приложение, с которым у вас возникли проблемы. Если это решит вашу проблему, значит, виновато стороннее приложение. Чтобы исправить ошибку «Не удалось запустить приложение, потому что не удалось инициализировать подключаемый модуль платформы Qt», вам следует удалить все недавно установленные приложения и посмотреть, решит ли это вашу проблему в обычном режиме.
Способ 4. Переустановите указанное приложение
Исправить это сейчас!Исправить это сейчас!
Для восстановления поврежденной системы необходимо приобрести лицензионную версию Reimage Reimage.
Вам следует попробовать удалить приложение, с которым у вас возникли проблемы, а затем установить его заново. Если вы имеете дело с OneDrive, вам следует сделать следующее:
- Нажмите Win + R на твоей клавиатуре
- в Бегать диалоговое окно, скопируйте и вставьте следующее:
% userprofile% AppData Local Microsoft OneDrive Update OneDriveSetup.exe - Пройдите этапы установки и начать сначала ваш компьютер
- Если Windows не может найти указанный файл, вам следует загрузить установочный файл с официального сайта [Прямая ссылка].

Если этот метод не работает и вы получаете сообщение об ошибке, перейдите к приведенному ниже методу, а затем повторите этот шаг.
Метод 5. Удалите проблемное приложение через командную строку
Исправить это сейчас!Исправить это сейчас!
Для восстановления поврежденной системы необходимо приобрести лицензионную версию Reimage Reimage.
Удаление программы, которая не хочет удаляться, может быть трудным, хотя это возможно через PowerShell, так как вы можете запустить ее от имени администратора. Имейте в виду, что приведенный ниже пример относится к приложению OneDrive, и команда будет отличаться в зависимости от имени приложения и его местоположения.
- Открытым Командная строка от имени администратора как объяснено выше
- Скопируйте и вставьте следующие команды, нажав Входить после каждого:
taskkill / f / im OneDrive.exe
% SystemRoot% SysWOW64 OneDriveSetup.exe / удалить - Примечание: если вы используете 32-битная система Windows вместо этого используйте следующую команду для удаления OneDrive:
% SystemRoot% System32 OneDriveSetup.exe / удалить - Это должно принудительно удалить приложение.

Исправляйте ошибки автоматически
Команда ugetfix.com делает все возможное, чтобы помочь пользователям найти лучшие решения для устранения их ошибок. Если вы не хотите бороться с методами ручного ремонта, используйте автоматическое программное обеспечение. Все рекомендованные продукты были протестированы и одобрены нашими профессионалами. Инструменты, которые можно использовать для исправления ошибки, перечислены ниже:
Предложение
сделай это сейчас!
Скачать Fix
Счастье
Гарантия
сделай это сейчас!
Скачать Fix
Счастье
Гарантия
Совместим с Майкрософт ВиндоусСовместим с OS X По-прежнему возникают проблемы?
Если вам не удалось исправить ошибку с помощью Reimage, обратитесь за помощью в нашу службу поддержки. Сообщите нам все подробности, которые, по вашему мнению, нам следует знать о вашей проблеме.
Reimage — запатентованная специализированная программа восстановления Windows. Он диагностирует ваш поврежденный компьютер. Он просканирует все системные файлы, библиотеки DLL и ключи реестра, которые были повреждены угрозами безопасности.Reimage — запатентованная специализированная программа восстановления Mac OS X. Он диагностирует ваш поврежденный компьютер. Он просканирует все системные файлы и ключи реестра, которые были повреждены угрозами безопасности.
Этот запатентованный процесс восстановления использует базу данных из 25 миллионов компонентов, которые могут заменить любой поврежденный или отсутствующий файл на компьютере пользователя.
Для восстановления поврежденной системы необходимо приобрести лицензионную версию Reimage инструмент для удаления вредоносных программ.

Нажмите
Условия использования Reimage | Политика конфиденциальности Reimage | Политика возврата денег за товар | Нажмите
VPN имеет решающее значение, когда дело доходит до конфиденциальность пользователя. Онлайн-трекеры, такие как файлы cookie, могут использоваться не только платформами социальных сетей и другими веб-сайтами, но также вашим интернет-провайдером и правительством. Даже если вы примените самые безопасные настройки через веб-браузер, вас все равно можно будет отслеживать через приложения, подключенные к Интернету. Кроме того, браузеры, ориентированные на конфиденциальность, такие как Tor, не являются оптимальным выбором из-за пониженной скорости соединения. Лучшее решение для вашей максимальной конфиденциальности — это Частный доступ в Интернет — быть анонимным и безопасным в сети.
Программное обеспечение для восстановления данных — один из вариантов, который может вам помочь восстановить ваши файлы. После удаления файла он не исчезает в воздухе — он остается в вашей системе до тех пор, пока поверх него не записываются новые данные. Восстановление данных Pro это программа для восстановления, которая ищет рабочие копии удаленных файлов на вашем жестком диске. Используя этот инструмент, вы можете предотвратить потерю ценных документов, школьных заданий, личных фотографий и других важных файлов.
Question
Issue: How to fix «Application failed to start because no Qt platform plugin could be initialized» error in Windows?
Hello. Recently, after a Windows update, I was unable to get OneDrive to work. Whenever my PC boots, I receive an error “Application failed to start because no Qt platform plugin could be initialized.” Any advice on how to deal with this issue? Thanks in advance.
Solved Answer
Windows operating system consists of many components – some are already pre-installed while others need to be implemented manually. For example, Node.js is one of the third-party components you would see on almost any Windows computer.
Qt is a C++-based[1] framework that is designed to create applications on Windows, Android, Linux,[2] and other platforms. While it is not a programming language on its own, apps that are based on it need to have the framework installed on their machines to be able to run. Unfortunately, these dependencies can create certain issues due to one reason or another.
When something goes wrong with the Qt platform, users may receive the “Application failed to start because no Qt platform plugin could be initialized” error.
Several applications could be affected by this error, including games such as Apex Legends,[3] standalone components (Dllhost), or commonly-used apps as OneDrive. The latter resides in every Windows computer and is an extremely useful app commonly used for system/file backups or additional storage for user files.
Here’s the full message that users receive upon encountering the error (the error message text may vary in some instances):
This application failed to start because no Qt platform plugin could be initialized. Reinstalling the application may fix this problem.
Available platform plugins are: minimal, offscreen, windows.
While it may seem like enabling or installing the Qt platform would fix the “Application failed to start because no Qt platform plugin could be initialized” error, it is not the case. Reinstalling the app that is having difficulties detecting the plugin might help, however.

Unfortunately, that is not always possible, as users reported that they then received the “Can’t be found” error while trying to do so. The reason for this being is that a newer version of the app may be already present on the device, hence uninstallation is not possible. There is a way around it.
In some cases, the reasons for the error could be unrelated to the ones mentioned above. For example, system file corruption might also cause this error, so we recommend you try running a scan with ReimageMac Washing Machine X9 repair software that could fix underlying Windows issues automatically. Otherwise, proceed with the below methods that should help you solve this error for good.
Method 1. Copy relevant folder to a different location
Fix it now!
Fix it now!
To repair damaged system, you have to purchase the licensed version of Reimage Reimage.
Method 2. Check system files for damage
Fix it now!
Fix it now!
To repair damaged system, you have to purchase the licensed version of Reimage Reimage.
- Type in cmd in Windows search
- Right-click on Command Prompt and select Run as administrator
- Here, type sfc /scannow and press Enter
- Wait till the scan completes and restart your machine
- If the SFC has returned an error saying it was unable to repair damaged files, run the following commands, pressing Enter each time:
DISM /Online /Cleanup-Image /CheckHealth
DISM /Online /Cleanup-Image /ScanHealth
DISM /Online /Cleanup-Image /RestoreHealth

Method 3. Try Clean Boot
Fix it now!
Fix it now!
To repair damaged system, you have to purchase the licensed version of Reimage Reimage.
- Type msconfig in Windows search, hit Enter
- Go to Services tab
- Check the Hide all Microsoft services checkbox and select Disable all
- Go to Startup tab and pick Open Task Manager
- Here, right-click on every entry and select Disable and close the Task Manager
- Go to Boot tab, tick Safe Boot and select Apply + OK.

Once booted back into Windows, try running the app you were having problems with. If that fixes your problem, it means that there is a third-party application that is at fault. In order to fix the “Application failed to start because no Qt platform plugin could be initialized” error, you should uninstall all recently installed applications and see if that solves your problem in normal mode.
Method 4. Reinstall the application in question
Fix it now!
Fix it now!
To repair damaged system, you have to purchase the licensed version of Reimage Reimage.
You should try uninstalling the app you are having troubles with and then installing it anew. If you are dealing with OneDrive, you should do the following:
- Press Win + R on your keyboard
- In the Run dialog, copy and paste the following:
%userprofile%AppDataLocalMicrosoftOneDriveUpdateOneDriveSetup.exe - Go through the installation steps and restart your PC
- If Windows can’t find the file specified, you should download the setup file from the official website [direct link].

If this method does not work and you are presented with an error, proceed with the method below and then repeat this step.
Method 5. Uninstall the problematic app via Command Prompt
Fix it now!
Fix it now!
To repair damaged system, you have to purchase the licensed version of Reimage Reimage.
Uninstalling a program that does not want to uninstall might be difficult, although it is possible via PowerShell, as you can launch it as an administrator. Keep in mind that the below example is for the OneDrive application, and the command would differ depending on the app name and its location.
- Open Command Prompt as administrator as explained above
- Copy and paste the following commands, pressing Enter after each:
taskkill /f /im OneDrive.exe
%SystemRoot%SysWOW64OneDriveSetup.exe /uninstall - Note: if you are using 32-bit Windows system use the following command to uninstall OneDrive instead:
%SystemRoot%System32OneDriveSetup.exe /uninstall - This should force-uninstall the app.

Repair your Errors automatically
ugetfix.com team is trying to do its best to help users find the best solutions for eliminating their errors. If you don’t want to struggle with manual repair techniques, please use the automatic software. All recommended products have been tested and approved by our professionals. Tools that you can use to fix your error are listed bellow:
do it now!
Download Fix
Happiness
Guarantee
do it now!
Download Fix
Happiness
Guarantee
Compatible with Microsoft Windows
Compatible with OS X
Still having problems?
If you failed to fix your error using Reimage, reach our support team for help. Please, let us know all details that you think we should know about your problem.
Reimage — a patented specialized Windows repair program. It will diagnose your damaged PC. It will scan all System Files, DLLs and Registry Keys that have been damaged by security threats.Reimage — a patented specialized Mac OS X repair program. It will diagnose your damaged computer. It will scan all System Files and Registry Keys that have been damaged by security threats.
This patented repair process uses a database of 25 million components that can replace any damaged or missing file on user’s computer.
To repair damaged system, you have to purchase the licensed version of Reimage malware removal tool.

A VPN is crucial when it comes to user privacy. Online trackers such as cookies can not only be used by social media platforms and other websites but also your Internet Service Provider and the government. Even if you apply the most secure settings via your web browser, you can still be tracked via apps that are connected to the internet. Besides, privacy-focused browsers like Tor is are not an optimal choice due to diminished connection speeds. The best solution for your ultimate privacy is Private Internet Access – be anonymous and secure online.
Data recovery software is one of the options that could help you recover your files. Once you delete a file, it does not vanish into thin air – it remains on your system as long as no new data is written on top of it. Data Recovery Pro is recovery software that searchers for working copies of deleted files within your hard drive. By using the tool, you can prevent loss of valuable documents, school work, personal pictures, and other crucial files.
When launching certain apps on Windows, many users receive the “This application failed to start because no Qt platform plugin could be initialized” error. Don’t worry. This post of MiniTool explores several effective troubleshooting methods.
According to user reports, the “this application failed to start because no Qt platform plugin could be initialized” error can occur with many apps such as OneDrive, Designer, Python, etc. This error often appears after installing a series of Windows updates. Here’s a true example from the answersmicrosoft.com forum:
After a series of recent Windows updates my Surface displays the following error when we log in OneDrive — This application failed to start because no Qt platform plugin could be initialized. Reinstalling the application may fix this problem. I have searched the community and followed the responses given to others suffering the same fate but so far this has not resolved the issue. Looking to know what I should attempt next?https://answers.microsoft.com/en-us/windows/forum/all/application-failed-to-start-because-no-qt-platform/205e4259-dcbc-4d72-addb-8e7edb9663e9
Qt is a cross-platform software that was designed to create graphical user interfaces and cross-platform applications on Windows, Linux, macOS, and Android. However, when something went wrong with the Qt platform, you may receive the “This application failed to start because it could not find or load the Qt platform plugin Windows” error.
It seems like reinstalling the application may fix the error. However, some users encounter new errors when reinstalling the app. Don’t worry. Here we explore several effective troubleshooting methods. Let’s try.
How to Fix the “No Qt Platform Plugin Could Be Initialized” Error
After analyzing extensive user reports, we summarize the 6 applicable ways to fix the Qt platform plugin Windows error. You can try them in order until the error gets solved or choose the ones that work best for you.
Fix 1. Replace the Qt Files in the Destination
The first and proven method is to replace the Qt files in the destination folder. Here we take Python for example. To do so, follow the steps below:
Step 1. Press the Win + E keys to open the File Explorer, select This PC, type pyqt5_tools in the search box, and hit Enter.
Step 2. Right-click the pyqt5_tools folder once the search is complete and select Open folder location.
Step 3. Then go to the folder path “PyQt5 > Qt > plugins”, and then open the Plugin folder, right-click the platforms folder, and select Copy.
Step 4. Go to the site-packages folder that you initially opened and go to pyqt5_tools > Qt > bin.
Step 5. Right-click any empty space inside the bin directory and select paste. Then confirm it when you see the “Replace the files in the destination” message.
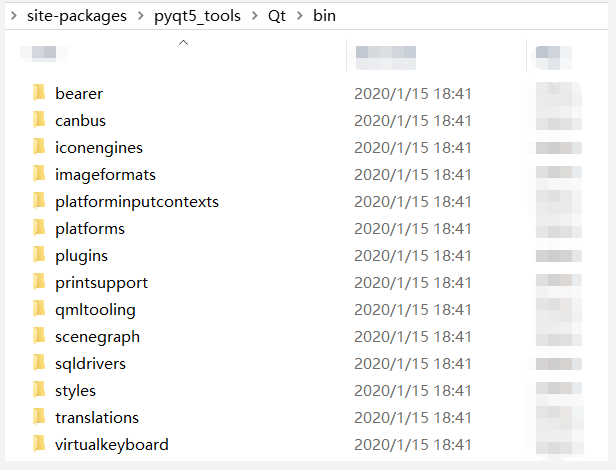
Now, you can relaunch the app and see if the “this application failed to start Qt platform Windows” message persists.
Fix 2. Perform a Clean Boot
One of the possible reasons for the “this application failed to start Qt platform Windows” error is third-party software conflicts. If you are not sure which app is causing the conflict, you can perform a clean boot (click on the Hyperlink to know the detailed steps). Once you find out the conflicting software, uninstall it and check if the error is fixed.
Fix 3. Check System File Corruption
Sometimes corrupted system files can trigger various errors and issues when running your apps such as the “no Qt platform plugin could be initialized” error. So, we recommend you run an SFC scan or DISM to check system files.
Step 1. Type cmd in the search box, and then right-click Command Prompt and select Run as administrator option.
Step 2. Type the sfc /scannow command in the elevated command prompt and hit Enter. After that, the SFC tool will scan and try to repair the corrupted system files automatically.

Step 3. If the SFC command was unable to repair corrupt system files, you can try running the following DISM commands:
- DISM /Online /Cleanup-Image /CheckHealth
- DISM /Online /Cleanup-Image /ScanHealth
- DISM /Online /Cleanup-Image /RestoreHealth
Fix 4. Reinstall the App
As the error message hints, reinstalling the application may help fix the problem. However, many users cannot uninstall the app smoothly. Don’t worry. We summarize the following 3 applicable ways to reinstall the app. (Here we take reinstalling OneDrive for example)
Uninstall OneDrive via the Run box:
Step 1, Press Win + R keys to open the Run dialog box, and then type the following command in it and hit Enter. Here make sure you replace the OneDriveSetup.exe path with the actual location.
%userprofile%AppDataLocalMicrosoftOneDriveUpdateOneDriveSetup.exe
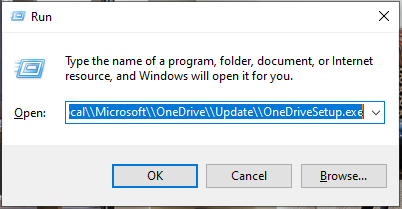
Step 2. Once uninstalled, go through the installation steps and restart your computer and check if the error gets fixed. If it fails to uninstall the application, you can try the following 2 methods.
Uninstall OneDrive via CMD:
Step 1. Type cmd in the Run dialog box and press Ctrl + Shift + Enter keys to open the elevated Command Prompt window.
Step 2. Type the following command and hit Enter to uninstall the app. If you are running on a 32-bit system, replace SysWOW64 with System32. This will force uninstalling the app.
- taskkill /f /im OneDrive.exe
- %SystemRoot%SysWOW64OneDriveSetup.exe /uninstall
Uninstall OneDrive from Settings:
Step 1. Right-click the Start menu at the bottom left and select Apps and Features.
Step 2. Inside the Applications window, search for OneDrive by name and click the Uninstall button.
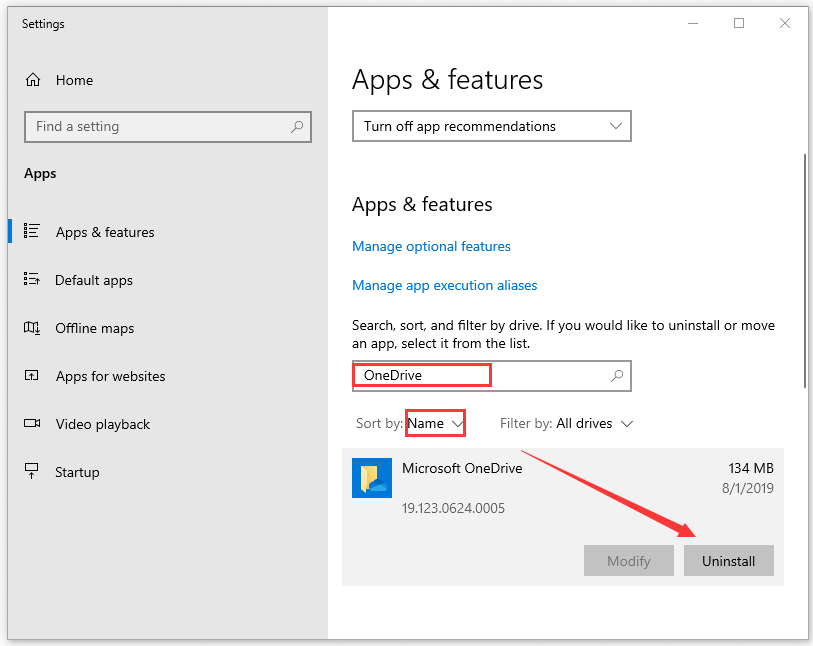
Step 3. Then follow the on-screen prompts to complete the uninstallation. After that, you can reinstall the app and check if the error disappears.
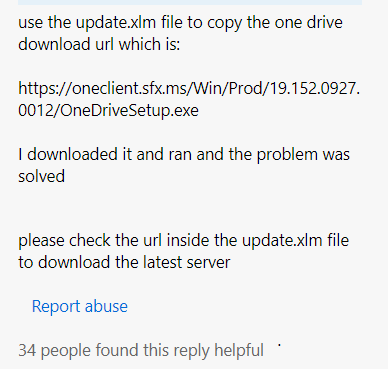
Fix 5. Download the Update.xml File of the App
Some users reported that the error can be fixed by downloading the update.xml file of the app. If you can’t reinstall OneDrive via the above method, try this solution. Click here to download the OneDriveSetup.exe file, and run it to install the latest version of OneDrive.
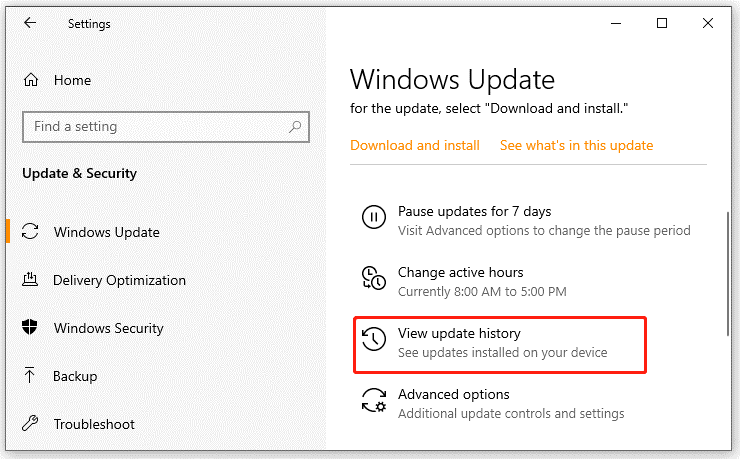
Fix 6. Undo the Recent Changes
Many people reported that “This application failed to start because it could not find or load the Qt platform plugin Windows” error mainly occurs after installing a series of Windows updates. If this scenario applies to you, you can try performing a system restore or uninstalling these updates manually.
Step 1. Press the Win + I keys to open the Settings app, and then select Update & Security > View update history.
Step 2. Click on Uninstall updates, and then right-click the most recent update and select Uninstall. Then follow the on-screen prompts to complete the uninstallation. Then repeat the same procedure to uninstall other Windows updates.
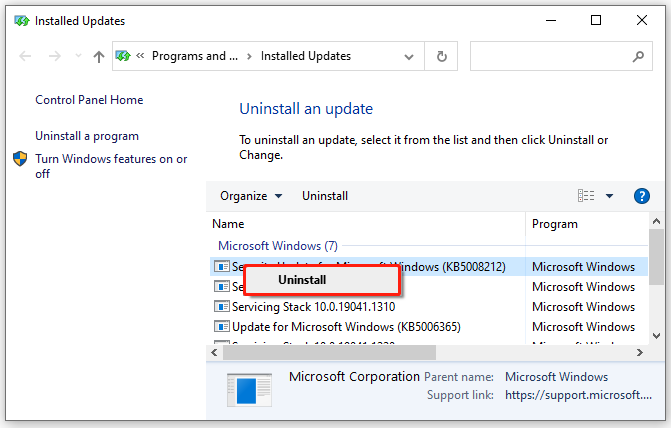
Issue:
The following error occurs when launching Autodesk products:
AdskLicensingAgent (or AdSSO)
This application failed to start because no Qt platform plugin could be initialized. Reinstalling the application may fix this problem.
Available platform plugins are: windows.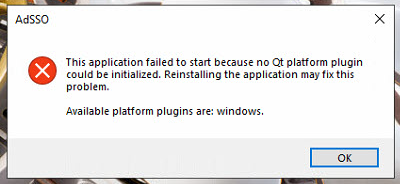
Causes:
There could be multiple causes for this error:
- An issue with Autodesk Licensing Service 10.1.1.66 (or newer).
- A conflict with Inventor 2021 beta.
- Corrupted or outdated Autodesk Single Sign on component / Autodesk Licensing Service.
- A conflict with 3rd party applications using QT libraries
Solution:
If using Autodesk Licensing Service 10.1.1.66 (or newer)
Do the following steps. Replace «10.1.1.66» in these steps with the latest version of the AdskLicensing that is installed.
- Open Windows File Explorer.
- Browse to the folder «C:Program Files (x86)Common FilesAutodesk SharedAdskLicensing10.1.1.66AdskLicensingAgentplatforms«.
- Copy the file «qwindows_Ad_5_12.dll«.
- Paste the file one folder up, into «C:Program Files (x86)Common FilesAutodesk SharedAdskLicensing10.1.1.66AdskLicensingAgent«.
If the above does not fix the issue
- Uninstall and reinstall the Autodesk Licensing Service:
- Uninstall the existing Autodesk licensing service by running this file as administrator:
- C:Program Files (x86)Common FilesAutodesk SharedAdskLicensingUninstall.exe
- Reinstall the licensing service using the file Autodesk Licensing Service 11.0.0.4854.zip installer or a newer version of the licensing service.
- See December 2020 — Autodesk Licensing Service Update for further information.
- Uninstall the existing Autodesk licensing service by running this file as administrator:
- Repair or update the «Single Sign On Component» (AdSSO) following the solution in «This application failed to start because it could not find or load the Qt platform plugin «windows».» dialogue appears when launching or updating any Autodesk software (It may be required to delete C:Program FilesAutodeskAutodesk AdSSO folder completely after uninstalling AdSSO.)
If there are 3rd party applications using QT libraries use the following steps
- Check if there is an environment/system variable defined with variable name QT_PLUGIN_PATH
- If present, take a backup of the variable value which would ideally be a location to the 3rd party libraries.
- Delete the variable and test Autodesk and 3rd party applications to ensure they work as expected.
Note: A system reboot is suggested after uninstalling the previous versions and again another reboot may require after installing the latest services.
Products:
All Desktop Products;
Versions:
2020; 2021; 2022; 2023;
Edit:
Some people started to mark my question as a duplicate. Do not forget that many similar questions existed when I asked this one (see e.g. the list below). However, none of these answers solved my problem. After a long search I found a comment which had been ignored by all users pointing to the missing lib. Now, many months later, the comment has been changed to an answer. However, when I answered this question by msyself I intended to help other people by directly providing the solution. This should not be forgotten and so far my answer helped a lot of people. Therefore my question is definitely not a duplicate. By the way: The accepted answer within the provided link on top does not solve the problem!
Yes, i used the search:
Failed to load platform plugin «windows». Available platforms are : Error
Deploying Qt C++ Application from Visual Studio qwindows.dll error
failed to load platform plugin «windows» Available platforms are: windows, minimal
However, in my case the problem still persists. I am using Qt 5.1.1 with Visual Studio 2012 and developed my Application on Windows 7 with Qt Creator 2.8.1. Application is compiled in «Release»-mode and can be executed if directly started with Qt Creator.
However, when starting from the «release»-Folder, i get the following message:
This application failed to start because it could not find or load the
Qt platform plugin «windows». Available platform plugins are:
minimal, offscreen, windows.
Folder structure looks like this:
release
+ gui.exe
+ icudt51.dll
+ icuin51.dll
+ icuuc51.dll
+ libGLESv2.dll
+ Qt5Core.dll
+ Qt5Gui.dll
+ Qt5Widgets.dll
+ platforms
Platforms is the folder directly copied from QtQt5.1.15.1.1msvc2012pluginsplatforms including e.g. qwindows.dll. Does not matter if I rename it to «platform» as some other users did. Qt is still not finding the «platform plugin windows», where is my mistake?
![]()
asked Dec 10, 2013 at 13:16
![]()
5
Okay, as posted here https://stackoverflow.com/a/17271172/1458552 without much attention by other users:
The libEGL.dll was missing! Even though this has not been reported when trying to start the application (all other *.dlls such as Qt5Gui.dll had been reported).
![]()
answered Dec 10, 2013 at 13:43
![]()
AnonymousAnonymous
4,5778 gold badges47 silver badges61 bronze badges
8
I created a platforms directory next to my exe location and put qwindows.dll inside, but I still received the «Failed to load platform plugin «windows». Available platforms are: windows» error.
I had copied qwindows.dll from C:QtQt5.1.1ToolsQtCreatorbinpluginsplatforms, which is not the right location. I looked at the debug log from running in Qt Creator and found that my app was looking in C:QtQt5.1.15.1.1mingw48_32pluginsplatforms when it ran in the debugger.
When I copied from C:QtQt5.1.15.1.1mingw48_32pluginsplatforms, everything worked fine.
answered Jun 12, 2014 at 19:30
![]()
BrandonBrandon
5514 silver badges2 bronze badges
2
The release is likely missing a library/plugin or the library is in the wrong directory and or from the wrong directory.
Qt intended answer: Use windeployqt. see last paragraph for explanation
Manual answer:
Create a folder named «platforms» in the same directory as your application.exe file. Copy and paste the qwindows.dll, found in the /bin of whichever compiler you used to release your application, into the «platforms» folder. Like magic it works. If the .dll is not there check plugins/platforms/ ( with plugins/ being in the same directory as bin/ ) <— PfunnyGuy’s comment.
It seems like a common issue is that the .dll was taken from the wrong compiler bin. Be sure to copy your the qwindows.dll from the same compiler as the one used to release your app.
Qt comes with platform console applications that will add all dependencies (including ones like qwindows.dll and libEGL.dll) into the folder of your deployed executable. This is the intended way to deploy your application, so you do not miss any libraries (which is the main issue with all of these answers). The application for windows is called windeployqt. There is likely a deployment console app for each OS.
![]()
answered Aug 10, 2017 at 2:10
![]()
4
Setting the QT_QPA_PLATFORM_PLUGIN_PATH environment variable to %QTDIR%pluginsplatforms worked for me.
It was also mentioned here and here.
![]()
answered Oct 30, 2016 at 12:38
![]()
Jim G.Jim G.
15k22 gold badges104 silver badges164 bronze badges
3
I ran into this and none of the answers I could find fixed it for me.
My colleauge has Qt (5.6.0) installed on his machine at:
C:QtQt5.6.05.6msvc2015plugins
I have Qt (5.6.2) installed in the same location.
I learned from this post: http://www.tripleboot.org/?p=536, that the Qt5Core.dll has a location to the plugins written to it when Qt is first installed.
Since my colleague’s and my Qt directories were the same, but different version of Qt were installed, a different qwindows.dll file is needed. When I ran an exe deployed by him, it would use my C:QtQt5.6.05.6msvc2015pluginsplatformsqwindows.dll file instead of the one located next to the executable in the .platforms subfolder.
To get around this, I added the following line of code to the application which seems to force it to look next to the exe for the ‘platforms’ subfolder before it looks at the path in the Qt5Core.dll.
QCoreApplication::addLibraryPath(".");
I added the above line to the main method before the QApplication call like this:
int main( int argc, char *argv[] )
{
    QCoreApplication::addLibraryPath(".");
    QApplication app( argc, argv );
    ...
    return app.exec();
}
answered Mar 13, 2017 at 15:38
![]()
JoelJoel
1372 silver badges7 bronze badges
3
create dir platforms and copy qwindows.dll to it, platforms and app.exe are in the same dir
 cd app_dir
 mkdir platforms
 xcopy qwindows.dll platformsqwindows.dll
Folder structure
 + app.exe
 + platformsqwindows.dll
answered Mar 8, 2018 at 9:24
![]()
KunMing XieKunMing Xie
1,57316 silver badges15 bronze badges
3
I found another solution. Create qt.conf in the app folder as such:
[Paths]
Prefix = .
And then copy the plugins folder into the app folder and it works for me.
answered Aug 6, 2017 at 18:56
![]()
Peter QuiringPeter Quiring
1,5881 gold badge15 silver badges21 bronze badges
1
For anyone coming from QT version 5.14.0, it took me 2 days to find this piece statment of bug:
windeployqt does not work for MinGW QTBUG-80763 Will be fixed in
5.14.1
https://wiki.qt.io/Qt_5.14.0_Known_Issues
So be aware. Using windeployqt withMinGW will give the same error stated here.
answered Jan 17, 2020 at 3:41
![]()
Yahya TawilYahya Tawil
3873 silver badges10 bronze badges
I had this problem while using QT 5.6, Anaconda 4.3.23, python 3.5.2 and pyinstaller 3.3.
I had created a python program with an interface developed using QTcreator, but had to deploy it to other computers, therefore I needed to make an executable, using pyinstaller.
I’ve found that the problem was solved on my computer if I set the following environment variables:
QT_QPA_PLATFORM_PLUGIN_PATH: %QTDIR%pluginsplatforms
QTDIR: C:Miniconda3pkgsqt-5.6.2-vc14_3Library
But this solution only worked on my PC that had conda and qt installed in those folders.
To solve this and make the executable work on any computer, I’ve had to edit the «.spec» (file first generated by pyinstaller) to include the following line:
datas=[(
‘C:Miniconda3pkgsqt-5.6.2-vc14_3Librarypluginsplatforms*.dll’,
‘platforms’ ),]
This solution is based on the answers of Jim G. and CrippledTable
answered Oct 3, 2017 at 12:34
![]()
For me the solution was to correct the PATH variable. It had Anaconda3Librarybin as one of the first paths. This directory contains some Qt libraries, but not all. Apparently, that is a problem. Moving C:ProgramsQt5.12.3msvc2017_64bin to the front of PATH solved the problem for me.
answered Apr 29, 2019 at 13:23
![]()
Most of these answers contain good (correct) info, but in my case, there was still something missing.
My app is built as a library (dll) and called by a non-Qt application. I used windeployqt.exe to set up the Qt dlls, platforms, plugins, etc. in the install directory, but it still couldn’t find the platform. After some experimentation, I realized the application’s working directory was set to a different folder. So, I grabbed the directory in which the dll «lived» using GetModuleHandleExA and added that directory to the Qt library path at runtime using
QCoreApplication::addLibraryPath(<result of GetModuleHandleExA>);
This worked for me.
answered May 9, 2018 at 13:14
![]()
I had the same problem and solved it by applying several things.
The first, if it is a program that you did with Qt.
In the folder (in my case) of «C: Qt Qt5.10.0 5.10.0 msvc2017_64 plugins» you find other folders, one of them is «platforms». That «platforms» folder is going to be copied next to your .exe executable. Now, if you get the error 0xc000007d is that you did not copy the version that was, since it can be 32bits or 64.
If you continue with the errors is that you lack more libraries. With the «Dependency Walker» program you can detect some of the missing folders. Surely it will indicate to you that you need an NVIDIA .dll, and it tells you the location.
Another way, instead of using «Dependency Walker» is to copy all the .dll from your «C: Windows System32» folder next to your executable file. Execute your .exe and if everything loads well, so you do not have space occupied in dll libraries that you do not need or use, use the .exe program with all your options and without closing the .exe you do is erase all the .dll that you just copied next to the .exe, so if those .dll are being used by your program, the system will not let you erase, only removing those that are not necessary.
I hope this solution serves you.
Remember that if your operating system is 64 bits, the libraries will be in the System32 folder, and if your operating system is 32 bits, they will also be in the System32 folder. This happens so that there are no compatibility problems with programs that are 32 bits in a 64-bit computer.
The SysWOW64 folder contains the 32-bit files as a backup.
![]()
answered Mar 23, 2018 at 17:41
![]()
1
For a MinGW platform and if you are compiling a Debug target by a hand made CMakeLists.txt written ad hoc you need to add the qwindows.dll to the platform dir as well.
The windeployqt executable does its work well but it seems that for some strange reason the CMake build needs the release variant as well.
In summary it will be better to have both the qwindows.dll and qwindowsd.dll in your platform directory.
I did not notice the same strange result when importing the CMake project in QtCreator and then running the build procedure.
Compiling on the command line the CMake project seems to trigger the qwindows.dll dependency either if the correct one for the Debug target is set in place (qwindowsd.dll)
answered Oct 11, 2017 at 9:40
![]()
Use this batch file: RunWithQt.bat
@echo off
set QTDIR=C:QtQt5.1.15.1.1msvc2012bin
set QT_QPA_PLATFORM_PLUGIN_PATH=%QTDIR%pluginsplatforms
start %1
- to use it, drag your gui.exe file and drop it on the RunWithQt.bat in explorer,
- or call
RunWithQt gui.exefrom the command line
answered Feb 8, 2018 at 15:54
![]()
If you have Anaconda installed I recomend you to uninstall it and try installing python package from source, i fixed this problem in this way
answered Mar 27, 2018 at 19:39
![]()
The application qtbase/bin/windeployqt.exe deploys automatically your application. If you start a prompt with envirenmentvariables set correctly, it deploys to the current directory.
You find an example of script:
@echo off
set QTDIR=E:QT5110vc2017

set INCLUDE=S:Program Files (x86)Microsoft Visual Studio2017EnterpriseVCToolsMSVC14.15.26726ATLMFCinclude;S:Program Files (x86)Microsoft Visual Studio2017EnterpriseVCToolsMSVC14.15.26726include;C:Program Files (x86)Windows KitsNETFXSDK4.6.1includeum;C:Program Files (x86)Windows Kits10include10.0.14393.0ucrt;C:Program Files (x86)Windows Kits10include10.0.14393.0shared;C:Program Files (x86)Windows Kits10include10.0.14393.0um;C:Program Files (x86)Windows Kits10include10.0.14393.0winrt;C:Program Files (x86)Windows Kits10include10.0.14393.0cppwinrt

set LIB=S:Program Files (x86)Microsoft Visual Studio2017EnterpriseVCToolsMSVC14.15.26726ATLMFClibx86;S:Program Files (x86)Microsoft Visual Studio2017EnterpriseVCToolsMSVC14.15.26726libx86;C:Program Files (x86)Windows KitsNETFXSDK4.6.1libumx86;C:Program Files (x86)Windows Kits10lib10.0.14393.0ucrtx86;C:Program Files (x86)Windows Kits10lib10.0.14393.0umx86;

set LIBPATH=S:Program Files (x86)Microsoft Visual Studio2017EnterpriseVCToolsMSVC14.15.26726ATLMFClibx86;S:Program Files (x86)Microsoft Visual Studio2017EnterpriseVCToolsMSVC14.15.26726libx86;S:Program Files (x86)Microsoft Visual Studio2017EnterpriseVCToolsMSVC14.15.26726libx86storereferences;C:Program Files (x86)Windows Kits10UnionMetadata10.0.17134.0;C:ProgramFiles (x86)Windows Kits10References10.0.17134.0;C:WindowsMicrosoft.NETFrameworkv4.0.30319;

Path=%QTDIR%qtbasebin;%PATH%
set VCIDEInstallDir=S:Program Files (x86)Microsoft Visual Studio2017EnterpriseCommon7IDEVC
set VCINSTALLDIR=S:Program Files (x86)Microsoft Visual Studio2017EnterpriseVC
set VCToolsInstallDir=S:Program Files (x86)Microsoft Visual Studio2017EnterpriseVCToolsMSVC14.11.25503
set VisualStudioVersion=15.0
set VS100COMNTOOLS=C:Program Files (x86)Microsoft Visual Studio 10.0Common7Tools
set VS110COMNTOOLS=C:Program Files (x86)Microsoft Visual Studio 11.0Common7Tools
set VS120COMNTOOLS=S:Program Files (x86)Microsoft Visual Studio 12.0Common7Tools
set VS150COMNTOOLS=S:Program Files (x86)Microsoft Visual Studio2017EnterpriseCommon7Tools
set VS80COMNTOOLS=C:Program Files (x86)Microsoft Visual Studio 8Common7Tools
set VS90COMNTOOLS=c:Program Files (x86)Microsoft Visual Studio 9.0Common7Tools
set VSINSTALLDIR=S:Program Files (x86)Microsoft Visual Studio2017Enterprise
set VSSDK110Install=C:Program Files (x86)Microsoft Visual Studio 11.0VSSDK
set VSSDK150INSTALL=S:Program Files (x86)Microsoft Visual Studio2017EnterpriseVSSDK
set WindowsLibPath=C:Program Files (x86)Windows Kits10UnionMetadata;C:Program Files (x86)Windows Kits10References
set WindowsSdkBinPath=C:Program Files (x86)Windows Kits10bin
set WindowsSdkDir=C:Program Files (x86)Windows Kits10
set WindowsSDKLibVersion=10.0.14393.0
set WindowsSdkVerBinPath=C:Program Files (x86)Windows Kits10bin10.0.14393.0
set WindowsSDKVersion=10.0.14393.0
set WindowsSDK_ExecutablePath_x64=C:Program Files (x86)Microsoft SDKsWindowsv10.0AbinNETFX 4.6.1 Toolsx64
set WindowsSDK_ExecutablePath_x86=C:Program Files (x86)Microsoft SDKsWindowsv10.0AbinNETFX 4.6.1 Tools

mkdir C:VCProjectsApplicationBuildVS2017_QT5_11_32-Releasesetup
cd C:VCProjectsApplicationBuildVS2017_QT5_11_32-Releasesetup
copy /Y ..Releaseapplication.exe .
windeployqt application.exe
pause
answered Nov 23, 2018 at 9:03
![]()
MyGeertRoMyGeertRo
1311 silver badge3 bronze badges
Lets say, you wanted to have some CGAL-Demos portable. So you’d have a folder «CGAL», and in it, 1 subfolder called «lib»: all (common) support-dlls for any programs in the CGAL-folder go here. In our example, this would be the Dll-Download: simply unzip into the «lib» directory. The further you scroll down on the demos-page, the more impressive the content. In my case, the polyhedron-demo seemed about right. If this runs on my 10+ yo notebook, I’m impressed. So I created a folder «demo» in the «CGAL»-directory, alongside «lib».
Now create a .cmd-file in that folder. I named mine «Polyhedron.cmd». So we have a directory structure like this:
 CGAL - the bag for all the goodies
  lib - all libraries for all CGAL-packages
 demo - all the demos I'm interested in
[...] - certainly some other collections, several apps per folder...
Polyhedron.cmd - and a little script for every Qt-exe to make it truly portable.
In this little example, «Polyhedron.cmd» contains the following text:
@echo off
set "me=%~dp0"
set PATH=%me%lib
set "QT_PLUGIN_PATH=%me%libplugins"
start /b "CGAL Polyhedron Demo" "%me%demopolyhedronpolyhedron_3.exe"
All scripts can be the same apart from the last line, obviously. The only caveat is: the «DOS-Window» stays open for as long as you use the actual program. Close the shell-window, and you kill the *.exe as well. Whereever you copy the «CGAL»-folder, as the weird «%~dp0»-wriggle represents the full path to the *.cmd-file that we started, with trailing «». So «%me%lib» is always the full path to the actual library («CGALlib» in my case). The next 2 lines tell Qt where its «runtime» files are. This will be at least the file «qwindows.dll» for Windows-Qt programs plus any number of *.dlls. If I remember rightly, the Dll-library (at least when I downloaded it) had a little «bug» since it contains the «platforms»-directory with qwindows.dll in it. So when you open the lib directory, you need to create a folder «plugins» next to «platforms», and then move into «plugins». If a Qt-app, any Qt-app, doesn’t find «qwindows.dll», it cannot find «windows». And it expects it in a directory named «platforms» in the «plugins» directory, which it has to get told by the OS its running on…and if the «QT_PLUGIN_PATH» is not exactly pointing to all the helper-dlls you need, some Qt-programs will still run with no probs. And some complain about missing *.dlls you’ve never heard off…
answered Jan 20, 2019 at 4:09
![]()
I ran into the same error and solved it with a different method than those mentioned in other posts. Hopefully this will help future readers.
BUILD:
Windows 10 (64bit)
Minicoda (using python 3.9.4) (pkgs are from conda-forge channel)
pyqt 5.12.3
My scenario:
I was building a GUI application for some embedded work. I had two machines that were used for development (same OS and architecture), one had zero internet connection. After packaging up my environment and installing on the offline machine, I ran into the error that you got.
Solution:
locate the qt.conf file in your conda environment.
for me: C:Users»name»miniconda3envs»env_name»qt.conf
Make sure the paths are correct. I needed to update the «name» as this was left over from the old machine.
Hopefully this helps someone.
answered Jun 3, 2021 at 20:34
![]()
Jesse T-PJesse T-P
1071 silver badge7 bronze badges
I had the same problem of running a QT5 application in windows 10 ( VS2019).
My error was
..DebugQt5Cored.dll
Module: 5.14.1
File: kernelqguiapplication.cpp
Line: 1249
This application failed to start because no Qt platform plugin could be initialized.
Reinstalling the application may fix this problem.
Solution
Since I was using QT msvc2017, I copied plugins folders from «C:QtQt5.14.15.14.1msvc2017plugins» location to the binary location
it worked.
Then check visual studio output window and identify the dlls loaded from plugin folder and removed unwanted dlls
answered Dec 17, 2020 at 22:54
![]()
SamanSaman
711 silver badge3 bronze badges
Setting QT_PLUGIN_PATH env variable to <...>/plugins directory also worked for me.
answered Jan 7, 2021 at 5:57
![]()
AndreiAndrei
7408 silver badges9 bronze badges
I got the error when Pycharm was trying to run Matplot. The solution that worked for me was setting the Anaconda3Libraryplugins directory (for example: c:Program filesAnaconda3Libraryplugins) as environment variable «QT_PLUGIN_PATH».
To set that you should go to Control Panel / System / Advanced System Settings / Environment Variables.
answered Sep 9, 2021 at 2:50
![]()
StarStar
837 bronze badges
Talking mainly about the Windows platform
Faced the same issue when trying to debug the app build using the vcpkg installed Qt library, while having my app build using cmake. Had trouble for some hours until found the solution. The simplest way is to do the following:
-
in your build folder, find the folder where the final executable is located.
-
in that folder, you’ll find some
Qtlibraries, likeQt6Core.dll. -
pay attention to whether or not the library file has the
dsuffix in its name, i.e.Qt6Cored.dllinstead ofQt6Core.dll -
in the
vcpkgfolder, you have 2 options./installed/x64-windows/Qt6/plugins/platforms./installed/x64-windows/debug/Qt6/plugins/platforms
-
if the
dsuffix was present, copy the content of the../debug/..folder (otherwise the other one) into theplatformsfolder in the same folder, where your executable and theQtlibraries are located (if there’s no such folder, create on your own).
You can somehow automate this process. Leaving that task to you. If I do that on my own, will update the answer.
Edit
If you are using CMakeLists you may want to give this a try. Add the following to your app’s CMakeLists.txt
# assuming your target's name is app

if(WIN32)
    add_custom_command(
        TARGET app POST_BUILD
        COMMAND ${CMAKE_COMMAND} -E copy_directory
            ${Qt6_DIR}/../../$<$<CONFIG:Debug>:debug/>Qt6/plugins/platforms/
            $<TARGET_FILE_DIR:app>/platforms/
    )
endif()
answered Mar 18, 2022 at 11:52
![]()
arsdeverarsdever
1,06010 silver badges29 bronze badges
Доброго времени суток.
При запуске нового приложения (установка прошла успешно без каких-либо ошибок) на Ubuntu 20.04 старт программы завершается ошибкой —
(This application failed to start because it could not find or load the Qt platform plugin "xcb".
Available platform plugins are: eglfs, linuxfb, minimal, minimalegl, offscreen, vnc, xcb.
Reinstalling the application may fix this problem.
2020-04-18T15:53:56 7[/] Project initial: Программа прервана!
Аварийный останов (стек памяти сброшен на диск))
Это-же приложение на Ubuntu 18.04.01 — запускалось и работало без проблем.
Переустановка приложения никак не помогает.
При выводе в терминал какие плагины Qt как запускаются видно, что плагин «xcb» — не может загрузится или запуститься.
~$ openscada
2020-04-19T00:58:25 1[/] Первичная станция: Загрузка.
2020-04-19T00:58:25 1[/sub_BD/] Project initial > Базы Данных: Подключение модуля 'SQLite'.
2020-04-19T00:58:25 1[/sub_BD/] Project initial > Базы Данных: Подключение модуля 'DBF'.
2020-04-19T00:58:25 1[/sub_DAQ/] Project initial > Сбор Данных: Подключение модуля 'JavaLikeCalc'.
2020-04-19T00:58:25 1[/sub_DAQ/] Project initial > Сбор Данных: Подключение модуля 'LogicLev'.
2020-04-19T00:58:25 1[/sub_Transport/] Project initial > Транспорты: Подключение модуля 'Sockets'.
2020-04-19T00:58:25 1[/sub_Transport/] Project initial > Транспорты: Подключение модуля 'Serial'.
2020-04-19T00:58:25 1[/sub_Protocol/] Project initial > Транспортные Протоколы: Подключение модуля 'SelfSystem'.
2020-04-19T00:58:25 1[/sub_Protocol/] Project initial > Транспортные Протоколы: Подключение модуля 'UserProtocol'.
2020-04-19T00:58:25 1[/sub_Special/] Project initial > Специальные: Подключение модуля 'FLibSYS'.
2020-04-19T00:58:25 1[/sub_Special/] Project initial > Специальные: Подключение модуля 'FLibComplex1'.
2020-04-19T00:58:25 1[/sub_UI/] Project initial > Интерфейсы Пользователя: Подключение модуля 'QTStarter'.
QFactoryLoader::QFactoryLoader() checking directory path "/usr/lib/x86_64-linux-gnu/qt5/plugins/platforms" ...
QFactoryLoader::QFactoryLoader() looking at "/usr/lib/x86_64-linux-gnu/qt5/plugins/platforms/libqeglfs.so"
Found metadata in lib /usr/lib/x86_64-linux-gnu/qt5/plugins/platforms/libqeglfs.so, metadata=
{
    "IID": "org.qt-project.Qt.QPA.QPlatformIntegrationFactoryInterface.5.3",
    "MetaData": {
        "Keys": [
            "eglfs"
        ]
    },
    "archreq": 0,
    "className": "QEglFSIntegrationPlugin",
    "debug": false,
    "version": 330752
}
Got keys from plugin meta data ("eglfs")
QFactoryLoader::QFactoryLoader() looking at "/usr/lib/x86_64-linux-gnu/qt5/plugins/platforms/libqlinuxfb.so"
Found metadata in lib /usr/lib/x86_64-linux-gnu/qt5/plugins/platforms/libqlinuxfb.so, metadata=
{
"IID": "org.qt-project.Qt.QPA.QPlatformIntegrationFactoryInterface.5.3",
"MetaData": {
"Keys": [
"linuxfb"
]
},
"archreq": 0,
"className": "QLinuxFbIntegrationPlugin",
"debug": false,
"version": 330752
}
Got keys from plugin meta data ("linuxfb")
QFactoryLoader::QFactoryLoader() looking at "/usr/lib/x86_64-linux-gnu/qt5/plugins/platforms/libqminimal.so"
Found metadata in lib /usr/lib/x86_64-linux-gnu/qt5/plugins/platforms/libqminimal.so, metadata=
{
"IID": "org.qt-project.Qt.QPA.QPlatformIntegrationFactoryInterface.5.3",
"MetaData": {
"Keys": [
"minimal"
]
},
"archreq": 0,
"className": "QMinimalIntegrationPlugin",
"debug": false,
"version": 330752
}
Got keys from plugin meta data ("minimal")
QFactoryLoader::QFactoryLoader() looking at "/usr/lib/x86_64-linux-gnu/qt5/plugins/platforms/libqminimalegl.so"
Found metadata in lib /usr/lib/x86_64-linux-gnu/qt5/plugins/platforms/libqminimalegl.so, metadata=
{
"IID": "org.qt-project.Qt.QPA.QPlatformIntegrationFactoryInterface.5.3",
"MetaData": {
"Keys": [
"minimalegl"
]
},
"archreq": 0,
"className": "QMinimalEglIntegrationPlugin",
"debug": false,
"version": 330752
}
Got keys from plugin meta data ("minimalegl")
QFactoryLoader::QFactoryLoader() looking at "/usr/lib/x86_64-linux-gnu/qt5/plugins/platforms/libqoffscreen.so"
Found metadata in lib /usr/lib/x86_64-linux-gnu/qt5/plugins/platforms/libqoffscreen.so, metadata=
{
"IID": "org.qt-project.Qt.QPA.QPlatformIntegrationFactoryInterface.5.3",
"MetaData": {
"Keys": [
"offscreen"
]
},
"archreq": 0,
"className": "QOffscreenIntegrationPlugin",
"debug": false,
"version": 330752
}
Got keys from plugin meta data ("offscreen")
QFactoryLoader::QFactoryLoader() looking at "/usr/lib/x86_64-linux-gnu/qt5/plugins/platforms/libqvnc.so"
Found metadata in lib /usr/lib/x86_64-linux-gnu/qt5/plugins/platforms/libqvnc.so, metadata=
{
"IID": "org.qt-project.Qt.QPA.QPlatformIntegrationFactoryInterface.5.3",
"MetaData": {
"Keys": [
"vnc"
]
},
"archreq": 0,
"className": "QVncIntegrationPlugin",
"debug": false,
"version": 330752
}
Got keys from plugin meta data ("vnc")
QFactoryLoader::QFactoryLoader() looking at "/usr/lib/x86_64-linux-gnu/qt5/plugins/platforms/libqxcb.so"
Found metadata in lib /usr/lib/x86_64-linux-gnu/qt5/plugins/platforms/libqxcb.so, metadata=
{
"IID": "org.qt-project.Qt.QPA.QPlatformIntegrationFactoryInterface.5.3",
"MetaData": {
"Keys": [
"xcb"
]
},
"archreq": 0,
"className": "QXcbIntegrationPlugin",
"debug": false,
"version": 330752
}
Got keys from plugin meta data ("xcb")
Cannot load library /usr/lib/x86_64-linux-gnu/qt5/plugins/platforms/libqxcb.so: (/opt/Qt/lib/libQt5XcbQpa.so.5: undefined symbol: _ZN20QEventDispatcherUNIX6selectEiP6fd_setS1_S1_P8timespec)
QLibraryPrivate::loadPlugin failed on "/usr/lib/x86_64-linux-gnu/qt5/plugins/platforms/libqxcb.so" : "Cannot load library /usr/lib/x86_64-linux-gnu/qt5/plugins/platforms/libqxcb.so: (/opt/Qt/lib/libQt5XcbQpa.so.5: undefined symbol: _ZN20QEventDispatcherUNIX6selectEiP6fd_setS1_S1_P8timespec)"
This application failed to start because it could not find or load the Qt platform plugin "xcb".
Available platform plugins are: eglfs, linuxfb, minimal, minimalegl, offscreen, vnc, xcb.
Reinstalling the application may fix this problem.
2020-04-19T00:58:25 7[/] Project initial: Программа прервана!
Аварийный останов (стек памяти сброшен на диск)
Хотя файл библиотеки Qt libqxcb.so по указаному пути /usr/lib/x86_64-linux-gnu/qt5/plugins/platforms/libqxcb.so присутствует.
Подскажите, что возможно предпринять чтобы устранить ошибку.
Заранее спасибо за помощь.
Правила форума
1.4. Листинги и содержимое текстовых файлов следует добавлять в сообщение с помощью теговПоказать скрытое содержание
…
или [code]…[/code], либо прикреплять к сообщению в виде отдельного файла. Длинные гиперссылки следует оформлять при помощи тега [url=]…[/url]
—Aleksandru
[РЕШЕНО] Как исправить ошибки, связанные с Wondershare Helper Compact.exe
Проблемы Wondershare Helper Compact.exe часто возникают из-за того, что исполняемый файл отсутствует, удалён или перемещён из исходного местоположения. Часто такие EXE ошибки наблюдаются при запуске программного обеспечения Wondershare Helper Compact. Как правило, решить проблему можно заменой файла EXE. Помимо прочего, в качестве общей меры по профилактике и очистке мы рекомендуем использовать очиститель реестра для очистки любых недопустимых записей файлов, расширений файлов EXE или разделов реестра, что позволит предотвратить появление связанных с ними сообщений об ошибках.
Формат Windows Executable File с расширением файла EXE классифицируют в качестве Исполнимые файлы. Мы подготовили для вас несколько версий файлов Wondershare Helper Compact.exe, которые походят для %%os%% и нескольких выпусков Windows. Данные файлы можно посмотреть и скачать ниже. В настоящее время в нашем каталоге для загрузки могут отсутствовать некоторые файлы (такие как Wondershare Helper Compact.exe), но их можно запросить, нажав на кнопку Request (Запрос) ниже. Кроме того, Windows Software Developer также может предоставить вам некоторые редкие файлы, которые отсутствуют в нашем каталоге.
«Server.exe — This application could NOT BE STARTED». Как исправить? (Субтитры на русском.)
Несмотря на то, что в большинстве случаев после размещения файла Wondershare Helper Compact.exe в надлежащем месте на жёстком диске, сообщения об ошибках, связанных с этим файлом, больше не выводятся, следует выполнить быструю проверку, чтобы окончательно в этом убедиться. Убедитесь в том, что вам удалось устранить ошибку, открыв Wondershare Helper Compact и (или) выполнив операцию, при выполнении которой возникала проблема.
Wondershare Helper Compact.exe Описание файла
| Тип файла: | EXE |
| Функция: | Wondershare Helper Compact |
| Софт: | Wondershare Helper Compact |
| Версия выпуска: | 2.0.2.0 |
| Разработчик: | Windows Software Developer |
| Имя файла: | Wondershare Helper Compact.exe E807ED5BD43F2356CE4D0549C1BE592259ACBC4C |
| MD5: | f3896c617fa6917800ca3b23e595dc16 |
| CRC32: |
Источник: www.solvusoft.com
Wondershare Helper Compact.exe это исполняемый файл, который является частью Wondershare Media Converter 1.4.1.1 Программа, разработанная Программное обеспечение Wondershare, Программное обеспечение обычно о 49.07 MB по размеру.
Wondershare Filmora Coupon Code | New Promo and Discount 2022 — 2023
Расширение .exe имени файла отображает исполняемый файл. В некоторых случаях исполняемые файлы могут повредить ваш компьютер. Пожалуйста, прочитайте следующее, чтобы решить для себя, является ли Wondershare Helper Compact.exe Файл на вашем компьютере — это вирус или троянский конь, который вы должны удалить, или это действительный файл операционной системы Windows или надежное приложение.
Первое, что поможет вам определить, является ли тот или иной файл законным процессом Windows или вирусом, это местоположение самого исполняемого файла. Например, такой процесс, как Wondershare Helper Compact.exe, должен запускаться из C: Program Files Wondershare Media Converter MediaConverter.exe и нигде в другом месте.
Для подтверждения откройте диспетчер задач, выберите «Просмотр» -> «Выбрать столбцы» и выберите «Имя пути к изображению», чтобы добавить столбец местоположения в диспетчер задач. Если вы обнаружите здесь подозрительный каталог, возможно, стоит дополнительно изучить этот процесс.
Еще один инструмент, который иногда может помочь вам обнаружить плохие процессы, — это Microsoft Process Explorer. Запустите программу (не требует установки) и активируйте «Проверить легенды» в разделе «Параметры». Теперь перейдите в View -> Select Columns и добавьте «Verified Signer» в качестве одного из столбцов.
Если статус процесса «Проверенная подписывающая сторона» указан как «Невозможно проверить», вам следует взглянуть на процесс. Не все хорошие процессы Windows имеют метку проверенной подписи, но ни один из плохих.
- Находится в C: Program Files Wondershare Media Converter вложенная;
- Издатель: Программное обеспечение Wondershare
- Полный путь: C: Program Files Wondershare Media Converter MediaConverter.exe
- Файл справки: support.wondershare.com
- URL издателя: www.wondershare.com/pro/media-converter.html
- Известно, что до 49.07 MB по размеру на большинстве окон;
Если у вас возникли какие-либо трудности с этим исполняемым файлом, перед удалением Wondershare Helper Compact.exe следует определить, заслуживает ли он доверия. Для этого найдите этот процесс в диспетчере задач.
Найдите его местоположение (оно должно быть в C: Program Files Wondershare Media Converter ) и сравните его размер с приведенными выше фактами.
Если вы подозреваете, что можете быть заражены вирусом, вы должны немедленно попытаться это исправить. Чтобы удалить вирус Wondershare Helper Compact.exe, необходимо Загрузите и установите приложение полной безопасности, например Malwarebytes., Обратите внимание, что не все инструменты могут обнаружить все типы вредоносных программ, поэтому вам может потребоваться попробовать несколько вариантов, прежде чем вы добьетесь успеха.
Кроме того, функциональность вируса может сама влиять на удаление Wondershare Helper Compact.exe. В этом случае вы должны включить Безопасный режим с загрузкой сетевых драйверов — безопасная среда, которая отключает большинство процессов и загружает только самые необходимые службы и драйверы. Когда вы можете запустить программу безопасности и полный анализ системы.
Не следует удалять безопасный исполняемый файл без уважительной причины, так как это может повлиять на производительность любых связанных программ, использующих этот файл. Не забывайте регулярно обновлять программное обеспечение и программы, чтобы избежать будущих проблем, вызванных поврежденными файлами. Что касается проблем с функциональностью программного обеспечения, проверяйте обновления драйверов и программного обеспечения чаще, чтобы избежать или вообще не возникало таких проблем.
Согласно различным источникам онлайн, 18% людей удаляют этот файл, поэтому он может быть безвредным, но рекомендуется проверить надежность этого исполняемого файла самостоятельно, чтобы определить, является ли он безопасным или вирусом. Лучшая диагностика для этих подозрительных файлов — полный системный анализ с Reimage, Если файл классифицируется как вредоносный, эти приложения также удалят Wondershare Helper Compact.exe и избавляются от связанных вредоносных программ.
- 1. в Меню Пуск (для Windows 8 щелкните правой кнопкой мыши в нижнем левом углу экрана), нажмите Панель управления, а затем под Программы:
o Windows Vista / 7 / 8.1 / 10: нажмите Удаление программы.
o Windows XP: нажмите Установка и удаление программ.
- 2. Когда вы найдете программу Wondershare Media Converter 1.4.1.1щелкните по нему, а затем:
o Windows Vista / 7 / 8.1 / 10: нажмите Удалить.
o Windows XP: нажмите Удалить or Изменить / Удалить вкладка (справа от программы).
- 3. Следуйте инструкциям по удалению Wondershare Media Converter 1.4.1.1.
Распространенные сообщения об ошибках в Wondershare Helper Compact.exe
Наиболее распространенные ошибки Wondershare Helper Compact.exe, которые могут возникнуть:
• «Ошибка приложения Wondershare Helper Compact.exe.»
• «Ошибка Wondershare Helper Compact.exe».
• «Возникла ошибка в приложении Wondershare Helper Compact.exe. Приложение будет закрыто. Приносим извинения за неудобства».
• «Wondershare Helper Compact.exe не является допустимым приложением Win32».
• «Wondershare Helper Compact.exe не запущен».
• «Wondershare Helper Compact.exe не найден».
• «Не удается найти Wondershare Helper Compact.exe».
• «Ошибка запуска программы: Wondershare Helper Compact.exe».
• «Неверный путь к приложению: Wondershare Helper Compact.exe».
Эти сообщения об ошибках .exe могут появляться во время установки программы, во время выполнения связанной с ней программы Wondershare Media Converter 1.4.1.1, во время запуска или завершения работы Windows или даже во время установки операционной системы Windows. Отслеживание момента появления ошибки Wondershare Helper Compact.exe является важной информацией, когда дело доходит до устранения неполадок.
Аккуратный и опрятный компьютер — это один из лучших способов избежать проблем с Wondershare Media Converter 1.4.1.1. Это означает выполнение сканирования на наличие вредоносных программ, очистку жесткого диска cleanmgr и ПФС / SCANNOWудаление ненужных программ, мониторинг любых автозапускаемых программ (с помощью msconfig) и включение автоматических обновлений Windows. Не забывайте всегда делать регулярные резервные копии или хотя бы определять точки восстановления.
Если у вас возникла более серьезная проблема, постарайтесь запомнить последнее, что вы сделали, или последнее, что вы установили перед проблемой. Использовать resmon Команда для определения процессов, вызывающих вашу проблему. Даже в случае серьезных проблем вместо переустановки Windows вы должны попытаться восстановить вашу установку или, в случае Windows 8, выполнив команду DISM.exe / Online / Очистка-изображение / Восстановить здоровье, Это позволяет восстановить операционную систему без потери данных.
Чтобы помочь вам проанализировать процесс Wondershare Helper Compact.exe на вашем компьютере, вам могут пригодиться следующие программы: Менеджер задач безопасности отображает все запущенные задачи Windows, включая встроенные скрытые процессы, такие как мониторинг клавиатуры и браузера или записи автозапуска. Единый рейтинг риска безопасности указывает на вероятность того, что это шпионское ПО, вредоносное ПО или потенциальный троянский конь. Это антивирус обнаруживает и удаляет со своего жесткого диска шпионское и рекламное ПО, трояны, кейлоггеры, вредоносное ПО и трекеры.
Обновлено ноябрь 2022 г .:
- Шаг 1: Скачать PC Repair https://windowsbulletin.com/ru/%D1%84%D0%B0%D0%B9%D0%BB%D1%8B/%D0%B5%D1%85%D0%B5/%D0%BF%D1%80%D0%BE%D0%B3%D1%80%D0%B0%D0%BC%D0%BC%D0%BD%D0%BE%D0%B5-%D0%BE%D0%B1%D0%B5%D1%81%D0%BF%D0%B5%D1%87%D0%B5%D0%BD%D0%B8%D0%B5-Wondershare/Wondershare-Media-Converter-1-4-1-1/Wondershare-Helper-Compact-Exe» target=»_blank»]windowsbulletin.com[/mask_link]
Всемогущий эксперт по написанию текстов, который хорошо разбирается в проблемах Mac и предоставляет эффективные решения.
Wondershare позволяет всем пользователям конвертировать или редактировать видеофайлы из различных форматов в форматы Mac, iPhone и iPad. Он также может настроить расширение браузера, которое позволяет загружать файл с платформ потокового видео, таких как Youtube. Вы также можете использовать приложение для редактирования видео, но только в очень простом виде.
Возможно, после загрузки и использования Wondershare в течение некоторого времени вы поняли, что это вызывает проблемы с вашим Mac, например замедляет его работу. Одно из решений — удалить Wondershare Mac чтобы избавиться от этого. Тем не мение, удалить приложение на Mac не означает просто переместить программу из папки «Приложения» в корзину; несколько файлов останутся на вашем стартовом диске. Вот как правильно удалить Wondershare на Mac.
Часть 1. Общие проблемы, возникающие при удалении
Некоторые пользователи могут столкнуться с проблемами или проблемами при попытке удалить Wondershare на Mac. Ниже приведены наиболее типичные проблемы, с которыми сталкивается большинство пользователей при удалении из Wondershare:
- Невозможно найти деинсталлятор для программы
- При перетаскивании программы в корзину она возвращается в исходное состояние.
- Wondershare постоянно работает в фоновом режиме и не может быть остановлен перед удалением.
- Wondershare нельзя полностью удалить с Mac; некоторые файлы, связанные с приложением, все еще остаются на устройстве
Если процесс удаления окажется неполным или неудачным, это, вероятно, приведет к следующим проблемам:
- Wondershare на вашем Mac больше не может быть переустановлен.
- Wondershare не запускается и всегда будет показывать код ошибки.
- Остатки Wondershare Filmora продолжают занимать место на жестком диске и не могут быть удалены вместе с приложением.
- Конфликт с приложением
- На компьютере неожиданно появляются проблемы с неизвестной ошибкой
Если вы ищете управляемый способ удаления Wondershare на Mac, приведенное ниже пошаговое руководство может оказаться полезным для вас.
Важно понимать, что простое перетаскивание приложений в корзину не приведет к их полному удалению. Вам придется найти и удалить все остатки вручную. И вот как вы можете это сделать.
- Откройте Finder, перейдите в Папка приложения а затем переместите Wondershare в корзину.
- Далее следует войти в Библиотека папка, найдите и удалите все служебные файлы и папки, связанные с Wondershare:
- ~Library/Application Support/Wondershare
- ~Library/Logs/Wondershare
- ~Library/Caches/com.wondershare.helper_compact
- ~Library/Preferences/com.wondershare.helper_compact.plist
- ~Library/Caches/com.Wondershare-Video-Converter-Ultimate
- ~Library/Application Support/Wondershare Video Converter Ultimate
- ~Library/Cookies/com.Wondershare.Video-Converter-Ultimate.binarycookies
- ~Library/Preferences/com.Wondershare.Video-Converter-Ultimate.plist
- ~Library/Safari/Extensions/Wondershare Video Converter for Mac.safariextz
Необходимо рассмотреть и обратить внимание на Wondershare Helper Compact. Вы будете продолжать получать надоедливые уведомления даже после удаления программы, если не удалите ее полностью. В отличие от подпапок, описанных ранее, в Application Support есть один дополнительный файл: папка Helper.
- Выберите все служебные файлы, связанные с Wondershare, затем удалите их.
- Как только все будет перемещено в корзину, пустая корзина чтобы полностью удалить приложение вместе с его компонентами.
Бесспорно, удаление приложений вручную неудобно и требует много времени. Хорошей новостью является то, что вы можете использовать специальное приложение для удаления под названием PowerMyMac, чтобы быстро и просто удалить Wondershare на Mac.
PowerMyMac — отличный инструмент для быстрого удаления файлов Wondershare. У этой программы очень плавный и удобный интерфейс. После установки комплексное сканирование произведет поиск на вашем Mac и удалит все остатки, стирая все следы его ДНК. Он тщательно проверяет все файлы и реестры перед их удалением.
PowerMyMac имеет полезный инструмент, который включает деинсталлятор, который находит и удаляет проблемные приложения одним щелчком мыши. Удаление ненужных приложений выполняется безопасно и просто при использовании. Программа удаления приложений PowerMyMac.
Вот шаги, как использовать приложение для удаления Wondershare:
- Сначала необходимо загрузить и установить PowerMyMac. Затем откройте программное обеспечение на своем Mac. Затем на домашней странице будет представлена сводная информация о текущем состоянии системы вашего Mac.
- Нажмите Деинсталлятор приложений и нажмите Scan. Прежде чем продолжить, дождитесь завершения сканирования. При необходимости выберите «Повторное сканирование», чтобы снова просканировать все приложения.
- Все программы, установленные на вашем Mac, должны отображаться в левом столбце после сканирования. Проверьте приложение Wondershare или введите Wondershare в поле поиска, расположенное вверху. Затем под программой появятся связанные служебные файлы или папки.
- Выберите все файлы, которые хотите стереть с устройства. Выбрать все если вы хотите удалить все данные сразу. Убедитесь, что вы выбрали правильные файлы, проверив или дважды проверив. Затем в правом нижнем углу нажмите кнопку Oчистка кнопку, чтобы завершить этот шаг. Подождите, пока он закончится, затем появится всплывающее окно «Очистка завершенаПоявится значок «, означающий, что удаление завершено.
Часть 4. Вывод
Wondershare потребляет много места для хранения и оперативной памяти на вашем MacBook или iMac, как и любые другие профессиональные приложения для редактирования видеофайлов. В результате у вас может возникнуть низкая производительность Mac после установки нескольких довольно похожих программ. Если это приведет вас к тому, что вам, возможно, придется удалить Wondershare на Mac, эта статья поможет и проведет вас через этот процесс.
В этой статье были описаны два метода: удаление Wondershare вручную или использование Программа удаления приложений PowerMyMac для автоматического удаления приложения. Это полное руководство гарантирует, что любой процесс, который вы используете, будет безопасным и эффективным. Если процесс удаления всегда внезапно останавливается или вы не можете начать удаление приложения и вместо этого получаете сообщение об ошибке, пришло время изменить способ удаления программы. Эта проблема обычно возникает при попытке удалить Wondershare путем перетаскивания его в корзину.
В этом случае вам следует попробовать другой подход, например использовать профессиональный деинсталлятор, который поможет вам удалить программное обеспечение. Многие пользователи Mac обнаружили PowerMyMac приложение действительно полезно, так как оно экономит ваше время, вручную находя каждый связанный файл. Кроме того, вам потребуется всего несколько щелчков мышью, чтобы завершить процесс.
Рейтинг: 4.4 / 5 (на основе 100 рейтинги)
Источник: www.imymac.com
Рекомендуется удалить программу перед ее обновлением, чтобы предотвратить возможный конфликт версий.
Шаг 1. Запустите программу удаления программ Wondershare. Откройте меню «Пуск» в левом нижнем углу рабочего стола. Выберите пункт меню Все программы , а затем выполните следующие действия: Wondershare >> Удалить. Примечание: После обновления до Windows 8, панель Удаления не отображаться на новом стартовом экране.
Чтобы получить к нему доступ, пожалуйста, щелкните правой кнопкой мыши на любой пустой области экрана, а затем нажмите кнопку Все приложения в правом нижнем углу экрана. Все программы, установленные на вашем компьютере, будут отображаться на экране Приложений. Элемент Удаления можно найти в разделе Wondershare section. Шаг 2: Выберите программы, которые вы хотите удалить.
Просто нажмите кнопку Wondershare Uninstaller, чтобы удалить установленный вами продукт Wondershare. Шаг 3: Завершите процесс удаления Как только вы получите всплывающее напоминание, это означает, что продукт уже удален с вашего компьютера.
Внимание: перед удалением вам необходимо выйти из этого программного обеспечения.Источник: www.wondershare.com.ru
Wondershare — это набор инструментов, состоящий из различных утилит, позволяющих изменять, конвертировать и просматривать все виды документов и мультимедиа. Это полезный программный пакет как для пользователей Windows, так и для MacOS, но он может занять довольно много места. Если вы думаете, что инструменты Wondershare вам больше не понадобятся, мы советуем вам удалить их, поскольку они могут занять довольно много места на диске. Вот как это сделать в Windows и macOS:
Удаление Wondershare в Windows
Пользователи Windows могут выполнить удаление двумя способами. Первый — перейти в их системный раздел и открыть папку «Program Files (x86) ». Зайдите в каталог Wondershare и запустите деинсталлятор.
Кроме того, они могут упростить процесс, перейдя в меню «Пуск» -> «Приложения» . Оказавшись там, выберите в меню продукт Wondershare, который они хотят удалить, и нажмите « Удалить» .
Удаление Wondershare на macOS
Обычно приложения macOS удаляются простым перетаскиванием, но Wondershare может потребовать дополнительной работы. Убедитесь, что приложение закрыто, а затем перейдите в Finder -> Applications, чтобы перетащить его в корзину. Как только это будет сделано, сделайте следующее:
- Откройте Finder и выберите меню « Перейти» -> «Перейти к папке» на верхней панели.
- Войдите в / Библиотека / Поддержка приложений / и продолжайте.
- Перетащите все папки, содержащие слово «wondershare» в своем имени, в корзину.
К Ruik году
April 8, 2021
April 8, 2021«123456» и «password» — все еще худшие пароли, которые вы.
4 years назад
Киберпреступники используют спам на тему коронавируса для.
2 years назад
Cybercrooks извлекает выгоду из глобальной пандемии, чтобы.
2 years назад
Игнорируйте «Это вы на видео?» Сообщения, отправленные через.
1 year назад
Ваш комментарий ожидает модерации.
Убедитесь, что вы не робот.
Показать форму комментариев (0)Оставьте Ответ
Продукты
Мы разрабатываем программные решения для управления данными, предназначенные для обеспечения доступности шифрования, а также для обеспечения простоты и организации вашей повседневной онлайн-жизни.
Компания
Программные решения для управления данными, разработанные и разработанные для упрощения работы в Интернете.
Главная
Products
Support
Компания
Легальный
Подписывайтесь на нас
Зарегистрированный офис: 3 Castle Street, Penthouse, Дублин D02KF25, Ирландия.
Cyclonis Limited, Закрытое акционерное общество с ограниченной ответственностью, регистрационный номер компании 574974.Windows является товарным знаком Microsoft, зарегистрированным в США и других странах.
Mac, iPhone, iPad и App Store являются товарными знаками Apple Inc., зарегистрированными в США и других странах.
iOS является зарегистрированным товарным знаком Cisco Systems, Inc. и / или ее дочерних компаний в США и некоторых других странах.
Android и Google Play являются товарными знаками Google LLC.Cyclonis.com uses cookies to provide you with a better browsing experience and analyze how users navigate and utilize the Site. By using this Site or clicking on «OK», you consent to the use of cookies. Learn more.
Источник: www.cyclonis.com
Последнее обновление: 07/09/2022
[Среднее время чтения: 4,5 мин.]
Файлы Registry Repair Wizard Scheduler, такие как RCHelper.exe, считаются разновидностью файла Win32 EXE (Исполняемое приложение). Они соотносятся с расширением EXE, разработанным компанией SmartPCTools для Registry Repair Wizard.
Файл RCHelper.exe изначально был выпущен с Registry Repair Wizard 2012 6.72 06/10/2012 для ОС Windows 10.
Это не только самый последний выпуск от компании SmartPCTools, но и, насколько известно, единственная существующая версия.
Ниже приведены исчерпывающие сведения о файле, инструкции для простого устранения неполадок, возникших с файлом EXE, и список бесплатных загрузок RCHelper.exe для каждой из имеющихся версий файла.
Что такое сообщения об ошибках RCHelper.exe?
RCHelper.exe — ошибки выполнения
Ошибки выполнения — это ошибки Registry Repair Wizard 2012, возникающие во время «выполнения». Термин «выполнение» говорит сам за себя; имеется в виду, что данные ошибки EXE возникают в момент, когда происходит попытка загрузки файла RCHelper.exe — либо при запуске приложения Registry Repair Wizard 2012, либо, в некоторых случаях, во время его работы. Ошибки выполнения являются наиболее распространенной разновидностью ошибки EXE, которая встречается при использовании приложения Registry Repair Wizard 2012.
В большинстве случаев ошибки выполнения RCHelper.exe, возникающие во время работы программы, приводят к ненормальному завершению ее работы. Большинство сообщений об ошибках RCHelper.exe означают, что либо приложению Registry Repair Wizard 2012 не удалось найти этот файл при запуске, либо файл поврежден, что приводит к преждевременному прерыванию процесса запуска. Как правило, Registry Repair Wizard 2012 не сможет запускаться без разрешения этих ошибок.
Таким образом, крайне важно, чтобы антивирус постоянно поддерживался в актуальном состоянии и регулярно проводил сканирование системы.
Поиск причины ошибки RCHelper.exe является ключом к правильному разрешению таких ошибок. Несмотря на то что большинство этих ошибок EXE, влияющих на RCHelper.exe, происходят во время запуска, иногда ошибка выполнения возникает при использовании Registry Repair Wizard. Причиной этого может быть недостаточное качество программного кода со стороны SmartPCTools, конфликты с другими приложениями, сторонние плагины или поврежденное и устаревшее оборудование. Кроме того, эти типы ошибок RCHelper.exe могут возникать в тех случаях, если файл был случайно перемещен, удален или поврежден вредоносным программным обеспечением. Таким образом, крайне важно, чтобы антивирус постоянно поддерживался в актуальном состоянии и регулярно проводил сканирование системы.
Как исправить ошибки RCHelper.exe — 3-шаговое руководство (время выполнения: ~5-15 мин.)
Если вы столкнулись с одним из вышеуказанных сообщений об ошибке, выполните следующие действия по устранению неполадок, чтобы решить проблему RCHelper.exe. Эти шаги по устранению неполадок перечислены в рекомендуемом порядке выполнения.
Шаг 1. Восстановите компьютер до последней точки восстановления, «моментального снимка» или образа резервной копии, которые предшествуют появлению ошибки.
Чтобы начать восстановление системы (Windows XP, Vista, 7, 8 и 10):
- Нажмите кнопку «Пуск» в Windows
- В поле поиска введите «Восстановление системы» и нажмите ENTER.
- В результатах поиска найдите и нажмите «Восстановление системы»
- Введите пароль администратора (при необходимости).
- Следуйте инструкциям мастера восстановления системы, чтобы выбрать соответствующую точку восстановления.
- Восстановите компьютер к этому образу резервной копии.
Если на этапе 1 не удается устранить ошибку RCHelper.exe, перейдите к шагу 2 ниже.
Шаг 2. Если вы недавно установили приложение Registry Repair Wizard 2012 (или схожее программное обеспечение), удалите его, затем попробуйте переустановить Registry Repair Wizard 2012.
Чтобы удалить программное обеспечение Registry Repair Wizard 2012, выполните следующие инструкции (Windows XP, Vista, 7, 8 и 10):
- Нажмите кнопку «Пуск» в Windows
- В поле поиска введите «Удалить» и нажмите ENTER.
- В результатах поиска найдите и нажмите «Установка и удаление программ»
- Найдите запись для Registry Repair Wizard 2012 6.72 и нажмите «Удалить»
- Следуйте указаниям по удалению.
После полного удаления приложения следует перезагрузить ПК и заново установить Registry Repair Wizard 2012.
Если на этапе 2 также не удается устранить ошибку RCHelper.exe, перейдите к шагу 3 ниже.
![]()
Registry Repair Wizard 2012 6.72
SmartPCTools
Шаг 3. Выполните обновление Windows.
Когда первые два шага не устранили проблему, целесообразно запустить Центр обновления Windows. Во многих случаях возникновение сообщений об ошибках RCHelper.exe может быть вызвано устаревшей операционной системой Windows. Чтобы запустить Центр обновления Windows, выполните следующие простые шаги:
- Нажмите кнопку «Пуск» в Windows
- В поле поиска введите «Обновить» и нажмите ENTER.
- В диалоговом окне Центра обновления Windows нажмите «Проверить наличие обновлений» (или аналогичную кнопку в зависимости от версии Windows)
- Если обновления доступны для загрузки, нажмите «Установить обновления».
- После завершения обновления следует перезагрузить ПК.
Если Центр обновления Windows не смог устранить сообщение об ошибке RCHelper.exe, перейдите к следующему шагу. Обратите внимание, что этот последний шаг рекомендуется только для продвинутых пользователей ПК.
Если эти шаги не принесут результата: скачайте и замените файл RCHelper.exe (внимание: для опытных пользователей)
Если ни один из предыдущих трех шагов по устранению неполадок не разрешил проблему, можно попробовать более агрессивный подход (примечание: не рекомендуется пользователям ПК начального уровня), загрузив и заменив соответствующую версию файла RCHelper.exe. Мы храним полную базу данных файлов RCHelper.exe со 100%-ной гарантией отсутствия вредоносного программного обеспечения для любой применимой версии Registry Repair Wizard 2012 . Чтобы загрузить и правильно заменить файл, выполните следующие действия:
- Найдите версию операционной системы Windows в нижеприведенном списке «Загрузить файлы RCHelper.exe».
- Нажмите соответствующую кнопку «Скачать», чтобы скачать версию файла Windows.
- Скопируйте этот файл в соответствующее расположение папки Registry Repair Wizard 2012:
Windows 10: C:Program Files (x86)SmartPCToolsRegistry Repair Wizard
- Перезагрузите компьютер.
Если этот последний шаг оказался безрезультативным и ошибка по-прежнему не устранена, единственно возможным вариантом остается выполнение чистой установки Windows 10.
СОВЕТ ОТ СПЕЦИАЛИСТА: Мы должны подчеркнуть, что переустановка Windows является достаточно длительной и сложной задачей для решения проблем, связанных с RCHelper.exe. Во избежание потери данных следует убедиться, что перед началом процесса вы создали резервные копии всех важных документов, изображений, установщиков программного обеспечения и других персональных данных. Если вы в настоящее время не создаете резервных копий своих данных, вам необходимо сделать это немедленно.
Скачать файлы RCHelper.exe (проверено на наличие вредоносного ПО — отсутствие 100 %)
ВНИМАНИЕ! Мы настоятельно не рекомендуем загружать и копировать RCHelper.exe в соответствующий системный каталог Windows. SmartPCTools, как правило, не выпускает файлы Registry Repair Wizard 2012 EXE для загрузки, поскольку они входят в состав установщика программного обеспечения. Задача установщика заключается в том, чтобы обеспечить выполнение всех надлежащих проверок перед установкой и размещением RCHelper.exe и всех других файлов EXE для Registry Repair Wizard 2012. Неправильно установленный файл EXE может нарушить стабильность работы системы и привести к тому, что программа или операционная система полностью перестанут работать. Действовать с осторожностью.
Файлы, относящиеся к RCHelper.exe
Файлы EXE, относящиеся к RCHelper.exe
| Имя файла | Описание | Программа (версия) | Размер файла (байты) | Расположение файла |
|---|---|---|---|---|
| OneDriveUpdaterService… | Updater Service | Microsoft OneDrive (19.222.1110.0006) | 2485096 | C:UsersTesterAppDataLocalMicrosoftOneDriv… |
| FileSyncHelper.exe | Microsoft OneDriveFileSyncHelper | Microsoft OneDrive (19.222.1110.0006) | 2134376 | C:UsersTesterAppDataLocalMicrosoftOneDriv… |
| OneDrive.exe | Microsoft OneDrive | Microsoft OneDrive (19.222.1110.0006) | 1584488 | C:UsersTesterAppDataLocalMicrosoftOneDrive |
| RCleaner.exe | Registry Repair Wizard | Registry Repair Wizard (2012, 6, 7, 2) | 3537688 | C:Program Files (x86)SmartPCToolsRegistry Re… |
| unins000.exe | Setup/Uninstall | Registry Repair Wizard 2012 6.72 | 754970 | C:Program Files (x86)SmartPCToolsRegistry Re… |
Другие файлы, связанные с RCHelper.exe
| Имя файла | Описание | Программа (версия) | Размер файла (байты) | Расположение файла |
|---|---|---|---|---|
| setupact.log | Log | Registry Repair Wizard 2012 6.72 | 62521 | C:WindowsPantherUnattendGC |
| setupact.log | Log | Registry Repair Wizard 2012 6.72 | 24622 | C:WindowsSystem32SysprepPanther |
| setupapi.dev.log | Log | Registry Repair Wizard 2012 6.72 | 684126 | C:Windowsinf |
| WmiApRpl.ini | Windows Initialization | Registry Repair Wizard 2012 6.72 | 29736 | C:WindowsinfWmiApRpl009 |
| api-ms-win-core-synch-… | ApiSet Stub DLL | Microsoft® Windows® Operating System (10.0.17134.12) | 13160 | C:UsersTesterAppDataLocalMicrosoftOneDriv… |
Вы скачиваете пробное программное обеспечение. Для разблокировки всех функций программного обеспечения требуется покупка годичной подписки, стоимость которой оставляет 39,95 долл. США. Подписка автоматически возобновляется в конце срока (Подробнее). Нажимая кнопку «Начать загрузку» и устанавливая «Программное обеспечение», я подтверждаю, что я прочитал (-а) и принимаю Лицензионное соглашение и Политику конфиденциальности компании Solvusoft.
Содержание
- Устранение неполадок при получении сообщения об ошибке «Не удалось запустить это приложение» Troubleshooting a ‘This application could not be started’ error message
- Cannot start application installer
- Replies (3)
- the windows 10 store APPLICATION CANNOT BE STARTED TRY REINSTALLING THE APPLICATION TO FIX THE PROBLEM
- Replies (9)
- «Cannot Start Application» Pop Up
Устранение неполадок при получении сообщения об ошибке «Не удалось запустить это приложение» Troubleshooting a ‘This application could not be started’ error message
Для приложений, разработанных для .NET Framework, обычно требуется, чтобы на компьютере была установлена определенная версия .NET Framework. Applications that are developed for .NET Framework typically require that a specific version of .NET Framework be installed on your system. В некоторых случаях вы можете попытаться запустить приложение без установленной или ожидаемой версии .NET Framework. In some cases, you may attempt to run an application without either an installed version or the expected version of .NET Framework present. В результате этого часто выводится примерно такое диалоговое окно с сообщением об ошибке: This often produces an error dialog box like the following:
Эта ошибка указывает на то, что выполняется одно из следующих условий: This error typically indicates one of the following conditions:
установка .NET Framework в системе повреждена; A .NET Framework installation on your system has become corrupted.
не удалось обнаружить версию .NET Framework, необходимую для приложения. The version of .NET Framework needed by your application cannot be detected.
Чтобы устранить эту проблему и запустить приложение, сделайте следующее: To address this issue so that you can run your application, do the following:
Скачайте средство восстановления .NET Framework (NetFxRepairTool.exe). Download the .NET Framework Repair Tool (NetFxRepairTool.exe). Средство запускается автоматически после завершения скачивания. The tool runs automatically when the download completes.
Если средство восстановления .NET Framework рекомендует какое-либо дополнительное действие, подобное показанному на следующем рисунке, нажмите кнопку Далее. If the .NET Framework Repair Tool recommends any additional action, such as those shown in the following figure, select Next.
В средстве восстановления .NET Framework отображается диалоговое окно, показанное на следующем рисунке, в котором указано, что изменения внесены. The .NET Framework Repair Tools displays a dialog box shown in the following figure to indicate that changes are complete. Не закрывайте диалоговое окно, пока выполняется повторная попытка запуска приложения. Leave the dialog box open while you to try rerun your application. Запуск должен быть выполнен успешно, если средство восстановления .NET Framework обнаружило и устранило поврежденную установку .NET Framework. This should succeed if the .NET Framework Repair Tool has identified and corrected a corrupted .NET Framework installation.
Если приложение успешно запускается, нажмите кнопку Готово. If your application runs successfully, select the Finish button. В противном случае нажмите кнопку Далее. Otherwise, select the Next button.
Если вы нажали кнопку Далее, в средстве восстановления .NET Framework отобразится диалоговое окно, как показано ниже. If you selected the Next button, the .NET Framework Repair Tool displays a dialog box like the following. Нажмите кнопку Готово, чтобы отправить диагностические данные в корпорацию Майкрософт. Select the Finish button to send diagnostic information to Microsoft.
Если по-прежнему не удается запустить приложение, установите последнюю версию .NET Framework, поддерживаемую вашей версией Windows, как показано в следующей таблице. If you still cannot run the application, install the latest version of .NET Framework that’s supported by your version of Windows, as shown in the following table.
| Версия Windows Windows version | Установка .NET Framework .NET Framework installation |
|---|---|
| Юбилейное обновление Windows 10 или более поздние версии Windows 10 Anniversary Update and later versions | Среда выполнения .NET Framework 4.8 .NET Framework 4.8 Runtime |
| Windows 10, Windows 10 с обновлением за ноябрь Windows 10, Windows 10 November Update | .NET Framework 4.6.2 .NET Framework 4.6.2 |
| Windows 8.1 Windows 8.1 | Среда выполнения .NET Framework 4.8 .NET Framework 4.8 Runtime |
| Windows 8 Windows 8 | .NET Framework 4.6.1 .NET Framework 4.6.1 |
| Windows 7 с пакетом обновления 1 (SP1) Windows 7 SP1 | Среда выполнения .NET Framework 4.8 .NET Framework 4.8 Runtime |
| Windows Vista SP2 Windows Vista SP2 | .NET Framework 4.6 .NET Framework 4.6 |
.NET Framework 4.8, предустановленная в Windows 10 с обновлением за май 2019 г. .NET Framework 4.8 is preinstalled on Windows 10 May 2019 Update.
Попытайтесь запустить приложение. Attempt to launch the application.
В некоторых случаях отображается диалоговое окно, подобное приведенному ниже, с предложением установить .NET Framework 3.5. In some cases, you may see a dialog box like the following, which asks you to install .NET Framework 3.5. Выберите Скачать и установить этот компонент, чтобы установить .NET Framework 3.5, а затем запустите приложение еще раз. Select Download and install this feature to install .NET Framework 3.5, then launch the application again.
Cannot start application installer
I am trying to install the Brother MFC-7860DW Wireless printer software into my Windows 8 Notebook.
I get a error code: Cannot start application installer
What can I do to correct this error, and install the software?
![]()
Thank you for posting your question on Microsoft community.
I would like to know some information about the issue so that we could help you better.
Is the issue specific to driver software?
I appreciate you for providing details about the issue.
This issue may occur either due to corrupt or missing Windows files.
I would suggest you to run this Microsoft fixit and check.
Refer:
Fix problems that programs cannot be installed or uninstalled
https://support.microsoft.com/en-us/mats/program_install_and_uninstall
It automatically repairs issues that block program installation or removal.
Please also run system file checker(SFC) and see if it helps.
Refer:
Use the System File Checker tool to repair missing or corrupted system files
https://support.microsoft.com/en-us/kb/929833
System file checker is a utility in Windows that allows users to scan for corruptions in Windows system files and restore corrupted files.
Note: It may ask for Windows installation DVD to fix and to enable SFC to make more than minor repairs. Some files
saved on your computer might get deleted when fixing corrupted files.
I hope this information helps.
Please do let us know if you need any further assistance.
the windows 10 store APPLICATION CANNOT BE STARTED TRY REINSTALLING THE APPLICATION TO FIX THE PROBLEM
Dear Microsoft communities
I have a problem with windows store I am updated my windows os from 8.1 to 10 it is single language original version last one month I am not able to open windows store.
The store icon not present in taskbar then i go to the Settings then Update and Security , Activation then I click the GO TO STORE it shows the following error » APPLICATION CANNOT BE STARTED TRY REINSTALLING THE APPLICATION TO FIX THE PROBLEM» kindly help me to resolve the issue
Welcome to Microsoft Community.
I understand the concern. Let me help you to fix the issue.
To assist you better I would like to know, are you log-in using Microsoft account?
Based on your information, I have tried the steps you have provided but we did not see the option to go to store from settings. To understand the issue better, it would be best if you include a screenshot in your post.
Please visit: How to include a screenshot in your post
Meanwhile, If you are logged-in using Microsoft account let’s try the below methods and check if this helps. Follow the below methods.
Method 1.
I would recommend you to run app troubleshooter and check if it helps. Follow the below link to run app troubleshooter.
If the issue still persist, try the below method.
Method 2.
I would suggest you reset the Windows app store and check if it helps.
Type «Run» on the search bar and press Enter.
Now type: «WSReset.exe» and hit enter to reset the Windows apps store.
Hope this helps. Post us with the status we will be glad to help you.
20 people found this reply helpful
Was this reply helpful?
Sorry this didn’t help.
Great! Thanks for your feedback.
How satisfied are you with this reply?
Thanks for your feedback, it helps us improve the site.
How satisfied are you with this reply?
Thanks for your feedback.
7 people found this reply helpful
Was this reply helpful?
Sorry this didn’t help.
Great! Thanks for your feedback.
How satisfied are you with this reply?
Thanks for your feedback, it helps us improve the site.
How satisfied are you with this reply?
Thanks for your feedback.
My app store wont open either. When I hit the app store button the shopping bag icon flashes on the screen for a second then disappears.
If i try the WSReset.exe I get the error message THE APPLICATION CANNOT BE STARTED. TRY REINSTALLING THE APPLICATION TO FIX THE PROBLEM.
In fact after further exploration, no app will open, it tells me to go to the app store THIS APP CANT OPEN. CHECK THE WINDOWS STORE FOR MORE INFO ABOUT_______.
Ironic and annoying
17 people found this reply helpful
Was this reply helpful?
Sorry this didn’t help.
Great! Thanks for your feedback.
How satisfied are you with this reply?
Thanks for your feedback, it helps us improve the site.
How satisfied are you with this reply?
Thanks for your feedback.
10 people found this reply helpful
Was this reply helpful?
Sorry this didn’t help.
Great! Thanks for your feedback.
How satisfied are you with this reply?
Thanks for your feedback, it helps us improve the site.
How satisfied are you with this reply?
Thanks for your feedback.
Hi, someone is helping me at this site: http://www.techsupportforum.com/forums/f338/windows-app-store-wont-open-neither-will-any-apps-1168537.html#post7289041
Its working so far, so follow the steps.
2 people found this reply helpful
Was this reply helpful?
Sorry this didn’t help.
Great! Thanks for your feedback.
How satisfied are you with this reply?
Thanks for your feedback, it helps us improve the site.
How satisfied are you with this reply?
Thanks for your feedback.
Nope this does not work either
There is an IO error due to the folder having Trusted Installer rights, and the Admin user you are using to run Powershell does not have write permission to this folder. So this Powershell script might have worked int he past but does not work now
Was this reply helpful?
Sorry this didn’t help.
Great! Thanks for your feedback.
How satisfied are you with this reply?
Thanks for your feedback, it helps us improve the site.
How satisfied are you with this reply?
Thanks for your feedback.
I have a problem with windows store I am updated my windows os from 8.1 to 10 it is single language original version last one month I am not able to open windows store.
The store icon not present in taskbar then i go to the Settings then Update and Security , Activation then I click the GO TO STORE it shows the following error » APPLICATION CANNOT BE STARTED TRY REINSTALLING THE APPLICATION TO FIX THE PROBLEM» kindly help me to resolve the issue
The application cannot be started. Try reinstalling the application to fix the problem.
6 people found this reply helpful
Was this reply helpful?
Sorry this didn’t help.
Great! Thanks for your feedback.
How satisfied are you with this reply?
Thanks for your feedback, it helps us improve the site.
How satisfied are you with this reply?
Thanks for your feedback.
I have a problem with windows store I am updated my windows os from 8.1 to 10 it is single language original version last one month I am not able to open windows store.
The store icon not present in taskbar then i go to the Settings then Update and Security , Activation then I click the GO TO STORE it shows the following error » APPLICATION CANNOT BE STARTED TRY REINSTALLING THE APPLICATION TO FIX THE PROBLEM» kindly help me to resolve the issue
The application cannot be started. Try reinstalling the application to fix the problem.
«Cannot Start Application» Pop Up
A pop up saying «Cannot Start Application» keeps constantly popping up every 10 seconds. I have no idea where its coming from, what program or anything.
If someone could please help as I cant do anything on my computer with this popping up.
These are the details:
PLATFORM VERSION INFO
Windows : 6.1.7601.65536 (Win32NT)
Common Language Runtime : 4.0.30319.18444
System.Deployment.dll : 4.0.30319.34244 built by: FX452RTMGDR
clr.dll : 4.0.30319.18444 built by: FX451RTMGDR
dfdll.dll : 4.0.30319.34244 built by: FX452RTMGDR
dfshim.dll : 4.0.41209.0 (Main.041209-0000)
SOURCES
Deployment url : http://www.reponets.com/creative/2-002138222-00001i;size=728×90;tag_id=8723;sub_id=1656;ref=INSERT_REFERRER_HERE;cb=INSERT_CACHEBUSTER_HERE
ERROR SUMMARY
Below is a summary of the errors, details of these errors are listed later in the log.
* Activation of http://www.reponets.com/creative/2-002138222-00001i;size=728×90;tag_id=8723;sub_id=1656;ref=INSERT_REFERRER_HERE;cb=INSERT_CACHEBUSTER_HERE resulted in exception. Following failure messages were detected:
+ Exception reading manifest from http://www.reponets.com/creative/2-002138222-00001i;size=728×90;tag_id=8723;sub_id=1656;ref=INSERT_REFERRER_HERE;cb=INSERT_CACHEBUSTER_HERE: the manifest may not be valid or the file could not be opened.
+ An error occurred while parsing EntityName. Line 1, position 48.
COMPONENT STORE TRANSACTION FAILURE SUMMARY
No transaction error was detected.
WARNINGS
There were no warnings during this operation.
OPERATION PROGRESS STATUS
* [25/11/2014 12:57:25 AM] : Activation of http://www.reponets.com/creative/2-002138222-00001i;size=728×90;tag_id=8723;sub_id=1656;ref=INSERT_REFERRER_HERE;cb=INSERT_CACHEBUSTER_HERE has started.
ERROR DETAILS
Following errors were detected during this operation.
* [25/11/2014 12:57:25 AM] System.Deployment.Application.InvalidDeploymentException (ManifestParse)
— Exception reading manifest from http://www.reponets.com/creative/2-002138222-00001i;size=728×90;tag_id=8723;sub_id=1656;ref=INSERT_REFERRER_HERE;cb=INSERT_CACHEBUSTER_HERE: the manifest may not be valid or the file could not be opened.
— Source: System.Deployment
— Stack trace:
at System.Deployment.Application.ManifestReader.FromDocument(String localPath, ManifestType manifestType, Uri sourceUri)
at System.Deployment.Application.DownloadManager.DownloadDeploymentManifestDirectBypass(SubscriptionStore subStore, Uri& sourceUri, TempFile& tempFile, SubscriptionState& subState, IDownloadNotification notification, DownloadOptions options, ServerInformation& serverInformation)
at System.Deployment.Application.DownloadManager.DownloadDeploymentManifestBypass(SubscriptionStore subStore, Uri& sourceUri, TempFile& tempFile, SubscriptionState& subState, IDownloadNotification notification, DownloadOptions options)
at System.Deployment.Application.ApplicationActivator.PerformDeploymentActivation(Uri activationUri, Boolean isShortcut, String textualSubId, String deploymentProviderUrlFromExtension, BrowserSettings browserSettings, String& errorPageUrl)
at System.Deployment.Application.ApplicationActivator.ActivateDeploymentWorker(Object state)
— Inner Exception —
System.Xml.XmlException
— An error occurred while parsing EntityName. Line 1, position 48.
— Source: System.Xml
— Stack trace:
at System.Xml.XmlTextReaderImpl.Throw(String res, String arg)
at System.Xml.XmlTextReaderImpl.ParseEntityName()
at System.Xml.XmlTextReaderImpl.ParseAttributeValueSlow(Int32 curPos, Char quoteChar, NodeData attr)
at System.Xml.XmlTextReaderImpl.ParseAttributes()
at System.Xml.XmlTextReaderImpl.ParseElement()
at System.Xml.XmlTextReaderImpl.ParseDocumentContent()
at System.Deployment.Application.ManifestValidatingReader.XmlFilteredReader.Read()
at System.Xml.XmlCharCheckingReader.Read()
at System.Xml.XsdValidatingReader.Read()
at System.Deployment.Application.ManifestReader.FromDocument(String localPath, ManifestType manifestType, Uri sourceUri)
COMPONENT STORE TRANSACTION DETAILS
No transaction information is available.