Если вы стали замечать, что у вас становится проблемный почерк, то советы, которые я даю в этой статье, могут вам сильно помочь. Вель мы настолько привыкли печатать на наших компьютерах и мобильных телефонах, что, кажется, забыли, как писать ручкой и бумагой.
Хорошей новостью является то, что это всего лишь вопрос практики, и что плохой почерк можно улучшить даже во взрослом возрасте.
Простые советы как улучшить проблемный почерк.
-
Пишите медленно
В начале я рекомендую вам писать медленнее, чем обычно. Таким образом, вы сможете изучить свой почерк и понять, что беспокоит вас больше всего. Мы тратим гораздо больше времени на набор текста, чем на собственно написание, поэтому совершенно нормально, что вам требуется больше времени, чтобы что-то написать, чем напечатать это.
Другими словами, цель — разборчивый почерк, независимо от того, сколько времени потребуется, чтобы закончить слово или предложение. Время часто является самым важным фактором при переходе от неаккуратного почерка к аккуратному.

-
Определите свои слабые места
Напишите алфавит на одном листе бумаги, чтобы увидеть, какие буквы вызывают у вас больше всего проблем. Обведите или подчеркните их, а затем сначала сосредоточьтесь на улучшении этих букв. Удивительно, как одна или две буквы могут изменить общий вид текста, который вы написали.
-
Проверьте размер и высоту ваших букв
Самая распространенная проблема, с которой сталкиваются люди, заключается в том, что некоторые из их букв слишком большие, а некоторые слишком маленькие. Это главная причина, по которой чей-то почерк выглядит неряшливым и неразборчивым.
Попробуйте выровнять ваши буквы и убедитесь, что они имеют более или менее одинаковую высоту и размер. Эта мелочь улучшит ваш общий почерк.
Например, высокие буквы, такие как “т”, ”г“ или «ь”, должны быть выше, но не больше других. Размер букв для прописных и строчных букв также может немного отличаться.
-
Выберите подходящую ручку и бумагу
Я предлагаю вам попробовать другие ручки, пока вы не найдете ту, которая подходит вам лучше всего. Удобная ручка поможет вам развить навыки рукописного ввода. Никогда не стоит недооценивать инвестиции в хорошую ручку, которая прослужит долгие годы. И вполне возможно, что именно правильная ручка поможет вам исправить проблемный почерк.
Что касается бумаги, то в качестве начинания вам следует использовать бумагу с линиями или линованную бумагу, потому что это поможет вам убедиться, что все буквы имеют одинаковую высоту и размер.
Лист бумаги с прямыми линиями поможет вам несколькими способами, в том числе:
- Выстраивать свои слова и отдельные буквы в прямую линию.
- Добиться большего прогресса во время каждого сеанса рукописного ввода, поскольку вы сможете разместить больше слов на странице.
- Избежать наклонных или диагональных линий.
-
Смотрите видео со знаменитыми каллиграфами
Используйте преимущества современных технологий, чтобы улучшить свой почерк. Посмотрите видео, на которых профессиональные каллиграфы пишут и объясняют свои действия. Вы можете найти множество из их видео в онлайн бесплатно, вам просто стоит выбрать стиль, который вам нравится, а затем следовать ему. Возможно, это лучший способ улучшить ваш проблемный почерк.
-
Скопируйте почерк, который вам нравится
Это может быть почерк кого-то из ваших знакомых или красивый почерк, который вы нашли в интернете. Вначале самый простой способ улучшить свой почерк — скопировать тот, который вам нравится. Сначала он не будет выглядеть даже похожим на оригинал, но скоро улучшится, и вы заметите его быстрое исправление.
Помните, что цель состоит в том, чтобы создать свой собственный стиль почерка, хотя и полезно копировать чей-то другой, пока вы не получите представление о том, как должен выглядел ваш почерк.
Итак, продолжайте и черпайте вдохновение от руки, прежде чем браться за ручку и бумагу.
-
Потренируйтесь на рабочих листах для рукописного ввода
Даже если это кажется занятием, которым дети занимаются в школе, вам стоит попробовать заняться этим способом улучшения почерка. Найдите в интернете рабочие листы для рукописного ввода, распечатайте их, а затем используйте для практики. Это один из лучших способов попрактиковаться и улучшить свой почерк. Результат гарантирован.

-
Начните вести дневник
Как я уже говорила, самое главное — это ежедневная практика. И есть ли лучший способ исправить проблемный почерк, чем начать вести ежедневный дневник? Ведение дневника имеет много преимуществ, оно помогает очистить наш разум и уменьшить стресс? чтобы вы смоги улучшить проблемный почерк.
Если вы возьмете на себя обязательство ежедневно вести дневник, вы будете получать по крайней мере 5 минут практики каждый день! Это может показаться незначительным, но помните: важно быть последовательным, и иногда для этого достаточно небольших шагов.
-
Будьте терпеливы
Возможно, это самый важный совет. Все хорошее требует времени, так что наберитесь терпения и не будьте слишком строги к себе. Вам никогда не следует сравнивать себя с другими, которые, вероятно, просто практиковались в течение более длительного периода времени, чем вы. Дайте себе немного времени, и вы будете поражены, когда увидите достигнутые вами результаты.
Важно не сдаваться, если поначалу вы не видите никакого улучшения. Просто придерживайтесь этого и практикуйтесь, когда у вас будет немного времени. Через некоторое время ваш проблемный почерк улучшится, и вы сможете писать записки и благодарственные открытки людям, которых вы любите, своим собственным, уникальным почерком.
Post Views: 70
Содержание статьи
- Зачем исправлять почерк?
- Как исправить почерк и правильно держать ручку?
- Что такое «хороший почерк»?
- Плохой почерк или плохое рабочее место?
- Как исправить почерк? Упражнения
- Воздушное письмо
- «Мы писали, мы писали, наши пальчики устали»
Зачем исправлять почерк?
«Плохой» почерк почти перестал быть проблемой. В век, когда многие давно не пишут рукописных текстов, кажется, что можно ничего не менять. На самом деле, проблема плохого почерка глубже, чем кажется. Почерк напрямую связан с развитием моторики, поэтому работать над ним — полезно. Если человек недоволен своим почерком или ребенок пишет «как курица лапой», существует ряд правил и упражнений. Как исправить почерк? Расскажем в нашем материале.
Как исправить почерк и правильно держать ручку?
Почерк зависит от того, как человек держит ручку. Нередко еще в детском возрасте возникает неправильный захват. Учиться писать с ручкой в кулаке — плохая затея. Лучше сразу брать пишущий предмет правильно. Верный захват иногда называют «крокодильчиком».
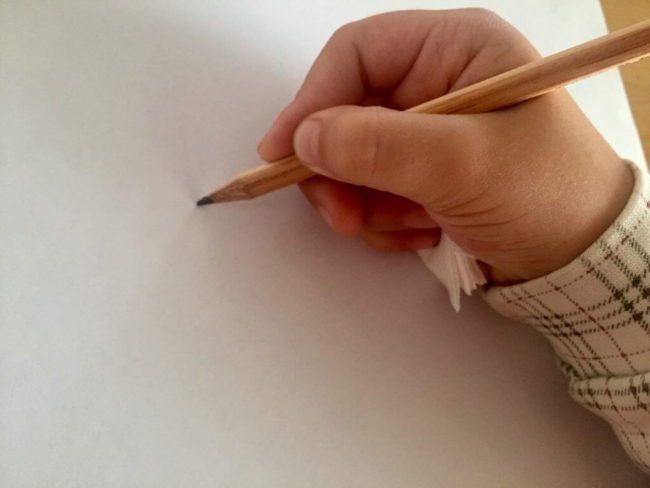
В захвате участвую три пальца — большой, указательный и средний. Два свободных пальца — безымянный и мизинец прижаты к ладони. Есть два способа привыкнуть к верному захвату:
- Зажимать безымянным пальцем и мизинцем кусочек марли, ваты или салфетки;
- Использовать специальное приспособление для установки правильного захвата. Такие часто встречаются в канцелярских магазинах.
Что такое «хороший почерк»?
Хороший почерк отличает совокупность нескольких факторов:
- Правильная форма букв: проследите, чтобы буквы не дублировали друг друга, буква «п» на письме не напоминала «и». Буквы должны быть примерно одного размера, если одну вы пишете слишком узко, а другую — слишком широко, текст выглядит некрасиво. Почерк может быть слишком витиеватым или наоборот — буквы как-будто не дописаны.
- Наклон: отклонение от «нормы» письма сильно влияет на почерк. В идеале все буквы имеют легкий наклон вправо.
- Интервал: расстояние между буквами и словами должно быть одинаковым.
- Нажим: старайтесь всегда писать с одинаковым нажимом.
Плохой почерк или плохое рабочее место?

Кроме правильного захвата ручки, надо проследить за тем, как сидит пишущий человек. Обратите внимание на то:
- Как обустроено место для письма;
- Правильно ли установлен источник света;
- Удобен ли стул;
- На каком расстоянии находится стол;
- Проследите за осанкой пишущего и положением руки.
Как исправить почерк? Упражнения
Почерк часто портится у тех, кто вынужден писать слишком много текста. Рука в этом случае просто устает. В этом случае можно сделать простое упражнение:
Воздушное письмо
Возьмите ручку или карандаш, согните руку в локте (на угол около 70–80 градусов) и начинайте писать воображаемые слова в воздухе. Делайте буквы крупными — в этом случае при выписывании будут задействованы не только кисть и пальцы, но и вся конечность от плеча, включая запястье и предплечье. Если писать всей рукой, утомление от письма будет меньше.
«Мы писали, мы писали, наши пальчики устали»
Это простое, известное еще со школьных времен, упражнение, позволяет отдохнуть и расслабить кисть. В течение минуты надо сжимать и разжимать кисть, широко расставляя пальцы рук. Для детей можно прочитать небольшой стишок: «мы писали, мы писали, наши пальчики устали, а теперь мы отдохнем и опять писать начнем».
Если речь идет о ребенке, то в ход должны пойти прописи и правильная мотивация.
Лайфхак: если ребенок не хочет писать в прописи буквы, можно обводить рисунки или красивые узоры.
Для взрослых существуют специальные курсы каллиграфии, которые научат не только красиво писать, но и оформлять открытки или поздравительные письма.
Проследите за письменными принадлежностями. Ручка, карандаш и бумага должны быть качественными. Детям рекомендуется простая шариковая (не гелевая) ручка
Хороший почерк вырабатывается не сразу, поэтому стоит запастись терпением и тренироваться каждый день. Психологи утверждают, что правильные привычки вырабатываются за 21 день. Возможно, это — именно тот срок, который поможет вам улучшить свой почерк!
Читайте также:
- Раннее развитие: вредно, бесполезно или необходимо?
- Рано? Поздно? Вовремя? Норма и не норма в развитии ребенка
Поскольку вы здесь…
У нас есть небольшая просьба. Эту историю удалось рассказать благодаря поддержке читателей. Даже самое небольшое ежемесячное пожертвование помогает работать редакции и создавать важные материалы для людей.
Сейчас ваша помощь нужна как никогда.
![]()
Download Article
![]()
Download Article
Has anyone ever told you your handwriting looks like chicken scratch? Are you frustrated and embarrassed that your notes look like a child’s writing rather than an adult’s? Because of all the typing we do on computer and cellphone keyboards, emphasis on handwritten material has slowly drifted by the wayside. However, even though typing has become a lot more common in our lives, writing things by hand is still a necessary skill in some academic and professional situations. Your handwriting doesn’t need to look like a first grader’s. All you need is a pen, patience, and some practice,
-

1
Stretch your fingers, hand, arm, and shoulder. Spending a few minutes stretching will help your muscles used for writing become stronger and more flexible. This will help prevent your hand from cramping or tiring out quickly. You will want to focus these stretching exercises on the hand you write with, but your non-writing hand can help out too. Here are some possible stretches:
- Wiggle and stretch your fingers using both hands.
- Match your hands up (like you’re giving yourself a high five), and push your fingers against each other.
- Interlace your fingers and push your hands out in front of your body.
- Alternate between making a tight fist, and then opening your hand wide to stretch your muscles.
- Flex and reach to touch each of your fingers to your thumb. Try to coordinate each touch with the beat of a song.
- Roll your wrist around in circular motions. You can also flex your wrist back and forth.
- Roll your shoulders in forward circular movements and backward circular movements.[1]
-
2
Gather your materials. Before you start practicing your handwriting, you will want materials that will help with your practice.[2]
Some helpful materials include:- A table or a hard surface to write on. Having a smooth, hard surface to write on will immediately increase the readability and clarity of your handwriting.
- A lined notebook or lined paper. This will help keep track of the size of your letters.
- A writing utensil. Some people debate over which is better to use for handwriting: a pen or a pencil. A pen can sometimes write smoother because of the free flowing ink, but a pencil but might better for someone looking to work on technique and correct mistakes. Either way, pick a writing utensil that is comfortable to hold in your hand.
Advertisement
-
3
Find a comfortable writing position. Many teachers would say that having proper posture is a must for having legible handwriting. Having proper posture constitutes as sitting up straight with your shoulders pushed back, and sitting with your legs uncrossed, and feet on the floor. Usually, a chair with a high, flat back is suggested for added back support. While practicing proper posture might be helpful in terms of writing in a balanced seated position, and relieving some tension on your back, it is not something you should get hung-up on. Sit in a comfortable position that gives your arm and hand enough room to move freely as you write.
-
4
Assess and adjust your grip. Everyone holds their writing utensil differently, but a common way of holding a pen or pencil is gripping it between your thumb, index finger, and middle finger, while resting the middle part of the pen on either the index finger knuckle, or in the webbed part of your hand between the thumb and index finger.[3]
You want to grip the pen with enough pressure that it won’t slip from your hand while writing, but gentle enough that your hand isn’t shaking and cramping within minutes.- For people who write with their left hand, it may help to write with your hand hooked, creating a mountain shape between the forearm and thumb of your hand. It may also help to hold the pen a little bit higher up, so you can see what you are writing.
-
5
Try learning a different writing technique. Most people write using their fingers to create the shape of their letters. This is called finger-writing. Using only your fingers to draw out the letters can put a lot of strain on your finger muscles, causing your hand to tire and cramp more quickly. An alternate and less strenuous way to write, is relying on your shoulder and arm muscles to do the work instead of your finger muscles. You will know if you’re using these muscles correctly if your forearm and shoulder move as you write. Some people who write or draw for their profession (calligraphers, architectural drafters, etc.) have found it easier and more precise to write and draw using their shoulder muscles. Using your forearm and shoulder muscles to write are beneficial because surprisingly, these muscles are capable of fine, intricate motor movements, and also tire out a lot less easily than your finger muscles.[4]
Here’s how to teach yourself to write using your shoulder and forearm muscles:-
Write big air letters. Writing in the air simulates the same movements you would use to write on paper using your shoulder and forearm muscles. It’s just like writing on a blackboard. Remember that your forearm should guide the shaping of the letters, while your shoulder should provide the power.[5]
- Once you get comfortable with the shoulder and forearm movements, make the size of the letters you are drawing out smaller and smaller.[6]
Then, once you feel you are ready, practice with pen and paper. - Concentrate on keeping your fingers, hand, and wrist steady while your forearm and shoulder provide the movements.
- Once you get comfortable with the shoulder and forearm movements, make the size of the letters you are drawing out smaller and smaller.[6]
-
Write big air letters. Writing in the air simulates the same movements you would use to write on paper using your shoulder and forearm muscles. It’s just like writing on a blackboard. Remember that your forearm should guide the shaping of the letters, while your shoulder should provide the power.[5]


Advertisement
-
1
Doodle. Doodling is a simple way to practice making writing movements with your shoulder and forearm muscles without having to construct precise letters. You can doodle some shapes and symbols used in the alphabet to get move comfortable with curves and angles. Common alphabet shapes you can practice are /////s, \\s, +++++s, and OOOOOs.[7]
You can also practice waves and zig-zags for other letters of the alphabet.[8]
-
2
Practice writing all the letters of the alphabet. It is easiest to begin with the individual letters of the alphabet before moving on to more complicated words and sentences. Begin by writing the alphabet in all uppercase letters and all lowercase letters. Then, you can start writing the individual letters both uppercase and lowercase, together (for example, Aa, Bb, Cc, Dd, Ee, Ff, etc).
-
3
Focus on writing just the uppercase alphabet letters. Practicing writing the alphabet letters in small groups can help you conquer writing out similar letters in smaller portions. By focusing on groups of letters that have similar shape, stroke count, and structure, you can solidify the the movements necessary to write out those letters.[9]
All uppercase letters should be the same height. The uppercase letters of the alphabet can be divided into these smaller groups:- Uppercase letters made using one stroke of the pen.[10]
- L,V,U,W,Z,C,O,S
- Uppercase letters made using two strokes of the pen.[11]
- B,D,J,K,M,N,PQ,R,X,T,Y,Z
- Uppercase letters made using three strokes of the pen.[12]
- A,E,F,H,I
- Uppercase letters made using one stroke of the pen.[10]
-
4
Focus on writing just the lowercase alphabet letters. While uppercase letters should all be the same height, lowercase letters should vary in height.[13]
For example the letters in group 1 should be smaller than the letters in group 4, since the letters in group 1 are all rounded letter whereas the letters in group 4 they have longer tails and stems.- Lowercase letters — group 1.[14]
- m,n,r,u
- Lowercase letters — group 2.[15]
- a,c,e,s,o
- Lowercase letters — group 3.[16]
- b,d,h,j,g,p,q,f,y
- Lowercase letters — group 4.[17]
- v,w,x,z
- Lowercase letters — group 1.[14]
-
5
Practice with directional charts and handwriting workbooks. Everybody has their own style of handwriting, but there are certain sequences when writing out the letters that make it easier to move on to the next letter. For example, rather than starting a lowercase ‘e’ with the bottom tail and bringing your pen up and around, begin with the short line in the middle of the letter, and bring the pen out, up, around, and down, so you can move to the next letter naturally.
- Handwriting notebooks usually consist of writing spaces that are lined in different ways to help with letter sizing and proportion. Repetitive practice writing out letters and sentences can make your handwriting neater and easier to read.
-
6
Experiment with different writing styles. Maybe you noticed your handwriting looks a lot better when your letters are more curvy and loopy. Maybe it’s easier for you to write comfortably when your letters are bigger than your usual handwriting. Whatever it may be, practice writing with different styles like loopy, bubbly letters, angled, sharp letters, or narrow, tall letters to see what is easiest for you to write and for others to read. There are a million ways to write your letters, experiment to find what works best for you.
-
7
Copy handwriting that you like. If you just received a birthday card from your uncle, and you really like the way he writes his J’s and c’s, get some tracing paper, place it on top of his writing, and trace away. This will help with recognizing and imitating different elements that you want to incorporate into your own writing.
-
8
Write slowly. As you progress to writing words and sentences, writing slowly will help you identify areas of your writing that need improvement, such as letter spacing, word spacing, letter size, and slant. By taking your time, you can focus on making your letters uniform and sharp.
-
9
Practice whenever you can. Write out your to-do list or grocery list by hand. Doodle while you’re on the phone. Keep a journal and write about your day. The more you practice, the better you will become.


Advertisement
Add New Question
-
Question
How can I write fast while still having good handwriting?

Relax. A tight grip makes for messy writing. Breathe slowly and slow down, grip the pen more lightly and even from doing that, your writing will look nicer.
-
Question
How can I write neatly if there is too much noise?
You can take your time, relax, and ignore people around you.
-
Question
Are retractable ball pens able to help improve handwriting?
Not really. It doesn’t matter what pencil or pen you use.
See more answers
Ask a Question
200 characters left
Include your email address to get a message when this question is answered.
Submit
Advertisement
-
If you write with your left hand, avoid notebooks with spiral binding. The spiral might prevent you from writing naturally.[18]
-
Give your hand frequent breaks if you are doing a long piece of writing.
-
If the pen or pencil slips in your hand as you write, you can buy rubber grips to slip on the lower end of the pen for a better grip.
Show More Tips
Thanks for submitting a tip for review!
Advertisement
References
About This Article
Article SummaryX
To have better handwriting, grip your writing utensil with enough pressure that it won’t slip out of your fingers while writing but be gentle enough to keep your hand from cramping or shaking. Once your grip feels comfortable, practice your handwriting by doodling any kinds of shapes. Additionally, practice writing all of the letters in the alphabet in both upper and lower case. You can also try mimicking a style that you like, writing more slowly to help you focus on precise lettering, and working with directional charts and handwriting workbooks. To learn how to hold your pen properly, keep reading!
Did this summary help you?
Thanks to all authors for creating a page that has been read 50,333 times.
Reader Success Stories
-

Sarah Warren
Apr 24, 2017
«This article helped my learn different strategies in positioning myself to write neatly and in a non-stressful way.»