Disclaimer: We use affiliate links to the products mentioned on this page. When you click an affiliate link and make a purchase, we receive commissions. If you want to support our portal, you can use the links. Otherwise, you can find the recommended products using a search engine.
If you are an adventure-seeker or a videographer, chances are you already own a GoPro camera. These cameras are one of the best things to happen to us since the internet. GoPro cameras are not just sleek and rigidly built but they also come with an incredible wide-angle view that makes it possible to take amazing photos and video footage from any height. And what if you want to edit this footage? Try Movavi Video Suite!
Before we delve into how to remove fisheye from GoPro, it is crucial to state that these cameras are ridiculously cheap and that they provide top notch results when it comes to shooting from a distance. What’s more? They can totally record in 4K. What is there not to like? Below, you can check what fisheye lenses Amazon offers: from the cheapest which you can connect to your smartphone to professional ones.
So, one of the secrets to the GoPro excellence is the built-in fisheye lens. However, this feature can be both positive and negative, depending on the user and the area your footage is supposed to cover. If you need a camera for a short interview or to take photographs of a tennis court? Then you may not really like GoPro cameras. But if you need a camera to capture the entire view of a mountain from top to bottom or the entire axis of a football field, then, GoPro cameras are arguably your best bet for the job. Alas, the fisheye distortion saps the fun away.
Why is the fisheye lens both good and bad? How do I remove fisheye GoPro? These are the two major focus of our guide on how to correct fisheye distortion in GoPro footage.
What is fisheye lens
The fisheye lens in GoPro cameras is designed to handle almost all the capturing project on its own, as it is best known for capturing images from several miles away from the subject. The lens is an ultra wide-angle lens that is capable of covering a landscape or horizontal view up to 122.6 degrees. To distort light coming in during filming, the Fisheye lens is designed with a curvy edge, which is usually seen at the edge of any photo or video taken with a GoPro camera. This circular distortion allows a wider coverage during filming and it is yet the reason you see straight lines appearing bent or distorted and the middle of the frame oversized compared to other areas.
Although the Fisheye effect is for a good cause, we can speak for everyone when we say it is not always fun to have in photos/videos. Sure, it could be a nice view in some photos/videos but extremely annoying in other cases.
It is no wonder most GoPro users are constantly looking for ways to get rid of this annoying feature. Thankfully, we know three tricky yet simple ways to enjoy the benefits of using a GoPro camera without suffering through the negative fisheye effect. Check them out!
Best fisheye removal methods for GoPro footage
Choose the linear field of view (FOV)
One simple way to eliminate the fisheye effect completely is to set your camera to Linear FOV in the settings. GoPro cameras come with three distinct FOV (Superview, Wide, Medium, Narrow, and Linear FOV), with Superview being the widest and of course, the one with the most fisheye distortion effect and Linear being like any normal standard angle camera.
The Linear FOV does not cover as much range as the Superview but you are sure to get pictures and videos with no fisheye effect. If your concern is on the distortion, then this may be the simplest option to get rid of it. However, it is important to note that once you go linear, you can’t go back. Okay, here is what I mean – using Linear FOV prevents you from going back to any of the other fisheye-effect FOV such as Superview, Wide, Medium, and narrow. You can only record your video in this landscape. Furthermore, the Linear FOV is not available for all GoPros. If you are using Hero 6, Hero 5 Session, and Hero 5 Black, then you are in the clear. Other versions such as Hero 4 Black and Hero 4 Silver cannot make use of this built-in fisheye distortion correction unless they have firmware v.05.00.00 installed. In addition, the Linear FOV works for only selected resolutions and frame rates. You may have to consider another option. Don’t worry, we have other options for you!
Remove fisheye effect with GoPro Studio
To curb the menace made by the fisheye effect, GoPro developed a software dubbed GoPro Studio that contains all the editing tools you need for a post-production editing. This tool helps you to completely eliminate the fisheye effect after filming. So, you get to enjoy the large landscape view and eliminate the curved edges too. This is much better than shooting in Linear field of view that allows you to record only in the standard landscape, thus reducing the area of coverage drastically.
Unfortunately, this software is no longer free to download. However, you can download it at independent third-party sites or better yet download a third-party app such as the Movavi Video Editor Plus which possesses the same feature and more.
For those who already have GoPro Studio, here are a few steps to get you the desired result.
-
First things first, you are required to download, install, and launch GoPro Studio on your computer.
-
Then, select the View and Trim option to commence editing.
-
Next, you will have to choose the video you wish to edit. Note: it has to be one recorded using a GoPro camera.
-
After choosing the video, the next step is to select the Advanced Settings option to start editing. Be sure to click Remove Fisheye and OK to get the ball rolling.
-
Next, you are required to click the Add Clip to Conversion List option and select Convert to complete the fisheye removal process. And you are done!
Remove fisheye with Movavi Video Editor
Using a third-party software such as the Movavi Video Editor your best chance of getting rid of the annoying Fisheye effect for good. It is very easy to use so anyone, whether beginner or expert, can get their videos edited perfectly without any hassle. If GoPro fisheye removal is your goal, then you should totally check this video editing tool out. I can say unabashedly that this method is the most effective for all GoPro footage irrespective of the camera version you are using.
Get rid of the fisheye distortion effect with the following simple steps.
-
Simply download and install the Movavi Video Editor on your PC.
-
Open the Filters tab and select Adjustments.
-
Here, you are giving a list of adjustments to make. Simply choose the Fish Eye – reduce option and drag it to your video.
-
Click the Export button, select saving options, and click Start to save the video on your computer. And bang! You are good to go!
GoPro cameras come in handy when you need to take amazing shots from a distance. Nonetheless, the renowned fisheye effect that comes with these cameras can make shooting a lot of stress. The pictures or videos appear curved and the middle unnecessarily over-sized. This can be really frustrating, to say the least. However, the fun of having a wide-angle view of a distant image is worth the pain. Thanks to the aforementioned fisheye correction methods, you can enjoy the wide-angle panoramic view without the ridiculous curvy edge.
Note: the methods mentioned above are perfect for GoPro video footage, not pictures. To get rid of the fisheye effect in a photo, you may have to try Photoshop or any other third-party fisheye correction app.
Frequently asked questions
📹 Is GoPro better than DSLR?
It depends on what you need from the camera and where you are going to use it. GoPro is smaller and more portable, so it’s more convenient to use it while travelling. GoPro can also provide videos with a higher resolution compared to DSLR, which can be crucial in film-making. However, DSLR cameras can provide a better image quality in low-light environment because they have a wider ISO range. DSLR cameras also have more settings and modes than GoPro, so it is rather an advantage for experineced users, but may seem confusing for beginners.
🎥 Is GoPro good for vlogging?
Yes, GoPro is good option for vlogging since it’s easy-to-use and can provide high-resolution videos.
💻 What equipment do you need for vlogging?
Of course, a good camera comes first. Then, you might need a recorder and some more devices. Consider checking this equipment list.
The best vlogging equipment
🎙Do you need a microphone for vlogging?
Yes, if you want your subscribers to hear your comments. People like to listen to other people so you might need a good microphone. Below, you can learn about some devices.
Top 8 best microphones for YouTube
Make videos. Create. Inspire.
Sign up for news and special offers
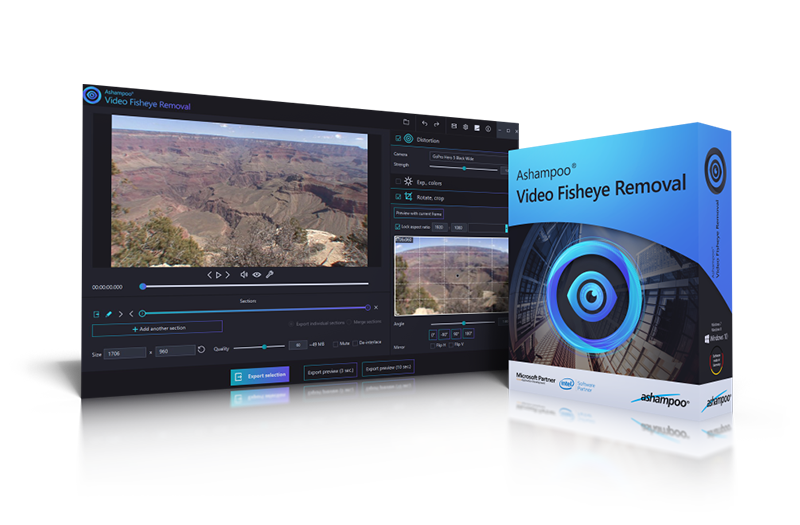
Искажение в виде рыбьего глаза – это основная проблема популярных экшн-камер, которая в лучшем случае нежелательна, а в худшем – напрягает при просмотре. Программа Ashampoo Video Fisheye Removal автоматически исправляет искажения от линзы для получения кристально чистого реалистичного изображения.
Более 50 тщательно подобранных пресетов для всех основных экшн-камер (GoPro, Mobius ActionCam, Rollei, Sony и многих других) обеспечивают мгновенное исправление по клику по одной кнопке. Встроенный предпросмотр в реальном времени позволяет с лёгкостью выполнять ручные настройки.
Данное приложение делает много больше, чем просто исправляет искажения в виде рыбьего глаза. Программа также позволяет выполнять поворот (на 90°, 180°, 270° или другой угол) или отражение видео, а также сохранять их в различные популярные форматы. А в то время, как другие программы заставляют Вам кликать по множеству вложенных меню, Ashampoo Video Fisheye Removal выводит все основные функции в одном легко доступном месте в виде слайдеров и областей ввода для тонкой настройки. Оптимизируйте экспозицию или температуру цвета и превращайте даже посредственные снимки в настоящее произведение искусства!
- Краткий обзор
- Подробности
- Скриншоты
- Языки
- Требования
Умные профили для быстрого результата
Ashampoo Video Fisheye Removal положит конец искажениям от линзы! Более 50 пресетов экшн-камер (GoPro, Mobius ActionCam, Rollei, Sony и многих других) обеспечивают мгновенное исправление по клику по одной кнопке. Встроенный предпросмотр позволяет Вам вручную выполнять точные настройки баланса белого, экспозиции и цветов. Ashampoo Video Fisheye Removal – это незаменимая помощь владельцам GoPro и других экшн-камер!
Поворачивайте и обрезайте видео с небывалой лёгкостью
Ashampoo Video Fisheye Removal делает много больше, чем просто исправляет искажения в виде рыбьего глаза. Программа также позволяет выполнять поворот (на 90°, 180°, 270° или другой угол) или отражение видео, а также сохранять их в различные популярные форматы. А чтобы у Вас был полный контроль над видео, Вы можете выполнять ещё и обрезку видео!
Быстрое исправление экспозиции и параметров цветов
В то время, как другие программы заставляют Вам кликать по множеству вложенных меню, Ashampoo Video Fisheye Removal выводит все основные функции в одном легко доступном месте в виде слайдеров и областей ввода для тонкой настройки. Оптимизируйте экспозицию или температуру цвета и превращайте даже посредственные снимки в настоящее произведение искусства!
Особенности функций:
- Автоматическая коррекция искажений от линзы
- Более 50 пресетов для всех популярных камер
- Оптимизируйте параметры баланса белого, экспозиции и цветов
- С лёгкостью вращайте и отражайте видео
- Выполняйте поворот видео на любой градус
- Обрезайте видео до любого размера

Сергей Иванов
2 года назад
За Впуклое, лайк

🎼А_С🎶
2 года назад
Всё просто, а главное понятно, спасибо автору!!!

lovely sas
3 года назад
а как перекачать видео с экшен камеры на комп?

Антон Порфирьев
4 года назад
После такой обработки и рендеринга качество видео оставляет желать лучшего. Но объяснено все доходчиво…

Рядовой Чмоня
4 года назад
Спасибо
Рядовой Чмоня
4 года назад
Вау

GOODLEO
4 года назад
Спасибо

Sefgey Pimenov
4 года назад
Огромное спасибо

— PARADOX
4 года назад
Спасибо помог

The Vika
4 года назад
Единственный канал на ютуб который рассказал и показал всё нормально))) Да и единственный который это рассказывает

KOLAMBO
5 лет назад
чювак спасибо тебе большое экшен камера есть на нормальную денег нету а эта с рьбим глазом теперя всё ровно в сони вегасе сделал !!!!!

Андрей Канаев
5 лет назад
проще при съемке сразу поставить средний угол обзора и камера сама сделает все тоже самое и на выходе вы ничего не потеряете..! но за информацию спасибо..))

pulse TV
5 лет назад
гран мерси!

Maksonshik8
5 лет назад
спасибо очень помогли

Артём Демьянов
5 лет назад
спасибо, помогли!

Алексей Филехин
5 лет назад
Так, так, еще вот так, вот на эту кнопку, ещё сюда — оп и твое видео в посмотреть позже улетело)
Пс насчёт чёрных полей в конце — не проще ли это pan/crop’ом исправить? Просто курсором уменьшаем и все?

Владислав Проценко
5 лет назад
Спасибо, помог)
января 2015
Убираем эффект рыбий глаз
Подскажите пожалуйста как можно выпрямить видео от эффекта рыбьего глаза? Планируется ли в PlayMemories Home редактировать данный эффект? И если не затруднит посаветуйте программку для исправления сего эффекта без потери качества.
-
Все темы форума -
Предыдущая тема -
Следующая тема
1 УТВЕРЖДЕННОЕ РЕШЕНИЕ
января 2015
Такие манипуляции над видеорядом обычно поддерживаются более-менее серьёзными платными видеоредакторами.
Ну или их серьёзными open source аналогами.
Увы, без потери качества такую манипуляцию проделать трудно. Ведь поток на карту памяти уже пишется со сжатием, а после применения фильтра видео приходится пересохранять и пережимать… Разве что изначальная съёмка в формате XAVC-S спасёт, там качество изначального материала максимально сохраняется.
А лично я искажения убирал используя open source 3D/видеоредактор Blender. Там можно даже под конкретные линзы профиль искажений самому сделать для компенсации.
———————————
Добра Вам!
3 ОТВЕТ 3
января 2015
Такие манипуляции над видеорядом обычно поддерживаются более-менее серьёзными платными видеоредакторами.
Ну или их серьёзными open source аналогами.
Увы, без потери качества такую манипуляцию проделать трудно. Ведь поток на карту памяти уже пишется со сжатием, а после применения фильтра видео приходится пересохранять и пережимать… Разве что изначальная съёмка в формате XAVC-S спасёт, там качество изначального материала максимально сохраняется.
А лично я искажения убирал используя open source 3D/видеоредактор Blender. Там можно даже под конкретные линзы профиль искажений самому сделать для компенсации.
———————————
Добра Вам!
января 2015
А в PlayMemories Home не планируется встроить данную корректировку??? Это бы решило много проблем с подбором линз. Забить данные продукций SONY и вуаля все довольны и восхваляют SONY)))
января 2015
Пока не сообщалось, но такое пожелание мы уже передали инженерам.
———————————
Добра Вам!