Папка wp-content — руководство для начинающих по наиболее важному каталогу WordPress
Доброго времени суток!
Сегодня я бы хотел рассказать вам о самом главном каталоге в установке WordPress — wp-content.

Что такое wp-content? Это может быть ваша первая реакция в качестве новичка WordPress или если вы в основном работаете с WordPress через бэкэнд. Ведь среднестатистический владелец сайта большую часть времени проводит в личном кабинете.
Это имеет смысл. В конце концов, вы можете выполнять все важные задачи здесь и иметь возможность позаботиться обо всем сайте без необходимости редактировать файлы, перемещать данные или выполнять другие утомительные задачи.
Ко мне часто поступают вопросы про хостинг, которым я пользуюсь и поэтому решил указать хостинг в статье https://sprinthost.ru. Вы можете попробовать попользоваться хостингом 30 дней бесплатно. Чтобы понять, как будет работать Ваш сайт на этом хостинге просто перенести свой сайт (в этом поможет поддержка хостинга бесплатно) и и таким образом сможете понять подходит хостинг Вам или нет. На этом хостинге находятся сайты с 20 000 тысяч посещаемость и сайты чувствуют себя отлично. Рекомендую! Да, если делать оплату на 1 год то получаете скидку 25%. И что мне нравится — тех. поддержка всегда помогает в технических вопросах, за что им спасибо. Как Вы понимаете не всегда проходит всё гладко и нет желания, чтобы сайт не был доступен тем самым страдал трафик и доход.
Если вы пошли на один шаг дальше и установили WordPress самостоятельно, вы даже можете быть в курсе его отдельных частей: установке базы данных и самого WordPress.
Однако, если вы не являетесь разработчиком или кем-то, кто любит контролировать все аспекты вашего сайта, вы, вероятно, не очень хорошо знакомы с файловой структурой WordPress и каждым из ее файлов и папок.
Одна из самых центральных его частей — папка wp-content. По этой причине, в этой статье я хочу подробно рассмотреть именно это. Мы поговорим о том, где находится wp-content, его назначение, что в нем содержится и что она позволяет делать.
Готовы окунуться в эту часть WordPress? Тогда поехали.
Если вы не внесли существенных изменений в свою файловую структуру или не переименовали wp-content во что-то еще (подробнее об этом ниже), вы должны найти его в середине вашей установки WordPress.

Как и wp-admin и wp-includes, wp-content является частью каждой стандартной установки WordPress и будет создаваться автоматически при каждой установке CMS на сервер.
Таким образом, чтобы получить к нему доступ, все, что вам нужно сделать, это войти на свой FTP-сервер (например, через FileZilla). В зависимости от настроек вашего хоста, вам может потребоваться перейти в другую папку, например public_html, чтобы попасть на ваш сайт, однако, как только вы там окажетесь, именно там вы найдете каталог wp-content.
Какова цель wp-content?
В более широком смысле, wp-content содержит весь предоставленный пользователем контент. В основном все, что вы можете загрузить на свой сайт, находится здесь. Заметьте, это не относится к тому, что вы пишете. Эти вещи хранятся в базе данных WordPress.
Однако, если у вас есть база данных и папка wp-content, вы всегда сможете вернуть свой сайт обратно, даже если все остальное было потеряно.
На самом деле, если у вас есть тестовый веб-сайт (ничего важного, например, сайт местной разработки ), вы можете попробовать небольшой эксперимент.

Сначала загрузите последнюю версию WordPress. Затем зайдите в главный каталог вашего тестового сайта. Здесь отметьте каждый файл и каталог, за исключением wp-content и wp-config.php (если он виден, вы также можете захотеть оставить файл .htaccess).

Затем удалите их. Вы меня правильно поняли, избавься от всей этой кучи. После того как вы это сделаете, при попытке загрузить свой сайт в браузер, он будет выглядеть примерно так:

Чтобы исправить ситуацию, перейдите на свежую версию WordPress, которую вы только что загрузили. Распакуйте архив и получите доступ к каталогу.
Здесь, опять же, отметьте все файлы и папки, за исключением тех, которые остались в вашей тестовой установке WordPress. Затем перепишите их.
После завершения, если вы сделали все правильно, теперь вы должны перезагрузить свой сайт без проблем и увидеть его именно таким, как он был раньше.
Благодаря папке wp-content и базе данных WordPress ничего особенного для вашего сайта не было потеряно. Аккуратно, правда?
Итак, что же тогда находится внутри wp-content?
Почему вышеуказанный эксперимент работает? Поскольку, как уже упоминалось, wp-content содержит все пользовательские данные, которые не хранятся в базе данных. Это становится еще более очевидным, когда вы открываете каталог.
Стандартные каталоги в папке wp-content
Как правило, wp-content будет содержать как минимум три каталога: плагины (plugins), темы (themes) и загрузки (uploads). Вот для чего они используются:
- Плагины. Как видно из названия, именно здесь WordPress хранит плагины. При установке плагина через меню в панели инструментов, он будет в конечном итоге здесь. И наоборот, можно также установить плагины вручную, извлекая и копируя их в этот каталог. Это сделает их доступными для активации в панели управления WordPress.
- Темы — аналогично папке плагинов, но для тем. Установите тему из бэкэнда и потом вы найдете ее в этом каталоге. Или скопируйте темы в эту папку, чтобы сделать их доступными в бэкэнде. Это также папка, в которой вы будете тратить много времени на создание или изменение собственной темы или дочерней темы.
- Загрузка — здесь WordPress хранит все ваши медиафайлы, такие как изображения, видео или другие файлы, которые вы загружаете на свой сайт. По умолчанию медиафайлы упорядочены в подпапках, обозначая год и месяц их добавления на сайт. Однако также возможно отключить эту опцию, и все файлы окажутся в одном каталоге.
Итак, это стандартная настройка WordPress. Однако, особенно на более авторитетных сайтах, вы часто найдете дополнительные папки внутри каталога wp-content.
Другие общие папки
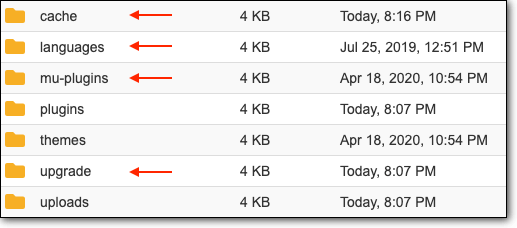
В зависимости от плагинов, тем и других вещей, присутствующих на вашем сайте, вы также можете найти это внутри wp-content:
- Mu-plugins — это сокращение от обязательных плагинов. Плагины для обязательного использования поставляются с некоторыми темами и имеют решающее значение для работы вашей темы и сайта. Если они существуют, вы найдете их в этой папке.
- Languages (языки) — если ваш сайт не использует английский, но является одним из многих других языков, на которых доступна CMS, WordPress сохранит языковые файлы в этом каталоге.
- Upgrade (обновление) — это временная папка, созданная WordPress при обновлении сайта до новой версии.
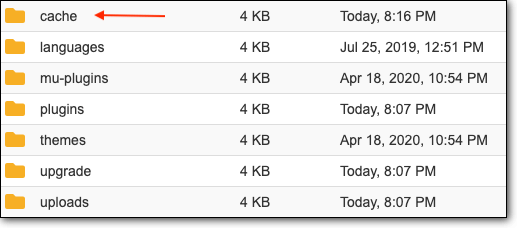
Помимо этого, другие плагины могут иногда создавать свои собственные каталоги внутри wp-content. Например, W3 Total Cache и WP Super Cache могут хранить здесь некоторые файлы.
Как упоминалось ранее, это имеет смысл, поскольку этот каталог не перезаписывается при обновлении WordPress. По этой причине любые данные, которые необходимо сохранить, лучше всего сохранить здесь.
Тем не менее, конечно, это также означает, что wp-content имеет жизненно важное значение для любого сайта WordPress и всегда должен быть включен в резервную копию.
Когда использовать wp-content
Во время работы сайта WordPress, есть несколько случаев, в которых вам, возможно, придется иметь дело с этой директории. Помимо работы с темами, ниже приведены некоторые другие примеры, когда вам может потребоваться доступ к wp-content.
Исправление важных ошибок
Содержание wp-content иногда может быть причиной распространенных ошибок WordPress. В частности, те, которые вызваны плагинами и темами.
Когда это произойдет, и ваш сайт станет недоступным, вам, возможно, придется получить доступ к папке плагинов, чтобы деактивировать некоторые из них вручную и вернуться в WordPress бэкэнд.
Переименовать wp-content
Несмотря на свою жизненно важную функцию, название wp-content не высечено на камне. Вполне возможно изменить его на что-то другое (как, кстати, с папками внутри wp-content).
Зачем вам это может понадобиться? Короче говоря, безопасность.
Поскольку WordPress является открытым исходным кодом, любой желающий может выяснить основную структуру любого сайта. Стандартная настройка WordPress общеизвестна, что облегчает начало атаки.
По этой причине переименование wp-content является одним из шагов на пути к более безопасному сайту. Используйте эту статью, чтобы выяснить, как это реализовать. Для получения дополнительных советов о том, как сделать WordPress безопаснее, не пропустите мою статью на эту тему.
О wp-content в двух словах
Папка wp-content является неотъемлемой частью любой установки WordPress, поэтому вы найдете ее в главном каталоге любого сайта, построенного на платформе WordPress.
В нем размещается любой контент, предоставленный пользователями, который не сохраняется в базе данных. Это включает в себя плагины, темы и загруженные медиа. По этой причине, кроме базы данных, wp-content всегда должен быть частью резервной копии вашего сайта.
В этом кратком руководстве вы узнали, как получить доступ к wp-content и что вы можете найти в нем. Обладая этими знаниями, вы теперь немного знакомы с тем, как WordPress работает за кулисами.
Это, в свою очередь, дает вам больше контроля над вашим сайтом, и это никогда не может быть плохо.
У вас есть еще вопросы по wp-content? Если это так, пожалуйста, сообщите мне об этом в комментариях ниже.
До скорых встреч!

Юрич:
Занимаюсь созданием сайтов на WordPress более 6 лет. Ранее работал в нескольких веб-студиях и решил делиться своим опытом на данном сайте. Пишите комментарии, буду рад общению.
WordPress состоит из 3 папок wp-includes, wp-admin, wp-content и из нескольких файлов рядом с этими папками.
Все файлы и папки, кроме wp-content — это и есть WordPress, движок. Т.е. каталоги: wp-includes и wp-admin — это ядро WordPress, а wp-content — это все остальное — все пользовательские данные…
В директории wp-content хранятся практически все пользовательские файлы, кроме файла конфигурации wp-config.php (это неотъемлемая часть ядра). Здесь находятся плагины, темы, файлы плагинов, тем и содержимого сайта. Тут же принято хранить все файлы связанные с расширением возможностей WordPress.
Исходно в WordPress, wp-content содержит один файл index.php и 3 папки: plugins, themes, languages.
Файл wp-content/index.php
Всегда должен существовать и должен иметь такое содержимое:
<?php // Silence is golden.
Этот файл запрещает видеть список файлов в папке. Если index.php не существует, а ваш веб-сервер позволяет смотреть файлы в директориях, то пройдя по ссылке http://example.com/wp-content, можно увидеть все файлы и папки в этой директории. Это могут использовать хакеры, чтобы получить доступ к файлам ключей, что позволит взломать сайт. Например, если у вас установлен уязвимый плагин, то сайт можно будет легко проверить на наличие этого уязвимого плагина, а дальше атакующий без особого труда сможет сломать сайт.
При обновлении WordPress вручную, никогда не трогайте папку wp-content и ничего в ней. Она к обновлению WordPress никакого отношения не имеет.
Список того, что может находиться в каталоге wp-content:
/mu-plugins — обязательные плагины
В WordPress есть «Обязательные плагины», они находится в директории wp-content/mu-plugins. О них я писал отдельно, обязательно ознакомьтесь!
Коротко об обязательных плагинах: Обязательные к использованию плагины (Must-use plugins), известные также под названием mu-plugins — это плагины, которые устанавливаются в специальную папку mu-plugins в каталоге контента wp-content и активируются автоматически (всегда активны) для сайта и сайтов сети. Эти плагины не видно среди обычных плагинов. В админ-панели они отображаются в верхней информационной строке и их невозможно отключить, кроме как удалить файл плагина из каталога wp-content/mu-plugins.
/plugins — плагины
Плагины находятся в директории wp-content/plugins. Плагин может представлять собой один файл или несколько файлов внутри папки. Любые файлы в директории /plugins сканируются WordPress, чтобы определить, является ли файл файлом плагина. Если файл определяется как плагин, он появляется в админ-панели в разделе «Плагины» и готов к активации.
Для деактивации плагина можно удалить плагин из папки /plugins. Также можно переименовать название папки, в этом случае, WordPress просто не сможет найти файл плагина и деактивирует при попытке подключения. Но имейте ввиду, что плагины лучше удалять из админ-панели, через кнопку Удалить, потому что при удалении срабатывают некоторые функции, которые подчищают данные плагина в базе данных или в файлах.
/themes — темы
Темы хранятся в директории wp-content/themes. Каждая тема должна находиться в собственной папке и содержать правильно оформленный файл style.css, чтобы WordPress распознал ее как тему, пригодную для использования. В директории темы должны находиться как минимум 2 файла: index.php и style.css.
WordPress может хранить в этой директории сколько угодно тем. Вы можете легко посмотреть любую имеющуюся тему или активировать её во вкладке Внешний вид ► Темы в админ-панели.
WordPress хранит загруженные файлы в папке wp-content/uploads. Эта директория не существует в дистрибутиве WordPress по умолчанию. Она создается при первой загрузке файла в WordPress. Отдельное создание необходимо, потому что эта папка может быть перемещена в другое место (см. ниже)
По умолчанию WordPress хранит загрузки в папках по годам и месяцам:
/wp-content/uploads/2012/06/image.png
Перед тем как можно будет загружать какие-либо изображения или файлы в WordPress, на сервере необходимо разрешить создание папок в директории /wp-content. При загрузке первого изображения WordPress автоматически создает директорию /uploads и необходимые поддиректории в ней. После того как первый файл загружен, верните права для /wp-content обратно, обычно 755. Некоторые серверы сразу позволяют скрипту создавать папки и файлы.
Директория uploads должна иметь все права, чтобы в ней можно было свободно создавать и удалять файлы, обычно это права 777.
WordPress НЕ умеет распознавать и импортировать в админку изображения загруженные в uploads напрямую (не через админку). И в библиотеке файлов WordPress такие файлы не отображаются — WordPress о них ничего не знает.
uploads в Multisite
В Multisite установке для основного сайта фалы загружаются как обычно. А для всех дополнительных сайтов, создается папка /wp-content/uploads/sites/2, где 2 — это ID сайта сети.
Так для каждого сайта создается папка с его ID в папке /wp-content/uploads/sites. Далее файлы также располагаются в папках по году и месяцу.
Такой подход позволяет разделить загрузки для каждого сайта и упрощает их обслуживание.

До версии WP 3.5 файлы дополнительных сайтов располагались не в /wp-content/uploads/sites, а в /wp-content/blogs.dir.
Так например, директория для сайта с ID 3 выглядит так:
- WP 3.5 и выше:
/wp-content/uploads/sites/3 - WP 3.4 и ниже:
/wp-content/blogs.dir/3
Перемещение папки uploads
Чтобы переместить папку uploads нужно определить константу UPLOADS в wp-config.php так:
define('UPLOADS', 'uploads'); // значит что папка uploads должна лежать в корне сайта
Или можно изменить опции: upload_path и upload_url_path в таблице опций (см. update_option()).
/upgrade — автообновления
Директория wp-content/upgrade создается WordPress автоматически при обновлении WordPress. Эта папка используется для хранения новой версии WordPress, скачанной с WordPress.org. Перед обновлением, WordPress скачивает архив и извлекает его содержимое в эту папку. Чтобы процесс автоматического обновления протекал успешно, рекомендуется не трогать эту папку. Если данная директория удалена, WordPress создаст её при следующем обновлении.
/languages — переводы
Каталог wp-content/languages присутствует только в том случае, если вы устанавливаете не английскую версию WordPress. В нем содержаться все файлы локализации (перевода) WordPress. Такие файлы имеют расширения:
.mo— сжатая версия аналогичного .po файла, которая используется при переводе;.po— исходный файл перевода. Этот файл можно использовать для редактирования перевода. После редактирования его нужно скомпилировать в сжатую версию с расширением.mo.
Также в languages могут находиться специальные поддиректории:
-
/pliugns— содержит переводы плагинов. Файл перевода должен иметь формат:название плагина-локаль.mo, например:akismet-ru_RU.mo. Перед загрузкой своего файла перевода, плагин проверяет наличие файла перевода в этой папке и если он там есть, то используется этот файл перевода, а не родной перевод плагина. /themes— содержит переводы тем. Файл перевода должен иметь формат:название темы-локаль.mo, например:twentyfifteen-ru_RU.mo. Также как и с плагинами — эти файлы имеют больший приоритет перед родными файлами перевода темы.
Произвольные директории
В /wp-content можно создавать любые директории. Некоторые плагины, создают такие папки для хранения файлов. Обычно отдельная папка создается, когда нужно хранить много файлов или когда хранимые файлы как-то отличаются от остальных.
Например плагин WP Super Cache создает директорию /wp-content/cache для хранения кэшированных страниц сайта. Кэшированная страница — это сгенерированная страница сайта, сохраненная как статический файл HTML. При обращении к такой странице она не генерируется повторно, а отдается статический файл. Это и есть страничный кэш, который уменьшает нагрузку сервера в десятки раз, поскольку страницы не генерируются при каждом просмотре, а создаются только когда кэш перезаписывается.
Плагин WP Super Cache также добавляет два файла в директорию wp-content: advanced-cache.php (специальный) и wp-cache-config.php. Они нужны для работы WP Super Cache.
Другой пример, популярный плагин для галерей — NextGen Gallery — создает директорию /wp-content/gallery для хранения изображений, загруженных в галереи. Каждая созданная галерея представляет собой поддиректорию /gallery.
Еще пример, мой плагин Kama Thumbnail, который также создает папку /wp-content/cache/thumb и записывает в нее созданные файлы миниатюр.
Специальные файлы
advanced-cache.php
Вызывается на самом раннем этапе загрузки WordPress, в файле wp-settings.php, если константа WP_CACHE включена. Вот так выглядит вызов:
if ( WP_CACHE && apply_filters( 'enable_loading_advanced_cache_dropin', true ) && file_exists( WP_CONTENT_DIR . '/advanced-cache.php' ) ) {
	// Для использования плагинами кэширования. Использует статический файл для обрыва работы скрипта.
	include WP_CONTENT_DIR . '/advanced-cache.php';

	// Re-initialize any hooks added manually by advanced-cache.php.
	if ( $wp_filter ) {
		$wp_filter = WP_Hook::build_preinitialized_hooks( $wp_filter );
	}
}
Этот файл используется плагинами страничного кэширования. В нем обычно проверяется наличие подходящего файла кэша и если он есть, то он выводиться на экран и работа скрипта обрывается. Это позволяет не загружать 90% файлов WordPress и отдавать статические HTML файлы.
object-cache.php
В отличии от advanced-cache.php, object-cache.php срабатывает всегда, если он существует. Он нужен, чтобы переопределить работу базового кэширования объектов WordPress.
Вызывается из функции wp_start_object_cache(), которая в свою очередь вызывается из файла wp-settings.php чуть позднее advanced-cache.php.
На основе этого файла работают такие кэши объектов как: Memcache, Memcached, APC, XCache.
Вызов выглядит так:
// Запускает объектное кэширование WordPress или
// внешнее объектное кэширование, если существует специальный файл.
wp_start_object_cache();
С версии WP 5.8 появился хук enable_loading_object_cache_dropin, который позволяет отключить плагин объектного кэширования. Хук вызывается раньше чем загружаются плагины и нужен когда код запускается не с веба, например при тестах.
maintenance.php
wp-content/maintenance.php отвечает за вывод страницы-заглушки, которая показывается в момент автообновления WoordPress. Такая страница определена по умолчанию и за её вывод отвечает функция wp_maintenance(). Но если создать файл maintenance.php в wp-content, то за вывод страницы-заглушки будет отвечать содержимое этого файла.
В maintenance.php нужно описать страницу-заглушку по всем правилам HTML.
Подробнее читайте в описании функции wp_maintenance()
db-error.php
Позволяет показать произвольный шаблон страницы ошибки соединения с базой данных.
Если файл wp-content/db-error.php существует в папке wp-content, тогда вместо дефолтного сообщения WordPress об ошибки соединения с базой данных будет загружен этот файл. В файле нужно создать HTML код страницы об ошибке!
Страница об ошибке подключения должна устанавливать статус ответа 500, чтобы поисковики не обрабатывали контент.
Файл db-error.php вызывается функцией dead_db(), а функция в свою очередь вызывается при ошибке подключения к БД.
Пример такой страницы смотрите здесь.
sunrise.php
Загружается только для мультисайтовой сборки, т.е. когда срабатывает условие is_multisite() и при этом определена константа ‘SUNRISE’ (её нужно определить в файле wp-config.php).
Файл wp-content/sunrise.php позволяет на раннем этапе изменить логику работы сайта в сети мультисайт. Например, тут можно установить глобальные переменные $current_site,
$current_blog определяющие текущий сайт сети. Или можно изменить префикс таблиц БД — переменная $table_prefix.
Также в файле sunrise.php можно изменить константы отвечающие за то, где находится каталоги MU плагинов или обычных плагинов. см. wp_plugin_directory_constants()
.
db.php
Позволяет переписать движок работы с БД. Если файл существует в папке wp-content, то он будет вызван до создания подключения к БД. Далее, если в этом файле определить переменную $wpdb, то именно она будет использоваться, как глобальная переменная для работы с БД.
Благодаря такой логике, можно, например, расширить базовый класс wpdb{} или полностью его заменить.
Пример расширения базового класса wpdb{}:
<?php

// это код для файла db.php, который лежит в папке wp-content

defined( 'ABSPATH' ) || die();

if ( defined( 'DOING_CRON' ) && DOING_CRON )
	return;

class MY_DB extends wpdb {

	public function __construct( $dbuser, $dbpassword, $dbname, $dbhost ) {

		// дополнительный код...

		parent::__construct( $dbuser, $dbpassword, $dbname, $dbhost );

	}

	// переопределяем метод wpdb::query()
	public function query( $query ) {

		// наш измененный код
	}

}

$wpdb = new QM_DB( DB_USER, DB_PASSWORD, DB_NAME, DB_HOST );
Переименование или перемещение папки wp-content
В некоторых случаях, например, для уникализации многих URL на всем сайте или для объединения структуры сайта с другим скриптом, или по каким-то еще причинам, нужно чтобы каталог wp-content назвался по-другому или чтобы он находился в другой директории.
Переместить или переименовать wp-content очень просто. Для этого нужно открыть конфигурационный файл wp-config.php, который лежит в корне вашего сайта и определить в нем две константы:
WP_CONTENT_DIR— путь до каталога контента;WP_CONTENT_URL— URL на каталог контента.
define( 'WP_CONTENT_DIR', __DIR__ .'/data' );
define( 'WP_CONTENT_URL', 'http://'. $_SERVER['HTTP_HOST'] .'/data' );
Данный код переименовывает wp-content в data.
Are you curious about where the content of your website is stored? Or have you heard of wp-content on your WordPress site and want to learn more about it?
A WordPress website is made up of many files and folders. wp-content is one of the key folders as it contains your website’s content, and the themes and plugins installed on your site. If this folder is accidentally deleted, your website will crash.
At MalCare, we’ve seen many cases where WordPress websites crashed because a hacker has meddled with the wp-content. Since many website owners never visit the backend of WordPress and check the wp-content, it makes it an ideal spot for hackers to inject malware. They also hide backdoors that give them a secret entry point into your site.
Learning about what hackers can do the wp-content repository can be alarming. But don’t worry!
In this guide, we’ve simplified everything you need to know about the wp-content. You’ll find out what the folder does and how to use it. Next, you’ll learn how to hide it or prevent it from being accessed by unauthorized users.
TL;DR: The wp-content is an integral part of your WordPress site. To ensure it is protected, we recommend installing a WordPress Security Plugin (MalCare). The plugin will scan and protect your WordPress files and folders from hackers. It will also automatically take backups of your site regularly and store them safely.
What Is The WP-content Folder?
As we mentioned in the introduction, a WordPress website is made of many files and directories. It is created by default at the time of building your website and is one of the most crucial folders of your website.
Every image that you upload, every theme and plugin that you install on your website is stored in this folder (more details in the next section). In other words, any files that don’t get stored in the database are stored here. If the folder gets deleted, your website will crash and you will need to rebuild it from scratch.
Generally, website owners don’t use this folder. But certain occasions may arise when you need to access it.
For instance, we have installed a plugin on our WordPress website. But the plugin caused the site to malfunction as it was not compatible with the version of WordPress we were running. We couldn’t disable it on the WordPress dashboard. So we had to go to the wp-content folder to delete the plugin in order to access our site.
Recommend read: Beginner’s Guide to Understanding WordPress File Structure & Database
How To Access The WP-Content Folder
To access the wp-content folder, you need to access the WordPress root directory. Here’s what to do:
1. Log into your web hosting account (e.g. WP Engine).
2. Access cPanel and open File Manager.
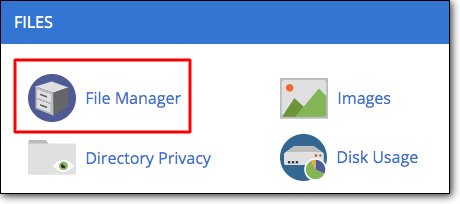
3. Here, you will see a folder named ‘public_html’. This folder resides on your web server and is made up of WordPress files and sub-folders that all contribute to the functioning and appearance of your website.
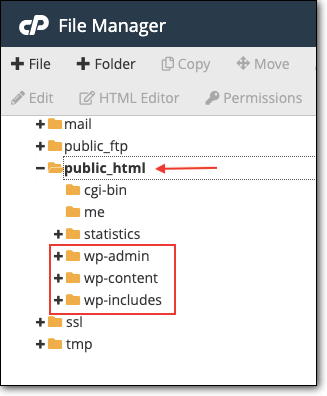
4. Inside the public_html folder, you will find three main sub-folders:
- wp-admin – Contains administrative files related to who can access your WordPress panel and what permissions they are granted.
- wp-includes – Contains files related to rules, hierarchies, and settings of your WordPress site.
- wp-content – Contains your website’s themes and plugins files and media uploads (in wp content / uploads).
Today we will focus on the wp-content folder and learn more about its role on your website. The wp-content folder has many more sub-folders and files which we’ll discuss in the next section.
What Does The Wp-content Contain?
The wp-content folder on a standard WordPress site has three more subfolders – plugins, themes, and uploads.

However, as WordPress sites expand and add more plugins and themes, more folders may be created. To simplify this, we’ve broken down the directory structure of this section into four parts:
- Plugins Folder
- Themes Folder
- Uploads Folder
- Other Common Folders In Wp-content
- mu-plugins
- Languages
- Upgrade
- Specific Plugins
1. Plugins Folder
On your WordPress website, you have the ability to install plugins. All the plugins you install on your WordPress site (both active and inactive) are stored in this folder. If you open any of the folders, you’d find rules and configuration files of the plugins installed. Tampering with this folder could cause the plugins to misbehave.

Knowing how to access this folder can come in handy if you are unable to install a plugin on your dashboard (admin panel). You can copy the plugin’s zip file and paste it into this folder. Next, you have to extract the zip file to activate the plugin on your site.
Similarly, you can use the folder to delete or disable a plugin. Sometimes, a plugin might be causing a compatibility issue which causes the website to malfunction. If you are unable to disable the plugin from the dashboard, you can access this folder and disable it manually.
We do not recommend using this manual method as making changes directly to this WordPress folder is very risky. A slight misstep can render your site broken. Use this method only when you have no other choice.
2. Themes Folder
Similar to the plugins folder, this one houses all the themes on your site. You can use it the same way you would use the plugins folder.
When you install a theme on your WordPress dashboard, it would appear in this folder.
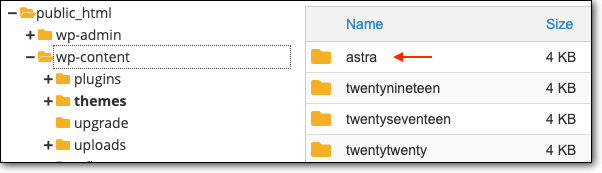
For instance, we installed the Astra theme on our site:
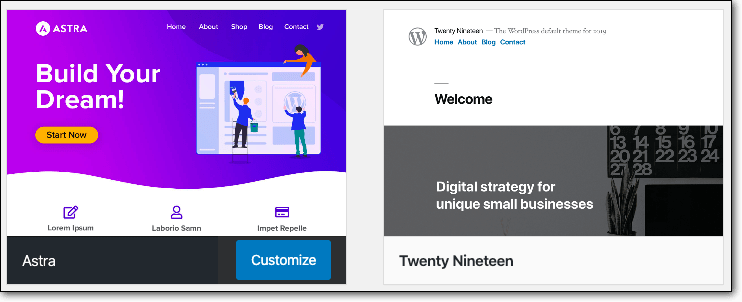
Next, we checked the themes folder and a sub-folder named ‘astra’ was automatically created:
You can also copy themes into this folder to make it available on your dashboard. In the same way, you can also delete themes here.
3. Uploads Folder
As the name suggests, everything that is uploaded to your site is stored in this folder. This includes images, videos, and any other files such as PDF documents, MS Word docs, and GIFs.
By default, these media files are stored in subfolders according to the year and month they were added to the site. You can think of it as a media library.

This is the default setup of a wp-content folder of a WordPress site. However, as WordPress sites expand and develop, you can often find additional folders here. We have briefly entailed them below:
4. Other Common Folders Inside Wp-content
There are four additional folders that are often created in the wp-content folder.
a) mu-plugins
mu-plugins are must-use plugins. These plugins are critical to the functioning of your WordPress site and are deemed as must use. For example, a plugin may come bundled with a theme. If you disable the plugin, it could break the theme and therefore, break your website. So developers tag them as mu-plugins so that you don’t disable them unintentionally. If such plugins exist on your site, they are stored in this folder.
b) Languages
WordPress can be used to create websites in many different languages. If you choose to use any language other than English or multiple languages, WordPress will save the language files in this folder.
c) Upgrade
This is a temporary folder created by WordPress when you update your site to a new version.
d) Specific Plugins
Sometimes plugins create their own directories on your website. This means they create their own folders within the wp-content folder. For example, the WP Super Cache plugin creates its own folder called ‘cache.’
You can see that the wp-content repository contains vital data on your website. Therefore, it should always be protected.
In the next section, we discuss the measures you can take to safeguard this folder from being tampered with or deleted by anyone.
How To Protect WP-content Or The Uploads Folder?
There are three measures you need to take to protect your wp-content and uploads folder:
- Take a backup of these folders
- Change the name of your wp-content folder
- Block the folder from showing on your website’s index
1. Backup Your WP-Content Repository
A backup is a copy of your website that can be used to restore your site to normal if anything were to go wrong with it like if you accidentally delete any file or hackers tamper with the folder.
You can take a backup using the BlogVault backup plugin. It’s easy to install and it will automatically take a complete backup of your WordPress site in under a few minutes. We recommend BlogVault because it’s guaranteed to work when you restore it.
You can also use the plugin to selectively restore your wp-content.
2. Change The Name Of Your Wp-content
As we know, by default, the folder that stores your content, themes, and plugins are named wp-content. This name is common across all WordPress sites which makes it easy for anyone to identify and locate the folder. This means if hackers find a way to break into your site they will be able to find this folder easily because they know it is named ‘wp-content’. You can protect this folder by changing its name.
There are two ways to do this – using a plugin or manually.
A. Using a Plugin (Safe)
We recommend doing this by using a plugin called WP Hide & Security Enhancer. It provides you with a simple way of hiding not just your wp-content, but other important WordPress files as well.
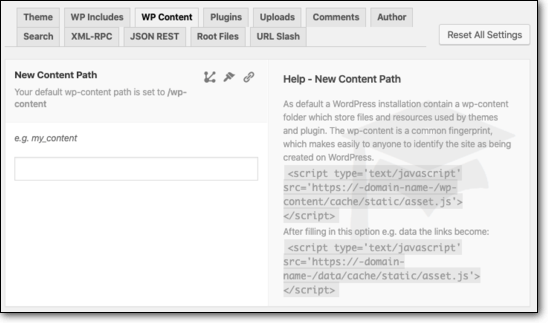
This plugin is great because it explains the process every step of the way. It’s easy for both beginners and pros to use. In addition to wp-content, you can also implement other protective measures on your site such as protecting your comments, authors, uploads, and more!
B. Manually (Not Recommended)
To rename your wp-content file manually, you need to access the folder on your web server and make changes to it. We strongly do not recommend using this method as the slightest mistake could break your site.
Step 1: Access your web hosting account. Go to cPanel, and access your website’s File Manager.
Step 2: Navigate to the wp-content folder, right-click on it, and select ‘Rename’.
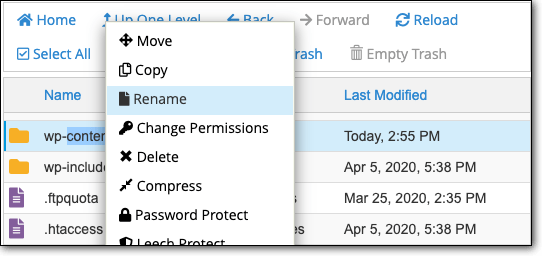
Step 3: Rename the folder to any other name. Ensure it is unique and not a name that is already in use on your site.
3. Hide The WP-Contents Folder
There are times hackers request for your wp-content repository using malicious code with a URL in it. This folder’s URL path is usually yourdomain.com/wp-content or yourdomain.com/public_html/wp-content.
This URL path isn’t used in the address bar of your browser. Rather, it is used in the coding of your site. Hackers write malicious code to fetch the data of this folder or to inject their own malicious code.
You can block outsiders from accessing this URL path. Only users who are logged into your common WordPress dashboard will have access to it. To do this, you can use the same plugin we mentioned above or you can do it manually.
A. Using a Plugin (Safe)
Using WP Hide & Security Enhancer, you can block the wp-content URL path with two clicks.
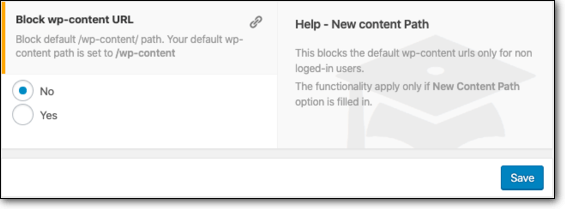
Simply navigate to the option ‘Block wp-content URL’ and select yes. Once you save changes, the plugin will block your wp-content URL path.
B. Manually (Not Recommended)
This method requires adding code into a file called the .htaccess file. Modifying your WordPress files manually is very risky. A small error can cause your site to malfunction or even crash. That said if you still want to go ahead and give it a try, here are the steps:
Step 1: Access your web hosting account. Go to cPanel, and access your website’s File Manager.
Step 2: Navigate to the wp-content folder and create a new file and name it .htacess file.
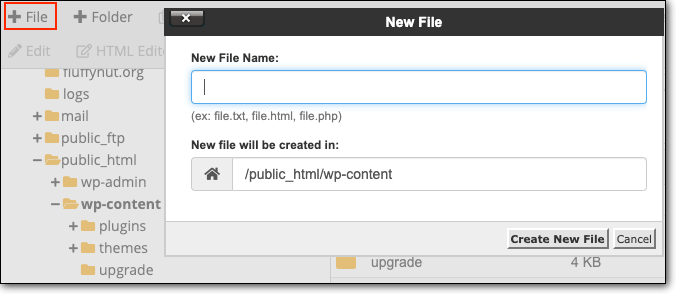
Step 3: Right-click this file and choose ‘Edit’. Paste the following code and save changes.
Order Allow, Deny
Deny from all
Allow from all
In case you cannot see your .htaccess file after creating it, go to Settings and select ‘Show Hidden Files’.
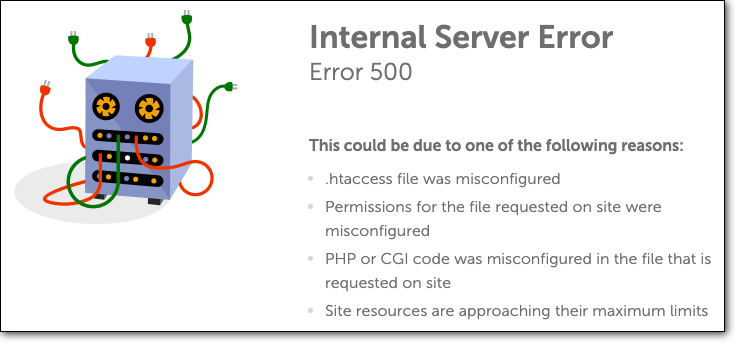
Step 4: Your wp-contents folder will be hidden. If you try to access your file using https://www.yourdomain.com/wp-contents, you should see an error message:
With that, we come to an end on discussing the wp-content and uploads folder on your WordPress site. We are confident that you will now be fully aware of what this folder does, where to find it, and how to protect it now.
[ss_click_to_tweet tweet=”The wp-contents folder of your WordPress site is more than just a place that stores your content. Learn all about it in this guide.” content=”” style=”default”]
Final Thoughts
The wp-content folder is an integral part of your WordPress site. This makes it so important to take WordPress security measures to ensure it is protected and backed up.
Apart from the wp-content, there are other integral files and folders that need to be safeguarded. We recommend protecting not just one or two elements on your site, but your entire site.
To do this, we recommend installing the MalCare Security Plugin. It will scan your site regularly for malware and alert you if there’s anything suspicious on your site. You can also take a complete backup of your site regularly and store it in a safe offsite location.
Protect Your WordPress Site With MalCare!
От автора
Привет! В 25-ти предыдущих «уроках», я основательно познакомил тебя с панелью администрирования WordPress. Во многих статьях я упоминал каталог и папки сайта, даже называл каталог тем (themes) и плагинов (plugins). Пора поговорить про каталог сайта на WordPress подробнее.
Зачем это нужно?
Вопрос, зачем нужно знать, что такое каталог сайта на WordPress, аналогичен вопросу, зачем ставить WordPress. Если ты работаешь с CMS WordPress, ты должен знать:
- что такое каталог сайта;
- его содержимое,
- как его найти;
- как в него попасть;
- как с ним работать.
Это базовые основы администрирования.
С понятием корневой каталог сайта, ты сталкивался на этапе установки системы, если ставил её самостоятельно. Если ты использовал сторонние услуги или использовал автоматическую установку WordPress на хостинге, сообщаю:
Корневой каталог сайта ли корень сайта или корневая папка сайта это папка, размещенная на твоём сервере (хостинге), в которой размещены все папки и файлы системы WordPress.
По умолчанию, корневая папка сайта совпадает с корневой папкой домена. При такой установке, сайт будет открываться в браузере по имени домена. В зависимости от панели управления твоего хостинга, корневая папка домена будет иметь имя: public_html или www/имя_домена или httpdocs или domains.
Подкаталог
Архитектура Вордпресс позволяет установить систему в подкаталог корневого каталога домена, например, domen.edu/podkatalog. Запуск сайта в подкаталоге, отличается от обычного запуска сайта и требует отдельного урока. На этом этапе, оставим тему подкаталога в стороне и считаем, что сайт установлен в корневом каталоге домена. Читать: Доступ к корневому каталогу сайта.
Как попасть в каталог сайта WordPress
При администрировании сайта входить в каталог сайта приходится часто. Для себя ты должен выбрать удобный вариант входа, но при этом необходимо знать альтернативные варианты.
Вариант 1. Вход по FTP
Самый удобный, независимый и универсальный способ войти в корневой каталог сайта. Для использования этого варианта тебе нужно установить на компьютер программу «FTP клиент». Рекомендую две программы:
- FilleZilla (https://filezilla.ru/)
- WinSCP (https://winscp.net/eng/docs/lang:ru)
Обе программы русскоговорящие, он рекомендованы сотнями веб-мастерами и описаны в тысячах статей. Останавливаться на их работе не буду, только замечу:
Работая с FilleZilla учти, что эта программа хранит пароли доступа к каталогу открыто в файлах: sitemanager.xml, filezilla.xml и recentservers.xml. Защити их или используй программу WinSCP.

Вариант 2. Вход через файловый менеджер хостинга
Большинство хостингов позволяют клиентам использовать файловый менеджер для доступа к каталогу сайта. Так как этот способ не является универсальным и зависит от настроек каждого хостера, привыкать к нему не рекомендую.
Доступ к файловому менеджеру нужно искать в административной панели своего хостинга. Скорее всего, ссылка будет называться «файловый менеджер».

Вариант 3. Вход в каталог из административной панели сайта
Есть третий вариант доступ к каталогу сайта, который достоин, чтобы о нём знать. Можно обеспечить доступ каталогу сайта из административной панели сайта.
Для этого нужно установить плагин под названием «CYSTEME Finder, the admin files explorer», страница плагина: https://wordpress.org/plugins/cysteme-finder/
Плагин CYSTEME Finder мощный файловый менеджер, для удобного управления файлами сайта из административной панели. Настроек у плагина нет, просто установи плагин и получи доступ к каталогу сайта, открыв плагин из вкладки «Настройки».
Используя плагин, тебе не понадобятся программы FTP клиента. Просто перетаскивай нужные файлы со своего компьютера сразу в каталог.

Итог 1: В первой части выяснили. Что такое корневой каталог и ка в него попасть.
Описание папок сайта
Чтобы работать с каталогом сайта, нужно знать, что лежит в папках системы. Этим и займёмся далее.
В коробочной версии WordPress видим в каталоге три папки wp-includes, wp-admin и wp-content и несколько «одиноких» файлов. Эти файлы и две папки wp-includes и wp-admin являются движком (ядром) WordPress.

Папка wp-admin
В этой папке лежит всё, что создает административную часть сайта (консоль) и позволяет с ней работать (администрировать сайт). Попытка открыть эту папку из браузера, откроет первый вход в админку сайта.
Папка wp-content
В этой папке нет ничего относящегося к ядру системы. Папка wp-content это пользовательская папка, которая будет постоянно пополняться за счет новых плагинов и тем установленных на сайт.

В коробочной версии папка wp-content включает три каталога languages, plugins, themes и файл index.php.
- В папке languages лежат файлы переводов, в том числе переводы плагинов и тем;
- В папке plugins лежат коробочные и ложатся новые плагины сайта;
- В папке themes можно найти все темы системы. В коробочной версии три twenty-темы.
Обрати внимание! Папка wp-content , пополнится каталогом uploads, как только ты загрузишь первую картинку на сайт. При этом если при настройке WordPress, ты выделишь чек «Помещать файлы в папки по месяцу и году» в настройках Общие>>Медиафайлы, первая картинка загрузится в папку uploads/текущий_год/номер_текущего_месяца.

Примечателен файл index.php. Это файл безопасности, который закрывает от просмотра список файлов этой директории. Его удалять не нужно. Содержание файла index.php:
<?php // Silence is golden.Аналогичные файлы лежат в других папках каталог сайта на WordPress.
Важно! Если ты обновляешь WordPress в ручном режиме, никогда и ничего не трогай в папке wp-content.
Папка wp-includes
Эта базовая папка ядра, она «отвечает» за формирование фронэнд сайта — части сайта для пользователей. Для начинающих пользователей об этой папке лучше забыть и ничего в ней не трогать, до первого ручного обновления системы.
Итог 2. Теперь ты знаешь три основные папки системы.
Примечательные файлы WordPress
К примечательным файлам коробочной версии, о которых нужно знать, я отношу файлы htaccess.txt и wp-config-sample.php.
После установки эти файлы переименовываются в файлы: .htaccess (точка впереди имени) и wp-config.php.
.htaccess
Файл .htaccess позволяет управлять поведением веб-сервера apache. С его помощью можно делать перенаправления, склеивать зеркала сайта, и делать массу продвинутых фишек. На этапе освоения системы этот файл нужно только переименовать.
wp-config.php
Файл wp-config.php обеспечивает работу сайта, связывая с сайтом его базу данных, также выполняет некоторые задачи безопасности. Напомню, ты мог править этот файл, на этапе установки WordPress, прописывая в него учетные данный базы данных сайта.
Вывод
В процессе освоения и администрирования WordPress тебе придётся обращаться к каталогам и файлам системы. Каталог сайта на WordPress знать нужно. Однако на этапе изучения лучше обращать к нему как можно реже. При этом нужно всегда иметь резервную копию сайта и ничего не делать, если точно не знаешь, что делаешь.
©WPkupi.ru
Еще статьи
WordPress consists of 3 folders wp-includes, wp-admin, wp-content and several files next to these folders.
All files and folders except wp-content — this is WordPress, the engine. That is, the directories: wp-includes and wp-admin are the core of WordPress, and wp-content is everything else — all user data…
The wp-content directory is where almost all user files are stored, except for the wp-config.php configuration file (which is an integral part of the core). This is where plugins, themes, plugin files, themes and site content are stored. This is also the place to store all the files associated with the expansion of WordPress.
Initially in WordPress, wp-content contains one file index.php and 3 folders: plugins, themes, languages.
File wp-content/index.php
Should always exist and should have this content:
<?php // Silence is golden.
This file prevents you from seeing a list of files in the folder. If index.php doesn’t exist and your web server allows you to see files in directories, then clicking on the link http://example.com/wp-content you can see all the files and folders in that directory. This can be used by hackers to gain access to key files, allowing the site to be compromised. For example, if you have a vulnerable plugin installed, the site could easily be checked for that vulnerable plugin, and then the attacker could easily break the site.
When updating WordPress manually, never touch the wp-content folder or anything in it. It has nothing to do with updating WordPress.
A list of what what the wp-content directory may contain:
/mu-plugins — must-use plugins
In WordPress, there are so-called «plugins that must be used», they are located in the wp-content/mu-plugins directory. About them I wrote in mu-plugins post, be sure to check it out!
Briefly about Must-use plugins: Must-use plugins, also known as mu-plugins are plugins that are installed in a special mu-plugins folder in the content wp-content directory and activated automatically (always active) for the site and network sites. These plugins are not visible among the regular plugins. In the admin panel, they appear in the top info line and there is no way to disable them except to delete the plugin file from the wp-content/mu-plugins directory.
/plugins
WordPress plugins are located in the wp-content/plugins directory. A plugin can be a single file or multiple files within a folder. Any files in the /plugins directory are scanned by WordPress to determine if the file is a plugin file. If the file is determined to be a plugin, it appears in the admin panel under «Plugins» and is ready to be activated.
To deactivate a plugin, you can delete the plugin from the /plugins folder. You can also rename the name of the folder, in which case, WordPress simply can not find the plugin file and will deactivate it while trying to connect. But keep in mind that it is better to delete plugins from the admin panel, through the Delete button, because the deletion triggers some functions that clean up the plugin data in the database or in the files.
/themes
WP Themes are stored in the wp-content/themes directory. Each theme must be in its own folder and contain a properly formatted style.css file so that WordPress will recognize it as a usable theme. There should be at least 2 files in the theme directory: index.php and style.css.
WordPress can store as many themes as you want in this directory. You can easily view any available theme or activate it in the Appearance ► Themes tab in the admin panel.
WordPress stores uploaded files in the wp-content/uploads directory. This directory does not exist in the WordPress distribution by default. It is created when the file is first uploaded to WordPress. A separate creation is necessary because this folder can be moved to another location (see below)
By default, WordPress stores uploads in folders by year and month:
/wp-content/uploads/2012/06/image.png
Before any images or files can be uploaded to WordPress, the server must be allowed to create folders in the /wp-content directory. When the first image is uploaded, WordPress automatically creates the /uploads directory and the necessary sub-directories in it. After the first file is uploaded, you need set the permissions for /wp-content back, usually 755. Some servers allow the php script to create folders and files right away.
The uploads directory should have all permissions to allow PHP freely create and delete files in it, usually it’s 777 permissions.
WordPress does NOT know how to recognize and import images to admin uploaded to uploads directly (not through the admin). And such files don’t show up in the WordPress file library — WordPress doesn’t know anything about them.
uploads to Multisite
In Multisite installation for the main site files are uploaded as usual. And for all additional sites, creates a folder /wp-content/uploads/sites/2, where 2 is the network site ID.
So for each site is created a folder with its ID in the /wp-content/uploads/sites directory. Then the files are also arranged in folders by year and month.
This approach allows to separate uploads for each site and simplifies their maintenance.

Before WP 3.5, the files of additional sites were not located in /wp-content/uploads/sites, but in /wp-content/blogs.dir.
So, for example, the directory for a site with ID 3 looks like this:
- WP 3.5 and above:
/wp-content/uploads/sites/3. - WP 3.4 and below:
/wp-content/blogs.dir/3
Moving the uploads folder
To move the uploads folder, you need to define the UPLOADS constant in wp-config.php as follows:
// this means that the uploads folder should be in the root of the site
define( 'UPLOADS', 'uploads' );
Or you can change the options: upload_path and upload_url_path in the options table, see update_option().
/upgrade — auto updates
The wp-content/upgrade directory is created automatically by WordPress when you update WordPress. This folder is used to store the new version of WordPress downloaded from WordPress.org. Before updating, WordPress downloads the archive and extracts its contents into this folder. For the automatic update process to be successful, it is recommended not to touch this folder. If this directory is deleted, WordPress will create it the next update.
/languages — translations
wp-content/languages directory is present only if you install a non-English version of WordPress. This contains all the localization (translation) files of WordPress. Such files have extensions:
.mo— a compressed version of a similar .po file, which is used by PHP for translation..po— the original translation file. This file can be used to edit the translation. After editing it must be compiled into a compressed version with the.moextension.
There may also be special sub-directories in languages dir:
-
/pliugns— contains translations of plugins. Plugin translation file must have the format:plugin_name-local.mo, for example:akismet-ru_RU.mo. Before loading its translation file, the plugin checks if there is a translation file in this folder, and if it is there, then this translation file is used instead of the plugin’s native translation. /themes— contains translations of themes. Translation file must have the format:theme_name-local.mo, for example:twentyfifteen-ru_RU.mo. As well as with plugins — these files have a higher priority than native theme translation files.
The arbitrary directories
In /wp-content you can create any directories. Some plugins, create such folders for storing files. Usually an additional folder is created when you need to store a lot of files or when the stored files are somehow different from the default WP files.
For example plugin WP Super Cache creates directory /wp-content/cache to store cached pages. Cached page — this is a generated page of the site, stored as a static HTML file. When such page is accessed, it is not re-generated, but a static file is given. This is the page cache, which reduces the server load dozens of times, because pages are not generated on every crawl, and are created only when the cache is overwritten.
The WP Super Cache plugin also adds two files to the wp-content directory: advanced-cache.php (special) and wp-cache-config.php. They are needed for WP Super Cache to work.
Another example, a popular gallery plugin — NextGen Gallery — creates a directory /wp-content/gallery to store images uploaded to galleries. Each gallery created is a subdirectory of /gallery.
Another example, my plugin Kama Thumbnail, which also creates a folder /wp-content/cache/thumb and writes created thumbnail files into it.
Special files
advanced-cache.php
Called at the earliest stage of loading WordPress, in the wp-settings.php file, if the WP_CACHE constant is enabled. This is what the call looks like:
/**
 * Filters whether to enable loading of the advanced-cache.php drop-in.
 *
 * This filter runs before it can be used by plugins. It is designed for non-web
 * run-times. If false is returned, advanced-cache.php will never be loaded.
 *
 * @since 4.6.0
 *
 * @param bool $enable_advanced_cache Whether to enable loading advanced-cache.php (if present).
 *                                    Default true.
 */
if ( WP_CACHE && apply_filters( 'enable_loading_advanced_cache_dropin', true ) && file_exists( WP_CONTENT_DIR . '/advanced-cache.php' ) ) {
	// For an advanced caching plugin to use. Uses a static drop-in because you would only want one.
	include WP_CONTENT_DIR . '/advanced-cache.php';

	// Re-initialize any hooks added manually by advanced-cache.php.
	if ( $wp_filter ) {
		$wp_filter = WP_Hook::build_preinitialized_hooks( $wp_filter );
	}
}
This file is used by page caching plugins. It usually checks for a suitable cache file, and if there is one, it is displayed and the script is terminated. This allows you not to load 90% of WordPress files and give static HTML files.
object-cache.php
Called from function wp_start_object_cache(), which in turn is called from the wp-settings.php file, a little later advanced-cache.php. Unlike advanced-cache.php, object-cache.php is always triggered if it exists. It is needed to override the operation of basic WordPress object caching.
The object caches based on this file are Memcache, Redis, Memcached, APC, XCache.
The call looks like this:
// Starts WordPress object caching or external object caching if a special file exists.
wp_start_object_cache();
Since WP 5.8 the enable_loading_object_cache_dropin hook has appeared which allows you to disable object caching plugin. The hook is invoked before the plugins are loaded and is needed when the code is launched not from the web, for example during tests.
maintenance.php
wp-content/maintenance.php is responsible for displaying a stub page that is shown when WoordPress auto-updates. Such a page is defined by default and the wp_maintenance() function is responsible for it. But if you create a file maintenance.php in wp-content, then the contents of that file will be responsible for the page’s output.
In maintenance.php you need to describe the maintenance-page according to all HTML rules.
See function wp_maintenance() for details.
db-error.php
Allows you to display an arbitrary database error page template.
If the wp-content/db-error.php file exists in the wp-content, then this file will be loaded instead of the default WordPress database connection error message. In the file you need to create HTML code for the error page!
The connection error page should set the 500 response status, so that search engines do not process content.
File db-error.php is called by function dead_db(), and the function in turn is called when the database connection error occurs.
An example of such a page:
<?php
  // custom WordPress database error page
  // Edit by Kolshix

  // error variations
  // 500 software works, but there are serious internal problems that prevent queries from being processed correctly.
  // 503 indicates a large queue of requests on the server - when the server is overloaded there can be problems with the connection to the database

  header('HTTP/1.1 503 Service Temporarily Unavailable');
  header('Status: 503 Service Temporarily Unavailable');
  header('Retry-After: 600'); // 1 hour = 3600 seconds // inform the bot that it should try again after the set time

  // admin email notification
  // mail( '[email protected]', 'Database Error', 'There is a problem with the database!', 'From: Db Error Watching');
?>

<!DOCTYPE html>
<html xmlns="http://www.w3.org/1999/xhtml">
	<head>
		<meta http-equiv="Content-Type" content="text/html; charset=utf-8" />
		<title>Database Error</title>
	</head>
	<body>
		<center>
			<script>
				setTimeout( "window.location.reload()", 9000 );
			</script>

			<h1>Error Connection</h1>
			<style>
				a.button {
					color: white;
					text-decoration: none;
					user-select: none;
					background: rgb(76, 144, 232);
					padding: 9px;
					outline: none;
					border: 3px solid #3d6ea0;
					border-radius: 10px;
				}
				a.button:hover  { background: rgb(86, 218, 72); }
				a.button:active { background: rgb(76, 144, 232); }
			</style>

			<script type="text/javascript">
				function timer(){
				var obj=document.getElementById('timer_inp');
				obj.innerHTML--;
					if (obj.innerHTML==0){
						setTimeout(function(){},1000);
					} else {
						setTimeout(timer,1000);
					}
				}
				setTimeout(timer,1000);
			</script>

			<h1><div>Wait: <span id="timer_inp">9</span> Or <a href='<?php echo "http://".$_SERVER['HTTP_HOST'].$_SERVER["REQUEST_URI"]; ?>' class="button">Refresh</a></div></h1>
			<img itemprop="url" src="/err_c.gif" width="300" height="300" >
		</center>
	</body>
</html>
sunrise.php
Only loaded for multisite builds, i.e. when is_multisite() is triggered and SUNRISE constant is defined (it should be defined in wp-config.php).
File wp-content/sunrise.php allows you to change the logic of the site at an early stage in the network multisite. For example, here you can set global variables $current_site, $current_blog defining the current network site. Or you can change the prefix of the database tables — the variable $table_prefix.
Also in the unrise.php file you can change the constants that are responsible for where the directories of MU plugins or ordinary plugins are located. See wp_plugin_directory_constants().
db.php
Allows you to rewrite the database engine. If the file exists in the wp-content folder, it will be called before creating a connection to the database. Further, if in this file variable $wpdb is defined, then it will be used as a global variable for work with the database.
With this logic, you can, for example, extend the base class wpdb{} or replace it completely.
An example of an extension for the base wpdb{} class.
<?php

// this is code for the db.php file, which is in the wp-content folder

defined( 'ABSPATH' ) || die();

if ( defined( 'DOING_CRON' ) && DOING_CRON )
	return;

class MY_DB extends wpdb {

	public function __construct( $dbuser, $dbpassword, $dbname, $dbhost ) {

		// additional code...

		parent::__construct( $dbuser, $dbpassword, $dbname, $dbhost );

	}

	// redefining the wpdb::query() method
	public function query( $query ) {

		// our modified code
	}

}

$wpdb = new QM_DB( DB_USER, DB_PASSWORD, DB_NAME, DB_HOST );
Renaming or moving the wp-content folder
In some cases, for example, to unique many URLs of your site, or to combine site structure with another script, or for some other reason, it is necessary that the directory wp-content have a different name or that it is located in a different directory.
Moving or renaming wp-content is very simple. To do this, open the wp-config.php configuration file, which is in the root of your site, and define in it two constants:
WP_CONTENT_DIR— the path to the content directory.WP_CONTENT_URL— URL to the content directory.
define( 'WP_CONTENT_DIR', $_SERVER['DOCUMENT_ROOT'] .'/data' );
define( 'WP_CONTENT_URL', 'http://'. $_SERVER['HTTP_HOST'] .'/data' );
This code renames wp-content to data.