Введение
Apache — кроссплатформенный HTTP-сервер, который был создан с учетом ошибок старого web-сервера NCSA HTTPd. На данный момент стабильная версия имеет номер 2.4.48. Основные достоинства Apache: кроссплатформенность и модульная система, позволяющая оптимизировать программное обеспечения для нужд конкретной разработки.
В этой статье рассмотрим установку HTTP-сервера Apache на операционную систему (ОС) Ubuntu. В рамках этой публикации используется релиз Ubuntu 20.04 server. И web-сервер Apache версии 2. Развернута система в «Облачной платформе» Selectel. Для тестового сервера используется минимальная конфигурация мощностей: 1 процессор, 1 ГБ оперативной памяти. Для запуска простого ненагруженного web-приложения этого достаточно.
Настроить виртуальный сервер
Для этой инструкции используется виртуальная среда Selectel. Панель управления расположена по адресу: https://my.selectel.ru/.
В разделе «Облачная платформа» во вкладке «Серверы» создадим новый сервер.
Используем минимальную конфигурацию:
![]()
В настройках надо выбрать образ операционной системы для установки.
Оставим себе root-пароль и создадим сервер. После этого в панели управления появится ip-адрес сервера.

Теперь можем подключиться к нему по SSH.
Самым простым способом подключения является использование утилиты PuTTY. Эта утилита является кроссплатформенной. Скачать ее можно с официального сайта https://putty.org.ru/.
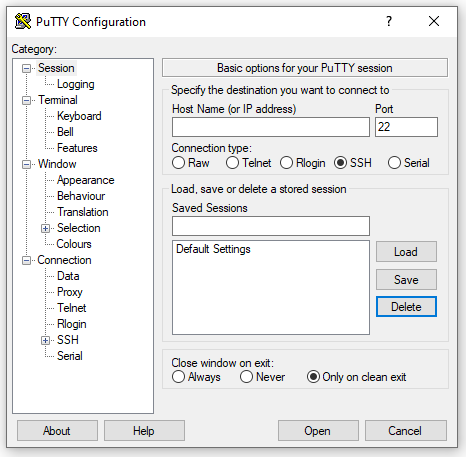
Для подключения в поле Host Name (or IP address) вводим полученный ранее ip-адрес, остальные опции оставляем без изменений.
После нажатия кнопки Open эмулятор терминала произведет подключение к серверу. Потребуется ввести комбинацию логин/пароль. На первоначальном этапе используем логин root и пароль, полученные на этапе создания сервера.
login as: vlan48
vlan48@xx.xx.xx.18's password: Welcome to Ubuntu 20.04.2 LTS (GNU/Linux 5.4.0-77-generic x86_64) * Documentation: https://help.ubuntu.com * Management: https://landscape.canonical.com * Support: https://ubuntu.com/advantage 31 updates login as: vlan48
vlan48@xx.xx.xx.18's password:
Welcome to Ubuntu 20.04.2 LTS (GNU/Linux 5.4.0-77-generic x86_64)

 * Documentation:  https://help.ubuntu.com
 * Management:     https://landscape.canonical.com
 * Support:        https://ubuntu.com/advantage

31 updates can be applied immediately.
To see these additional updates run: apt list --upgradable

*** System restart required ***
Last login: Tue Aug  3 09:51:36 2021 from xx.xx.xx.230
vlan48@apachi:~$
Установить Apache
При установке и конфигурации будет использован пользователь, отличный от root, но с правами администратора. Для большинства операций применяется повышение привилегий через sudo. Первоначально необходимо загрузить информацию об актуальных списках пакетов и зависимостях.
sudo apt update
После этой операции произведем установку пакета Apache2, он располагается в стандартном репозитории, дополнительные добавлять не нужно.
sudo apt install apache2
По окончании демон запускается автоматически, а также попадает в автозагрузку.
Настроить брандмауэр для Apache
По умолчанию в Ubuntu используется ufw. Uncomplicated Firewall — утилита для настройки межсетевого экрана. Если настройка происходит на виртуальном сервере, желательно проверить наличие установленной утилиты.
sudo ufw status verbose
В случае отсутствия ее в списке установленных пакетов появится ошибка:
sudo: ufw: command not foundТогда ее необходимо установить:
sudo apt install ufw
Заново запросим ее статус:
Status: inactive Это означает, что она деактивирована. Активируем:
sudo ufw enable
Разрешаем HTTP на сервере:
sudo ufw allow http
Очень важно в этом моменте разрешить SSH-доступ. На тестовом сервере SSH на стандартном порту.
sudo ufw allow 22/tcp
Обязательно перезапустить процесс:
sudo ufw reload
Проверить базовую настройку Apache
На данный момент сервер доступен из интернета по HTTP. Можно проверить это в браузере по ip-адресу в поисковой строке. Ip-адрес мы уже получили в панели управления сервером.

Появившееся приветствие означает успешную начальную настройку Apache-сервера.
Как запустить Apache и другие полезные команды
В этом разделе будут собраны базовые команды для управления Apache web-сервером. Несмотря на то, что демон запускается самостоятельно, иногда необходимо выключить его или перечитать конфигурацию.
Проверить статуса демона Apache:
sudo systemctl status apache2
В выводе будет указан текущий статус. Возможны два варианта.
Активен:
apache2.service - The Apache HTTP Server
     Loaded: loaded (/lib/systemd/system/apache2.service; enabled; vendor preset: enabled)
     Active: active (running) since Thu 2021-07-15 09:49:55 UTC; 2 weeks 5 days ago
       Docs: https://httpd.apache.org/docs/2.4/
    Process: 535575 ExecReload=/usr/sbin/apachectl graceful (code=exited, status=0/SUCCESS)
   Main PID: 718 (apache2)
      Tasks: 55 (limit: 1105)
     Memory: 12.9M
     CGroup: /system.slice/apache2.service
             ├─   718 /usr/sbin/apache2 -k start
             ├─535580 /usr/sbin/apache2 -k start
             └─535581 /usr/sbin/apache2 -k start
Неактивен:
apache2.service - The Apache HTTP Server
     Loaded: loaded (/lib/systemd/system/apache2.service; enabled; vendor preset: enabled)
     Active: inactive (dead) since Tue 2021-08-03 10:01:39 UTC; 2s ago
       Docs: https://httpd.apache.org/docs/2.4/
    Process: 535575 ExecReload=/usr/sbin/apachectl graceful (code=exited, status=0/SUCCESS)
    Process: 544224 ExecStop=/usr/sbin/apachectl stop (code=exited, status=0/SUCCESS)
   Main PID: 718 (code=exited, status=0/SUCCESS)
Иногда возникает ошибка.
apache2.service - The Apache HTTP Server
     Loaded: loaded (/lib/systemd/system/apache2.service; enabled; vendor preset: enabled)
     Active: failed (Result: exit-code) since Tue 2021-08-03 10:07:39 UTC; 5s ago
       Docs: https://httpd.apache.org/docs/2.4/
    Process: 544394 ExecStart=/usr/sbin/apachectl start (code=exited, status=1/FAILURE)

Aug 03 10:07:39 apachi systemd[1]: Starting The Apache HTTP Server...
Aug 03 10:07:39 apachi apachectl[544401]: AH00526: Syntax error on line 134 of /etc/apache2/apache2.conf:
Чтобы выйти в консоль из статуса, необходимо использовать комбинацию клавиш Ctrl+С.
Для деактивации:
sudo systemctl stop apache2
Для активации:
sudo systemctl start apache2
Перезапуск:
sudo systemctl restart apache2
При изменении конфигурации Apache возможно ее перечитать без разрыва текущей сессии с хостов:
sudo systemctl reload apache2
Чтобы деактивировать запуск web-сервера при загрузке:
sudo systemctl disable apache2
Активировать в загрузку:
sudo systemctl enable apache2
Настроить виртуальные хосты Apache
Можно использовать веб-сервер Apache для поддержки одного web-приложения. Но достаточно часто приходится на одном сервере создавать и обслуживать несколько web-ресурсов.
В Apache для этих целей используется модуль виртуальных хостов. Он позволяет развернуть несколько web-приложений на одном сервере с использованием одного ip-адреса, но разных доменных имен. Про теорию доменных имен есть хорошие статьи и книги, например, Крикет Ли, Пол Альбитц “DNS и BIND”. Об управлении доменами и ресурсными записями написали в базе знаний Selectel.
Перейдем к настройке виртуального хоста.
В Ubuntu конфигурации виртуальных хостов расположены в директории /etc/apache2/sites-available. Нам необходимо получить директорию для виртуального хоста по умолчанию. Получим root-директорию из файла дефолтной конфигурации:
grep "DocumentRoot" /etc/apache2/sites-available/000-default.conf
Вывод:
DocumentRoot /var/www/htmlСоздадим новые необходимые директории, не меняя корневой.
sudo mkdir -p /var/www/sample.net/html
В стандартном исполнении Apache ищет документ index.htm или index.html
Создадим простой html5-документ:
sudo touch /var/www/sample.net/html/index.html
Добавим небольшую структуру документа, открыв его в текстовом редакторе:
sudo nano /var/www/sample.net/html/index.html
Вставляем в файл.
<!DOCTYPE html>
<html>
 <head>
   <title>Hello</title>
   <meta charset="utf-8">
 </head>
 <body>
         <h1>Hello Selectel!</h1>
  </body>
</html>
Чтобы оставить дефолтную конфигурацию виртуального хоста неизменной, копируем его в созданную ранее директорию настроек нового виртуального хоста.
sudo cp /etc/apache2/sites-available/000-default.conf /etc/apache2/sites-available/sample.net.conf
Теперь откроем скопированный файл, рассмотрим основные директивы и внесем необходимые правки. На данном этапе нам будет интересна только строка, в которой указан путь к директории виртуального хоста. Меняем его на путь к директории, созданной специально для него. Чтобы при обращении Аpache мог перенаправить запрос именно к созданному нами виртуальному хосту.
sudo nano /etc/apache2/sites-available/sample.net.conf
Файл дефолтного виртуального хоста:
<VirtualHost *:80>
        # The ServerName directive sets the request scheme, hostname and port that
        # the server uses to identify itself. This is used when creating
        # redirection URLs. In the context of virtual hosts, the ServerName
        # specifies what hostname must appear in the request's Host: header to
        # match this virtual host. For the default virtual host (this file) this
        # value is not decisive as it is used as a last resort host regardless.
        # However, you must set it for any further virtual host explicitly.
        #ServerName www.example.com

        ServerAdmin webmaster@localhost
        DocumentRoot /var/www/html

        # Available loglevels: trace8, ..., trace1, debug, info, notice, warn,
        # error, crit, alert, emerg.
        # It is also possible to configure the loglevel for particular
        # modules, e.g.
        #LogLevel info ssl:warn

        ErrorLog ${APACHE_LOG_DIR}/error.log
        CustomLog ${APACHE_LOG_DIR}/access.log combined

        # For most configuration files from conf-available/, which are
        # enabled or disabled at a global level, it is possible to
        # include a line for only one particular virtual host. For example the
        # following line enables the CGI configuration for this host only
        # after it has been globally disabled with "a2disconf".
        #Include conf-available/serve-cgi-bin.conf
</VirtualHost>

# vim: syntax=apache ts=4 sw=4 sts=4 sr noet
<VirtualHost *:80> — в этой строке указываем ip-адрес сервера, а также порт, используемый для этого виртуального хоста. На данный момент мы используем HTTP и один ip-адрес. В связи с этим номер порта 80, адрес не указываем. Настройка HTTPS будет описана ниже.
ServerAdmin webmaster@localhost — строка связи с администратором, необходимо указать активный почтовый адрес отвечающего за обслуживание сервера специалиста. Опционально. Добавим адрес, по которому всегда придут на помощь support@selectel.ru.
DocumentRoot /var/www/html — root-директория или корневой каталог виртуального хоста. Обязательна к применению и настройке. В нашем случае это путь к созданной ранее директории с документом index.html. Вносим изменения:
/var/www/sample.net/html
ErrorLog ${APACHE_LOG_DIR}/error.log — путь к файлу с логами сервера. Вносить какие-либо изменения нет необходимости. Здесь будут храниться ошибки запуска демона и ошибки, не относящиеся к клиентам.
CustomLog ${APACHE_LOG_DIR}/access.log combined — это директива для хранения логов клиентского доступа.
Редактирование файла на этом завершается. Это минимальная конфигурация для запуска виртуального хоста на Apache web-сервере. Изменять конфигурацию далее на данном этапе нет необходимости.
Сохраняем и выходим из редактора. Для сохранения используется комбинация Ctrl+o, для выхода Ctrl+x.
Файл с готовой конфигурацией:
 <VirtualHost *:80>
        # The ServerName directive sets the request scheme, hostname and port that
        # the server uses to identify itself. This is used when creating
        # redirection URLs. In the context of virtual hosts, the ServerName
        # specifies what hostname must appear in the request's Host: header to
        # match this virtual host. For the default virtual host (this file) this
        # value is not decisive as it is used as a last resort host regardless.
        # However, you must set it for any further virtual host explicitly.
        #ServerName www.example.com

        ServerAdmin support@selectel.ru
        DocumentRoot  /var/www/sample.net/html

        # Available loglevels: trace8, ..., trace1, debug, info, notice, warn,
        # error, crit, alert, emerg.
        # It is also possible to configure the loglevel for particular
        # modules, e.g.
        #LogLevel info ssl:warn

        ErrorLog ${APACHE_LOG_DIR}/error.log
        CustomLog ${APACHE_LOG_DIR}/access.log combined

        # For most configuration files from conf-available/, which are
        # enabled or disabled at a global level, it is possible to
        # include a line for only one particular virtual host. For example the
        # following line enables the CGI configuration for this host only
        # after it has been globally disabled with "a2disconf".
        #Include conf-available/serve-cgi-bin.conf
</VirtualHost>

# vim: syntax=apache ts=4 sw=4 sts=4 sr noet
Для подключения виртуальных хостов, а также модулей в Apache HTTP-сервере используется набор команд:
a2enmod {модуль} — подключение модуля;
a2dismod {модуль} — отключение модуля;
a2ensite {конфиг виртуального хоста} — подключает виртуальный хост;
a2dissite {конфиг виртуального хоста} — отключает виртуальный хост.
Нам потребуется a2ensite для активации созданного хоста:
sudo a2ensite sample.net.conf
И a2dissite для деактивации дефолтного:
sudo a2dissite 000-default.conf
После внесенных изменений требуется перечитать конфигурацию сервера:
sudo systemctl reload apache2
Теперь мы можем обратиться с созданному виртуальному хосту по доменному имени.
В этой инструкции мы не используем dns, поэтому для разрешения имени используем файл hosts.
В windows этот файл расположен здесь: C:WindowsSystem32driversetchosts.
А в linux/mac: /etc/hosts.
Добавим строчку: 94.0.0.0 sample.net.
Где 94.0.0.0 — ранее полученный ip-адрес сервера, а sample.net — доменное имя виртуального хоста.
Теперь перейдем в браузер и в адресной строке наберем :sample.net.
Получим созданное web-приложение:

SSL для Apache
TLS (transport layer security — протокол защиты транспортного уровня) и предыдущая версия защиты SSL (secure sockets layer — слой защищенных сокетов). Это все протоколы криптографии, созданные для защиты передачи данных между узлами в информационной сети.
Оба протокола используют асимметричное шифрование для аутентификации, симметричное шифрование для конфиденциальности и коды аутентичности сообщений. Подробно останавливаться на теории сейчас нет необходимости. На первоначальном этапе достаточно быть в курсе, что эти протоколы отвечают за сохранность конфиденциальности данных в момент обмена данными между клиентом и сервером. Ключи могут быть самозаверяющими, т.е. созданными и подписанными самим web-сервером.
Такие ключи подходят для использования протокола HTTPS и шифрования данных, но не являются доверенными для сети интернет. Также сертификаты бывают выданными центрами сертификации. Они не только шифруют данные, но также web-браузер знает о таком ключе и доверяет ему по-умолчанию. В таком случае сертификаты платные, но имеется возможность использования бесплатного сервиса Let`s encrypt. С использованием сервиса можно создать и заверить ключ.
В этом случае сертификат будет действительным для сети интернет, но бесплатным. В этой инструкции будет настроено простое шифрование с использованием самозаверяющего ключа, созданного на сервере Apache.
Создать SSL-сертификат на сервере
Чтобы создать и подписать сертификат, потребуется пакет OpenSSL. Он есть в системе, не нужно устанавливать. Сейчас будет создан и подписан сертификат, а также закрытый и открытый ключи будут перемещены в необходимые директории.
sudo openssl req -x509 -nodes -days 365 -newkey rsa:2048 -keyout /etc/ssl/private/server-sample.key -out /etc/ssl/certs/server-sample.crt
Расшифровка опций из команды:
req -x509 — опция определения стандарта сертификата (-x509 стандарт инфраструктуры открытого ключа).
-nodes — отказаться от защиты сертификата паролем. Если убрать эту опцию, произойдет запрос пароля для ключа, который необходимо вводить при каждом запуске web-сервера (желательно использовать в продакшене).
-days 365 — срок действия сертификата. Обычно срок устанавливается более длительный, но для тестового сервера достаточно. Также необходимо учитывать, что на web-сервере время и дата должны быть верными.
-newkey rsa:2048 — опция указывает на создание нового сертификата и ключа единовременно. Часть rsa:2048 обозначает размер ключа.
-keyout /etc/ssl/private/server-sample.key — обозначает директорию, в которую необходимо поместить закрытый ключ.
-out /etc/ssl/certs/server-sample.crt- — директория местоположения сертификата.
server-sample.key и server-sample.crt — имена ключа и сертификата.
После ввода команды потребуется ответить на некоторые вопросы, разберем список директив:
Country Name (2 letter code) [AU]:RU — указываем страну
State or Province Name (full name) [Some-State]:LIP — область
Locality Name (eg, city) []:Lipetsk — город
Organization Name (eg, company) [Internet Widgits Pty Ltd]:Sel — организацию
Organizational Unit Name (eg, section) []:Sel — отдел
Common Name (e.g. server FQDN or YOUR name) []:94.255.255.255 — вводим доменное имя или белый адрес сервера
После выполнения операции требуется подключение модуля SSL для Apache HTTP-сервера. Ранее были разобраны команды для этого действия. Вот так выглядит необходимая:
sudo a2enmod ssl
После включения модуля необходимо перезапустить демона Apache.
Переходим к настройке HTTPS для виртуального хоста. Вносим изменения в файл его настройки.
sudo nano /etc/apache2/sites-available/sample.net.conf
Во-первых, меняем директиву <VirtualHost *:80>.
Порт изменится на 443 (порт для протокола HTTPS по умолчанию).
Добавляем директиву SSLEngine on после строки DocumentRoot для включения поддержки SSL на web-сервере.
После этого еще две строки, в которых указан путь к ключу и сертификату:
    SSLCertificateFile /etc/ssl/certs/server-sample.crt
SSLCertificateKeyFile /etc/ssl/private/server-sample.key
Теперь файл конфигурации виртуального хоста выглядит следующим образом:
<VirtualHost *:443>
        # The ServerName directive sets the request scheme, hostname and port that
        # the server uses to identify itself. This is used when creating
        # redirection URLs. In the context of virtual hosts, the ServerName
        # specifies what hostname must appear in the request's Host: header to
        # match this virtual host. For the default virtual host (this file) this
        # value is not decisive as it is used as a last resort host regardless.
        # However, you must set it for any further virtual host explicitly.
        #ServerName www.sample.net
        ServerAdmin support@selectel.ru
        DocumentRoot /var/www/sample.net/html
        SSLEngine on
        SSLCertificateFile /etc/ssl/certs/server-sample.crt
        SSLCertificateKeyFile /etc/ssl/private/server-sample.key
        # Available loglevels: trace8, ..., trace1, debug, info, notice, warn,
        # error, crit, alert, emerg.
        # It is also possible to configure the loglevel for particular
        # modules, e.g.
        #LogLevel info ssl:warn

        ErrorLog ${APACHE_LOG_DIR}/error.log
        CustomLog ${APACHE_LOG_DIR}/access.log combined

        # For most configuration files from conf-available/, which are
        # enabled or disabled at a global level, it is possible to
        # include a line for only one particular virtual host. For example the
        # following line enables the CGI configuration for this host only
        # after it has been globally disabled with "a2disconf".
        #Include conf-available/serve-cgi-bin.conf
</VirtualHost>

# vim: syntax=apache ts=4 sw=4 sts=4 sr noet
Перед проверкой по web добавим разрешающее правило безопасности:
sudo ufw allow https
А также перечитаем конфигурацию web-сервера Apache:
sudo systemctl reload apache2
Теперь при запросе сервера по HTTPS:sample.net браузер выдаст оповещение о небезопасном сертификате. Проигнорировав его, будет отображено созданное ранее web-приложение.
На этом настройка SSL закончена.
Конфигурационные файлы и директории web-сервера Apache
Приведенные файлы и директории используются для настройки Apache-сервера. В данном документе уникальных настроек не приводится. Этот раздел создан для ознакомительных целей.
/etc/apache2 — директория конфигурационных файлов Apache.
/etc/apache2/apache2.conf — основной файл конфигурации сервера. Он отвечает за множество настроек сервера. Например, включить чтение файла .htaccess необходимо именно здесь.
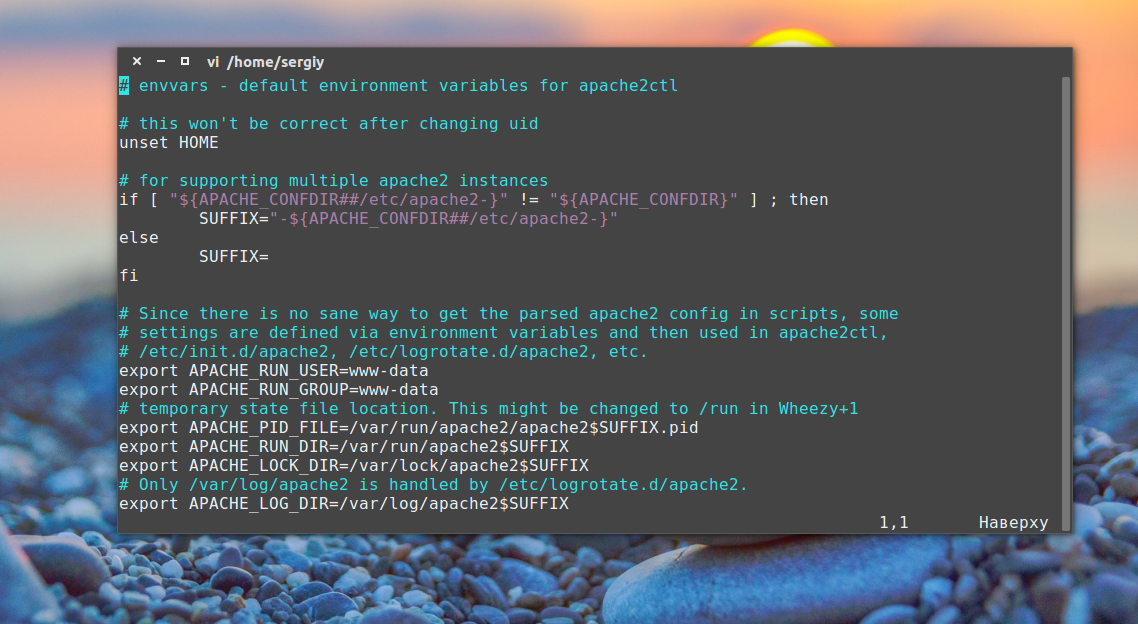
/etc/apache2/envvars — файл значения переменных среды для Apache.
/etc/apache2/magic — отображает инструкции для определения типа файла на сервере и клиенте.
/etc/apache2/ports.conf — настройка слушающих портов по умолчанию.
/etc/apache2/sites-available/ — директория конфигураций виртуальных хостов.
/etc/apache2/sites-enabled/ — здесь хранится информация об активных виртуальных хостах.
/etc/apache2/conf-available/ — директория настроек хостов, не относящихся к виртуальным.
/etc/apache2/conf-enabled/ — ссылки на включенные хосты, не относящиеся к виртуальным.
/etc/apache2/mods-available/ и /etc/apache2/mods-enabled/ — директории модулей. Модули, а также их настройки расположены здесь.
/var/www — директория для хранения web-приложений. Обычно виртуальные хосты тоже хранят здесь. Может быть изменена.
/var/log/apache2 — директория файлов логирования, содержит в себе два файла, ранее в этой инструкции было описано какой из них за что отвечает.
Безопасность web-сервера Apache
Сервер, который смотрит в интернет, вне зависимости от задач на него возложенных, находится в опасности. Он может быть атакован злоумышленниками с последующим вмешательством в его функциональность. Рассмотрим защиту от доступа неблагонадежных пользователей к серверу по протоколу SSH.
В Linux-системах отличным решением является утилита Fail2ban. Принцип ее работы основан на отслеживании файлов логирования доступа к серверу. По заданному количеству попыток обращений создается правило блокировки ip-адреса, с которого предположительно происходит вторжение.
Установка и настройка Fail2ban
sudo apt-get install fail2ban -y
Утилита из коробки включает защиту от перебора паролей. Но в нашем случае перед включением будут внесены несколько изменений.
/etc/fail2ban/jail.conf — отвечает за настройки безопасности конкретных сервисов.
Вносить изменения в него не рекомендуется, поэтому создадим новый файл с расширением .local. Эти файлы имеют приоритет выше, чем файл .conf для Fail2ban.
sudo nano /etc/fail2ban/jail.local
Внесем настройки для защиты SSH:
    [sshd]
enabled = true
port = 22
filter = sshd
logpath = /var/log/auth.log
maxretry = 4
bantime  = 60
Построчно:
Директива [sshd] отвечает за защиту доступа по SSH при отказе в авторизации;
enabled = true — состояние;
port = 22 — номер порта;
filter = sshd — имя, по которому идет поиск в логах сервиса;
logpath = /var/log/auth.log — файл журнала, из которого будут взяты результаты поиска по фильтру;
maxretry = 4 — количество неудачных попыток;
bantime = 60 — время блокировки в секундах. Сейчас эта секция добавлена для тестовой инструкции, в продакшене обычно время блокировки больше.
С настройкой закончили, добавим демона fail2ban в загрузку и запустим, а потом проверим его работу.
    sudo systemctl enable fail2ban
sudo systemctl start fail2ban

Как мы видим, доступ заблокирован после превышения попыток авторизации.
Через 60 секунд доступ появится.
Для того, чтобы разблокировать доступ, принудительно используется команда:
sudo fail2ban-client set sshd unbanip ip_add
ip_add — заблокированный адрес.
Заключение
На этом инструкция по настройке web-сервера Apache завершена. Подведем итог: мы настроили один из самых популярных web-серверов и доступ к нему по протоколу HTTPS , изучили возможность настройки виртуальных хостов и обезопасили сервер от злоумышленников. На данном этапе администратор может самостоятельно обслуживать и настраивать Apache web-сервер на linux.
Apache is the most commonly used Web server on Linux systems. Web servers are used to serve Web pages requested by client computers. Clients typically request and view Web pages using Web browser applications such as Firefox, Opera, Chromium, or Internet Explorer.
Users enter a Uniform Resource Locator (URL) to point to a Web server by means of its Fully Qualified Domain Name (FQDN) and a path to the required resource. For example, to view the home page of the Ubuntu Web site a user will enter only the FQDN:
www.ubuntu.com
To view the community sub-page, a user will enter the FQDN followed by a path:
www.ubuntu.com/community
The most common protocol used to transfer Web pages is the Hyper Text Transfer Protocol (HTTP). Protocols such as Hyper Text Transfer Protocol over Secure Sockets Layer (HTTPS), and File Transfer Protocol (FTP), a protocol for uploading and downloading files, are also supported.
Apache Web Servers are often used in combination with the MySQL database engine, the HyperText Preprocessor (PHP) scripting language, and other popular scripting languages such as Python and Perl. This configuration is termed LAMP (Linux, Apache, MySQL and Perl/Python/PHP) and forms a powerful and robust platform for the development and deployment of Web-based applications.
Installation
The Apache2 web server is available in Ubuntu Linux. To install Apache2:
At a terminal prompt enter the following command:
sudo apt install apache2
Configuration
Apache2 is configured by placing directives in plain text configuration files. These directives are separated between the following files and directories:
-
apache2.conf: the main Apache2 configuration file. Contains settings that are global to Apache2.
-
httpd.conf: historically the main Apache2 configuration file, named after the httpd daemon. In other distributions (or older versions of Ubuntu), the file might be present. In Ubuntu, all configuration options have been moved to apache2.conf and the below referenced directories, and this file no longer exists.
-
conf-available: this directory contains available configuration files. All files that were previously in
/etc/apache2/conf.dshould be moved to/etc/apache2/conf-available. -
conf-enabled: holds symlinks to the files in
/etc/apache2/conf-available. When a configuration file is symlinked, it will be enabled the next time apache2 is restarted. -
envvars: file where Apache2 environment variables are set.
-
mods-available: this directory contains configuration files to both load modules and configure them. Not all modules will have specific configuration files, however.
-
mods-enabled: holds symlinks to the files in
/etc/apache2/mods-available. When a module configuration file is symlinked it will be enabled the next time apache2 is restarted. -
ports.conf: houses the directives that determine which TCP ports Apache2 is listening on.
-
sites-available: this directory has configuration files for Apache2 Virtual Hosts. Virtual Hosts allow Apache2 to be configured for multiple sites that have separate configurations.
-
sites-enabled: like mods-enabled,
sites-enabledcontains symlinks to the/etc/apache2/sites-availabledirectory. Similarly when a configuration file in sites-available is symlinked, the site configured by it will be active once Apache2 is restarted. -
magic: instructions for determining MIME type based on the first few bytes of a file.
In addition, other configuration files may be added using the Include directive, and wildcards can be used to include many configuration files. Any directive may be placed in any of these configuration files. Changes to the main configuration files are only recognized by Apache2 when it is started or restarted.
The server also reads a file containing mime document types; the filename is set by the TypesConfig directive, typically via /etc/apache2/mods-available/mime.conf, which might also include additions and overrides, and is /etc/mime.types by default.
Basic Settings
This section explains Apache2 server essential configuration parameters. Refer to the Apache2 Documentation for more details.
-
Apache2 ships with a virtual-host-friendly default configuration. That is, it is configured with a single default virtual host (using the VirtualHost directive) which can be modified or used as-is if you have a single site, or used as a template for additional virtual hosts if you have multiple sites. If left alone, the default virtual host will serve as your default site, or the site users will see if the URL they enter does not match the ServerName directive of any of your custom sites. To modify the default virtual host, edit the file
/etc/apache2/sites-available/000-default.conf.Note
The directives set for a virtual host only apply to that particular virtual host. If a directive is set server-wide and not defined within the virtual host settings, the default setting is used. For example, you can define a Webmaster email address and not define individual email addresses for each virtual host.
If you wish to configure a new virtual host or site, copy that file into the same directory with a name you choose. For example:
sudo cp /etc/apache2/sites-available/000-default.conf /etc/apache2/sites-available/mynewsite.confEdit the new file to configure the new site using some of the directives described below.
-
The ServerAdmin directive specifies the email address to be advertised for the server’s administrator. The default value is webmaster@localhost. This should be changed to an email address that is delivered to you (if you are the server’s administrator). If your website has a problem, Apache2 will display an error message containing this email address to report the problem to. Find this directive in your site’s configuration file in /etc/apache2/sites-available.
-
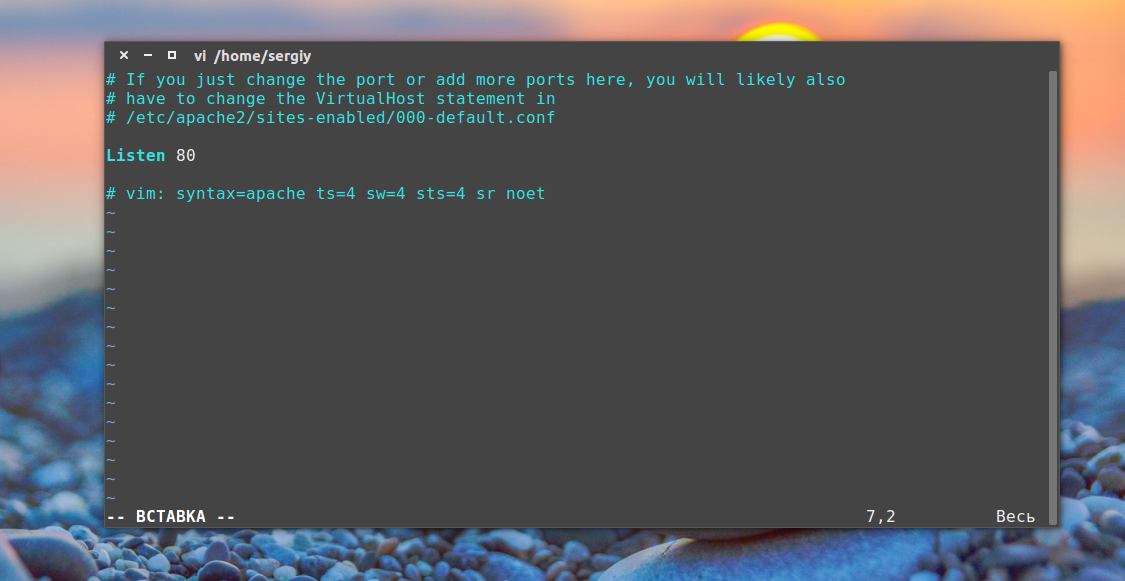
The Listen directive specifies the port, and optionally the IP address, Apache2 should listen on. If the IP address is not specified, Apache2 will listen on all IP addresses assigned to the machine it runs on. The default value for the Listen directive is 80. Change this to 127.0.0.1:80 to cause Apache2 to listen only on your loopback interface so that it will not be available to the Internet, to (for example) 81 to change the port that it listens on, or leave it as is for normal operation. This directive can be found and changed in its own file,
/etc/apache2/ports.conf -
The ServerName directive is optional and specifies what FQDN your site should answer to. The default virtual host has no ServerName directive specified, so it will respond to all requests that do not match a ServerName directive in another virtual host. If you have just acquired the domain name
mynewsite.comand wish to host it on your Ubuntu server, the value of the ServerName directive in your virtual host configuration file should bemynewsite.com. Add this directive to the new virtual host file you created earlier (/etc/apache2/sites-available/mynewsite.conf).You may also want your site to respond to
www.mynewsite.com, since many users will assume the www prefix is appropriate. Use the ServerAlias directive for this. You may also use wildcards in the ServerAlias directive.For example, the following configuration will cause your site to respond to any domain request ending in .mynewsite.com.
ServerAlias *.mynewsite.com -
The DocumentRoot directive specifies where Apache2 should look for the files that make up the site. The default value is /var/www/html, as specified in
/etc/apache2/sites-available/000-default.conf. If desired, change this value in your site’s virtual host file, and remember to create that directory if necessary!
Enable the new VirtualHost using the a2ensite utility and restart Apache2:
sudo a2ensite mynewsite
sudo systemctl restart apache2.service
Note
Be sure to replace mynewsite with a more descriptive name for the VirtualHost. One method is to name the file after the ServerName directive of the VirtualHost.
Similarly, use the a2dissite utility to disable sites. This is can be useful when troubleshooting configuration problems with multiple VirtualHosts:
sudo a2dissite mynewsite
sudo systemctl restart apache2.service
Default Settings
This section explains configuration of the Apache2 server default settings. For example, if you add a virtual host, the settings you configure for the virtual host take precedence for that virtual host. For a directive not defined within the virtual host settings, the default value is used.
-
The DirectoryIndex is the default page served by the server when a user requests an index of a directory by specifying a forward slash (/) at the end of the directory name.
For example, when a user requests the page
http://www.example.com/this_directory/, he or she will get either the DirectoryIndex page if it exists, a server-generated directory list if it does not and the Indexes option is specified, or a Permission Denied page if neither is true. The server will try to find one of the files listed in the DirectoryIndex directive and will return the first one it finds. If it does not find any of these files and if Options Indexes is set for that directory, the server will generate and return a list, in HTML format, of the subdirectories and files in the directory. The default value, found in/etc/apache2/mods-available/dir.confis “index.html index.cgi index.pl index.php index.xhtml index.htm”. Thus, if Apache2 finds a file in a requested directory matching any of these names, the first will be displayed. -
The ErrorDocument directive allows you to specify a file for Apache2 to use for specific error events. For example, if a user requests a resource that does not exist, a 404 error will occur. By default, Apache2 will simply return a HTTP 404 Return code. Read
/etc/apache2/conf-available/localized-error-pages.conffor detailed instructions for using ErrorDocument, including locations of example files. -
By default, the server writes the transfer log to the file
/var/log/apache2/access.log. You can change this on a per-site basis in your virtual host configuration files with the CustomLog directive, or omit it to accept the default, specified in/etc/apache2/conf-available/other-vhosts-access-log.conf. You may also specify the file to which errors are logged, via the ErrorLog directive, whose default is/var/log/apache2/error.log. These are kept separate from the transfer logs to aid in troubleshooting problems with your Apache2 server. You may also specify the LogLevel (the default value is “warn”) and the LogFormat (see/etc/apache2/apache2.conffor the default value). -
Some options are specified on a per-directory basis rather than per-server. Options is one of these directives. A Directory stanza is enclosed in XML-like tags, like so:
<Directory /var/www/html/mynewsite>
...
</Directory>
The Options directive within a Directory stanza accepts one or more of the following values (among others), separated by spaces:
-
ExecCGI — Allow execution of CGI scripts. CGI scripts are not executed if this option is not chosen.
Caution
Most files should not be executed as CGI scripts. This would be very dangerous. CGI scripts should kept in a directory separate from and outside your DocumentRoot, and only this directory should have the ExecCGI option set. This is the default, and the default location for CGI scripts is
/usr/lib/cgi-bin. -
Includes — Allow server-side includes. Server-side includes allow an HTML file to include other files. See Apache SSI documentation (Ubuntu community) for more information.
-
IncludesNOEXEC — Allow server-side includes, but disable the #exec and #include commands in CGI scripts.
-
Indexes — Display a formatted list of the directory’s contents, if no DirectoryIndex (such as index.html) exists in the requested directory.
Caution
For security reasons, this should usually not be set, and certainly should not be set on your DocumentRoot directory. Enable this option carefully on a per-directory basis only if you are certain you want users to see the entire contents of the directory.
-
Multiview — Support content-negotiated multiviews; this option is disabled by default for security reasons. See the Apache2 documentation on this option.
-
SymLinksIfOwnerMatch — Only follow symbolic links if the target file or directory has the same owner as the link.
-
apache2 Settings
This section explains some basic apache2 daemon configuration settings.
LockFile — The LockFile directive sets the path to the lockfile used when the server is compiled with either USE_FCNTL_SERIALIZED_ACCEPT or USE_FLOCK_SERIALIZED_ACCEPT. It must be stored on the local disk. It should be left to the default value unless the logs directory is located on an NFS share. If this is the case, the default value should be changed to a location on the local disk and to a directory that is readable only by root.
PidFile — The PidFile directive sets the file in which the server records its process ID (pid). This file should only be readable by root. In most cases, it should be left to the default value.
User — The User directive sets the userid used by the server to answer requests. This setting determines the server’s access. Any files inaccessible to this user will also be inaccessible to your website’s visitors. The default value for User is “www-data”.
Warning
Unless you know exactly what you are doing, do not set the User directive to root. Using root as the User will create large security holes for your Web server.
Group — The Group directive is similar to the User directive. Group sets the group under which the server will answer requests. The default group is also “www-data”.
Apache2 Modules
Apache2 is a modular server. This implies that only the most basic functionality is included in the core server. Extended features are available through modules which can be loaded into Apache2. By default, a base set of modules is included in the server at compile-time. If the server is compiled to use dynamically loaded modules, then modules can be compiled separately, and added at any time using the LoadModule directive. Otherwise, Apache2 must be recompiled to add or remove modules.
Ubuntu compiles Apache2 to allow the dynamic loading of modules. Configuration directives may be conditionally included on the presence of a particular module by enclosing them in an <IfModule> block.
You can install additional Apache2 modules and use them with your Web server. For example, run the following command at a terminal prompt to install the Python 3 WSGI module:
sudo apt install libapache2-mod-wsgi-py3
The installation will enable the module automatically, but we can disable it with a2dismod:
sudo a2dismod wsgi
sudo systemctl restart apache2.service
And then use the a2enmod utility to re-enable it:
sudo a2enmod wsgi
sudo systemctl restart apache2.service
See the /etc/apache2/mods-available directory for additional modules already available on your system.
HTTPS Configuration
The mod_ssl module adds an important feature to the Apache2 server — the ability to encrypt communications. Thus, when your browser is communicating using SSL, the https:// prefix is used at the beginning of the Uniform Resource Locator (URL) in the browser navigation bar.
The mod_ssl module is available in apache2-common package. Execute the following command at a terminal prompt to enable the mod_ssl module:
sudo a2enmod ssl
There is a default HTTPS configuration file in /etc/apache2/sites-available/default-ssl.conf. In order for Apache2 to provide HTTPS, a certificate and key file are also needed. The default HTTPS configuration will use a certificate and key generated by the ssl-cert package. They are good for testing, but the auto-generated certificate and key should be replaced by a certificate specific to the site or server. For information on generating a key and obtaining a certificate see Certificates.
To configure Apache2 for HTTPS, enter the following:
sudo a2ensite default-ssl
Note
The directories
/etc/ssl/certsand/etc/ssl/privateare the default locations. If you install the certificate and key in another directory make sure to change SSLCertificateFile and SSLCertificateKeyFile appropriately.
With Apache2 now configured for HTTPS, restart the service to enable the new settings:
sudo systemctl restart apache2.service
Note
Depending on how you obtained your certificate you may need to enter a passphrase when Apache2 starts.
You can access the secure server pages by typing https://your_hostname/url/ in your browser address bar.
Sharing Write Permission
For more than one user to be able to write to the same directory it will be necessary to grant write permission to a group they share in common. The following example grants shared write permission to /var/www/html to the group “webmasters”.
sudo chgrp -R webmasters /var/www/html
sudo chmod -R g=rwX /var/www/html/
These commands recursively set the group permission on all files and directories in /var/www/html to allow reading, writing and searching of directories. Many admins find this useful for allowing multiple users to edit files in a directory tree.
Warning
The
apache2daemon will run as thewww-datauser, which has a correspondingwww-datagroup. These should not be granted write access to the document root, as this would mean that vulnerabilities in Apache or the applications it is serving would allow attackers to overwrite the served content.
References
-
Apache2 Documentation contains in depth information on Apache2 configuration directives. Also, see the apache2-doc package for the official Apache2 docs.
-
O’Reilly’s Apache Cookbook is a good resource for accomplishing specific Apache2 configurations.
-
For Ubuntu specific Apache2 questions, ask in the #ubuntu-server IRC channel on libera.chat.
Apache — это популярнейший свободный веб-сервер. Состоянием на 2020 год он используется на 33% всех сайтов интернета, а это приблизительно 304 миллиарда сайтов. Этот веб-сервер был разработан в далеком 1995, как замена для популярного того сервера NCSA и исправил множество его проблем. Ходят слухи что его имя походит от a patchy, заплатка, так как он исправлял ошибки NCSA. Сейчас же, это кроссплатформенная программа, поддерживающая Windows, Linux и MacOS и обеспечивающая достаточную гибкость, настраиваемость и функциональность. Программа имеет модульную структуру, что позволяет расширять ее функциональность почти до бесконечности с помощью модулей.
Установить Apache в Linux можно с помощью нескольких команд, но программа предоставляет очень большое количество настроек, которые можно изменить, а также модулей, после включения которых она будет работать лучше. В этой статье будет рассмотрена установка и настройка Apache, в качестве основной системы мы будем использовать Ubuntu, но вы можете повторить эти действия в любом другом дистрибутиве. Будет рассмотрена не только установка самой программы, но и способы ее настройки, настройка виртуальных хостов apache, а также самые полезные модули.
На данный момент, самая новая версия программы 2.4 поэтому и будет рассмотрена настройка apache 2.4. Как я уже говорил, в Linux программа устанавливается буквально в пару команд. Для установки в Ubuntu сначала обновим систему до самой новой версии:
sudo apt update
sudo apt upgrade
Затем установка apache2:
sudo apt install apache2
В других дистрибутивах пакет программы называется либо так, либо httpd и его установка у вас не вызовет трудностей.
После завершения установки нужно добавить веб-сервер в автозагрузку, чтобы не запускать его вручную после включения компьютера:
sudo systemctl enable apache2
Настройка Apache
Уже прошло то время, когда конфигурация Apache хранилась в одном файле. Но оно и правильно, когда все распределено по своим директориям, в конфигурационных файлах легче ориентироваться.
Все настройки содержатся в папке /etc/apache/:
- Файл /etc/apache2/apache2.conf отвечает за основные настройки
- /etc/apache2/conf-available/* — дополнительные настройки веб-сервера
- /etc/apache2/mods-available/* — настройки модулей
- /etc/apache2/sites-available/* — настойки виртуальных хостов
- /etc/apache2/ports.conf — порты, на которых работает apache
- /etc/apache2/envvars
Как вы заметили есть две папки для conf, mods и site. Это available и enabled. При включении модуля или хоста создается символическая ссылка из папки available (доступно) в папку enable (включено). Поэтому настройки лучше выполнять именно в папках available. Вообще говоря, можно было бы обойтись без этих папок, взять все и по старинке свалить в один файл, и все бы работало, но сейчас так никто не делает.
Сначала давайте рассмотрим главный файл конфигурации:
vi /etc/apache2/apache2.conf
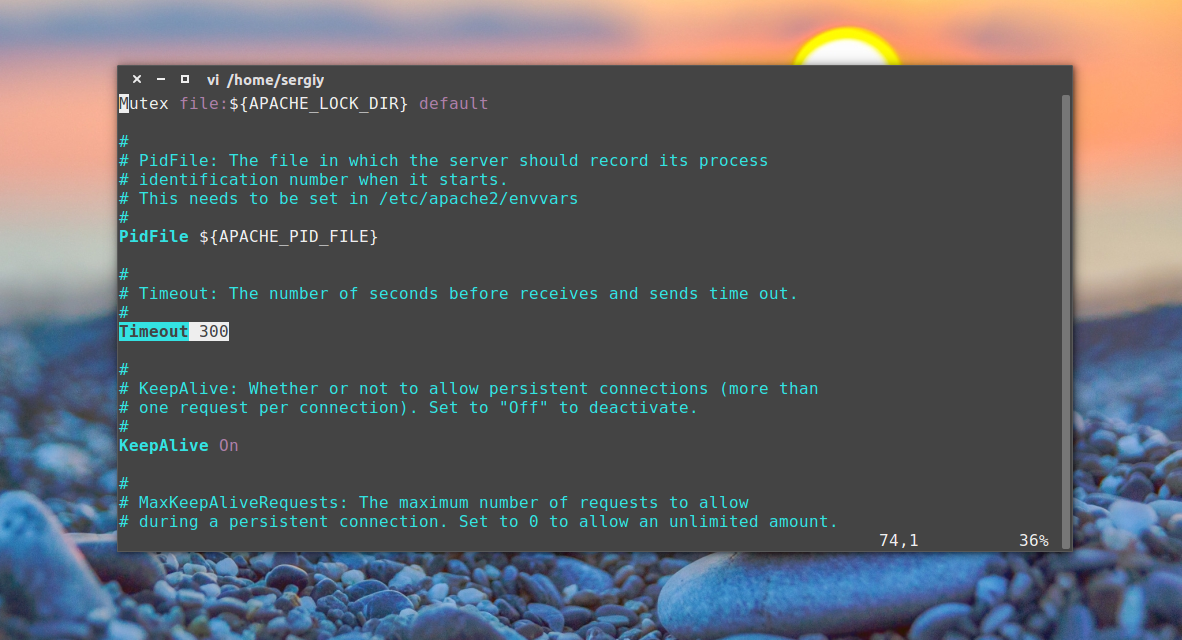
Timeout — указывает как долго сервер будет пытаться продолжить прерванную передачу или прием данных. 160 секунд будет вполне достаточно.
KeepAlive On — очень полезный параметр, позволяет передавать несколько файлов, за одно соединение, например, не только саму html страницу, но и картинки и css файлы.
MaxKeepAliveRequests 100 — максимальное количество запросов за одно соединение, чем больше, тем лучше.
KeepAliveTimeout 5 — таймаут соединения, обычно для загрузки страницы достаточно 5-10 секунд, так что больше ставить не нужно, но и рвать соединение раньше чем загрузились все данные тоже не нужно.
User, Group — пользователь и группа, от имени которых будет работать программа.
HostnameLookups — записывать в логи вместо ip адресов доменные имена, лучше отключить, чтобы ускорить работу.
LogLevel — уровень логирования ошибок. По умолчанию используется warn, но чтобы логи заполнялись медленнее достаточно включить error
Include — все директивы include отвечают за подключение рассмотренных выше конфигурационных файлов.
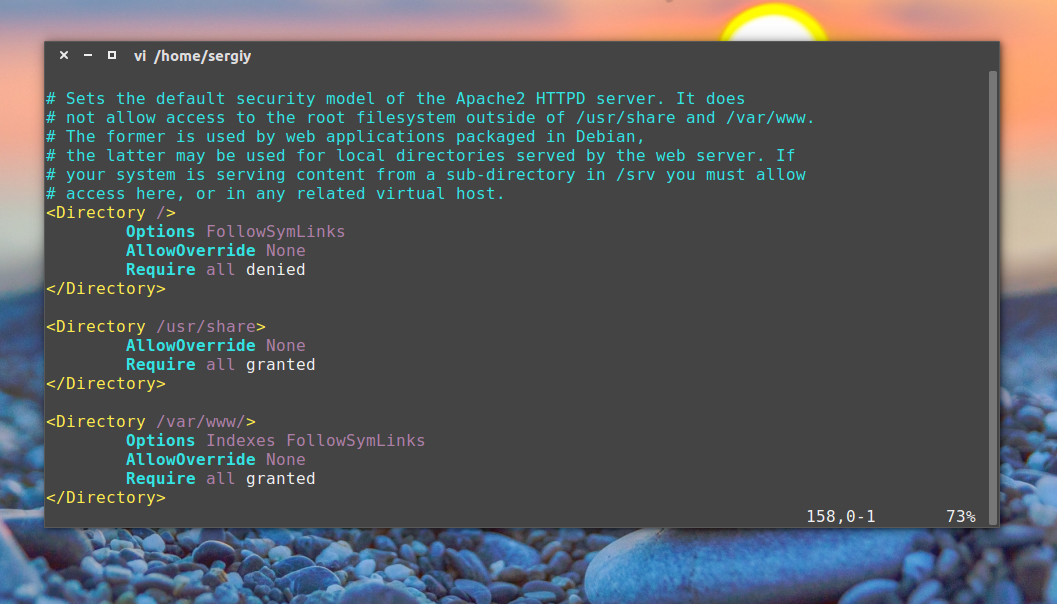
Директивы Directory отвечают за настройку прав доступа к той или иной директории в файловой системе. Синтаксис здесь такой:
<Directory /адрес/в/файловой/системе/>

Параметр значение

</Directory>
Здесь доступны такие основные опции:
AllowOverride — указывает нужно ли читать .htaccess файлы из этой директории, это такие же файлы настроек и таким же синтаксисом. All — разрешать все, None — не читать эти файлы.
DocumentRoot — устанавливает из какой папки нужно брать документы для отображенияа пользователю
Options — указывает какие особенности веб-сервера нужно разрешить в этой папке. Например, All — разрешить все, FollowSymLinks — переходить по символическим ссылкам, Indexes — отображать содержимое каталога если нет файла индекса.
Require — устанавливает, какие пользователи имеют доступ к этому каталогу. Require all denied — всем запретить, Require all granted — всем разрешить. можно использовать вместо all директиву user или group чтобы явно указать пользователя.
Order — позволяет управлять доступом к директории. Принимает два значения Allow,Deny — разрешить для всех, кроме указанных или Deny,Allow — запретить для всех, кроме указанных. Теперь мы можем запретить доступ к директории для всех: Deny from all, а затем разрешить только для приложения от losst.pro: Allow from losst.pro.
Здесь все эти директивы не используются, поскольку нас устраивают значения по умолчанию, но вот в файлах .htaccess они могут быть очень полезны.
У нас остался файл /etc/apache2/ports.conf:
В нем только одна директива, Listen, которая указывает программе на каком порту нужно работать.
Последний файл /etc/apache2/envvars, его вы вряд ли будете использовать, в нем указанны переменные, которые можно использовать в других конфигурационных файлах.
Дальше поговорим немного о htacess. Совсем немного.
Настройка сервера Apache через htaccess
Файлы .htaccess позволяют настраивать веб-сервер на Ubuntu для поведения в определенной директории. Все инструкции, указанные в этом файле выполняются как бы они были обвернуты в тег <directory адрес_папки> если бы находились в основном файле.
Важно заметить, что для того, чтобы сервер читал инструкции из .htaccess настройки для этой папки в основном файле или файле виртуального хоста не должны содержать AllowOverride None, чтобы могли работать все настройки нужно AllowOverride All.
А в остальном, здесь может выполняться любая настройка сервера apache, от включения модулей, до обычного изменения доступа к папке. Поскольку все параметры мы уже рассмотрели просто приведем пару примеров:
Order Deny,Allow

Deny from all
Запрещает всем доступ к этой папке, важно применить, для папок с конфигурацией. Чаще всего .htaccess используется для работы с модулем mod_rewrite, который позволяет изменять запросы на лету:
RewriteEngine on

RewriteRule ^product/([^/.]+)/?$ product.php?id=$1 [L]
Но это очень обширная тема и выходит за рамки этой статьи.
Настройка модулей Apache
Как я уже говорил, Apache — модульная программа, ее функциональность можно расширять с помощью модулей. Все доступные модули загрузчики и конфигурационные файлы модулей находятся в папке /etc/apache/mods-available. А активированные в /etc/apache/mods-enable.
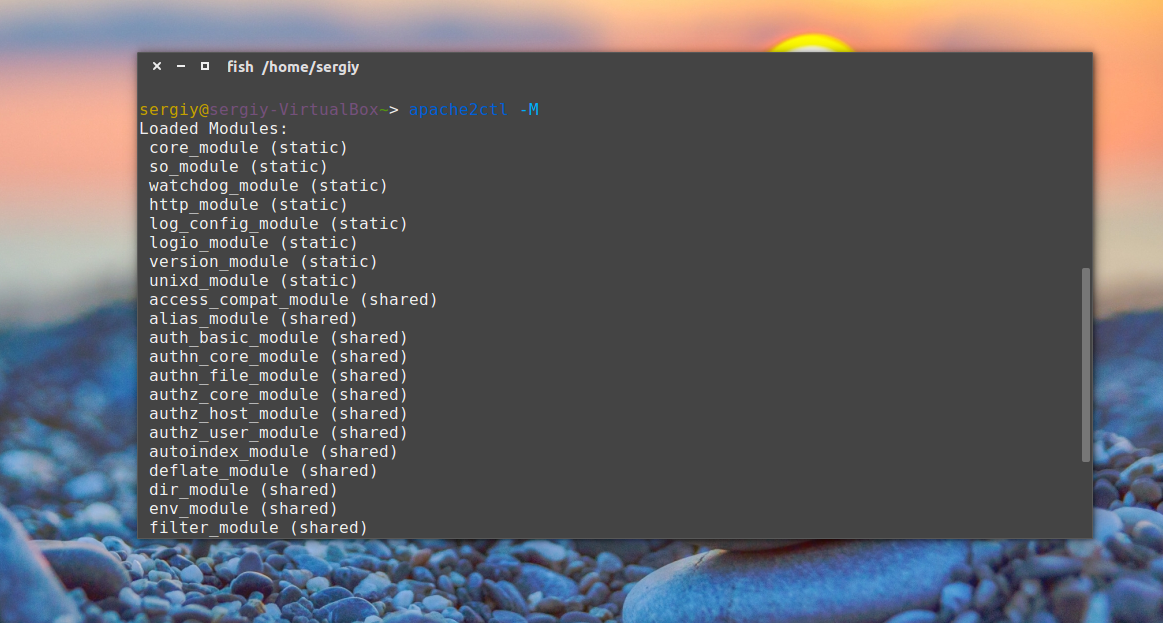
Но вам необязательно анализировать содержимое этих папок. Настройка Apache 2.4 с помощью добавления модулей выполняется с помощью специальных команд. Посмотреть все запущенные модули можно командой:
apache2ctl -M
Включить модуль можно командой:
sudo a2enmod имя_модуля
А отключить:
sudo a2dismod имя_модуля
После включения или отключения модулей нужно перезагрузить apache:
sudo systemctl restart apache2
Во время выполнения одной из этих команд создается или удаляется символическая ссылка на файл модуля с расширением load в директории mods-available. Можете посмотреть содержимое этого файла, там только одна строка. Например:
vi /etc/apache2/mods-available/deflate.load
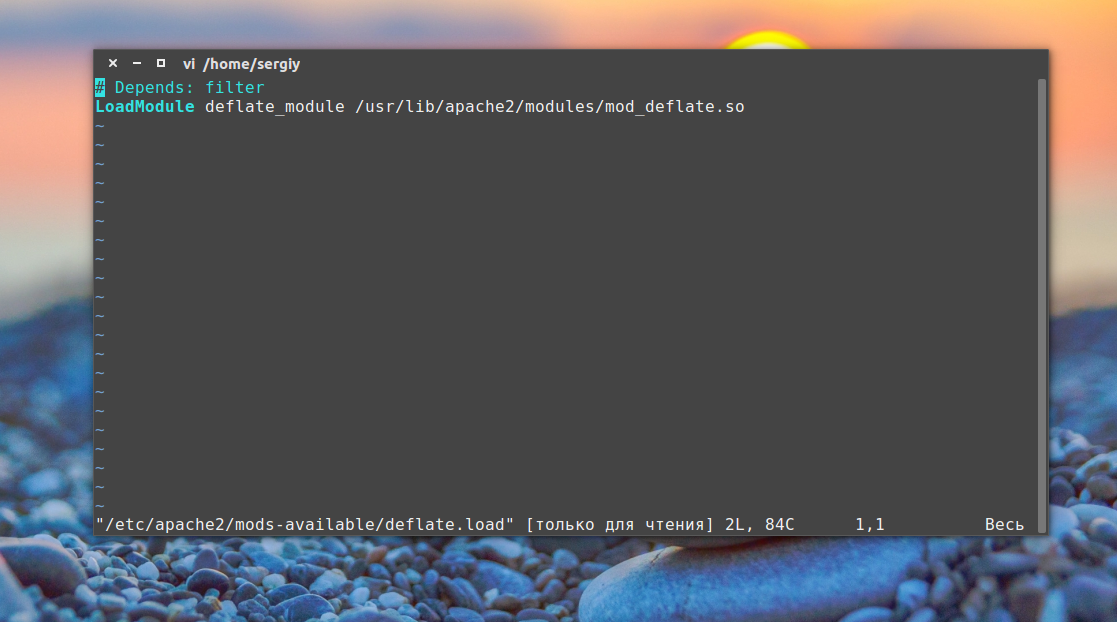
Это к тому, что активировать модуль можно было просто добавив эту строчку в файл apache2.conf. Но принято делать именно так, чтобы избежать путаницы.
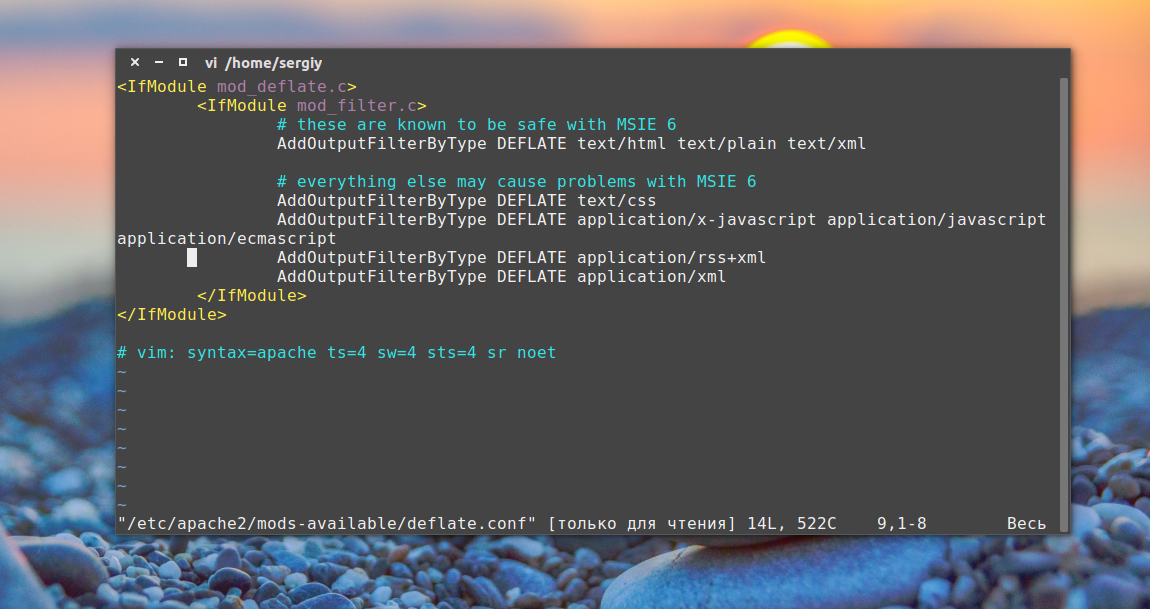
Настройки модулей находятся в той же папке, только в файле с расширением .conf вместо load. Например, посмотрим настройки того же модуля для сжатия deflate:
vi /etc/apache2/mods-available/deflate.conf
Файлы в папке conf-available, это такие же модули, только они установлены отдельно от apache, это может быть конфигурационные файлы для включения модуля php или любого другого языка программирования. Здесь работает все точно так же, только команды для включения и отключения этих модулей немного другие:
a2enconf имя_модуля
a2disconf имя модуля
Как вы убедились, включать модули очень просто. Давайте включим несколько необходимых, но не включенных по умолчанию модулей:
sudo a2enmod expires
sudo a2enmod headers
sudo a2enmod rewrite
sudo a2enmod ssl
Модули expires и headers уменьшают нагрузку на сервер. Они возвращают заголовок Not Modified, если документ не изменился с последнего запроса. Модуль expiries позволяет устанавливать время, на которое браузер должен кэшировать полученный документ. Rewrite позволяет изменять запрашиваемые адреса на лету, очень полезно при создании ЧПУ ссылок и т д. А последний для включения поддержки шифрования по SSL. Не забудьте перезагрузить apache2 после завершения настроек.
Настройка виртуальных хостов Apache
Было бы не совсем удобно, если на одной физической машине можно было размещать только один сайт. Apache может поддерживать сотни сайтов на одном компьютере и выдавать для каждого из них правильное содержимое. Для этого используются виртуальные хосты. Сервер определяет к какому домену приходит запрос и отдает нужное содержимое из папки этого домена.
Настройки хостов Apache расположены в папке /etc/apache2/sites-available/. Для создания нового хоста достаточно создать файл с любым именем (лучше кончено с именем хоста) и заполнить его нужными данными. Обернуть все эти параметры нужно в директиву VirtualHost. Кроме рассмотренных параметров здесь будут использоваться такие:
- ServerName — основное имя домена
- ServerAlias — дополнительное имя, по которому будет доступен сайт
- ServerAdmin — электронная почта администратора
- DocumentRoot — папка с документами для этого домена
Например:
vi /etc/apache2/sites-available/test.site.conf
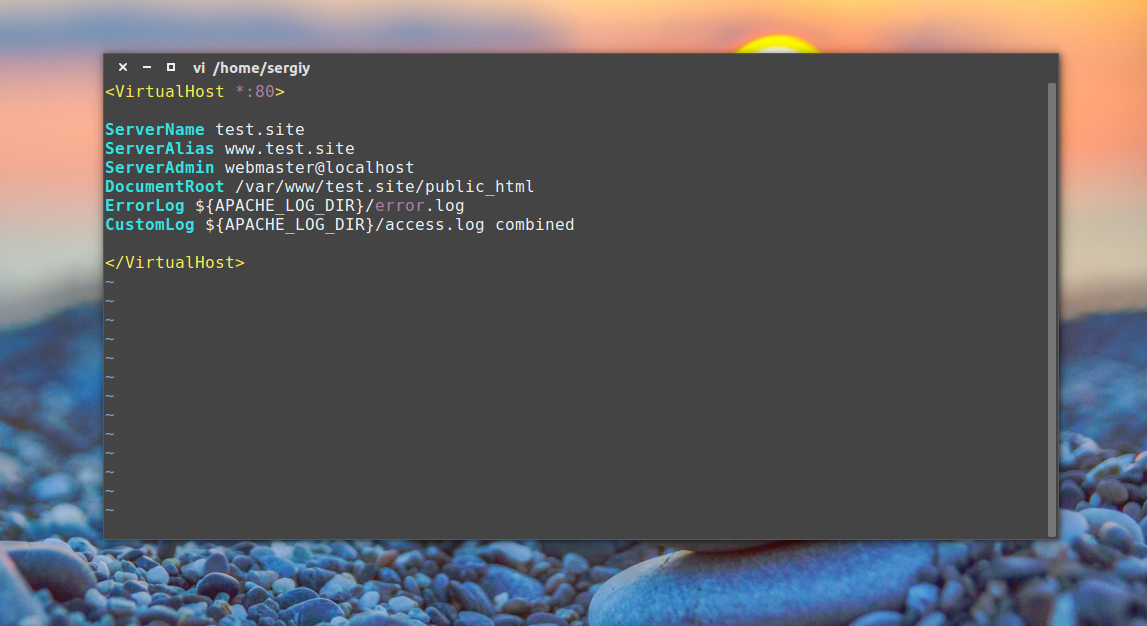
<VirtualHost *:80>

ServerName test.site

ServerAlias www.test.site

ServerAdmin webmaster@localhost

DocumentRoot /var/www/test.site/public_html

ErrorLog ${APACHE_LOG_DIR}/error.log

CustomLog ${APACHE_LOG_DIR}/access.log combined

</VirtualHost>
Виртуальные хосты, как и модули нужно активировать. Для этого есть специальные утилиты. Чтобы активировать наберите:
sudo a2ensite test.site
Здесь test.site — имя файла виртуального хоста. Для отключения тоже есть команда:
sudo a2dissite test.site
Настройка виртуальных хостов Apache завершена и на публичном сервере это все бы уже работало, но если вам нужна настройка Apache на домашней машине, то вы ваш новый сайт не откроется в браузере. Браузер не знает такого сайта. И откуда ему знать? DNS службы не могут ничего сообщить об этом доменном имени. Но в системе Linux мы можем сами указать ip адреса для доменных имен в файле /etc/hosts. Поэтому добавляем в конец файла такие строки:
vi /etc/hosts
127.0.0.1 test.site

127.0.0.1 www.test.site
Вот, ну теперь будет работать, открывайте браузер, проверяйте.
Выводы
Вот и все. Установка и настройка Apache linux завершена, вы можете использовать программу для размещения ваших сайтов. Более того, вы не просто настроили ее, вы разобрались со всеми подробностями и теперь знаете чуточку больше. Если у вас остались еще вопросы, пишите в комментариях!
Обнаружили ошибку в тексте? Сообщите мне об этом. Выделите текст с ошибкой и нажмите Ctrl+Enter.

Статья распространяется под лицензией Creative Commons ShareAlike 4.0 при копировании материала ссылка на источник обязательна .
-
Главная
-
Инструкции
-
Ubuntu
-
Установка и настройка Apache на Ubuntu 22.04
Под веб-серверами понимают как физические машины, так и специальное программное обеспечение. С точки зрения софта, веб-сервер — это программа, которая реализует логику сервера в клиент-серверной архитектуре: принимает HTTP-запросы от клиентов и возвращает соответствующие ответы.
На рынке представлено большое количество различных веб-серверов, которые предлагают своим пользователям дополнительный функционал. В зависимости от своих потребностей пользователь может выбрать наиболее подходящее его задачам решение.
Самые распространенные веб-серверы в 2023 году — это Nginx и Apache. В этом материале мы расскажем, как установить и настроить Apache на операционной системе Ubuntu 22.04.
Apache HTTP Server или просто Apache — это бесплатный кроссплатформенный веб-сервер с открытым исходным кодом. Он был разработан в 1995 году группой разработчиков для устранения недостатков популярного на тот момент веб-сервера NCSA HTTPd.
NCSA HTTPd был одним из первых веб-серверов. Его разработали в 1993 году в NCSA, университет Иллинойса. Он распространялся бесплатно и позволял пользователям размещать в интернете первые страницы, но NCSA HTTPd имел ограниченные возможности по сравнению с современными веб-серверами и ряд других недостатков, которые по итогу вылились в появление Apache.
Через год после выхода Apache получил популярность среди хостинг-компаний и разработчиков благодаря новой функциональности и кроссплатформенности. В 2005 году порядка 70% всех серверов в сети работало на Apache. Сейчас эта цифра держится в районе 20%, а основной конкурент Apache — это Nginx.
Apache состоит из двух основных компонентов: ядра и модулей. Ядро выполняет базовые функции веб-сервера: обрабатывает конфигурационные файлы, выполняет действия, связанные с HTTP, и загружает дополнительные модули. Модули позволяют расширить базовый функционал ядра: поддержка новых языков программирования, авторизация пользователей, повышение уровня безопасности. Над ядром работает исключительно команда Apache.
В целом, к плюсам Apache можно отнести:
- Бесплатное ПО;
- Кастомизация: веб-сервер на Apache можно легко подстроить под конкретные цели и задачи благодаря большому количеству дополнительных модулей и открытому коду.
- Большое комьюнити;
- Кроссплатформенность;
- Хороший уровень производительности и безопасности.
А к минусам:
- Требовательность к ресурсам, особенно при обслуживании большого количества одновременных запросов;
- Ограниченная многопоточность: Apache использует технологию мультипроцессинга, помещая каждое соединение в отдельный поток. Количество таких потоков ограниченно, что негативно сказывается при большом количестве запросов;
- Сложность настройки из-за большого количества настроек.
Установка Apache
Установка Apache выполняется в несколько шагов:
Шаг 1. Обновите индексы пакетов apt
Перед установкой любого программного обеспечения на Ubuntu в первую очередь необходимо обновить индексы пакетов. Благодаря этому в репозитории будут находиться последние пакеты, доступные для установки.
Для обновления индекс пакетов APT до последней версии выполните следующую команду:
sudo apt updateШаг 2. Установка веб-сервера Apache
Установка веб-сервера Apache на Ubuntu — это простой процесс, включающий в себя выполнение одной команды и перезагрузку системы. Чтобы установить Apache, выполните следующую команду:
sudo apt install apache2После чего перезагрузите систему.
Шаг 3. Запуск и автозагрузка Apache
Чтобы запустить службу Apache, выполните эту команду:
sudo systemctl start apache2Эту команду придется выполнять каждый раз при запуске сервера. Чтобы избежать этого, добавим Apache в автозагрузку:
sudo systemctl enable apache2Шаг 4. Проверка установки сервера Apache
Проверим статус службы Apache, чтобы убедиться в успешности установки:
service apache2 status
Настройка брандмауэра
Теперь, когда вы установили Apache на Ubuntu, необходимо разрешить внешние подключения через брандмауэр UFW.
UFW (Uncomplicated Firewall) — это интерфейс командной строки для iptables, который представляет собой фаервол для ОС Linux. Он предназначен для упрощения управления правилами фаервола, делая его более доступным для новичков. UFW позволяет легко настраивать правила фаервола, такие как открытие или закрытие портов, блокировка или разрешение доступа к сети и т.д.
UFW является простым и эффективным способом обеспечения безопасности вашего сервера или компьютера. Он может использоваться как для домашних пользователей, так и для предприятий.
Вы можете пропустить этот раздел, если на вашем сервере не запущен UFW или не установлен брандмауэр. Но это не совсем безопасно, поэтому для обеспечения безопасности вашего устройства мы рекомендуем вам использовать брандмауэр.
При включенном брандмауэре вы можете обнаружить, что подключение к серверу Apache с удаленного устройства невозможно. Это связано с тем, что порты, которые использует Apache, по умолчанию закрыты. Речь идет о 80 порту (для HTTP) и 443 порту (для HTTPS). Откроем подключение к обоим портам
Давайте начнем с открытия 80 порта. Через этот порт будут проходить подключения к Apache через HTTP.
Даже если вы планируете работать только с HTTPS-соединениями, не лишним будет открыть подключения на 80 порту, чтобы вы могли перенаправлять их на HTTPS.
В первую очередь проверим, включен ли файрвол UFW:
sudo ufw statusМы должны увидеть статус Active. Если это не так, запустите сервис ufw следующей командой:
sudo ufw enableЧтобы разрешить доступ к порту 80 с помощью UFW, мы можем использовать следующую команду в терминале:
sudo ufw allow 80Также если вы планируете использовать HTTPS с сервером Apache на Ubuntu, вам также необходимо открыть порт 443.
Порт 443 — это порт, через который HTTPS работает по умолчанию. Поэтому если вы посетили сайт, использующий протокол «https://», ваш веб-браузер будет использовать именно этот порт.
Вы можете разрешить этот порт с помощью этой команды:
sudo ufw allow 443Посещение вашего веб-сайта
Теперь, когда вы установили веб-сервер Apache на Ubuntu и открыли подключения в брандмауэре, давайте попробуем зайти на него.
Посетив страницу сервера, мы увидим только страницу по умолчанию. Это хороший показатель того, что все работает правильно.
Если планируется подключения с удаленного устройства, то в первую очередь необходимо узнать IP-адрес сервера Apache. Есть несколько способов узнать это.
Самый простой способ — использовать команду hostname с опцией -I. Команда в качестве результата выведет список IP-адресов, назначенных вашему устройству.
hostname -IНапример, нашему тестовому серверу присвоен только локальный IP-адрес, который мы видим ниже.
192.168.0.215По этому адресу нужно перейти в любом браузере. Если вы получаете доступ непосредственно с вашего сервера Ubuntu, вы можете использовать 127.0.0.1 или localhost вместо этого.
После перехода по этому адресу вы должны увидеть страницу, аналогичную той, что показана на скриншоте ниже.
Это говорит о том, что вы успешно запустили Apache на Ubuntu.
Заключение
В рамках этого материала мы рассмотрели установку Apache на Ubuntu 22.04, настройку брандмауэра и запуск сервера. При разработке сайта или веб-приложение эти шаги будут первыми на пути к готовому продукту. Если вы хотите создать свой сервер, то для этих планов вы можете арендовать облачный сервер на timeweb.cloud.
The Apache HTTP Server, or Apache for short, is a very popular web server, developed by the Apache Software Foundation.
This article describes how to set up Apache and how to optionally integrate it with PHP.
Installation
Install the apache package.
Configuration
Apache configuration files are located in /etc/httpd/conf. The main configuration file is /etc/httpd/conf/httpd.conf, which includes various other configuration files. The default configuration file should be fine for a simple setup. By default, it will serve the directory /srv/http to anyone who visits your website.
To run Apache, start httpd.service. If everything is working correctly, visiting http://localhost/ should display a simple index page.
For optional further configuration, see the following sections.
Advanced options
See the full list of Apache configuration directives and the directive quick reference.
These options in /etc/httpd/conf/httpd.conf might be interesting for you:
User http
- For security reasons, as soon as Apache is started by the root user (directly or via startup scripts) it switches to this UID. The default user is http, which is created automatically during installation.
Listen 80
- This is the port Apache will listen to. For Internet-access with router, you have to forward the port.
- If you want to setup Apache for local development you may want it to be only accessible from your computer. Then change this line to
Listen 127.0.0.1:80.
ServerAdmin you@example.com
- This is the admin’s email address which can be found on e.g. error pages.
DocumentRoot "/srv/http"
- This is the directory where you should put your web pages.
- Change it, if you want to, but do not forget to also change
<Directory "/srv/http">to whatever you changed yourDocumentRootto, or you will likely get a 403 Error (lack of privileges) when you try to access the new document root. Do not forget to change theRequire all deniedline toRequire all granted, otherwise you will get a 403 Error. Remember that the DocumentRoot directory and its parent folders must allow execution permission to others (can be set withchmod o+x /path/to/DocumentRoot), otherwise you will get a 403 Error.
AllowOverride None
- This directive in
<Directory>sections causes Apache to completely ignore.htaccessfiles. Note that this is now the default for Apache 2.4, so you need to explicitly allow overrides if you plan to use.htaccessfiles. If you intend to usemod_rewriteor other settings in.htaccessfiles, you can allow which directives declared in that file can override server configuration. For more info refer to the Apache documentation.
Tip: If you have issues with your configuration you can have Apache check the configuration with: apachectl configtest
More settings can be found in /etc/httpd/conf/extra/httpd-default.conf:
To turn off your server’s signature:
ServerSignature Off
To hide server information like Apache and PHP versions:
ServerTokens Prod
User directories
User directories are available by default through http://localhost/~yourusername/ and show the contents of ~/public_html (this can be changed in /etc/httpd/conf/extra/httpd-userdir.conf).
If you do not want user directories to be available on the web, comment out the following line in /etc/httpd/conf/httpd.conf:
Include conf/extra/httpd-userdir.conf
![]() The factual accuracy of this article or section is disputed.
The factual accuracy of this article or section is disputed.![]()
You must make sure that your home directory permissions are set properly so that Apache can get there. Your home directory and ~/public_html must be executable for others («rest of the world»):
$ chmod o+x ~
$ chmod o+x ~/public_html
$ chmod -R o+r ~/public_html
Restart httpd.service to apply any changes. See also Umask#Set the mask value.
TLS
Firstly obtain a certificate. If you own a public domain, you can use Transport Layer Security#ACME clients.
In /etc/httpd/conf/httpd.conf, uncomment the following three lines:
LoadModule ssl_module modules/mod_ssl.so
LoadModule socache_shmcb_module modules/mod_socache_shmcb.so
Include conf/extra/httpd-ssl.conf
If using Certbot (certbot --apache), the following line needs to be uncommented as well:
LoadModule rewrite_module modules/mod_rewrite.so
After obtaining a key and certificate, make sure the SSLCertificateFile and SSLCertificateKeyFile lines in /etc/httpd/conf/extra/httpd-ssl.conf point to the key and certificate. If a concatenated chain of CA certificates was also generated, add that filename against SSLCertificateChainFile.
Finally, restart httpd.service to apply any changes.
Virtual hosts
Note: You will need to add a separate <VirtualHost *:443> section for virtual host SSL support.
See #Managing many virtual hosts for an example file.
If you want to have more than one host, uncomment the following line in /etc/httpd/conf/httpd.conf:
Include conf/extra/httpd-vhosts.conf
In /etc/httpd/conf/extra/httpd-vhosts.conf set your virtual hosts. The default file contains an elaborate example that should help you get started.
To test the virtual hosts on your local machine, add the virtual names to your /etc/hosts file:
127.0.0.1 domainname1.dom
127.0.0.1 domainname2.dom
Restart httpd.service to apply any changes.
Managing many virtual hosts
If you have a huge amount of virtual hosts, you may want to easily disable and enable them. It is recommended to create one configuration file per virtual host and store them all in one folder, eg: /etc/httpd/conf/vhosts.
First create the folder:
# mkdir /etc/httpd/conf/vhosts
Then place the single configuration files in it:
# nano /etc/httpd/conf/vhosts/domainname1.dom
# nano /etc/httpd/conf/vhosts/domainname2.dom
...
In the last step, Include the single configurations in your /etc/httpd/conf/httpd.conf:
#Enabled Vhosts:
Include conf/vhosts/domainname1.dom
Include conf/vhosts/domainname2.dom
You can enable and disable single virtual hosts by commenting or uncommenting them.
A very basic vhost file will look like this:
/etc/httpd/conf/vhosts/domainname1.dom
<VirtualHost *:80>
    ServerAdmin webmaster@domainname1.dom
    DocumentRoot "/home/user/http/domainname1.dom"
    ServerName domainname1.dom
    ServerAlias domainname1.dom
    ErrorLog "/var/log/httpd/domainname1.dom-error_log"
    CustomLog "/var/log/httpd/domainname1.dom-access_log" common

    <Directory "/home/user/http/domainname1.dom">
        Require all granted
    </Directory>
</VirtualHost>

<VirtualHost *:443>
    ServerAdmin webmaster@domainname1.dom
    DocumentRoot "/home/user/http/domainname1.dom"
    ServerName domainname1.dom:443
    ServerAlias domainname1.dom:443
    SSLEngine on
    SSLCertificateFile "/etc/httpd/conf/server.crt"
    SSLCertificateKeyFile "/etc/httpd/conf/server.key"
    ErrorLog "/var/log/httpd/domainname1.dom-error_log"
    CustomLog "/var/log/httpd/domainname1.dom-access_log" common

    <Directory "/home/user/http/domainname1.dom">
        Require all granted
    </Directory>
</VirtualHost>
Extensions
PHP
First install PHP, then follow one of the next three subsections below. Finally, test the installation as described in the final subsection.
Using libphp
This method is probably the easiest, but is also the least scalable: it is suitable for a light request load. It also requires you to change the mpm module, which may cause problems with other extensions (e.g. it is not compatible with #HTTP/2).
Install php-apache.
In /etc/httpd/conf/httpd.conf, comment the line:
#LoadModule mpm_event_module modules/mod_mpm_event.so
and uncomment the line:
LoadModule mpm_prefork_module modules/mod_mpm_prefork.so
Note: The above is required, because libphp.so included with the package does not work with mod_mpm_event, but will only work mod_mpm_prefork instead. (FS#39218)
Otherwise you will get the following error:
Apache is running a threaded MPM, but your PHP Module is not compiled to be threadsafe.  You need to recompile PHP.
AH00013: Pre-configuration failed
httpd.service: control process exited, code=exited status=1
As an alternative, you can use mod_proxy_fcgi (see #Using php-fpm and mod_proxy_fcgi below).
To enable PHP, add these lines to /etc/httpd/conf/httpd.conf:
- Place this at the end of the
LoadModulelist:
LoadModule php_module modules/libphp.so
AddHandler php-script .php
- Place this at the end of the
Includelist:
Include conf/extra/php_module.conf
then restart httpd.service.
Using apache2-mpm-worker and mod_fcgid
This method provides improved performance and memory usage when serving multiple requests.
Install mod_fcgidAUR and php-cgi.
Create the needed directory and symlink it for the PHP wrapper:
# mkdir /srv/http/fcgid-bin
# ln -s /usr/bin/php-cgi /srv/http/fcgid-bin/php-fcgid-wrapper
Create /etc/httpd/conf/extra/php-fcgid.conf with the following content:
/etc/httpd/conf/extra/php-fcgid.conf
# Required modules: fcgid_module

<IfModule fcgid_module>
    AddHandler php-fcgid .php
    AddType application/x-httpd-php .php
    Action php-fcgid /fcgid-bin/php-fcgid-wrapper
    ScriptAlias /fcgid-bin/ /srv/http/fcgid-bin/
    SocketPath /var/run/httpd/fcgidsock
    SharememPath /var/run/httpd/fcgid_shm
        # If you don't allow bigger requests many applications may fail (such as WordPress login)
        FcgidMaxRequestLen 536870912
        # Path to php.ini – defaults to /etc/phpX/cgi
        DefaultInitEnv PHPRC=/etc/php/
        # Number of PHP childs that will be launched. Leave undefined to let PHP decide.
        #DefaultInitEnv PHP_FCGI_CHILDREN 3
        # Maximum requests before a process is stopped and a new one is launched
        #DefaultInitEnv PHP_FCGI_MAX_REQUESTS 5000
    <Location /fcgid-bin/>
        SetHandler fcgid-script
        Options +ExecCGI
    </Location>
</IfModule>
Edit /etc/httpd/conf/httpd.conf:
- Uncomment the loading of the actions module:
LoadModule actions_module modules/mod_actions.so
- Load the FCGID module after the loading of the unixd module (on which it is dependent) — you may wish to place this within the
<IfModule unixd_module>block:LoadModule fcgid_module modules/mod_fcgid.so
- Ensure that the inclusion of the MPM configuration is uncommented (it is uncommented in the default installed version of this file):
Include conf/extra/httpd-mpm.conf
- Add an inclusion of your new FCGID configuration:
Include conf/extra/php-fcgid.conf
Restart httpd.service.
Using php-fpm and mod_proxy_fcgi
This method provides «an alternative PHP FastCGI implementation with some additional features (mostly) useful for heavy-loaded sites» [1].
Note: Unlike the widespread setup with ProxyPass, the proxy configuration with SetHandler respects other Apache directives like DirectoryIndex. This ensures a better compatibility with software designed for libphp, mod_fastcgi and mod_fcgid.
If you still want to try ProxyPass, experiment with a line like this:
ProxyPassMatch ^/(.*.php(/.*)?)$ unix:/run/php-fpm/php-fpm.sock|fcgi://localhost/srv/http/$1
Install php-fpm.
Enable proxy modules:
/etc/httpd/conf/httpd.conf
LoadModule proxy_module modules/mod_proxy.so
LoadModule proxy_fcgi_module modules/mod_proxy_fcgi.so
Create /etc/httpd/conf/extra/php-fpm.conf with the following content:
DirectoryIndex index.php index.html
<FilesMatch .php$>
    SetHandler "proxy:unix:/run/php-fpm/php-fpm.sock|fcgi://localhost/"
</FilesMatch>
And include it at the bottom of /etc/httpd/conf/httpd.conf:
Include conf/extra/php-fpm.conf
Note: The pipe between sock and fcgi is not allowed to be surrounded by a space! localhost can be replaced by any string. More here
You can configure PHP-FPM in /etc/php/php-fpm.d/www.conf, but the default setup should work fine.
Start and enable php-fpm.service, then restart httpd.service.
Test whether PHP works
To test whether PHP was correctly configured, create a file called test.php in your Apache DocumentRoot directory (e.g. /srv/http/ or ~<username>/public_html/) with the following contents:
<?php phpinfo(); ?>
Then go to http://localhost/test.php or http://localhost/~<username>/test.php as appropriate.
HTTP/2
Note:
- While Apache supports unencrypted HTTP/2 over TCP (
h2c), common browsers do not. Thus for use with the latter, #TLS must be enabled first. - If supporting clients do not use HTTP/2 instead of HTTP/1.1 and Mozilla’s configuration generator (which already includes the
Protocolsline below) was used to setup #TLS, tryIncludeinghttpd-ssl.confafter the latter’s output. - Ways to test include
curl -sI https://your.websiteor use http indicator (supports both chromium based browsers and firefox based browsers).
To enable HTTP/2 over TLS support, uncomment the following line in httpd.conf:
LoadModule http2_module modules/mod_http2.so
And add the following line:
Protocols h2 http/1.1
To debug, you can set only the module rather than the entire server to debug or info:
<IfModule http2_module>
    LogLevel http2:info
</IfModule>
For more information – including extra HTTP/2 feature settings – see the mod_http2 documentation.
Warning: The http2_module is incompatible with the mpm_prefork_module that old configurations widely use to setup PHP. Consider using php-fpm instead.
Troubleshooting
Apache Status and Logs
See the status of the Apache daemon with systemctl.
Apache logs can be found in /var/log/httpd/
Error: PID file /run/httpd/httpd.pid not readable (yet?) after start
Comment out the unique_id_module line in httpd.conf: #LoadModule unique_id_module modules/mod_unique_id.so
/run/httpd not being created at boot
If systemd-tmpfiles --create as the root user complains about «unsafe path transition», check ownership of your root directory.
ls -la /
chown root:root /
Apache is running a threaded MPM, but your PHP Module is not compiled to be threadsafe.
If when loading php_module the httpd.service fails, you may get an error like this in the journal:
Apache is running a threaded MPM, but your PHP Module is not compiled to be threadsafe. You need to recompile PHP.
This is because PHP includes support for a module that is not threadsafe, and you are trying to use a threaded MPM. One solution to fix this is to use a non-threaded MPM. Try replacing mpm_event_module with mpm_prefork_module:
/etc/httpd/conf/httpd.conf
LoadModule mpm_event_module modules/mod_mpm_event.soLoadModule mpm_prefork_module modules/mod_mpm_prefork.so
and restart httpd.service.
Warning: Some other modules, like the http2_module, will disable themselves when mpm_prefork is active.
AH00534: httpd: Configuration error: No MPM loaded.
You might encounter this error after a recent upgrade. This is only the result of a recent change in httpd.conf that you might not have reproduced in your local configuration. To fix it, uncomment the following line:
/etc/httpd/conf/httpd.conf
LoadModule mpm_prefork_module modules/mod_mpm_prefork.so
and restart httpd.service.
AH00072: make_sock: could not bind to address
This can be caused by multiple things. Most common issue being that something is already listening on a given port, check via ss that this is not happening:
# ss -lnp | grep -e :80 -e :443
If you get any output, stop the given service that’s taking up the port or kill the runaway process that is causing the port to be bound, and try again.
Another issue could be that Apache is not starting as root for some reason — try starting it manually and see if you still get the AH0072 error.
# httpd -k start
Finally, you can also have an error with your configuration and you are listening twice on the given port. Following is an example of a bad configuration that will trigger this issue:
Listen 0.0.0.0:80
Listen [::]:80
AH01071: Got error ‘Primary script unknown’
This can be caused by ProtectHome=true in the php-fpm systemd unit file if you are serving files in /home such as in a virtual host environment. You can disable this feature by editing the php-fpm unit file and restarting php-fpm.service. Alternatively, move your document root.
Changing the max_execution_time in php.ini has no effect
If you changed the max_execution_time in php.ini to a value greater than 30 (seconds), you may still get a 503 Service Unavailable response from Apache after 30 seconds. To solve this, add a ProxyTimeout directive to your http configuration right before the <FilesMatch .php$> block:
/etc/httpd/conf/httpd.conf
ProxyTimeout 300
and restart httpd.service.
PHP-FPM: errors are not being logged separately per virtual host
If you have multiple virtual hosts, it may be desirable to have each of them output their error logs to separate files (using the ErrorLog Apache directive). If this is not working for you, confirm that PHP-FPM is configured to log errors to syslog:
/etc/php/php-fpm.conf
error_log = syslog
It is also possible that the pool configuration is overriding it. Ensure the following line is commented out:
/etc/php/php-fpm.d/www.conf
;php_admin_value[error_log] = /var/log/fpm-php.www.log
See also
- Apache Official Website
- Apache documentation
- Apache wiki
- Apache documentation — Security Tips
- Apache Wiki — Troubleshooting
- Apache on wiki.debian.org