Выполняя несколько задач на своем ПК или ноутбуке, вы можете случайно потерять свои важные данные, такие как изображения, аудио, видео, документы и т.д. Более того, в некоторых ситуациях вы можете случайно удалить файлы и папки безвозвратно, нажав клавиши Shift + Delete на клавиатуре. Следовательно, вам потребуется восстановить безвозвратно удаленные файлы с компьютера.
Важно подчеркнуть, что когда файлы удаляются безвозвратно, не остается возможности восстановить файлы даже из корзины ПК с Windows или ноутбука. Ниже приведены распространенные причины необратимой потери файлов:
- Стирание файлов с помощью клавиш «Shift + Delete»
- Случайное или намеренное опорожнение корзины
- Повреждение файла вызвано вирусной инфекцией или вредоносным ПО, установленным на вашем компьютере
- Удаление любого файла с помощью командной строки
- Удаление любого файла, если включена опция “Не перемещать удаленные файлы в корзину”
Однако, к счастью, безвозвратно удаленные данные и файлы могут быть восстановлены с помощью метода записи. Мы рассмотрим возможные способы восстановления безвозвратно удаленных файлов после очистки корзины.
Как восстановить безвозвратно удаленные файлы Windows 11/10?
Часть 1. Как восстановить безвозвратно удаленные файлы из корзины в Windows (50% успеха)
Чтобы восстановить удаленные файлы на вашем компьютере, вы можете рассмотреть возможность восстановления их из корзины. Однако, прежде чем попробовать этот метод, вы должны знать, что вероятность успеха этого метода не очень высока при удалении файла с помощью комбинаций клавиш Shift + Delete. Просто используйте перечисленные ниже шаги:
Откройте корзину, дважды щелкнув по ее значку.
Найдите удаленные файлы, которые вы хотите восстановить. Чтобы выбрать более одного файла одновременно, используйте клавиши Ctrl и Shift.
Теперь щелкните правой кнопкой мыши на файле, который вы хотите восстановить, и выберите опцию восстановления.
При этом файл будет восстановлен в исходное местоположение. Чтобы проверить, вы можете вернуться в папку, из которой вы удалили файл, и посмотреть, был ли он восстановлен или нет.
Часть 2. Как восстановить безвозвратно удаленные файлы в Windows без ПО (70% успеха)
Ниже мы представили три способа восстановления безвозвратно удаленных файлов, которые не требуют от вас использования какого-либо программного обеспечения. Здесь важно упомянуть, что эти методы работают в 70% случаев, но в исключительных случаях могут дать сбой.
1. Восстановить безвозвратно удаленные файлы из резервной копии
С запуском Windows 10 и 11 была введена новая функция под названием резервное копирование и восстановление. Эта функция уникальна, поскольку позволяет пользователям создавать резервные копии файлов, чтобы восстановить их позже. Чтобы восстановить безвозвратно удаленные файлы с помощью функции резервного копирования и восстановления, убедитесь, что вы включили эту функцию на своем ПК или ноутбуке с Windows.
Подключите внешнее запоминающее устройство, содержащее ваш файл резервной копии.
Откройте панель управления в Windows, перейдите в раздел Система и безопасность и нажмите на опцию Резервное копирование и восстановление (Windows 7).
Здесь вы найдете опцию Восстановить мои файлы; нажмите на нее. Откроется окно мастера восстановления удаленных файлов.
В случае, если опции Восстановить мои файлы нет, нажмите на опцию Выбрать другую резервную копию для восстановления файлов из. Чтобы успешно восстановить удаленные данные, следуйте инструкциям мастера.
Одним из недостатков является то, что все текущие данные в Windows будут заменены данными в файлах резервных копий. Итак, убедитесь, что файлы резервных копий содержат все важные данные, которые вам нужны.
2. Восстановить безвозвратно удаленные файлы в Windows из предыдущей версии
Если вы включили функцию истории файлов на своем ПК с Windows перед удалением файлов, то вы можете использовать эту функцию для восстановления безвозвратно удаленных файлов в Windows 10 без программного обеспечения.
В меню «Пуск» или строке поиска Windows введите «История файлов» и выберите параметр «Настройки истории файлов».
Во всплывающих окнах выберите Восстановить личные файлы на левой панели.
Вы можете переключать кнопки навигации влево и вправо в нижней части окна, чтобы выбрать резервную копию, из которой вы хотите восстановить файлы. При переключении между резервными копиями вы можете просмотреть дату резервного копирования и папки внутри него.
Найдите файл резервной копии и папку, в которой хранились ваши удаленные файлы. Затем нажмите кнопку Восстановить, чтобы восстановить удаленные файлы обратно в их исходное местоположение.
Если ваша система показывает, что в пункте назначения уже есть файл с именем warning, затем нажмите на опцию Заменить файл в пункте назначения, чтобы восстановить безвозвратно удаленные файлы обратно.
Проверьте, вернулись ли удаленные файлы в исходную папку или нет.
3. Восстановить безвозвратно удаленные файлы с помощью командной строки
Последний вариант восстановления безвозвратно удаленных файлов с ПК — это использование функции командной строки. Часто некоторые файлы и папки не могут быть найдены обычным образом, когда вы случайно скрываете их, используя скрытый атрибут для файлов, или когда файл поврежден. В таком случае вы можете рассмотреть возможность использования функции командной строки, выполнив следующие действия:
Запустите меню «Пуск» и введите cmd в строке поиска.
Теперь выберите опцию Запуск от имени администратора.
Введите chkdsk *: /f в окне командной строки. Обязательно замените * буквой вашего жесткого диска и нажмите кнопку Enter.
После завершения введите ATTRIB -H -R -S /S /D D:*.* и замените букву D буквой вашего жесткого диска. Снова нажмите кнопку ввода.
Процесс восстановления файла начнется немедленно после того, как вы успешно выполните описанные выше действия. Теперь вам просто нужно дождаться завершения всего процесса восстановления.
Часть 3. Восстановить безвозвратно удаленные файлы с ПК с помощью ПО для восстановления данных (95% успеха)
Если все вышеупомянутые способы не позволяют восстановить безвозвратно удаленные файлы из Windows 10, то программное обеспечение для восстановления данных вас не подведет. В настоящее время на рынке доступно множество инструментов, которые претендуют на звание лучшего средства восстановления для ПК с Windows и ноутбуков. Однако не используйте какой-либо случайный инструмент, который не гарантирует никакого успеха. Но вы можете положиться на инструмент восстановления данных Tenorshare 4DDiG за его высокую вероятность успеха и удобный интерфейс.
Это профессиональный инструмент восстановления данных Windows, который вы можете использовать для восстановления безвозвратно удаленных файлов на вашем компьютере с Windows. Вы можете легко назвать это универсальным решением для восстановления данных во всех сценариях потери данных. Давайте кратко рассмотрим некоторые из выделенных функций программы для восстановления данных Tenorshare 4DDiG:
- Вы можете восстановить более 1000 типов файлов и форматов, включая видео, изображения, аудио, документы и т.д.
- Вы можете восстановить файлы, потерянные из-за потерянных разделов, вирусного заражения, сбоя систем и так далее.
- Вы можете использовать его для восстановления потерянных данных с внутренних и внешних накопителей, ноутбуков или ПК, SD-карт, USB-флэш-дисков и других устройств.
- Вы можете восстановить файлы и папки после их предварительного просмотра.
Шаги по восстановлению безвозвратно удаленных файлов в Windows с помощью 4DDiG
Это то, что требуется для восстановления безвозвратно удаленных файлов за 3 шага с помощью Tenorshare 4DDiG. Разве этот процесс не быстрый и простой?
Заключение:
Это краткое описание того, как восстановить безвозвратно удаленные файлы с ПК. Следуя любому из методов восстановления, показанных выше, вы легко восстановите безвозвратно удаленные файлы без программ или с помощью профессиональной программы для ПК восстановления данных Tenorshare 4DDiG.
Вам Также Может Понравиться
-
Home>>
- Исправления Windows >>
- Как восстановить безвозвратно удаленные файлы с компьютера?
![]()
Download Article
![]()
Download Article
Did you accidentally delete an irreplaceable file from your Windows 10 PC? It happens to the best of us! Fortunately, there are many safeguards in place that make it easy to recover your files before they are gone forever. This wikiHow article will show you how to undelete files using free tools built into Windows and two other easy data recovery tools.
-

1
Open the Recycle Bin on your PC. Before you panic or try another method, double-check your Recycle Bin to make sure the file isn’t still in there. You’ll usually see the Recycle Bin icon on your desktop, but if you don’t, you can also fine it by pressing the Windows key, typing recycle, and clicking Recycle Bin.
-
2
Browse or search for a file. If your Recycle Bin has a lot of files, it may be helpful to use the search bar at the top-right corner. You can also simply scroll through the files to look for the one you need.
Advertisement
-
3
Right-click a file and choose Restore. This will return the deleted file to the folder from which you deleted it.
- To restore multiple files at once, hold down the Control key as you click each file, then right-click anywhere in the highlighted area and choose Restore.
- You can also restore all deleted files from the Recycle Bin at once by clicking Restore all items at the top of the window.


Advertisement
-
1
Know when to use this method. If you aren’t able to restore a file from the Recycle Bin or find it in your backup, this method can help you regain access to lost files.[1]
- You have to restore the missing files to a drive that is not the same drive the file was deleted from—this means that if you only have one hard drive, you’ll need to connect a USB flash or other external drive to your PC to restore the lost files. If you don’t have another drive to use, you won’t be able to use this method.
- It’s not possible to restore files to or from a cloud storage or networked drive with this method.
-
2
Install Windows File Recovery by Microsoft. This utility might already be installed on some systems, but not all.
- Open the Microsoft Store app from the Windows Start menu.
- Search for Windows File Recovery.
- If you see the option to do so, click Get and follow the on-screen instructions to install.
- If the app is already installed, you’ll see Open instead.
-
3
Open Windows File Recovery. It’s easy—just type windows file recovery into the Windows Search field (press Windows key + S if you don’t see it), and then click Windows File Recovery in the search results. This will open a command prompt window.
- If prompted, give the app permission to make changes to your computer.
-
4
Determine the mode you want to use. There are two different modes for restoring files:
- Regular mode: Use this mode if the file you deleted was from a drive formatted with NTFS and the drive is not corrupted.
-
Extensive mode: Use this mode if the file you deleted was on a drive formatted as FAT or exFAT, which is common for flash cards and other removable media, or the drive is corrupted. This mode will take a little longer.
- If you’re not sure which mode to use, start with Regular mode, and then try Extensive if that doesn’t work.
-
5
Use the winfr command to restore your files. The command will look like this winfr source-drive: destination-drive: /mode /switches file-or-folder. The /n switch lets you specify files and folders to recover. Here are some examples you can use in both regular and extensive modes:
- If you want to recover all files ending with .JPEG from your pictures directory on the C drive to a recovery folder on your F drive, you’d use winfr C: F: /regular /n *UsersyourusernamePictures*.JPEG.
- You can also use /n multiple times to recover files that meet multiple criteria. For example, to recover both JPEG and PNG files from your Pictures folder, you could use winfr C: F: /regular /n UsersyourusernamePictures*.JPEG /n UsersyourusernamePictures*.PNG.
- To recover all files ending with .docx from any location on the original drive, you could use winfr C: F: /regular /n *.docx.
- To recover your entire Documents folder from the C: drive to the F: drive, you’d use winfr C: F: /regular UsersyourusernameDocuments.
- Note the trailing backslash at the end of the folder name—this is necessary when recovering an entire folder.
-
6
Press Y to confirm. Windows File Recovery will now attempt to recover the file(s). If the recovery is successful, the files will be saved to the destination drive in a new folder called «Recovery_(date and time).»
- If you’re unable to recover the files in regular mode, run the same command again replacing /regular with /extensive.
- Some file types are hidden from results by default, including .log, .vbs, .c, .cab, .py, and .lnk. If you are unable to find the type of file you’re looking for, run the recovery again, this time adding the /e switch to disable extended filtering.


Advertisement
-
1
Open the File History tool. If you want to recover a file or folder you’ve accidentally overwritten or replaced with a newer version in your Documents, Music, Pictures, Videos, or Desktop folder, this method will help you get your original file(s) back. To open the tool, press the Windows key on your keyboard, type restore your files, and then click Restore your files with File History.[2]
- This method requires that you’ve enabled File History in your settings. File History works with a network or external drive, so if you don’t have one of those, you don’t have File History enabled.[3]
- If the file you want to recover no longer exists at all, you can restore its containing folder to a previous version that existed before you deleted the file.
- This method requires that you’ve enabled File History in your settings. File History works with a network or external drive, so if you don’t have one of those, you don’t have File History enabled.[3]
-
2
Locate the file or folder you need in the File History tool. All of the files that have earlier versions saved will be visible here. Once you find the file, you’ll be able to browse the dates of previously saved versions.
-
3
Use the arrows to select the version to restore. Be sure to choose a version of the file or folder that existed before you made the change.
-
4
Select a version and click Restore. A confirmation message will appear.
- If you’d rather restore the file or folder to a different location, right-click Restore, choose Restore to, and then click another location.
-
5
Click Restore to confirm. This saves the original version of the file or folder to its original location.


Advertisement
-
1
Install Recuva. Recuva is a free app that will undelete files you accidentally removed from your computer.[4]
You can get the tool from https://www.ccleaner.com/recuva.- The free version of the tool should be enough for recovering most deleted files.
-
2
Open Recuva once installed. You’ll find it in your Windows menu. If prompted, allow the app to make changes to your PC.
- The first time you open Recuva, you may see a warning message about the app being blocked. Click the warning message, select the first option in the list, select the Actions menu, and then click Allow on device to continue.
-
3
Click Next on the wizard. Now you’ll be able to use this quick-scan feature to recover deleted files.
-
4
Select a file type and click Next. If you’re not sure the type of file you’re looking for, choose All Files.
-
5
Select the location the file was deleted from. For example, if you deleted the file from Recycle Bin, choose In the Recycle Bin.
- To enter a specific folder, choose In a specific location, click Browse…, and then select the folder.
-
6
Click Next. Recuva will now attempt to find deleted files.
- You’ll see that there’s a Deep Scan option here. Try the regular scan first. If you are unable to recover your file normally, you can close and re-open Recuva and check the box next to «Enable Deep Scan.» This option will take a long time, and it might not be necessary.
-
7
Click Start. Recuva will now search for shadow copies of deleted files from the selected location. Once the scan is complete, a list of files will appear.
-
8
Select the file(s) you want to recover and click Recover…. This restores the selected file(s) and/or folder(s) to the original location.


Advertisement
-
1
Open the Control Panel. If you back up your PC to another drive, including a networked drive, or another version of Windows that was installed on your PC, you can restore files at any time from earlier backups. To get started, press the Windows key and type control panel, then click Control Panel in the search results.[5]
-
2
Open the Backup and Restore tool. If you don’t see it, click System and Security first.
-
3
Choose which files to restore. If you want to restore one of your own files, select Restore my files. To restore files for another user (or all users), choose Restore all users’ files.
- If you want to restore files from a different backup than the one selected by default, click Select another backup to restore files from, and then locate the backup.
-
4
Select Browse for files or Browse for folders. Choose the option that applies to you based on whether you want to restore individual files or entire folders.
-
5
Search for the file or folder you want to restore. You can type any part of the file or folder name to locate the file or folder, and then click Search.
- You can use wildcards, such as *.jpg, to find all files that match a certain string of text.
-
6
Select the file(s) or folder(s) and click Next.
-
7
Choose where you want to restore the files. To bring them back to their original location, leave the default option selected. Otherwise, you can select In the following location and click Browse to select another folder.
-
8
Click Restore. The selected file(s) and/or folder(s) will be recovered to the chosen directory.


Advertisement
-
1
Install Stellar Data Recovery on your Windows PC. This file recovery app does have a fee, but you can do a free scan before paying to see if the app is capable of restoring the files you need. Search the web for «Stellar Data Recovery» and install the free downloadable version.
-
2
Open Stellar Data Recovery. You’ll find it in your Windows menu after installing.
-
3
Choose what you want to recover and click Next. You can select as many of the different file types as you’d like.
-
4
Select the location from which you deleted the file. You can choose one of the common locations at the top, such as Desktop or Documents, or select Choose Location to select a folder manually.
- If the file was saved to an external drive that’s connected to your computer right now, select that drive.
- If the file was saved to a partition that is no longer accessible, select Can’t Find Drive.
-
5
Click Scan to search for deleted files. Once the scan is complete, you’ll see a list of files and/or folders you can restore.
- If nothing is found, click the link next to «Deep Scan» to try a more in-depth scan.
-
6
Select the file(s) and/or folder(s) and click Recover. If you’re willing to pay for Stellar, you will be asked to do so now. Once you make your payment, you’ll receive a product key via email that you can enter into the provided field. Once validated, you’ll be able to recover the selected file(s), as well as any you need to recover in the future.


Advertisement
Add New Question
-
Question
How can I recover a file that was accidentally overwritten?

Stan Kats is the COO and Chief Technologist for The STG IT Consulting Group in West Hollywood, California. Stan provides comprehensive technology & cybersecurity solutions to businesses through managed IT services, and for individuals through his consumer service business, Stan’s Tech Garage. Stan has over 7 years of cybersecurity experience, holding senior positions in information security at General Motors, AIG, and Aramark over his career. Stan received a BA in International Relations from The University of Southern California.
Cybersecurity Expert
Expert Answer
If you hadn’t turned on file versions in your operating system, and you overwrote a file with the exact same name, then unfortunately it will have been lost irrevocably. Check to see if you made backup copies.

Ask a Question
200 characters left
Include your email address to get a message when this question is answered.
Submit
Advertisement
References
About This Article
Article SummaryX
1. Check the Recycle Bin first.
2. Use Windows File Recovery if you have another drive, including a flash drive.
3. Restore from File History if you make backups.
4. Use the free Recuva tool to find deleted files.
5. Restore from an older backup using Backup and Restore.
6. Try Stellar Data Recovery’s free option to see if files are recoverable.
Did this summary help you?
Thanks to all authors for creating a page that has been read 25,952 times.
Is this article up to date?
Если вам не удается найти файл на компьютере или если вы случайно удалили или изменили его, то вы можете восстановить его из резервной копии (если вы используете программу архивации данных) или попытаться восстановить его предыдущую версию. Предыдущие версии — это копии файлов и папок, которые Windows автоматически сохраняет в составе точки восстановления. Предыдущие версии иногда называют теневыми копиями.
Чтобы восстановить файл из резервной копии, убедитесь, что доступен носитель или диск, на который сохранена резервная копия, а затем выполните указанные ниже действия.
Восстановление файлов из резервной копии
-
Откройте функцию «Резервное копирование и восстановление», нажатием кнопки
«Начните», выберите панель управления,выберите «Система и обслуживание», а затем выберите «Резервное копирование и восстановление». -
Выберите Восстановить мои файлы, а затем следуйте инструкциям в мастере.
 «Начните», выберите панель управления,выберите «Система и обслуживание», а затем выберите «Резервное копирование и восстановление».
Восстановите удаленные файлы и папки или предыдущее состояние файла или папки.
Восстановление удаленного файла или папки
-
Откройте «Компьютер», нажатием кнопки «Начните
«Компьютер» и выберите «Компьютер». -
Найдите папку, в которой хранился нужный файл или папка, щелкните ее правой кнопкой мыши, а затем щелкните «Восстановить прежнюю версию». Если папка была расположена на верхнем уровне диска, например по пути C:, щелкните диск правой кнопкой мыши и выберите Восстановить прежнюю версию.
Вы увидите список доступных предыдущих версий файла или папки. В этот список включаются и файлы, сохраненные при резервном копировании (если вы используете программу архивации данных), и точки восстановления (если доступны оба типа архивации).
Примечание: Чтобы восстановить прежнюю версию файла или папки, включенных в библиотеку, щелкните файл или папку правой кнопкой мыши в расположении, в котором он или она сохранены, а не в библиотеке. Например, чтобы восстановить предыдущую версию рисунка, включенного в библиотеку «Изображения», но сохраненного в папке «Мои рисунки», щелкните папку «Мои рисунки» правой кнопкой мыши, а затем — «Восстановить предыдущую версию».
Предыдущие версии файлов
-
Дважды щелкните предыдущую версию папки с файлом или папкой, которую нужно восстановить. (Например, если файл был удален сегодня, выберите версию папки со вчерашнего дня, которая должна содержать файл.)
-
Перетащите файл или папку, которую вы хотите восстановить, в другое место, например на рабочий стол или в другую папку.
Версия файла или папки будет сохранена в выбранном расположении.
Совет: Если вы не помните точное имя или расположение файла или папки, можно выполнить их поиск, введя часть имени в поле поиска в библиотеке «Документы».
Восстановление файла или папки в предыдущее состояние
-
Щелкните правой кнопкой мыши файл или папки и выберите Восстановить прежнюю версию.
Вы увидите список доступных предыдущих версий файла или папки. В этот список включаются и файлы, сохраненные при резервном копировании (если вы используете программу архивации данных), и точки восстановления (если доступны оба типа архивации).
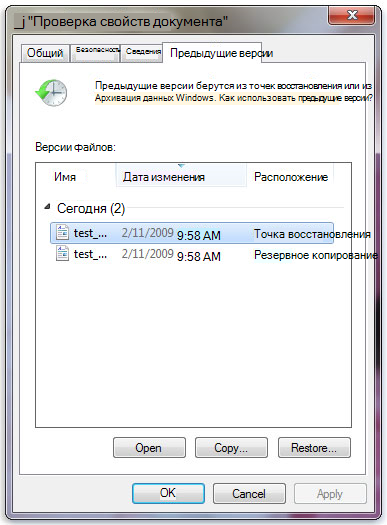
Вкладка «Предыдущие версии», на которой отображены предыдущие версии файлов -
Прежде чем восстанавливать предыдущую версию файла или папки, выберите ее, а затем щелкните Открыть, чтобы убедиться, что это нужная вам версия.
Примечание: Вам не удастся открыть или скопировать предыдущие версии файлов, созданных программой архивации данных, но вы можете восстановить их.
-
Для восстановления предыдущей версии выберите ее, а затем щелкните Восстановить.
Предупреждение: Этот файл или папка заменит текущую версию файла или папки на вашем компьютере, причем замена будет необратимой.
Примечание: Если эта кнопка «Восстановить» недоступна, вам не удастся восстановить предыдущую версию файла или папки в его или ее первоначальном расположении. Возможно, вам удастся открыть или сохранить их в другое расположение.
Нужна дополнительная помощь?
Нужны дополнительные параметры?
Изучите преимущества подписки, просмотрите учебные курсы, узнайте, как защитить свое устройство и т. д.
В сообществах можно задавать вопросы и отвечать на них, отправлять отзывы и консультироваться с экспертами разных профилей.
Найдите решения распространенных проблем или получите помощь от агента поддержки.