Где найти файлы blob в папке steam? Посоветовали удалить их, потому что стим не запускается. А после удаления вроде он должен сам себя восстановить.
Steam
спросил
04 сентября 2020
1 Ответ
Возможно вы имеете в виду файл ClientRegistry.blob. Steam сам создаёт этот файл. Если у вас его нет и Стим не запускается, то:
1. Полностью закройте Стим (обязательно!)
2. С помощью комбинации клавиш Win+R вызовите командную строку и пропишите в неё следующую команду «steam://flushconfig» (без кавычек)
3. Перезагрузите компьютер и заново откройте Стим.
Если это не поможет, то верным решением будет полная переустановка Стима. Для удаления используйте утилиту Steam Cleaner.
![]()
Jarvis
ответил
09 сентября 2020
Друг, помоги остальным игрокам, зайди на страницу вопросы без ответов.
Может именно ты знаешь ответ, который кто-то ждёт.
Many users face a problem where they have a working and stable internet connection available but their Steam client doesn’t register this and prompts that there is no connection available. The reason to this problem varies because of the different software and hardware configurations of individual users. It isn’t right to say that this error is caused by exactly “this” reason. If something fixes this problem on another’s computer, it isn’t necessary it will fix yours too.

That’s why we have listed each and every method which seemed to work. We didn’t miss anything and included even the tiniest bit of detail. Refer to the solutions starting from the first and work your way down. It is advised not to miss any because as you go down, the level of technical difficulty increases.
1. Delete clientregistry.blob
Your Steam’s client registry may get corrupted and this may be the reason why you are facing the error. We can try renaming/deleting it.
Clientregistry.blob is the file used by Steam that holds your registration data of the installed games. If we delete it, the file will be restored on the next login. You will get all of your default settings on each game installed (your name, skins, etc). This fixes about 30% of the problems as this file can get corrupt easily.
Do note that after this solution when you launch Steam again, it will prompt you for your username and password. Don’t follow this solution if you don’t have your credentials at hand. Furthermore, your saved progress and in-game items will not be lost. They are stored on cloud storage by Steam so it is safe to assume that deleting clientregistry.blob won’t bring any problems to you or Steam.
- Completely exit Steam and end all tasks as mentioned in the solution above.
- Browse to your Steam directory. The default one is
C:Program FilesSteam
- Locate ‘ClientRegistry.blob’.

- Rename the file to ‘ClientRegistryOld.blob’ (or you can delete the file completely).
- Restart Steam and allow the file to be recreated.
Hopefully, your Client will run as expected. If it still doesn’t work, follow the steps listed below.
- Browse back to your Steam directory.
- Locate ‘Steamerrorreporter.exe’.

- Run the application and re-launch Steam.
2. Stop all Steam related processes
Sometimes just stopping Steam by ending all processes and starting it again fixes the problem. Sometimes Steam may be conflicting with another issue/software in your computer and may have halted its operations because of it. Because of this, no matter how much you try, it won’t recognize the internet connection. Check if by ending all Steam processes forcefully fixes the problem at hand. If not, move on to the other solutions.
- Launch your Task Manager by pressing ⊞ Win + R button. This should pop-up the Run application.
In the dialogue box write “taskmgr”. This should open up the task manager.
- End all Steam related processes starting from the process ‘Steam Client BootStrapper’.

- Restart Steam using the option Run as administrator.
3. Add a launch option (-tcp) in Steam
Steam originally uses the UDP (User Datagram Protocol) for the transmission of data. We can try changing it to TCP (Transmission Control Protocol). As we all know TCP is more reliable whereas UDP is mostly faster. If we encounter an error, we can try changing protocols to see if the problem at hand gets fixed.
You always have the option to resort back to the default setting by removing the launch option/command line.
- Navigate to your Steam directory. The default Steam directory is listed below. If you installed Steam to another one, you can browse there.
C:Program Files (x86)Steam
- Once in the main Steam folder, locate the file “Steam.exe”. Right-click on it and select Create Shortcut.
- Right-click on the shortcut and select Properties from the drop-down menu.

- In the target dialogue box, write “-tcp” in the end. So the entire line looks like:
“C:Program Files (x86)SteamSteam.exe” –tcp
Please remember to give a space after the default line in the target dialogue box.

- Apply the changes and close the window. Launch Steam using the shortcut and hopefully, it will run as expected.
4. Grant administrator privileges to Steam
Steam requires administrator privileges to perform correctly as it has to sync with various system files and perform read and write operations at high speeds. It also requires a lot of processing power and memory usage. Sometimes, it may be possible that Steam doesn’t work properly because it doesn’t have administrator rights and is stuck somewhere.
We can try setting the whole Steam directory as an administrator and see if the problem gets fixed.
- Open your Steam directory. The default location of it is C:Program Files (x86)Steam. Or if you installed Steam in another directory, you can browse to that directory and you will be good to go.
- Locate a file named “Steam.exe”. This is the main Steam launcher. Right-click on it and select Properties. Select the Compatibility tab from the top of the screen. Here at the bottom of the window, you will see a checkbox stating “Run this program as an administrator”. Make sure it is checked. Save changes and exit.

- Now locate the file named “Steam.exe”. Right-click and select its Properties. Select the Compatibility tab from the top of the screen. Here at the bottom of the window, you will see a checkbox stating “Run this program as an administrator”. Make sure it is checked. Save changes and exit.

- Restart Steam and check if Steam connects to the internet properly.
5. Run Steam in compatibility mode and update Windows
It may be possible that your Steam client may be having trouble with your operating system. It is a well-known fact that Steam always keeps its client and games up to date with the latest updates on all operating systems. It tweaks its client and updates it accordingly.
If you haven’t updated your system recently, you can try running in Steam in compatibility mode for an older version of the operating system. This method is known to work very less but it’s worth a shot. If it doesn’t work, you can try updating your computer through windows updates.
- Navigate to your Steam directory. The default location for your steam folder should be “C:Program Files (x86)Steam”. Press ⊞ Win + R button. This should pop-up the Run application. In the dialogue box write “C:Program Files (x86)Steam”. Or if you installed Steam in another directory, you can browse to that directory and you can proceed with steps mentioned below.
- Locate the file “Steam.exe”. Right-click on it and select Properties from the drop-down menu.
- Choose the “Compatibility” tab and check the box which says “Run this program in compatibility mode for: “.
- In the drop-down box, select Windows 8/Windows 7. It is advised not to use the older versions as most probably, they won’t work. Apply the changes and save.
- Re-launch the Steam client and check if the client is connecting to the internet properly.

- If the client still refuses to connect, follow the steps below to ensure that your machine is up to date with the latest updates.
- Click Start and type in the dialogue box “Settings”. Click the first search result which returns in the search results. Click on the “Update and security” button.

- Here you will find “Check for updates” in the “Windows Update” tab. Now windows will check for any available updates and perform them after downloading.

- Launch Steam again and check if it connects to the internet or not.
6. Change language of the Steam client
This is a bug that doesn’t allow Steam to connect to the internet. You can change your language to any other and try to log in using your credentials. If Steam connects, you can revert back to the language set earlier; otherwise, you can revert back and follow more solutions listed below.
There are two methods for changing the language of Steam. You can change the language if Steam is opening in offline mode, or you can change it using a command-line parameter like the one we used before.
Changing through client
- Launch your Steam client (it will be in offline mode). Click on Steam present on the top left side of the screen and select Settings from the drop-down menu.
- Navigate to the tab named Interface (present on the left side). Now you will be able to a line which says “Select the language you wish Steam to use (requires Steam to restart)”. It will be followed by a drop-down box. Click it and select any language.

- Save changes and restart Steam. Check if it connects to the internet.
Changing through the command line
- Navigate to your Steam directory. The default Steam directory is “C:Program Files (x86)Steam”. If you installed Steam to another one, you can browse there.
- Once in the main Steam folder, locate the file “Steam.exe”. Right-click on it and select Create Shortcut.
- Right-click on the shortcut and select Properties from the drop-down menu.

- In the target dialogue box, write “-language german” in the end. So the entire line looks like:
“C:Program Files (x86)SteamSteam.exe” –language german
(Sometimes you have to write “de” in the place of German or “it” in the place of Italian. You can check these short names through the internet”).
Please remember to give a space after the default line in the target dialogue box.
- Apply the changes and close the window. Launch Steam using the shortcut and hopefully, it will run as expected.
7. Flush Steam config files and DNS
We can try resetting your internet settings and config to see if the problem gets resolved. Flushconfig flushes and reloads the configurations for each of the applications/games installed on your PC.
Most operating systems are designed to cache the DNS records. It is generally a good practice as it allows an application to process faster requests/data transfer to a website. However, if the DNS frequently changed, it is necessary to flush it so the new DNS can be retrieved and you can resume the data transfer you were doing. It removes the local cache from your computer and obtains the most recent cache that your Internet Service Provider is using.
- Press Windows + R to bring up the Run application.
- In the dialogue box type “steam://flushconfig”.
- Steam will pop up a small window to confirm your action. Press Ok. No note that after this action, Steam will ask you to log in again using your credentials. Don’t follow this method if you don’t have access to your login details.

- After performing the above actions, press Windows + R button to pop up the Run window again. In the dialogue box type “cmd” to bring up the command prompt.
- Once in the command prompt, type “ipconfig /flushdns”. Press Enter.

- Restart your PC and re-launch Steam to see if the problem is resolved.
8. Restart your router manually
It can be possible that your internet router may be saved in the wrong configuration. Or any recent settings may have caused it not to work properly. Of course, you should try to restart the router first and check, but, if that doesn’t work, we can try resetting the router (hard-reset) manually and see if it improves our situation.
- Pick up your router and turn it back so all the ports are in front of you.
- Look for any button named “reset” on its back. Most routers don’t have buttons so you don’t accidentally reset it to factory defaults, instead, you have to use something thin like a pin to press inwards towards the hole which says “reset”.

- Reset your router and connect your computer again to the WiFi network. Launch Steam again and check if the problem gets fixed.
Note: It is worth noting that after you manually reset your router, your router won’t have any SSID (password) and the name of your WiFi will be set to default (something like TPlink121). Furthermore, any internet settings that your internet provider has set on it will be removed. Do not perform this method unless you know those settings or your router works as a plug and play. It can be a real pain to call up the provider and ask them to guide how to make the internet working again so always keep this factor in mind. All the connected devices will be disconnected and you will have to re-connect all the devices one by one again.
9. Reset settings of your router through the web page
There is also an option to reset your router settings through the web page using your default gateway IP address. You can use this method if solution 8 is proving troublesome for you due to any reason. Once again, the note written above applies to this solution too so it’s best to keep all of those things in mind.
- Open your web browser and type in the IP address of the router (if you don’t know this, it will most probably be written on the back of your router or in its box/manual). It will look something like 192.168.1.1

- Press enter. Now the router will ask you for the username and password before it allows you access. The default ones are admin/admin. If this isn’t working and you don’t remember the credentials, you can always contact your internet provider and ask them.
- Click on the Tools tab on the top and the System Commands on the left.
- Here you will be seeing a button named Restore. Click it. You will be disconnected with your router and it will resort back to factory settings.

Note: Do note that the menu configuration may be different for each router. You can easily type in your model number in Google and see how to reset the router (if you are unable to reach the factory reset button yourself).
- After connecting back to the internet, launch Steam again, and check if it is registering the internet connection or not.
10. Disable beta programs
There is a case where your beta participation may cause Steam to act unusual/out of order. Using beta participation, you gain game content before they are released. The content is rather unstable and the developer launches frequent updates from time to time addressing the bugs. There is no harm in disabling beta participation. The beta content will be gone along with the content that was stored about your progress according to it. Follow the steps listed below:
- Press Windows + R button to open the Run application. In the dialogue box type “taskmgr”. This is a command to bring up the Task Manager irrespective of the version of windows you are using.
- Search for different Steam processes that are running and close them one by one. Don’t leave any behind. This ensures that the changes we make stay concrete and get saved so when we launch the client again, it doesn’t display any errors.
- Also, close all third party applications, refresh your screen, and proceed with the next step to opt-out of Steam beta.
- What opting out of beta actually means is opting out of updates until they are officially launched. There are both pros and cons of the beta phase. You get to try the new changes before they are released a few months later; on the other hand, the updates may still be buggy and cause you unexpected problems. In this case, Steam is misbehaving and not connecting to the internet. Open your Steam client and in the upper left corner you will see an option named “Steam”. Click it and navigate to settings.

- When you are in the settings, click the very tab named “Account”. Here you will see an option named “Beta participation”. We have to make sure that your client isn’t part of any beta phase. Click the option and you will see a drop-down window allowing you to select your option.

- Select the option which says “NONE- Opt out of all beta programs”. Close Steam and open task manager to end all the Steam processes. Restart your computer and open Steam again. If your client was part of a beta program, it will install some updates before you can play your games again.
- If you face any problem while opting out of beta you can browse to your directory and delete the beta files from there. The default location for your steam folder should be “C:Program Files (x86)Steam”.
Press ⊞ Win + R button. This should pop-up the Run application.
In the dialogue box write the following:
C:Program Files (x86)Steam
Or if you installed Steam in another directory, you can browse to that directory and you can proceed with steps mentioned below.
- Browse to a folder named “Packages” and delete all the files that start with beta. Close the window and after starting the client again, follow the method on how to opt-out beta mentioned in step number 4.
- Restart Steam and check if Steam goes online after recognizing that there is an internet connection available.
11. Start Steam in Safe mode with Networking
Another thing we can try is starting Steam in Safe mode with Networking. Safe mode is used in helping diagnose the problem. If Steam connects to the internet using this method, it means that a third party application is conflicting with your client.
Starting anything in safe mode doesn’t pose any kind of thread and it is used worldwide to fix various problems. You don’t have to worry about anything.
- Get your computer to safe mode by selecting from various different options available. Select ‘Enable Safe Mode with Networking’. You can learn how to get your PC to safe mode from here. If you are running Windows 7, press F8 upon the startup of your PC and you will be directed to a similar window where you can select the required option.

- Open Steam and try connecting it to the internet and logging in. If this is successful, it means that your antivirus or firewall/third party program may be the issue. You can browse the solutions below where we have explained how to remove/configure these applications step by step.
12. Clear your download cache
Clearing your Steam download cache can fix problems that may result in a not responding/connecting client. This process won’t affect your current games. You would only have to re-login. Don’t use this solution if you don’t have your correct login credentials at hand.
- Open your Steam client and navigate to Settings. This is located in the top left menu.
- Locate Downloads in the Settings panel.
- Click Clear Download Cache. Click OK to confirm your choice and after a while, Steam will ask for your login credentials.

- After logging in again, Steam will start as expected.
If the downloads are smooth on another network, it means there is a problem with your ISP. You have to contact the customer representative and tell him about your specific problem. You can also try disconnecting other devices on your network and restart the internet modem. You should also check if there is any conflict with your antivirus or Windows defender. Sometimes, the extensions present in Chrome also create problems.
13. Scan for malware
There can be malware present on your PC which may be giving you connectivity. Although you can scan for malware using different antivirus programs, you can also use malwarebytes. Please note that we only link other websites to help our users. We won’t be responsible to for any risks involved using that software whatsoever.
14. Disable Firewall/Antivirus
It is a very common fact that your firewall and antivirus software conflicts with Steam. Steam has a lot of processes going on at once to ensure that your gaming experience is nothing but the best. However, many antivirus software marks these processes as potential threats and quarantine them resulting in some processes/applications not working. We have put together a guide on how to put steam as an exception in antivirus. Follow the steps here.
For disabling the Windows Firewall, follow the steps listed below.
- Press Windows + R button to bring up the Run application. In the dialogue box type “control”. This will open your computer’s control panel in front of you.
- On the top right there will be a dialogue box to search. Write Firewall and click on the first option that comes as a result.

- Now on the left side, click the option which says “Turn Windows Firewall on or off”. Through this, you can turn your firewall off easily.

- Select the option of “Turn off Windows Firewall” on both the tabs, Public and Private Networks. Save changes and exit. Restart Steam and launch it using the option Run as administrator.

15. Disable Proxy settings
Having a proxy active on your computer can cause Steam not to connect to the internet properly. A proxy induces a tunnel through which your internet data flow. While sometimes it may work, many times Steam produces an error. We can disable your proxy settings and check if Steam connects to the internet or not.
First of all, make sure that suspicious search engines are uninstalled and there are no “extra” programs present on your PC.
1. Chrome
- Open Chrome browser and click on the Chrome menu (top right) upon opening.
- After the drop-down comes, click on Settings.

- Once the Settings page is opened, type “proxy” in the search dialogue bar present on the top.
- From search results, select the result which says “open proxy settings”.
- When the settings are opened, click on “LAN Settings” in the Connections tab, present in the bottom.

- Uncheck the line which says “Automatically detect settings”. And also uncheck the line which says “Use a proxy server for your LAN”. Save changes and exit. Restart Steam.

2. Through Network Settings
- Press Windows + R button to bring up the Run application.
- In the dialogue box, type “inetcpl.cpl”.
- Internet properties will open. Navigate to the Connections tab and click on LAN settings.
- Once in the LAN settings, uncheck the line which says “Automatically detect settings”. And also uncheck the line which says “Use a proxy server for your LAN”. Save changes and exit to re-launch Steam.
16. Editing your registry to set offline value to 0
We can check if the offline value in your computer is set to 0. If it is set to 1, it means that no matter how hard you try or how many methods you test, Steam will never connect to the internet.
Please follow the steps very carefully as any carelessness while editing registries can cause a lot of damage to your computer and may render it unusable.
- Press Windows + R button to launch the Run application. In the dialogue box, type “regedit”. Press Enter.
- Navigate to HKEY_CURRENT_USER using the menu’s present on the left side of the window. Then search for a folder of Software. Once you open it, search for Valve.

- Once in Valve, click the folder Steam and on the right side, all the registries will show up.
- Right-click on “offline” and click modify. Set it to 0 (if it is set as 1). Save changes and exit.
- Restart Steam and check if it is connecting to the internet. It is advised that you restart your computer after modifying the registry.
17. Refreshing Steam files
If the error still persists at this stage, we have no choice but to refresh Steam files. Refreshing Steam files will reinstall Steam on your computer again. We will delete some of the configuration folders to ensure that they get renewed upon the installation and all the bad files get removed.
Please note that any interruption during the copy process will corrupt the files and you will have to re-download the entire content over again. Only proceed with this solution if you are sure that your computer won’t be interrupted.
- Navigate to your Steam directory. The default location for your directory is
C:/Program Files (x86)/Steam.
- Locate the following files and folders:
Userdata (folder)
Steam.exe (Application)
Steamapps (folder- only preserve the files of other games in it)
The userdata folder contains all the data of your gameplay. We don’t need to delete it. Furthermore, inside Steamapps, you will have to search for the game that is giving you a problem and only delete that folder. The other files located contain the installation and game files of other games you have installed.
However, if there all the games are giving you problems, we suggest that you skip deleting Steamapps folder and proceed with the following step.

- Delete all other files/folders (except the ones mentioned above) and restart your computer.
- Re-launch Steam using administrator privileges and hopefully, it will start updating itself. After the update is complete, it will run as expected.
Even after resorting to all these methods, the problem doesn’t get fixed, it means there is a problem with your ISP and you should contact your internet provider.
 A brief guide on how to restore Steam missing downloaded files:
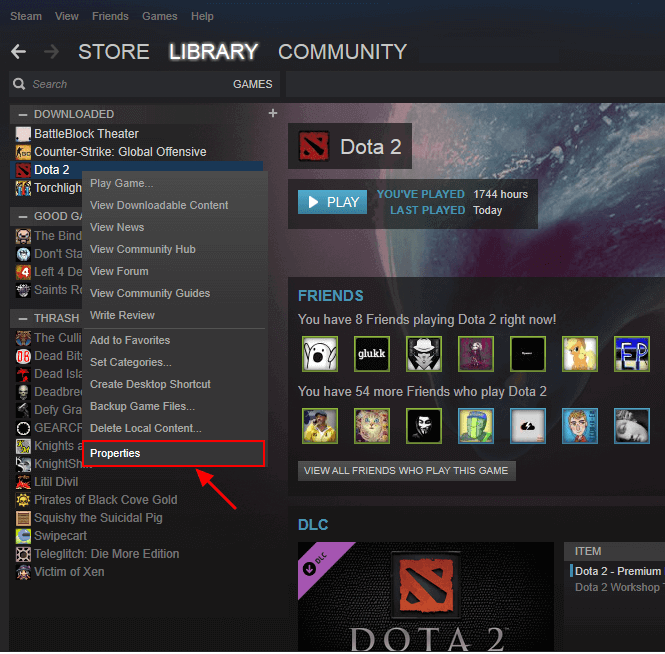
Open Steam and click on the Library button at the top of the window. Right-click on the game that doesn’t run, and click on Properties. Click on Local Files, then click on Verify the integrity of the game cache. Re-try running/updating the game with the issue.
The following table displays the outlines of all the effective methods on how to restore missing downloaded files Steam. Go to each part to check details.
| Workable Solutions | Step-by-step Troubleshooting |
|---|---|
| Fix 1. Restore from Steam library | Open the Steam game player and go to Library. Find the lost game name and select «Properties»…Full steps |
| Fix 2. Add installation libraries | Launch Steam. Go to «Steam» > «Settings» > «Downloads»> Click «Steam Library Folder»…Full steps |
| Fix 3. Rename ClientRegistry.blob | Open your Steam installation folder and selecting «Open file location». Locate the ClientRegistry.blob file…Full steps |
| Fix 4. Restore lost game files | Find Steam game files on PC, and then recover lost steam game files (including game videos, screenshots)…Full steps |
| Fix 5. Remove content and reinstall | Remove local content on Steam by going to Steam Library > right-click it and select «Delete Local Content»…Full steps |
Steam Games have gained a high reputation for that this powerful platform has brought so many wonderful games to worldwide game players. Windows users may carelessly delete or removed Steam game files or installing patches from their computers under Windows 10/8/7 etc.
Fortunately, you can follow multiple Steam Game file recovery solutions provided by the Steam support team, experienced YouTubers, and EaseUS software here to bring all your lost Steam games back immediately.

Steam Game Files Lost Problems
Q 1. Steam doesn’t recognize my games, help.
«It seems that the Steam stops working after I upgrade the computer system into Windows 10. It’s located in D: drive, but it just cannot recognize my game files, what can I do?»
Q 2. Steam games appeared uninstalled, how do I get Steam to locate my games?
«Steam seems to lose the track of my installed games on my computer. I opened Steam but the game itself appears grayed out and I’ve checked that it’s right there. How to make Steam to find my game files again? Do I need to download and reinstall the game again?»
Q 3. How do I restore deleted Steam game files?
«It seems that I lost my game files on Steam after a reboot of my computer. I tried to play the Dota 2 on Steam, it warned me that no game files were found. I don’t know where to find the game files? Any solutions?»
You need to calm down when the Steam stops working or cannot read your Game files on your computer. And here below are detailed solutions for you to apply to recover lost Steam game files again.
Solutions for Lost Steam Games Recovery
The solutions towards different Steam games lost issues are varied. You need to be careful to choose the right solution to bring lost games back on your Steam.
Method 1. Restore Lost Games from Steam Library
Applies to: Resolve Steam games shows greyed out or not recognizable issue.
Provider by: YouTubers, Steam game players
If Steam stops you from playing games, warning you that no files were found, or Steam games greyed out in Steam LIBRARY, you may follow steps below to verify game files and make your games playable again:
Step 1. Open up Steam game player on your device and go to Library.
Step 2. Find the lost game name on the left panel, such as Dota 2, right-click on it and select «Properties».
Step 3. On the Properties window, click «LOCAL FILES» and select «VERIFY INTEGRITY OF GAME FILES…».
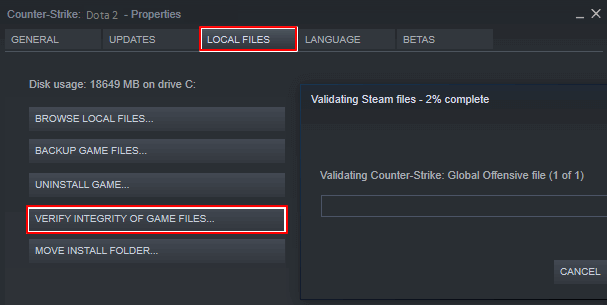
Wait for the verifying process to finish, then you can open your beloved game and play it on Steam again.
Method 2. Add Installation Libraries/Folders to Steam and Make Game Playable
Applies to: Steam games appear uninstalled when Steam no longer recognizes the installation files.
Provided by: Steam support team, Steam game players.
As long as the game folders are still in the right location, when you try to launch a game, Steam will redownload the game for you. You can follow the below path to check if the game folders are in the proper location on your PC:
C:Program Files (x86)SteamSteamappsCommon
If the game folder is in the Steam file location, you can relaunch the game to redownload it on your Steam. Or you can follow the steps below to add alternative installation libraries or folders to Steam:
Step 1.Launch Steam and go to Steam > Settings > Downloads > Click «Steam Library Folder».
This will open all your current Steam Library folders.
Step 2. Click «Add Library Folder» to select the folder with your installed games.
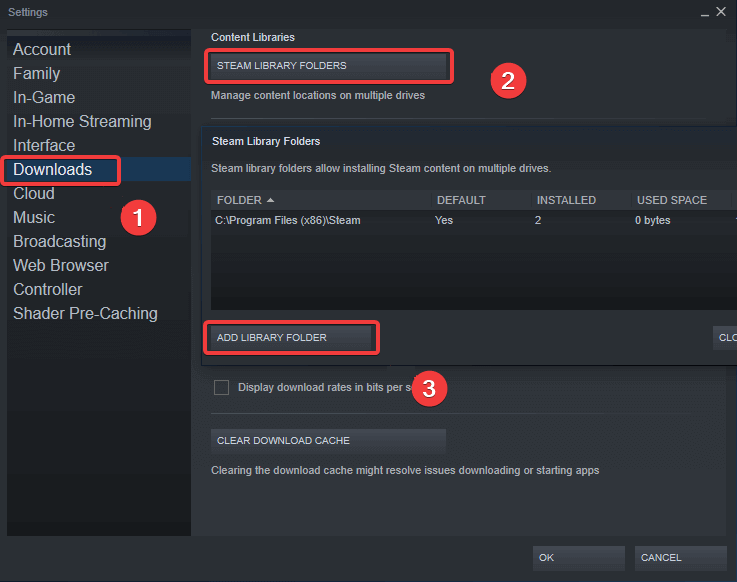
Wait for the adding process to finish, your installed games that appeared uninstalled will show up in your Steam Library. And you can play games again.
If this doesn’t work, try the following tips provided by a Steam player to make Steam game show up in Steam again:
Step 1.Move everything from the original steam folder to a new folder, rename the original (empty) parent folder into a library folder.
Step 2.Move everything from the new folder back to the library folder and restart the client.
Step 3.Start Steam, go to Steam > Settings > Downloads > Steam Library Folders.
Step 4.Click «Add Library Folder» and select the newly renamed library folder.
Wait for the process to finish, your disappeared games would show up again.
Method 3. Rename the ClientRegistry.blob File to Restore Missing Steam Games
Applies to: Restore missing Steam game files that cause Steam games lost.
Provided by: Geeks, Steam game players.
The ClientRegistry.blob file contains information related to your steam installation and game installations. Once you reset the file, Steam will reset various settings to default, making missing games show up in Steam and work again.
Step 1. Open your Steam installation folder by right-clicking on the Steam shortcut on your Desktop and selecting «Open file location».
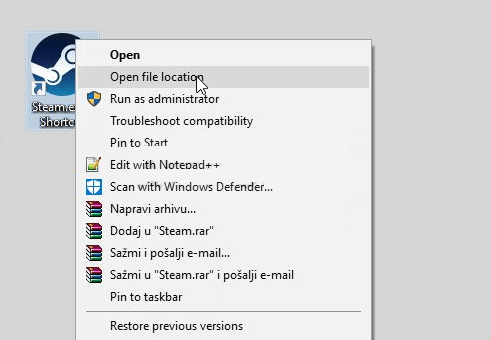
Step 2. Locate the ClientRegistry.blob file in the Steam folder, right-click on it and select «Rename».
Step 3. Change the ClientRegistry.blob to ClientRegistry.old.blob and confirm the changes.
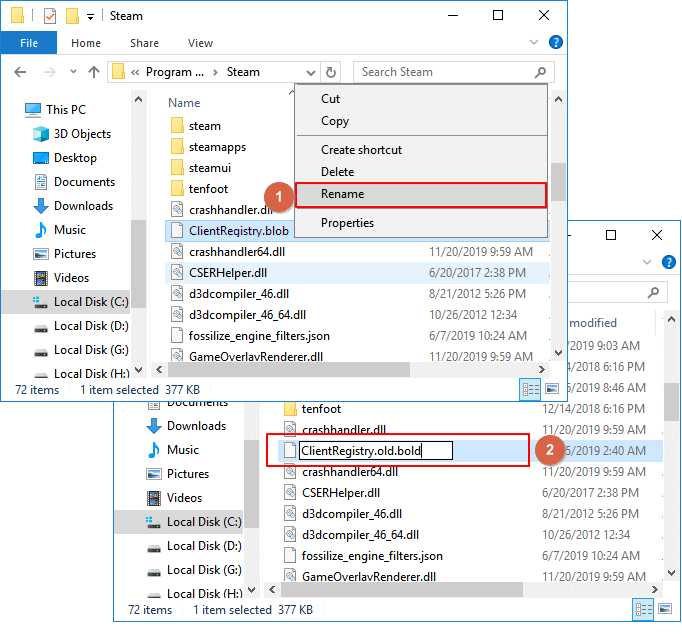
Step 4. Restart your Steam client and check if your games are back.
Method 4. Restore Lost Steam Game Files — Recordings & Screenshots
Applies to: Restore lost or missing Steam game files, such as game installation files, or recordings, screenshots.
Provided by: Geeks, EaseUS software.
Usually, when Steam fails to read or recognize your game files, there might be something wrong with the files in the Steam file location. You may manually check the location of the Steam game files to find out whether those game files are there or apply EaseUS file recovery to fully scan and restore all lost game files.
# 1. Find Steam Game Files on PC
Where to find the Steam game files in PC? Here is the location that you can follow to check if the game files are there:
C:SteamUserdata55230Remote
C is the DriveLetter of the volume where Steam is installed onto.
Steam is the directory where Steam is installed into.
55230 is just the number Steam has assigned to your account.
If the files were not there, you may need to re-download the game files or follow the next tip to recover the lost Steam game files.
# 2. Recover Lost Steam Game Files (Including Game Videos, Screenshots)
Reliable file recovery software like EaseUS Data Recovery Wizard can find the lost Steam game files, including game videos, screenshot on your PC by fully scanning your computer hard drive.
You can try EaseUS Data Recovery Wizard to scan and restore lost Steam game files in 3 steps. All Windows systems including Windows 10 are supported.
Note: To guarantee a high data recovery chance, install EaseUS data recovery software on another disk instead of the original disk where you lost files.
Step 1. Launch EaseUS Data Recovery Wizard on your Windows 11, Windows 10, Windows 8, or Windows 7 computer. Select the disk partition or storage location where you lost data and click «Scan».

Step 2. This recovery software will start scanning the disk to find all lost and deleted files. When the scan process completes, click «Filter» > «Type» to specify lost file types.

Step 3. Preview and restore lost Windows files. You can double-click to preview the scanned files. Then, select the target data and click the «Recover» button to save them to another safe spot in the PC or an external storage device.

You can choose a safe location to save found Steam game files and then move the found game files back to the original Steam Game file location. After this, you can restart the Steam client to make your games playable again.
# 5. Remove Local Content and Reinstall Lost Steam Games
If you’ve tried or found lost Steam Game files, but it turned out that it still fails to work. You can try to remove the local content and reinstall the game on Steam:
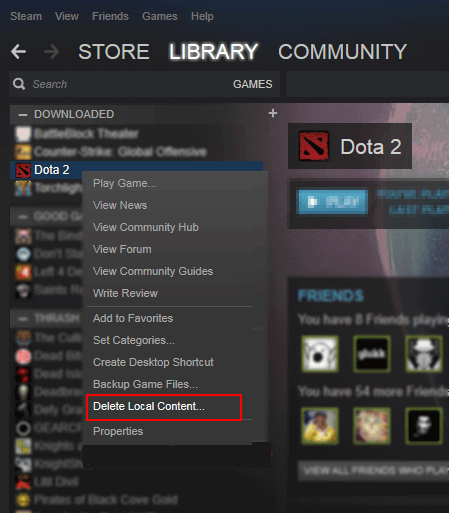
Step 1.Remove local content on Steam
On Steam Library > Right-click it and select «Delete Local Content».
Step 2.Reinstall beloved Steam games
Locate greyed out games in Steam LIBRARY, right-click on a specific game and select «Install».
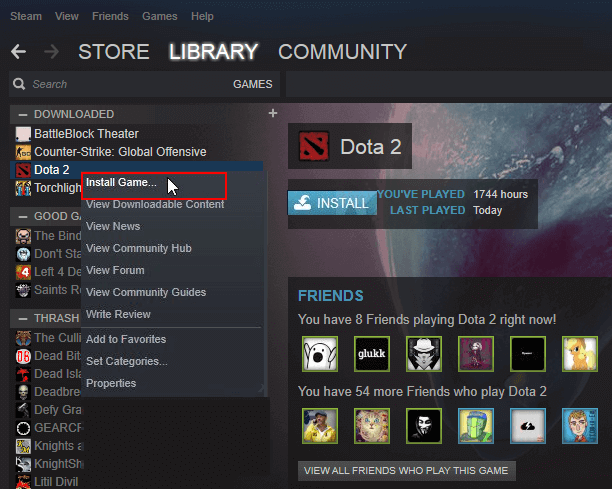
Repeat the process until you have all the desired games installed. You can restart the Steam client to play games on your PC again.
Bonus Tips: Back Up and Restore Steam Games
Besides knowing remarkably efficient ways for lost Steam games recovery, you should also acquire reliable ways for backing up Steam games.
You can always survive whenever you lost Steam games or local saved game files including recordings, screenshots, etc. on your computer. Two reliable tips will help you fully back up Steam games and related game files on your own. Let’s see the details:
# 1. Manually Back Up Steam Games
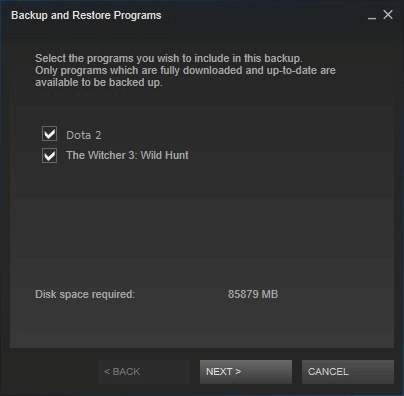
Step 1.Launch Steam on your PC, and go to the LIBRARY > Right-click on downloaded games that you want to back up and select «Backup Game Files…».
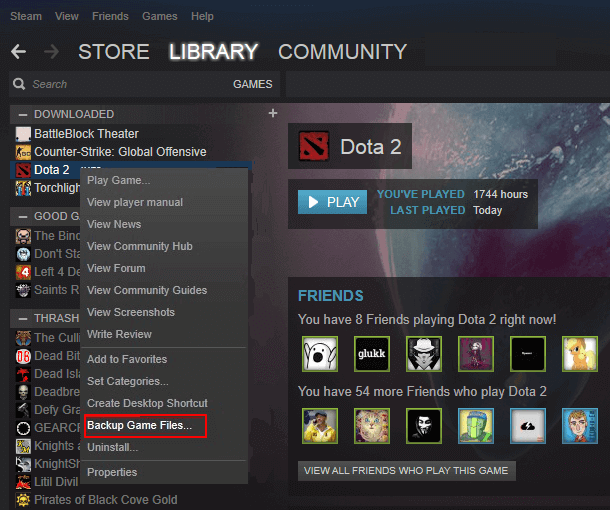
Step 2.Check the box in front of the games that you wish to backup, and click «Next» to continue.
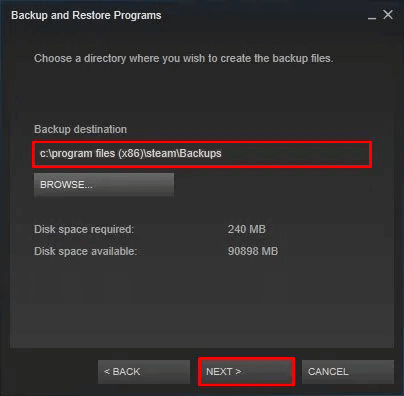
Step 3.Select the location to save your Steam games backup and click «Next» to continue.
Usually, the default backup location is C:/programs files (x86)/steam/Backups/. If you want to specify another location for saving the games, click «Browse» to choose a new location.
Step 4. You can rename the backup files or keep the default generated name, and click «Next» to continue.
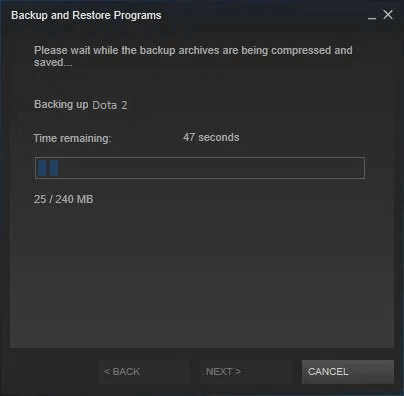
Wait until the backup operation finishes. The backup speed is based on the size of your selected games.
When you need to restore the Steam backups of your favored games, you can simply go to Steam > Backup and Restore Games and follow the onscreen guidelines to finish the backup recovery process.
# 2. Back Up Local Saved Steam Game Files
Don’t forget to back up your saved files of Steam games on your local drive. To do so, you should first learn what files need to be backed up on your PC?
First. Find Game Files Location for Backup
- Game folders: C:Program FilesSteamSteamAppscommon(including the below listed folders)
- /cfg/ — Custom configurations and configuration scripts
- /downloads/ — Custom content for multiplayer games
- /maps/ — Custom maps which have been installed or downloaded during multiplayer games
- /materials/ — Custom textures and skins
- /SAVE/ — Single-player saved games
- Game recordings and screenshots in My Documents, Videos, Pictures, etc. (You should make sure the exact location where you saved all your games’ recordings and screenshots.)
Next. Back Up Game Files
You need now specify another secure drive or an external hard drive to continue the backup process.
After this, you can manually copy each folder one by one the target device or use reliable file backup software such as EaseUS Todo Backup to fully backup all files at one time.
This backup software enables you to selectively back up all desired files in only 3 steps:
Step 1. Click the «Select backup contents» button to start backup.

Step 2. There are four data backup categories, File, Disk, OS, and Mail, click File.

Step 3. Both local and network files will be listed on the left. You can expand the directory to select the files to be backed up.

Step 4. Follow the on-screen guide, select the destination where you want to save the backup.

Click «Options» to encrypt the backup with password in «Backup Options«, set the backup schedule and choose to start back up at certain event in «Backup Scheme«. There are also many other options you can explore, customize the backup task according to your need.

Step 5. You can store the backup to local drive, EaseUS’s cloud service, and NAS.

Step 6. EaseUS Todo Backup enables users to back up data to both third-party cloud drive and its own cloud drive.
If you want to back up data to third-party cloud drive, choose Local Drive, scroll down to add Cloud Device, add and login your account.

You can also choose EaseUS’s own cloud drive. Click EaseUS Cloud, sign up with your EaseUS Account and log in.

Step 7. Click «Backup Now» to start backup. After the backup task is completed, it will be displayed in the form of a card on the left side of the panel. Right-click the backup task to further manage it.

Решаем распространенную проблему.
Ошибка синхронизации файлов Steam Cloud может случаться по нескольким причинам. Основной причиной могут быть поврежденные файлы или проблемы с серверами. Здесь мы собрали несколько советов, которые помогут вам исправить эту ошибку.

Иногда серверы Стима могут падать из-за большой нагрузки или других проблем. В это время вы можете испытывать проблемы с синхронизацией файлов. Посмотреть состояние серверов Steam можно здесь.
Если с серверами все в порядке, попробуйте воспользоваться следующими советами.
Удалите папку Userdata
Папка userdata содержит информацию о вашем аккаунте. Иногда ее файлы повреждаются и вы сталкиваетесь с проблемой синхронизации файлов Steam Cloud. Вот как это исправить:
- Закройте Стим через Диспетчер задач;
- Найдите папку userdata по пути C:Program Files (x86)Steamuserdata (если Стим у вас установлен в другую папку, найдите самостоятельно);
- Удалите папку и запустите Steam, чтобы проверить исправилась ли проблема.
Обновите файлы Steam
Обновление файлов Steam поможет удалить все поврежденные файлы. Эти файлы автоматически заменятся на свои неповрежденные версии. Это должно решить проблему с их синхронизацией. Вот как это сделать:
- Закройте Стим через Диспетчер задач;
- Найдите папку по пути C:Program Files (x86)Steam (если Стим у вас установлен в другую папку, найдите самостоятельно);
- Удалите все папки внутри, кроме папки steamapps или steam.exe.old;
- Перезапустите компьютер и откройте Steam, чтобы проверить исправилась ли проблема.
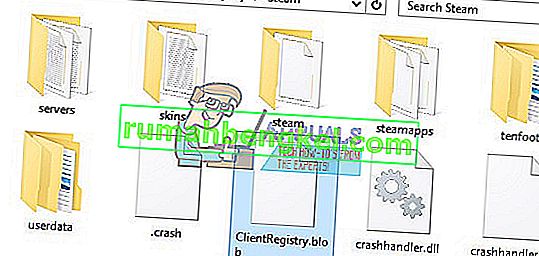
Избавьтесь от файла ClientRegistry.blob
Файл ClientRegistry.blob обычно хранит ваши предпочтительные настройки и настройки ваших игр. Время от времени он может повреждаться и нарушать синхронизацию файлов. В этом случае лучше всего просто удалить этот файл. Вот как это сделать:
- Закройте Стим через Диспетчер задач;
- Найдите папку ClientRegistry.blob по пути C:Program Files (x86)SteamClientRegistry.blob (если Стим у вас установлен в другую папку, найдите самостоятельно);
- Удалите эту папку;
- Перезапустите компьютер и откройте Steam, чтобы проверить исправилась ли проблема.
Временно отключите антивирус или добавьте Steam в исключения
Антивирус или файервол могут спутать Steam с вредоносной программой, выгружающей в облако ваши файлы. Попробуйте отключить антивирус или добавить Steam в его исключения.
Проверьте целостность файлов игр
Иногда файлы ваших игр могут повреждаться в процессе обновлений или выгрузки в Steam Cloud. В результате, Стим не дает вам синхронизировать поврежденные файлы. Чтобы проверить ваши игры на целостность файлов, сделайте следующие шаги:
- Откройте Steam;
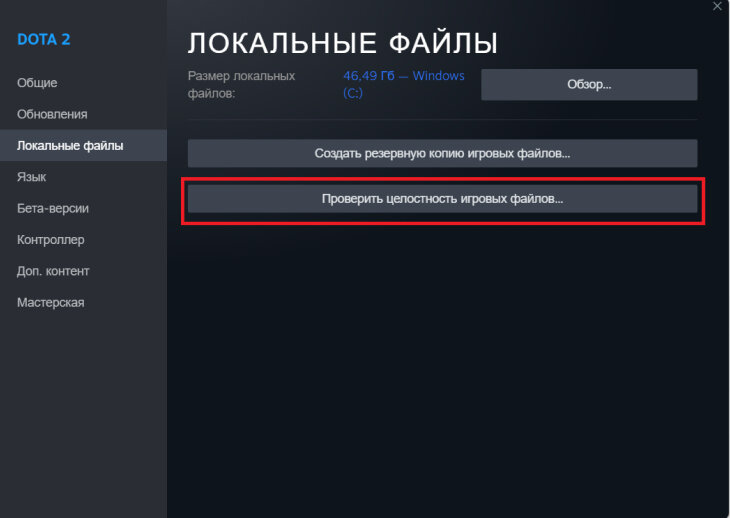
- Выберите игру, файлы которой не синхронизируются;
- Нажмите «Свойства», затем «Локальные файлы»;
- Нажмите на кнопку «Проверить целостность игровых файлов».
В процессе проверки поврежденные файлы автоматически заменятся на целые.
***
Комната ожидания патча 7.33
У Dreamleague – почти идеальный формат. Такой нужен в LCQ и групповом Инта
Саппорт EG убил больше 20 (!) курьеров за одну карту! Это абсолютный рекорд
Многие пользователи удаляли или переименовывали файл ClientRegistry.blob, чтобы обновить файлы Steam и исправить определенные проблемы, связанные с запуском клиента, а также проблемы с подключением, которые возникают, как только пользователь вводит свои учетные данные. Это был один из многочисленных методов, используемых для исправления определенных проблем, связанных с клиентом Steam, и долгое время он был успешным. Однако некоторые пользователи жаловались, что файл больше не существует в некоторых их установках, особенно в отношении тех людей, которые только недавно установили Steam на один из своих компьютеров.
Многие люди сообщают, что изменение файла просто больше ничего не решает, а некоторые люди сообщают, что файл отсутствует в их каталогах Steam, что заставляет их думать, что отсутствие этого файла вызывает сбой в работе их клиента. Сам файл находился в папке каталога Steam вне каких-либо подпапок. Люди либо удаляли файл, либо переименовывали его во что-то другое. Затем они выходили из Steam, убивали все его процессы и снова открывали Steam. Затем Steam создавал новый файл в том же каталоге с теми же данными, который использовался для решения около 25% всех проблем, связанных со Steam. Сам файл представляет собой своего рода двоичный кеш, используемый для хранения определенных настроек и предпочтений.
Однако несколько лет назад пользователи Steam начали замечать, что файл в папке Steam устарел, и его удаление или удаление не повлекло бы за собой изменений в клиенте. Кроме того, люди, которые только недавно присоединились к Steam, вообще не заметили этот файл, и можно с уверенностью заключить, что Steam больше не использует файл для каких-либо целей.