I activated a virtualenv which has pip installed. I did
pip3 install Django==1.8
and Django successfully downloaded. Now, I want to open up the Django folder. Where is the folder located?
Normally it would be in «downloads», but I’m not sure where it would be if I installed it using pip in a virtualenv.
![]()
asked May 1, 2015 at 2:25
![]()
SilentDevSilentDev
20.5k28 gold badges108 silver badges212 bronze badges
4
pip show <package name> will provide the location for Windows and macOS, and I’m guessing any system. 
For example:
> pip show cvxopt
Name: cvxopt
Version: 1.2.0
...
Location: /usr/local/lib/python2.7/site-packages
![]()
answered Jul 25, 2017 at 16:55
![]()
12
pip list -v can be used to list packages’ install locations, introduced in https://pip.pypa.io/en/stable/news/#b1-2018-03-31
Show install locations when list command ran with “-v” option. (#979)
>pip list -v
Package                  Version   Location                                                             Installer
------------------------ --------- -------------------------------------------------------------------- ---------
alabaster                0.7.12    c:usersmeappdatalocalprogramspythonpython38libsite-packages pip
apipkg                   1.5       c:usersmeappdatalocalprogramspythonpython38libsite-packages pip
argcomplete              1.10.3    c:usersmeappdatalocalprogramspythonpython38libsite-packages pip
astroid                  2.3.3     c:usersmeappdatalocalprogramspythonpython38libsite-packages pip
...
This feature is introduced in pip 10.0.0b1. On Ubuntu 18.04 (Bionic Beaver), pip or pip3 installed with sudo apt install python-pip or sudo apt install python3-pip is 9.0.1 which doesn’t have this feature.
Check https://github.com/pypa/pip/issues/5599 for suitable ways of upgrading pip or pip3.
![]()
answered Dec 11, 2019 at 2:46
![]()
leolyleoly
8,3286 gold badges32 silver badges32 bronze badges
4
pip when used with virtualenv will generally install packages in the path <virtualenv_name>/lib/<python_ver>/site-packages.
For example, I created a test virtualenv named venv_test with Python 2.7, and the django folder is in venv_test/lib/python2.7/site-packages/django.
answered May 1, 2015 at 2:41
![]()
khampsonkhampson
14.5k4 gold badges41 silver badges43 bronze badges
5
Easiest way is probably
pip3 -V
This will show you where your pip is installed and therefore where your packages are located.
answered Jul 3, 2020 at 19:10
![]()
RyanRyan
7194 silver badges3 bronze badges
2
In a Python interpreter or script, you can do
import site
site.getsitepackages() # List of global package locations
and
site.getusersitepackages() # String for user-specific package location
For locations third-party packages (those not in the core Python distribution) are installed to.
On my Homebrew-installed Python on macOS, the former outputs
['/usr/local/Cellar/python/3.7.4/Frameworks/Python.framework/Versions/3.7/lib/python3.7/site-packages'],
which canonicalizes to the same path output by pip show, as mentioned in a previous answer:
$ readlink -f /usr/local/Cellar/python/3.7.4/Frameworks/Python.framework/Versions/3.7/lib/python3.7/site-packages
/usr/local/lib/python3.7/site-packages
Reference: https://docs.python.org/3/library/site.html#site.getsitepackages
answered Aug 11, 2019 at 21:55
![]()
flow2kflow2k
3,89939 silver badges54 bronze badges
2
By default, on Linux, Pip installs packages to /usr/local/lib/python2.7/dist-packages.
Using virtualenv or —user during install will change this default location. If you use pip show make sure you are using the right user or else pip may not see the packages you are referencing.
answered Jul 3, 2018 at 14:16
![]()
CognizantApeCognizantApe
1,14910 silver badges10 bronze badges
2
The safest way is to call pip through the specific python that you are executing. If you run pip show pip directly, it may be calling a different pip than the one that python is calling. Examples:
$ python -m pip show pip
$ python3 -m pip show pip
$ /usr/bin/python -m pip show pip
$ /usr/local/bin/python3 -m pip show pip
Here’s an example showing how they can differ:
$ pip show pip

Location: /usr/local/lib/python3.9/site-packages

$ python -m pip show pip

Location: /Library/Python/2.7/site-packages
answered Sep 2, 2021 at 18:09
![]()
wisbuckywisbucky
32.2k10 gold badges142 silver badges99 bronze badges
One can import the package then consult its help
import statsmodels
help(sm)
At the very bottom of the help there is a section FILE that indicates where this package was installed.
This solution was tested with at least matplotlib (3.1.2) and statsmodels (0.11.1) (python 3.8.2).
answered Jul 22, 2020 at 17:27
![]()
Gael LorieulGael Lorieul
2,9564 gold badges24 silver badges49 bronze badges
1
% python -c "import sysconfig; print(sysconfig.get_path('purelib'))"
/opt/homebrew/lib/python3.11/site-packages
% pip show yt-dlp
Name: yt-dlp
Version: 2023.3.4
Summary: A youtube-dl fork with additional features and patches
Home-page: https://github.com/yt-dlp/yt-dlp
Author:
Author-email:
License:
Location: /opt/homebrew/lib/python3.11/site-packages
Requires: brotli, certifi, mutagen, pycryptodomex, websockets
Required-by:
How do I find the location of my Python site-packages directory?
or shorter python -m pip show pip
Where does pip install its packages?
answered Apr 6 at 12:56
![]()
rofrolrofrol
14.1k7 gold badges78 silver badges74 bronze badges
If you have installed packages via pip and are running the code on Windows, the package should be located in one of the following directories:
User Site Packages: C:UsersUSERNAMEAppDataRoamingPythonPythonXXsite-packages
Global Site Packages: C:Program FilesPythonXXLibsite-packages
Note that «USERNAME» and «XX» will depend on your system configuration and the version of Python you are using. Also, if you have installed Python in a different location than the default, the paths may differ.
If you’re not sure where the package is installed, you can open a command prompt and type pip show ‘package-name’. This will show you the installation location of the package.
answered Mar 2 at 22:13
![]()
Do you know your python path? If yes, then look under the Scripts directory.
For me (Windows user), pip it is located in
C:Python27Scriptspip.exe
Correspondingly for Linux, it should be inside
/usr/lib/python2.7/dist-packages/pip
Also, if you have Homebrew installed, pip installs with python:
brew install python
And, the fact that you have python & pip installed & cannot get pip but can get python from the command line (path), pip must have been misconfigured.
If you still can’t find it, you can use locate pip for Linux, or a corresponding search method for other OSs. Also, in your case, it already seems to be in
/Library/Frameworks/Python.framework/Versions/3.3/lib/python3.3/site-packages
as per the output message.
Что представляют собой пакеты и модули, откуда их брать и что с ними делать.
https://gbcdn.mrgcdn.ru/uploads/post/1340/og_cover_image/a9b1c9e84cf2c603aa80f227403c4177

Прежде чем что-то устанавливать, давайте разберёмся, что такое пакет, чем он отличается от модуля, и как с ним работать. У слова «пакет» применительно к Python два значения.
C одной стороны, пакеты Python — это Py-приложения, дополнения или утилиты, которые можно установить из внешнего репозитория: Github, Bitbucket, Google Code или официального Python Package Index. На сервере пакеты хранятся в .zip и .tar архивах, либо в дополнительной упаковке — «яйцах» (.egg, старый формат) или «колесах» (.whl). В составе пакета, как правило, есть сценарий установки setup.py, который хранит сведения о зависимостях — других пакетах и модулях, без которых пакет работать не будет.
С другой стороны, если речь об архитектуре Python-приложения, пакет — это каталог, внутри которого файл __init__.py и, опционально, другие каталоги и файлы .py. Так большую Python-программу разбивают на пакеты и модули. Модуль — файл с исходным кодом, который можно использовать в других приложениях: как «заготовку» для будущих проектов или как часть библиотеки/фреймворка. Но к теме статьи это прямого отношения не имеет, поэтому дальше мы будем говорить только о пакетах из репозиториев.
Чтобы за секунды устанавливать пакеты со всеми зависимостями, используют менеджер пакетов pip или модуль easy_install. В большинстве случаев рекомендуется использовать pip. И только если у вас есть инфраструктура на пакетах .egg, которые pip не открывает, нужен easy_install.
Установка PIP для Python 3 и 2
Если вы используете виртуальные окружения на базе venv или virtualenv, pip уже установлен. Начиная с Python 3.4 (для Python 2 — с версии 2.7.9) pip поставляется вместе с интерпретатором. Для более ранних версий устанавливать менеджер пакетов нужно вручную. Вариантов два:
-
C помощью скрипта get_pip.py — быстро.
-
Через setuptools — кроме pip сможем использовать easy_install.
Вариант 1. Скачиваем скрипт get_pip.py и запускаем в консоли. Для этого открываем терминал через Win+R>»cmd»>OK и пишем:
python get_pip.py
Остальное установщик сделает сам: если нужно, попутно установит wheel (для распаковки .whl-колес) и setuptools. Чтобы запретить инсталляцию дополнительных инструментов, можно добавить в строку ключи —no-setuptools и/или —no-wheels.
Если возникает ошибка, путь к Python не прописан в переменной среды $PATH. Нужно либо найти эту переменную в системном реестре и задать её значение, либо каждый раз указывать полный путь до python.exe, а за ним уже имя исполняемого Py-файла:
C:/python32/python.exe get_pip.py
Полный путь полезен и в том случае, если у вас на компьютере несколько версий Python и вы ставите пакет для одной из них.
Вариант 2. Скачиваем архив с setuptools из PYPI и распаковываем в отдельный каталог. В терминале переходим в директорию setuptools c файлом setup.py и пишем:
python setup.py install
Обновить pip для Python в Windows можно так:
python pip install -U pip
Если это не работает, нужно добавить путь к папке с pip в $PATH.
Установка пакета в pip

Пора запустить pip в Python и начать устанавливать пакеты короткой командой из консоли:
pip install имя_пакета
При установке в Windows, перед pip нужно добавить «python -m».
Обновить пакет не сложнее:
pip install имя_пакета -U
Если у вас последняя версия пакета, но вы хотите принудительно переустановить его:
pip install --force-reinstall
Посмотреть список установленных пакетов Python можно с помощью команды:
pip list
Найти конкретный пакет по имени можно командой «pip search». О других командах можно прочесть в справке, которая выдается по команде «pip help».
Удаление пакета Python
Когда пакет больше не нужен, пишем:
pip uninstall имя_пакета
Как установить пакеты в Python без pip
Формат .egg сейчас используют не часто, поэтому pip его не поддерживает. Модуль easy_install умеет устанавливать как .egg, так и обычные пакеты, но есть у него важные минусы:
-
он не удаляет пакеты,
-
он может пытаться установить недозагруженный пакет.
Использовать easy_install можно сразу после установки setuptools. Хранится модуль в папке Scripts вашего интерпретатора. Если у вас в $PATH верно прописан путь, ставить пакеты из PYPI можно короткой командой:
easy_install имя_пакета
Для обновления после install и перед именем пакета нужно ставить ключ -U. Откатиться до нужной версии можно так:
easy_install имя_пакета=0.2.3
Если нужно скачать пакет из альтернативного источника, вы можете задать URL или локальный адрес на компьютере:
easy_install http://адрес_репозитория.ру/директория/пакет-1.1.2.zip
Чтобы узнать об опциях easy_install, запустим его с ключом -h:
easy_install -h
Список пакетов, установленных через easy_install, хранится в файле easy-install.pth в директории /libs/site-packages/ вашего Python.
К счастью, удалять установленные через easy_install пакеты можно с помощью pip. Если же его нет, потребуется удалить пакет вручную и стереть сведения о нем из easy-install.pth.
Теперь вы умеете ставить и удалять пакеты для вашей версии Python.
Кстати, для тех, кто изучает Python, мы подготовили список полезных и практичных советов.

To see where pip installs packages on your system, run the following command:
pip show <package_name>
And replace <package_name> with the actual name of the package.
Example: NumPy Location
For example, let’s see where NumPy is installed:
pip show numpy
Output:
Name: numpy
Version: 1.22.2
Summary: NumPy is the fundamental package for array computing with Python.
Home-page: https://www.numpy.org
Author: Travis E. Oliphant et al.
Author-email: None
License: BSD
Location: /usr/local/lib/python3.8/site-packages
Requires:
Required-by: torchvision, perfplot, opencv-python, matplotx, DALL-E, benchit
Here you can see that the location field says the package is installed at /usr/local/lib/python3.8/site-packages.
The location obviously depends on your system and Python version.
How to View All pip Package Locations
To list all the installed package locations, run the following command:
pip list -v
This spits out a huge list of different packages and their locations:
alabaster                    0.7.8                /usr/lib/python3/dist-packages
apparmor                     2.13.3               /usr/lib/python3/dist-packages
appdirs                      1.4.3                /usr/lib/python3/dist-packages
apturl                       0.5.2                /usr/lib/python3/dist-packages
...
Now you understand how to check the pip package locations using the command line/terminal.
Next, let’s take a look at how you can find this information using a Python script.
How to View pip Package Location in Python Script?
In addition to using the command line to figure out the location of packages installed via pip, you can run a Python script to get the information.
There are two ways to do this:
- Use the site module.
- Use the help() function.
The site Module
To find the general location of pip packages in a Python script:
- Import the site package.
- Call the getsitepackages() function of the module.
- See a list of global package locations.
Here is how it looks in code:
>>> import site
>>> site.getsitepackages()
['/usr/local/lib/python3.8/dist-packages', '/usr/lib/python3/dist-packages', '/usr/lib/python3.8/dist-packages']
And to get a user-specific package location as a string, call the getusersitepackages() function instead.
The help() Function
Of course, you can always use the help() function to get all kinds of information about any Python package or object.
This also shows you the location where the package is installed.
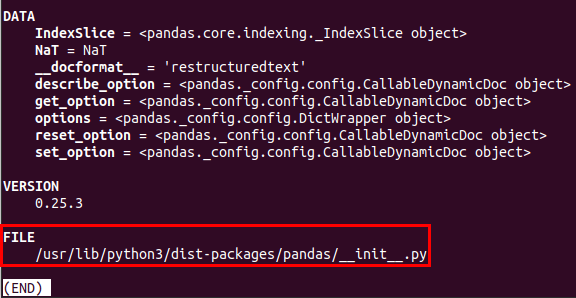
For example, lets’ see where the pandas package is installed:
>>> import pandas
>>> help(pandas)
Running this piece of code opens up the package-specific manual.
If you scroll all the way down to the end of this output, you can see the FILE section where it shows you the path of the package.
By the way, in case you happen to be unfamiliar with the help() function in Python, I highly recommend you read this article. Using help() can help you a lot and save valuable coding time!
Conclusion
Today you learned how to check where pip installs packages on your system.
To recap, all you need to do is:
- Open up command line.
- Run pip show <package_name>.
Thanks for reading.
Happy coding!
About the Author

-
I’m an entrepreneur and a blogger from Finland. My goal is to make coding and tech easier for you with comprehensive guides and reviews.
Recent Posts
Usage#
Unix/macOS
python -m pip install [options] <requirement specifier> [package-index-options] ...
python -m pip install [options] -r <requirements file> [package-index-options] ...
python -m pip install [options] [-e] <vcs project url> ...
python -m pip install [options] [-e] <local project path> ...
python -m pip install [options] <archive url/path> ...
Windows
py -m pip install [options] <requirement specifier> [package-index-options] ...
py -m pip install [options] -r <requirements file> [package-index-options] ...
py -m pip install [options] [-e] <vcs project url> ...
py -m pip install [options] [-e] <local project path> ...
py -m pip install [options] <archive url/path> ...
Description#
Install packages from:
-
PyPI (and other indexes) using requirement specifiers.
-
VCS project urls.
-
Local project directories.
-
Local or remote source archives.
pip also supports installing from “requirements files”, which provide
an easy way to specify a whole environment to be installed.
Overview#
pip install has several stages:
-
Identify the base requirements. The user supplied arguments are processed
here. -
Resolve dependencies. What will be installed is determined here.
-
Build wheels. All the dependencies that can be are built into wheels.
-
Install the packages (and uninstall anything being upgraded/replaced).
Note that pip install prefers to leave the installed version as-is
unless --upgrade is specified.
Argument Handling#
When looking at the items to be installed, pip checks what type of item
each is, in the following order:
-
Project or archive URL.
-
Local directory (which must contain a
setup.py, or pip will report
an error). -
Local file (a sdist or wheel format archive, following the naming
conventions for those formats). -
A requirement, as specified in PEP 440.
Each item identified is added to the set of requirements to be satisfied by
the install.
Working Out the Name and Version#
For each candidate item, pip needs to know the project name and version. For
wheels (identified by the .whl file extension) this can be obtained from
the filename, as per the Wheel spec. For local directories, or explicitly
specified sdist files, the setup.py egg_info command is used to determine
the project metadata. For sdists located via an index, the filename is parsed
for the name and project version (this is in theory slightly less reliable
than using the egg_info command, but avoids downloading and processing
unnecessary numbers of files).
Any URL may use the #egg=name syntax (see VCS Support) to
explicitly state the project name.
Satisfying Requirements#
Once pip has the set of requirements to satisfy, it chooses which version of
each requirement to install using the simple rule that the latest version that
satisfies the given constraints will be installed (but see here
for an exception regarding pre-release versions). Where more than one source of
the chosen version is available, it is assumed that any source is acceptable
(as otherwise the versions would differ).
Obtaining information about what was installed#
The install command has a --report option that will generate a JSON report of what
pip has installed. In combination with the --dry-run and --ignore-installed it
can be used to resolve a set of requirements without actually installing them.
The report can be written to a file, or to standard output (using --report - in
combination with --quiet).
The format of the JSON report is described in Installation Report.
Installation Order#
Note
This section is only about installation order of runtime dependencies, and
does not apply to build dependencies (those are specified using PEP 518).
As of v6.1.0, pip installs dependencies before their dependents, i.e. in
“topological order.” This is the only commitment pip currently makes related
to order. While it may be coincidentally true that pip will install things in
the order of the install arguments or in the order of the items in a
requirements file, this is not a promise.
In the event of a dependency cycle (aka “circular dependency”), the current
implementation (which might possibly change later) has it such that the first
encountered member of the cycle is installed last.
For instance, if quux depends on foo which depends on bar which depends on baz,
which depends on foo:
Unix/macOS
$ python -m pip install quux
...
Installing collected packages baz, bar, foo, quux

$ python -m pip install bar
...
Installing collected packages foo, baz, bar
Windows
C:> py -m pip install quux
...
Installing collected packages baz, bar, foo, quux

C:> py -m pip install bar
...
Installing collected packages foo, baz, bar
Prior to v6.1.0, pip made no commitments about install order.
The decision to install topologically is based on the principle that
installations should proceed in a way that leaves the environment usable at each
step. This has two main practical benefits:
-
Concurrent use of the environment during the install is more likely to work.
-
A failed install is less likely to leave a broken environment. Although pip
would like to support failure rollbacks eventually, in the mean time, this is
an improvement.
Although the new install order is not intended to replace (and does not replace)
the use of setup_requires to declare build dependencies, it may help certain
projects install from sdist (that might previously fail) that fit the following
profile:
-
They have build dependencies that are also declared as install dependencies
usinginstall_requires. -
python setup.py egg_infoworks without their build dependencies being
installed. -
For whatever reason, they don’t or won’t declare their build dependencies using
setup_requires.
Requirements File Format
This section has been moved to Requirements File Format.
Requirement Specifiers
This section has been moved to Requirement Specifiers.
Per-requirement Overrides
This is now covered in Requirements File Format.
Pre-release Versions#
Starting with v1.4, pip will only install stable versions as specified by
pre-releases by default. If a version cannot be parsed as a compliant PEP 440
version then it is assumed to be a pre-release.
If a Requirement specifier includes a pre-release or development version
(e.g. >=0.0.dev0) then pip will allow pre-release and development versions
for that requirement. This does not include the != flag.
The pip install command also supports a —pre flag
that enables installation of pre-releases and development releases.
VCS Support
This is now covered in VCS Support.
Finding Packages#
pip searches for packages on PyPI using the
HTTP simple interface,
which is documented here
and there.
pip offers a number of package index options for modifying how packages are
found.
pip looks for packages in a number of places: on PyPI (if not disabled via
--no-index), in the local filesystem, and in any additional repositories
specified via --find-links or --index-url. There is no ordering in
the locations that are searched. Rather they are all checked, and the “best”
match for the requirements (in terms of version number — see PEP 440 for
details) is selected.
See the pip install Examples.
SSL Certificate Verification
This is now covered in HTTPS Certificates.
Caching
This is now covered in Caching.
Wheel Cache
This is now covered in Caching.
Hash checking mode
This is now covered in Secure installs.
Local Project Installs
This is now covered in Local project installs.
Editable installs
This is now covered in Local project installs.
Build System Interface
This is now covered in Build System Interface.
Options#
- -r, —requirement <file>#
-
Install from the given requirements file. This option can be used multiple times.
- -c, —constraint <file>#
-
Constrain versions using the given constraints file. This option can be used multiple times.
- —no-deps#
-
Don’t install package dependencies.
- —pre#
-
Include pre-release and development versions. By default, pip only finds stable versions.
- -e, —editable <path/url>#
-
Install a project in editable mode (i.e. setuptools “develop mode”) from a local project path or a VCS url.
- —dry-run#
-
Don’t actually install anything, just print what would be. Can be used in combination with —ignore-installed to ‘resolve’ the requirements.
- -t, —target <dir>#
-
Install packages into <dir>. By default this will not replace existing files/folders in <dir>. Use —upgrade to replace existing packages in <dir> with new versions.
- —platform <platform>#
-
Only use wheels compatible with <platform>. Defaults to the platform of the running system. Use this option multiple times to specify multiple platforms supported by the target interpreter.
- —python-version <python_version>#
-
The Python interpreter version to use for wheel and “Requires-Python”
compatibility checks. Defaults to a version derived from the running
interpreter. The version can be specified using up to three dot-separated
integers (e.g. “3” for 3.0.0, “3.7” for 3.7.0, or “3.7.3”). A major-minor
version can also be given as a string without dots (e.g. “37” for 3.7.0).
- —implementation <implementation>#
-
Only use wheels compatible with Python implementation <implementation>, e.g. ‘pp’, ‘jy’, ‘cp’, or ‘ip’. If not specified, then the current interpreter implementation is used. Use ‘py’ to force implementation-agnostic wheels.
- —abi <abi>#
-
Only use wheels compatible with Python abi <abi>, e.g. ‘pypy_41’. If not specified, then the current interpreter abi tag is used. Use this option multiple times to specify multiple abis supported by the target interpreter. Generally you will need to specify —implementation, —platform, and —python-version when using this option.
- —user#
-
Install to the Python user install directory for your platform. Typically ~/.local/, or %APPDATA%Python on Windows. (See the Python documentation for site.USER_BASE for full details.)
- —root <dir>#
-
Install everything relative to this alternate root directory.
- —prefix <dir>#
-
Installation prefix where lib, bin and other top-level folders are placed. Note that the resulting installation may contain scripts and other resources which reference the Python interpreter of pip, and not that of
--prefix. See also the--pythonoption if the intention is to install packages into another (possibly pip-free) environment.
- —src <dir>#
-
Directory to check out editable projects into. The default in a virtualenv is “<venv path>/src”. The default for global installs is “<current dir>/src”.
- -U, —upgrade#
-
Upgrade all specified packages to the newest available version. The handling of dependencies depends on the upgrade-strategy used.
- —upgrade-strategy <upgrade_strategy>#
-
Determines how dependency upgrading should be handled [default: only-if-needed]. “eager” — dependencies are upgraded regardless of whether the currently installed version satisfies the requirements of the upgraded package(s). “only-if-needed” — are upgraded only when they do not satisfy the requirements of the upgraded package(s).
- —force-reinstall#
-
Reinstall all packages even if they are already up-to-date.
- -I, —ignore-installed#
-
Ignore the installed packages, overwriting them. This can break your system if the existing package is of a different version or was installed with a different package manager!
- —ignore-requires-python#
-
Ignore the Requires-Python information.
- —no-build-isolation#
-
Disable isolation when building a modern source distribution. Build dependencies specified by PEP 518 must be already installed if this option is used.
- —use-pep517#
-
Use PEP 517 for building source distributions (use —no-use-pep517 to force legacy behaviour).
- —check-build-dependencies#
-
Check the build dependencies when PEP517 is used.
- —break-system-packages#
-
Allow pip to modify an EXTERNALLY-MANAGED Python installation
- -C, —config-settings <settings>#
-
Configuration settings to be passed to the PEP 517 build backend. Settings take the form KEY=VALUE. Use multiple —config-settings options to pass multiple keys to the backend.
- —global-option <options>#
-
Extra global options to be supplied to the setup.py call before the install or bdist_wheel command.
- —compile#
-
Compile Python source files to bytecode
- —no-compile#
-
Do not compile Python source files to bytecode
- —no-warn-script-location#
-
Do not warn when installing scripts outside PATH
- —no-warn-conflicts#
-
Do not warn about broken dependencies
- —no-binary <format_control>#
-
Do not use binary packages. Can be supplied multiple times, and each time adds to the existing value. Accepts either “:all:” to disable all binary packages, “:none:” to empty the set (notice the colons), or one or more package names with commas between them (no colons). Note that some packages are tricky to compile and may fail to install when this option is used on them.
- —only-binary <format_control>#
-
Do not use source packages. Can be supplied multiple times, and each time adds to the existing value. Accepts either “:all:” to disable all source packages, “:none:” to empty the set, or one or more package names with commas between them. Packages without binary distributions will fail to install when this option is used on them.
- —prefer-binary#
-
Prefer older binary packages over newer source packages.
- —require-hashes#
-
Require a hash to check each requirement against, for repeatable installs. This option is implied when any package in a requirements file has a —hash option.
- —progress-bar <progress_bar>#
-
Specify whether the progress bar should be used [on, off] (default: on)
- —root-user-action <root_user_action>#
-
Action if pip is run as a root user. By default, a warning message is shown.
- —report <file>#
-
Generate a JSON file describing what pip did to install the provided requirements. Can be used in combination with —dry-run and —ignore-installed to ‘resolve’ the requirements. When — is used as file name it writes to stdout. When writing to stdout, please combine with the —quiet option to avoid mixing pip logging output with JSON output.
- —no-clean#
-
Don’t clean up build directories.
- -i, —index-url <url>#
-
Base URL of the Python Package Index (default https://pypi.org/simple). This should point to a repository compliant with PEP 503 (the simple repository API) or a local directory laid out in the same format.
-
Extra URLs of package indexes to use in addition to —index-url. Should follow the same rules as —index-url.
- —no-index#
-
Ignore package index (only looking at —find-links URLs instead).
- -f, —find-links <url>#
-
If a URL or path to an html file, then parse for links to archives such as sdist (.tar.gz) or wheel (.whl) files. If a local path or file:// URL that’s a directory, then look for archives in the directory listing. Links to VCS project URLs are not supported.
Examples#
-
Install
SomePackageand its dependencies from PyPI using Requirement SpecifiersUnix/macOS
python -m pip install SomePackage            # latest version
python -m pip install 'SomePackage==1.0.4'   # specific version
python -m pip install 'SomePackage>=1.0.4'   # minimum version
Windows
py -m pip install SomePackage            # latest version
py -m pip install "SomePackage==1.0.4"   # specific version
py -m pip install "SomePackage>=1.0.4"   # minimum version
-
Install a list of requirements specified in a file. See the Requirements files.
Unix/macOS
python -m pip install -r requirements.txt
Windows
py -m pip install -r requirements.txt
-
Upgrade an already installed
SomePackageto the latest from PyPI.Unix/macOS
python -m pip install --upgrade SomePackage
Windows
py -m pip install --upgrade SomePackage
Note
This will guarantee an update to
SomePackageas it is a direct
requirement, and possibly upgrade dependencies if their installed
versions do not meet the minimum requirements ofSomePackage.
Any non-requisite updates of its dependencies (indirect requirements)
will be affected by the--upgrade-strategycommand. -
Install a local project in “editable” mode. See the section on Editable Installs.
Unix/macOS
python -m pip install -e .                # project in current directory
python -m pip install -e path/to/project  # project in another directory
Windows
py -m pip install -e .                 # project in current directory
py -m pip install -e path/to/project   # project in another directory
-
Install a project from VCS
Unix/macOS
python -m pip install 'SomeProject@git+https://git.repo/some_pkg.git@1.3.1'
Windows
py -m pip install "SomeProject@git+https://git.repo/some_pkg.git@1.3.1"
-
Install a project from VCS in “editable” mode. See the sections on VCS Support and Editable Installs.
Unix/macOS
python -m pip install -e 'git+https://git.repo/some_pkg.git#egg=SomePackage'          # from git
python -m pip install -e 'hg+https://hg.repo/some_pkg.git#egg=SomePackage'            # from mercurial
python -m pip install -e 'svn+svn://svn.repo/some_pkg/trunk/#egg=SomePackage'         # from svn
python -m pip install -e 'git+https://git.repo/some_pkg.git@feature#egg=SomePackage'  # from 'feature' branch
python -m pip install -e 'git+https://git.repo/some_repo.git#egg=subdir&subdirectory=subdir_path' # install a python package from a repo subdirectory
Windows
py -m pip install -e "git+https://git.repo/some_pkg.git#egg=SomePackage"          # from git
py -m pip install -e "hg+https://hg.repo/some_pkg.git#egg=SomePackage"            # from mercurial
py -m pip install -e "svn+svn://svn.repo/some_pkg/trunk/#egg=SomePackage"         # from svn
py -m pip install -e "git+https://git.repo/some_pkg.git@feature#egg=SomePackage"  # from 'feature' branch
py -m pip install -e "git+https://git.repo/some_repo.git#egg=subdir&subdirectory=subdir_path" # install a python package from a repo subdirectory
-
Install a package with extras.
Unix/macOS
python -m pip install 'SomePackage[PDF]'
python -m pip install 'SomePackage[PDF] @ git+https://git.repo/SomePackage@main#subdirectory=subdir_path'
python -m pip install '.[PDF]'  # project in current directory
python -m pip install 'SomePackage[PDF]==3.0'
python -m pip install 'SomePackage[PDF,EPUB]'  # multiple extras
Windows
py -m pip install "SomePackage[PDF]"
py -m pip install "SomePackage[PDF] @ git+https://git.repo/SomePackage@main#subdirectory=subdir_path"
py -m pip install ".[PDF]"  # project in current directory
py -m pip install "SomePackage[PDF]==3.0"
py -m pip install "SomePackage[PDF,EPUB]"  # multiple extras
-
Install a particular source archive file.
Unix/macOS
python -m pip install './downloads/SomePackage-1.0.4.tar.gz'
python -m pip install 'http://my.package.repo/SomePackage-1.0.4.zip'
Windows
py -m pip install "./downloads/SomePackage-1.0.4.tar.gz"
py -m pip install "http://my.package.repo/SomePackage-1.0.4.zip"
-
Install a particular source archive file following PEP 440 direct references.
Unix/macOS
python -m pip install 'SomeProject@http://my.package.repo/SomeProject-1.2.3-py33-none-any.whl'
python -m pip install 'SomeProject @ http://my.package.repo/SomeProject-1.2.3-py33-none-any.whl'
python -m pip install 'SomeProject@http://my.package.repo/1.2.3.tar.gz'
Windows
py -m pip install "SomeProject@http://my.package.repo/SomeProject-1.2.3-py33-none-any.whl"
py -m pip install "SomeProject @ http://my.package.repo/SomeProject-1.2.3-py33-none-any.whl"
py -m pip install "SomeProject@http://my.package.repo/1.2.3.tar.gz"
-
Install from alternative package repositories.
Install from a different index, and not PyPI
Unix/macOS
python -m pip install --index-url http://my.package.repo/simple/ SomePackage
Windows
py -m pip install --index-url http://my.package.repo/simple/ SomePackage
Install from a local flat directory containing archives (and don’t scan indexes):
Unix/macOS
python -m pip install --no-index --find-links=file:///local/dir/ SomePackage
python -m pip install --no-index --find-links=/local/dir/ SomePackage
python -m pip install --no-index --find-links=relative/dir/ SomePackage
Windows
py -m pip install --no-index --find-links=file:///local/dir/ SomePackage
py -m pip install --no-index --find-links=/local/dir/ SomePackage
py -m pip install --no-index --find-links=relative/dir/ SomePackage
Search an additional index during install, in addition to PyPI
Warning
Using this option to search for packages which are not in the main
repository (such as private packages) is unsafe, per a security
vulnerability called
dependency confusion:
an attacker can claim the package on the public repository in a way that
will ensure it gets chosen over the private package.Unix/macOS
python -m pip install --extra-index-url http://my.package.repo/simple SomePackage
Windows
py -m pip install --extra-index-url http://my.package.repo/simple SomePackage
-
Find pre-release and development versions, in addition to stable versions. By default, pip only finds stable versions.
Unix/macOS
python -m pip install --pre SomePackage
Windows
py -m pip install --pre SomePackage
-
Install packages from source.
Do not use any binary packages
Unix/macOS
python -m pip install SomePackage1 SomePackage2 --no-binary :all:
Windows
py -m pip install SomePackage1 SomePackage2 --no-binary :all:
Specify
SomePackage1to be installed from source:Unix/macOS
python -m pip install SomePackage1 SomePackage2 --no-binary SomePackage1
Windows
py -m pip install SomePackage1 SomePackage2 --no-binary SomePackage1