Тег <div> — пустой контейнер, который определяет разделение или раздел. Он не влияет на контент или макет и используется для группировки HTML-элементов, которые должны быть написаны с помощью CSS или с помощью скриптов.
Мы рекомендуем использовать тег <div> только в случае, когда нецелесообразно использовать семантические элементы HTML5, такие как <nav> , <main> или <article>.
Тег <div> является блочным элементом, поэтому разрыв строки помещается до и после него.
Вы можете поместить любой элемент HTML в тег <div>, включая другой тег <div>.
Тег <div> не может быть дочерним элементом <p>, так как параграф будет разорван в месте включения тега <div> .
Для применения стилей внутри параграфа используется тег <span>.
Синтакс
Тег <div> — парный, состоит из двух частей, открывающего (<div>) и закрывающего (</div>) тегов.
Пример
<!DOCTYPE html>
<html>
<head>
<title>Использование тега <div></title>
</head>
<body>
<h1> Тег <div> </h1>
<div style="background-color:#8ebf42">
<p> Мы использовали тег <div>, чтобы сгруппировать два параграфа и добавить фон к тексту, а для того, чтобы изменить цвет <span style="color:#1c87c9"> этого слова</span> мы использовали тег <span>.</p>
<p> Обратите внимание, что тег <div> является блочным элементом, до и после него добавляется разрыв строки.</p>
</div>
</body>
</html>Результат

При верстке HTML страниц с помощью слоев тег <div> является ее базовым фундаментом, так как именно этот тег определяет многочисленные структурные блоки веб-страницы.
Для корректного отображения блоков на странице необходимо их правильно расположить. Различают несколько способов расположения блоков в зависимости от целей и контента страницы. Давайте рассмотрим несколько из них.
Флексбокс
Спецификация CSS Flexible Box успешно пришла на замену верстке float-ами. Flexbox позволяет контролировать размер, порядок и выравнивание элементов по нескольким осям, распределение свободного места между элементами и многое другое.
Пример
<!DOCTYPE html>
<html>
  <head>
    <title>Заголовок документа</title>
    <style>
      .flex-container {
      display: flex;
      align-items: center; /* Подставьте другое значение и посмотрите результат */
      width: 90%;
      height: 300px;
      background-color: #1c87c9;
      }
      .flex-container > div {
      width: 25%;
      padding: 5px 0;
      margin: 5px;
      background-color: lightgrey;
      text-align: center;
      font-size: 35px;
      }
    </style>
  </head>
  <body>
    <div class="flex-container">
      <div>1</div>
      <div>2</div>
      <div>3</div>
    </div>
  </body>
</html>
Результат

CSS свойство float 
CSS свойство float определяет, по какой стороне будет выравниваться элемент, при этом остальные элементы будут обтекать его с других сторон. С помощью свойства float можно размещать элементы по горизонтали рядом друг с другом, что позволяет верстать типовые фрагменты веб-страниц, вроде врезок, горизонтальных меню, каталога товаров, колонок и др.
Пример
<!DOCTYPE html>
<html>
  <head>
    <title>Заголовок страницы</title>
    <style>
      .content {
      overflow: auto;
      border: 3px solid #666666;
      }
      .content div {
      padding: 10px;
      }
      .content a {
      color: darkblue;
      }
      .blue {
      float: right;
      width: 45%;
      background: #1c87c9;
      }
      .green {
      float: left;
      width: 35%;
      background: #8ebf42;
      }
    </style>
  </head>
  <body>
    <div class="content">
      <div class="blue">
        <p>Параграф в блоке div.</p>
        <a href="#">Гиперссылка в теге div.</a>
        <ul>
          <li>Элемент списка 1</li>
          <li>Элемент списка 2</li>
        </ul>
      </div>
      <div class="green">
        <p>Параграф в блоке div.</p>
        <ol>
          <li>Элемент списка 1</li>
          <li>Элемент списка 1</li>
        </ol>
      </div>
    </div>
  </body>
</html>
Результат

Отрицательные отступы 
Использование отрицательных отступов (negative margins) открывает широкие возможности и позволяет сделать верстку более универсальной.
Пример
<!DOCTYPE html>
<html>
  <head>
    <title>Заголовок окна веб-страницы</title>
    <style>
      .content div {
      padding: 2%;
      }
      .content a {
      color: darkblue;
      }
      .main-content {
      width: 30%;
      margin-left: 32%;
      }
      .blue {
      width: 25%;
      margin-top: -10%;
      background: #1c87c9;
      }
      .green {
      width: 20%;
      margin: -35% auto auto 70%;
      background: #8ebf42;
      }
    </style>
  </head>
  <body>
    <div class="content">
      <div class="main-content">
        <a href="#">Гиперссылка в теге div.</a>
      </div>
      <div class="blue">
        <p>Параграф в теге div.</p>
        <a href="#">Гиперссылка в теге div.</a>
        <ul>
          <li>Элемент списка 1</li>
          <li>Элемент списка 2</li>
        </ul>
      </div>
      <div class="green">
        <p>Параграф в теге div.</p>
        <ol>
          <li>Элемент списка 1</li>
          <li>Элемент списка 2</li>
        </ol>
      </div>
    </div>
  </body>
</html>
Результат

Позиционирование Relative + absolute positioning
Комбинация разных типов позиционирования для вложенных элементов — один из удобных и практичных приемов верстки. Если для родительского элемента задать position: relative, а для дочернего position: absolute, то произойдёт смена системы координат и положение дочернего элемента при этом указывается относительно его родителя.
Пример
<!DOCTYPE html>
<html>
  <head>
    <title>Заголовок документа</title>
    <style>
      .content { position: relative; height: 400px; border: 1px solid #666666;}
      .content div { position: absolute; width: 35%; padding: 10px; }
      .blue { right: 20px; bottom: 0; background: #1c87c9; }
      .green { top: 10px; left: 15px; background: #8ebf42; }
    </style>
  </head>
  <body>
    <div class="content">
      <div class="blue">
        <p>Параграф в теге div.</p>
      </div>
      <div class="green">
        <p>Параграф в теге div.</p>
      </div>
    </div>
  </body>
</html>
Результат

position: relative не влияет на позиционирование элементов в нормальном потоке, если вы не добавляете смещения.
Тег <div> поддерживает глобальные атрибуты и атрибуты событий.
Earn income with your HTML skills
Sign up and we’ll send you the best freelance opportunities straight to
your inbox.
We’re building the largest self-service freelancing marketplace for people like you.
A style attribute on a <div> tag assigns a unique style to the element.
Its value is CSS that defines the appearance of the div element.
Example
#
A style attribute on a <div> element.
Paul Gauguin
Eugène Henri Paul Gauguin, was a French Post-Impressionist artist.
Unappreciated until after his death, Gauguin is now recognized for
his experimental use of color and Synthetist style that were
distinct from Impressionism. Toward the end of his life, he
spent ten years in French Polynesia. The paintings from this
time depict people or landscapes from that region.
<div style="background-color:aliceblue;padding:25px;">
  <h4>Paul Gauguin</h4>
  <p>
    Eugène Henri Paul Gauguin, was a French Post-Impressionist artist.
    Unappreciated until after his death, Gauguin is now recognized for
    his experimental use of color and Synthetist style that were
    distinct from Impressionism. Toward the end of his life, he
    spent ten years in French Polynesia. The paintings from this
    time depict people or landscapes from that region.</p>
</div>
Using style
The style attribute specifies the style, i.e. look and feel, of the <div> element.
A style contains any number of CSS property/value pairs, separated by semicolons (;).
The style attribute overrides any other style that was defined in a <style> tag or an external CSS file.
This inline styling affects the current <div> element only.
Syntax
<div style="CSS-styles" >
Values
#
| Value | Description |
|---|---|
| CSS-styles | One or more CSS property/value pairs separated by semicolons (;). |
More Examples
A style attribute on a <div> element.
Clicking the button toggles the background color.
Paul Gauguin
Eugène Henri Paul Gauguin, was a French Post-Impressionist artist.
Unappreciated until after his death, Gauguin is now recognized for
his experimental use of color and Synthetist style that were
distinct from Impressionism. Toward the end of his life, he
spent ten years in French Polynesia. The paintings from this
time depict people or landscapes from that region.
<div id="mydiv" style="background-color:aliceblue;padding:25px;">
  <h4>Paul Gauguin</h4>
  <p>
    Eugène Henri Paul Gauguin, was a French Post-Impressionist artist.
    Unappreciated until after his death, Gauguin is now recognized for
    his experimental use of color and Synthetist style that were
    distinct from Impressionism. Toward the end of his life, he
    spent ten years in French Polynesia. The paintings from this
    time depict people or landscapes from that region.</p>
</div>

<br />
<button onclick="toggle();">Toggle style</button>

<script>
  let toggle = () => {
    let element = document.getElementById("mydiv");

    if (element.style.backgroundColor === "aliceblue") {
       element.style.backgroundColor = "moccasin";
    } else {
       element.style.backgroundColor = "aliceblue";
    }
  }
</script>
Code explanation
The style attribute assigns a background color to the <div> element.
Clicking the button calls JavaScript which changes the element background color.
Browser support
Here is when style support started for each browser:
|
Chrome |
1.0 | Sep 2008 |
|
Firefox |
1.0 | Sep 2002 |
|
IE/Edge |
1.0 | Aug 1995 |
|
Opera |
1.0 | Jan 2006 |
|
Safari |
1.0 | Jan 2003 |


You may also like

- Our HTML div Tag Reference
- Our HTML style Attribute Reference
- Our CSS Tutorial
Back to <div>
Earn income with your HTML skills
Sign up and we’ll send you the best freelance opportunities straight to
your inbox.
We’re building the largest self-service freelancing marketplace for people like you.
- HTML Tables
- HTML Images
- HTML Color Names
- HTML Links
- HTML Tags
- HTML Lists
- HTML Forms
- HTML Buttons
- HTML Spaces
- HTML Checkboxes
- HTML Editors
- HTML Comments
In your HTML
<div class="myClass">Look at me!</div>
In your CSS
.myClass
{
   background-color:#eee;
}
EDIT
As pointed out by Dave, you can assign multiple classes to an element. This means you can modularise you styles as required. Helps with the DRY principle.
For example, in your HTML
<div class="myClass myColor">Look at me too!</div>
In your CSS
.myClass
{
   background-color:#eee;
   color:#1dd;
}

.myColor
{
   color:#111;
}
You should also note, that the order in the class attribute does not matter if different styles have conflicting settings. That is, class="myClass myColor" is exactly the same as class="myColor myClass". Which conflicting setting is actually used is determined by which style is defined last in the CSS.
This means, in the above example, to make the color from myClass be used instead of the color from myColor, you have to change your CSS to switch them around as follows
.myColor
{
   color:#111;
}

.myClass
{
   background-color:#eee;
   color:#1dd;
}
HTML Tutorial » HTML div style class
Inserting style for div, there are three ways:
External style sheet, — In this case we make file as style.css where we add CSS style
Internal style sheet, — We add CSS style betweenthem: <style> content style </style>
Inline style,
For any <div> on your page, you can specify any CSS property as: color, font-style, font-family, font-size, background, etc.
Example: On this window you can edit online this script,
div class and internal style.
<!DOCTYPE html>

<html>

<head>

<title>div class and style</title>

    <style>

    .text {

    font-family: Verdana, Geneva, sans-serif;

    font-size: 16px;

    color: #09C;

    background-color: #CCC;

    margin: 12px;

    padding: 15px;

    }

    </style>

</head>

<body>

<div class="text">HTML div style - div style class</div>

<div style="height:300px; width:450px; color:#000000; background:#CCC"> Add your text here</div>

</body>

</html>
Syntax:
Syntax inline style.
<div style=»value»> text here </div>
Note: try to avoid inline-css, you have to make external style in a separate file as: style.css
Inline html div style
Here, in the next example we show you how to use inline css style what can be applied to div box as: height, width, background and color.
Example: Edit online this window, then Execute to see how you script change page.
<!DOCTYPE html>

<html>

<head>

<title>div class and style</title>

</head>

<body>

<div class="text">HTML div style - div style class</div>

<div style="height:200px; width:300px; color:#000000; background:#CCC"> Add your text here</div>

</body>

</html>
Note: try to avoid inline-css, you have to make external HTML div style.
Related subjects:
div style
HTML div style class
Tags:
div style class, border, center, color, background color, width, align center, background image
margin top 24px margin-bottom 20px span style= font size 24px color
How to use div style in HTML
Internal and external style applied for div
You can archieve same style using Internal and External CSS
1. Internal style for html div.
Example: Edit online this window, then Execute to see how you script change page.
<html >

<head>

<style>

div {

height:70px;

width:200px;

background-color:yellow;

}

</style>

</head>

<body>

<div> Here your text:<br />

This is a box useing internal style

</div>

</body>

</html >
2. External style for html div.
Example 3: named index.html and we add external file named style.css in Example 4.
<head>
<link rel=»stylesheet» type=»text/css» href=»style.css»>
</head>
<body>
<div> Your text here</div>
</body>
Example 4
named style.css
div
{
height:350px;
width:450px;
background-color:red;
color: #000000;
}
HTML div style class
The HTML div style class attribute is used to define equal styles for item with the same class name.
So, all HTML div style class item with the same attribute will have the same format and style.
Here we have three HTML <div> class elements that point to the same class name:
Example 5:
<!DOCTYPE html>
<html>
<head>
<style>
.town {
height: 70px;
width: 200px;
background-color: #CCC;
color: #000000;
margin: 12px;
padding: 15px;
}
</style>
</head>
<body>
<div class=»town»>
<h2>ROMA</h2>
<p>ROMA is the capital of Italy.</p>
</div>
<div class=»town»>
<h2>MADRID</h2>
<p>Madrid is the capital of Spain.</p>
</div>
<div class=»town»>
<h2>SEOUL</h2>
<p>Seoul is not the capital of Japan.</p>
</div>
</body>
</html>
Note. Use External style sheet instead.
div class and style together, div class style css, div class style inline, div class style background image, color, size, full screen, inline, center, combine, background image, html div style width, background color, width percentage, example, attributes, center, display, border, styles
HTML div style — div style class — html tutorial
| Internet Explorer | Chrome | Opera | Safari | Firefox | Android | iOS |
| 4.0+ | 1.0+ | 4.0+ | 1.0+ | 1.0+ | 1.0+ | 1.0+ |
Спецификация
| HTML: | 3.2 | 4.01 | 5.0 | XHTML: | 1.0 | 1.1 |
Описание
Элемент <div> является блочным элементом и
предназначен для выделения фрагмента документа с целью изменения вида содержимого.
Как правило, вид блока управляется с помощью стилей. Чтобы не описывать каждый
раз стиль внутри тега, можно выделить стиль во внешнюю таблицу стилей, а для
тега добавить атрибут class или id с именем селектора.
Как и при использовании других блочных элементов, содержимое тега <div> всегда начинается с новой строки. После него также добавляется перенос строки.
Синтаксис
<div>...</div>Атрибуты
- align
- Задает выравнивание содержимого тега <div>.
- title
- Добавляет всплывающую подсказку к содержимому.
Также для этого тега доступны универсальные атрибуты и события.
Закрывающий тег
Обязателен.
Пример
HTML5IECrOpSaFx
<!DOCTYPE HTML>
<html>
 <head>
  <meta charset="utf-8">
  <title>Тег DIV</title>
  <style type="text/css">
   .block1 {
    width: 200px;
    background: #ccc;
    padding: 5px;
    padding-right: 20px;
    border: solid 1px black;
    float: left;
   }
   .block2 {
    width: 200px;
    background: #fc0;
    padding: 5px;
    border: solid 1px black;
    float: left;
    position: relative;
    top: 40px;
    left: -70px;
   }
  </style>
 </head>
 <body>

  <div class="block1">Lorem ipsum dolor sit amet, consectetuer
   adipiscing elit, sed diem nonummy nibh euismod tincidunt ut lacreet
   dolore magna aliguam erat volutpat.</div>
  <div class="block2">Ut wisis enim ad minim veniam, quis nostrud
   exerci tution ullamcorper suscipit lobortis nisl ut aliquip ex
   ea commodo consequat.</div>

 </body>
</html>
Результат данного примера показан на рис. 1.
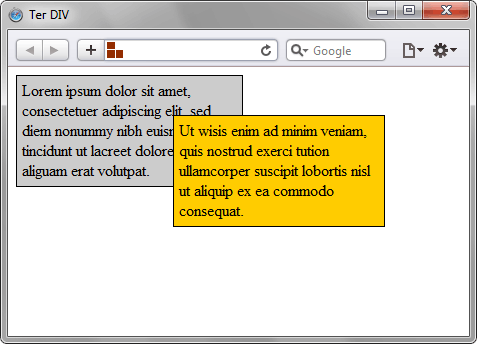
Рис. 1. Вид блоков, оформленных с помощью стилей