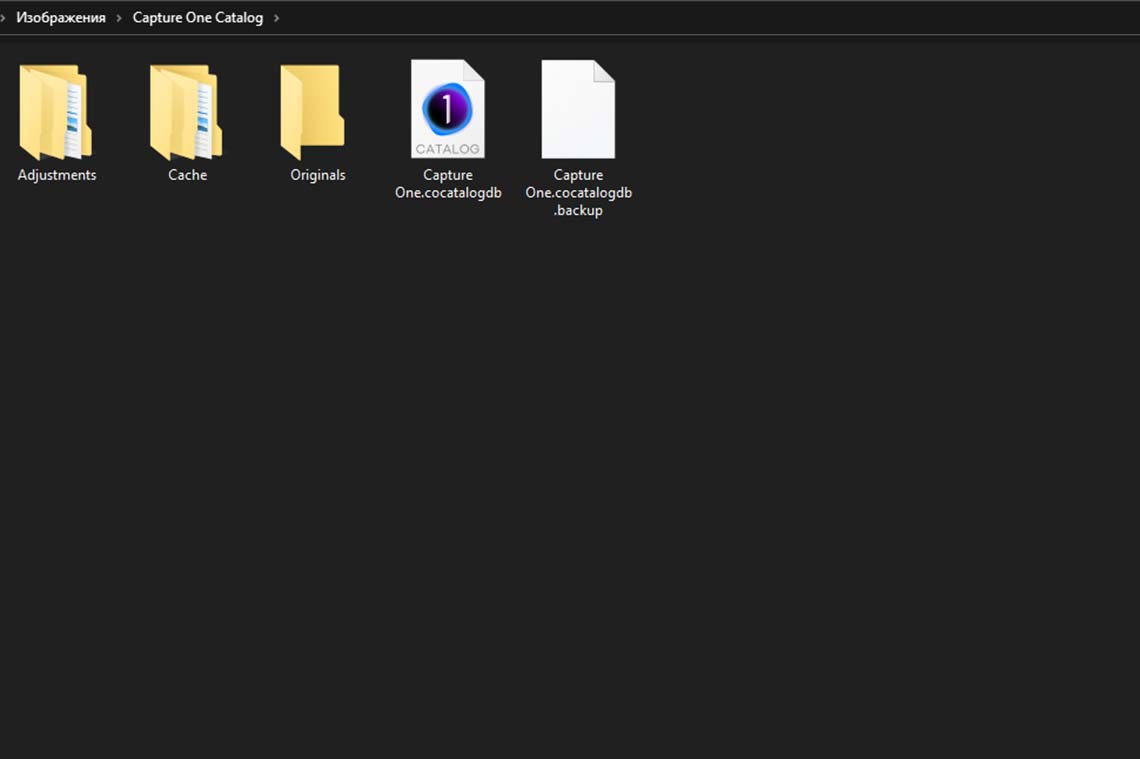
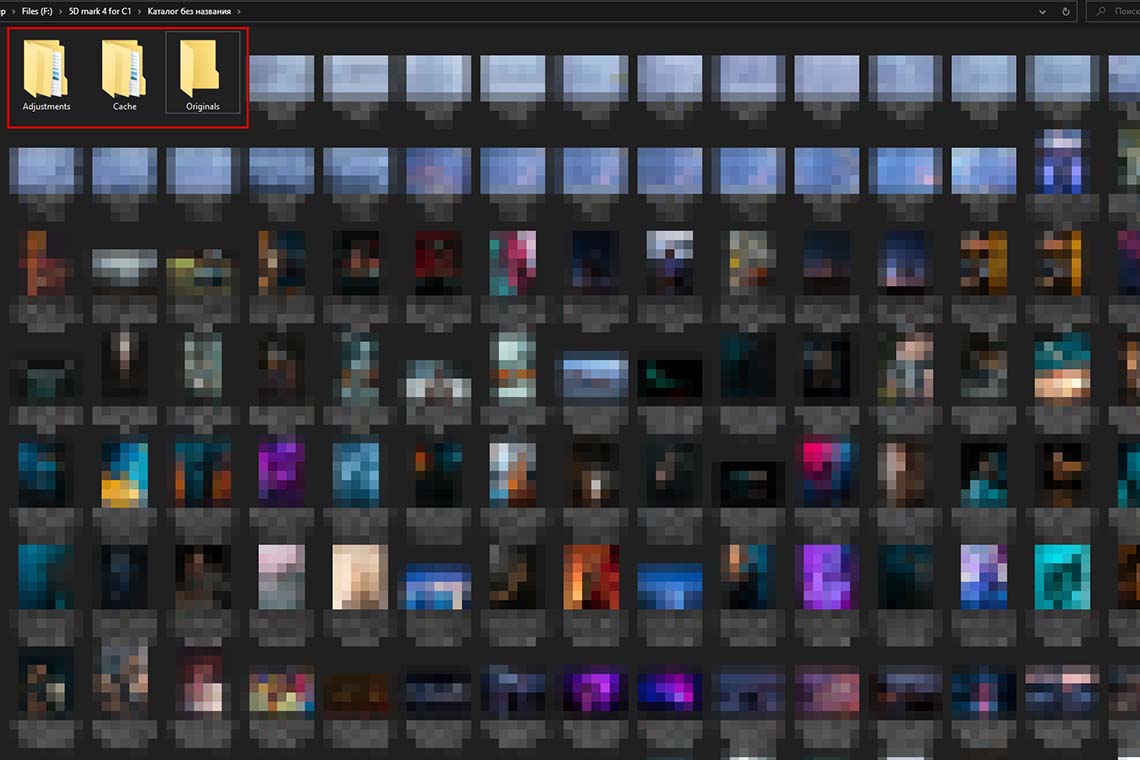
Чтобы удалить кэш Capture One в 2022 году, откройте каталог файлов и удалите содержимое папок «Cash», «Каталог без названия», «Originals». Если вы не назначали отдельную папку для хранения кэша и каталогов, их можно найти в разделе по умолчанию. Например, в операционной системе Windows 10 каталог находится в папке «Изображения» на диске С и называется «Capture One Catalog».
Если вы хотите создать новый каталог, вместо удаления содержимого можно удалить всю папку. Пока файлы в каталоге занимают менее 500 мегабайт, избавляться от них не обязательно.
В папках также могут содержаться RAW, сохранённые во время импорта файлов. Поскольку они являются копией исходников с других папок, их также стоит удалить при очистке каталога файлов Capture One.
Как найти каталог файлов Capture One?
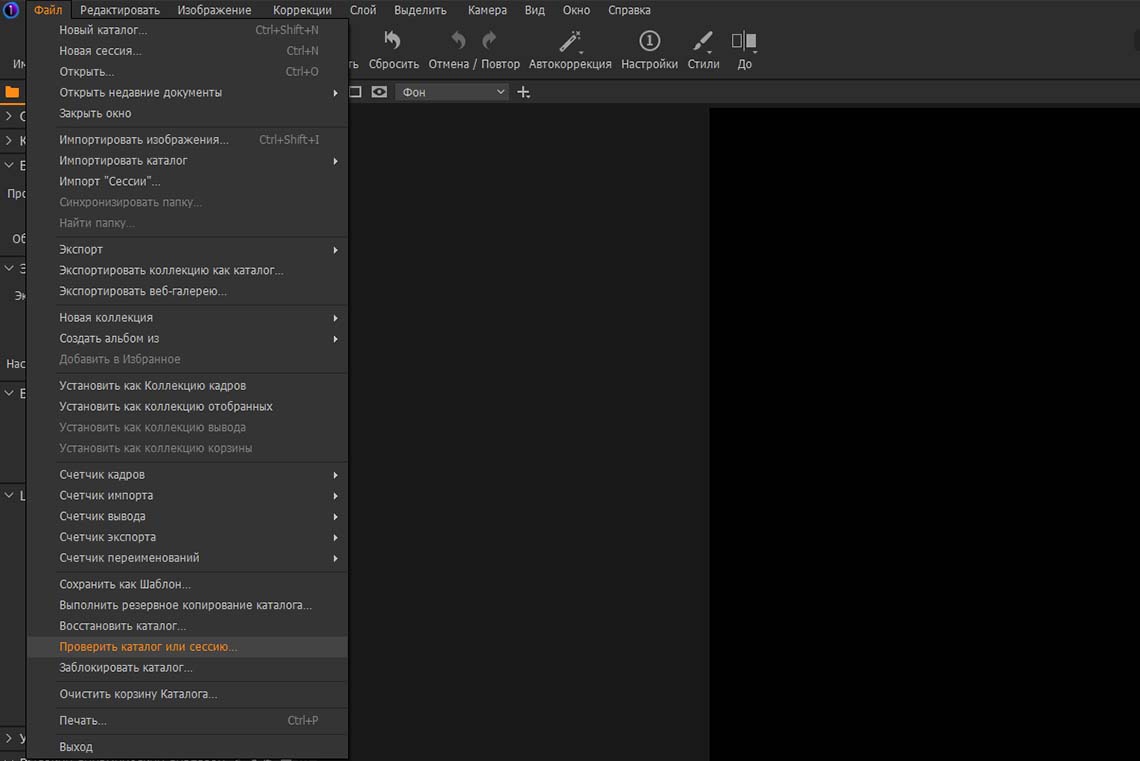
Если каталог файлов Capture One отсутствует в папке «Изображения» на диске С, либо вы создали его на другом диске и забыли точное местонахождение, запустите программу, перейдите в раздел «Файл» и нажмите на пункт «Проверить каталог или сессию». После этого редактор RAW откроет папку с каталогом и кэшем исходников.
Не забудьте закрыть Capture One перед удалением кэша, миниатюр или других файлов из каталога!
Как убрать удалённые файлы из каталога Capture One 2022?
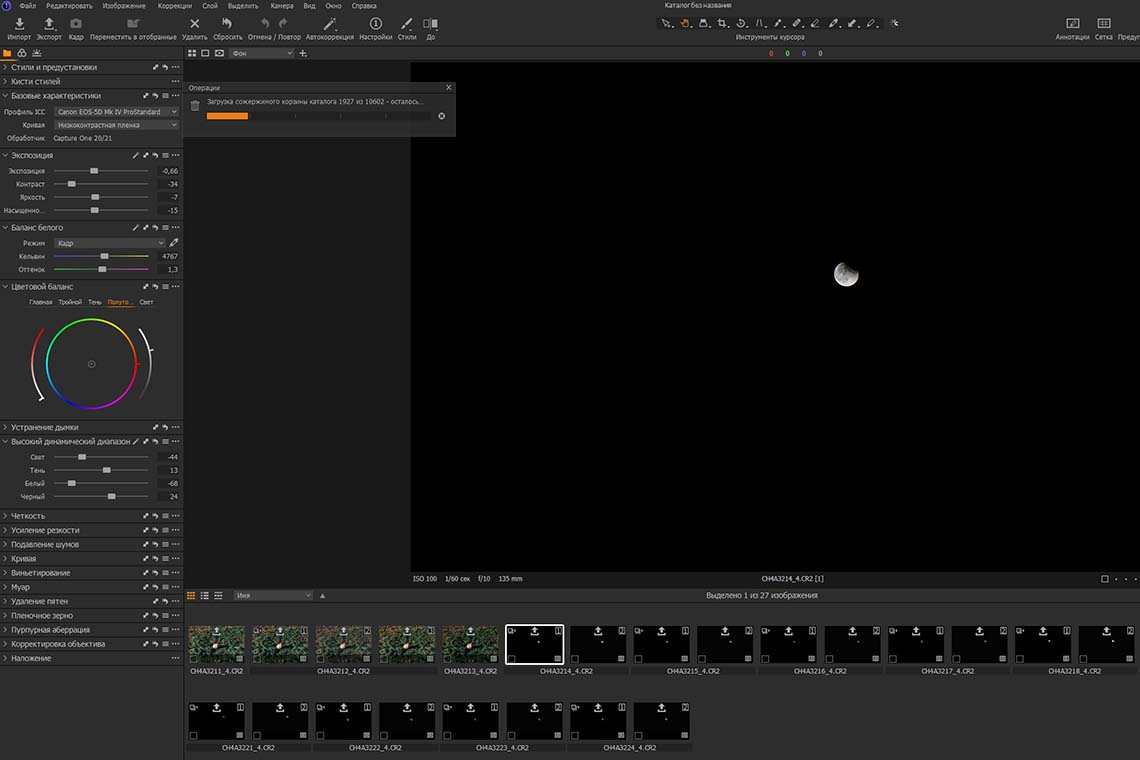
Чтобы убрать удалённые файлы из каталога Capture One 2022, запустите программу, перейдите в раздел «Файл» и нажмите на пункт «Очистить корзину каталога» в меню редактора. После этого перед вами появится предупреждение: «Вы действительно хотите удалить файлы из корзины?». Нажмите «Ок» и немного подождите. Сначала произойдёт загрузка содержимого каталога, а затем очистка папки.
Также может появиться надпись «Вы хотите удалить Х изображений с вашего диска или просто убрать их из каталога?». Вы можете выбрать любой из вариантов, но для большей безопасности я рекомендую нажать на кнопку «Убрать из каталога», а затем вручную удалить «лишние» файлы.
Так как очистка корзины не удаляет абсолютно все файлы, вам всё равно придётся очистить каталог файлов вручную. Поэтому такое решение может уберечь вас от возникновения ошибок и уменьшить время, необходимое для уничтожения системного мусора.
Полное удаление файлов из каталога также уничтожит все оставшиеся «мусорные записи» из корзины, поэтому не обязательно заходить в редактор, чтобы от них избавиться!
Как удалить кэш Capture One с помощью скрипта?
Чтобы удалить кэш Capture One или удалить файлы из каталога в 2022 году с помощью скрипта, откройте поиск в Windows, введите cmd, затем запустите командную строку от имени администратора. После этого введите следующий код, заменив «Name» на используемое вами имя пользователя, либо полностью изменив путь к каталогу файлов (строку «C:UsersNamePicturesCapture One CatalogCache»):
ForFiles /p "C:UsersNamePicturesCapture One CatalogCache" /s /d -30 /c "cmd /c del @file"С помощью скрипта вы сможете удалить все файлы, которые не изменялись последние 30 дней. Перед удалением содержимого папок в командной строке будет появляться окно «Вы уверены? Y/N», в котором нужно будет подтвердить ваш выбор (нажать Y).
Если папок будет много, подтверждать удаление придётся довольно часто. Зато скрипт можно записать и использовать в любое время!
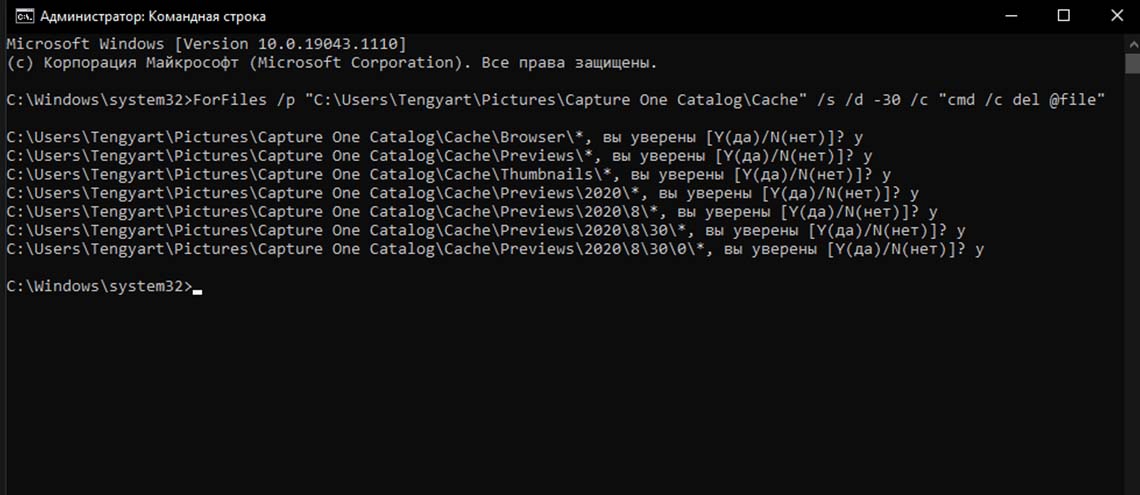
Если вы хотите удалить файлы за другой временной промежуток, вместо -30 введите другое число. Например, чтобы удалить содержимое кэша старше 1 недели, установите -7.
Почему нужно удалять кэш Capture One?
Кэш Capture One и содержимое каталога нужно удалять, чтобы очистить пространство на диске. Если этого не делать, общий размер файлов может достигать астрономических значений! Например, превысить 1,8 ТБ за 2 года использования:
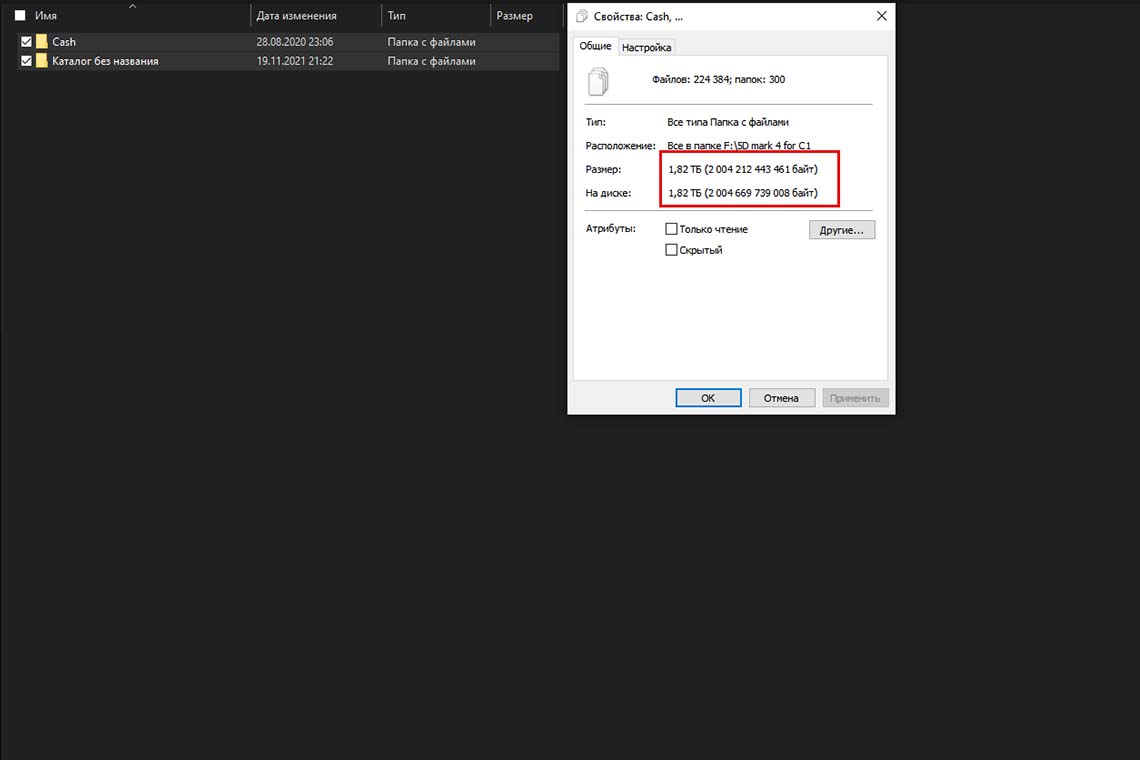
P.S. Настолько сильно кэш будет забиваться только в том случае, если вы импортируете файлы в новую папку (например, в каталог снимков). Без копирования исходников в новый раздел размер кэша будет существенно меньше!
Понравилась статья?

Делитесь публикацией с друзьями, пишите комментарии, подписывайтесь на Telegram, Boosty и другие страницы, чтобы первыми видеть всё самое интересное!

В прошлых статьях мы поговорили про особенности каталогизации в Capture One, о возможностях импорта файлов и работы с каталогом фотографий.
Теперь, когда мы собрали и каталогизировали фотоархив, самое время разобраться с поиском и фильтрацией файлов в нашем каталоге.
Вы узнаете как легко и быстро искать фотографии в каталоге Capture One, используя ключевые слова, параметры файлов, а так же рейтинги и цветные метки.
Поиск и фильтрация файлов в Capture One
Для работы с фотографиями в каталоге Capture One есть два главных инструмента — поиск и фильтрация файлов.
Оба инструмента находятся в блоке Filters во вкладке Library.

Фильтрация файлов

Это основной инструмент для быстрого поиска фотографий в вашем каталоге.
Здесь представлены параметры поиска, по которым можно искать файлы внутри архива.
По дефолту это рейтинг, цветные метки, ключевые слова (keywords), а так же место и дата съемки.
Напротив каждого параметра поиска стоит число, которое показывает количество таких фотографий в вашем каталоге.

А чтобы открыть подборку кадров, нужно просто кликнуть по этому числу.

Зажав Alt можно выделить сразу несколько параметров фильтрации, тогда вы увидите только фотографии, которые отвечают всем критериям поиска.
Например, я хочу посмотреть все кадры, которые я снял во Франкфурте 30 апреля и пометил пятью звездами.

Если вам нужно, чтобы в выдаче файлов отображались все фотографии, которые подходят хотя бы по одному из критериев — просто отключите галку «Result Match All Criteria» в настройках Filters.

Очень важно, что вы можете сами добавлять любые параметры для фильтрации фотографий. Например, выставить фильтр по типу объектива или диафрагмы:

Список параметров поиска находятся в настройках Filters.

Поиск фотографий

В самом простом режиме, поиск в Capture One ищет фотографии по названию файлов. При этом он работает в связке с инструментом фильтрации, то есть можно одновременно искать фотографии, которые помечены красной меткой и содержат, например, «DSC_100» в названии файла.
Но кроме простого поиска в Capture One есть и «продвинутый» режим — Advanced Search.
Тут можно выставить абсолютно любые параметры и условия поиска, и также совместить это с инструментом фильтрации.

Еще одна удобная фича Advanced Search — результаты поиска вы можете собрать в новый альбом или сделать из них Smart Album (о которых я подробно писал в прошлой статье).

Работа с мета-данными фотографий
Самый частый вопрос, который мне задают о работе с каталогом Capture One — как добавить новые параметры для поиска и фильтрации файлов?
Например, где взять новые ключевые слова или описания мест съемки, чтобы начать искать по ним?
Нигде.
Capture One автоматически получает все параметры для поиска из самих файлов фотографий. Вся информация, которая у вас есть в файлах — автоматически доступна вам для поиска.
И для продуктивной работы с каталогом Capture One важно лишь научиться правильно заполнять информацию о кадрах.
Для этого есть очень простые и удобные инструменты, а главный из них — Adjustments Clipboard.
Возьмем фотографию граффити с Дартом Вейдером, которую я снял во время поездки в Таллин.

Откроем вкладку Metadata и для начала пропишем кейворды, а именно «Star Wars» и «граффити».
Кейворды можно писать через запятую и они автоматически преобразуются в список.
Также фотографию можно просто перетащить на ключевое слово и оно применится к нему.

Как только мы добавили к фотографии новые ключевые слова, они тут же появились в параметрах фильтрации.

Затем добавим место съемки — Таллин, Эстония.

Мы прописали мета-информацию для одного файла и теперь можно очень просто применить ее на все остальные кадры из этой поездки.
Открываем Adjustments Clipboard и нажимаем Copy.

Таким образом, мы скопировали в память все параметры фотографии и ее описания.
После этого выберем, какие именно настройки нам нужно скопировать на другие кадры.
Определенно не нужно копировать параметры обработки и ключевые слова (они подходят только для этой конкретной фотографии).
Поэтому мы оставим информацию о стране и городе, где была сделана фотография и применяем это ко всем остальным кадрам из поездки.

Теперь все фотографии из Таллина каталогизированы, и их можно очень легко и быстро найти в фотоархиве.
Точно также вы можете прописать свою контактную информацию и копирайт, скопировать и применить ее на все фотографии.
Но есть еще более удобный способ – один раз прописать всю общую информацию о вашем копирайте и контактных данных, и сохранить их в пресет (Preset).

Теперь вы можете в один клик добавлять эту информацию к любым файлам.
Кстати, при импорте фотографий в каталог Capture One можно автоматически применять ко всем фотографиям созданные пресеты, то есть информация о вашем авторстве будет сразу добавляться ко всем новым фотографиям.
Используя возможности Capture One, вы можете очень быстро и просто каталогизировать фотографии, а потом найти любые файлы в вашем каталоге. И в будущих статьях мы еще не раз вернемся к теме работы с каталогом в Capture One.
Подробно про работу с каталогом и весь функционал Capture One я рассказываю на моем он-лайн курсе «Профессиональная обработка RAW в Capture One Pro 7».
Видеокурс «Профессиональная обработка RAW в Capture One Pro 7»
О всех возможностях Capture One Pro 7 я рассказываю в своем видеокурсе «Профессиональная обработка RAW в Capture One Pro 7».
Это четыре часа обучающего видео (полностью на русском языке), которые освещают все аспекты работы в Capture One Pro: от описания всех инструментов программы и эффективных приемов обработки, до сложной работы с RAW.
Пример видеоурока:
Версия урока в высоком разрешении и оригинальном качестве (1680х1050)
Другие статьи про работу с каталогом в Capture One Pro 7:
Каталогизация в Capture One Pro 7. Импорт фотографий
Каталогизация в Capture One Pro 7. Работа с проектами, группами и альбомами
Экспорт фотографий из каталога Capture One Pro 7
Чтобы первыми узнавать о всех новых статьях на CaptureOneBlog.ru – подписывайтесь на наши группы в социальных сетях:
![]()
![]()
![]()
![]()
Или подписываемся на RSS

Автор: Александр Свет
Twitter: @sashasvet
ЖЖ: sashasvet.livejournal.com
![]()
leerob
•
Senior Member
•
Posts: 2,670
Can I recover images in C1 from session trash?
Jan 11, 2018
1
I’m new to C1. Just bought it yesterday.
Playing around I deleted compare variants (I think / thought) to session trash folder. Now when I look in folder using windows explorer those images are missing. Doing search I find file names but they have extension like D11111.NEF.cop and other funky names. I don’t like this compare variants idea.
Thank you very much for all the help.
Panasonic Lumix DMC-LX7
Panasonic Lumix DMC-FZ200
Leica X Vario
Leica C-Lux
Nikon D7100
+5 more
ANSWER:
This question has not been answered yet.
Cariboo
•
Contributing Member
•
Posts: 774
Re: Can I recover images in C1 from session trash?
In reply to leerob
•
Jan 12, 2018
If you press F1 or go to the top menu bar & press Help, then you can search for info on how to use Capture One. Not mention the CO user forum & YouTube has many many tutorials.
This is from CO Help / F1. I hope it helps.
«Delete files from a session
- Select a file or multiple filesto be deleted in the Browser.
- Press Backspace on your keyboard. Alternatively, press the trash icon on the toolbar.
- The files are placed in the Session Trash Folder, where they can be deleted or retrieved.
- Empty the Session Trash folder by selecting File>Empty Session Trash.»
![]()
OP
leerob
•
Senior Member
•
Posts: 2,670
Re: Can I recover images in C1 from session trash?
In reply to Cariboo
•
Jan 12, 2018
1
3.The files are placed in the Session Trash Folder, where they can be deleted or retrieved.
How can they be retrieved?
Panasonic Lumix DMC-LX7
Panasonic Lumix DMC-FZ200
Leica X Vario
Leica C-Lux
Nikon D7100
+5 more
myotisone
•
Senior Member
•
Posts: 2,430
Re: Can I recover images in C1 from session trash?
In reply to leerob
•
Jan 12, 2018
2
leerob wrote:
3.The files are placed in the Session Trash Folder, where they can be deleted or retrieved.
How can they be retrieved?
I don’t know the answer to your OP, but the variants aren’t «files» they are just a different virtual view of your original image file.
If you delete an «image file», you should be able to go to the trash and just drag it back into the active folder or use the file move command from the menu.
But the only thing you are deleting, when you delete a variant, is the set of instructions telling C1 how you want see this particular variant of the original. That’s part of the point of having the virtual variants approach, so you can have multiple comparisons without increasing disk space.
It may well be that C1 treats the variant «instructions» as if it was an image file, which can be deleted and then recovered, but I would have thought that once deleted, unless you use the undo command, it might well be gone for ever.
I can’t remember what the C1 extensions mean, but the *.cop file you are seeing could well contain the instructions file, which may well rebuild the variant, but I have no idea how you access it.
Hopefully, someone will come along with a proper answer, but looking for ways to recover «files» might not help in finding out how to recover variants.
I’ve googled for help on retrieving variants, but have found nothing.
Cheers,
Graham
Viyice
•
New Member
•
Posts: 2
Re: Can I recover images in C1 from session trash?
In reply to leerob
•
Jan 12, 2018
Go to your Library tools group, and then the Trash Folder. From there you can select files and use the menu: File>Move to Selects Folder [CTRL+J], or drag the file(s) to the place where you want it to be.
PiNa1971
•
Forum Member
•
Posts: 81
Re: Can I recover images in C1 from session trash?
In reply to leerob
•
Jan 12, 2018
leerob wrote:
3.The files are placed in the Session Trash Folder, where they can be deleted or retrieved.
How can they be retrieved?
Simply move/copy them manually from C1’s Trash folder back to C1’s Capture folder with your favorite file manager. Done.
— hide signature —
Martin
Nikon D500
Nikon AF-S Nikkor 70-200mm f/2.8G ED VR
Nikon AF-S DX Nikkor 17-55mm f/2.8G ED-IF
Nikon AF Nikkor 50mm f/1.8D
Nikon 200-500mm F5.6E ED VR
![]()
OP
leerob
•
Senior Member
•
Posts: 2,670
Re: Can I recover images in C1 from session trash?
myotisone wrote:
leerob wrote:
3.The files are placed in the Session Trash Folder, where they can be deleted or retrieved.
How can they be retrieved?
I don’t know the answer to your OP, but the variants aren’t «files» they are just a different virtual view of your original image file.
If you delete an «image file», you should be able to go to the trash and just drag it back into the active folder or use the file move command from the menu.
But the only thing you are deleting, when you delete a variant, is the set of instructions telling C1 how you want see this particular variant of the original. That’s part of the point of having the virtual variants approach, so you can have multiple comparisons without increasing disk space.
It may well be that C1 treats the variant «instructions» as if it was an image file, which can be deleted and then recovered, but I would have thought that once deleted, unless you use the undo command, it might well be gone for ever.
I can’t remember what the C1 extensions mean, but the *.cop file you are seeing could well contain the instructions file, which may well rebuild the variant, but I have no idea how you access it.
Hopefully, someone will come along with a proper answer, but looking for ways to recover «files» might not help in finding out how to recover variants.
I’ve googled for help on retrieving variants, but have found nothing.
Cheers,
Graham
Thank you for all the help.
I searched in windows explorer and found trash folder and successfully retrieved my image. Apparently I moved it session trash by mistake.
Now, i bought a book for version 10, but should be close enough. Meantime, I’d like to ask another question. How do I configure C1 to put catalog, cache and other folders to drive other than «C»?
I learning, but it sure going slow, so far. I guest I’ve to learn tofollow the Danish logic
Panasonic Lumix DMC-LX7
Panasonic Lumix DMC-FZ200
Leica X Vario
Leica C-Lux
Nikon D7100
+5 more
Cariboo
•
Contributing Member
•
Posts: 774
Re: Can I recover images in C1 from session trash?
In reply to leerob
•
Jan 12, 2018
Again, all the info is in the F1 / Help file. Also a quick search of YouTube brought up these many tutorials on Capture One File Management. You can also download the Help file from Capture One website to read outside of Capture One. It is a book in itself.
YouTube Capture One File Management
You could also search this forum or the PC Forum as how to work with Capture One has been discussed many times before. These forums are a wealth of information & the search function is powerful & highly educational.
Do EVERYTHING regarding file management, deleting & moving files & folders from within Capture One using it’s file management (left side folder system) vs. outside of it & you will be better off. Capture One cannot track outside file management.
To do what you want is done by setting up a Session or Catalog & it will ask you WHERE you want to place the folders, so just follow the instructions (& folder icons for creating folders where you want them.). MANY MANY MANY tutorials on YouTube, short to long. Most versions of Capture One for basic operations are the same since v7 or so, so you don’t need to watch JUST version 11 tutorials.
One more suggestion: Don’t try to do things YOUR WAY vs. how Capture One works. You will drive yourself crazy if you do. Do not think that you know better or that your way works better & that Capture One (or any software) is more stupid than your way. It is just different. Accept that & learn the software as designed & your workflow will be better off. Do not do file management of Capture One files outside of Capture One (or ANY DAM), unless you know what you are doing & don’t need Capture One to follow along.
![]()
OP
leerob
•
Senior Member
•
Posts: 2,670
Re: Can I recover images in C1 from session trash?
In reply to Cariboo
•
Jan 12, 2018
Cariboo wrote:
Again, all the info is in the F1 / Help file. Also a quick search of YouTube brought up these many tutorials on Capture One File Management. You can also download the Help file from Capture One website to read outside of Capture One. It is a book in itself.
YouTube Capture One File Management
You could also search this forum or the PC Forum as how to work with Capture One has been discussed many times before. These forums are a wealth of information & the search function is powerful & highly educational.
Do EVERYTHING regarding file management, deleting & moving files & folders from within Capture One using it’s file management (left side folder system) vs. outside of it & you will be better off. Capture One cannot track outside file management.
To do what you want is done by setting up a Session or Catalog & it will ask you WHERE you want to place the folders, so just follow the instructions (& folder icons for creating folders where you want them.). MANY MANY MANY tutorials on YouTube, short to long. Most versions of Capture One for basic operations are the same since v7 or so, so you don’t need to watch JUST version 11 tutorials.
One more suggestion: Don’t try to do things YOUR WAY vs. how Capture One works. You will drive yourself crazy if you do. Do not think that you know better or that your way works better & that Capture One (or any software) is more stupid than your way. It is just different. Accept that & learn the software as designed & your workflow will be better off. Do not do file management of Capture One files outside of Capture One (or ANY DAM), unless you know what you are doing & don’t need Capture One to follow along.
Well I chose session and it didn’t ask me any questions about folder/file placement during installation. BTW I chose SESSION for now because it said that I can change it anytime.
Thanks!
Panasonic Lumix DMC-LX7
Panasonic Lumix DMC-FZ200
Leica X Vario
Leica C-Lux
Nikon D7100
+5 more
myotisone
•
Senior Member
•
Posts: 2,430
Re: Can I recover images in C1 from session trash?
In reply to leerob
•
Jan 13, 2018
leerob wrote:
Well I chose session and it didn’t ask me any questions about folder/file placement during installation. BTW I chose SESSION for now because it said that I can change it anytime.
When you used File|New session dialog, the first field asks for a session name, the second field asked for a location, which you presumably left at the default when you created the session.
Once created, all the files related to that session are kept within the session folder. You should now be able to move the session folder to a different location, or even a different computer. I presume you can do this from inside Capture One, but I always do it at system level.
Capture One will then complain when you open it, that it can’t find the session, but you just tell Capture One where it is, and it will then remember where it is the next time you open it.
You can convert/import Sessions into catalogues, but you can’t create a session from a catalogue.
C1 isn’t a difficult program to get to grips with, but it is a complex one, and you should find the book helpful, but it really is worth putting several hours into watching the Phase 1 webinar videos that have been suggested. They will save you a lot of grief.
Cheers,
Graham
Re: Can I recover images in C1 from session trash?
In reply to leerob
•
Feb 17, 2020
In C1, to retrieve an «image» from the trash, select it and drag it to the Session folder.
Keyboard shortcuts:
FForum
MMy threads
Latest sample galleries
Latest in-depth reviews

Leica introduces a tilt screen, USB-C and HDMI ports, 8K video and more to the Q-series.

With a bigger battery and better video capabilities, the Fujifilm X-S20 could be the vlogging machine content creators have been waiting for.

The Nikon Z8 is a $4000 Stacked-CMOS full-frame mirrorless camera that offers most of the capabilities of the range-topping Z9 but in a smaller, less expensive body.

The Canon EOS R10 is compact, mid-level 24MP APS-C mirrorless camera built around Canon’s RF mount. We look into whether it offers more than your smartphone.

Leica has announced a mono-only version of its M11 60MP manual focus rangefinder. We’ve been taking a look at what it offers and what it’s like to shoot with.
Latest buying guides

Above $2500 cameras tend to become increasingly specialized, making it difficult to select a ‘best’ option. We case our eye over the options costing more than $2500 but less than $4000, to find the best all-rounder.

There are a lot of photo/video cameras that have found a role as B-cameras on professional film productions or even A-cameras for amateur and independent productions. We’ve combed through the options and selected our two favorite cameras in this class.

What’s the best camera for around $2000? These capable cameras should be solid and well-built, have both the speed and focus to capture fast action and offer professional-level image quality. In this buying guide we’ve rounded up all the current interchangeable lens cameras costing around $2000 and recommended the best.

Family moments are precious and sometimes you want to capture that time spent with loved ones or friends in better quality than your phone can manage. We’ve selected a group of cameras that are easy to keep with you, and that can adapt to take photos wherever and whenever something memorable happens.

What’s the best camera for shooting sports and action? Fast continuous shooting, reliable autofocus and great battery life are just three of the most important factors. In this buying guide we’ve rounded-up several great cameras for shooting sports and action, and recommended the best.
-

-
April 5 2017, 05:27
- Компьютеры
- Cancel
Ситуация: случайно выделил несколько фотографий и при удалении ненужной, остальные последовали за ней, вопрос: куда? Можно как-то восстановить их, хотя бы в рамках одной сессии? Уверен, должен быть какой-то способ. Знающему ответ + в карму!
03.04.2017. Задал этот вопрос гуру Capture one Свет Александру, но сходу ответа не получил:

06.04.2017. Ответ пришел случайно. После неправильного завершения работы компьютера (не вышел из сна, пришлось перезагружаться кнопкой питания) и запуска С1 (Capture one), редактор мне выдал следующее диалоговое окно с прописанными путями, где хранятся удалённые фотографии. Я и раньше заходил сюда, но тогда не нашел папку «Capture one», т.к. нужно было искать папку «Сеанс без названия» и это меня запутало.

И действительно, все случайно или осознанно удалённые фотографии преспокойненько лежат себе в папке «Trash». А я всё думал-гадал, куда это место на диске C: девается? =)

![]()
-

-
February 28 2010, 23:34
Куда деваются удаленные файлы?
Куда Capture One Pro 5.0 девает удаленные файлы, упорно не могу найти?
В хелпе написано, что удаляет в системную корзину, при этом там их нет. Весь диск уже перерыла… поможите, плиз