For anyone who stumbles across this in the future.
This can be done with template matching. To summarize (my understanding), template matching looks for an exact match of one image within another image.
Here’s an example of how to do it within Python:
import cv2

method = cv2.TM_SQDIFF_NORMED

# Read the images from the file
small_image = cv2.imread('small_image.png')
large_image = cv2.imread('large_image.jpeg')

result = cv2.matchTemplate(small_image, large_image, method)

# We want the minimum squared difference
mn,_,mnLoc,_ = cv2.minMaxLoc(result)

# Draw the rectangle:
# Extract the coordinates of our best match
MPx,MPy = mnLoc

# Step 2: Get the size of the template. This is the same size as the match.
trows,tcols = small_image.shape[:2]

# Step 3: Draw the rectangle on large_image
cv2.rectangle(large_image, (MPx,MPy),(MPx+tcols,MPy+trows),(0,0,255),2)

# Display the original image with the rectangle around the match.
cv2.imshow('output',large_image)

# The image is only displayed if we call this
cv2.waitKey(0)
EDIT: Ok, here is the naive way to do this:
import Image, numpy

def subimg(img1,img2):
    img1=numpy.asarray(img1)
    img2=numpy.asarray(img2)

    #img1=numpy.array([[1,2,3],[4,5,6],[7,8,9]])
    #img2=numpy.array([[0,0,0,0,0],[0,1,2,3,0],[0,4,5,6,0],[0,7,8,9,0],[0,0,0,0,0]])

    img1y=img1.shape[0]
    img1x=img1.shape[1]

    img2y=img2.shape[0]
    img2x=img2.shape[1]

    stopy=img2y-img1y+1
    stopx=img2x-img1x+1

    for x1 in range(0,stopx):
        for y1 in range(0,stopy):
            x2=x1+img1x
            y2=y1+img1y

            pic=img2[y1:y2,x1:x2]
            test=pic==img1

            if test.all():
                return x1, y1

    return False

small=Image.open('small.tif')
big=Image.open('big.tif')

print subimg(small, big)
It works just fine, but I want to SPEED IT UP. I think the key is in the array ‘test’ which we might be able to use to skip some positions in the image.
Edit 2: Make sure you use images in a loss-less format to test this.
On Mac, install Pillow and from PIL import Image
Время на прочтение
5 мин
Количество просмотров 24K
В данной статье хочу рассказать про поиск объектов на изображении с помощью Python и OpenCV. В качестве изображения может быть использована как Captcha, так и любое другое изображение.
Полный код и все исходники можно найти на моем Github.
Для того, чтобы написать легковесное приложение для обнаружения объектов на изображении, установим необходимые библиотеки:
pip install opencv-python
pip install numpy
Также для красивого вывода текста в консоль я добавил следующую библиотеку:
pip install artТеперь можем перейти к написанию самого приложения, которое будет находить объекты на изображении при помощи YOLO и отмечать их.
Скачаем с моего Github исходники и поместим в директорию Resources в проекте. Посмотрим, какие объекты сможет определять наша будущая программа:
'person', 'bicycle', 'car', 'motorbike', 'aeroplane', 'bus', 'train', 'truck', 'boat', 'traffic light',
'fire hydrant', 'stop sign', 'parking meter', 'bench', 'bird', 'cat', 'dog', 'horse', 'sheep', 'cow',
'elephant', 'bear', 'zebra', 'giraffe', 'backpack', 'umbrella', 'handbag', 'tie', 'suitcase', 'frisbee',
'skis', 'snowboard', 'sports ball', 'kite', 'baseball bat', 'baseball glove', 'skateboard', 'surfboard',
'tennis racket', 'bottle', 'wine glass', 'cup', 'fork', 'knife', 'spoon', 'bowl', 'banana', 'apple',
'sandwich', 'orange', 'broccoli', 'carrot', 'hot dog', 'pizza', 'donut', 'cake', 'chair', 'sofa',
'pottedplant', 'bed', 'diningtable', 'toilet', 'tvmonitor', 'laptop', 'mouse', 'remote', 'keyboard',
'cell phone', 'microwave', 'oven', 'toaster', 'sink', 'refrigerator', 'book', 'clock', 'vase', 'scissors',
'teddy bear', 'hair drier', 'toothbrush'
Первым делом импортируем необходимые библиотеки:
import cv2
import numpy as np
from art import tprint
Напишем функции для применения YOLO. С ее помощью определяются самые вероятные классы объектов на изображении, а также координаты их границ, которые в дальнейшем будут использованы для отрисовки.
def apply_yolo_object_detection(image_to_process):
    """
    Recognition and determination of the coordinates of objects on the image
    :param image_to_process: original image
    :return: image with marked objects and captions to them
    """

    height, width, _ = image_to_process.shape
    blob = cv2.dnn.blobFromImage(image_to_process, 1 / 255, (608, 608),
                                 (0, 0, 0), swapRB=True, crop=False)
    net.setInput(blob)
    outs = net.forward(out_layers)
    class_indexes, class_scores, boxes = ([] for i in range(3))
    objects_count = 0

    # Starting a search for objects in an image
    for out in outs:
        for obj in out:
            scores = obj[5:]
            class_index = np.argmax(scores)
            class_score = scores[class_index]
            if class_score > 0:
                center_x = int(obj[0] * width)
                center_y = int(obj[1] * height)
                obj_width = int(obj[2] * width)
                obj_height = int(obj[3] * height)
                box = [center_x - obj_width // 2, center_y - obj_height // 2,
                       obj_width, obj_height]
                boxes.append(box)
                class_indexes.append(class_index)
                class_scores.append(float(class_score))

    # Selection
    chosen_boxes = cv2.dnn.NMSBoxes(boxes, class_scores, 0.0, 0.4)
    for box_index in chosen_boxes:
        box_index = box_index
        box = boxes[box_index]
        class_index = class_indexes[box_index]

        # For debugging, we draw objects included in the desired classes
        if classes[class_index] in classes_to_look_for:
            objects_count += 1
            image_to_process = draw_object_bounding_box(image_to_process,
                                                        class_index, box)

    final_image = draw_object_count(image_to_process, objects_count)
    return final_image
Добавим функцию, которая обведет найденные на изображении объекты с помощью координат границ, полученных из функции apply_yolo_object_detection:
def draw_object_bounding_box(image_to_process, index, box):
    """
    Drawing object borders with captions
    :param image_to_process: original image
    :param index: index of object class defined with YOLO
    :param box: coordinates of the area around the object
    :return: image with marked objects
    """

    x, y, w, h = box
    start = (x, y)
    end = (x + w, y + h)
    color = (0, 255, 0)
    width = 2
    final_image = cv2.rectangle(image_to_process, start, end, color, width)

    start = (x, y - 10)
    font_size = 1
    font = cv2.FONT_HERSHEY_SIMPLEX
    width = 2
    text = classes[index]
    final_image = cv2.putText(final_image, text, start, font,
                              font_size, color, width, cv2.LINE_AA)

    return final_image
Помимо отрисовки объектов, можно добавить вывод их количества. Напишем для этого еще одну функцию:
def draw_object_count(image_to_process, objects_count):
    """
    Signature of the number of found objects in the image
    :param image_to_process: original image
    :param objects_count: the number of objects of the desired class
    :return: image with labeled number of found objects
    """

    start = (10, 120)
    font_size = 1.5
    font = cv2.FONT_HERSHEY_SIMPLEX
    width = 3
    text = "Objects found: " + str(objects_count)

    # Text output with a stroke
    # (so that it can be seen in different lighting conditions of the picture)
    white_color = (255, 255, 255)
    black_outline_color = (0, 0, 0)
    final_image = cv2.putText(image_to_process, text, start, font, font_size,
                              black_outline_color, width * 3, cv2.LINE_AA)
    final_image = cv2.putText(final_image, text, start, font, font_size,
                              white_color, width, cv2.LINE_AA)

    return final_image
Для получения результата будем выводить входное изображение, только с отрисованными объектами и их количеством:
def start_image_object_detection(img_path):
    """
    Image analysis
    """

    try:
        # Applying Object Recognition Techniques in an Image by YOLO
        image = cv2.imread(img_path)
        image = apply_yolo_object_detection(image)

        # Displaying the processed image on the screen
        cv2.imshow("Image", image)
        if cv2.waitKey(0):
            cv2.destroyAllWindows()

    except KeyboardInterrupt:
        pass
Программа уже почти готова, осталось только написать функцию main, где будем передавать аргументы в функции.
Данный блок не является обязательным, но я захотел сделать красивый вывод текста в консоль:
# Logo
    tprint("Object detection")
    tprint("by")
    tprint("paveldat")
Создадим функцию main, в которой настроим нашу сеть:
	if __name__ == '__main__':
  	# Loading YOLO scales from files and setting up the network
    net = cv2.dnn.readNetFromDarknet("Resources/yolov4-tiny.cfg",
                                     "Resources/yolov4-tiny.weights")
    layer_names = net.getLayerNames()
    out_layers_indexes = net.getUnconnectedOutLayers()
    out_layers = [layer_names[index - 1] for index in out_layers_indexes]

    # Loading from a file of object classes that YOLO can detect
    with open("Resources/coco.names.txt") as file:
        classes = file.read().split("n")

    # Determining classes that will be prioritized for search in an image
    # The names are in the file coco.names.txt

    image = input("Path to image(recapcha): ")
    look_for = input("What we are looking for: ").split(',')

    # Delete spaces
    list_look_for = []
    for look in look_for:
        list_look_for.append(look.strip())

    classes_to_look_for = list_look_for

    start_image_object_detection(image)
Программа будет запрашивать путь до изображения и объекты, которые хотим найти. Объекты должны перечисляться через запятую, если их несколько.
Запускаем программу и тестируем. Слева будет оригинальное изображение, а справа — обработанное.
Path to image(recapcha): Resultinputbus1.png
What we are looking for: bus
Path to image(recapcha): Resultinputtruck.jpg
What we are looking for: truck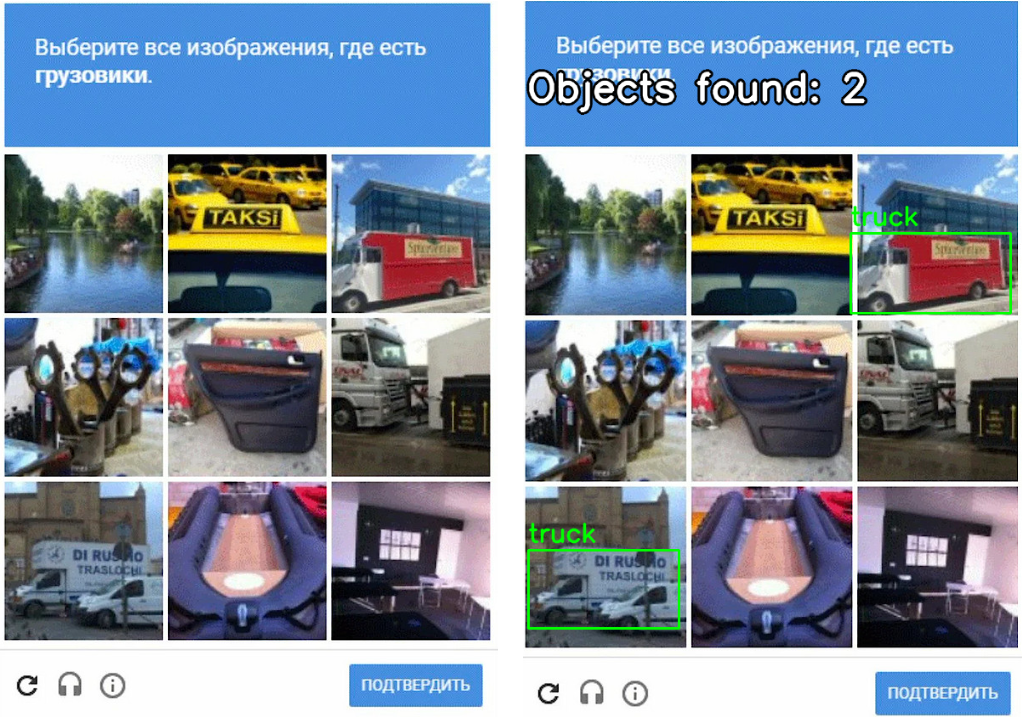
Path to image(recapcha): Resultinputcity.png
What we are looking for: car, person, traffic light
Мы проверили, как алгоритм YOLO справился с тестом. Погрешность все же есть, но в основном программа успешно находит необходимые объекты.
This is the second time that I’m writing on how to do image search with python. The first blog post. That I wrote about the subject got a lot of interest and even today I regularly get people commenting on it or coming to the github repo asking for help. So I figured it was time for a refresher.
Python imagesearch is now a pip-eable package
I have put a bit of work to put the library as a package. In order to allow you to just pip the library. This is a much better solution than me saying nonsense like “copy the file in your project”. Now it is as easy as doing :
pip3 install python-imagesearch
The above will probably fail or you won’t be able to use the library as you need extra packages depending on your os :
Linux
sudo pip3 install python3-xlib
sudo apt-get install -y scrot python3-tk python3-dev python3-opencv -y
MacOs
brew install opencv
pip3 install -U pyobjc-core
pip3 install -U pyobjc
Windows
No extra installation steps needed 🙂
Quick start
The simplest example to do image search with python is this:
from python_imagesearch.imagesearch import imagesearchpos = imagesearch("./github.png")
if pos[0] != -1:
    print("position : ", pos[0], pos[1])
else:
    print("image not found")
Simply search for one occurrence of the image “github.png” on the screen and print its x/y position
Other functions
imagesearcharea
Performs an image search on a specific rectangle of the screen, it’s very useful to speed up searches as there will be less screen space to search.
It’s also useful to focus the search only on a specific part of the screen to reduce the chances of having a false positive.
pos = imagesearcharea("./github.png", 0, 0, 800, 600)
if pos[0] != -1:
    print("position : ", pos[0], pos[1])
else:
    print("image not found")
Input:
image : path to the image file (see opencv imread for supported types)
precision : the higher, the lesser tolerant and fewer false positives are found default is 0.8
im : a PIL image, usefull if you intend to search the same unchanging region for several elements
Output:
the top left corner coordinates of the element if found as an array [x,y] or [-1,-1] if not
region_grabber
Useful to optimize imagesearcharea or imagesearch calls, by getting an already processed image you can perform multiple searches on it with minor speed gains. Here’s an example
# non -optimized way :
time1 = time.clock()
for i in range(10):
    imagesearcharea("./github.png", 0, 0, 800, 600)
    imagesearcharea("./panda.png", 0, 0, 800, 600)
print(str(time.clock() - time1) + " seconds (non optimized)")

# optimized way :

time1 = time.clock()
im = region_grabber((0, 0, 800, 600))
for i in range(10):
    imagesearcharea("./github.png", 0, 0, 800, 600, 0.8, im)
    imagesearcharea("./panda.png", 0, 0, 800, 600, 0.8, im)
print(str(time.clock() - time1) + " seconds (optimized)")

# sample output :

# 0.5233619831305721 seconds (non optimized)
# 0.4075934110084374 seconds (optimized)
Input: a tuple containing the 4 coordinates of the region to capture tuple should contain coordinates of : topx, topy, bottomx, bottomy
Output: a PIL image of the area selected.
imagesearch_loop
Searches for an image on screen continuously until it’s found, useful to make a waiting script until x image appears. For instance waiting for the end of a loading screen.
from python_imagesearch.imagesearch import imagesearch_loop

pos = imagesearch_loop("./github.png", 1)
print("position : ", pos[0], pos[1])
Input:
image : path to the image file (see opencv imread for supported types)
time : Waiting time after failing to find the image (seconds)
precision : the higher, the lesser tolerant and fewer false positives are found default is 0.8
Output:
the top left corner coordinates of the element if found as an array [x,y]
imagesearch_numLoop
Searches for an image on screen continuously until it’s found or max number of samples reached.
from python_imagesearch.imagesearch import imagesearch_numLooppos = imagesearch_numLoop("./github.png", 1, 50)
if pos[0] != -1:
    print("position : ", pos[0], pos[1])
else:
    print("image not found")
Input:
image : path to the image file (see opencv imread for supported types)
time : Waiting time after failing to find the image
maxSamples: maximum number of samples before function times out.
precision : the higher, the lesser tolerant and fewer false positives are found default is 0.8
Output: the top left corner coordinates of the element if found as an array [x,y]
imagesearch_region_loop
Very similar to imagesearch_loop except it works with regions
from python_imagesearch.imagesearch import imagesearch_region_looppos =  imagesearch_region_loop("./github.png", 1, 0, 0, 800, 600)
print("position : ", pos[0], pos[1])
Input:
image : path to the image file (see opencv imread for supported types)
time : Waiting time after failing to find the image
x1 : top left x value
y1 : top left y value
x2 : bottom right x value
y2 : bottom right y value
precision : the higher, the lesser tolerant and fewer false positives are found default is 0.8
Output:
the top left corner coordinates of the element as an array [x,y]
imagesearch_count
Counts how many occurrences there are of the image there are on the screen.
from python_imagesearch.imagesearch import imagesearch_countcount = imagesearch_count("./github.png")
print(count)
Input:
image : path to the target image file (see opencv imread for supported types)
precision : the higher, the lesser tolerant and fewer false positives are found default is 0.9
Output:
the number of times a given image appears on the screen.
optionally an output image with all the occurances boxed with a red outline.
imagesearch_from_folder
Performs an imagesearch on all the images in a folder. This function was done by kadusalles
from python_imagesearch.imagesearch import imagesearch_count

results = str(imagesearch_from_folder('./', 0.8))
print(results)
Input:
path: to the folder containing the images (supported image types are jpg, gif, png and jpeg)
precision : the higher, the lesser tolerant and fewer false positives are found default is 0.9
Output:
A dictionnary with all the images where the key is the image path and the value is it’s position
Conclusion
And that’s about it ! Now you should be able to easily perform Image search with python. If you are interested in the actual code or want to contribute feel free to head on over to the github repository : https://github.com/drov0/python-imagesearch and if you liked my article, come to see more at https://brokencode.io
A curated list of the best Image Search libraries for Python.
In this piece we want to explore examples and packages that we can use when we intend to search images in python.
(a).Pupyl
Pupyl is a really fast image search library which you can index your own (millions of) images and find similar images in milliseconds.
The pupyl project (pronounced pyoo·piel) is a pythonic library to perform image search tasks. It’s intended to made easy reading, indexing, retrieving and maintaining a complete reverse image search engine. You can use it in your own data pipelines, web projects and wherever you find fit!
Step 1: Install Pupyl
The first step is to install Pupyl. You can install it using pip as follows:
# pypi
pip install pupyl
or using conda
# anaconda
conda install -c policratus pupyl
Step 2: Write Code
Start by importing required packages:
from pupyl.search import PupylImageSearch
from pupyl.web import interface
Then instantiate the PupylImageSearch:
SEARCH = PupylImageSearch()Then index the images:
SEARCH.index(
    'https://github.com/policratus/pupyl'
    '/raw/master/samples/images.tar.xz'
)
Here’s the full code:
from pupyl.search import PupylImageSearch
from pupyl.web import interface

SEARCH = PupylImageSearch()

SEARCH.index(
    'https://github.com/policratus/pupyl'
    '/raw/master/samples/images.tar.xz'
)

interface.serve()
Find complete reference here.
Here are more image search libraries for Python:
1. Google-Search-API
A Google Search API python library.
Google Search API is a python based library for searching various functionalities of google. It uses screen scraping to retrieve the results, and thus is unreliable if the way google’s web pages are returned change in the future.
Disclaimer: This software uses screen scraping to retreive search results from google.com, and therefore this software may stop working at any given time. Use this software at your own risk. I assume no responsibility for how this software API is used by others.
Google Web Search
You can search google web in the following way:
search_results = Google.search("This is my query")search_results will contain a list of GoogleResult objects
GoogleResult:
    self.name # The title of the link
    self.link # The link url
    self.description # The description of the link
    self.thumb # The link to a thumbnail of the website (not implemented yet)
    self.cached # A link to the cached version of the page
    self.page # What page this result was on (When searching more than one page)
    self.index # What index on this page it was on
Google Calculator
Attempts to search google calculator for the result of an expression. Returns a CalculatorResult if successful or None if it fails.
Google.calculate("157.3kg in grams"){'expr': u'157.3 kilograms',
'fullstring': u'157.3 kilograms = 157xa0300 grams',
'result': u'157 300 grams',
'unit': u'grams',
'value': u'157300'}Google.calculate("cos(25 pi) / 17.4"){'expr': u'cos(25 * pi) / 17.4',
'fullstring': u'cos(25 * pi) / 17.4 = -0.0574712644',
'result': u'-0.0574712644',
'unit': None,
'value': u'-0.0574712644'}Google Image Search
Searches google images for a list of images. Image searches can be filtered to produce better results.
Perform a google image search on «banana» and filter it:
options = ImageOptions()
options.image_type = ImageType.CLIPART
options.larger_than = LargerThan.MP_4
options.color = "green"
results = Google.search_images("banana", options)
Sample Result:
{'domain': u'exitrealworld.com',
 'filesize': u'4054k',
 'format': u'jpg',
 'height': u'3103',
 'index': 0,
 'link': u'http://www.exitrealworld.com/tools_v2/resources/9e55471ba84686ade677ffe595c45992/upload_images/YELLOW_BANANA.jpg',
 'name': u'Lib Tech Skate Banana BTX',
 'page': 0,
 'thumb': u'http://t3.gstatic.com/images?q=tbn:ANd9GcRzvAUW0en9eZTag3giWelcQ_xbrnBMXVChb3RU3v4HtEgxN3RMS0bSdidf',
 'width': u'3104'}
Filter options:
ImageOptions:
    image_type # face, body, clipart, line drawing
    size_category # large, small, icon
    larger_than # the well known name of the smallest image size you want
    exact_width # the exact width of the image you want
    exact_height # the exact height of the image you want
    color_type # color, b&w, specific
    color # blue, green, red
Enums of values that can be used to filter image searches:
class ImageType:
    NONE = None
    FACE = "face"
    PHOTO = "photo"
    CLIPART = "clipart"
    LINE_DRAWING = "lineart"

class SizeCategory:
    NONE = None
    ICON = "i"
    LARGE = "l"
    MEDIUM = "m"
    SMALL = "s"
    LARGER_THAN = "lt"
    EXACTLY = "ex"

class LargerThan:
    NONE = None
    QSVGA = "qsvga" # 400 x 300
    VGA = "vga"     # 640 x 480
    SVGA = "svga"   # 800 x 600
    XGA = "xga"     # 1024 x 768
    MP_2 = "2mp"    # 2 MP (1600 x 1200)
    MP_4 = "4mp"    # 4 MP (2272 x 1704)
    MP_6 = "6mp"    # 6 MP (2816 x 2112)
    MP_8 = "8mp"    # 8 MP (3264 x 2448)
    MP_10 = "10mp"  # 10 MP (3648 x 2736)
    MP_12 = "12mp"  # 12 MP (4096 x 3072)
    MP_15 = "15mp"  # 15 MP (4480 x 3360)
    MP_20 = "20mp"  # 20 MP (5120 x 3840)
    MP_40 = "40mp"  # 40 MP (7216 x 5412)
    MP_70 = "70mp"  # 70 MP (9600 x 7200)

class ColorType:
    NONE = None
    COLOR = "color"
    BLACK_WHITE = "gray"
    SPECIFIC = "specific"
Google Currency Converter (Exchange Rates)
Convert between one currency and another using google calculator. Results are real time and can change at any time based on the current exchange rate according to google.
Convert 5 US Dollars to Euros using the official 3 letter currency acronym:
euros = Google.convert_currency(5.0, "USD", "EUR")
print "5.0 USD = {0} EUR".format(euros)
5.0 USD = 3.82350692 EURConvert 1000 Japanese Yen to US Dollars:
yen = Google.convert_currency(1000, "yen", "us dollars")
print "1000 yen = {0} us dollars".format(yen)
1000 yen = 12.379 us dollarsInstead you can get the exchange rate which returns what 1 from_currency equals in to_currency and do your own math:
rate = Google.exchange_rate("dollars", "pesos")
print "dollars -> pesos exchange rate = {0}".format(rate)
dollars -> pesos exchange rate = 13.1580679Perform your own math. The following 2 statements are equal:
5.0 * Google.exchange_rate("USD", "EUR")Google.convert_currency(5.0, "USD", "EUR")As a side note, convert_currency is always more accurate than performing your own math on exchange_rate because of possible rounding errors. However if you have more than one value to convert it is best to call exchange_rate and cache the result to use for multiple calculations instead of querying the google server for each one.
Read more
2. image-match
image-match is a simple (now Python 3!) package for finding approximate image matches from a
corpus.
It is similar, for instance, to pHash, but
includes a database backend that easily scales to billions of images and
supports sustained high rates of image insertion: up to 10,000 images/s on our
cluster!
PLEASE NOTE: This algorithm is intended to find nearly duplicate images — think copyright
violation detection. It is NOT intended to find images that are conceptually similar.
For more explanation, see this issue or
this video.
Based on the paper An image signature for any kind of image, Wong et
al. There is an existing
reference implementation which
may be more suited to your needs.
Read more
3. image_search_engine
Building a Deep Image Search Engine using tf.Keras.
Motivation :
Imagine having a data collection of hundreds of thousands to millions of images without any metadata describing the content of each image. How can we build a
system that is able to find a sub-set of those images that best answer a user’s
search query ?.
What we will basically need is a search engine that is able
to rank image results given how well they correspond to the search query, which can be either expressed in a natural language or by another query image.
The way we will solve the problem in this post is by training a deep neural model that learns a fixed length representation (or embedding) of any input image and
text and makes it so those representations are close in the euclidean space if the pairs text-image or image-image are “similar”.
Read more
4. Google-Images-Search
Google Images Search.
Installation
To be able to use this library, you need to enable Google Custom Search API, generate API key credentials and set a project:
- Visit https://console.developers.google.com and create a project.
- Visit https://console.developers.google.com/apis/library/customsearch.googleapis.com and enable «Custom Search API» for your project.
- Visit https://console.developers.google.com/apis/credentials and generate API key credentials for your project.
- Visit https://cse.google.com/cse/all and in the web form where you create/edit your custom search engine enable «Image search» option and for «Sites to search» option select «Search the entire web but emphasize included sites».
After setting up your Google developers account and project you should have been provided with developers API key and project CX.
Install package from pypi.org:
> pip install Google-Images-SearchCLI usage
# without environment variables:

> gimages -k __your_dev_api_key__ -c __your_project_cx__ search -q puppies
# with environment variables:
> export GCS_DEVELOPER_KEY=__your_dev_api_key__
> export GCS_CX=__your_project_cx__
>
> gimages search -q puppies# search only (no download and resize):
> gimages search -q puppies# search and download only (no resize):
> gimages search -q puppies -d /path/on/your/drive/where/images/should/be/downloaded# search, download and resize:
> gimages search -q puppies -d /path/ -w 500 -h 500Programmatic usage
from google_images_search import GoogleImagesSearch

# you can provide API key and CX using arguments,
# or you can set environment variables: GCS_DEVELOPER_KEY, GCS_CX
gis = GoogleImagesSearch('your_dev_api_key', 'your_project_cx')

# define search params
# option for commonly used search param are shown below for easy reference.
# For param marked with '##':
#   - Multiselect is currently not feasible. Choose ONE option only
#   - This param can also be omitted from _search_params if you do not wish to define any value
_search_params = {
    'q': '...',
    'num': 10,
    'fileType': 'jpg|gif|png',
    'rights': 'cc_publicdomain|cc_attribute|cc_sharealike|cc_noncommercial|cc_nonderived',
    'safe': 'active|high|medium|off|safeUndefined', ##
    'imgType': 'clipart|face|lineart|stock|photo|animated|imgTypeUndefined', ##
    'imgSize': 'huge|icon|large|medium|small|xlarge|xxlarge|imgSizeUndefined', ##
    'imgDominantColor': 'black|blue|brown|gray|green|orange|pink|purple|red|teal|white|yellow|imgDominantColorUndefined', ##
    'imgColorType': 'color|gray|mono|trans|imgColorTypeUndefined' ##
}

# this will only search for images:
gis.search(search_params=_search_params)

# this will search and download:
gis.search(search_params=_search_params, path_to_dir='/path/')

# this will search, download and resize:
gis.search(search_params=_search_params, path_to_dir='/path/', width=500, height=500)

# search first, then download and resize afterwards:
gis.search(search_params=_search_params)
for image in gis.results():
    image.url  # image direct url
    image.referrer_url  # image referrer url (source)

    image.download('/path/')  # download image
    image.resize(500, 500)  # resize downloaded image

    image.path  # downloaded local file path
Custom file name
Sometimes you would want to save images with file name of your choice.
from google_images_search import GoogleImagesSearch

gis = GoogleImagesSearch('your_dev_api_key', 'your_project_cx')

_search_params = { ... }

gis.search(search_params=_search_params, path_to_dir='...',
           custom_image_name='my_image')
Paging
Google’s API limit is 10 images per request.
That means if you want 123 images, it will be divided internally into 13 requests.
Keep in mind that getting 123 images will take a bit more time if the image validation is enabled.
from google_images_search import GoogleImagesSearch

gis = GoogleImagesSearch('your_dev_api_key', 'your_project_cx')
_search_params = {
    'q': '...',
    'num': 123,
}

# get first 123 images:
gis.search(search_params=_search_params)

# take next 123 images from Google images search:
gis.next_page()
for image in gis.results():
    ...
Image validation
Every image URL is validated by default.
That means that every image URL will be checked if the headers can be fetched and validated.
With that you don’t need to wary about which image URL is actually downloadable or not.
The downside is the time needed to validate.
If you prefer, you can turn it off.
from google_images_search import GoogleImagesSearch

# turn the validation off with "validate_images" agrument
gis = GoogleImagesSearch('your_dev_api_key', 'your_project_cx', validate_images=False)
Inserting custom progressbar function
By default, progressbar is not enabled.
Only in CLI progressbar is enabled by default using Curses library.
In a programmatic mode it can be enabled in two ways:
- using contextual mode (Curses)
- using your custom progressbar function
from google_images_search import GoogleImagesSearch

# using your custom progressbar function
def my_progressbar(url, progress):
    print(url + ' ' + progress + '%')
gis = GoogleImagesSearch(
    'your_dev_api_key', 'your_project_cx', progressbar_fn=my_progressbar
)
_search_params = {...}
gis.search(search_params=_search_params)

# using contextual mode (Curses)
with GoogleImagesSearch('your_dev_api_key', 'your_project_cx') as gis:
    _search_params = {...}
    gis.search(search_params=_search_params)
...
Saving to a BytesIO object
from google_images_search import GoogleImagesSearch
from io import BytesIO
from PIL import Image

# in this case we're using PIL to keep the BytesIO as an image object
# that way we don't have to wait for disk save / write times
# the image is simply kept in memory
# this example should display 3 pictures of puppies!

gis = GoogleImagesSearch('your_dev_api_key', 'your_project_cx')

my_bytes_io = BytesIO()

gis.search({'q': 'puppies', 'num': 3})
for image in gis.results():
    # here we tell the BytesIO object to go back to address 0
    my_bytes_io.seek(0)

    # take raw image data
    raw_image_data = image.get_raw_data()

    # this function writes the raw image data to the object
    image.copy_to(my_bytes_io, raw_image_data)

    # or without the raw data which will be automatically taken
    # inside the copy_to() method
    image.copy_to(my_bytes_io)

    # we go back to address 0 again so PIL can read it from start to finish
    my_bytes_io.seek(0)

    # create a temporary image object
    temp_img = Image.open(my_bytes_io)

    # show it in the default system photo viewer
    temp_img.show()
Read more
5. sis
Simple Image Search Engine.
Find demo below:

Here is an overview:

Overview
- Simple image-based image search engine using Keras + Flask. You can launch the search engine just by running two python scripts.
offline.py: This script extracts a deep-feature from each database image. Each feature is a 4096D fc6 activation from a VGG16 model with ImageNet pre-trained weights.server.py: This script runs a web-server. You can send your query image to the server via a Flask web-interface. The server finds similar images to the query by a simple linear scan.- GPUs are not required.
- Tested on Ubuntu 18.04 and WSL2 (Ubuntu 20.04)
Usage
git clone https://github.com/matsui528/sis.git
cd sis
pip install -r requirements.txt

# Put your image files (*.jpg) on static/img

# Then fc6 features are extracted and saved on static/feature
# Note that it takes time for the first time because Keras downloads the VGG weights.
python offline.py

# Now you can do the search via localhost:5000
python server.py
Read more
6. DeepImageSearch
Deep Image Search — AI-Based Image Search Engine.
Deep Image Search is an AI-based image search engine that includes deep transfer learning features Extraction and tree-based vectorized search technique.
Features
- Faster Search O(logN) Complexity.
- High Accurate Output Result.
- Best for Implementing on python based web application or APIs.
- Best implementation for College students and freshers for project creation.
- Applications are Images based E-commerce recommendation, Social media and other image-based platforms that want to implement image recommendation and search.
Installation
This library is compatible with both windows and Linux system you can just use PIP command to install this library on your system:
pip install DeepImageSearchIf you are facing any VS C++ 14 related issue in windows during installation, kindly refer to following solution: Pip error: Microsoft Visual C++ 14.0 is required
How To Use?
We have provided the Demo folder under the GitHub repository, you can find the example in both .py and .ipynb file. Following are the ideal flow of the code:
1. Importing the Important Classes
There are three important classes you need to load LoadData — for data loading, Index — for indexing the images to database/folder, SearchImage — For searching and Plotting the images
# Importing the proper classes
from DeepImageSearch import Index,LoadData,SearchImage
2. Loading the Images Data
For loading the images data we need to use the LoadData object, from there we can import images from the CSV file and Single/Multiple Folders.
# load the Images from the Folder (You can also import data from multiple folders in python list type)
image_list = LoadData().from_folder(['images','wiki-images'])
# Load data from CSV file
image_list = LoadData().from_csv(csv_file_path='your_csv_file.csv',images_column_name='column_name)
3. Indexing and Saving The File in Local Folder
For faster retrieval we are using tree-based indexing techniques for Images features, So for that, we need to store meta-information on the local path [meta-data-files/] folder.
# For Faster Serching we need to index Data first, After Indexing all the meta data stored on the local path
Index(image_list).Start()
3. Searching
Searching operation is performed by the following method:
# for searching, you need to give the image path and the number of the similar image you want
SearchImage().get_similar_images(image_path=image_list[0],number_of_images=5)
you can also plot some similar images for viewing purpose by following the code method:
# If you want to plot similar images you can use this method, It will plot 16 most similar images from the data index
SearchImage().plot_similar_images(image_path = image_list[0])
Complete Code
# Importing the proper classes
from DeepImageSearch import Index,LoadData,SearchImage
# load the Images from the Folder (You can also import data from multiple folder in python list type)
image_list = LoadData().from_folder(['images','wiki-images'])
# For Faster Serching we need to index Data first, After Indexing all the meta data stored on the local path
Index(image_list).Start()
# for searching you need to give the image path and the number of similar image you want
SearchImage().get_similar_images(image_path=image_list[0],number_of_images=5)
# If you want to plot similar images the you can use this method, It will plot 16 most similar images from the data index
SearchImage().plot_similar_images(image_path = image_list[0])
Read more
7. semantic-search
This repository contains a barebones implementation of a semantic search engine.

The implementation is based on leveraging pre-trained embeddings from VGG16 (trained on Imagenet), and GloVe (trained on Wikipedia).
It allows you to:
- Find similar images to an input image
- Find similar words to an input word
- Search through images using any word
- Generate tags for any image
See examples of usage by following along on this notebook.
Read more details about why and how you would use this in this blog post.
Setup
Clone the repository locally and create a virtual environment (conda example below):
conda create -n semantic_search python=3.5 -y
source activate semantic_search
cd semantic_search
pip install -r requirements.txt
If you intend to use text, download pre-trained GloVe vectors (we suggest to use the length 300 vectors):
curl -LO http://nlp.stanford.edu/data/glove.6B.zip
unzip glove.6B.zip
mkdir models
mkdir models/glove.6B
mv glove.6B.300d.txt models/glove.6B/
Download an example image dataset by using:
mkdir dataset
python downloader.py
mv dataset/diningtable dataset/dining_table
mv dataset/pottedplant dataset/potted_plant
mv dataset/tvmonitor dataset/tv_monitor
Credit to Cyrus Rashtchian, Peter Young, Micah Hodosh, and Julia Hockenmaier for the dataset
Read more
8. Image-to-Image-Search
SmartSearch is a reverse image search engine which finds similar images by generating captions and comparing those captions.
It is Powered by Tensorflow and ElasticSearch.
Packages Required:
- Anaconda
- Keras with Tensorflow Backend (Python 3.6)
- Elastic Search and elasticsearch-py (Elastic Search 6.0)
Demo
Deep Reverse Image Search Engine — YouTube demos the core functionality.
Read more
9. image_search
Image Search Python Package.
A simple python package for saving images from Bing and Google without using API keys. This package utilizes web browsers to help scrape images found on web searches.
This should only be used for educational and personal purposes only. I am not responsible for any issues that may arise by scraping such sources. All images are copyrighted and owned by their respective owners, I do not claim any ownership.
Ensure you have the appropriate version of ChromeDriver on your machine if you would like to scrape from Google Images.
Usage
    usage: image_search [-h] [--limit LIMIT] [--json] [--url URL]
                    [--adult-filter-off]
                    engine query
Example: Google Images
image_search google cat --limit 10 --jsonThis will download 10 cat images and metadata from Google Images.
Example: Bing Images
image_search bing dog --limit 10 --jsonThis will download 10 dog images and metadata from Bing Images.
Read more
10. mrisa
MRISA (Meta Reverse Image Search API) is a RESTful API which takes an image URL, does a reverse Google image search, and returns a JSON array with the search results.
Usage
Install the necessary dependencies:
pip install -r requirements.txtOr
pip install certifi flask pycurl beautifulsoup4 flask_cors requests lxmlStart the server with:
python src/server.pyThere is also a docker image. Please note that this is a work in progress and any amends/fixes would be most welcome (Dockerfile is in the project root)
docker build -t "vivithemage/mrisa:latest" .
docker run -p 5000:5000 mrisa python mrisa/src/server.py
Any issues with pycurl or lxml
If you have any issues relating to pycurl, it’s likely dependancies are required.
sudo apt install libcurl4-openssl-dev libssl-devThat’s also the case for lxml.
sudo apt-get install libxml2-dev libxslt1-devPlease note, these commands for apt based systems only so you will need to find the equivalents for other packaging systems.
API
Perform a Reverse Image Search
Performs a reverse image search using the supplied image URL as input.
URL
- POST to http://localhost:5000/search
Arguments
- __image_url__ — A URL to an image to use for the search input.
Request Example
CURL
curl -X POST http://localhost:5000/search
    -H "Content-Type: application/json"
    -d '{
        "image_url":
            "http://placehold.it/350x150.png",
        "resized_images":false
        }'
XMLHttpRequest
    var xhr = new XMLHttpRequest();

    xhr.open('POST',"http://localhost:5000/search");

    //Important
    xhr.setRequestHeader("Content-Type","application/json");

    data= {
        "image_url":"http://placehold.it/350x150.png",
        "resized_images":false // Or true
        };

    json = JSON.stringify(data);

    xhr.onreadystatechange = gotDetails;

    xhr.send(json);

    var gotDetails = () => {
        //Got The response
        console.log(xhr.responseText);
    };
Python request example
import requests, json

url = "http://localhost:5000/search"

data = {
    "image_url":"http://placehold.it/350x150.png",
    "resized_images":False, # Or True
    "cloud_api":True
}

headers = {'Content-type': 'application/json'}
r = requests.post(url, headers=headers, data=json.dumps(data))

#r.json to get the response as json
print(r.json())

#r.text for no u'' characters
Read more