![]()
Загрузить PDF
![]()
Загрузить PDF
Из данной статьи вы узнаете, как вставить клипарт в Microsoft Word на компьютерах под управлением Windows и Mac OS X. В новых версиях MS Office клипарты были заменены изображениями Bing, но в Microsoft Word все равно можно найти и вставить клипарты.
-

1
Откройте документ Microsoft Word. Для этого дважды щелкните по документу Microsoft Word, в который нужно вставить клипарт.
- Также можно создать новый документ; для этого дважды щелкните по значку программы Microsoft Word, а затем нажмите «Новый документ».
-
2
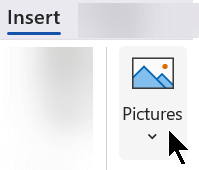
Перейдите на вкладку Вставка. Она находится слева на синей ленте инструментов Word, которая расположена в верхней части окна Word. Откроется панель инструментов «Вставка».
-
3
Нажмите Изображения из интернета. Вы найдете эту опцию в разделе «Иллюстрации» на панели инструментов. Откроется всплывающее окно со строкой поиска Bing.
-
4
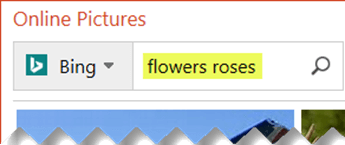
Введите поисковый запрос со словом клипарт. Введите ключевое слово, которое описывает нужный клипарт, затем введите слово клипарт, после этого нажмите ↵ Enter. Bing приступит к поиску клипартов, которые соответствуют поисковому запросу.
- Например: чтобы найти клипарт со слонами, введите слоны клипарт и нажмите ↵ Enter.
- У вас должен быть доступ в интернет, чтобы искать клипарты с помощью Bing.
-
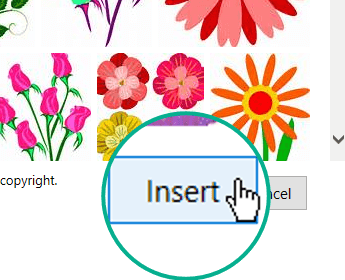
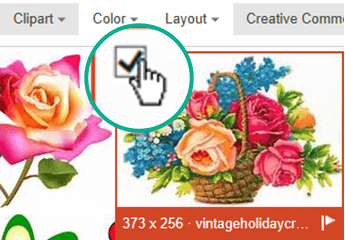
5
Выберите клипарт. Щелкните по клипарту, который вы хотите вставить в документ Word. В верхнем левом углу изображения появится галочка, что свидетельствует о том, что клипарт выбран.
- Можно выбрать сразу несколько клипартов.
-
6
Нажмите Вставить. Эта кнопка находится в нижней части окна. Выбранный клипарт будет вставлен в документ Word.
Реклама


-
1
Откройте страницу поиска изображений Bing. Перейдите на страницу https://www.bing.com/images/. Описываемый процесс можно применить в Safari, Google Chrome и Firefox, но не факт, что и в других браузерах.[1]
-
2
Введите поисковый запрос. Введите ключевое слово, которое описывает нужный клипарт, а затем нажмите ⏎ Return. Запустится поиск изображений с помощью Bing.
-
3
Щелкните по Фильтр. Этот значок в виде воронки находится на правой стороне страницы Bing, чуть выше результатов поиска. Под строкой поиска и над результатами поиска отобразится ряд вкладок.
-
4
Щелкните по Тип ▼. Эта вкладка находится под панелью поиска. Откроется выпадающее меню.
-
5
Щелкните по Клипарт. Эта опция находится посередине выпадающего меню и позволит оставить в результатах поиска только клипарты.
-
6
Выберите клипарт. Щелкните по клипарту, который вы хотите вставить в документ Word.
-
7
Сохраните клипарт. Зажмите Ctrl, щелкните по клипарту, а затем нажмите «Сохранить изображение». Клипарт будет сохранен на компьютере.
-
8
Откройте документ Word. Для этого дважды щелкните по документу Word, в который нужно вставить клипарт.
- Также можно создать новый документ; для этого дважды щелкните по значку программы Microsoft Word, а затем нажмите «Новый документ».
-
9
Перейдите на вкладку Вставка. Она находится слева на синей ленте инструментов Word, которая расположена в верхней части окна Word. Откроется панель инструментов «Вставка».
- Не щелкайте по меню «Вставка» в верхней части экрана.
-
10
Нажмите Рисунки. Вы найдете эту опцию слева на панели инструментов. Откроется выпадающее меню.
-
11
Нажмите Рисунок из файла. Эта опция находится в нижней части выпадающего меню.
-
12
Выберите изображение. Для этого щелкните по сохраненному клипарту.
- Возможно, вам придется перейти в папку (на левой панели окна Finder), в которую скачался выбранный клипарт, например, в папку «Загрузки».
-
13
Нажмите Вставить. Эта кнопка находится в нижней части окна. Выбранный клипарт будет вставлен в документ Word.
Реклама


Советы
- Также можно вставить фотографии из фототеки компьютера; для этого нажмите «Вставка» > «Рисунки».
Реклама
Предупреждения
- Многие изображения (клипарты), которые найдет Bing, защищены авторским правом. Их можно использовать бесплатно в личных целях (например, в презентации), но если вы получаете от этого прибыль, ваши действия являются незаконными.
Реклама
Об этой статье
Эту страницу просматривали 41 225 раз.
Была ли эта статья полезной?
Add clip art to your file
Word for Microsoft 365 Outlook for Microsoft 365 PowerPoint for Microsoft 365 OneNote for Microsoft 365 Publisher for Microsoft 365 Excel for Microsoft 365 for Mac Word for Microsoft 365 for Mac PowerPoint for Microsoft 365 for Mac Word for the web OneNote for the web PowerPoint for the web Word 2021 PowerPoint 2021 Publisher 2021 OneNote 2021 Excel 2021 for Mac Word 2021 for Mac PowerPoint 2021 for Mac Word 2019 PowerPoint 2019 Publisher 2019 Excel 2019 for Mac Word 2019 for Mac PowerPoint 2019 for Mac Excel 2016 Word 2016 Outlook 2016 PowerPoint 2016 OneNote 2016 Publisher 2016 Excel 2013 Word 2013 Outlook 2013 PowerPoint 2013 OneNote 2013 Publisher 2013 Excel 2010 Word 2010 Outlook 2010 PowerPoint 2010 OneNote 2010 Publisher 2010 More…Less
Depending on which version of Office you have, you may be able to use an Office library of clip art, or get clip art from the web.
Insert clip art
In the newer versions of Office, there’s no longer a clip art library, but Office still helps you insert clip art.
STEP 1:
Select Insert > Pictures > Online Pictures
(In Outlook, when you’re using the Reading pane, there isn’t an Insert menu. Click Pop Out  and then you’ll see the Insert menu.)
STEP 2:
Type a word or phrase to describe what you’re looking for, then press Enter.
STEP 3:
Filter the results by Type for Clipart.

STEP 4:
Select a picture.

STEP 5:
Select Insert.
That’s it!
The image is inserted in your Office document.

Clip art and copyright
The licensing filter (Creative Commons only or All) can help you choose images that are appropriate for the use you have in mind. (Read about Creative Commons licenses here.)
When using pictures or clip art from Bing, you’re responsible for respecting copyright, and the license filter in Bing can help you choose which images to use.
New kinds of clip art for Microsoft 365
Microsoft 365 doesn’t have traditional clip art anymore, but as a subscriber you get several new kinds of high quality art in its place for free: high-resolution photographs, icons, cutout people, stickers, illustrations, and cartoon people. Select Insert > Pictures > Stock Images to see your options. For more details, see Insert images, icons, and more.
|
Icons are ready-made images that you can insert, pivot, rotate, color, and resize (with no loss of quality). |
|

|
Stickers are whimsical illustrations that can enliven any document. |

|
Cartoon people are cartoon-style drawings. You can mix and match different head/hair, face, and body parts to get just the look you want. |
Voice clips instead of clip art
Looking for information about adding an audio clip to a slide? See Add or delete audio in your PowerPoint presentation.
Insert clip art
In Office 2013 and Office 2016, there’s no longer a clip art library, but Office still helps you insert clip art.
STEP 1:
Select Insert > Online Pictures
(In Outlook, when you’re using the Reading pane, there isn’t an Insert menu. Click Pop Out and then you’ll see the Insert menu.)

STEP 2:
Type a word or phrase to describe what you’re looking for, then press Enter.
STEP 3:
Filter the results by Type for Clipart.

STEP 4:
Select a picture.
STEP 5:
Select Insert.
That’s it!
The image is inserted in your Office document.
Clip art and copyright
The licensing filter (Creative Commons only or All) can help you choose images that are appropriate for the use you have in mind. (Read about Creative Commons licenses here.)
When using pictures or clip art from Bing, you’re responsible for respecting copyright, and the license filter in Bing can help you choose which images to use.
Free image library: the Pickit add-in
Another option is to install an Office add-in named Pickit that puts free, licensed clip art in Office.
Click a section title below to open it and read detailed instructions.
-
Open the Office app you want to add Pickit it to (Word, PowerPoint, or Excel).
-
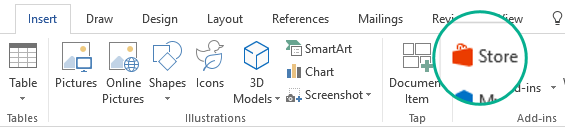
On the Insert tab, in the Add-ins group, select Store.
The Office Add-ins dialog box opens.
-
In the dialog box, use the Search box to look for Pickit Free Images.
-
Click the Add button for Pickit Free Images.
-
Close the Office Add-ins dialog box.
Pickit may take a few moments to be «loaded» into the Office app. When it’s done, a message appears at the bottom of your app window telling you so.
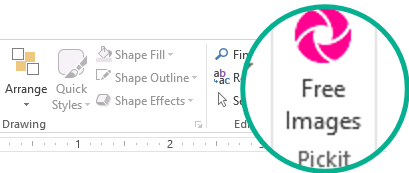
At the far right end of the ribbon, on the Home tab, you’ll see the circular pink Pickit icon:
Once Pickit is on your computer, you can find pictures with it as described here:
-
On the Home tab of the Ribbon, in the Pickit section at the far right, select the Free Images button.
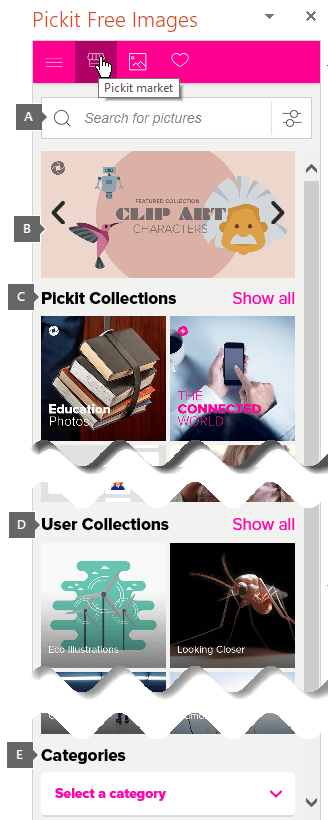
The Pickit Free Images task panel opens on the right side of the application window.
-
On the pink toolbar near the top, use the second tab, the Pickit market, to browse for images.
Pickit lets you browse images in several ways:
-
There’s a search box (callout A in the picture) where you can type keywords such as flower, clipart, and business.
-
A set of featured collections (B) just below the Search box. The set includes a Clip Art Characters collection.
-
There are 25 collections (C) organized by Pickit.
-
There are numerous user collections (D) to browse.
-
There are 35 categories (E) of images (such animals and pets, cities and places, music and instruments, and transportation) you can choose from at the bottom of the task panel.
Voice clips instead of clip art
Looking for information about adding an audio clip to a slide? See Add or delete audio in your PowerPoint presentation.
-
On the Insert tab of the toolbar ribbon, in the Images section, select Clip Art.
(In Outlook, when you’re using the Reading pane, there isn’t an Insert menu. Click Pop Out
and then you’ll see the Insert menu and the Clip Art icon.)The Clip Art task panel appears on the right side of the application window.
-
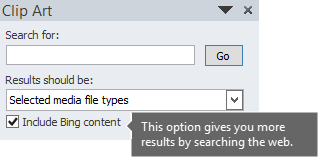
In the Search for box, type keywords that describe the art you’re looking for.
-
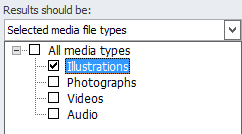
Under Results should be, select the types of media you want included in the search results:
-
Ensure that Include Bing content is selected if you’re connected to the internet and want images from the web included in your search results. *
Turning on this option gives you more search results to choose from. (Otherwise, leave that box cleared, and you’ll only receive search results from the pictures installed on your computer by Office 2010.)
-
Select Go to start the search.
The search results are shown in the task panel.
-
You can scroll vertically if the results don’t all fit in the task pane.
-
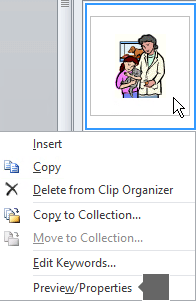
To see a larger version of a thumbnail image in the result list, or to simply see the image if all that is shown is a small red x placeholder, right-click the thumbnail and select Preview/Properties.
While you’re in the Preview/Properties window, you can browse through the images by selecting Previous and Next.
-
-
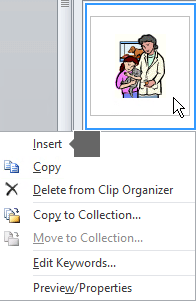
To insert a picture in your document, right-click the thumbnail image in the task panel, and select Insert.
Once the image is inserted, you can adjust its placement by selecting it and dragging with the mouse.

When you search for clip art and pictures online, you’ll be directed to Bing. You’re responsible for respecting copyright, and the license filter in Bing can help you choose which images to use.
* Bing Image Search filters are based on the highly respected Creative Commons license system. To better understand the licensing options, see Filter images by license type. You’re responsible for respecting the rights of others’ property, including copyright.
In Microsoft 365 for Mac, Office 2021 for Mac, and Office 2019 for Mac, beginning with version 16.19, you can go on the web to find clip art and other pictures.
STEP 1:
Select Insert > Pictures > Online Pictures
STEP 2:
Type a word or phrase to describe what you’re looking for, then press Enter.
STEP 3:
Filter the results by Type for Clipart.
STEP 4:
Select a picture.
STEP 5:
Select Insert.
That’s it!
The image is inserted in your Office document.
The licensing filter (Creative Commons only or All) can help you choose images that are appropriate for the use you have in mind. (Read about Creative Commons licenses here.)
Sorry, clip art isn’t supported in Office 2016 for Mac.
You can use Insert > Pictures to add pictures from your computer or from the Photo Browser.

Microsoft 365 supports Online Pictures, Icons, and 3D objects, and it gets feature updates monthly:
Buy or try Microsoft 365
You can insert clip art from the web in Word, PowerPoint, and Excel, or in OneNote.
Insert clip art in Word, PowerPoint, or Excel
-
Select Insert > Pictures > Stock Images.
Tabs across the top show you the types of pictures you can select from:
-
Images: A large set of high-resolution photographs featuring many different subjects.
-
Cutout People: Photos of people in various poses. The pictures have transparent backgrounds to help them fit easily into your document or to combine multiple pictures.
-
Stickers: Fun, animation-style drawings.
-
Icons (PowerPoint only): Small symbols covering numerous subjects. You can easily change color and resize them with no loss of image quality.
-
Illustrations (PowerPoint only): Many drawings, all in a similar style, covering numerous subjects.
-
Cartoon People (PowerPoint only): A large set of cartoon-style drawings. You can mix and match different parts, such as head/hair and facial expressions.
-
-
Select a tab, then browse the images by scrolling, or enter a term in the search box to filter the set of images.
-
Select an image or images, then choose Insert.
Insert clip art in OneNote
-
Select Insert > Picture > From Online.
-
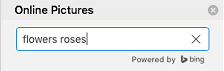
In the Online Pictures dialog box, type words describing the kind of picture you want (such as roses), and then press Enter.
-
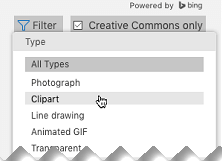
Select the Filter button
and then select Clipart under the Type category. -
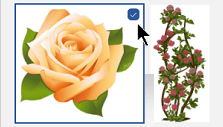
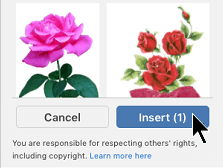
Select the image you want to insert, then click the Insert button.
(You can only insert one picture at a time.)
 and then select Clipart under the Type category.
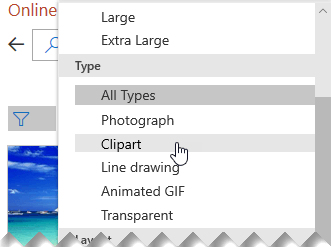
The licensing filter (Creative Commons only or All) can help you choose images that are appropriate for the use you have in mind. (Read about Creative Commons licenses here.)
See Also
Insert images, icons, and more in Microsoft 365
Make or find pictures in Office
Add a drawing to a Word document
Icons: A new kind of clip art
Need more help?
Want more options?
Explore subscription benefits, browse training courses, learn how to secure your device, and more.
Communities help you ask and answer questions, give feedback, and hear from experts with rich knowledge.
» 2015 » Октябрь » 28 » Как вставить клипарт в Word
Как вставить клипарт в Word4 методика:Word 2003 (Windows) и Word 2004 (Mac OS)Word 2007 и Word 2010 (Windows)Word 2008 (Mac OS)Word 2011 (Mac OS) Microsoft Word включает в себя библиотеки клипартов, которые вставляются в документы, если у вас нет других изображений (например, вставка красочных границ). ШагиМетод 1 из 4: Word 2003 (Windows) и Word 2004 (Mac OS)
Метод 2 из 4: Word 2007 и Word 2010 (Windows)
Метод 3 из 4: Word 2008 (Mac OS)
Метод 4 из 4: Word 2011 (Mac OS)
Предупреждения
|
Категория: Вопросы и ответы | | Рейтинг: 0.0/0 |
 1 Поместите курсор туда, куда вы хотите вставить клипарт.
 2 Перейдите в меню «Вставка».
 3 Выберите «Иллюстрация».
 4 Нажмите «Клипарт». Откроется коллекция клипартов.
 5 В коллекции клипартов найдите клип, который вы хотите вставить в документ.
 6 Выделите клип и нажмите «Вставить».
 7 Закройте коллекцию клипартов и сохраните документ.
 1 Поместите курсор туда, куда вы хотите вставить клипарт.
 2 Перейдите на вкладку «Вставка».
 3 Найдите группу «Иллюстрации».
 4 Нажмите «Клип». Откроется панель клипартов.
 5 Найдите клипарт, который вы хотите вставить в документ. Вы можете ограничить поиск определенной коллекцией изображений (в меню «Просматривать») или искать клип по определенному слову. Щелкните по клипарту, чтобы вставить его.
 6 Закройте панель клипартов и сохраните документ.
 ![]()
Download Article
![]()
Download Article
- On Windows
- On Mac
- Q&A
- Tips
- Warnings
|
|
|
|
This wikiHow teaches you how to insert clip art images in Microsoft Word for both Windows and Mac computers. While the clip art feature of previous Office products has been replaced by Bing images, it’s still possible to find and insert clip art in Microsoft Word.
-
1
Open a Microsoft Word document. Double-click the Microsoft Word document to which you want to add clip art in order to open it.
- You can also create a new document by double-clicking the Microsoft Word program icon and then clicking Blank document.
-
2
Click the Insert tab. It’s in the upper-left side of the blue Word ribbon that’s at the top of the Word window. This will open the Insert toolbar below the blue ribbon.
Advertisement
-
3
Click Online Pictures. You’ll find this in the «Illustrations» section of the toolbar. A pop-up window will appear with a Bing search bar in it.
-
4
Enter a search term followed by clipart. Type the name of the kind of image you want to find followed by clipart, then press ↵ Enter. Doing so will search Bing for images matching your search.
- For example: to find clip art of elephants, you would type in elephant clipart and press ↵ Enter.
- You must have Internet access to search for images on Bing.
-
5
Select an image. Click an image that you would like to use for your Word document. This will place a checkmark in the upper-left corner of the image, meaning you have it selected.
- You can select more than one image at once.
-
6
Click Insert. It’s at the bottom of the window. This will add your selected clip art to your Word document.


Advertisement
-
1
Go to Bing’s image search. Go to https://www.bing.com/images/. This process will work on Safari, Google Chrome, and Firefox, though other browsers may not be supported.[1]
-
2
Enter a search term. Type in the name of an item for which you want to find clip art, then press ⏎ Return. This will search Bing images for matching images.
-
3
Click Filter. This funnel-shaped icon is on the far-right side of the Bing page, just above the image results. Clicking it prompts a series of tabs to appear below the search bar and above the top row of images.
-
4
Click Type ▼. It’s a tab below the search bar. A drop-down menu will appear.
-
5
Click Clipart. This option is near the middle of the drop-down menu. Doing so will refresh your image search to display only clip art.
-
6
Select an image. Click an image that you would like to insert into your Word document.
-
7
Save the image. Hold down Ctrl and click the image, then click Save Image. The image will download to your Mac.
-
8
Open your Word document. Double-click the Microsoft Word document to which you want to add clip art in order to open it.
- You can also create a new document by double-clicking the Microsoft Word program icon and then clicking Blank Document.
-
9
Click the Insert tab. It’s in the blue ribbon near the top of the Word window. Doing so displays the Insert toolbar below the blue ribbon.
- Don’t click the Insert menu item at the top of your Mac’s screen.
-
10
Click Pictures. You’ll find this option on the left side of the toolbar. Clicking it prompts a drop-down menu.
-
11
Click Picture from File…. It’s the bottom option in the drop-down menu.
-
12
Select your picture. Click the picture you downloaded from Bing images. This will select it.
- You may have to select the picture’s download location (e.g., Downloads) on the left-hand side of the Finder window first.
-
13
Click Insert. It’s at the bottom of the window. This will insert your clip art into your Word document.


Advertisement
Add New Question
-
Question
How do I make the clip art smaller?

Click on one of the corner dots and drag it closer to the center of the image.
-
Question
How do I add an image of artwork to Microsoft Word?
If you mean your own artwork, then you’d take a picture of it, upload it to your computer (make sure you know where you’re saving it), then select Insert > Picture in Word, browse in the location where you saved the photo, click the picture, and insert. If you mean an image from the internet or something, you can just save it to your computer and basically follow the rest of the steps above.
-
Question
I have multiple text boxes on my document and when trying to insert an image from clip art, it goes behind, not on top of the document. How can I insert on the document itself?
When you insert the clip art, a little box will appear next to the image. Click the box and check to see if the picture if set to appear on top or underneath the text. Choose the option that best suits your needs.
See more answers
Ask a Question
200 characters left
Include your email address to get a message when this question is answered.
Submit
Advertisement
-
You can also insert photos from your computer’s photo library using the Insert > Pictures feature.
Thanks for submitting a tip for review!
Advertisement
-
Many images in the Bing search results will be copyrighted. You can use them for free, non-promotional means (e.g., a presentation or personal use), but any paid use of copyrighted materials is illegal.
Advertisement
About This Article
Article SummaryX
1. Click Insert.
2. Click Online Pictures.
3. Enter a search term followed by «clipart.»
4. Press Enter.
5. Select an image.
6. Click Insert.
Did this summary help you?
Thanks to all authors for creating a page that has been read 457,869 times.
Is this article up to date?
microsoft clip gallery где находится
Для вставки в документы иллюстраций можно использовать готовые библиотеки (коллекции) рисунков. Доступ к коллекции клипов Microsoft осуществляется приложением Microsoft Clipart (Clip Gallery), входящим в состав Microsoft Office и поддерживающим не только рисунки, но и звуки, и видео.
Чтобы вставить картинку необходимо выбрать место для ее вставки, затем использовать команду Вставка/Рисунок/Картинки.
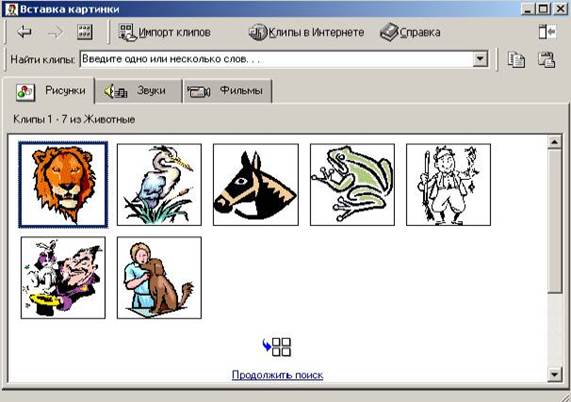
Диалоговое окно Microsoft Clip Gallery 3.0для вставки графических клипов
Графические объекты находятся на вкладке Рисунки. Они классифицированы по категориям. Разыскав нужную картинку, достаточно выделить ее и вставить в документ щелчком на кнопке вставить клип.
Картинки следует рассматривать как заготовки для создания средств оформления. Картинки – это композиционные объекты. Их можно «разбирать» на составляющие, редактировать их элементы по отдельности, создавать композиции из объектов, взятых из разных клипов. Можно изменять размеры вставленного рисунка, перемещать рисунок на другое место, убирать ненужные части, изменять взаимное расположение рисунка и текста.
Всё это выполняется путём редактирования картинок, вставленных в документ.
Обычный порядок редактирования клипартов следующий:
1. Картинку выделяют щелчком левой кнопки мыши;
2. Открывают ее контекстное меню щелчком правой кнопки мыши;
3. В контекстном меню выбирают команду Изменить рисунок – он открывается в отдельном окне редактирования;
4. В этом окне работают с отдельными объектами, составляющими рисунок.
Задание 2.
1.Выполните команду Вставка/Рисунок/Картинки… В открывшемся окне Вставка картинки выберите пункт Коллекция картинок…
2. Вставьте в свой документ следующую картинку из раздела Коллекции Microsoft Office/Природа:

3. Откройте контекстное меню добавленного рисунка и выберите команду Изменить рисунок. Теперь рисунок можно редактировать.
4. Увеличьте рабочую область рисунка с помощью маркеров управления размерами рисунка.
5. Выделите фон рисунка. Вокруг нее появится 8 белых маркеров, предназначенных для изменения размеров объекта, и зеленый – для свободного вращения. Увеличить фоновое полотно до размеров рабочей области.
6. В контекстном меню выделенного объекта выберите команду Формат автофигуры. Откроется окно для изменения его свойств. На странице Цвета и линии измените свойства заливки и линии границы.
7. Выделите листок дуба. Он состоит из отдельных частей, которые необходимо выделить вместе и сгруппировать. Изменить цвет листка.
8. Выделите второй листок и сгруппируйте. Изменить его цвет.
9. Скопируйте этот листок, вставьте и перенести на новое место. С помощью маркера Свободного вращения поверните его на нужный угол. Измените цвет.

Не нашли то, что искали? Воспользуйтесь поиском:
Лучшие изречения: Увлечёшься девушкой-вырастут хвосты, займёшься учебой-вырастут рога 9826 – | 7691 – или читать все.
78.85.5.224 © studopedia.ru Не является автором материалов, которые размещены. Но предоставляет возможность бесплатного использования. Есть нарушение авторского права? Напишите нам | Обратная связь.
Отключите adBlock!
и обновите страницу (F5)
очень нужно
Трушина Светлана Юрьевна
Учитель музыки высшей квалификационной категории
Муниципальное бюджетное общеобразовательное учреждение
“Средняя общеобразовательная казачья школа”
с.Знаменка, Нерчинский район, Забайкальский край
Тема: ” Вставка рисунков из коллекции клипов Microsoft Office»
Цель:
Обучение последовательному действию вставки рисунков из коллекции клипов в документе Word
Задачи:
1.Научить вставлять рисунки из коллекции клипов в документе Word в программе Microsoft Office
2.Расширить знания коллег о возможностях программы Microsoft Office Word .
3.Передать коллегам личный опыт по предложенной теме.
Клипами в Microsoft Office называют мультимедийные файлы: рисунок, звук, анимация или фильм.
В комплект программы Word входит коллекция рисунков в области «Поиск клипа», где содержится большое количество профессионально выполненных рисунков, предназначенных для оформления документов: изображения людей, географические карты, карикатуры и многое другое.
Документ Microsoft Word может содержать различные графические объекты: рисунки из графических файлов и рисунки из коллекции клипов Microsoft Office, организационные и обычные диаграммы.
Пункт “Клипы” – позволяет вставлять рисунки, медиа – файлы, настраивать их анимацию и прочее. Кроме того, этот пункт поможет вам сделать довольно интересные вещи с обычным рисунком уже после вставки его в Word.
Шаг 1
Открываем документ. В верхней панели инструментов во вкладке «Вставка» выбираем пункт «Клипы».
.png)
Шаг 2
Нажимаем «Клипы», появляется меню, выбираем- «Коллекция Microsoft»
.png)
Шаг 3
Для выбора клипов прокручиваем окно поиска.
В создании этой статьи участвовала наша опытная команда редакторов и исследователей, которые проверили ее на точность и полноту.
Команда контент-менеджеров wikiHow тщательно следит за работой редакторов, чтобы гарантировать соответствие каждой статьи нашим высоким стандартам качества.
Из данной статьи вы узнаете, как вставить клипарт в Microsoft Word на компьютерах под управлением Windows и Mac OS X. В новых версиях MS Office клипарты были заменены изображениями Bing, но в Microsoft Word все равно можно найти и вставить клипарты.
Как вставить изображения и клипарт в Microsoft Word
Использование изображений в единообразном оформлении придает документам профессиональный, безупречный вид. При выборе изображений клипартов следует учитывать несколько моментов. Изображение должно соответствовать теме документа. Он также должен иметь стиль, аналогичный другим изображениям, используемым в документе. Узнайте, как вставить картинки в документ Word.
Инструкции в этой статье применимы к Word для Microsoft 365, Word Online, Word 2019, Word 2016, Word 2013, Word 2010, Word 2007, Word для Microsoft 365 для Mac и Word 2019 для Mac.
Вставьте изображение с помощью Microsoft 365, Word 2019, Word 2016 или Word 2013
В более новых версиях Office нет библиотеки картинок, но вы можете вставлять изображения, найденные в Интернете.
Выбирать инсерир > Фотографии онлайн.

Выбирать отфильтрованный, перейдите в раздел Модельтак что выберите Clipart.

Выберите изображение и выберите инсерир чтобы разместить картинку в вашем документе.

Word по умолчанию ищет изображения Creative Commons. Они бесплатны для публики. Хотя вы можете снять флажок Creative Commons для поиска дополнительных изображений, это не рекомендуется, поскольку использование изображений, защищенных авторским правом, может вызвать юридические проблемы с правообладателями.
Вставить изображение в Word 2010
Вот как вставить клипарт изображения с помощью Word 2010:
Пойдем инсерир > Образность > Клип Арт.
Нет по результатам, выберите типы мультимедиа, которые вы хотите включить.
Установите флажок Включить контент Bing если вы подключены к Интернету и хотите искать фотографии в Интернете.
Выбирать Ir чтобы начать поиск.
Как только вы найдете изображение, которое хотите использовать, щелкните правой кнопкой мыши миниатюру и выберите инсерир.
Вставить изображение в Word 2007
В отличие от более новых версий Word 2007 поставляется со встроенной библиотекой картинок.
Пойдем инсерир > Образность > Клип Арт.
Открытость (искренность) Поиск и выберите, где вы хотите искать изображения. Выбор мои коллекции, офисные коллекции Где коллекции веб-сайтов.
Выбирать Ir чтобы начать поиск.
Как только вы найдете изображение, которое хотите использовать, щелкните правой кнопкой мыши миниатюру и выберите инсерир.
RIP: клипарт Microsoft Office
Рекомендуем почитать: 
Xakep #276. Разборки на куче
Microsoft приняла решение отказаться от выпуска коллекции изображений, которые многие годы распространялись вместе с Microsoft Office. В течение последних лет использование клипарта всё больше снижалось, и хотя раньше он был очень популярным, но в наше время эти картинки практически никто не использует.
Теперь вместо клипарта Microsoft рекомендует воспользоваться поиском в интернете через систему Bing. Другими словами, при попытке поиска изображений внутри офисной программы пользователя автоматически перенаправляют на галерею Bing Images с результатами со всего веба.
Фильтр поисковика по умолчанию ограничивает поиск изображениями, которые опубликованы под лицензией Creative Commons и могут свободно использоваться всеми желающими.
Объясняя своё решение, Microsoft говорит, что поиск в интернете даёт возможность найти более качественные изображения, чем имеются во встроенной коллекции. К тому же, они более актуальны, по сравнению с клипартом.
Апдейт с отказом от клипарта сейчас накатывают на версии Microsoft Office 2013, 2010 и 2007. В последней версии MS Office для вставки изображения нужно выбрать пункт меню «Вставить» – «Онлайновые изображения» (Insert – Online Pictures), а в предыдущих версиях следует выбрать пункт «Вставить» – «Клипарт» (Insert – Clip Art).