What is the proper way to get a list of all available serial ports/devices on a Linux system?
In other words, when I iterate over all devices in /dev/, how do I tell which ones are serial ports in the classic way, that is, those usually supporting baud rates and RTS/CTS flow control?
The solution would be coded in C.
I ask because I am using a third-party library that does this clearly wrong: It appears to only iterate over /dev/ttyS*. The problem is that there are, for instance, serial ports over USB (provided by USB-RS232 adapters), and those are listed under /dev/ttyUSB*. And reading the Serial-HOWTO at Linux.org, I get the idea that there’ll be other name spaces as well, as time comes.
So I need to find the official way to detect serial devices. The problem is that none appears to be documented, or I can’t find it.
I imagine one way would be to open all files from /dev/tty* and call a specific ioctl() on them that is only available on serial devices. Would that be a good solution, though?
Update
hrickards suggested to look at the source for «setserial».
Its code does exactly what I had in mind:
First, it opens a device with:
fd = open (path, O_RDWR | O_NONBLOCK)
Then it invokes:
ioctl (fd, TIOCGSERIAL, &serinfo)
If that call returns no error, then it’s a serial device, apparently.
I found similar code in Serial Programming/termios, which suggested to also add the O_NOCTTY option.
There is one problem with this approach, though:
When I tested this code on BSD Unix (that is, Mac OS X), it worked as well. However, serial devices that are provided through Bluetooth cause the system (driver) to try to connect to the Bluetooth device, which takes a while before it’ll return with a timeout error. This is caused by just opening the device. And I can imagine that similar things can happen on Linux as well — ideally, I should not need to open the device to figure out its type. I wonder if there’s also a way to invoke ioctl functions without an open, or open a device in a way that it does not cause connections to be made?
What should I do?
- Печать
Страницы: [1] Вниз

Тема: как узнать номер ком порта (ttyS*) (Прочитано 36102 раз)
0 Пользователей и 1 Гость просматривают эту тему.

c0tt0nm0uF

в общем надо узнать номер ком порта который в моём пк один. Я вынужден работать с этим самым ком портом. но при команде «sudo ls -l /dev/ttyS*» вижу вот это http://img.by/?v=4yav2.png тоесть у меня 30 каких то портов. Как мне найти адрес именно того порта который у меня на задней панели пк
_angus_
c0tt0nm0uF
dmesg | grep ttyS
Спасибо! оказывается просто нулевой, но как его проверить? я закоротил 2 и 3 контакты и через minicom пытаюсь отправить команду «просто символ» по идее он должен прийти в ответ, нет?
_angus_
Надо ещё контроль потока вовсе отключить, если только 2-3 замкнуты. что-то вроде
stty clocal -F /dev/ttyS0
c0tt0nm0uF
Надо ещё контроль потока вовсе отключить, если только 2-3 замкнуты. что-то вроде
аппаратное управление потоком выключил через тот же minicom но всё равно он молчит.Но! когда я попробовал через putty то по идее всё получилось но не совсем.Дело в том что мне надо перепрошить baracuda 7200.11 (жесткий диск) и когда я к нему подключаю rx tx то он должен выдавать «LED:000000CC FAddr:0025BF67» а выдаёт только шумы http://img.by/?v=q8Ct.png
« Последнее редактирование: 22 Декабря 2013, 19:25:59 от c0tt0nm0uF »
_angus_
А вы уверены, что это именно шумы, а не неверно установленная скорость? У 7200.11 скорость 38400, а по дефолту у UART под линуксом, кажется, таки 9600. И да, пересчёт транслятора у этих сигейтов может вызвать немалые проблемы, если у них не пустой пост-скановый дефектлист. (проверяется командой F3 T> V40)
c0tt0nm0uF
да кажется я понял суть. на разных сайтах мурзилки разные и на одном говорится что мол «на прямую подключайте rs232 к харду а вот на другом ясно сказано что конкретно к моей баракуде надо подключатся по ttl ну я не совсем понимаю чем отличается rs232 от ttl, помойму протоколы разные, но я лучше куплю переходник usb to ttl (200 рублей стоит)
_angus_
Опа. Это вы прямо к компорту диск цепляете? Сурово. Легко можно спалить контроллер. Разница в том, что у диска уровни напряжения 0..+5V(TTL), а у RS232, который на задней панели компа, -+(3..12)V. Нужен преобразователь уровня, в общем, какой-нибудь дата-кабель «от старого сименса» сгодится, если он USB, то от того ж USB и будет питаться, а если RS232, то ему надо внешнее питание.
c0tt0nm0uF
Оу  ну не силён я по аппаратной части XD вот такой переходник собираюсь купить, пойдёт?http://savepic.net/4092781.htm сзади написанно usb to ttl
« Последнее редактирование: 22 Декабря 2013, 21:57:25 от c0tt0nm0uF »
_angus_
Да, вполне, только я бы на RxD/TxD повесил резисторы ом по 100, а то нежные они, преобразователи эти.
- Печать
Страницы: [1] Вверх
You can also use setserial to get and set serial port information, in addition to dmesg.
Tested on Ubuntu 18.04:
setserial
# install it
sudo apt update
sudo apt install setserial

# Display (and sort) serial information for all /dev/ttyS* devices
setserial -g /dev/ttyS* | sort -V
# Display (and sort) serial information for all /dev/ttyUSB* devices
setserial -g /dev/ttyUSB* | sort -V

# To see extra info. such as the baud rate too, add `-G`:
setserial -g -G /dev/ttyS* | sort -V
setserial -g -G /dev/ttyUSB* | sort -V
Sample run and output. Notice that /dev/ttyS4 is the only port that appears to be alive and not «unknown» (whatever that means). (This /dev/ttyS4 device also shows up in the Arduino IDE even though it’s not an Arduino and I don’t know what it is.):
$ setserial -g -G /dev/ttyS* | sort -V
/dev/ttyS0 uart unknown port 0x03f8 irq 4 baud_base 115200 spd_normal skip_test
/dev/ttyS1 uart unknown port 0x02f8 irq 3 baud_base 115200 spd_normal skip_test
/dev/ttyS2 uart unknown port 0x03e8 irq 4 baud_base 115200 spd_normal skip_test
/dev/ttyS3 uart unknown port 0x02e8 irq 3 baud_base 115200 spd_normal
/dev/ttyS4 uart 16550A port 0x3060 irq 19 baud_base 115200 spd_normal skip_test
/dev/ttyS5 uart unknown port 0x0000 irq 0 baud_base 0 spd_normal
/dev/ttyS6 uart unknown port 0x0000 irq 0 baud_base 0 spd_normal
/dev/ttyS7 uart unknown port 0x0000 irq 0 baud_base 0 spd_normal
/dev/ttyS8 uart unknown port 0x0000 irq 0 baud_base 0 spd_normal
/dev/ttyS9 uart unknown port 0x0000 irq 0 baud_base 0 spd_normal
/dev/ttyS10 uart unknown port 0x0000 irq 0 baud_base 0 spd_normal
/dev/ttyS11 uart unknown port 0x0000 irq 0 baud_base 0 spd_normal
/dev/ttyS12 uart unknown port 0x0000 irq 0 baud_base 0 spd_normal
/dev/ttyS13 uart unknown port 0x0000 irq 0 baud_base 0 spd_normal
/dev/ttyS14 uart unknown port 0x0000 irq 0 baud_base 0 spd_normal
/dev/ttyS15 uart unknown port 0x0000 irq 0 baud_base 0 spd_normal
/dev/ttyS16 uart unknown port 0x0000 irq 0 baud_base 0 spd_normal
/dev/ttyS17 uart unknown port 0x0000 irq 0 baud_base 0 spd_normal
/dev/ttyS18 uart unknown port 0x0000 irq 0 baud_base 0 spd_normal
/dev/ttyS19 uart unknown port 0x0000 irq 0 baud_base 0 spd_normal
/dev/ttyS20 uart unknown port 0x0000 irq 0 baud_base 0 spd_normal
/dev/ttyS21 uart unknown port 0x0000 irq 0 baud_base 0 spd_normal
/dev/ttyS22 uart unknown port 0x0000 irq 0 baud_base 0 spd_normal
/dev/ttyS23 uart unknown port 0x0000 irq 0 baud_base 0 spd_normal
/dev/ttyS24 uart unknown port 0x0000 irq 0 baud_base 0 spd_normal
/dev/ttyS25 uart unknown port 0x0000 irq 0 baud_base 0 spd_normal
/dev/ttyS26 uart unknown port 0x0000 irq 0 baud_base 0 spd_normal
/dev/ttyS27 uart unknown port 0x0000 irq 0 baud_base 0 spd_normal
/dev/ttyS28 uart unknown port 0x0000 irq 0 baud_base 0 spd_normal
/dev/ttyS29 uart unknown port 0x0000 irq 0 baud_base 0 spd_normal
/dev/ttyS30 uart unknown port 0x0000 irq 0 baud_base 0 spd_normal
/dev/ttyS31 uart unknown port 0x0000 irq 0 baud_base 0 spd_normal
dmesg
Use dmesg to also see some of this information:
# Show UART information, incl. baudrate, for /dev/ttyS* devices.
dmesg | grep ttyS

# Show UART information, incl. baudrate, for /dev/ttyUSB* devices.
dmesg | grep ttyUSB
Sample run and output:
$ dmesg | grep ttyS
[    1.624447] 0000:00:16.3: ttyS4 at I/O 0x3060 (irq = 19, base_baud = 115200) is a 16550A
Even better, watch the dmesg kernel ring buffer output live with the -w option:
dmesg -wH
Now, unplug your USB device you’re trying to identify and plug it back in to see which device it is, based on the messages that show up in the dmesg output, live.
I have a laptop which has only one serial port.
I went into:
/dev
directory, and I found:
ttyS0
ttyS1
ttyS2
ttyS3
How do I know which of those «ttyS» refers to my serial port?
![]()
Cfinley
1,4353 gold badges14 silver badges20 bronze badges
asked Apr 14, 2010 at 21:10
![]()
1
I think it’s this command:
dmesg | grep tty
Running that on my own Linux box (which only has 1 Serial port) produces a single ttyS0 output line. Try it on your own, you will see what I mean.
answered Apr 14, 2010 at 21:24
![]()
sivabudhsivabudh
3,0657 gold badges28 silver badges30 bronze badges
4
See which UARTs where detected in /proc/tty/driver/serial. A line with uart:unknown means: nothing detected (and likely not existent).
# cat /proc/tty/driver/serial
serinfo:1.0 driver revision:
0: uart:16550A port:000003F8 irq:4 tx:0 rx:0
1: uart:16550A port:000002F8 irq:3 tx:111780 rx:1321 RTS|DTR|DSR
2: uart:unknown port:000003E8 irq:4
3: uart:unknown port:000002E8 irq:3
If you see any of the CTS, DSR, (D)CD or RI flags (these are input signals), like on UART no. 1 above, you can even be pretty sure that there actually is something connected and driving these lines. Same is true for the rx-byte-count.
Seeing a positive tx-byte-count, RTS and/or DTR only reveals that some software accessed the device and ordered it to set those signals or send bytes here, but not if something was listening.
Note: you might see more ports available in hardware than ports reaching the outside of your computer in form of a connector.
answered Jun 30, 2016 at 15:45
![]()
If you need to do this programmatically reading the output from dmesg can be troublesome, instead the folder /dev/serial/by-id has sym links that are named after identifiable data of your device and point to the specific /dev/tty* they are connected to.
I’m not sure if this is some special udev rule that is distribution specific, but it works well in Ubuntu, let me know if it works.
answered Dec 20, 2014 at 13:55
![]()
santileortizsantileortiz
5231 gold badge5 silver badges6 bronze badges
1
ttyS0 through 3 correspond to COM1 through 4, respectively. They usually have the same hardware resources and are not always detectable, so they always exist.
answered Apr 14, 2010 at 21:17
![]()
2
There is also the command setserial which uses /proc/tty/driver/serial to get it’s data.
# setserial -g /dev/ttyS[0123]
/dev/ttyS0, UART: 16550A, Port: 0x03f8, IRQ: 4
/dev/ttyS1, UART: 16550A, Port: 0x02f8, IRQ: 3
/dev/ttyS2, UART: unknown, Port: 0x03e8, IRQ: 4
/dev/ttyS3, UART: unknown, Port: 0x02e8, IRQ: 3
answered Sep 12, 2016 at 15:19
![]()
1
Although modern PCs no longer come with a physical serial port, plenty of devices still require RS232 serial communication to interact with them. With the help of an RS232-to-USB adapter you can easily connect them to your PC. Once connected, you might wonder: How do I monitor the serial port in Linux? Luckily several tools exist, both for the terminal and with a GUI. In this article I’ll introduce you to few popular programs to monitor the serial port in Linux.
Background
The mouse of my first PC connected to the serial port. As did my modem for dialing-in to my Internet provider over the phone line. But who actually still needs a serial port in the day and age of USB? Typically those working with microcontroller based systems. Think Arduino, Atmel AVR, Microchip PIC, STM32, etc.
All microcontrollers still feature a UART subsystem. UART stands for Universal Asynchronous Receiver/Transmit. UART enables these embedded devices to communicate serially with each other (RS232 / RS485 / Modbus), but also a PC. To communicate with such a device using your PC, its UART peripheral connects to your PCs serial port, with the help of an RS232 level shifter chip. The RS232 level shifter adjusts the voltage levels of the UART peripheral’s TX and RX lines (TTL) to those specified by the RS232 specification.
Most PCs no longer ship with a serial port, but luckily you can purchase a low-cost RS232-to-USB adapter to connect the standardized RS232 SUB-D9 connector to your PCs USB port. Even better, recent microcontroller designs include all the electronics for this on-board. For example with a FTDI FT232R chip. That way you can directly connect the board to your PC using a standard USB cable.
No matter what method you use for connecting the RS232 device to your PC, it shows up as a serial device. On Windows its a COM port such as COM1. On Linux it shows up as a teletype terminal (TTY) device such as /dev/ttyS0, /dev/ttyUSB0 or /dev/ttyACM0.
This tutorial explains how you can use Linux to monitor the serial port communication data and even interact with it. I typically use this while debugging microcontroller software or to send commands to the firmware running on the microcontroller.
A brief introduction to serial communication
A serial port offers a basic interface for communicating with external devices. It’s named serial because bits move serially through the communication line, meaning one bit after the other. The bits travel at a predetermined speed, also known as the baudrate. Typical baudrate settings: 9600, 19200, 38400, 57600 and 115200 bits per second. Serial communication consists of two wires, one for transmitting (TX) and one for receiving (RX) data. Each wire measures logic high when idle.
To transfer a full byte, the transmitting side first send a logic low bit (start-bit), then the eight data bits and finally another logic low bit (stop-bit). Meaning that a byte transfer actually consists of ten bits. These start- and stop-bits enable the receiving side to synchronize with the data stream. Because of the separate TX and RX wires, data can travel in both directions as the same time, also referred to as full-duplex communication.
What do you need
For this article you need two things:
- A Linux PC, ideally with desktop environment installed.
- A device that communicates via RS232.
The Linux PC can be anything, really. Your daily driver, a Raspberry PI or a virtual machine. For this article I decided on using my main PC, which runs openSUSE Tumbleweed. If you don’t yet have Linux installed, consider setting up Ubuntu as a virtual machine:
- How to install Ubuntu Desktop 20.04 LTS in VirtualBox
- Install VirtualBox guest additions in Ubuntu 20.04
For the device, capable of communicating via RS232, I selected a good old Arduino Uno. As a Linux aficionado, with an interest in monitoring the serial port, you might even have one lying around. If not, consider getting one. Arduinos are a blast to tinker with and offer an educational entry into the field of embedded systems.
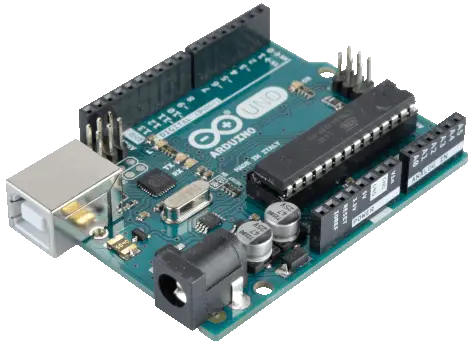
Example serial communication program for the Arduino Uno
For this tutorial, I created a small sketch for the Arduino. It does the following:
- It prints out a selection menu on the serial port.
- Then waits for your input, either 1 or 2.
- Blinks the on-board LED at the interval time, based on your menu selection.
The code for the sketch:
void setup() {
  /* Initialize digital pin LED_BUILTIN as an output. */
  pinMode(LED_BUILTIN, OUTPUT);

  /* Configure serial port for 9600 bits/second. */
  Serial.begin(9600);

  /* Output program info and its menu. */
  Serial.println("|**************************************|");
  Serial.println("|**        Serial port demo          **|");
  Serial.println("|**************************************|");
  Serial.println("");
  Serial.println("  Enter LED toggle time:");
  Serial.println("");
  Serial.println("    1: 100 milliseconds");
  Serial.println("    2: 500 milliseconds");
  Serial.println("");
  Serial.print("> ");

  /* Obtain user input. */
  bool entryValid = false;
  while (!entryValid) {
    /* Wait for reception of new data from the serial port. */
    while(!Serial.available()) {
      ;
    }
    /* Read out the received data as an integer value. */
    int option = Serial.parseInt();
    /* Process received menu option. */
    switch(option) {
      case 1:
        Serial.println(option);
        ledToggleTime = 100;
        entryValid = true;
        break;
      case 2:
        Serial.println(option);
        ledToggleTime = 500;
        entryValid = true;
        break;
    }
  }
}

void loop() {
  /* Toggle the LED with the selected time. */
  digitalWrite(LED_BUILTIN, HIGH);
  delay(ledToggleTime);
  digitalWrite(LED_BUILTIN, LOW);
  delay(ledToggleTime);
}
The remainder of this article assumes that you uploaded this sketch to your Arduino Uno. Furthermore, it assumes that you connected the Arduino to a USB port on your Linux PC. Alternatively, you can use any other device. As long as it communicates ASCII back at forth, for testing purposes. Refer to this article for more information on installing the Arduino IDE on Linux and building and uploading sketches to your Arduino board.
Finding the serial port device on Linux
Taking into consideration that you connected your serial communication device to your PC, using a USB cable, it shows up as either:
/dev/ttyUSBx/dev/ttyACMx
Where the x stand for a number depending on the amount of serial devices currently connected.
In order to monitor the serial port, we first need to determine its Linux device name. Run the following command to obtain a list:
ls -l /dev/ttyUSB* /dev/ttyACM*

As you can see in the above screenshot, the Arduino Uno shows up as device /dev/ttyACM0 on my system. That’s the device name to specify, when attempting to monitor the serial port on my Linux PC.
Setting up permissions to access the serial port device
The terminal screenshot from the previous section, listing the serial communication devices, holds more important information. Namely that only the root user or members of group dialout have permission to access it. With other words, you should add your own user to group dialout. Otherwise you cannot access the /dev/ttyACM0 serial device.
To add your user to group dialout, open the terminal and run command:
sudo usermod -a -G dialout $USER

Afterwards, run the groups command to verify that your user now belong to group dialout. You might have to reboot your Linux system first, for the group change to activate.
Monitor the serial port in Linux from the terminal
With the system setup out of the way, we can continue with the actual serial port monitoring part on your Linux system. We’ll start by doing this directly in the terminal. My preferred program to use for this purpose is called screen.
Installing the screen program
On my openSUSE Tumbleweed system, the installer automatically installed screen. I briefly fired up some virtual machines of other Linux distributions. Only to realize that Debian, Ubuntu and Fedora do not install screen by default. No worries, because here follow the installation commands:
- Debian and Ubuntu:
sudo apt install screen - Fedora:
sudo dnf install screen - openSUSE:
sudo zypper install screen
Running the screen program
The syntax for running screen to monitor the serial port on your Linux system:
screen [DEVICE NAME] [BAUDRATE]
As seen in a previous section, my Linux system knows my Arduino Uno as a serial device with name /dev/ttyACM0. Furthermore, the sketch running on the Arduino Uno initializes the serial interface for a baudrate (communication speed) of 9600 bits per second. Taking these to configuration parameters into consideration, I start screen using this command:
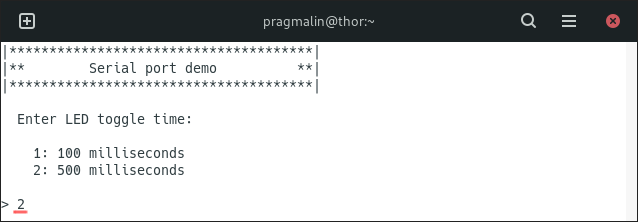
screen /dev/ttyACM0 9600
After pressing the reset button on the Arduino Uno, the menu from the example program appears. This proves that the Linux system properly receives data from the Arduino Uno serial device. To test that we can send data back to the Arduino Uno, we can press either 1 or 2 on the keyboard. The on-board LED should then start blinking every 100 milliseconds or 500 milliseconds, respectively:
Closing the screen program
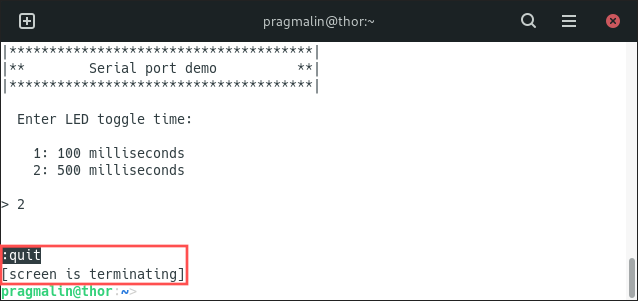
In my opinion, screen works great for monitoring the serial port on Linux. The only tricky and non-intuitive part is closing the screen program. You would expect that CLTR+c would to the trick or perhaps ESC. Unfortunately not. To properly exit screen, perform these two steps:
- Enter command mode by pressing CLTR+a .
- Type
:quitand press ENTER.
Monitor the serial port in Linux using a GUI application
For those that do not enjoy working directly in the Linux terminal, the CuteCom GUI application offers a solid alternative.
Installing the CuteCom program
Your Linux installer did not install CuteCom by default. No big deal, because we can quickly take care of this using the following installation command:
- Debian and Ubuntu:
sudo apt install cutecom - Fedora:
sudo dnf install cutecom - openSUSE:
sudo zypper install cutecom
Running the CuteCom program
To run CuteCom, locate its launcher in your desktop environment’s application menu. Click the settings button, which you find in the top-right corner. The settings window drops down where you configure these settings:
- Serial device name to connect to. On my system this is
/dev/ttyACM0. - The communication speed (baudrate). The example Arduino sketch uses 9600 bits per second.
- Set the flow control to Software.
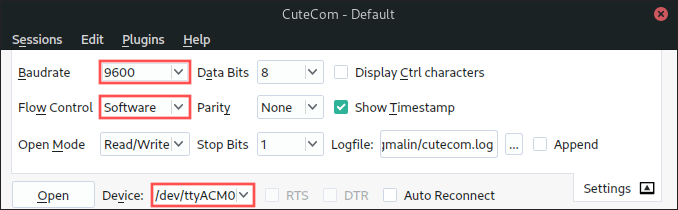
Afterwards, you can click the settings button once more, to roll up the settings window. With CuteCom configured to communicating with the Arduino Uno, continue by clicking the Open button on the user interface. Next, press the reset button on the Arduino Uno to verify that the menu from the example program appears:
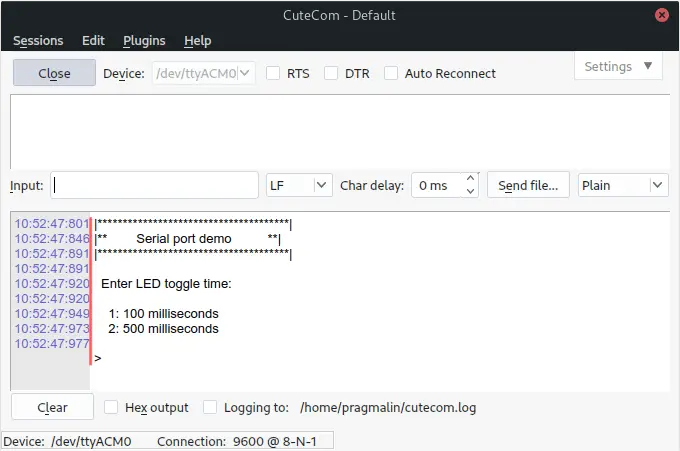
Knowing that data reception works, we continue by testing data transmission. Enter either 1 or 2 in the Input box and press ENTER to actually send it. The on-board LED should then start blinking every 100 milliseconds or 500 milliseconds, respectively. To close the connection with the serial communication device, click the Close button on the user interface.
Wrap up
The main question that the article answered was: How do I monitor the serial port in Linux? Two programs for this purpose were selected. One that works directly in the terminal (screen) and one that comes with a graphical user interface (CuteCom). At the end of the day, it boils down to personal preferences, to decide which on you want to use. Both get the job done.
What I disliked about screen is that it’s a bit tricker to figure out how to exit the program. First entering command mode by pressing CLTR+a . Followed by typing :quit and pressing ENTER.
CuteCom offers a user-friendly interface. My only pet peeve with CuteCom is that you can’t seem to change the font. I would prefer a monospaced font by default.
In case you didn’t like either one of these programs, alternatives exist. Have a look at minicom and putty for example.
Visit the following links for more serial port and Arduino related articles:
- Serial port articles on the PragmaticLinux blog
- Arduino articles on the PragmaticLinux blog