Asked
14 years, 4 months ago
Viewed
2.2m times
I want to know how to get the X and Y position of HTML elements such as img and div in JavaScript.
![]()
Dorian
7,2334 gold badges36 silver badges53 bronze badges
asked Jan 14, 2009 at 9:35
5
The correct approach is to use element.getBoundingClientRect():
var rect = element.getBoundingClientRect();
console.log(rect.top, rect.right, rect.bottom, rect.left);
Internet Explorer has supported this since as long as you are likely to care about and it was finally standardized in CSSOM Views. All other browsers adopted it a long time ago.
Some browsers also return height and width properties, though this is non-standard. If you’re worried about older browser compatibility, check this answer’s revisions for an optimised degrading implementation.
The values returned by element.getBoundingClientRect() are relative to the viewport. If you need it relative to another element, simply subtract one rectangle from the other:
var bodyRect = document.body.getBoundingClientRect(),
    elemRect = element.getBoundingClientRect(),
    offset   = elemRect.top - bodyRect.top;

alert('Element is ' + offset + ' vertical pixels from <body>');
![]()
jwhitlock
4,5223 gold badges38 silver badges49 bronze badges
answered Jul 9, 2012 at 14:06
![]()
Andy EAndy E
336k85 gold badges474 silver badges445 bronze badges
2
This function returns an element’s position relative to the whole document (page):
function getOffset(el) {
  const rect = el.getBoundingClientRect();
  return {
    left: rect.left + window.scrollX,
    top: rect.top + window.scrollY
  };
}
Using this we can get the X position:
getOffset(element).left
… or the Y position:
getOffset(element).top
answered Jan 29, 2015 at 18:46
![]()
Adam GrantAdam Grant
12.3k10 gold badges57 silver badges65 bronze badges
1
The libraries go to some lengths to get accurate offsets for an element.
here’s a simple function that does the job in every circumstances that I’ve tried.
function getOffset( el ) {
    var _x = 0;
    var _y = 0;
    while( el && !isNaN( el.offsetLeft ) && !isNaN( el.offsetTop ) ) {
        _x += el.offsetLeft - el.scrollLeft;
        _y += el.offsetTop - el.scrollTop;
        el = el.offsetParent;
    }
    return { top: _y, left: _x };
}
var x = getOffset( document.getElementById('yourElId') ).left;
![]()
Da-Jin
2215 silver badges16 bronze badges
answered Jan 14, 2009 at 10:04
![]()
meouwmeouw
41.6k10 gold badges52 silver badges69 bronze badges
2
If you want it done only in javascript, here are some one liners using getBoundingClientRect()
window.scrollY + document.querySelector('#elementId').getBoundingClientRect().top // Y

window.scrollX + document.querySelector('#elementId').getBoundingClientRect().left // X
The first line will return offsetTop say Y relative to document.
The second line will return offsetLeft say X relative to document.
getBoundingClientRect() is a javascript function that returns the position of the element relative to viewport of window.
answered Sep 24, 2018 at 10:41
![]()
Mustkeem KMustkeem K
8,0182 gold badges32 silver badges42 bronze badges
0
HTML elements on most browsers will have:-
offsetLeft
offsetTop
These specifiy the position of the element relative its nearest parent that has layout. This parent can often be accessed bif the offsetParent property.
IE and FF3 have
clientLeft
clientTop
These properties are less common, they specify an elements position with its parents client area (padded area is part of the client area but border and margin is not).
answered Jan 14, 2009 at 9:43
![]()
AnthonyWJonesAnthonyWJones
187k35 gold badges232 silver badges306 bronze badges
0
If page includes — at least- any «DIV», the function given by meouw throws the «Y» value beyond current page limits. In order to find the exact position, you need to handle both offsetParent’s and parentNode’s.
Try the code given below (it is checked for FF2):
var getAbsPosition = function(el){
    var el2 = el;
    var curtop = 0;
    var curleft = 0;
    if (document.getElementById || document.all) {
        do  {
            curleft += el.offsetLeft-el.scrollLeft;
            curtop += el.offsetTop-el.scrollTop;
            el = el.offsetParent;
            el2 = el2.parentNode;
            while (el2 != el) {
                curleft -= el2.scrollLeft;
                curtop -= el2.scrollTop;
                el2 = el2.parentNode;
            }
        } while (el.offsetParent);

    } else if (document.layers) {
        curtop += el.y;
        curleft += el.x;
    }
    return [curtop, curleft];
};
![]()
Unmitigated
70.4k8 gold badges58 silver badges77 bronze badges
answered Aug 12, 2010 at 20:14
![]()
Refik AyataRefik Ayata
3893 silver badges3 bronze badges
2
You can add two properties to Element.prototype to get the top/left of any element.
Object.defineProperty( Element.prototype, 'documentOffsetTop', {
    get: function () {
        return this.offsetTop + ( this.offsetParent ? this.offsetParent.documentOffsetTop : 0 );
    }
} );

Object.defineProperty( Element.prototype, 'documentOffsetLeft', {
    get: function () {
        return this.offsetLeft + ( this.offsetParent ? this.offsetParent.documentOffsetLeft : 0 );
    }
} );
This is called like this:
var x = document.getElementById( 'myDiv' ).documentOffsetLeft;
Here’s a demo comparing the results to jQuery’s offset().top and .left: http://jsfiddle.net/ThinkingStiff/3G7EZ/
![]()
Kerem
11.3k3 gold badges56 silver badges57 bronze badges
answered Jan 14, 2012 at 8:57
![]()
ThinkingStiffThinkingStiff
64.6k30 gold badges145 silver badges239 bronze badges
1
To retrieve the position relative to the page efficiently, and without using a recursive function: (includes IE also)
var element = document.getElementById('elementId'); //replace elementId with your element's Id.
var rect = element.getBoundingClientRect();
var elementLeft,elementTop; //x and y
var scrollTop = document.documentElement.scrollTop?
                document.documentElement.scrollTop:document.body.scrollTop;
var scrollLeft = document.documentElement.scrollLeft?
                 document.documentElement.scrollLeft:document.body.scrollLeft;
elementTop = rect.top+scrollTop;
elementLeft = rect.left+scrollLeft;
answered Jul 26, 2013 at 1:49
![]()
1
How about something like this, by passing ID of the element and it will return the left or top, we can also combine them:
1) find left
function findLeft(element) {
  var rec = document.getElementById(element).getBoundingClientRect();
  return rec.left + window.scrollX;
} //call it like findLeft('#header');
2) find top
function findTop(element) {
  var rec = document.getElementById(element).getBoundingClientRect();
  return rec.top + window.scrollY;
} //call it like findTop('#header');
or 3) find left and top together
function findTopLeft(element) {
  var rec = document.getElementById(element).getBoundingClientRect();
  return {top: rec.top + window.scrollY, left: rec.left + window.scrollX};
} //call it like findTopLeft('#header');
answered May 22, 2017 at 13:09
![]()
AlirezaAlireza
99.2k27 gold badges266 silver badges171 bronze badges
Here’s a modern 1-liner using vanilla JS to recursively iterate over element.offsetTop and element.offsetParent:
Function:
getTop = el => el.offsetTop + (el.offsetParent && getTop(el.offsetParent))
Usage:
const el = document.querySelector('#div_id');
const elTop = getTop(el)
Advantage:
Always returns the absolute vertical offset, regardless of the current scroll position.
Traditional syntax:
function getTop(el) {
  return el.offsetTop + (el.offsetParent && getTop(el.offsetParent));
}
answered Aug 16, 2021 at 15:14
![]()
PhilippPhilipp
9,9607 gold badges59 silver badges70 bronze badges
1
Update:
The recursion approach (in my old answer) creates many call stacks. We can use a while loop to avoid recursion in this case:
/**
 *
 * @param {HTMLElement} el
 * @return {{top: number, left: number}}
 */
function getDocumentOffsetPosition(el) {
    let top = 0, left = 0;
    while (el !== null) {
        top += el.offsetTop;
        left += el.offsetLeft;
        el = el.offsetParent;
    }
    return {top, left};
}
Old answer:
/**
 *
 * @param {HTMLElement} el
 * @return {{top: number, left: number}}
 */
function getDocumentOffsetPosition(el) {
    var position = {
        top: el.offsetTop,
        left: el.offsetLeft
    };
    if (el.offsetParent) {
        var parentPosition = getDocumentOffsetPosition(el.offsetParent);
        position.top += parentPosition.top;
        position.left += parentPosition.left;
    }
    return position;
}
Thank ThinkingStiff for the answer, this is only another version.
answered Aug 29, 2019 at 4:10
![]()
Văn QuyếtVăn Quyết
2,35414 silver badges29 bronze badges
jQuery .offset() will get the current coordinates of the first element, or set the coordinates of every element, in the set of matched elements, relative to the document.
![]()
cosbor11
14.2k10 gold badges53 silver badges69 bronze badges
answered Aug 18, 2010 at 14:43
![]()
akauppiakauppi
16.8k15 gold badges90 silver badges118 bronze badges
2
You might be better served by using a JavaScript framework, that has functions to return such information (and so much more!) in a browser-independant fashion. Here are a few:
- Prototype
- jQuery
- MooTools
- YUI (yahoo)
With these frameworks, you could do something like:
$('id-of-img').top
to get the y-pixel coordinate of the image.
answered Jan 14, 2009 at 9:47
![]()
Shalom CraimerShalom Craimer
20.5k8 gold badges69 silver badges106 bronze badges
0
I’ve taken @meouw’s answer, added in the clientLeft that allows for the border, and then created three versions:
getAbsoluteOffsetFromBody — similar to @meouw’s, this gets the absolute position relative to the body or html element of the document (depending on quirks mode)
getAbsoluteOffsetFromGivenElement — returns the absolute position relative to the given element (relativeEl). Note that the given element must contain the element el, or this will behave the same as getAbsoluteOffsetFromBody. This is useful if you have two elements contained within another (known) element (optionally several nodes up the node tree) and want to make them the same position.
getAbsoluteOffsetFromRelative — returns the absolute position relative to the first parent element with position: relative. This is similar to getAbsoluteOffsetFromGivenElement, for the same reason but will only go as far as the first matching element.
getAbsoluteOffsetFromBody = function( el )
{   // finds the offset of el from the body or html element
    var _x = 0;
    var _y = 0;
    while( el && !isNaN( el.offsetLeft ) && !isNaN( el.offsetTop ) )
    {
        _x += el.offsetLeft - el.scrollLeft + el.clientLeft;
        _y += el.offsetTop - el.scrollTop + el.clientTop;
        el = el.offsetParent;
    }
    return { top: _y, left: _x };
}

getAbsoluteOffsetFromGivenElement = function( el, relativeEl )
{   // finds the offset of el from relativeEl
    var _x = 0;
    var _y = 0;
    while( el && el != relativeEl && !isNaN( el.offsetLeft ) && !isNaN( el.offsetTop ) )
    {
        _x += el.offsetLeft - el.scrollLeft + el.clientLeft;
        _y += el.offsetTop - el.scrollTop + el.clientTop;
        el = el.offsetParent;
    }
    return { top: _y, left: _x };
}

getAbsoluteOffsetFromRelative = function( el )
{   // finds the offset of el from the first parent with position: relative
    var _x = 0;
    var _y = 0;
    while( el && !isNaN( el.offsetLeft ) && !isNaN( el.offsetTop ) )
    {
        _x += el.offsetLeft - el.scrollLeft + el.clientLeft;
        _y += el.offsetTop - el.scrollTop + el.clientTop;
        el = el.offsetParent;
        if (el != null)
        {
            if (getComputedStyle !== 'undefined')
                valString = getComputedStyle(el, null).getPropertyValue('position');
            else
                valString = el.currentStyle['position'];
            if (valString === "relative")
                el = null;
        }
    }
    return { top: _y, left: _x };
}
If you are still having problems, particularly relating to scrolling, you could try looking at http://www.greywyvern.com/?post=331 — I noticed at least one piece of questionable code in getStyle which should be fine assuming browsers behave, but haven’t tested the rest at all.
answered Dec 1, 2015 at 7:24
![]()
3
Difference between small and little
function getPosition( el ) {
    var x = 0;
    var y = 0;
    while( el && !isNaN( el.offsetLeft ) && !isNaN( el.offsetTop ) ) {
    x += el.offsetLeft - el.scrollLeft;
    y += el.offsetTop - el.scrollTop;
    el = el.offsetParent;
    }
    return { top: y, left: x };
}
Look a example coordinates:
http://javascript.info/tutorial/coordinates
answered Aug 25, 2016 at 15:44
![]()
KingRiderKingRider
2,12025 silver badges23 bronze badges
2
If you are using jQuery, this could be a simple solution:
<script>
  var el = $("#element");
  var position = el.position();
  console.log( "left: " + position.left + ", top: " + position.top );
</script>
answered Apr 16, 2013 at 4:56
![]()
Adam BoostaniAdam Boostani
5,9119 gold badges37 silver badges44 bronze badges
if using jQuery, the dimensions plugin is excellent and allows you specify exactly what you want.
e.g.
Relative position, absolute position, absolute position without padding, with padding…
It goes on, let’s just say there is a lot you can do with it.
Plus the bonus of using jQuery is it’s lightweight file size and easy use, you won’t go back to JavaScript without it afterwards.
![]()
answered Jan 14, 2009 at 10:24
![]()
John_John_
2,9213 gold badges32 silver badges49 bronze badges
0
This is the best code I’ve managed to create (works in iframes as well, unlike jQuery’s offset()). Seems webkit has a bit of a different behavior.
Based on meouw’s comment:
function getOffset( el ) {
    var _x = 0;
    var _y = 0;
    while( el && !isNaN( el.offsetLeft ) && !isNaN( el.offsetTop ) ) {
        _x += el.offsetLeft - el.scrollLeft;
        _y += el.offsetTop - el.scrollTop;
        // chrome/safari
        if ($.browser.webkit) {
            el = el.parentNode;
        } else {
            // firefox/IE
            el = el.offsetParent;
        }
    }
    return { top: _y, left: _x };
}
answered Sep 10, 2011 at 17:05
![]()
Ron ReiterRon Reiter
3,8123 gold badges30 silver badges33 bronze badges
3
The cleanest approach I have found is a simplified version of the technique used by jQuery’s offset. Similar to some of the other answers it starts with getBoundingClientRect; it then uses the window and the documentElement to adjust for scroll position as well as things like the margin on the body (often the default).
var rect = el.getBoundingClientRect();
var docEl = document.documentElement;

var rectTop = rect.top + window.pageYOffset - docEl.clientTop;
var rectLeft = rect.left + window.pageXOffset - docEl.clientLeft;
answered Nov 4, 2014 at 14:17
![]()
James MontagneJames Montagne
77.2k14 gold badges109 silver badges129 bronze badges
To get the total offset of an element, you could recursively sum up all parent offsets:
function getParentOffset(el): number {
if (el.offsetParent) {
    return el.offsetParent.offsetTop + getParentOffset(el.offsetParent);
} else {
    return 0;
}
}
with this utility function the total top offset of a dom element is:
el.offsetTop + getParentOffset(el);
answered Mar 1, 2019 at 13:56
![]()
Kevin K.Kevin K.
5325 silver badges7 bronze badges
0
While this is very likely to be lost at the bottom of so many answers, the top solutions here were not working for me.
As far as I could tell neither would any of the other answers have helped.
Situation:
In an HTML5 page I had a menu that was a nav element inside a header (not THE header but a header in another element).
I wanted the navigation to stick to the top once a user scrolled to it, but previous to this the header was absolute positioned (so I could have it overlay something else slightly).
The solutions above never triggered a change because .offsetTop was not going to change as this was an absolute positioned element. Additionally the .scrollTop property was simply the top of the top most element… that is to say 0 and always would be 0.
Any tests I performed utilizing these two (and same with getBoundingClientRect results) would not tell me if the top of the navigation bar ever scrolled to the top of the viewable page (again, as reported in console, they simply stayed the same numbers while scrolling occurred).
Solution
The solution for me was utilizing
window.visualViewport.pageTop
The value of the pageTop property reflects the viewable section of the screen, therefore allowing me to track where an element is in reference to the boundaries of the viewable area.
Probably unnecessary to say, anytime I am dealing with scrolling I expect to use this solution to programatically respond to movement of elements being scrolled.
Hope it helps someone else.
IMPORTANT NOTE: This appears to work in Chrome and Opera currently & definitely not in Firefox (6-2018)… until Firefox supports visualViewport I recommend NOT using this method, (and I hope they do soon… it makes a lot more sense than the rest).
UPDATE:
Just a note regarding this solution.
While I still find what I discovered to be very valuable for situations in which «…programmatically respond to movement of elements being scrolled.» is applicable. The better solution for the problem that I had was to use CSS to set position: sticky on the element. Using sticky you can have an element stay at the top without using javascript (NOTE: there are times this will not work as effectively as changing the element to fixed but for most uses the sticky approach will likely be superior)
UPDATE01:
So I realized that for a different page I had a requirement where I needed to detect the position of an element in a mildly complex scrolling setup (parallax plus elements that scroll past as part of a message).
I realized in that scenario that the following provided the value I utilized to determine when to do something:
  let bodyElement = document.getElementsByTagName('body')[0];
  let elementToTrack = bodyElement.querySelector('.trackme');
  trackedObjPos = elementToTrack.getBoundingClientRect().top;
  if(trackedObjPos > 264)
  {
    bodyElement.style.cssText = '';
  }
Hope this answer is more widely useful now.
answered Oct 24, 2017 at 19:23
![]()
MERMER
1,42520 silver badges25 bronze badges
0
I did it like this so it was cross-compatible with old browsers.
// For really old browser's or incompatible ones
    function getOffsetSum(elem) {
        var top = 0,
            left = 0,
            bottom = 0,
            right = 0

         var width = elem.offsetWidth;
         var height = elem.offsetHeight;

        while (elem) {
            top += elem.offsetTop;
            left += elem.offsetLeft;
            elem = elem.offsetParent;
        }

         right = left + width;
         bottom = top + height;

        return {
            top: top,
            left: left,
            bottom: bottom,
            right: right,
        }
    }

    function getOffsetRect(elem) {
        var box = elem.getBoundingClientRect();

        var body = document.body;
        var docElem = document.documentElement;

        var scrollTop = window.pageYOffset || docElem.scrollTop || body.scrollTop;
        var scrollLeft = window.pageXOffset || docElem.scrollLeft || body.scrollLeft;

        var clientTop = docElem.clientTop;
        var clientLeft = docElem.clientLeft;


        var top = box.top + scrollTop - clientTop;
        var left = box.left + scrollLeft - clientLeft;
        var bottom = top + (box.bottom - box.top);
        var right = left + (box.right - box.left);

        return {
            top: Math.round(top),
            left: Math.round(left),
            bottom: Math.round(bottom),
            right: Math.round(right),
        }
    }

    function getOffset(elem) {
        if (elem) {
            if (elem.getBoundingClientRect) {
                return getOffsetRect(elem);
            } else { // old browser
                return getOffsetSum(elem);
            }
        } else
            return null;
    }
More about coordinates in JavaScript here: http://javascript.info/tutorial/coordinates
answered Mar 15, 2015 at 12:11
![]()
Bojan KsenemanBojan Kseneman
15.4k2 gold badges54 silver badges59 bronze badges
HTML program to show (x, y) of an
element by dragging mouse over it  you just copied it and use it on your own
<!DOCTYPE html>
<html>
    <head>
        <title>
            position of an element
        </title>

        <!-- scropt to get position -->
        <script type = "text/javascript">
            function getPositionXY(element) {
                var rect = element.getBoundingClientRect();
                document.getElementById('text').innerHTML
                = 'X: ' + rect.x + '<br>' + 'Y: ' + rect.y;
            }
        </script>
    </head>

    <body>
        <p>Move the mouse over the text</p>

        <div onmouseover = "getPositionXY(this)">
            Position:
            <p id = 'text'></p>
        </div>

    </body>
</html>
answered May 23, 2021 at 18:13
![]()
Azer8Azer8
5098 silver badges17 bronze badges
i could just like element.offsetLeft or element.offsetTop. Example :
document.getElementById('profileImg').offsetLeft
answered Nov 13, 2022 at 12:32
![]()
I successfully used Andy E’s solution to position a bootstrap 2 modal depending on what link in a table row a user clicks on. The page is a Tapestry 5 page and javascript below is imported in the java page class.
javascript:
function setLinkPosition(clientId){
var bodyRect = document.body.getBoundingClientRect(),
elemRect = clientId.getBoundingClientRect(),
offset   = elemRect.top - bodyRect.top;
offset   = offset + 20;
$('#serviceLineModal').css("top", offset);
}
My modal code:
<div id="serviceLineModal" class="modal hide fade add-absolute-position" data-backdrop="static"
 tabindex="-1" role="dialog" aria-labelledby="myModalLabel" aria-hidden="true" style="top:50%;">
<div class="modal-header">
    <button type="button" class="close" data-dismiss="modal" aria-hidden="true">x</button>
    <h3 id="myModalLabel">Modal header</h3>
</div>

<div class="modal-body">
    <t:zone t:id="modalZone" id="modalZone">
        <p>You selected service line number: ${serviceLineNumberSelected}</p>
    </t:zone>
</div>

<div class="modal-footer">
    <button class="btn" data-dismiss="modal" aria-hidden="true">Close</button>
    <!-- <button class="btn btn-primary">Save changes</button> -->
</div>
The link in the loop:
<t:loop source="servicesToDisplay" value="service" encoder="encoder">
<tr style="border-right: 1px solid black;">
    <td style="white-space:nowrap;" class="add-padding-left-and-right no-border">
        <a t:type="eventLink" t:event="serviceLineNumberSelected" t:context="service.serviceLineNumber"
            t:zone="pageZone" t:clientId="modalLink${service.serviceLineNumber}"
            onmouseover="setLinkPosition(this);">
            <i class="icon-chevron-down"></i> <!-- ${service.serviceLineNumber} -->
        </a>
    </td>
And the java code in the page class:
void onServiceLineNumberSelected(String number){
    checkForNullSession();
    serviceLineNumberSelected = number;
    addOpenServiceLineDialogCommand();
    ajaxResponseRenderer.addRender(modalZone);
}

protected void addOpenServiceLineDialogCommand() {
    ajaxResponseRenderer.addCallback(new JavaScriptCallback() {
        @Override
        public void run(JavaScriptSupport javascriptSupport) {
            javascriptSupport.addScript("$('#serviceLineModal').modal('show');");
        }
    });
}
Hope this helps someone, this post helped out.
answered Oct 23, 2014 at 15:02
![]()
1
This simple example retrieves the DOMRect object representing the bounding client rect of a simple element, and prints out its properties below it.
for more descriptions
let elem = document.querySelector("div");
let rect = elem.getBoundingClientRect();
for (const key in rect) {
  if (typeof rect[key] !== "function") {
    let para = document.createElement("p");
    para.textContent = `${key} : ${rect[key]}`;
    document.body.appendChild(para);
  }
}
div {
width: 400px;
height: 200px;
padding: 20px;
margin: 50px auto;
background: purple;
}<div></div>answered Mar 2 at 7:45
![]()
After much research and testing this seems to work
function getPosition(e) {
    var isNotFirefox = (navigator.userAgent.toLowerCase().indexOf('firefox') == -1);
    var x = 0, y = 0;
    while (e) {
        x += e.offsetLeft - e.scrollLeft + (isNotFirefox ? e.clientLeft : 0);
        y += e.offsetTop - e.scrollTop + (isNotFirefox ? e.clientTop : 0);
        e = e.offsetParent;
    }
    return { x: x + window.scrollX, y: y + window.scrollY };
}
see http://jsbin.com/xuvovalifo/edit?html,js,output
answered Jun 17, 2015 at 20:48
![]()
Jay Byford-RewJay Byford-Rew
5,6661 gold badge35 silver badges36 bronze badges
Just thought I’d throw this out there as well.
I haven’t been able to test it in older browsers, but it works in the latest of the top 3. 
Element.prototype.getOffsetTop = function() {
    return ( this.parentElement )? this.offsetTop + this.parentElement.getOffsetTop(): this.offsetTop;
};
Element.prototype.getOffsetLeft = function() {
    return ( this.parentElement )? this.offsetLeft + this.parentElement.getOffsetLeft(): this.offsetLeft;
};
Element.prototype.getOffset = function() {
    return {'left':this.getOffsetLeft(),'top':this.getOffsetTop()};
};
answered Oct 12, 2014 at 10:57
![]()
DuncanDuncan
1,53015 silver badges20 bronze badges
This is easy as two lines in JS :
var elem = document.getElementById("id");
alert(elem.getBoundingClientRect());
![]()
answered Jul 18, 2020 at 6:36
![]()
Talha RafiqueTalha Rafique
5,0321 gold badge10 silver badges11 bronze badges
1
Since different browsers are rendering border, padding, margin and etc in different way. I wrote a little function to retrieve top and left positions of specific element in every root element that you want in precise dimension:
function getTop(root, offset) {
    var rootRect = root.getBoundingClientRect();
    var offsetRect = offset.getBoundingClientRect();
    return offsetRect.top - rootRect.top;
}
For retrieve left position you must return:
return offsetRect.left - rootRect.left;
![]()
arrowd
33k8 gold badges78 silver badges108 bronze badges
answered Jan 8, 2015 at 17:42
![]()
samadadisamadadi
3,0306 gold badges24 silver badges37 bronze badges
In this article, we are given an HTML document and the task is to get the position of any element by using JavaScript. Use the following steps to get the position:
Step 1: Selecting an element: Before finding the position, it is necessary to select the required HTML element. Every element in HTML is structured in a tree-like format known as DOM or Document Object Model. In JavaScript, there is an in-built object called the document object that points to the root of the DOM tree. It means that it is possible to access every component of the web page.
The document object has various methods available to find a particular element within the HTML page. Each of these methods has a parameter that could be used to find the required element. Some of the methods are:
- The getElementsByTagName() Method
- The getElementsByClassName() Method
- The getElementById() Method
- The getElementsByName() Method
- The querySelector() Method
- The querySelectorAll() Method
Step 2: Finding the position of the element: To get the location of any HTML element in the (x, y) coordinate format, there are two document properties that are used:
JavaScript offsetTop Property: It returns the top position in pixels, relative to the top of the parent element. It includes the top position, and margin of the element and the top padding, scrollbar, and border of its parent element.
Example: This example shows the use of the above-explained approach.
html
<body>
<div id="target">
<p>Click the button</p>
<button onclick="getPoint()">
Click
</button>
<p id="output"></p>
</div>
<script>
function getPoint() {
var target = document
.getElementById("target");
var output = document
.getElementById("output");
output.innerHTML = "offsetTop: "
+ target.offsetTop;
}
</script>
</body>
Output:

find the position of HTML elements in JavaScript
JavaScript offsetLeft Property: It returns the left position in pixels, relative to the left of the parent element. It includes the left position, and margin of the element and the left padding, scrollbar, and border of its parent element.
Example: This example shows the use of the offsetLeft property.
html
<body>
<div id="target">
<p>Click the button </p>
<button onclick="getPoint()">
Click
</button>
<p id="output"></p>
</div>
<script>
function getPoint() {
var target = document
.getElementById("target");
var output = document
.getElementById("output");
output.innerHTML = "offsetLeft: "
+ target.offsetLeft;
}
</script>
</body>
Output:
find the position of HTML elements in JavaScript
Combining both these properties into one to get the code for calculating the coordinates for an HTML element is given as follows:
html
<body>
<div id="target">
<p>
Click the button to get the
co-ordinate of the element
</p>
<button onclick="getPoint()">
Get coordinate
</button>
<p id="output"></p>
</div>
<script>
function getPoint() {
var target = document
.getElementById("target");
var output = document
.getElementById("output");
output.innerHTML =
"Co-ordinate of the element:" +
" (" + target.offsetLeft + ", "
+ target.offsetTop + ")";
}
</script>
</body>
Output:

find the position of HTML elements in JavaScript
Last Updated :
25 Jan, 2023
Like Article
Save Article
-
Главная
-
Инструкции
-
JavaScript
-
Методы поиска в массивах JavaScript

Поиск в массиве — довольно несложная задача для программиста. На ум сразу приходит перебор через цикл for или бинарный поиск в отсортированном массиве, для элементов которого определены операции «больше» и «меньше». Но, как и любой высокоуровневый язык программирования, JavaScript предлагает разработчику встроенные функции для решения различных задач. В этой статье мы рассмотрим четыре метода поиска в массивах JavaScript: find, includes, indexOf и filter.
indexOf
indexOf — это функция поиска элемента в массиве. Этот метод с помощью перебора ищет искомый объект и возвращает его индекс или «-1», если не находит подходящий.
Синтаксис
Функция имеет такой синтаксис:
Array.indexOf (search element, starting index)где:
- Array — массив;
- search element — элемент, который мы ищем;
- starting index — индекс, с которого начинаем перебор. Необязательный аргумент, по умолчанию работа функции начинается с индекса “0”, т.е. метод проверяет весь Array. Если starting index больше или равен Array.length, то метод сразу возвращает “-1” и завершает работу.
Если starting index отрицательный, то JS трактует это как смещение с конца массива: при starting index = “-1” будет проверен только последний элемент, при “-2” последние два и т.д.
Практика
Опробуем метод на практике. Запустим такой код и проверим результаты его работы:
let ExampleArray = [1,2,3,1,'5', null, false, NaN,3];console.log("Позиция единицы", ExampleArray.indexOf(1) );
console.log("Позиция следующей единицы", ExampleArray.indexOf(1,2) );
console.log("Позиция тройки", ExampleArray.indexOf(3) );
console.log("Позиция тройки, если starting index отрицательный", ExampleArray.indexOf(3,-2) );
console.log("Позиция false", ExampleArray.indexOf(false) );
console.log("Позиция 5", ExampleArray.indexOf("5") );
console.log("Позиция NaN", ExampleArray.indexOf(NaN));
В результате работы этого кода мы получили такой вывод:
Позиция единицы 0
Позиция следующей единицы 3
Позиция тройки 2
Позиция тройки, если starting index отрицательный 8
Позиция false 6
Позиция 5 -1
Позиция NaN -1
indexOf осуществляет поиск элемента в массиве слева направо и останавливает свою работу на первом совпавшем. Отчетливо это проявляется в примере с единицей. Для того, чтобы идти справа налево, используйте метод LastIndexOf с аналогичным синтаксисом.
Для сравнения искомого и очередного объекта применяется строгое сравнение (===). При использовании строгого сравнения для разных типов данных, но с одинаковым значение, например 5, ‘5’ и “5” JavaScript даёт отрицательный результат, поэтому IndexOf не нашел 5.
Также стоит помнить, что indexOf некорректно обрабатывает NaN. Так что для работы с этим значением нужно применять остальные методы.
includes
includes не совсем проводит поиск заданного элемента в массиве, а проверяет, есть ли он там вообще. Работает он примерно также как и indexOf. В конце работы includes возвращает «True», если нашел искомый объект, и «False», если нет. Также includes правильно обрабатывает NaN
Синтаксис
includes имеет следующий синтаксис:
Array.includes (search element, starting index)где:
- Array — массив;
- search element — элемент, который мы ищем;
- starting index — индекс, с которого начинаем перебор. Необязательный аргумент, по умолчанию работа функции начинается с индекса “0”, т.е. метод проверяет весь Array. Если starting index больше или равен Array.length, то метод сразу возвращает «False» и завершает работу.
Если starting index отрицательный, то JS трактует это как смещение с конца массива: при starting index = “-1” будет проверен только последний элемент, при “-2” последние два и т.д.
Практика
Немного изменим код из предыдущего примера и запустим его:
let Example = [1,2,3,1,'5', null, false,NaN, 3];console.log("Наличие единицы", Example.includes(1) );
console.log("Наличие следующей единицы", Example.includes(1,2) );
console.log("Наличие тройки", Example.includes(3) );
console.log("Наличие тройки, если starting index отрицательный", Example.includes(3,-1) );
console.log("Наличие false", Example.includes(false) );
console.log("Наличие 5", Example.includes(5) );
console.log("Наличие NaN", Example.includes(NaN));
Вывод:
Наличие единицы true
Наличие следующей единицы true
Наличие тройки true
Наличие тройки, если starting index отрицательный true
Наличие false true
Наличие 5 false
Наличие NaN true
Для includes отсутствует альтернативная функция, которая проводит поиск по массиву js справа налево, которая, в общем-то, и не очень актуальна.
find
Предположим, что нам нужно найти в массиве некий объект. Но мы хотим найти его не по значению, а по его свойству. Например, поиск числа в массиве со значением между 15 и 20. Как и прежде, мы можем воспользоваться перебором с помощью for, но это не слишком удобно. Для поиска с определенным условием в JavaScript существует метод find.
Синтаксис
Array.find(function(...){
//если элемент соответствует условиям (true), то функция возвращает его  и прекращает работу;
//если ничего не найдено, то возвращает undefined
})- Array — массив;
- function(…) — функция, которая задает условия.
Практика
Как и в прошлых примерах, напишем небольшой код и опробуем метод:
let ExampleArray = ["Timeweb", 55555, "Cloud", "облачный провайдер", "буквы"];console.log(ExampleArray.find(element => element.length == 5))
Вывод:
CloudВ этом примере мы искали строки с длиной в 5 символов. Для числовых типов данных длина не определена, поэтому 55555 не подходит. find находит первый элемент и возвращает его, поэтому «буквы» также не попали в результат работы нашей функции. Для того, чтобы найти несколько элементов, соответствующих некоторому условию, нужно использовать метод filter.
Также не стоит забывать о методе findIndex. Он возвращает индекс подходящего элемента. Или -1, если его нет. В остальном он работает точно также, как и find.
filter
find ищет и возвращает первый попавшийся элемент, соответствующий условиям поиска. Для того, чтобы найти все такие элементы, необходимо использовать метод filter. Результат этой функции — массив (если ничего не найдено, то он будет пустым).
Синтаксис
Array.find(function(...){
//если элемент соответствует условиям (true), то добавляем его к конечному результату и продолжаем перебор;
})- Array — массив;
- function(…) — функция, которая задает условия.
Практика
Представим следующую задачу: у нас есть список кубоидов (прямоугольных параллелепипедов) с длинами их граней и нам нужно вывести все кубоиды с определенным объемом. Напишем код, реализующий решение данной задачи:
let ExampleArray = [
  [10, 15, 8],
  [11, 12, 6],
  [5, 20, 1],
  [10, 10, 2],
  [16,2, 4]
  ];console.log(ExampleArray.filter(element=> element[0]*element[1]*element[2]>300))
Вывод:
[ [ 10, 15, 8 ],
 [ 11, 12, 6 ] ]
В этом примере мы нашли прямоугольные параллелепипеды с объемом больше 300. В целом, метод filter в JS позволяет реализовывать всевозможные условия для поиска.
Заключение
В этой статье узнали о методах поиска в JavaScript и научились ими пользоваться. Все перечисленные методы — универсальные инструменты для разработчиков. Но, как и любые универсальные инструменты, они не всегда являются самыми производительными. Так, например, бинарный поиск будет куда эффективнее, чем find и filter.
Array.prototype.indexOf()
Метод indexOf() возвращает первый индекс, по которому данный элемент может быть найден в массиве, или -1, если его нет.
Try it
Syntax
indexOf(searchElement)
indexOf(searchElement, fromIndex)
Parameters
searchElement-
Элемент для нахождения в массиве.
-
fromIndexOptional -
Индекс для начала поиска.Если индекс больше или равен длине массива,возвращается -1,что означает,что поиск массива не будет осуществляться.Если предоставленное значение индекса является отрицательным числом,то оно принимается за смещение от конца массива.Примечание:если предоставленный индекс имеет отрицательное значение,то поиск массива все равно будет вестись спереди и сзади.Если предоставленный индекс равен 0,поиск будет выполняться по всему массиву.По умолчанию:0 (выполняется поиск всего массива).
Return value
Первый индекс элемента в массиве; -1, если не найден.
Description
indexOf() сравнивает searchElement с элементами массива, используя строгое равенство (тот же метод, что и для оператора === или оператора тройного равенства).
Examples
Using indexOf()
В следующем примере indexOf() для поиска значений в массиве.
const array = [2, 9, 9];
array.indexOf(2);
array.indexOf(7);
array.indexOf(9, 2);
array.indexOf(2, -1);
array.indexOf(2, -3);
Поиск всех случаев возникновения элемента
const indices = [];
const array = ['a', 'b', 'a', 'c', 'a', 'd'];
const element = 'a';
let idx = array.indexOf(element);
while (idx !== -1) {
  indices.push(idx);
  idx = array.indexOf(element, idx + 1);
}
console.log(indices);
Поиск,существует ли элемент в массиве или нет,и обновление массива
function updateVegetablesCollection (veggies, veggie) {
  if (veggies.indexOf(veggie) === -1) {
    veggies.push(veggie);
    console.log(`New veggies collection is: ${veggies}`);
  } else {
    console.log(`${veggie} already exists in the veggies collection.`);
  }
}

const veggies = ['potato', 'tomato', 'chillies', 'green-pepper'];

updateVegetablesCollection(veggies, 'spinach');

updateVegetablesCollection(veggies, 'spinach');
Specifications
Browser compatibility
| Desktop | Mobile | Server | ||||||||||||
|---|---|---|---|---|---|---|---|---|---|---|---|---|---|---|
| Chrome | Edge | Firefox | Internet Explorer | Opera | Safari | WebView Android | Chrome Android | Firefox для Android | Opera Android | Safari на IOS | Samsung Internet | Deno | Node.js | |
indexOf |
1 |
12 |
1.5 |
9 |
9.5 |
3 |
≤37 |
18 |
4 |
10.1 |
1 |
1.0 |
1.0 |
0.10.0 |
See also
- Полифилл
Array.prototype.indexOfвcore-js Array.prototype.lastIndexOf()TypedArray.prototype.indexOf()String.prototype.indexOf()
JavaScript
-
Array.prototype.groupToMap()
Экспериментальный:Эта технологияПеред использованием продукции внимательно проверьте таблицу совместимости браузеров.
-
Array.prototype.includes()
Метод includes()определяет,имеет ли массив определенное значение среди своих элементов,возвращая true или false в зависимости от ситуации.
-
Array.isArray()
Метод Array.isArray()определяет,является ли переданное значение проверяемым значением.
-
Array.prototype.join()
Метод join()создает и возвращает новую строку путем конкатенации всех элементов массива (или массивоподобного объекта),разделенных запятыми Указанный разделитель Указывает
Время на прочтение
6 мин
Количество просмотров 27K
Доброго времени суток, друзья!
В этом небольшом туториале мы вместе с вами выполним три простых задания:
- С помощью Geolocation API и Leaflet.js определим текущее местоположение пользователя и отобразим его на карте
- Реализуем анимированный переход между городами
- Реализуем переключение между адресами с предварительным получением названия объекта и его координат
Код проекта находится здесь.
Поиграть с кодом можно здесь:
Определяем текущее местоположение пользователя
Geolocation API позволяет пользователю предоставлять веб-приложению данные о своем местоположении. В приложении для запроса этих данных используется метод Geolocation.getCurrentPosition(). Данный метод принимает один обязательный и два опциональных параметра: success — функция обратного вызова, получающая объект Position при предоставлении разрешения, error — функция обратного вызова, получающая объект PositionError при отказе в доступе, и options — объект с настройками. Вот как это выглядит в коде:
navigator.geolocation.getCurrentPosition(success, error, {
  // высокая точность
  enableHighAccuracy: true
})

function success({ coords }) {
  // получаем широту и долготу
  const { latitude, longitude } = coords
  const position = [latitude, longitude]
  console.log(position) // [широта, долгота]
}

function error({ message }) {
  console.log(message) // при отказе в доступе получаем PositionError: User denied Geolocation
}
Отображаем местоположение пользователя на карте
В качестве карты мы будем использовать Leaflet.js. Данный сервис является альтернативой Google Maps и OpenStreetMap, уступает им по функционалу, но подкупает простотой интерфейса. Создаем разметку, в которой подключаем стили и скрипт карты:
<head>
  <!-- стили карты -->
  <link
      rel="stylesheet"
      href="https://unpkg.com/leaflet@1.7.1/dist/leaflet.css"
      integrity="sha512-xodZBNTC5n17Xt2atTPuE1HxjVMSvLVW9ocqUKLsCC5CXdbqCmblAshOMAS6/keqq/sMZMZ19scR4PsZChSR7A=="
      crossorigin=""
    />
    <!-- скрипт карты -->
    <script
      src="https://unpkg.com/leaflet@1.7.1/dist/leaflet.js"
      integrity="sha512-XQoYMqMTK8LvdxXYG3nZ448hOEQiglfqkJs1NOQV44cWnUrBc8PkAOcXy20w0vlaXaVUearIOBhiXZ5V3ynxwA=="
      crossorigin=""
    ></script>
    <!-- наши стили -->
    <link rel="stylesheet" href="style.css" />
</head>
<body>
  <!-- контейнер для карты -->
  <div id="map"></div>
  <!-- кнопка для вызова функции -->
  <button id="my_position">My Position</button>
  <!-- наш скрипт-модуль -->
  <script src="script.js" type="module"></script>
</body>
Добавляем минимальные стили (style.css):
* {
  margin: 0;
  padding: 0;
  box-sizing: border-box;
}

body {
  min-height: 100vh;
  display: grid;
  place-content: center;
  place-items: center;
  background-color: rgb(241, 241, 241);
}

#map {
  width: 480px;
  height: 320px;
  border-radius: 4px;
  box-shadow: 0 0 1px #222;
}

button {
  padding: 0.25em 0.75em;
  margin: 1em 0.5em;
  cursor: pointer;
  user-select: none;
}
Создаем модуль map.js следующего содержания:
// создаем локальные переменные для карты и маркера
// каждый модуль имеет собственное пространство имен
let map = null
let marker = null

// функция принимает позицию - массив с широтой и долготой
// и сообщение, отображаемое над маркером (tooltip)
export function getMap(position, tooltip) {
  // если карта не была инициализирована
  if (map === null) {
    // второй аргумент, принимаемый методом setView - это масштаб (zoom)
    map = L.map('map').setView(position, 15)
  } else return

  // что-то типа рекламы
  // без этого карта работать не будет
  L.tileLayer('https://{s}.tile.openstreetmap.org/{z}/{x}/{y}.png', {
    attribution:
      '© <a href="https://www.openstreetmap.org/copyright">OpenStreetMap</a> contributors'
  }).addTo(map)

  // добавляем маркер с сообщением
  L.marker(position).addTo(map).bindPopup(tooltip).openPopup()
}
Наконец, создаем script.js:
// импортируем функцию
import { getMap } from './map.js'
// находим кнопку и добавляем к ней обработчик
document.getElementById('my_position').onclick = () => {
navigator.geolocation.getCurrentPosition(success, error, {
enableHighAccuracy: true
})
}
function success({ coords }) {
const { latitude, longitude } = coords
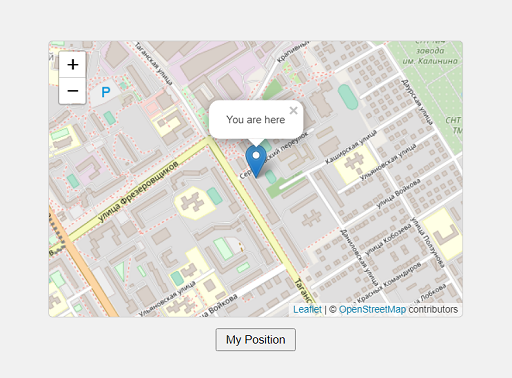
const currentPosition = [latitude, longitude]
// вызываем функцию, передавая ей текущую позицию и сообщение
getMap(currentPosition, 'You are here')
}
function error({ message }) {
console.log(message)
}
Открываем index.html в браузере, нажимаем на кнопку, предоставляем разрешение на получение данных о местоположении, видим нашу позицию на карте.
Отлично. Двигаемся дальше.
Анимированный переход между городами
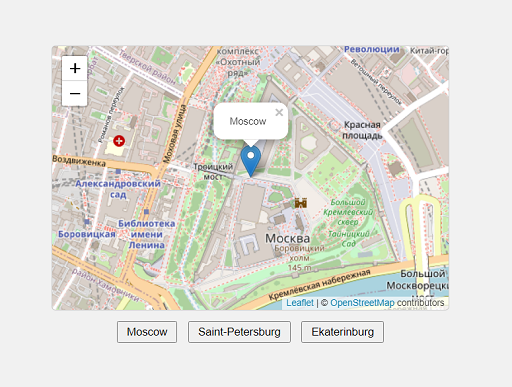
Предположим, что у нас имеется объект с тремя городами (Москва, Санкт-Петербург, Екатеринбург) и их координатами (db/cities.json):
{
  "Moscow": {
    "lat": "55.7522200",
    "lon": "37.6155600"
  },
  "Saint-Petersburg": {
    "lat": "59.9386300",
    "lon": "30.3141300"
  },
  "Ekaterinburg": {
    "lat": "56.8519000",
    "lon": "60.6122000"
  }
}
Нам необходимо реализовать плавное переключение между этими городами на карте.
Добавляем в разметку контейнер для городов:
<div id="cities"></div>
Переписываем script.js:
import { getMap } from './map.js'

// получаем контейнер для городов
const $cities = document.getElementById('cities')

;(async () => {
  // получаем объект с городами
  const response = await fetch('./db/cities.json')
  const cities = await response.json()
  // перебираем города
  for (const city in cities) {
    // создаем кнопку
    const $button = document.createElement('button')

    // текстовое содержимое кнопки - название города
    $button.textContent = city

    // получаем широту и долготу
    const { lat, lon } = cities[city]

    // записываем название города, широту и долготу
    // в соответствующие data-атрибуты
    $button.dataset.city = city
    $button.dataset.lat = lat
    $button.dataset.lon = lon

    // добавляем кнопку в контейнер
    $cities.append($button)
  }
})()

// обрабатываем нажатие кнопки
$cities.addEventListener('click', ({ target }) => {
  // нас интересует только нажатие кнопки
  if (target.tagName !== 'BUTTON') return

  // получаем название города, широту и долготу из data-атрибутов
  const { city, lat, lon } = target.dataset
  const position = [lat, lon]
  // вызываем функцию, передавая ей позицию и название города
  getMap(position, city)
})
Также немного изменим map.js:
let map = null
let marker = null

export function getMap(position, tooltip) {
  if (map === null) {
    map = L.map('map').setView(position, 15)
  } else {
    // перемещение к следующей позиции
    map.flyTo(position)
  }

  L.tileLayer('https://{s}.tile.openstreetmap.org/{z}/{x}/{y}.png', {
    attribution:
      '© <a href="https://www.openstreetmap.org/copyright">OpenStreetMap</a> contributors'
  }).addTo(map)

  // удаление предыдущего маркера
  if (marker) {
    map.removeLayer(marker)
  }
  marker = new L.Marker(position).addTo(map).bindPopup(tooltip).openPopup()
}
Открываем index.html. При нажатии первой кнопки сразу получаем позицию и название города. При нажатии второй и последующих кнопок плавно перемещаемся между городами.
Плавное переключением между адресами
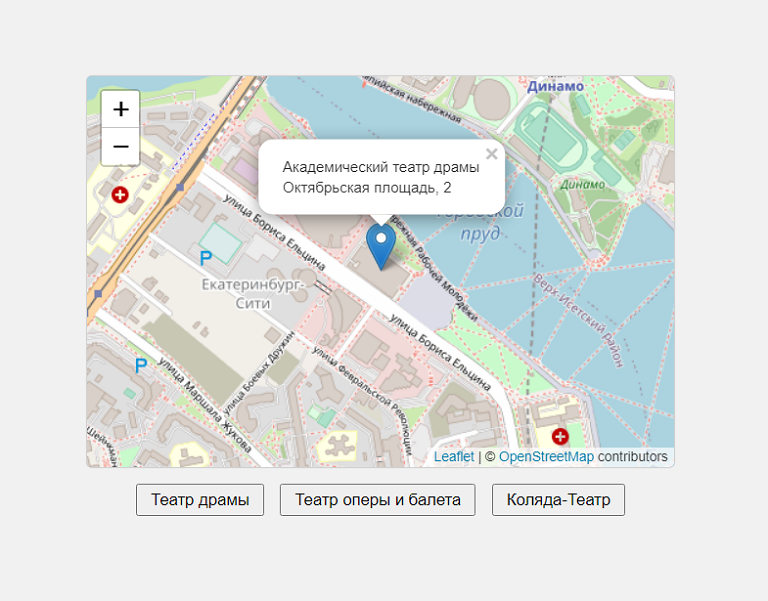
Предположим, что у нас имеются три объекта с названиями и адресами (db/addresses.json):
{
  "Театр драмы": "Октябрьская площадь, 2",
  "Театр оперы и балета": "Проспект Ленина, 46А",
  "Коляда-Театр": "Проспект Ленина, 97"
}
Нам необходимо реализовать переключение между этими объектами на карте. Но как нам это сделать без координат? Никак. Следовательно, нам каким-то образом нужно эти координаты получить. Для этого воспользуемся сервисом Nominatim от OpenStreetMap. О том, как правильно сформировать строку запроса, смотрите здесь. Я продемонстрирую лишь один из возможных вариантов.
Итак, создаем в разметке контейнер для адресов:
<div id="addresses"></div>
Переписываем script.js:
// получаем контейнер для адресов
const $addresses = document.getElementById('addresses')

;(async () => {
  // названия и адреса объектов
  const response = await fetch('./db/addresses.json')
  const addresses = await response.json()

  // для каждого места
  for (const place in addresses) {
    // создаем кнопку
    const $button = document.createElement('button')

    $button.textContent = place

    // получаем адрес
    const address = addresses[place]

    // формируем строку запроса
    const query = address.replace(
      /([А-ЯЁа-яё]+)s([А-ЯЁа-яё]+),s([0-9А-ЯЁа-яё]+)/,
      '$3+$1+$2,+Екатеринбург'
    )
    // получаем, например, 2+Октябрьская+площадь,+Екатеринбург

    // записываем данные в соответствующие data-атрибуты
    $button.dataset.address = address
    $button.dataset.query = query

    $addresses.append($button)
  }
})()

// обрабатываем нажатие кнопки
$addresses.addEventListener('click', async ({ target }) => {
  if (target.tagName !== 'BUTTON') return

  // получаем данные из data-атрибутов
  const { address, query } = target.dataset

  // получаем ответ от сервиса
  const response = await fetch(
    `https://nominatim.openstreetmap.org/search?q=${query}&format=json&limit=1`
  )
  // format - формат данных, limit - количество объектов с данными

  // парсим ответ, извлекая нужные сведения
  const { display_name, lat, lon } = (await response.json())[0]

  // редактриуем название объекта
  const name = display_name.match(/[А-ЯЁа-яёs(«-»)]+/)[0]

  const position = [lat, lon]

  // формируем сообщение
  const tooltip = `${name}<br>${address}`

  // вызываем функцию
  getMap(position, tooltip)
})
Открываем index.html. При нажатии первой кнопки сразу получаем позицию и название театра. При нажатии второй и последующих кнопок плавно перемещаемся между театрами.
Круто. Все работает, как ожидается.
На этом позвольте откланяться. Надеюсь, вы нашли для себя что-нибудь интересное. Благодарю за внимание и хорошего дня.