- Global search scopes
- Global search validation
- Perform a search
-
Search in code
- View Git blame from code search
- Filter code search results by language
- Search for projects by full path
- Search for a SHA
- Searching for specific terms
- Retrieve search results as feed
- Search history
- Removing search filters
- Autocomplete suggestions
- Search settings
GitLab has two types of searches available: basic and advanced.
Both types of search are the same, except when you are searching through code.
- When you use basic search to search code, your search includes one project at a time.
- When you use advanced search to search code, your search includes all projects at once.
Global search scopes
To improve the performance of your instance’s global search, a GitLab administrator
can limit the search scope by disabling the following ops feature flags.
| Scope | Feature flag | Description |
|---|---|---|
| Code | global_search_code_tab |
When enabled, global search includes code. |
| Commits | global_search_commits_tab |
When enabled, global search includes commits. |
| Issues | global_search_issues_tab |
When enabled, global search includes issues. |
| Merge requests | global_search_merge_requests_tab |
When enabled, global search includes merge requests. |
| Users | global_search_users_tab |
When enabled, global search includes users. |
| Wiki | global_search_wiki_tab |
When enabled, global search includes project wikis (not group wikis). |
All global search scopes are enabled by default on GitLab.com
and self-managed instances.
Global search validation
Global search ignores and logs as abusive any search with:
- Fewer than 2 characters
- A term longer than 100 characters (URL search terms must not exceed 200 characters)
- A stop word only (for example,
the,and, orif) - An unknown
scope -
group_idorproject_idthat is not completely numeric -
repository_reforproject_refwith special characters not allowed by Git refname
Global search only flags with an error any search that includes more than:
- 4096 characters
- 64 terms
Perform a search
To start a search, in the upper-right corner of the screen, in the search bar, type your search query.
You must type at least two characters.

After the results are displayed, you can modify the search, select a different type of data to
search, or choose a specific group or project.

Search in code
To search through code or other documents in a project:
- On the top bar, select Main menu > Projects and find your project.
- On the top bar, in the search field, type the string you want to search for.
- Press Enter.
Code search shows only the first result in the file.
To search across all of GitLab, ask your administrator to enable advanced search.
View Git blame from code search
After you find search results, you can view who made the last change to the line
where the results were found.
- From the code search result, hover over the line number.
- On the left, select View blame.

Filter code search results by language
To filter code search results by one or more languages:
- On the code search page, on the left sidebar, select one or more languages.
- On the left sidebar, select Apply.
Search for projects by full path
Version history
-
Introduced in GitLab 15.9 with a flag named
full_path_project_search. Disabled by default. - Enabled on GitLab.com in GitLab 15.9.
- Enabled on self-managed GitLab 15.10.
-
Generally available in GitLab 15.11. Feature flag
full_path_project_searchremoved.
You can search for a project by entering its full path (including the namespace it belongs to) in the search box.
As you type the project path, autocomplete suggestions are displayed.
For example, the search query:
-
gitlab-org/gitlabsearches for thegitlabproject in thegitlab-orgnamespace. -
gitlab-org/displays autocomplete suggestions for projects that belong to thegitlab-orgnamespace.
Search for a SHA
You can search for a commit SHA.
- On the top bar, select Main menu > Projects and find your project.
- On the top bar, in the search field, type the SHA.
If a single result is returned, GitLab redirects to the commit result
and gives you the option to return to the search results page.

Searching for specific terms
You can filter issues and merge requests by specific terms included in titles or descriptions.
- Syntax
- Searches look for all the words in a query, in any order. For example: searching
issues fordisplay bugreturns all issues matching both those words, in any order. - To find the exact term, use double quotes:
"display bug"
- Searches look for all the words in a query, in any order. For example: searching
- Limitation
- For performance reasons, terms shorter than 3 chars are ignored. For example: searching
issues forincluded in titlesis same asincluded titles - Search is limited to 4096 characters and 64 terms per query.
- When searching issues, partial matches are not allowed. For example: searching for
playwill
not return issues that have the worddisplay. But variations of words match, so searching
fordisplaysalso returns issues that have the worddisplay.
- For performance reasons, terms shorter than 3 chars are ignored. For example: searching
Retrieve search results as feed
Feeds for merge requests were introduced in GitLab 14.3.
GitLab provides RSS feeds of search results for your project. To subscribe to the
RSS feed of search results:
- Go to your project’s page.
- On the left sidebar, select Issues or Merge requests.
- Perform a search.
- Select the feed symbol to display the results as an RSS feed in Atom format.
The URL of the result contains both a feed token, and your search query.
You can add this URL to your feed reader.
Search history
Search history is available for issues and merge requests, and is stored locally
in your browser. To run a search from history:
- In the top menu, select Issues or Merge requests.
- To the left of the search bar, select Recent searches, and select a search from the list.
Removing search filters
Individual filters can be removed by selecting the filter’s (x) button or backspacing. The entire search filter can be cleared by selecting the search box’s (x) button or via ⌘ (Mac) + ⌫.
To delete filter tokens one at a time, the ⌥ (Mac) / Control + ⌫ keyboard combination can be used.
Autocomplete suggestions
In the search bar, you can view autocomplete suggestions for:
- Projects and groups
- Users
- Various help pages (try and type API help)
- Project feature pages (try and type milestones)
- Various settings pages (try and type user settings)
- Recently viewed issues (try and type some word from the title of a recently viewed issue)
- Recently viewed merge requests (try and type some word from the title of a recently viewed merge request)
- Recently viewed epics (try and type some word from the title of a recently viewed epic)
- GitLab Flavored Markdown (GLFM) for issues in a project (try and type a GLFM reference for an issue)
Search settings
Version history
-
Introduced in GitLab 13.8 with a flag named
search_settings_in_page. Disabled by default. - Added to Group, Administrator, and User settings in GitLab 13.9.
-
Feature flag
search_settings_in_pageremoved in GitLab 13.11. - Generally available in GitLab 13.11.
You can search inside a Project, Group, Administrator, or User’s settings by entering
a search term in the search box located at the top of the page. The search results
appear highlighted in the sections that match the search term.

Сегодня поговорим об азах взаимодействия с одной из самых популярных git-систем.
Что такое GitLab
Сейчас почти никто не пишет код в одиночку. Команды инженеров и разработчиков растут, как на дрожжах. Работая в группах, программисты используют системы управления исходным кодом на базе git, специального инструмента, позволяющего хранить данные разрабатываемого проекта в сети и совместно редактировать его с учетом определенных правил и методик взаимодействия. Самый известный подобный сервис – GitHub. А GitLab – это его собрат, выполняющий те же функции, но устроенный несколько иначе.
GitLab позволяет управлять репозиториями с кодом, отслеживать ошибки в разрабатываемых программах, публиковать код и тестировать его. Это незаменимый инструмент для каждого, кто программирует не в одиночку.
Комьюнити теперь в Телеграм
Подпишитесь и будьте в курсе последних IT-новостей
Подписаться
Разница между GitLab и GitHub
Оба сервиса – системы управления репозиториями на базе git. Принципиальных отличий между ними нет. GitHub появился раньше и стал чуть ли не синонимом git, поэтому он популярнее и для многих является единственной системой для управления репозиториями.
Но GitLab есть что предложить с точки зрения функциональности, поэтому все чаще наблюдается переход пользователей с GitHub на GitLab. В частности, это касается разработчиков-новичков, которые пока еще не «приросли» к GitHub.
В связи с растущей популярностью GitLab я и решил познакомить вас с этим сервисом поближе.
Инструкция по использованию GitLab
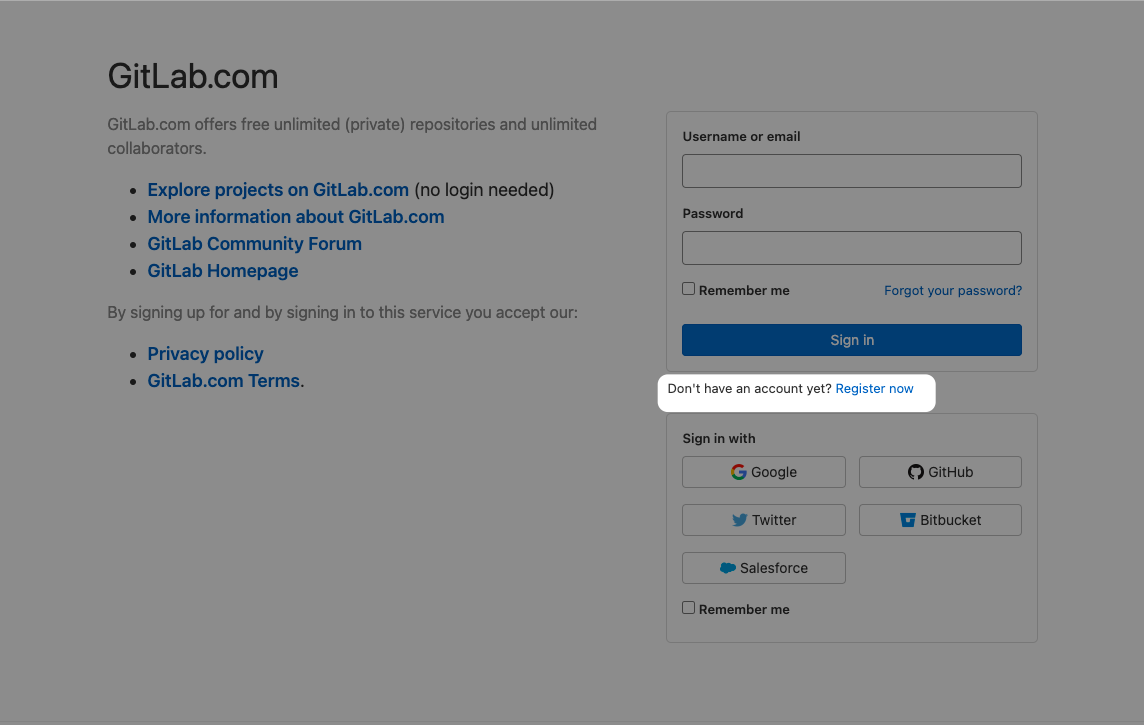
Перед началом работы с сервисом, нужно создать учетную запись. Процедура эта весьма тривиальна:
-
Заходим на официальный сайт GitLab.
-
В верхнем левом углу находим кнопку Login и жмем по ней.
-
Через пару секунд перед вам откроется форма входа в систему, а под ней будет ссылка на форму регистрации (Register now). Переходим по ней.

-
Заполняем данные для регистрации (классические данные: адрес электронной почты, пароль, логин и т.п.). Жмем на кнопку Register.
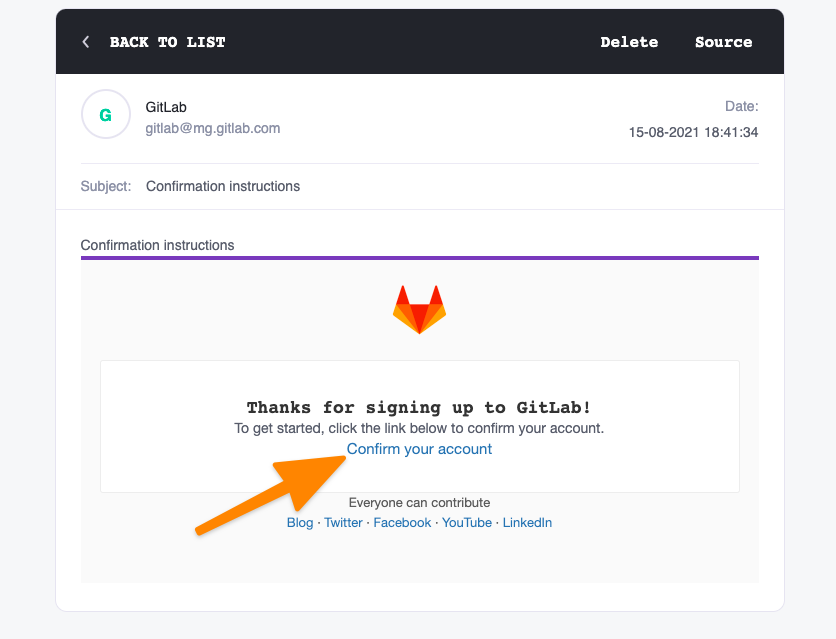
-
В течение пары минут на указанную при регистрации почту «упадет» сообщение со ссылкой для подтверждения создания аккаунта. Переходим по ней.
Учетная запись готова. Теперь можно переходить непосредственно к знакомству с GitLab.
Как создать проект
Проектом в GitLab считается глобальное рабочее пространство, в котором будет размещен репозиторий с файлами ваших сайтов и приложений. А также в нем можно взаимодействовать с коллегами и использовать другие возможности сервиса.
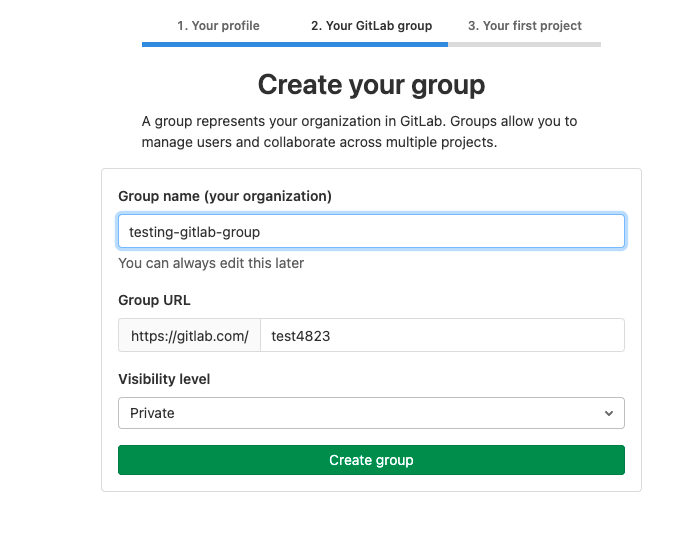
Поэтому при первом входе под своей учетной записью GitLab попросит вас указать род деятельности, наличие или отсутствие команды, имя рабочей группы и название проекта.
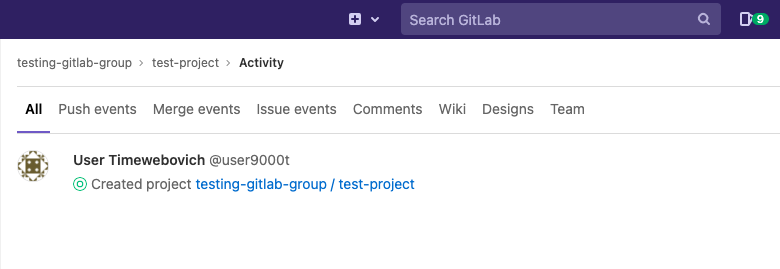
После формирования проекта можно переходить непосредственно к созданию репозиториев, загрузке программ в GitLab и т.п.
Как создать репозиторий
Чтобы воспользоваться репозиторием, нужно создать новый проект:
-
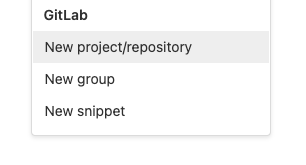
Кликаем по иконке со значком + в панели управления.
-
Выбираем пункт New project/repository.
-
Затем кликаем по Create blank project.
-
Указываем его имя и другие запрашиваемые параметры (можно указать, публичным будет репо или приватным) и нажимаем на кнопку Create Project.
Вместе с проектом сформируется новый git-репозиторий. Теперь можно с ним взаимодействовать, то есть загружать файлы, делать коммиты, создавать различные ветки для разработки продукта и мерджить их при необходимости.
Как загрузить файлы сайта/приложения в GitLab
Тут есть 3 пути.
Первый – используем веб-интерфейс GitLab
-
На главной странице проекта ищем строку The repository for this project is empty, а под ней кнопку Upload File и нажимаем на нее.
-
GitLab предложит выбрать файлы проекта для загрузки и последующей работы с ними. Выбираем все файлы, что используем при разработке и выгружаем.
Также можно использовать WebIDE, встроенную в GitLab, чтобы прямо в браузере писать код и создавать файлы для своего приложения/сайта.
Второй – используем командную строку
Тут все сложнее, но на самом GitLab опубликована короткая и доходчивая инструкция по подключению к сервису через командную строку, используя классический git-клиент.
Третий – используем сторонний git-клиент
Существуют приложения в духе Tower и Sublime Merge, позволяющие управлять репозиториями, делать коммиты и пушить изменения в проекты при помощи удобного графического интерфейса. Можно подключиться к GitLab с помощью одной из таких программ.
Как добавить SSH-ключ для подключения к репозиторию
SSH-ключи можно использовать для авторизации в GitLab и для управления репозиториями по протоколу Secure Shell. Чтобы это сделать:
-
Генерируем ключ с помощью команды ssh-keygen (вводим ее в терминал).
-
Генератор предложит сохранить получившийся ключ. Менять директорию, куда сохраняется ключ, необязательно.
-
Затем утилита попросит ввести пароль. Его тоже можно не вводить. Просто жмем на Enter.
-
В указанной на втором этапе папке появится файл с ключом в формате .pub. В нем лежит ключ. Нужно скопировать его.
-
Возвращаемся на сайте GitLab. Открываем раздел SSH-keys, вставляем ключ в специально отведенное для этого поле и нажимаем на кнопку Add key.


Как работать с ветками
Ветки – это инструмент для создания дополнительных вариаций приложения/сайта, которые позволяют вести разработку новых функций, не затрагивая при этом основное приложение, доступное для пользователей.
По умолчанию в GitLab доступна только одна ветка – master. Но ее чаще используют не для разработки, а для публикации готовых сборок проекта, которые нестрашно превратить в релиз для масс.
Поэтому принято создавать новые ветки для разработки дополнительных функций, а уже потом объединять их с основной.
Как создавать ветки
Ветки – не уникальная для GitLab функция. Это часть git, поэтому, как и в случае с репозиториями, тут можно пойти тремя путями:
-
На сайте GitLab в окне управления репозиторием нажать на кнопку + справа от названия ветки, а потом выбрать пункт New branch в выпадающем меню.
-
Можно создать новую ветку через git-клиент в терминале с помощью команды git checkout -b [название новой ветки].
-
Или воспользоваться аналогичной функций в используем графическом git-клиенте (Tower, Sublime Merge, GitFox и т.п.).
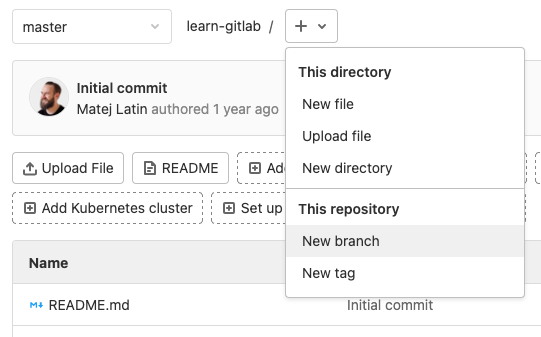
Любой из способов позволит создавать новую ветку, в которую после этого можно будет отправлять коммиты и делать пуши.
Мерджинг веток
Мерджинг (или объединение) веток – это механизм слияния двух наборов функций одной программы, позволяющий переносить функции из дополнительных веток в основную ветку разработки, где лежит приложение. Результат увидят еще и пользователи, а не только разработчики.
Запрос на объединение веток будет появляться на сайте GitLab каждый раз, когда вы будете вносить изменения в код одной или нескольких веток.
Выглядит это следующим образом:
-
На сайте появляется большая синяя кнопка Create merge request. Кликаем по ней.
-
Затем рассказываем о своем запросе (поясняем, для чего он делается).
-
Указываем автор запроса в поле Assignee.
-
Указываем человека, который будет проверять запрос в поле Reviewer.
-
Потом указываем Milestone (если используете их).
-
Ставим теги.
-
И нажимаем на Create merge request.
-
Если с запросом все ок, то проверяющий нажмет на кнопку Merge, и весь код перекочует в основную ветку проекта (ну или ту, которую указал автор запроса).

Как добавлять пользователей в проект
К разработке своего приложения/сайта всегда можно привлечь людей со стороны:
-
Для этого кликаем по кнопке Project information в боковой панели GitLab.
-
Выбираем пункт Members.
-
В графу GitLab member or Email address вписываем ник GitLab-пользователя или его email-адрес.
-
Выбираем для него роль (гость, наблюдатель, разработчик).
-
Также указываем время действия приглашения (в указанный день приглашенный будет исключен из проекта).
-
А потом кликаем на Invite.
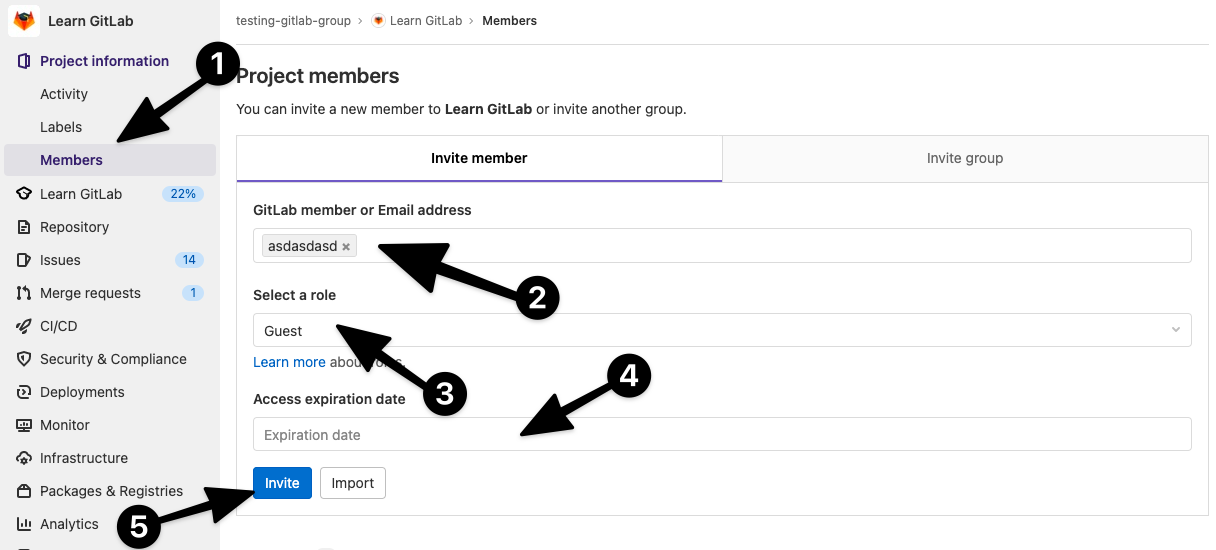
Если выбранный человек согласится присоединиться, то ваша команда расширится.
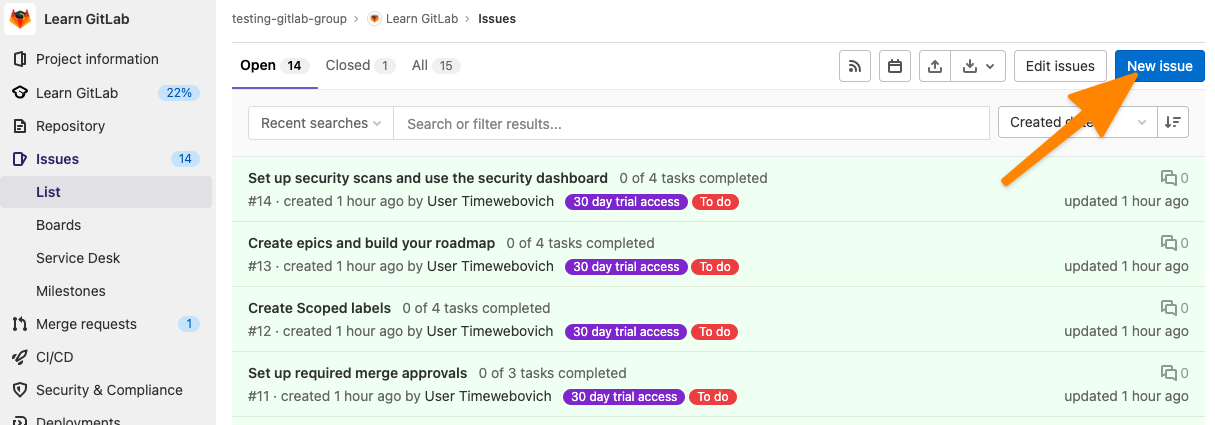
Как создавать баг-репорты
В git-системах есть инструменты, помогающие оповещать разработчиков об ошибках и обсуждать их как с пользователями, так и с коллегами.
Речь идет о разделе Issues. Если возникла проблема, то нужно сообщить о ней тут. Для этого:
-
Открываем раздел Issues в боковой панели управления.
-
Затем нажимаем на кнопку New issue.
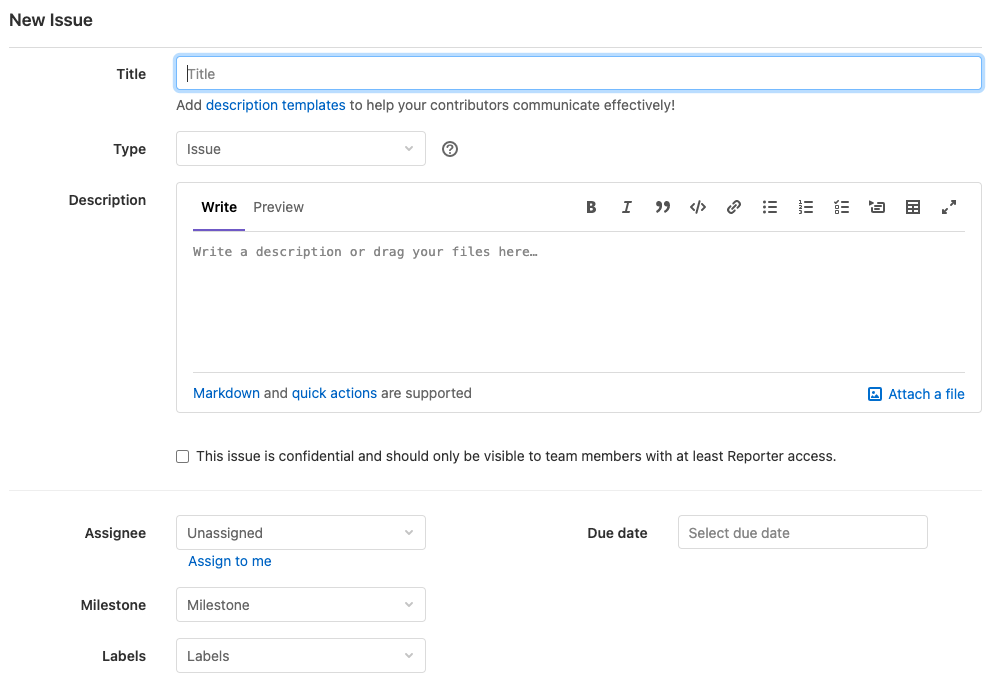
-
Даем имя обнаруженной проблеме, а затем подробно описываем ее в разделе Description.
-
Затем назначаем ответственного в пункте Assignee и срок, в течение которого нужно найти решение найденной проблемы.
-
А потом нажимаем на кнопку Create issue.
Как удалить проект
-
Открываем настройки проекта и переходим во вкладку General.
-
Листаем ее до пункта Advanced и справа от него ищем кнопку Expand, которая откроет доступ к дополнительным параметрам.
-
Вновь пролистываем появившееся меню до упора вниз, пока не наткнемся на кнопку Delete project.
-
Нажимаем на нее и вписываем название проекта, чтобы его удалить.
Вместо заключения
На этом все. Я рассмотрел базовые возможности GitLab и намеренно не затрагивал аналитические инструменты, интеграцию с Kubernetes и дополнительные функции, пытаясь сконцентрироваться на важнейших концептах GitLab и git. Это то, что вам необходимо для старта, независимо от того, пользовались вы ранее другими системами управлениями репозиториями или нет.
| stage | group | info |
|---|---|---|
|
Data Stores |
Tenant Scale |
To determine the technical writer assigned to the Stage/Group associated with this page, see https://about.gitlab.com/handbook/product/ux/technical-writing/#assignments |
Manage projects (FREE)
Most work in GitLab is done in a project. Files and
code are saved in projects, and most features are in the scope of projects.
View projects
To view all your projects, on the top bar, select Main menu > Projects > View all projects.
To browse all public projects, select Main menu > Explore > Projects.
Who can view the Projects page
When you select a project, the project landing page shows the project contents.
For public projects, and members of internal and private projects
with permissions to view the project’s code,
the project landing page shows:
- A
READMEor index file. - A list of directories in the project’s repository.
For users without permission to view the project’s code, the landing page shows:
- The wiki homepage.
- The list of issues in the project.
Access a project page with the project ID
Introduced in GitLab 11.8.
To access a project from the GitLab UI using the project ID,
visit the /projects/:id URL in your browser or other tool accessing the project.
Explore topics
To explore project topics:
- On the top bar, select Main menu > Projects > View all projects.
- Select the Explore topics tab.
- To view projects associated with a topic, select a topic.
The Explore topics tab shows a list of topics sorted by the number of associated projects.
You can assign topics to a project on the Project Settings page.
If you’re an instance administrator, you can administer all project topics from the
Admin Area’s Topics page.
Star a project
You can add a star to projects you use frequently to make them easier to find.
To add a star to a project:
- On the top bar, select Main menu > Projects and find your project.
- In the upper-right corner of the page, select Star.
View starred projects
-
On the top bar, select Main menu > Projects > View all projects.
-
Select the Starred projects tab.
-
GitLab displays information about your starred projects, including:
- Project description, including name, description, and icon.
- Number of times this project has been starred.
- Number of times this project has been forked.
- Number of open merge requests.
- Number of open issues.
View personal projects
Personal projects are projects created under your personal namespace.
For example, if you create an account with the username alex, and create a project
called my-project under your username, the project is created at https://gitlab.example.com/alex/my-project.
To view your personal projects:
- On the top bar, select Main menu > Projects > View all projects.
- In the Yours tab, select Personal.
Delete a project
After you delete a project:
- Projects in personal namespaces are deleted immediately.
- Projects in groups are deleted after a retention period.
To delete a project:
- On the top bar, select Main menu > Projects and find your project.
- Select Settings > General.
- Expand the Advanced section.
- Scroll down to the Delete project section.
- Select Delete project.
- Confirm this action by completing the field.
View projects pending deletion (PREMIUM)
- Introduced in GitLab 13.3 for Administrators.
- Tab renamed from Deleted projects in GitLab 14.6.
- Available to all users in GitLab 14.8 with a flag named
project_owners_list_project_pending_deletion. Enabled by default.- Generally available in GitLab 14.9. Feature flag
project_owners_list_project_pending_deletionremoved.
To view a list of all projects that are pending deletion:
- On the top bar, select Main menu > Projects > View all projects.
- Based on your GitLab version:
- GitLab 14.6 and later: select the Pending deletion tab.
- GitLab 14.5 and earlier: select the Deleted projects tab.
Each project in the list shows:
- The time the project was marked for deletion.
- The time the project is scheduled for final deletion.
- A Restore link to stop the project being eventually deleted.
View project activity
To view the activity of a project:
- On the top bar, select Main menu > Projects and find your project..
- On the left sidebar, select Project information > Activity.
- Select a tab to view the type of project activity.
Search in projects
You can search through your projects.
- On the top bar, select Main menu.
- In Search your projects, type the project name.
GitLab filters as you type.
You can also look for the projects you starred (Starred projects).
You can Explore all public and internal projects available in GitLab.com, from which you can filter by visibility,
through Trending, best rated with Most stars, or All of them.
You can sort projects by:
- Name
- Created date
- Updated date
- Owner
You can also choose to hide or show archived projects.
Filter projects by language
- Introduced in GitLab 15.9 with a flag named
project_language_search. Enabled by default.- Generally available in GitLab 15.9. Feature flag
project_language_searchremoved.
You can filter projects by the programming language they use. To do this:
- On the top bar, select Main menu > Projects > View all projects.
- From the Language dropdown list, select the language you want to filter projects by.
A list of projects that use the selected language is displayed.
Change the visibility of individual features in a project
You can change the visibility of individual features in a project.
Prerequisite:
- You must have the Owner role for the project.
- On the top bar, select Main menu > Projects and find your project.
- On the left sidebar, select Settings > General.
- Expand Visibility, project features, permissions.
- Use the toggle by each feature you want to turn on or off, or change access for.
- Select Save changes.
Leave a project
When you leave a project:
- You are no longer a project member and cannot contribute.
- All the issues and merge requests that were assigned
to you are unassigned.
To leave a project:
- On the top bar, select Main menu > Projects and find your project.
- Select Leave project. The Leave project option only displays
on the project dashboard when a project is part of a group under a
group namespace.
Use a project as a Go package
Prerequisites:
- Contact your administrator to enable the GitLab Go Proxy.
- To use a private project in a subgroup as a Go package, you must authenticate Go requests. Go requests that are not authenticated cause
go getto fail. You don’t need to authenticate Go requests for projects that are not in subgroups.
To use a project as a Go package, use the go get and godoc.org discovery requests. You can use the meta tags:
go-importgo-source
Authenticate Go requests to private projects
Prerequisites:
- Your GitLab instance must be accessible with HTTPS.
- You must have a personal access token with
read_apiscope.
To authenticate Go requests, create a .netrc file with the following information:
machine gitlab.example.com
login <gitlab_user_name>
password <personal_access_token>
On Windows, Go reads ~/_netrc instead of ~/.netrc.
The go command does not transmit credentials over insecure connections. It authenticates
HTTPS requests made by Go, but does not authenticate requests made
through Git.
Authenticate Git requests
If Go cannot fetch a module from a proxy, it uses Git. Git uses a .netrc file to authenticate requests, but you can
configure other authentication methods.
Configure Git to either:
-
Embed credentials in the request URL:
git config --global url."https://${user}:${personal_access_token}@gitlab.example.com".insteadOf "https://gitlab.example.com"
-
Use SSH instead of HTTPS:
git config --global url."git@gitlab.example.com:".insteadOf "https://gitlab.example.com/"
Disable Go module fetching for private projects
To fetch modules or packages, Go uses
the environment variables:
GOPRIVATEGONOPROXYGONOSUMDB
To disable fetching:
- Disable
GOPRIVATE:- To disable queries for one project, disable
GOPRIVATE=gitlab.example.com/my/private/project. - To disable queries for all projects on GitLab.com, disable
GOPRIVATE=gitlab.example.com.
- To disable queries for one project, disable
- Disable proxy queries in
GONOPROXY. - Disable checksum queries in
GONOSUMDB.
- If the module name or its prefix is in
GOPRIVATEorGONOPROXY, Go does not query module
proxies. - If the module name or its prefix is in
GONOPRIVATEorGONOSUMDB, Go does not query
Checksum databases.
Fetch Go modules from Geo secondary sites
Use Geo to access Git repositories that contain Go modules
on secondary Geo servers.
You can use SSH or HTTP to access the Geo secondary server.
Use SSH to access the Geo secondary server
To access the Geo secondary server with SSH:
-
Reconfigure Git on the client to send traffic for the primary to the secondary:
git config --global url."git@gitlab-secondary.example.com".insteadOf "https://gitlab.example.com"
git config --global url."git@gitlab-secondary.example.com".insteadOf "http://gitlab.example.com"
- For
gitlab.example.com, use the primary site domain name. - For
gitlab-secondary.example.com, use the secondary site domain name.
- For
-
Ensure the client is set up for SSH access to GitLab repositories. You can test this on the primary,
and GitLab replicates the public key to the secondary.
The go get request generates HTTP traffic to the primary Geo server. When the module
download starts, the insteadOf configuration sends the traffic to the secondary Geo server.
Use HTTP to access the Geo secondary
You must use persistent access tokens that replicate to the secondary server. You cannot use
CI/CD job tokens to fetch Go modules with HTTP.
To access the Geo secondary server with HTTP:
-
Add a Git
insteadOfredirect on the client:git config --global url."https://gitlab-secondary.example.com".insteadOf "https://gitlab.example.com"
- For
gitlab.example.com, use the primary site domain name. - For
gitlab-secondary.example.com, use the secondary site domain name.
- For
-
Generate a personal access token and
add the credentials in the client’s~/.netrcfile:machine gitlab.example.com login USERNAME password TOKEN machine gitlab-secondary.example.com login USERNAME password TOKEN
The go get request generates HTTP traffic to the primary Geo server. When the module
download starts, the insteadOf configuration sends the traffic to the secondary Geo server.
Related topics
- Import a project.
- Connect an external repository to GitLab CI/CD.
- Fork a project.
- Adjust project visibility and access levels.
- Limitations on project and group names
Troubleshooting
When working with projects, you might encounter the following issues, or require alternate methods to complete specific tasks.
Find projects using an SQL query
While in a Rails console session, you can find and store an array of projects based on a SQL query:
# Finds projects that end with '%ject'
projects = Project.find_by_sql("SELECT * FROM projects WHERE name LIKE '%ject'")
=> [#<Project id:12 root/my-first-project>>, #<Project id:13 root/my-second-project>>]
Clear a project’s or repository’s cache
If a project or repository has been updated but the state is not reflected in the UI, you may need to clear the project’s or repository’s cache.
You can do so through a Rails console session and one of the following:
WARNING:
Commands that change data can cause damage if not run correctly or under the right conditions. Always run commands in a test environment first and have a backup instance ready to restore.
## Clear project cache
ProjectCacheWorker.perform_async(project.id)

## Clear repository .exists? cache
project.repository.expire_exists_cache
Find projects that are pending deletion
If you need to find all projects marked for deletion but that have not yet been deleted,
start a Rails console session and run the following:
projects = Project.where(pending_delete: true)
projects.each do |p|
  puts "Project ID: #{p.id}"
  puts "Project name: #{p.name}"
  puts "Repository path: #{p.repository.full_path}"
end
Delete a project using console
If a project cannot be deleted, you can attempt to delete it through Rails console.
WARNING:
Commands that change data can cause damage if not run correctly or under the right conditions. Always run commands in a test environment first and have a backup instance ready to restore.
project = Project.find_by_full_path('<project_path>')
user = User.find_by_username('<username>')
ProjectDestroyWorker.new.perform(project.id, user.id, {})
If this fails, display why it doesn’t work with:
project = Project.find_by_full_path('<project_path>')
project.delete_error
Toggle a feature for all projects within a group
While toggling a feature in a project can be done through the projects API,
you may need to do this for a large number of projects.
To toggle a specific feature, you can start a Rails console session
and run the following function:
WARNING:
Commands that change data can cause damage if not run correctly or under the right conditions. Always run commands in a test environment first and have a backup instance ready to restore.
projects = Group.find_by_name('_group_name').projects
projects.each do |p|
  ## replace <feature-name> with the appropriate feature name in all instances
  state = p.<feature-name>

  if state != 0
    puts "#{p.name} has <feature-name> already enabled. Skipping..."
  else
    puts "#{p.name} didn't have <feature-name> enabled. Enabling..."
    p.project_feature.update!(<feature-name>: ProjectFeature::PRIVATE)
  end
end
To find features that can be toggled, run pp p.project_feature.
Available permission levels are listed in
concerns/featurable.rb.
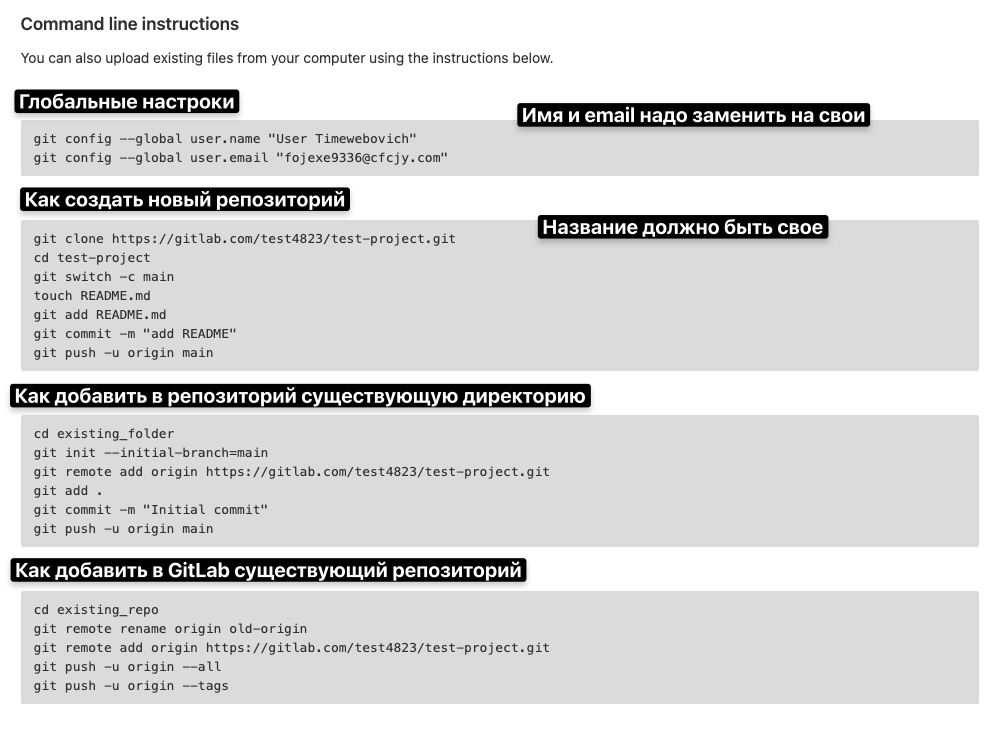
Steps to push an existing project to GitLab
Follow these steps to add and import a new project into an existing GitLab repository:
- Create a GitLab repository for the current project.
- Copy the GitLab URL for the new repository to your clipboard.
- Issue the
git initcommand in the base folder of your development project. - Add all of your project’s files to the Git index and then perform a commit.
- Add the GitLab repository as a remote reference for the local project.
- Run a
git pushoperation and use the-fand-uswitches. - Confirm that the files in the local project have been imported into GitLab.
Git’s remote push commands for GitLab
For GitLab users who simply want a quick overview of the commands to run in the existing project to push to GitLab, here they are.
git initgit add .git commit -m "Push existing project to GitLab"git remote add source https://gitlab.com/cameronmcnz/example-website.gitgit push -u -f source master
These commands assume a GitLab repository named example-website and a user account named cameronmcnz.
Configure you GitLab repository first
To push a local development project to GitLab, you must first create a GitLab repository.
To do this, simply click on the “Create Repository” button in the GitLab online console and name the repository. In this tutorial, the repository is called a example-website .
Get the GitLab URL
After you create the repository, find the option to clone the repo.
Copy the GitLab URL that points to the repository you just created.
Initialize Git locally
If the current project does not yet use Git, perform a git init operation in the existing project’s root directory:
git init
Once the repository is set up, add all of the project’s files to the Git index and perform a commit:
git add .

git commit -m "Add existing project files before sending GitLab."
Add GitLab as a remote reference
To push and pull between your existing project and GitLab, you must issue a git remote add command. This provides your local Git repo with the GitLab URL which was obtained earlier.
git remote add source https://github.com/cameronmcnz/example-website.git
Upload your existing project to GitLab
Once you have configured the remote reference to GitLab, you are ready to push your existing GitLab project.
To do this, issue a git push command with the name of the current branch along with the -f and -u switches.
The -f switch forces Git to overwrite any files that already exist on GitLab with your existing project’s files.
The -u switch makes the remote GitLab repo the default for your existing project.
git push -u -f origin master
Legacy Git repositories create a master branch by default, while newer ones use main. Use the branch name that matches your local Git repository.
Validate the GitLab import
To verify that the existing project was successfully pushed to GitLab, log into GitLab and browse the files uploaded to the repository.
Every file in your current project should now be hosted in your GitLab repo.
GitLab — это онлайн сервис для работы с git репозиториями, у которого есть Open Source версия, которую можно установить и развернуть на своем сервере. Разработчики позиционируют свой сервис как альтернативу GitHub и с этой задачей он полностью справляется. Здесь есть все то же самое, что и на GitHub, плюс бесплатные неограниченные частные репозитории, создание команд, редактирование кода прямо в браузере и многое другое.
В этой статье мы поговорим о том, как пользоваться GitLab для разработки своих проектов. Как создавать репозитории и взаимодействовать с ними. Если вам нужна информация по Git, то лучше смотрите статью как пользоваться git.
1. Создание аккаунта
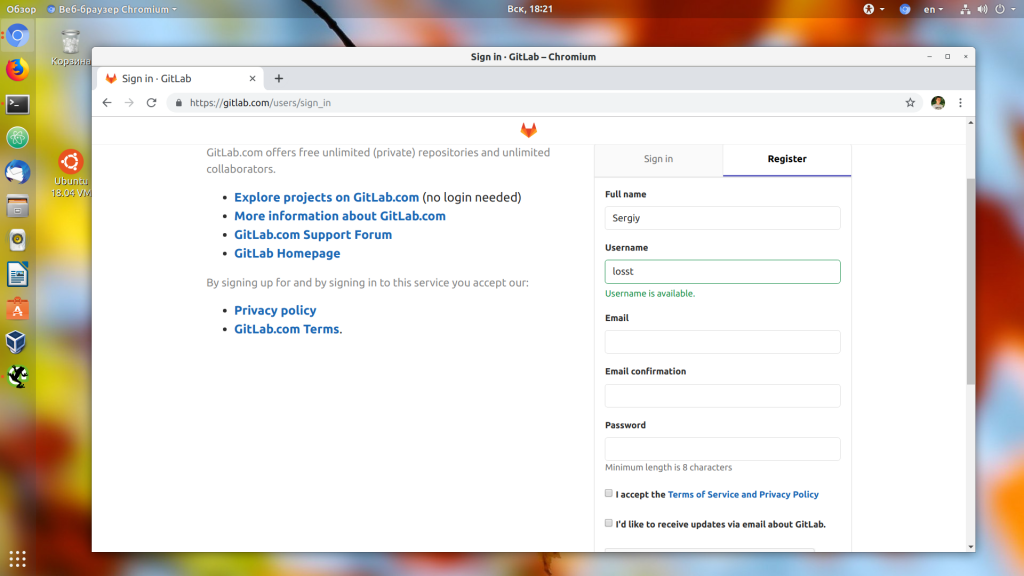
Зарегистрироваться на GitLab очень просто. Откройте главную страницу GitLab найдите в правой части экрана форму входа и перейдите на вкладку Register. Здесь вам нужно ввести ваше имя, логин, адрес электронной почты, согласится с условиями использования и нажать кнопку Register:
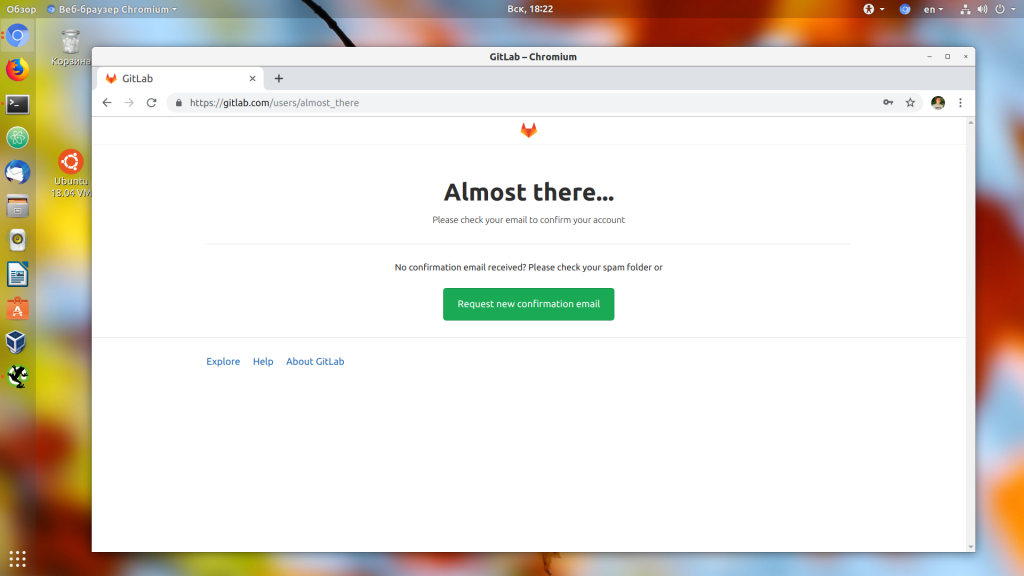
После этого вам на почту придет сообщение со ссылкой для подтверждения аккаунта, перейдите по ней:
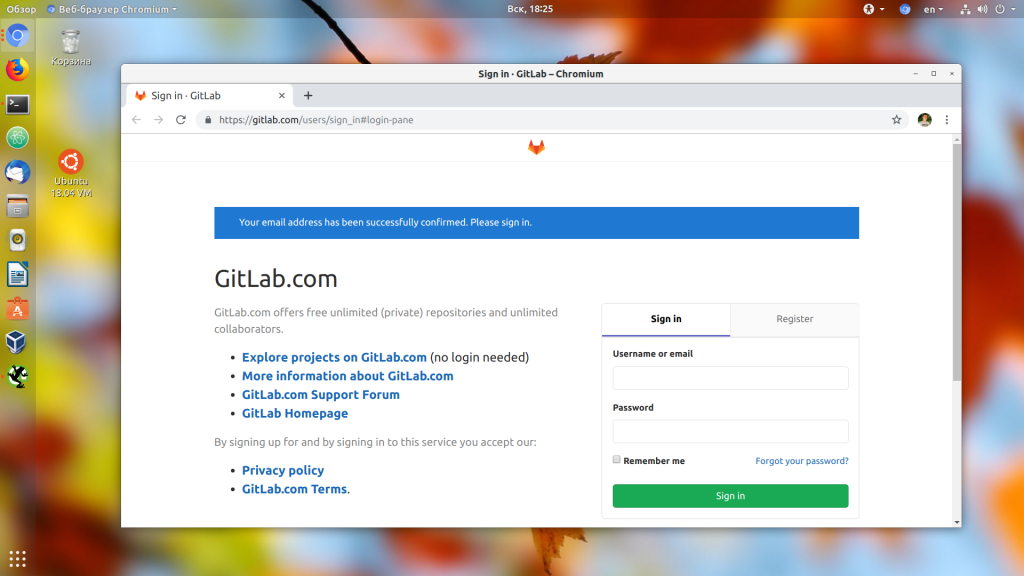
Теперь ваш аккаунт подтвержден и вы можете в нём авторизоваться:
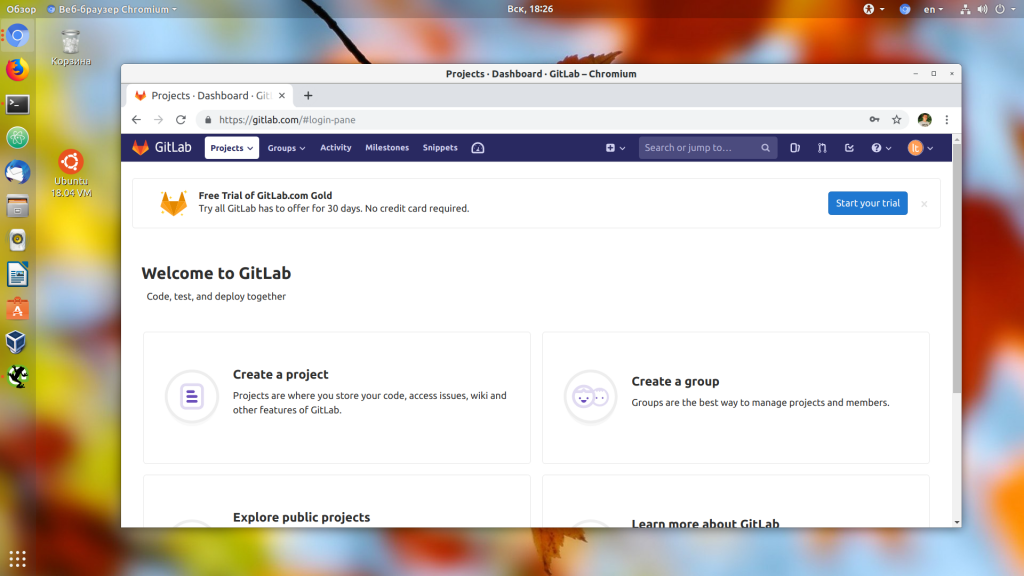
После ввода логина и пароля вы попадете на главную страницу профиля. Сейчас здесь страница приветствия, но позже тут будет список ваших репозиториев:
2. Создание репозитория
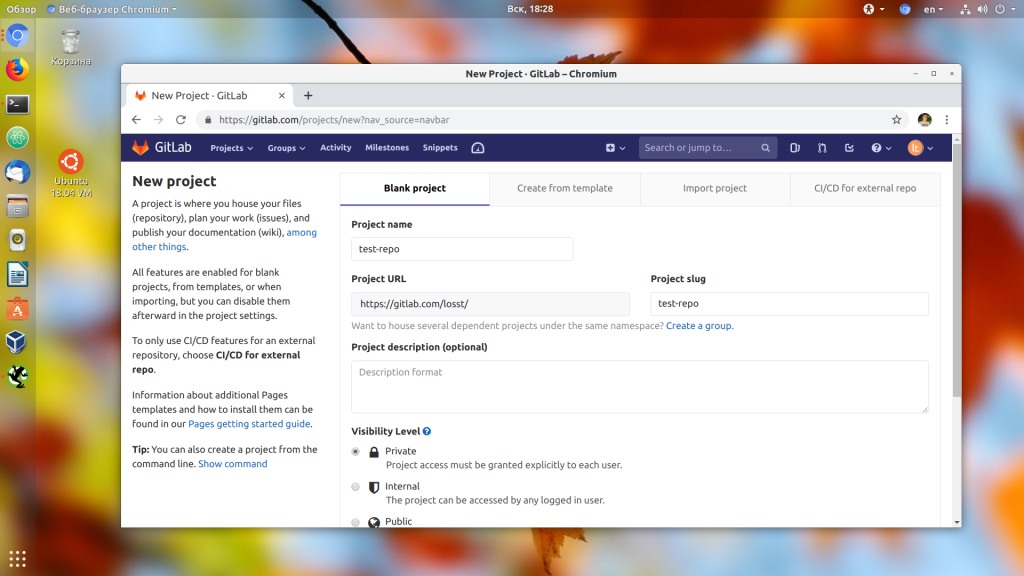
Чтобы добавить проект GitLab кликните по значку + по центру верхней панели и выберите New Project:

Здесь вам нужно ввести имя репозитория, его описание, а также выбрать уровень доступа:
- Private — доступен только вам;
- Internal — доступен всем зарегистрированным пользователям;
- Public — доступен абсолютно всем.
Ещё вы можете установить галочку напротив Инициализировать репозиторий файлом README, но если вы хотите залить сюда файлы из уже существующего репозитория, делать этого не следует:
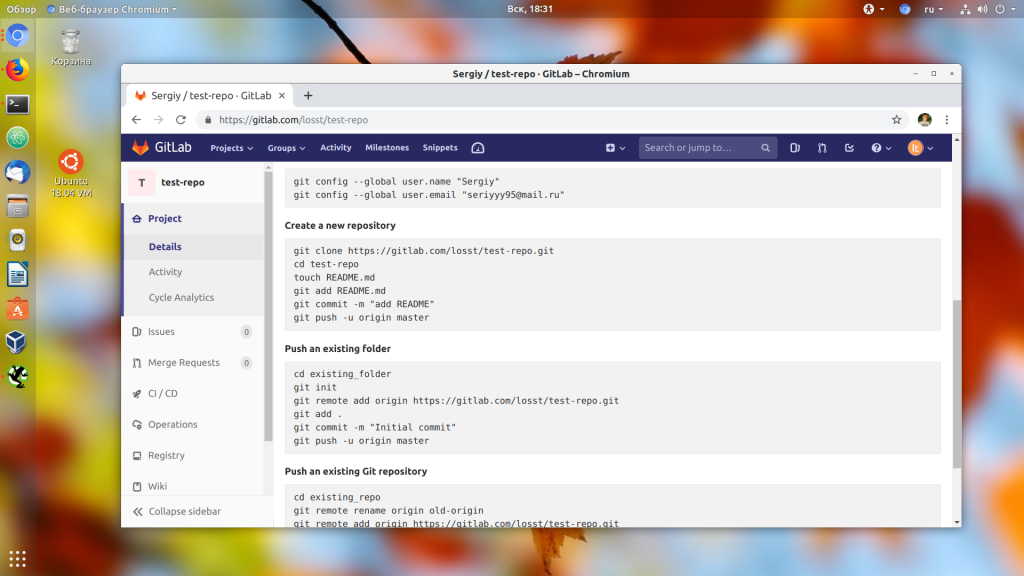
После нажатия на кнопку Create repo вы попадаете на страницу репозитория. Здесь GitLab уже предлагает первоначальный набор действий, чтобы проиниализировать ваш репозиторий. Например, вы можете создать здесь файлы или загрузить сюда файлы из вашего компьютера.
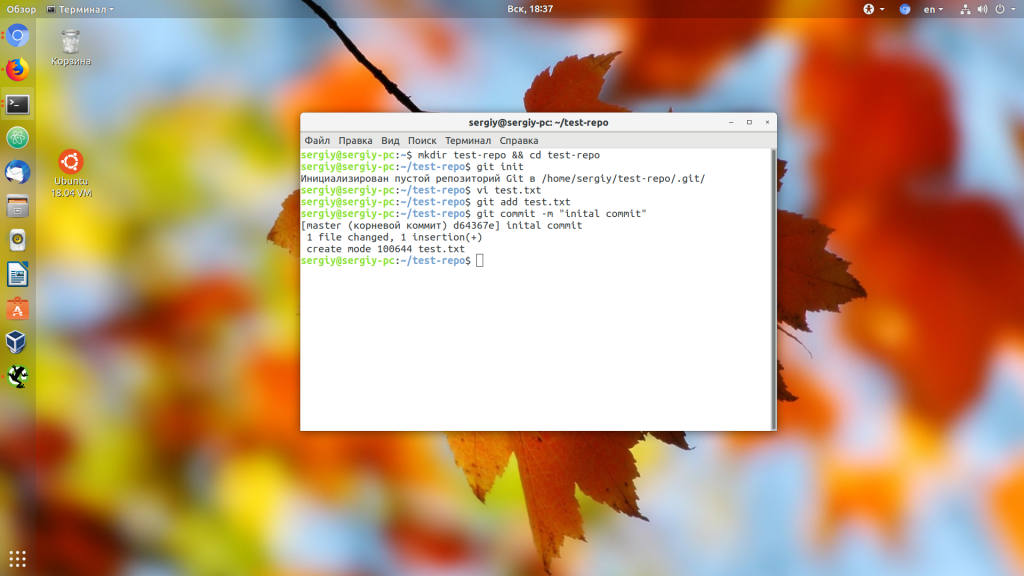
4. Загрузка файлов проекта
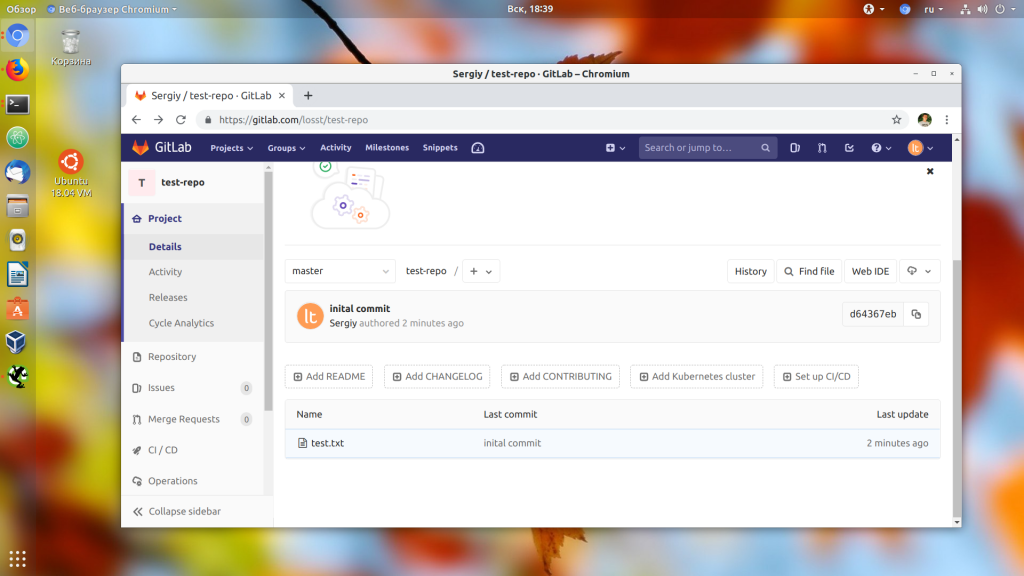
Давайте создадим новый локальный репозиторий на компьютере и загрузим его содержимое на GitLab. Для этого создайте папку репозитория, например, test-repo и инициализируйте в ней новый репозиторий командой git:
mkdir test-repo && cd test-repo
git init
Затем давайте создадим файл test.txt:
vi test.txt
This is test losst repo
И зафиксируем изменения:
git add test.txt
git commit -m "Inital commit"
Дальше нам нужно добавить наш удаленный репозиторий с GitLab к нашему локальному. Для этого выполните:
git remote add origin https://gitlab.com/losst/test-repo.git
Затем отправляем изменения в удаленный репозиторий:
git push origin master
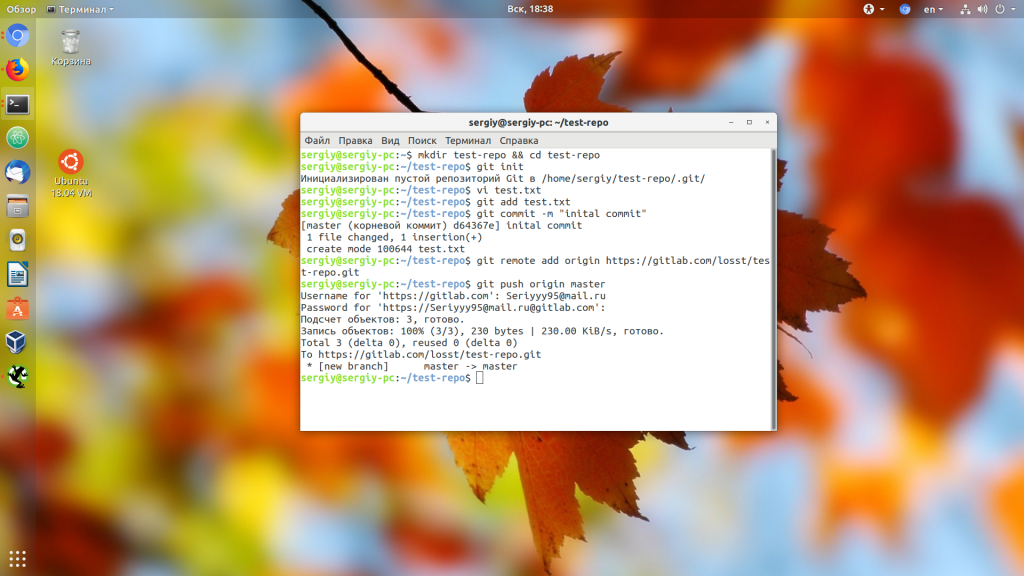
Для отправки данных нужно ввести ваш логин и пароль на GitLab. Теперь, если вы обновите страницу репозитория на GitLab, то увидите там наш файл:
Важно отметить, что если удаленный репозиторий не пуст, то у вас не получиться так сделать. Вам нужно будет сначала скачать удаленный репозиторий, слить локальные изменения с ним, а потом уже отправить всё назад.
5. SSH ключи
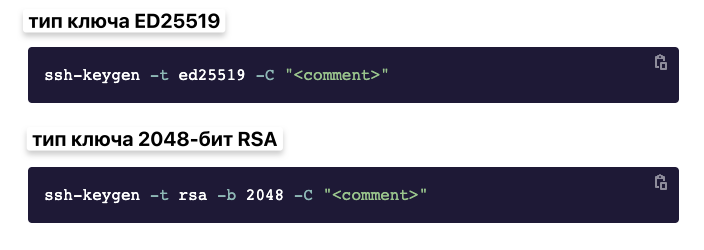
Во время загрузки данных репозитория на GitLab нам нужно было ввести логин и пароль на сервере. Чтобы этого избежать можно использовать SSH ключи для авторизации. Сначала вам нужно создать такой ключ. Для этого откройте терминал и выполните:
ssh-keygen
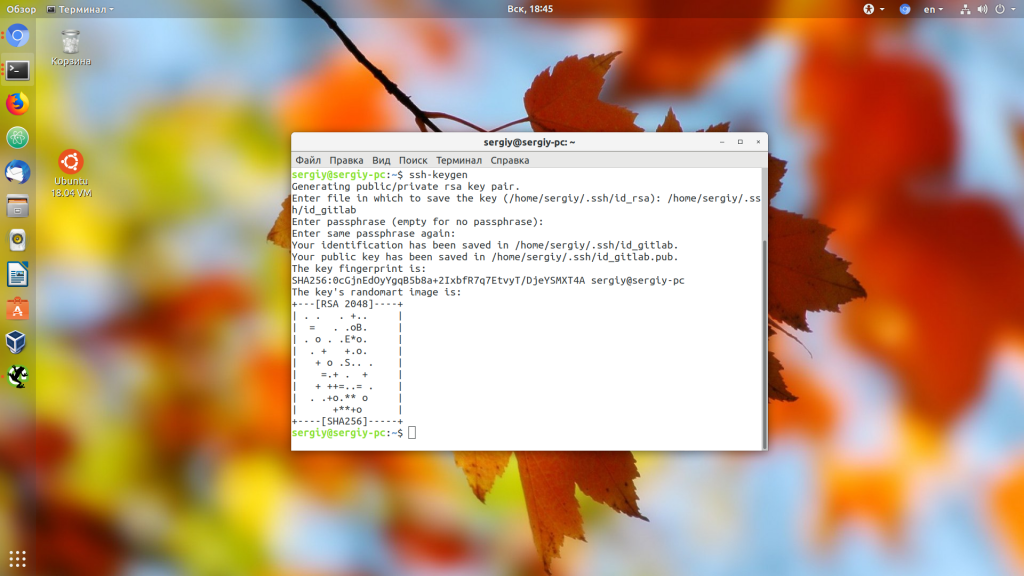
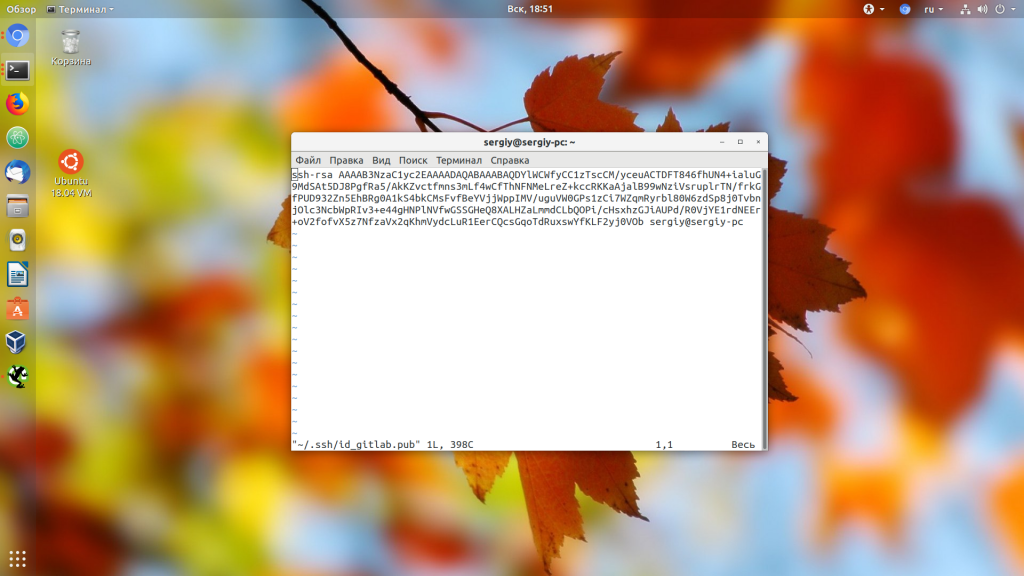
Введите путь к файлу, куда нужно сохранить ключ, а пароль оставьте пустым. Будут созданы два файла — открытый ключ с расширением .pub и закрытый. Вам нужен открытый. Откройте его в текстовом редакторе и скопируйте его содержимое в буфер обмена:
vi /home/sergiy/.ssh/id-gitlab
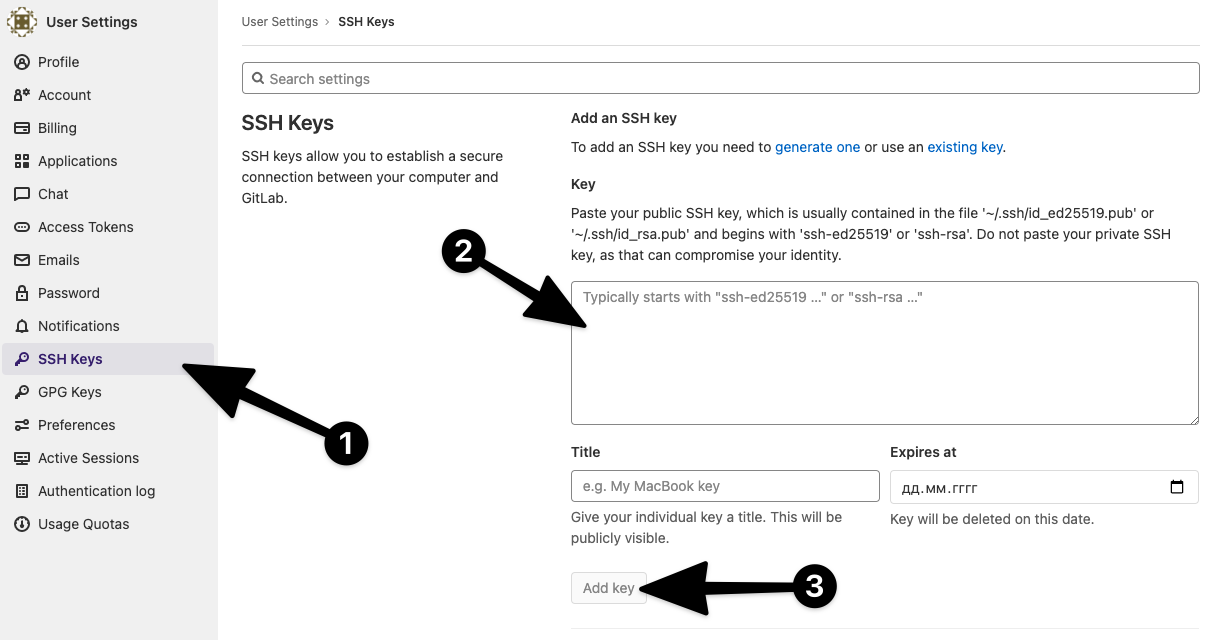
Далее возвращайтесь к интерфейсу GitLab кликните по иконке профиля и выберите Settings:
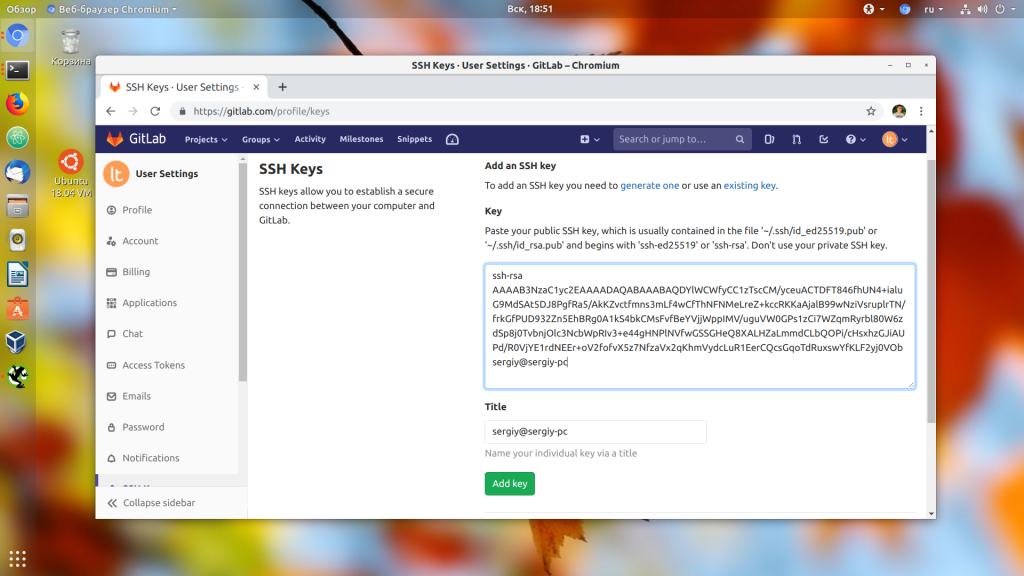
Здесь на левой панели найдите пункт SSH Keys. В этом окне найдите поле Key и вставьте туда скопированный ключ. Далее сохраните изменения. Теперь ваш ключ добавлен:
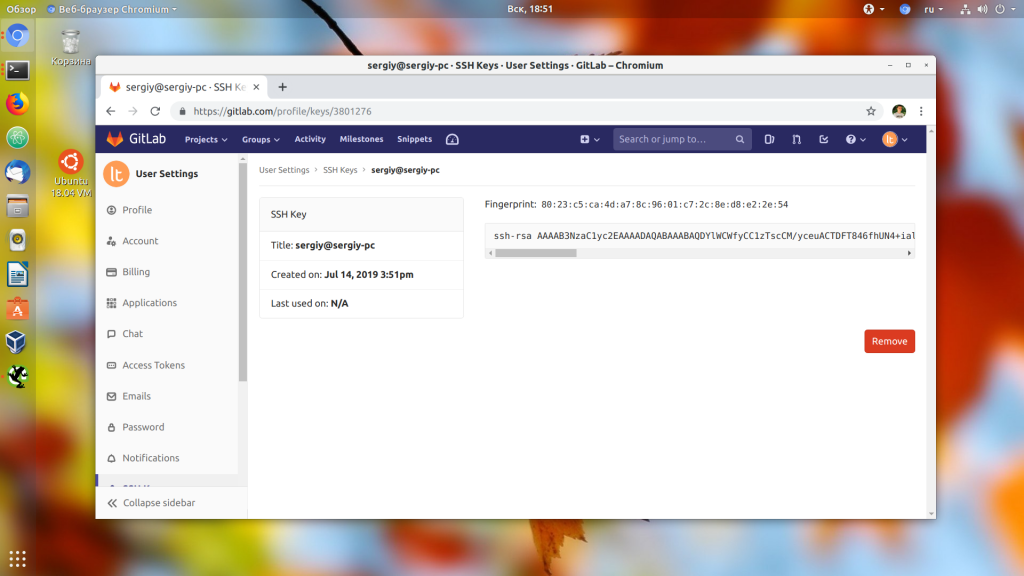
Далее вернитесь в ваш репозиторий, найдите в правом верхнем углу кнопку Clone и кликните по ней. Нас интересует адрес Clone with SSH:
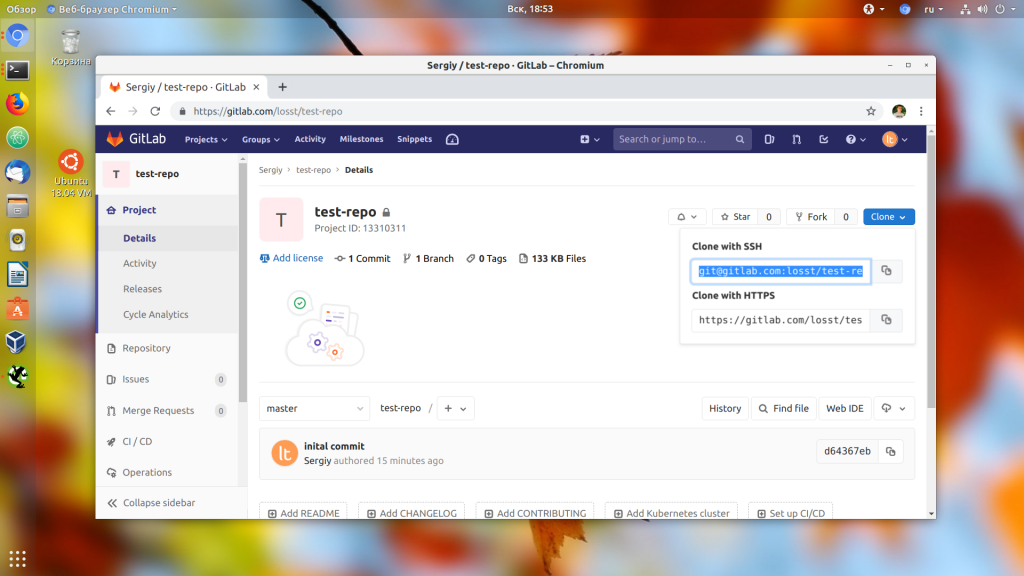
Возвращаемся к нашему локальному репозиторию, удаляем адрес https и добавляем ssh:
git remote remove origin

git remote add origin git@gitlab.com:losst/test-repo.git
Настройка ssh GitLab завершена. Теперь все действия будут выполняться по SSH и у вас не будет необходимости вводить логин и пароль.
6. Ветки репозитория
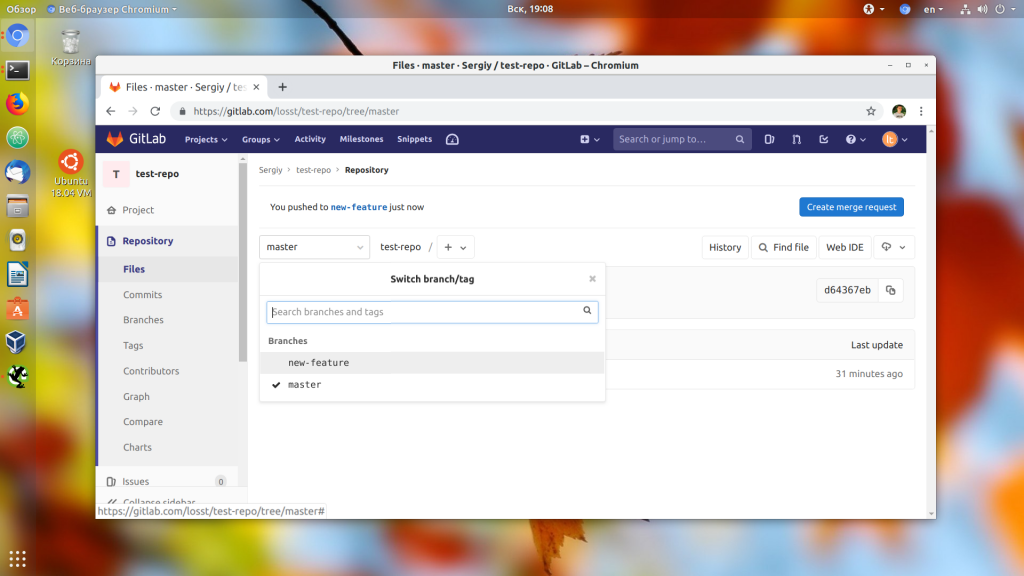
Разберем использование gitlab для работы с ветками. По умолчанию у репозитория есть только одна ветка — это master. Но для реализации дополнительных функций разработку можно выносить в отдельные ветки. В интерфейсе GitLab ветки отображаются слева. Здесь можно выбрать нужную ветку:
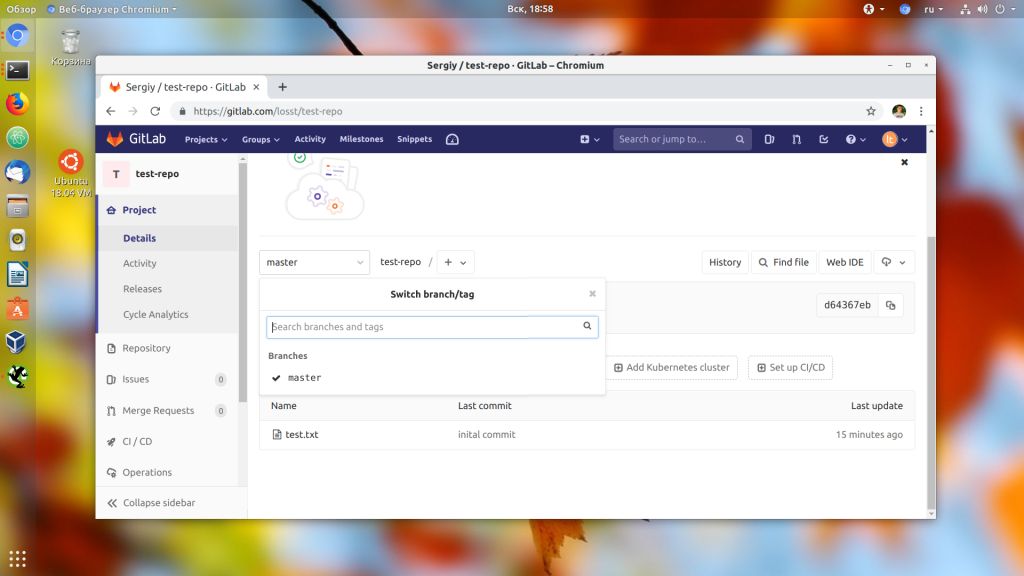
Создать новую ветку можно кликнув по значку плюс и выбрав New branch. Но это не обязательно, так как если вы создадите ветку в git и зальете изменения в репозиторий, то ветка появится там автоматически.

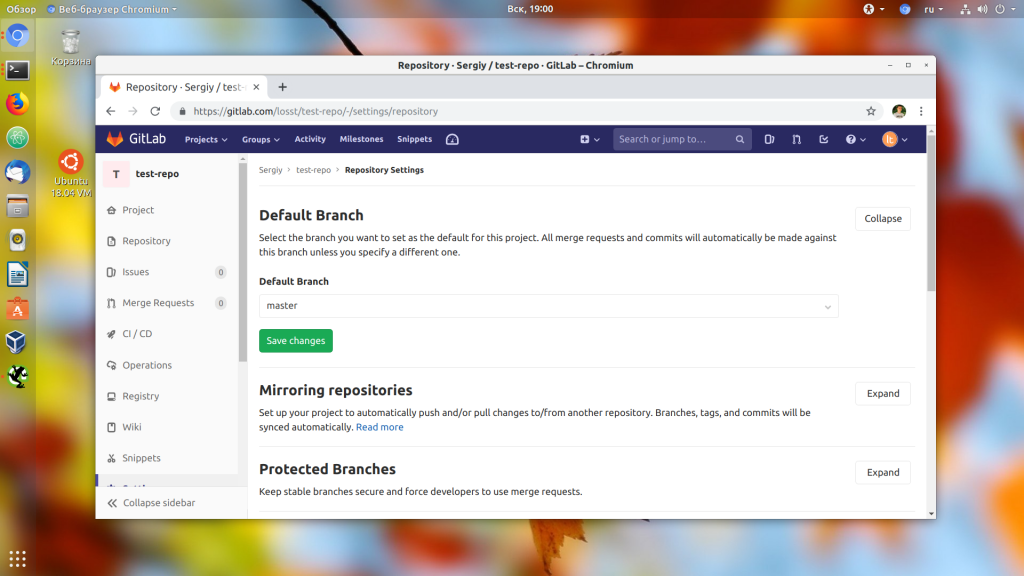
Чтобы изменить ветку по умолчанию откройте Settings -> Repository, а потом просто выберите нужную ветку в разделе Default branch:
6. Слияние веток
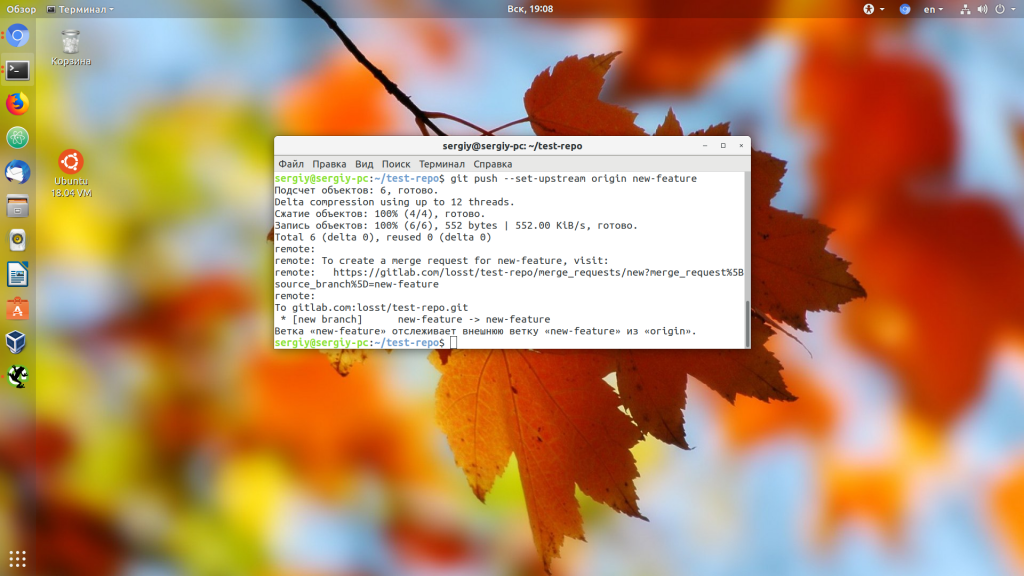
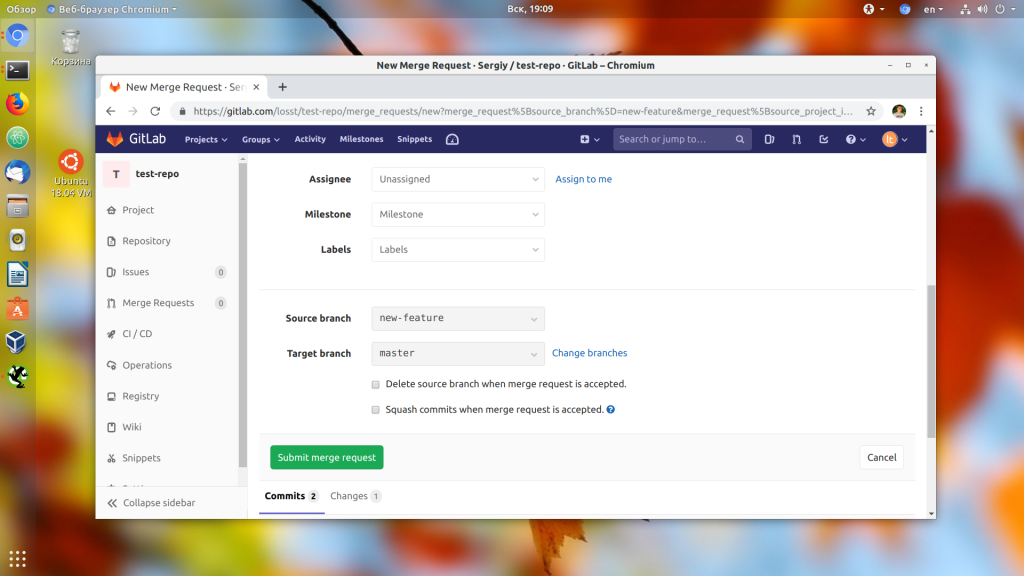
Поскольку у нас есть ветки и в них разрабатывается функциональность может возникнуть необходимость перенести её из одной ветки в другую. Для этого используются запросы слияния (Merge request gitlab). Давайте добавим ветку new-feature, а в ней создадим файл new-feature с текстом:
git checkout -b new-feature
vi new-feature.txt
New feature with change
git add new-feature.txt
git commit -m "add feature"
git push --set-upstream origin new-feature
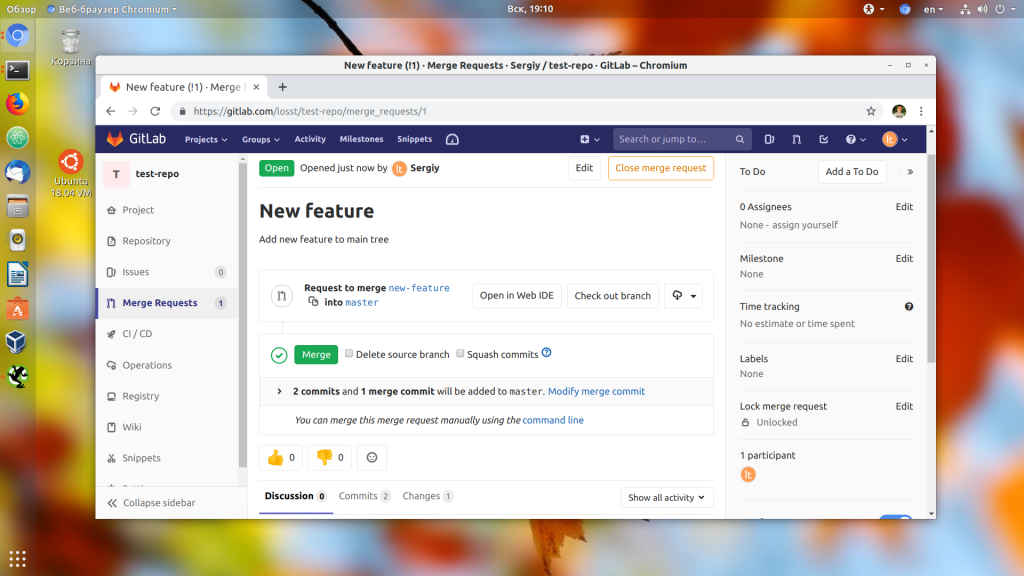
Теперь, когда мы перейдем в новую ветку через интерфейс GitLab появится кнопка Create merge request. Нажмите на неё:
Здесь нужно написать описание Merge Request, который вы создаете, выбрать ветку источник и ветку цель. Также можно выбрать пользователя, которому будет оправлено уведомление о созданном запросе:
Далее запрос на слияние нужно одобрить. Вы можете посмотреть изменения нажав кнопку Open IDE или через терминал:
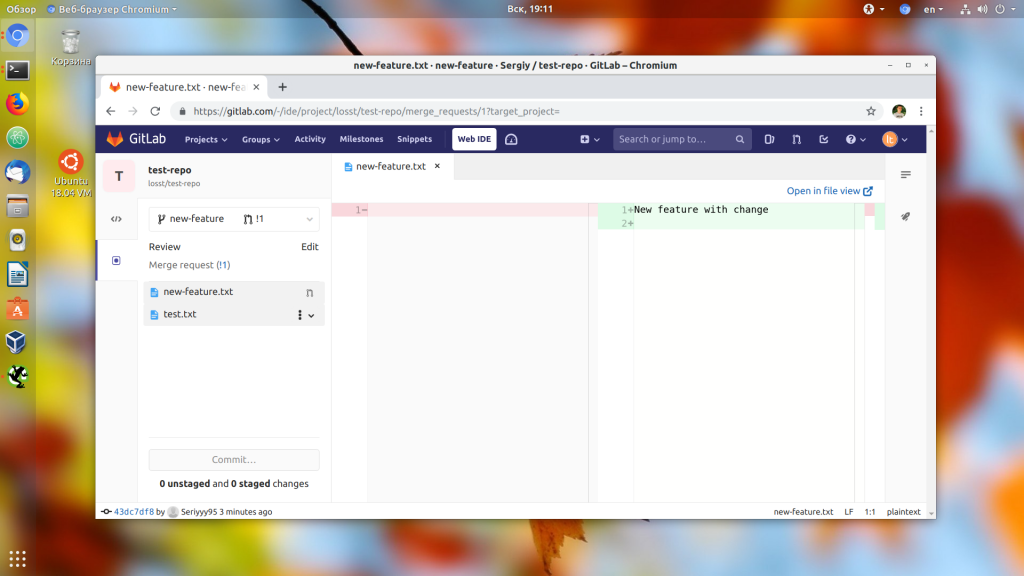
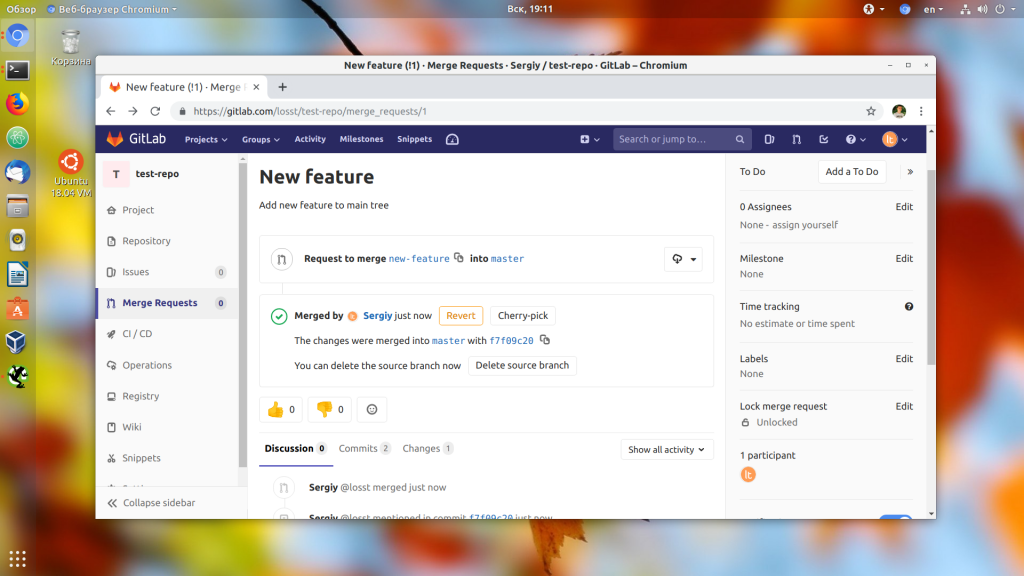
Далее просто нажмите кнопку Merge, если хотите слить ветки. Файлы ветки источника заменят файлы в ветке преемника, поэтому будьте осторожны, чтобы не потерять важные данные.
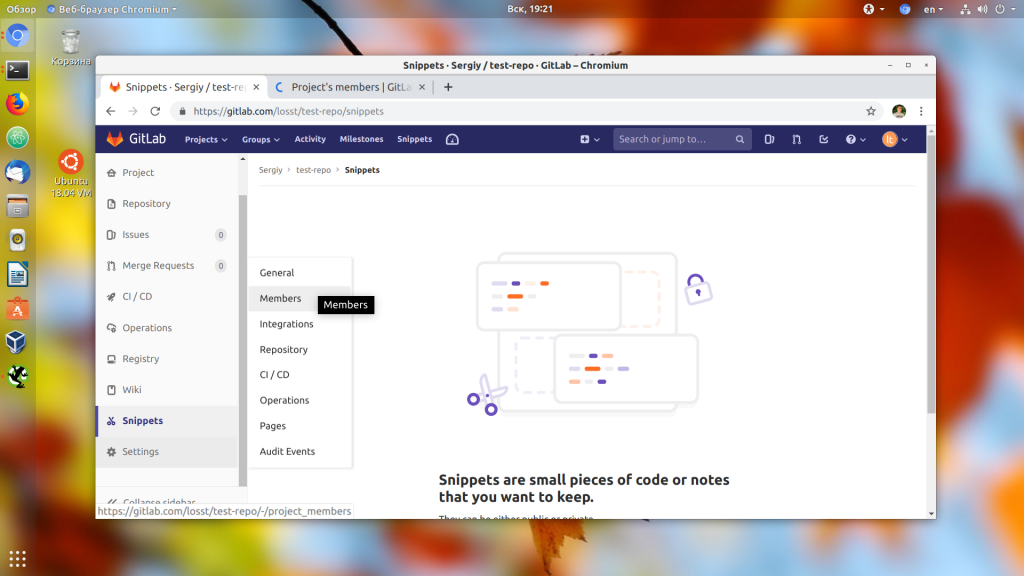
8. Добавление пользователей
Несмотря на то, что репозитории приватные, возможна работа с gitlab командой. Вы можете добавить к ним неограниченное количество разработчиков. Для этого откройте пункт Settings -> Members. Здесь в поле Select members to invite введите никнеймы или адреса электронной почты пользователей, которых надо пригласить, а в поле Choose a role permission выберите их уровень доступа:
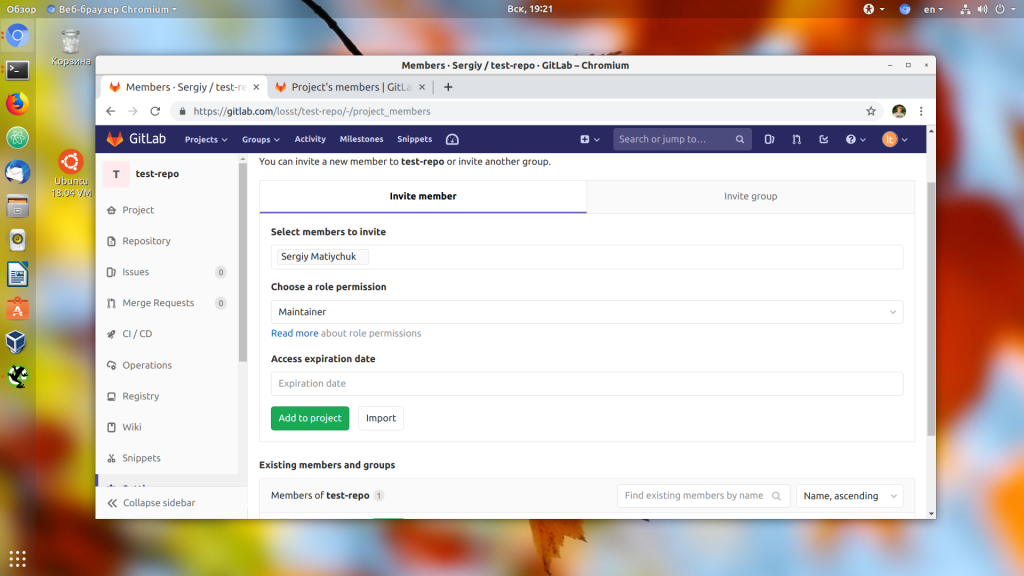
Затем нажмите кнопку Add to project.
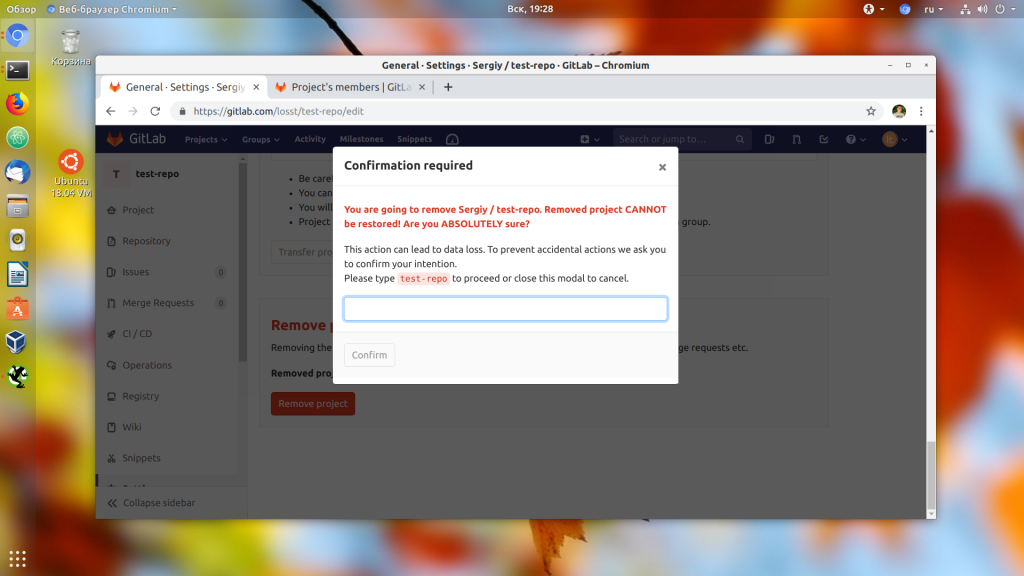
9. Удаление проекта
Чтобы удалить проект с Gitlab надо открыть Settings -> General -> Advanced и выбрать Remove Project в самом низу страницы:
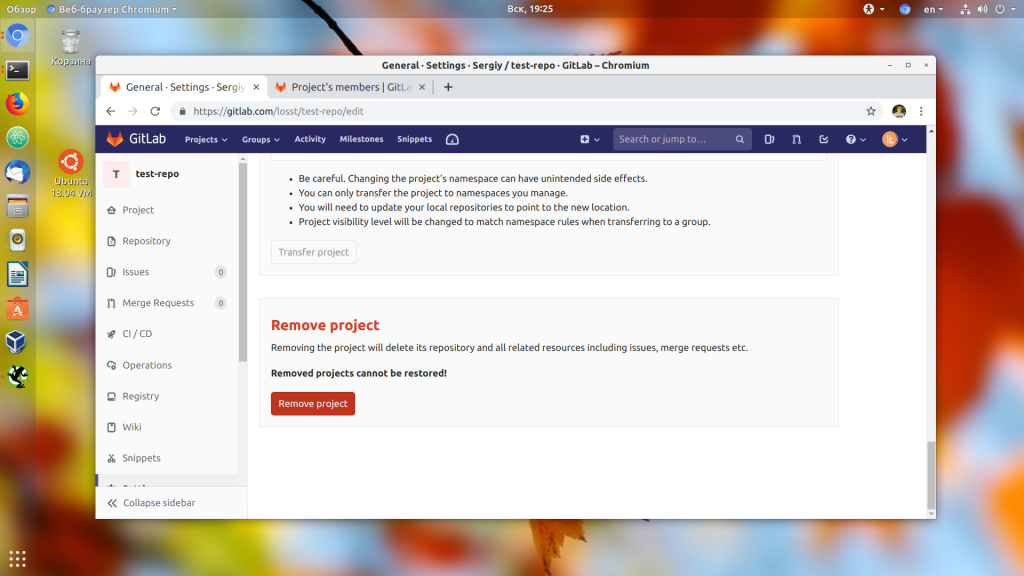
После нажатия на кнопку вам нужно будет ввести имя проекта, после чего он будет удален:
Выводы
В этой статье мы кратко разобрали как пользоваться GitLab для разработки программного обеспечения. Это далеко не все возможности GitLab, которые заслуживают внимания, там ещё есть релизы, сообщения об ошибках, инструменты автоматизации и тестирования, удобный редактор кода и многое другое. В общем это полноценная альтернатива для GitHub если тот сервис больше вам не нравится. А что вы предпочитаете, GitHub или GitLab? Напишите в комментариях!
Обнаружили ошибку в тексте? Сообщите мне об этом. Выделите текст с ошибкой и нажмите Ctrl+Enter.

Статья распространяется под лицензией Creative Commons ShareAlike 4.0 при копировании материала ссылка на источник обязательна .