Эксплуататор добывает энергию из окружающей среды и использует бурю изо льда и снега для защиты Храма Прибыли от незваных гостей.
Сфера Эксплуатации — это босс-ракноид, которого можно встретить патрулирующим Храм Прибыли в Долине Сфер в сопровождении Охладительных Ракноидов. Сфера Эксплуатации следует своему маршруту не отклоняясь, поэтому её можно легко обойти.
Появление[]
Пока сфера патрулирует территорию Храма Прибыли она является полностью неуязвимой к урону, а настоящее сражение с этим боссом происходит внутри локации Палуба 12. Для того, чтобы привлечь внимание Сферы Эксплуатации и начать сражение необходимо активировать терминал на втором этаже Палубы 12 слева от входа, положив в него ![]() Разбавленную Термию. Для призыва необходимо использовать лишь 1ед. Разбавленной Термии на весь отряд. Таким образом, игрок с Разбавленной Термией может разблокировать босса для трёх других игроков, даже если у них отсутствует своя Термия.
Разбавленную Термию. Для призыва необходимо использовать лишь 1ед. Разбавленной Термии на весь отряд. Таким образом, игрок с Разбавленной Термией может разблокировать босса для трёх других игроков, даже если у них отсутствует своя Термия.
Способности[]
У Храма Прибыли[]
Находясь у Храма Прибыли Сфера Эксплуатации неуязвима к атакам и способностям. Если подойти к ней близко, то Сфера активирует свои клапаны находящиеся в нижней части тела, создавая вокруг себя снежный вихрь, а также начнет атаковать активно используя свои способности.
На Палубе 12[]
Во время сражения в Палубе 12 Сфера Эксплуатации не использует весь свой арсенал, ограничиваясь лишь несколькоми способностями:
- Плазменная турель — фиксируется на одной цели и ведет по ней стрельбу до тех пор, пока она не спрячется за укрытием или не покинет радиус поражения. При перегреве Сферы превращается в огнемёт с повышенным уроном, но ограниченным радиусом поражения.
- Ледяной удар — Сфера бьётся своим телом о землю, выплёскивая хладагент в большом радиусе. Наносит высокий урон и накладывает
 заморозку при нахождении в нём. На втором этапе сражения эта способность будет создавать разломы термии.
 - Призыв Ракноидов-Клещей — с определенной периодичностью на Сфере появляются три клеща, а при уничтожении трёх клапанов Сфера сбросит целый рой клещей перед переходом на другую сторону арены.
- Призыв Охладительных Ракноидов — забирается к потолку Палубы 12 и сбрасывает несколько охладительных ракноидов. Используется только когда уничтожены три клапана.
- Миномёт — голова Сферы открывается, после чего происходит несколько секунд зарядки и наведения снаряда. Место попадания на земле подсвечивается красным. Наносит высокий урон и сбивает с ног. Используется во время второй фазы боя, вне Палубы 12.
Примечания[]
- В официальной таблице дропов, для Сферы Эксплуатации в категории сигилов разработчиками указаны ресурсы.

Местоположение Палубы 12
Внутри руин Палубы 12 в пещере к северо-востоку от кратера Харинди, Грубиянка Зууд сообщает, что она вместе со своими сестрами сконструировали устройство для превращения термии в оружие, которое способно повредить корпус Сферы Эксплуатации. Для начала боя необходимо поместить ![]() Разбавленную Термию в конденсатор термии на верхней платформе слева. После активации с потолка спустится Сфера и атакует
Разбавленную Термию в конденсатор термии на верхней платформе слева. После активации с потолка спустится Сфера и атакует ![]() Тэнно, объявляя себя ответственной за уничтожение Палубы 12 и смерть сестер Зууд.
Тэнно, объявляя себя ответственной за уничтожение Палубы 12 и смерть сестер Зууд.
Бой со Сферой Эксплуатации состоит из двух этапов — внутри Палубы 12 и на поверхности.
Рекомендуемое снаряжение[]
Для сражения со Сферой не требуется особо мощного снаряжения, достаточно любого Варфрейма обладающего защитными способностями, чтобы уменьшить получение урона от огня турели, и оружия с билдом на ![]() коррозийный урон против Ферритовой Брони босса. Для защиты от
коррозийный урон против Ферритовой Брони босса. Для защиты от ![]() заморозки способности Ледяной Удар, можно использовать
заморозки способности Ледяной Удар, можно использовать ![]() Мистическое Тепло или мод
Мистическое Тепло или мод ![]() Стремительная Стойкость.
Стремительная Стойкость.
Первый этап: Палуба 12[]
Задачей на этом этапе сражения является уничтожение четырёх охлаждающих клапанов, расположенных по бокам и в задней части Сферы. Порядок действий:
- Включить конденсатор термии используя
 Разбавленную Термию.
 - После появления Сферы, необходимо уничтожить куски скалы на которые она опирается — так она упадет вниз и начнётся бой.
- Уничтожить один из клапанов.
- Остальные клапаны будут заморожены и станут невосприимчивы к урону. Для их уничтожения потребуется канистры с термией появляющиеся из раздатчиков на нижних уровнях по краям арены, необходимо подбирать эти канистры и бросать их на клапаны для разморозки.
- На размораживание одного клапана нужно три попадания.
- После разморозки клапан может быть уничтожен.
- Когда останется последний клапан, Сфера переместится к потолку и сбросит рой Клещей Ракноидов и несколько Охладительных Ракноидов, их необходимо уничтожить.
- Когда Сфера спустится с потолка и переместится в начальную точку, можно приступить к разморозке и уничтожению последнего клапана.
Второй этап: Долина Сфер[]
После потери охлаждающих клапанов, Сфера Эксплуатации начнет перегреваться и бой переместится на поверхность. Задачей на этом этапе будет нагрев Сферы с помощью канистр с Термией и уничтожение появляющихся Охладительных Ракноидов, которые будут пытаться её охладить.
Порядок действий на этом этапе таков:
- Уничтожайте Охладительных Ракноидов и подбирайте выпавшие с них канистры с хладагентом.
- При появлении разломов используйте на них канистру — она мгновенно заполнится Термией.
- Берите канистру и бросайте её в босса — это повысит уровень его нагрева.
- Когда уровень нагрева достигнет максимума необходимо вплотную подойти к боссу и нажать клавишу X — запустится катсцена с обнажением уязвимой точки на корпусе Сферы.
- Стреляйте в открывшуюся уязвимую точку.
- Повторить предыдущие пункты еще два раза до победы.
Примечания[]
- Сфера Эксплуатации постепенно нагревается сама по себе, канистры с Термией увеличивают скорость нагрева, а также поднимают минимальный уровень нагрева, позволяя быстрее достичь максимальной температуры после охлаждения способностью Ледяной удар.
- Для достижения максимального нагрева требуется 4 / 12 / 18 канистр при условии, что Ракноиды не будут охлаждать Сферу.
- При переходе с первого этапа боя на второй можно захватить канистры с Термией из палубы 12 для того, чтобы не ожидать создания разломов боссом.
- Барьер созданный Варфреймом Гара с помощью способности Витрификация Материи не даст охладительным Ракноидам подойти к Сфере Эксплуатации для её охлаждения.
- Для более удобной защиты Сферы от охладительных Ракноидов можно использовать арчвинг.
Последнее обновление Warframe добавило в игру нового босса. В этой битве, которая является частью события «Погребенные долги», вы спускаетесь на 12 палубу, чтобы уничтожить Сферу эксплуатации.
Загрузите Сферу Валлиса на Венере. Как только вы окажетесь на ледяной равнине, откройте карту и опустите маркер вниз, к горе. Точное местоположение указано на карте ниже.

В нужном месте обойдите вокруг горы, где вы найдете пещеру. Заходите внутрь и доберитесь до двери безопасности и консоли. Взломайте консоль и решите головоломку (картинка ниже).

Теперь идите вниз по туннелю, пока не дойдете до разрушенного дома. Прыгайте на платформу с левой стороны и отправляйтесь к самому дальнему концу заброшенного города. Там вы найдете рычаг, который вы должны нажать, чтобы начать бой с боссом.

Убийство Сферы Эксплуатации
Сфера Эксплуатации — это босс-ракноид, которого можно встретить патрулирующим Храм Прибыли в Долине Сфер в сопровождении Охладительных Ракноидов. Сфера Эксплуатации следует своему маршруту не отклоняясь, поэтому её можно легко обойти.
Пока сфера патрулирует территорию Храма Прибыли она является полностью неуязвимой к урону, а сражение с этим боссом происходит внутри локации Палуба 12. Бой со Сферой Эксплуатации состоит из двух этапов — внутри Палубы 12 и на поверхности.
Этап 1
Для того, чтобы привлечь внимание Сферы Эксплуатации и начать сражение необходимо активировать терминал на втором этаже Палубы 12 слева от входа, положив в него
![]()
Разбавленную Термию.

Для призыва необходимо использовать лишь 1ед. Разбавленной Термии на весь отряд. Таким образом, игрок с Разбавленной Термией может разблокировать босса для трёх других игроков, даже если у них отсутствует своя Термия.
Получить Разбавленную Термию можно при запечатывании разломов на поверхности Долины Сфер во время соответствующего события. События повторяются раз в несколько недель, между которыми получить Разбавленную Термию нельзя.
Расположение Палубы 12 на карте.
Как только активируете консоль, Сфера Эксплуатации будет стоять на двух скалах, необходимо уничтожить куски скалы на которые она опирается — так она упадет вниз и начнётся бой.
Как только сфера упадёт, нужно будет уничтожить один из клапанов, остальные клапаны будут заморожены и станут невосприимчивы к урону. Для их уничтожения потребуются канистры с термией, появляющиеся из раздатчиков на нижних уровнях по краям арены, необходимо подбирать эти канистры и бросать их на клапаны для разморозки (на размораживание одного клапана нужно три попадания и после разморозки клапан может быть уничтожен).

Когда останется последний клапан, Сфера переместится к потолку и сбросит рой Клещей Ракноидов и несколько Охладительных Ракноидов, после чего можно приступить к разморозке и уничтожению последнего клапана.
Этап 2
После потери охлаждающих клапанов Сфера Эксплуатации начнет перегреваться и бой переместится на поверхность. Задачей на этом этапе будет нагрев Сферы с помощью канистр с Термией и уничтожение появляющихся Охладительных Ракноидов, которые будут пытаться её охладить.
После окончания первого этапа не спешите покидать Палубу 12, возьмите с собой 2 канистры с Термией (одну с помощью Варфрейма, вторую с помощью Оператора). И после выхода на поверхность бросайте их в Сферу.
На данном этапе придётся повторять следующий порядок действий:
- Уничтожайте Охладительных Ракноидов и подбирайте выпавшие с них канистры с хладагентом.
- При появлении разломов используйте на них канистру — она мгновенно заполнится Термией.
- Берите готовую канистру и бросайте её в босса — это повысит уровень его нагрева.
- Когда уровень нагрева достигнет максимума необходимо вплотную подойти к боссу и нажать клавишу X — запустится катсцена с обнажением уязвимой точки на корпусе Сферы.
- Стреляйте в открывшуюся уязвимую точку.
- Повторить предыдущие пункты еще два раза до победы.
После уничтожения последней уязвимой точки Сфера начнёт ярко светиться и самоуничтожиться, оставив после себя награду.
Награды
При убийстве Сферы Эксплуатации выпадают следующие награды:
| Модификаторы | Пистолетный Гамбит (38.72%) Заглушение (38.72%) Дробитель (4.51%) Глубокая Заморозка (4.51%) Горячий Заряд (4.51%) Патогенные Патроны (4.51%) Конвульсия (4.51%) |
| Предметы | Чертёж: Хильдрин: Каркас (38.72%) Чертёж: Хильдрин: Нейрооптика (38.72%) Чертёж: Хильдрин: Система (22.56%) Дополнительно: Чертёж: Эфемера: Шокирующая Поступь (5.00%) Чертёж: Эфемера: Морозная Поступь (5.00%) |
| Ресурсы | Тороид Лазулит (100.00%)
Экосинтетический Анализатор Синафиды (50%) |
Примечания
- Сфера Эксплуатации постепенно нагревается сама по себе, канистры с Термией увеличивают скорость нагрева, а также поднимают минимальный уровень нагрева, позволяя быстрее достичь максимальной температуры.
- Для достижения максимального нагрева требуется 4 / 12 / 18 канистр при условии, что Ракноиды не будут охлаждать Сферу.
- Барьер созданный Варфреймом Гара с помощью способности Витрификация Материи, не даст охладительным Ракноидам подойти к Сфере Эксплуатации для её охлаждения.
Exploiter harvests energy from the landscape and uses storms of ice and snow to safeguard the Temple of Profit from trespassers.
«Solaris. United. You shall not be spared the rod… as those who came before you. Were. Not. Spared.»
—Exploiter’s introduction
Exploiter Orb is a large Raknoid creature that can be found patrolling around the Temple of Profit within the Orb Vallis, acting as one of the Grand Bosses of the landscape. She is the one responsible for the destruction of Deck 12 which left many of its Solaris United survivors traumatized. The Exploiter Orb is battled in the ruins of Deck 12 located in a cave northeast of Harindi Crater, requiring a single Diluted Thermia from the recurring Thermia Fractures event.
Unlike the Profit-Taker Orb, the Exploiter Orb lacks Sentient adaptive shielding, but her carapace remains impervious to all gunfire. To defend herself, the Exploiter Orb can surround herself with a winter storm on command and has four vents across her lower body which spray jets of ice and an underbelly turret. Her main weakness of overheating is kept in check by her numerous exhaust vents as well as the small squad of Coolant Raknoids accompanying her.
Behavior[]
Around the Temple of Profit[]
The Exploiter Orb has a set path that she will follow, taking it in a loose circle around the Temple of Profit. She will climb over terrain, mountains, and roads. She constantly makes noises akin to roaring, indicating her aggressive state. Her steps will do contact damage if a Tenno is too close to her feet. It takes her around 15 minutes to return to her starting position.
Five Coolant Raknoids will hang behind and trail the Exploiter Orb. When killed, one Coolant Raknoid will spawn under the Exploiter Orb every twenty seconds.
Upon a player getting the Orb’s attention, she will begin spewing icy vapor from the jets mounted on her underside, creating a snow vortex around the Orb. This also signifies that the Orb will begin to actively attack the player with her many other attacks. The snow vortex has many interesting properties, though:
- Upon entering the vortex, the player will gain a similar aura around themselves, although much smaller than that of the Orb.
- While this aura is active, 4 icicle projectiles will spawn at the edge of the player’s aura, staying in place for a few moments before homing in on the player, doing a small amount of damage. This will happen every few seconds.
- The player will also take a minuscule amount of damage every ~2.5 seconds while they have the aura.
- The hud has no mention of whether or not a player has this aura.
- The vortex makes for quite the visual obstacle, being nearly opaque at times.
- The vortex around the Orb will block bullets, projectiles, and some Warframe abilities.
- A cloud appears directly above the Orb while the vortex is active.
The Orb has many other attacks, such as:
- Main Laser: Acts similarly to a beam weapon and does an immense amount of damage. Fired from the belly-mounted turret. Has enough «ammo» to last ~4 seconds before needing to «reload» for ~10 seconds. Will target a single player and track them until they reach cover/leave range.
- Ice Vents: The vapor pouring out of the Orb’s vents will deal a medium amount of damage and give the player a
 Cold status effect that lasts for 5 seconds. It will constantly refresh until the player leaves the vent-stream.
 - Homing Icicle: As mentioned previously, the aura that the player has while within the snow vortex will spawn 4 icicle projectiles, one after the other, which will stay in place for a few seconds before homing in on the player, doing a noticeable amount of damage.
- Hull Lasers: The green spots that dot the sides of the main body of the Orb are all hull-mounted Laser turrets. The Orb will use all of the mounted lasers that are on the side that a player is on. The Orb will stand up on its legs before this attack, which involves the lasers moving around randomly.
In Deck 12[]
Phase 1[]
When the Tenno first enters Deck 12, located in a cave northeast of Harindi Crater and inserts Diluted Thermia into the Thermic Condenser located next to where the Ventkids vent would be, Exploiter Orb will engage the Tenno with the following moveset.
Phase 2[]
After pursuing the Exploiter Orb outside the Deck 12, the Orb Mother will have an entirely different moveset.
- Hull Flamethrower: Instead of lasers, Exploiter Orb fires off a flamethrower from her belly-mounted turret which is aimed towards any nearby Tenno.
- Mortar Cannons: Exploiter Orb will occasionally bare mortars from the top of her head and fire them. The shots’ intended impact locations are telegraphed as large red circles on the ground.
- Thermia Fractures: When Exploiter’s heat gauge reaches approximately 45% or more, she slams her main body to the ground to eject the heat off her main body, causing roughly a dozen of Thermia fracture to the surface and in turn resetting her heat gauge down to roughly 15% before heat generation. There is a set cooldown of 30-45 seconds before she does this move again.
- Fire Dome: Exploiter Orb vents out flames around her creating a damaging, physical dome which traps any Tenno inside for ~10 seconds. She only uses this ability sparingly when her heat gauge had reached roughly 65% or more, and using it takes away roughly 25% of her heat gauge before heat generation. The dome has its top open, meaning that players can still enter or exit it.
- Call Coolant Raknoids: Occasionally used by the Orb to summon any nearby Coolant Raknoids to come to her aid. Each Coolant Raknoid will fire their coolant (breaking their coolant canister in the process) to cool the Orb Mother once by roughly 5% per shot, and each Raknoid can only cool the Orb exactly once. If killed with their canister intact, these Coolant Raknoids will drop a Cooling Canister which can be used to create Concentrated Thermia Canister from the Thermia Fractures.
- Self-destruct: When defeated, the Exploiter Orb will begin to draw energy from the Satellite Overcharger and self-destruct, killing anything within a 300m radius. Notably, the Exploiter Orb self-destructs much sooner after her death than Profit-Taker Orb, but Exploiter Orb’s rewards will not disappear during the explosion.
Strategy[]
In the ruins of Deck 12, located in a cave northeast of Harindi Crater, Rude Zuud exclaims she and her sisters built a device to condense the planet’s thermia into a weapon strong enough to be used against the Exploiter Orb’s defenses. One player must deliver their Diluted Thermia into the Thermia Condenser on an upper platform, which is collected from the Thermia Fractures world state event that occurs once every few weeks; only the player that interacted with the Condenser will have their Diluted Thermia consumed. The Exploiter Orb will then climb down the ruins and engage the Tenno, proclaiming herself as the one responsible for the destruction of Deck 12.
Phase 1[]
The Exploiter Orb engages the Tenno nested high up and will constantly shoot her turret belly throughout the phase. Shoot down the rocks that maintain her footing to bring her down. Once she falls down, the four vents on her sides will be exposed to fire. Shoot down one of the vents.
Once one of the vents is destroyed, the Mother Orb will ice up the rest of her vents rendering them invulnerable. She will then travel to the other side of the room while surrounding herself in a winter storm. Once there, she will constantly shift her body around, summon swarms of Mite Raknoids, and occasionally slam her body to the ground causing an avalanche of ice which can proc ![]() Cold.
Cold.
At this point, six Thermia Condensers will begin to continually dispense a Condensed Thermia Canister, which can be found at the following locations:
- The left side of the Deck, where The Business would usually be found.
- The left side of the Deck, on the third floor above where The Business / Ticker would usually be found.
- The left side of the Deck, where Smokefinger would usually be found.
- The left side of the Deck, on the second floor above where Smokefinger would usually be found (entrance to the room is to the left of the Ventkids’s clubhouse entrance).
- The right side of the Deck, to the left of where Rude Zuud would usually be found.
- The right side of the Deck, on the second floor to the left of where Rude Zuud would usually be found.
The Condensed Thermia Canister can be used to melt the ice which protects her vents from damage. To use it, the player must lob the canister with Alternate Fire (default MMB ) and shoot the canister to make it blow up. The number of canisters it takes to de-ice the vents is dependent on how close the canisters are to them when they explode. For example:
- A direct hit to the vent will immediately melt the ice.
- A close explosion to her vent will melt the ice in two explosions.
- A far explosion to her vent will melt the ice in three explosions.
Once fully exposed, up to two more of her vents can be destroyed before she ices up her final vent if it was partially melted before. She will proceed to the middle of the room and hang overhead, dropping several Coolant Raknoids which must be defeated. It is possible to throw a canister at the iced-up vent while Exploiter Orb hangs overhead.
After defeating enough Coolant Raknoids, the Exploiter Orb will once again descend to the Deck. Melt the last vent and destroy it and she will retreat and head topside. Head out of the cave to proceed to the next phase of the fight.
Phase 2[]
The Exploiter Orb can be found waiting for the Tenno outside the cave. In this phase, a Heat Gauge will be displayed at the top-left of the player’s HUD, which indicates the overheat level the Mother Orb is currently at. Throughout the fight, Exploiter Orb will alternate between using her hull flamethrower, firing mortar cannon and calling Coolant Raknoids as reinforcements. The main objective of the phase is to overheat the massive Orb until her heat gauge is full, rendering her vulnerable to assault.
Exploiter Orb herself will heat up passively, though swarms of Coolant Raknoids will rush in from all directions, each of which can cool her down by 5% of her heat gauge once they reach her underbelly, after which the Raknoids will slowly «bleed» to death. If the Raknoids are defeated before they reach Exploiter Orb, they may drop a Coolant Canister which will be used in the later parts of the fight.
When Exploiter’s heat gauge reaches roughly 45%, she will slam her main body to the landscape’s frigid surface to cool herself down to 15% before commencing heat generation, causing roughly a dozen Thermia Fractures to appear. There is a set cooldown of 30-45 seconds before she repeats this move if her heat gauge surpasses 45% again. These Fractures can be used to instantly create a Condensed Thermia Canister by spending a Coolant Canister into it, then lobbed to the Orb Mother to permanently speed up her overheating rate. The overheating speed added to the heat gauge is doubled if the canister is shot mid-air, near the Orb Mother.
When Exploiter’s Heat Gauge reaches roughly 65% or more, she will vent out flames around her creating a damaging physical dome which traps any Tenno inside for roughly 10 seconds, which will take away roughly 25% of her heat gauge before preceding heat generation. The dome has its top open, meaning that players can still enter it or exit it.
Once she fully overheats, she will become disabled allowing the Tenno to approach her. This will trigger a cutscene where the Tenno boards her side and rips off a part of her hull, leaving a weak spot for the Tenno squad to assault. Once she loses a third of her health, she regains her invulnerability and the overheating process must be repeated twice more, resetting her overheating speed.
After she is fully defeated, she will drop a sizable amount of loot consisting of a ![]() Lazulite Toroid,
Lazulite Toroid, ![]() Hildryn part blueprint, as well as massive amount of Orb Vallis resources both common and rare. Loot and escape as soon as possible as she will self-destruct (notably much faster than Profit-Taker Orb), obliterating all Tenno in a 300-meter radius.
Hildryn part blueprint, as well as massive amount of Orb Vallis resources both common and rare. Loot and escape as soon as possible as she will self-destruct (notably much faster than Profit-Taker Orb), obliterating all Tenno in a 300-meter radius.
Summary[]
- Phase 1
- Vent 1: Shoot down her foothold and destroy one of her exposed vents.
- Vent 2-3: Take a Condensed Thermia Canister, lob at the Orb Mother and blow it up near her vents to melt the icy protection.
- A direct hit to the vent will melt the ice instantly.
- A close explosion to her vent will melt the ice in two explosions.
- A far explosion to her vent will melt the ice in three explosions.
- Vent 4: Defeat all summoned Coolant Raknoids until she descends, melt her last vent and destroy it.
- Preferably shoot down one of side vents first, then mid two vents will be faster to melt down and shoot together, and at last shoot the other side vent.
- Phase 2
- Overheat 1: Prevent any Coolant Raknoids from cooling her down until she passively generates heat up to 45% of the gauge, she will then cool down causing Thermia Fractures to appear. Use a Coolant Canister to create a Condensed Thermia Canister and use it to make her overheat faster. It should be noted that mid-air canister shot adds double the overheat rate. Repeat until she is fully overheated and jump on her to trigger a quick cutscene of your Warframe ripping off a part (possibly a power cell) on her side hull. After the cutscene, shoot the exposed parts (now in flames) until one third of her health is taken away.
- Overheat 2 and 3: Repeat the last overheating process until she is defeated. They will be the part on other side and her head. Collect rewards and escape the vicinity as soon as possible as it will self-destruct with a lethal range of 300m, though unlike Profit-Taker the explosion will not destroy Exploiter’s drops.
Notes[]
- Exploiter’s drops are affected by Resource Boosters and Smeeta Kavat’s
 Charm.
 - Although the Exploiter Orb follows a set path around Temple of Profit, her legs will try and put themselves on logical surfaces. This can lead to the legs and some of the main body clipping through the ground.
- Although she is immune to Corrosive Projection, she has significantly less health and armor than the Profit-Taker Orb.
- The Exploiter Orb isn’t immune to Shattering Impact.
- The Exploiter Orb isn’t immune to
- A major difference between the Exploiter Orb and her counterpart, the Profit-Taker Orb, is that the Exploiter Orb’s legs are a part of the main body – the Profit-Taker Orb has separate segments for her four legs and the main body. The Exploiter Orb’s legs still can be marked with waypoints, though.
- However, her four vents (Left-Fore, Left-Aft, Right-Aft, and Right-Fore) are separate parts and can be marked with waypoints.
- During Phase 1, the four vents have Object Health class, which means they are immune to Critical Hits.
- The Exploiter Orb will always be level 50, regardless of the mission level she is fought on.
- Players can restart the boss fight by reentering Deck 12. They don’t have to go back to Fortuna to do so.
- While the Diluted Thermia required to start the Exploiter Orb can only be acquired from Operation: Buried Debts and recurring thermia events, the actual fight itself can be performed at any time without the event as long as players have Diluted Thermia available.
- The damage dealt by Self Destruct is dealt in two pulses roughly half a second apart. The damage can be mitigated using invulnerability effects, such as
 Rhino‘s Iron Skin, Nezha‘s Warding Halo, Harrow‘s Covenant, Hildryn‘s passive or Haven, Wukong‘s passive, Cloud Walker, or Defy, Revenant‘s Mesmer Skin or Amesha’s Benevolent Decoy.
Tips[]
- When farming the enemies around the Temple of Profit (more often than not, for Sola Toroids) it is recommended to stay on the Temple grounds or within the temple, as the Orb will rarely come close enough to reach the player with any of its attacks.
- It is recommended that you stay in a place where you can constantly see the direction the laser turret is facing, and moreover to be constantly moving. Akin to the eye of a hurricane, staying underneath the Orb is a good way to stay safe from most of its attacks while being able to see the Mounted Laser.
- During Phase 1, it is a good idea throw the Thermia canisters towards the two vents behind the Exploiter Orb so you can save time and canisters by catching two vents at the same time with only one canister. Done right, you will only need to use three Thermia Canisters during the entirety of Phase 1; two for the rear vents, and one more for the final one.
- During Phase 2, the Exploiter Orb can pick up coolant and cool herself down if she goes near them, thus slowing down the fight. Pick up the coolant and move it away from the boss at all costs.
- During Phase 2, it is ideal to have one player in Archwing, keeping overwatch and sniping the far-off Coolant Raknoids before they can reach the Exploiter Orb.
- A weapon with high status procs and Radiation damage can oftentimes stall the Raknoids, or otherwise force them to fight each other and nearby Corpus. This can make it easier to pick them off, especially if you don’t have a weapon that can output a high amount of damage in a short amount of time.
- A weapon with high status procs and
- If you pick up a Thermia Cell with your Warframe and use Transference to go into Operator you can pick up two cells at once. Throwing/dropping the one cell as Operator before going back into your Warframe that has the second cell which you picked up first. This is also a useful tip for Excavation missions.
- If you pick up cells in Phase 1 near the Thermia creating machines and drop them, this will restart the timer for the Thermia machine cooldown. This makes more cells spawn faster for other teammates.
- Orange Thermia cells from Phase 1 can be transfered to Phase 2 in the loading room to quicken the pace of Phase 2. Be mindful though, someone will need to stand by the door loading or you will load back into the Phase 1 room if running cells back and forth to doorway outside. Best tactics call for someone staying in Phase 1 room until about 12-18 orange Thermia is by outside loading door. Only 24 Thermia total is needed to overheat Phase 2 boss the three times.
- Phase 2: Exploiter Orb heat buildup is additive via Thermia hits. Meaning Coolant Raknoids do little to prevent you from beating this boss.
- General gameplay observations: 4/8/12 Thermia Cells are required to push the boss to the next phase.
- If the Coolant Racknoids do prevent you from beating this boss, 5-6/9/? will force the Exploiter Orb to instantly overheat, no matter the scenario
- While the heat buildup indicator is not shown, you can still throw Thermia Cells on the Exploiter Orb to count toward this instant overheat
Bugs[]
- Very rarely, she can clip through the surface of the Vallis and enter Fortuna. An instance of this happening can be seen here.
- This was later revealed to be an accidental leak since WARFRAME tweeted a video showing the Exploiter Orb entering Deck 12.
Trivia[]
Media[]
")
")
Exploiter Orb Quick Guide Warframe Event Guide
Warframe Everything you need to Kill the Exploiter Orb Solo!
Patch History[]
Update 32.3 (2023-02-15)
- Fixed Exploiter Orb not taking damage from single target weapons (only AOE weapons could damage the weak spots).
- In Hotfix 32.2.5 we had made some temporary fixes to prevent the complete inability to defeat these bosses due to the above issue. The above fix reverts the tweaks that were made to how Bosses operate so that they could be defeated over the holiday break. The following issues from these tweaks are now also fixed:
- Fixed Secondary mechanics that rely on hitting things are not always triggering.
- Fixed punch-through letting you hit weak points on the opposite side of a target.
- In Hotfix 32.2.5 we had made some temporary fixes to prevent the complete inability to defeat these bosses due to the above issue. The above fix reverts the tweaks that were made to how Bosses operate so that they could be defeated over the holiday break. The following issues from these tweaks are now also fixed:
- Fixed Spearguns thrown at the Exploiter Orb scaling up to massive sizes.
- Fixed Hosts with slower internet connections dropping squad members when loading into Deck 12 for the Exploiter Orb boss fight.
Hotfix 32.2.5 (2022-12-14)
- Fixes towards Exploiter Orb not taking damage from single target weapons (only AOE weapons could damage the weak spots).
- It is important to note that these are temporary fixes to prevent the complete inability to defeat these bosses due to the above issue. A code fix is required to address the issue which we are unable to release before the holiday break. So in the meantime, seeing as progstops are a top priority, we had to make some necessary tweaks to how these Bosses operate so that they could be defeated. These tweaks are temporary for the holiday break and will be reverted in a future update to bring these Bosses back to their original mechanics:
- You can shoot any of the Exploiter Orb’s three vents, but still only deplete a maximum of one third of the Orb’s Health per phase.
- There are also some issues with this workaround that will be fixed with the future revert:
- Secondary mechanics that rely on hitting things are not always triggering.
- Punch-through lets you hit weak points on the opposite side of a target.
- It is important to note that these are temporary fixes to prevent the complete inability to defeat these bosses due to the above issue. A code fix is required to address the issue which we are unable to release before the holiday break. So in the meantime, seeing as progstops are a top priority, we had to make some necessary tweaks to how these Bosses operate so that they could be defeated. These tweaks are temporary for the holiday break and will be reverted in a future update to bring these Bosses back to their original mechanics:
Hotfix 31.6.4 (2022-07-14)
- Fixed doors not opening to go back up to the surface during the Exploiter Orb fight.
- Also fixed crash related to this.
Update 31.6 (2022-06-09)
- Upon throwing a Thermia Canister, you will now switch back to your Primary weapon if that’s what you were using upon pick-up.
- This applies to the Exploiter Orb fight
Update 31.0 (2021-12-15)
- Fixed a harmless script error that could occur when fighting the Exploiter Orb.
Hotfix 29.10.8 (2021-03-31)
- Fixed a bug that would break Exploiter Orb hunts and missing objective text.
Hotfix 29.10.3 (2021-03-23)
- Fixed a likely harmless script error that could occur after defeating the Exploiter Orb.
Hotfix 29.6.2 (2020-12-22)
- Fixed an issue where Bonewidow could Grab the Exploiter Orb. Oh lord!
Update 29.5 (2020-11-19)
- Fixed <SECONDARY_FIRE> appearing instead of button callout when throwing Condensed Thermia in the Exploiter Orb fight.
Hotfix 29.1.2.1 (2020-09-22)
- Fixed the Exploiter Orb spawning underground as reported here: https://forums.warframe.com/topic/1224705-exploiter-orb-still-spawning-underground-during-bounty/
Update 27.3 (2020-03-24)
- Fixed ice on the vents of the Exploiter Orb not appearing for Clients.
- Fixed the HUD disappearing if you look away at the wrong time during the Exploiter Orb boss fight intro. As reported here: https://forums.warframe.com/topic/1136226-hud-disappearing-in-the-exploiter-orb-fight-fix-pending/
Update 27.2 (2020-03-05)
- (Undocumented) Health types changed from Flesh to Robotic.
- (Undocumented) Health increased from 6,000 to 12,000.
Update 25.0 (2019-05-22)
- Increased Ephemera drop rate on Exploiter Orb from 6% category drop to 10% category drop.
- The Exploiter Orb now properly drops the Deck 12 Scene.
Update 24.6 (2019-04-04)
- Matchmaking for the Exploiter Orb fight can now be done by visiting Eudico in Little Duck’s room!
Hotfix 24.5.6 (2019-03-26)
- You can now waypoint the Exploiter vents!
Hotfix 24.5.5 (2019-03-25)
- Fixes towards infinite loading/disconnect upon Entering Deck 12 while other players are still loading in.
- Fixes towards Clients seeing a massive Exploiter Orb in the last vent cinematic scene.
- Fixed a crash when killing Coolant Raknoids.
- Fixed Coolant Raknoids not attempting to destroy Gara’s Mass Vitrify walls.
Hotfix 24.5.4 (2019-03-20)
- Polished some animations in the Exploiter Orb vent cinematics.
- Fixed crashing when transitioning to or from Deck 12 as an Operator.
- Fixed the Exploiter Orb not appearing in Phase 2 if there was a Host migration before Phase 1. Thanks to ‘Immortal’ for the solid repro on this!
- Fixed players sometimes disappearing on each others’ screens after beginning to load to Deck 12 or back to Venus. This would often result in further issues such as unloading Venus while the player is standing in it.
- Fixed Clients seeing a massive Exploiter Orb when initiating the vent cinematic.
- Fixed the Exploiter Orb heat gauge potentially not updating when transitioning to and from Deck 12.
- Fixed the Exploiter Orb boss title text not appearing for Clients.
- Fixed a (sometimes) massive game hitch when entering Orb Vallis due to Thermia Fractures spot loading.
Hotfix 24.5.3 (2019-03-19)
The team continues to work on further crash fixes and Matchmaking issues related to join-in-progress and Operator specific cases. The particular case of missing Exploiter Orb during Phase 2 is also still under investigation. If anyone encounters this particular issue, we would greatly appreciate Host EE.Logs to http://support.warframe.com/. Visiting http://warframe.com/logs shows you how to collect your EE.Logs!
- More fixes towards crashing when transitioning to or from Deck 12.
- Fixed the Exploiter Orb being in a broken state if you transitioned back to Deck 12 while the Exploiter Orb was still alive above ground.
- Fixed all players seeing the ‘Throw the Coolant Canister’ UI message when only one person is holding one.
- Fixed persisting ‘0 players waiting’ UI message during Phase 2 of the Exploiter Orb fight.
Hotfix 24.5.2 (2019-03-18)
- Fixed ability to destroy the Exploiter Orb’s vents simultaneously. One vent at a time!
Hotfix 24.5.1 (2019-03-15)
- Exploiter Orb’s Fire Wall ability now cools down gradually instead of in a single big chunk.
- Exploiter Orb heat gauge no longer shows in the HUD if you’re not in that Phase of the fight.
- Thermia can no longer be destroyed when lying on the ground before you pick it up.
- Increased the visual indication of where the Thermia Dispensers are during Phase 1 of the Exploiter Orb fight.
- Minor tweaks to the Exploiter Orb vent explosion sounds.
- Fixed crashing when Mining after transitioning to Deck 12. You will still notice Mining veins in these areas, but you’ll be unable to interact with them due to the crash risk.
- Fixed a crash occurring during the Exploiter Orb vent cinematic scene.
- Fixed a crash that could occur in Phase 1 of the Exploiter Orb fight.
- Fixed a script error after destroying the Exploiter Orb’s vents in Phase 1 that resulted in an inability to continue.
- Fixed Warframe becoming invulnerable and being unable to use Operator if you attempted to use Transference while loading into Deck 12.
- Fixed Nekros’ Desecrate removing the Exploiter Orbs body, resulting in missing death explosion.
- Fixed Exploiter Orb heat gauge persisting on the UI after death.
Update 24.5 (2019-03-14)
- Added boss fight in Operation: Buried Debts.
Update 24.0 (2018-11-08)
- Introduced.
See Also[]
- Profit-Taker Orb
|
| Bosses and Mini-Bosses | ||
|---|---|---|
| Planet | Captain Vor (Mercury/Ceres) • Councilor Vay Hek (Earth) • General Sargas Ruk (Saturn) • Kela De Thaym (Sedna) • Lieutenant Lech Kril (Mars/Ceres) • Tyl Regor (Uranus) | |
| Mission | Kuva Liches • The Grustrag Three (Assassin) • Ven’kra Tel and Sprag (Orokin Sabotage) | |
| Quest | Elder Queen (The War Within) | |
| Event | Balor Fomorian (Fomorian Fleet) | |
| Planet | Alad V and Zanuka (Jupiter) • Ambulas (Pluto) • Jackal (Venus) • Hyena Pack (Neptune) • Raptors (Europa) • The Sergeant (Phobos) | |
| Mission | Exploiter Orb (Orb Vallis) • Lynx (Orokin Sabotage) • Profit-Taker Orb (Orb Vallis) • Zanuka Hunter (Assassin) | |
| Quest | Protea Specter (The Deadlock Protocol) | |
| Event | Razorback (Razorback Armada) | |
| Planet | Jordas Golem (Eris) • Juggernaut Behemoth (Eris) • Mutalist Alad V (Eris) • Lephantis (Deimos) • Zealoid Prelate (Deimos) | |
| Mission | Juggernaut (Infested Ship) | |
| Quest | Infested Mesa (Patient Zero) | |
| Event | Phorid (Phorid Manifestation) • Hemocyte (Plains of Eidolon — Operation: Plague Star) | |
| Mission | Corrupted Vor (Tier 4 Void) • Nihil (Nightwave/Series 3) | |
| Quest | Necramech (Heart of Deimos) | |
| Planet | Ropalolyst (Jupiter) | |
| Mission | Eidolon Teralyst • Gantulyst • Hydrolyst (Plains of Eidolon) | |
| Quest | Suda-Hunhow (Octavia’s Anthem) • Typholyst (The New War) | |
| Event | Condrix (Earth — Operation: Scarlet Spear) | |
| Mission | Acolytes (The Steel Path) • Stalker or Shadow Stalker (Assassin) | |
| Mission | Wolf of Saturn Six (Assassin) • Void Angel (Zariman Ten Zero) | |
| Duviri | Dax Equitem • Orowyrm | |
| Mission | Archon Amar • Archon Boreal • Archon Nira (Archon Hunt) | |
| Quest | Ballas (The New War) |
В этом уроке мы покажем вам, как сразиться и убить Сферу эксплуататора в Warframe. Это совместная стрелялка с довольно приличным игровым процессом, захватывающей графикой и сложными миссиями. Действие этой игры от третьего лица происходит в научно-фантастическом мире, где вы управляете штурвалом космического корабля и вступаете в космический бой. Фермерство Рубедо и имея идеальный отлов животных это лишь некоторые из его примечательных особенностей. Кроме того, его тяжелобронированные враги выводят игру на совершенно другой уровень.
Одним из врагов в этом отношении является Сфера Эксплуататора. Это большое Ракноидское существо, которое обычно патрулирует вокруг Храма Прибыли, который, в свою очередь, расположен в Долине Сфер. Он один из великих боссов этого пейзажа. Кроме того, он является главной (и некоторые называют это единственной) причиной того, что Палуба 12 была разрушена, что оставило многих выживших Солярис в травмированном состоянии. Так что вам нужно отомстить и убить это существо. Но сделать это — непростая задача. Поэтому в этом руководстве мы перечислили полные инструкции, которые помогут вам убить Сферу эксплуататора. Давайте начнем.

Оглавление
-
1 Как сразиться и убить сферу эксплуататора в Warframe
- 1.1 Этап 1: Расположение сферы эксплуататора в Варфрейме
- 1.2 Этап 2: начало боя
- 1.3 Этап 3: первая фаза боя
- 1.4 Этап 4: Второй этап
- 1.5 Этап 5: Третий и последний этап боя.
- 2 Вывод
Как сразиться и убить сферу эксплуататора в Warframe
Exploiter Orb — один из самых сложных боссов в Warframe. Вбрасывание, которое вам предстоит с ним, не будет ни на что другое. Но у него есть и слабые места, и мы будем их использовать. Но перед этим познакомимся с его местонахождением.
Этап 1: Расположение сферы эксплуататора в Варфрейме
Для тех, кто не подозревает, Сфера Эксплуататора может быть найдена только в Долине Сфер. Но прежде чем отправиться к нему, нужно помнить несколько вещей. Во-первых, у вас должна быть разбавленная Thermia, иначе вы не сможете использовать консоль, которая используется для Призыв Сферы Эксплуататора, с другой стороны, Разбавленная Терния, может быть найден во время операции Похоронен. Долги. Так что убедитесь, что вы выполнили эту миссию, прежде чем идти в бой.
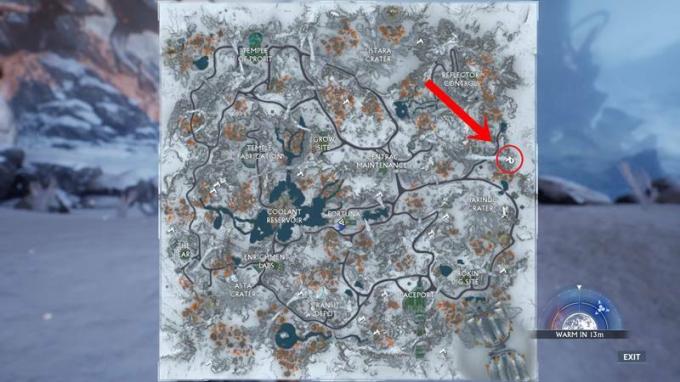
Затем, когда вы достигнете Долины, направляйтесь к северо-востоку от кратера Харинди. Там вы должны увидеть пещеру, где будет находиться заброшенная станция под названием Deck 12. Войдите в пещеру и следуйте по тропинке, ведущей к этой колоде. Достигнув этого места, прыгните в верхний левый угол, и вы должны увидеть консоль там. Теперь вы можете легко активировать Разбавленную Термию и вызвать Сферу Эксплуататора.
Этап 2: начало боя
Как только вы активируете консоль, направляйтесь в безопасное место, потому что сфера упадет с потолка и начнется с огня. На этом этапе, вместо того, чтобы проявлять чрезмерную агрессию, пора спрятаться в углу и дождаться идеальной возможности. Вначале Сфера эксплуататора будет стоять над скалами. В этот момент вы должны начать стрелять по камням, чтобы он упал на землю. Теперь босс находится на вашей прямой видимости, и вы успешно начали бой на уровне земли.
Этап 3: первая фаза боя
На этом этапе вам нужно будет уничтожить все вентиляционные отверстия Сферы. По мере того, как вы уничтожаете определенное фиксированное количество вентиляционных отверстий, вы активируете другой этап битвы с боссом. Вначале начните с того, что выстрелите и повредите одно из его вентиляционных отверстий, как только он упадет на землю с вышеупомянутых камней. Увидев, что его вентиляционное отверстие повреждено, он побежит в другую руку, во время этого сеанса вы должны выстрелить и уничтожить два его других вентиляционных отверстия.

Но сделать это будет непросто, так как есть вероятность, что на этот раз оба вентиляционных отверстия могут быть заморожены. Так что вам нужно искать канистру Thermia, которая появляется в одном из диспенсеров. Если его еще нет, дождитесь его появления, иногда также может быть задержка. Как только вы получите эти канистры, бросьте их в оба его вентиляционных отверстия.
Как только два его других вентиляционных отверстия будут повреждены, Сфера побежит в среднюю комнату и поднимется. Теперь он выпустит набор Raknoids охлаждающей жидкости. Следовательно, ваша основная цель должна заключаться в том, чтобы разобраться с этими Ракноидами. Как только вы победите их, Сфера вернется к тому месту, где вы изначально разрушили его первое вентиляционное отверстие. Так же, как вы повредили его первое вентиляционное отверстие, сделайте то же самое и для последнего, используя любую технику, которая у вас есть на тот момент. Как только вы разрушите все вентиляционные отверстия Сферы, пора начинать новую фазу за пределами Палубы 12.
Этап 4: Второй этап
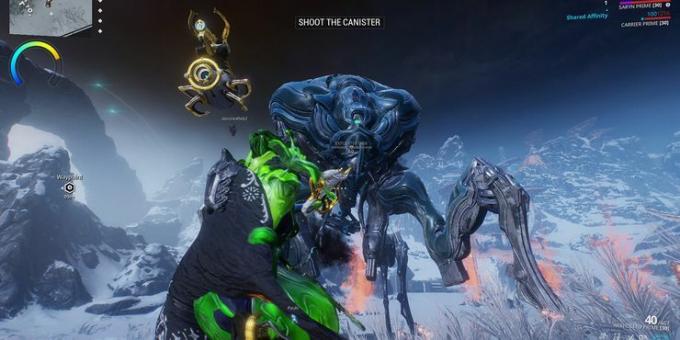
На этом этапе вы выбегаете с палубы 12 и направляетесь к Долине Сфер. Там вы встретите босса. Чтобы победить его, вам нужно будет полностью использовать его слабость — перегрев. Когда вы это сделаете, он вызовет свои ракноиды охлаждающей жидкости, чтобы свести на нет этот эффект перегрева. Эти ракноиды упадут в канистры с охлаждением. Этими канистрами следует закрыть трещины, которые взрываются от земли. Как только эти канистры пожелтеют, возьмите их и начните швырять в них Сферу Эксплуататора. Это заставит его перегреться, и теперь вы находитесь в финальной фазе этого боя.
Этап 5: Третий и последний этап боя.

На этом этапе Сфера Эксплуататора начинает перегреваться, и это прекрасная возможность для вас запрыгнуть на Сферу. Когда вы это сделаете, вы должны увидеть, как его двигатель запускается. Поскольку вы уже стоите на нем, начните стрелять по его двигателям и продолжайте делать это, пока не увидите выходящее пламя. Кроме того, вам также придется убить всех Ракноидов Coolant.
Потому что они несут ответственность за отмену вашей тактики перегрева. Так что пока они не умрут, вы не добьетесь успеха в своей миссии. Как только Сфера эксплуататора будет убита, с него выпадут награды в виде добычи. Но не забудьте быстро собрать все товары и броситься прочь от этого места, потому что сфера в любой момент взорвется и, следовательно, вызовет огромный взрыв, уничтожающий все в своем периметре.
Вывод
На этом мы завершаем руководство о том, как убить Сферу эксплуататора в Warframe. Убедитесь, что вы выполняете шаги точно по фазе, как указано выше. Это упростит убийство без особой суеты. Однако, если вы не можете добиться успеха, задайте свои вопросы в разделе комментариев ниже. Кроме того, вот несколько Советы и хитрости iPhone, Советы и хитрости для ПК, а также Советы и хитрости для Android что вам тоже стоит проверить.