С помощью встроенного пакета OpenSSH для Windows вы можете легко настроить безопасную передачу файлов между клиентом и серверов Windows по защищенному протоколу передачи файлов SFTP (Secure FTP). В этой статье мы покажем, как установить и настроить установить SFTP сервер в Windows 10/11 или Windows Server 2022/2019/2016/2012R2 с помощью встроенных средств (Win32-OpenSSH).
Содержание:
- Установка OpenSSH в Windows
- Настройка SFTP сервера на базе OpenSSH в Windows
- Подключение к SFTP серверу с помощью PowerShell и WinSCP
- Настройка SFTP аутентификации по ключам
Протокол SFTP (Secure File Transfer Protocol , Secure FTP или SSH FTP) это расширение протокола SSH, являющимся стандартом мира UNIX/Linux систем. Хотя с точки зрения пользователей он похож на FTP, но на самом деле это абсолютно другой протокол, не имеющий с FTP ничего общего. Данные между клиентом и сервером передаются по порту 22 через SSH туннель.
Основные преимущества протокола SFTP:
- Передача файлов и команд происходит внутри защищенной SSH-сессии;
- Для передачи файлов и команд используется одно соединение;
- Поддерживаются символические ссылки, доступны функций прерывания, возобновления передачи, удаления файла и другие;
- Обычно на каналах, где FTP работает медленно или с перебоями, SFTP-соединение работает более надежно и быстро;
- Возможность аутентификации с помощью SSH ключей.
Не нужно путать протоколы SFTP и FTPS. FTPS – это по сути обычный FTP с SSL сертификатом, а SFTP – это передача FTP данных и команд внутри SSH сессии.
В современные версии Windows по-умолчанию встроен порт OpenSSH для win32 (Win32-OpenSSH). Вы можете использовать его для организации защищенного SFTP сервера вместо таких сторониих продуктов как Core FTP, FileZilla, CYGWIN, OpenSSH, FTP Shell, IPSwitch и пр.
Установка OpenSSH в Windows
Пакет OpenSSH уже включен в операционную систему в современных билдах Windows 10 (начиная с 1803), Windows 11, Windows Server 2022/2019 в виде Feature on Demand (как и RSAT).
В этих версиях Windows вы можете установить сервер OpenSSH с помощью PowerShell:
Add-WindowsCapability -Online -Name OpenSSH.Server*
Или с помощью DISM:
dism /Online /Add-Capability /CapabilityName:OpenSSH.Server~~~~0.0.1.0
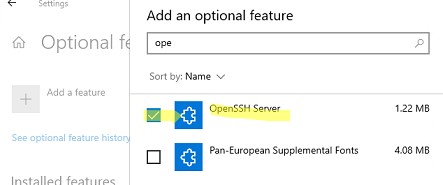
Также можно установить OpenSSH из графического интерфейса Windows 10 (Settings -> Apps -> Optional Features -> Add a feature -> Open SSH Server -> Install).
Чтобы проверить, установлен ли пакет:
Get-WindowsCapability -Online | ? Name -like 'OpenSSH*'
Исполняемые файлы OpenSSH находятся в каталоге:
C:windowssystem32OpenSSH
Конфигурационный файл sshd_config находится в каталоге C:ProgramDatassh (каталог создается после первого запуска службы).
Лог — c:windowssystem32OpenSSHlogssshd.log
Файл authorized_keys и ключи хранятся в каталоге %USERPROFILE%.ssh.
В предыдущих версиях Windows 10, в Windows 8.1 или в Windows Server 2016/2012 R2 вам придется скачать Win32-OpenSSH для Windows с GitHub и установить вручную (https://github.com/PowerShell/Win32-OpenSSH/releases). Нам нужна версия для 64 битной версии Windows: OpenSSH-Win64.zip (4,15 Мб).
- Распакуйте содержимое архива в целевой каталог, к примеру:
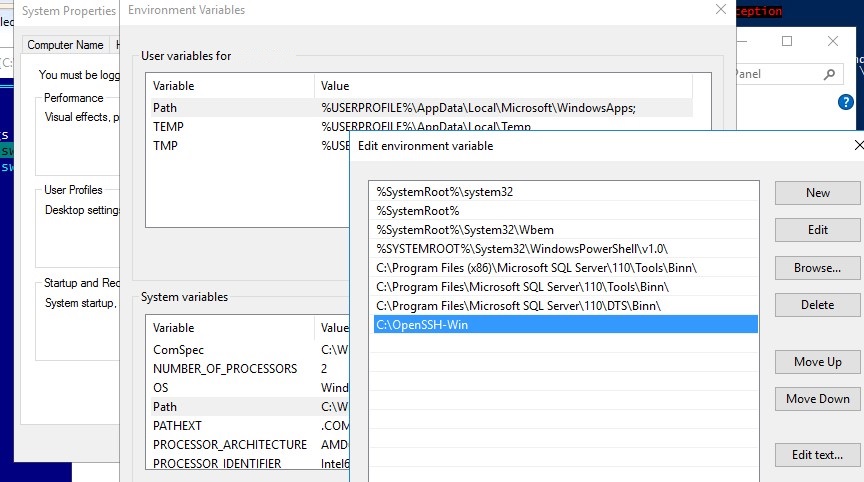
C:OpenSSH-Win - Запустите командную строку PowerShell с правами администратора и перейдите в каталог OpenSSH:
cd C:OpenSSH-Win - Добавьте путь к каталогу OpenSSH в переменную окружения Path;

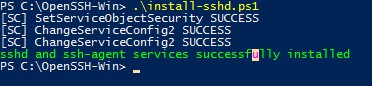
- Установите сервер OpenSSH:
.install-sshd.ps1
должно появиться зеленое сообщение “sshd and ssh-agent services successfully installed”).
Настройка SFTP сервера на базе OpenSSH в Windows
Теперь вам нужно настроить OpenSSH для режима SFTP.
Включите автозапуск для службы SSHD и запустите ее с помощью следующих PowerShell команд управления службами:
Set-Service -Name sshd -StartupType ‘Automatic’
Start-Service sshd
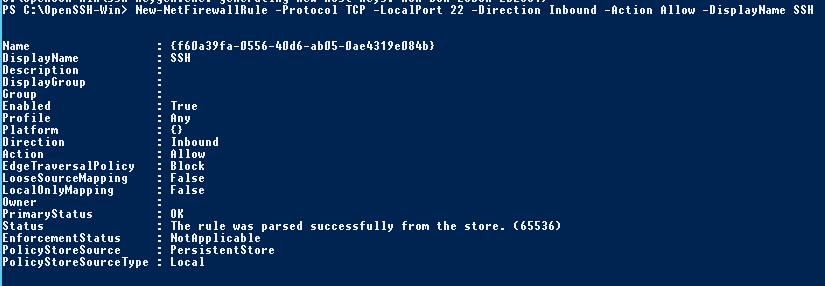
С помошью PowerShell отройте в брандмауэре Windows порт TCP 22 для входящего трафика на SSH сервер:
New-NetFirewallRule -Protocol TCP -LocalPort 22 -Direction Inbound -Action Allow -DisplayName SSH
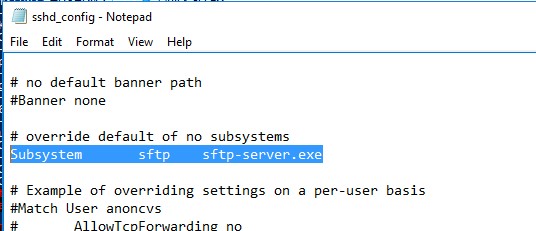
 Откройте в любом текстовом редакторе конфигурационный файл «C:ProgramDataSSHsshd_config», найдите и проверьте значение директивы Subsystem sftp. Здесь должен быть указан файл sftp-server.exe.
Рассмотрим полезные директивы в конфигурационном файле sshd_config:
# разрешить подключение к OpenSSH только для пользователей из этой группы
AllowGroups corpadmingroup
# включить аутентификацию по паролю (нельзя использовать ключи SSH)
AuthenticationMethods password
ForceCommand internal-sftp
#каталог для SFTP пользователей (по умолчанию пользователь подключается в каталог со своим профилем в папке C:usersusername)
ChrootDirectory C:SFTPRoot
#Для каждого пользователя можно индивидуальную chrootdirectory:
Match User user1
ChrootDirectory c:SFTPRootuser1
ForceCommand internal-sftp
X11Forwarding no
 AllowTcpForwarding no
Match User user2
ChrootDirectory c:SFTPRootuser2
ForceCommand internal-sftp
X11Forwarding no
AllowTcpForwarding no
Подключение к SFTP серверу с помощью PowerShell и WinSCP
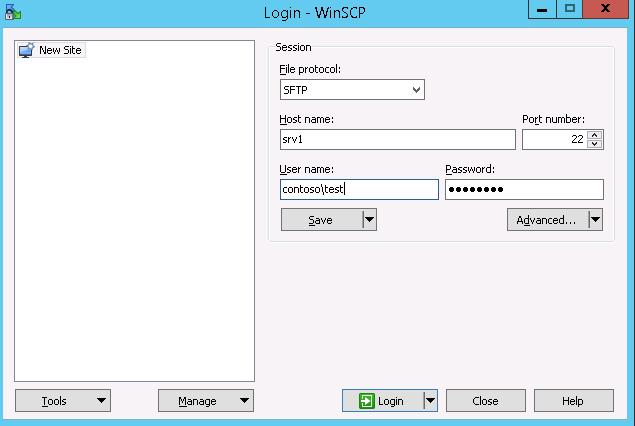
Теперь вы может подключиться к вашему SSH серверу на Windows по протоколу SFTP. Ниже мы покажем, как подключиться к SFTP серверу с помощью бесплатного клиента клиент WinSCP, консоли PowerShell и встроенной утилиты sftp.exe.
В окне настройки подключения выберите протокол передачи файлов SFTP, укажите имя сервера и данные учетной записи Windows (в формате
[email protected]
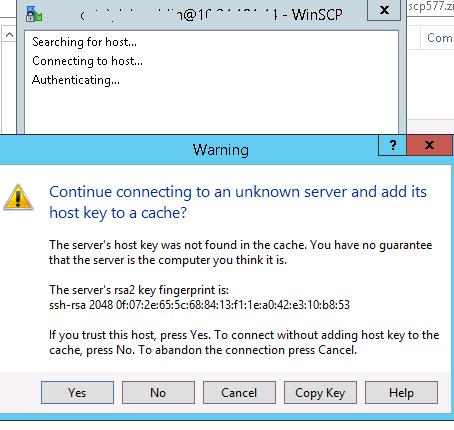
для доменных пользователей), под которой осуществляется подключение (возможно также настроить авторизацию по ключам). При первом подключении появится окно с предупреждением о том, что ключ хоста отсутствует в локальном кеше.
 При первом подключении появится окно с предупреждением о том, что ключ хоста отсутствует в локальном кеше.
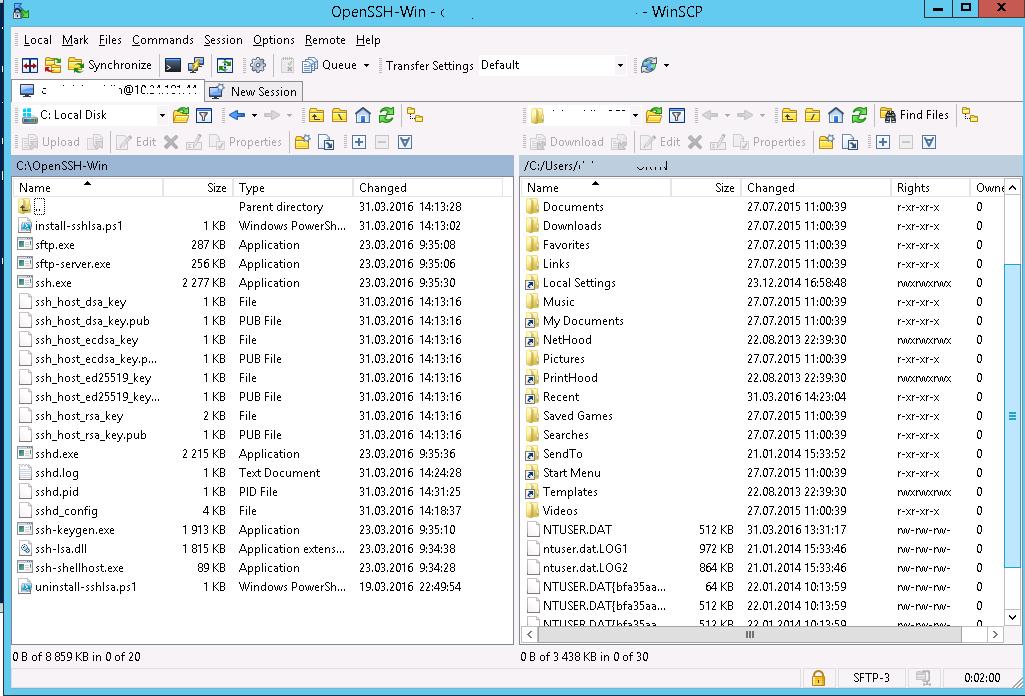
 Если все настроено правильно, клиент должен подключиться к SFTP серверу и отобразить список файлов в домашнем каталоге пользователя (по умолчанию каталог с профилем пользователя).
С помощью привычного интерфейса файлового менеджера можно безопасно копировать файлы между сервером и клиентом по защищённому протоколу SFTP.
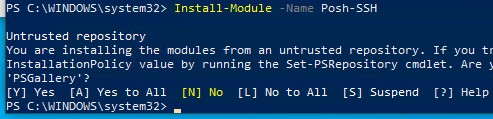
Для подключения к SFTP серверу из PowerShell можно использовать модуль Posh-SSH. Вы можете скачать установить модуль из PowerShell Gallery или офлайн:
Install-Module -Name Posh-SSH
Для подключения к SFTP серверу с помощью пароля, нужно получить имя пользователя и пароль через Get-Credential:
$usrCreds= Get-Credential
Теперь можно подключиться к вашем SFTPS серверу:
$SFTPSession = New-SFTPSession -ComputerName 192.168.13.200 -Credential $usrCreds
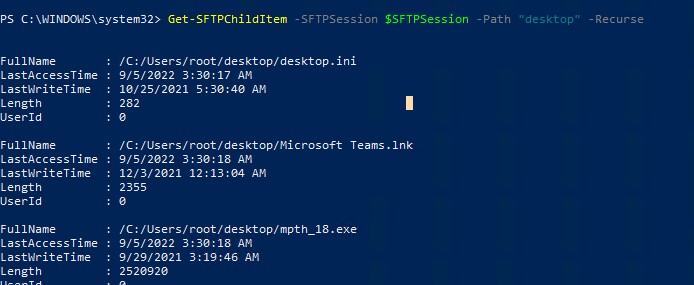
Теперь вы можете вывести список файлов в удаленном каталоге на SFTP сервере. В этом примере я получу список файлов на рабочем столе пользователя (профиль пользователя в этом случае будет являться корнем)
Get-SFTPChildItem -SFTPSession $SFTPSession -Path "desktop" –Recurse
Чтобы скачать файл с удаленного SFTP сервера:
Get-SFTPItem -SessionId $SFTPSession.SessionId -Path "desktop/OpenVPNScript.log" -Destination c:temp
Чтобы закачать файл с вашего компьютера на удаленный SFTP хост:
Set-SFTPItem -SessionId $SFTPSession.SessionId -Path C:Tempmytestfile.log -Destination “desktop”

Завершить SFTP сессию:
Remove-SFTPSession -SFTPSession $SFTPSession
В Windows вы можете использоваться встроенную утилиту sftp.exe (устанавливается вместе с клиентом OpenSSH) для подключения к SFTP серверу.
Подключиться к sftp серверу:
sftp [email protected]
Подключиться с помощью ssh ключа:
sftp -i .ssh/id_rsa [email protected]
Вывести список файлов в удаленном каталоге:
pwd
Скачать файл с SFTP в локальный каталог на ваш компьютер:
get file-test1.txt
Загрузить файл с вашего компьютера на SFTP сервер:
put file-test2.txt
Закрыть сессию:
exit

Настройка SFTP аутентификации по ключам
Вы можете настроить SFTP аутентификацию по ключам. В этом случае при подключении к SFTP серверу вам не нужно будет указывать пароль пользователя.
Подробно настройка SSH аутентификации по ключам описана в этой статье.
Для этого нужно:
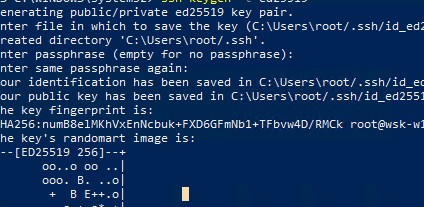
- Создать на вашем компьютере (SFTP клиент) ключи для пользователя, под которым вы будете подключаться к серверу:
ssh-keygen -t ed25519

- Утилита сгенерирует два файла
id_ed25519
(закрытый ключ для клиента) и
id_ed25519.pub
(открытый ключ для сервера); - Теперь нужно добавить ваш SSH ключ на сервер. Скопируйте файл id_ed25519.pub(или id_rsa.pub в зависимости от типа ключа) в каталог .ssh профиля пользователя, под которым вы будете подключаться к SFTP серверу. Переименуйте файл в authorized_keys (например для пользователя alex путь будет выглядеть так:
C:Usersalex.sshauthorized_keys
)
Теперь вы можете использоваться файл id_ed25519 для аутентификации на SFTP сервере в настройках WinSCP (настройки подключения Advanced -> to SSH > Authentication page -> Private key file).
Если вы хотите задать SSH ключ при подключении к SFTP из PowerShell, используйте такую команду:
New-SFTPSession -ComputerName 192.168.13.200 -Credential user1 -KeyFile C:Usersalex.sshid_ed25519" -Verbose
Most people prefer utilities like FileZilla, WinSCP or other FTP programs when they need to transfer files to or from Linux servers. SFTP is a secure alternative to the original FTP protocol. It performs mostly the same functions as its unsecured version, but with an added layer of encryption. To accomplish this, it uses the SSH protocol that provides it with encryption capabilities. Setting up an SFTP server on your Linux system involves multiple steps, which we showcase here.
Content
- What Is SFTP?
- Installing SSH and the OpenSSH Server
- Creating Users, Groups and Directories for SFTP
- Configuring the SSH Server
- (Optional) Changing The SFTP Port
- Logging in and Using the Server
- Frequently Asked Questions
What Is SFTP?
SFTP (Secure File Transfer Protocol) is a network protocol for transferring files from a client to a server. Unlike FTP (File Transfer Protocol), SFTP utilizes the SSH (Secure Shell) protocol to encrypt the data that is sent. It was developed by computer scientists, Tatu Ylönen and Sami Lehtinen, who are also responsible for the development of the SSH protocol in the 1990s. However, the modern version is developed by the IETF (Internet Engineering Task Force).
It can be described as a remote file system protocol, even though its name suggests it only performs file transfer operations. When sending a file using SFTP from a client to a receiving server, the data is encrypted before it is sent to the destination. If the data being sent is intercepted by a “man-in-the-middle,” it can’t easily be decrypted by this third party.
Installing SSH and the OpenSSH Server
We are starting the process of setting up the SFTP server by installing SSH and the OpenSSH server.
Most Linux installations already have SSH installed by default, but in case your system doesn’t have it, you can install it by using the Advanced Packaging Tool’s apt command:
After installing SSH, you can check its version by running the ssh command with the -V flag:

You can install the OpenSSH Server on Debian and Ubuntu systems, for example, by using the apt command:
sudo apt install openssh-server
You can do the same on Arch Linux by using the pacman command:
Creating Users, Groups and Directories for SFTP
It is a common recommendation that different services on Linux should use their own users, groups, and directories.
Start by creating a group for the users of SFTP. This is accomplished by using the groupadd command:
You can create a user and add it to the group that was created by using the useradd command and its -g flag, which is used to specify the group the user will be a part of:
sudo useradd -g sftp_group sftp_user
After creating the user, assign it a password by using the passwd command:

Create the default directory for the newly created user:
sudo mkdir -p /data/sftp_user/uploaded_files
Use the chown command to give the directory the necessary permissions:
sudo chown -R root:sftp_group /data/sftp_user
sudo chown -R sftp_user:sftp_group /data/sftp_user/uploaded_files
Configuring the SSH Server
The next step for setting up an SFTP server is configuring the SSH server it will be using.
Edit the “sshd_config” file found in “/etc/ssh/” so that the user is using the SFTP shell when connecting to the server instead of SSH’s shell.
You can easily edit the file using the commonly used Nano editor found on many Linux installations by default:
sudo nano /etc/ssh/sshd_config
Find the bottom of the file and add the following:
Match Group sftp_group
ChrootDirectory /data/%u
ForceCommand internal-sftp

Restart the SSH service:
sudo systemctl restart sshd
(Optional) Changing The SFTP Port
If you want to change the port the SFTP server is using from the default value of 22 to your chosen option, you’ll need to edit the “sshd_config” file once again.
Once again edit the file by using the Nano editor:
sudo nano /etc/ssh/sshd_config
Find a line in the file with the default port value of 22 commented out:
You can remove the hash (#) sign used to comment out the line and add your choice of port value. In my case, I am changing the value to 1111:
Now simply save the file

and restart the server:
sudo systemctl restart sshd
Logging in and Using the Server
W the server installed and configured, it is ready for use. You can easily upload files and download them, all with an encrypted session provided by SSH.
Before logging in, it won’t hurt to take a look at the manual provided:

Log into the server by providing the username and the server IP or hostname in the following format:
Additionally, you can specify the port your SFTP server is using (default is 22) by utilizing the -P flag:
When you log in, you are greeted with an SFTP shell.
View a manual by typing help.

Downloading Files
To download a file:
get /path/to/file/on/server
Example:
This will download to your current directory – the one you were in locally before you logged in to the server. To download to a specific local directory:
get /path/to/file/on/server /path/to/local/folder
To copy directories, you have to add the -r parameter, which stands for recursive, to the command.
get -r /bin /home/username/Desktop/bin

Remember to add a name for the new directory you want to create locally, like “/home/username/Desktop/bin” in this case. If you use get -r /bin /home/username/Desktop, files will be copied directly on the Desktop. Note that t’s the files that are copied and not the directory itself.
Uploading Files
Uploading files or directories follows the same principles. The only exception is that paths are reversed, meaning you first specify the local file/directory, then the remote path.
To start with, upload files to the server by using the put command:
put /path/to/local/content /path/to/remote/location
When uploading directories (recursive), remember that the same rule from the previous section applies: it’s actually the files in the directory that are copied and not the directory itself. Specify a new name for a directory you want to copy those files to.
put -r /home/username/Desktop/bin bin
This creates a new directory called “bin” on the remote side.
Resume Transfers and Use Paths that Contain Spaces
When you transfer a large file that gets interrupted, you can resume by replacing the previous command with reput and reget. Just make sure you use the same paths you used last time so that the source and destination match exactly.
reget /path/to/file/on/server /path/to/local/file
reput /path/to/local/file /path/to/file/on/server
To resume directory transfers, just add the -r parameter:
reput -r /home/username/Desktop/bin bin
If the path to a file contains spaces, put it within quotes:
put "/home/username/My Documents/Files"
Other Uses
You can list the files and directories by using the ls command:
The permissions of files are also changeable using the chmod command:
chmod <PERMISSION> <FILE>
Additionally, you can create a new directory by using the mkdir command:
Frequently Asked Questions
1. Do I need to install an SFTP client?
In most cases no, since most Linux systems come with a terminal-based SFTP client installed by default.
2. Can I use public-key authentication?
Yes, you can use public-key authentication instead of a password as an authentication method. Setting it up is fairly simple, and it provides additional security for your server.
3. Can I simultaneously host an SSH server?
Yes. However, you will need to make sure that your SFTP server is not using the same port as the SSH server.
Subscribe to our newsletter!
Our latest tutorials delivered straight to your inbox
Windows Server 2019 and Windows 10 (build 1809) have support for OpenSSH out-of-the-box, so there is no need to use any third-party library to run an SSH server or SFTP. In this post, I will demonstrate how to configure an SFTP server in Windows and use it to transfer files.
Contents
- FTPS vs. SFTP
- Install and configure the SFTP server.
- Custom SSH port [optional]
- Allow or deny connections
- Connect to OpenSSH server using SFTP
- Change the default SFTP directory
- Troubleshooting SFTP connections
- Author
- Recent Posts

Surender Kumar has more than twelve years of experience in server and network administration. His fields of interest are Windows Servers, Active Directory, PowerShell, web servers, networking, Linux, virtualization, and penetration testing. He loves writing for his blog.
FTPS vs. SFTP
The File Transfer Protocol (FTP) is no longer considered safe for use as it lacks the ability to encrypt data while it is in transit. If you still use FTP over a traditional FTP port number (TCP 21), all your data and commands are transmitted in clear text. Anyone can intercept this server–client communication, which is a big security concern as per modern IT standards. Two alternatives to FTP exist:
- FTPS (FTP over SSL/TLS)—This method is just like the traditional FTP with the added support of a TLS certificate to offer encryption.
- SFTP (FTP over SSH)—This method uses SSH for transferring files, which encrypts the communication by default.
Although both can serve the purpose of transferring files, they are totally different by design. FTPS is not very firewall friendly and is difficult to configure. Thus, I will focus on SFTP in this post.
I am using two VMs in a lab environment for this demo:
- Windows Server 2022—This will work as an OpenSSH server.
- Windows 10—This will work as a client.
I have also installed the FileZilla FTP client in a Windows 10 VM, which will connect to the OpenSSH server using the SFTP protocol. Of course, you can use WinSCP or any other FTP client that supports the SFTP protocol.
Install and configure the SFTP server.
First, log in to Windows Server VM and enable the optional OpenSSH feature. To do so, launch an elevated PowerShell console, and run the following command:
Add-WindowsCapability -Online -Name OpenSSH.Server~~~~0.0.1.0

Installing an OpenSSH server in Windows using PowerShell
The installation was successful if the output includes Online : True. The command will automatically configure the required firewall rule, so there is nothing you need to do manually.
Now use the following command to change the startup mode of the OpenSSH server service (sshd) to automatic and start it at the same time:
Get-Service -Name "sshd" | Set-Service -Startup "Automatic" -PassThru | Start-Service -PassThru

Change the service start mode and start the service using PowerShell
You can see that the service is now running. The main configuration file of the OpenSSH server on Windows is %ProgramData%sshsshd_config, but Windows can also read the configuration from the user profile (%UserProfile%.sshconfig) if available. Furthermore, it allows you to specify a custom configuration file using the -f switch (e.g., sshd.exe -f «c:usersadministrator.sshcustom_config»).
Custom SSH port [optional]
By default, the OpenSSH server listens on TCP Port 22. But you can change the port to something else by running the following PS command:
(Get-Content "C:ProgramDatasshsshd_config").replace("#Port 22", "Port 2223") | Set-Content "C:ProgramDatasshsshd_config"
Restart-Service "sshd"

Changing the OpenSSH server port on Windows using PowerShell
The first command replaces the port number with the one you specify in the system-wide configuration file (%ProgramData%sshsshd_config), and the second command restarts the service. The following command can be used to make sure the server is now listening on a new port number:
Get-NetTCPConnection -LocalPort 2223 | select Local*, State,`
@{n="ProcessName";e={(Get-Process -Id $_.OwningProcess).ProcessName}},`
@{n="ProcessPath";e={(Get-Process -Id $_.OwningProcess).Path}} | ft -Auto

Verify the custom port of the OpenSSH server using PowerShell
You can see that the OpenSSH server is now listening on Port 2223.
Allow or deny connections
The OpenSSH server in Windows also lets you control which users or groups are allowed to connect to the server (or denied a connection) using SFTP (and SSH). To do so, you can add the following directives to the configuration file:
- DenyUsers
- AllowUsers
- DenyGroups
- AllowGroups
Note that these directives are processed in the same order as written. By default, the OpenSSH server will allow every local or domain user to connect, but if you want to allow (or deny) a particular user or group, specify that in the configuration file, as shown in this line of code:
AllowGroups testlabdevelopers testlabssh_admins
Remember, these allow or deny directives must come before the Match Group administrators directive, as pointed out in the screenshot; otherwise, it won’t work as expected.

Using the SSH configuration file to allow or deny users and groups
Adding the above line inside the SSH configuration file will allow the members of the developers and ssh_admins groups in the TestLab domain to connect, while denying everyone else. It is recommended to specify the account names in lowercase only. Furthermore, to specify a domain account in UPN format, you must replace the @ character with ? to avoid any conflicts with regular Linux patterns. For example, to specify user@domain.com with an allow or deny directive, you must type it as user?domain*.
Connect to OpenSSH server using SFTP
The OpenSSH server is now set to accept connections from the client. Head over to your Windows 10 machine, launch FileZilla, and make a connection to the server with the settings shown in the screenshot.

Connecting to the SFTP server using the FileZilla FTP client
Make sure the protocol SFTP – SSH File Transfer Protocol and the correct SSH server port are specified. When you connect for the first time, you will see an Unknown host key warning. Click OK to trust the host and continue connecting.

The servers host key is unknown. You have no guarantee that the server is the computer you think it is.
You will now be connected to the server using the SFTP protocol, and you can start transferring files.

Using FileZilla client with the SFTP protocol to transfer files
Change the default SFTP directory
By default, you will land in your user profile directory when you connect to the server. However, you can specify a custom directory in the sshd_config file to change the default root directory for SFTP. To do so, open the C:ProgramDatasshsshd_config file on the server in any text editor, and add the following line:
ChrootDirectory "C:inetpubwwwroot"
See the following screenshot for reference:

Change the default SFTP root directory in Windows
Restart the sshd service after making this change, and reconnect the server. You will now land in the specified directory (C:inetpubwwwroot). This is particularly useful on web servers, where you want users to land directly inside the website’s root directory instead of their home directory.

FileZilla FTP client connecting to a predefined root directory in Windows
There are many other settings supported by the OpenSSH server, but covering everything is beyond the scope of this article.
Troubleshooting SFTP connections
If you run into any issues while working with OpenSSH server, you can always view the event logs under Applications and Services Logs OpenSSH, as shown in the following screenshot:

Viewing event logs related to OpenSSH in Windows
The OpenSSH server also supports file-based logging, so if you’re interested in that, add the following lines to the SSH configuration file and restart the sshd service.
SyslogFacility LOCAL0
LogLevel Debug3

Enabling file based debug logging using the OpenSSH configuration file
Once you do this, you will be able to view the debug logs in the %ProgramData%sshlogs directory. As you can see in the following screenshot, the debug log showed that the user testjohn wasn’t able to connect to the server because they are not a member of any group specified in the AllowGroups directive.
Subscribe to 4sysops newsletter!

Viewing OpenSSH debug logs to troubleshoot problems
The procedure described here also allows you to connect to a Windows system using the SSH shell, which means that users who can connect using SFTP can also connect using any SSH client (like putty) and run commands. This is why it is very important to allow only a limited number of groups containing trusted people. I hope this guide helped you get started with SFTP as a safer alternative to an FTP server on Windows.
![]()
Работу с удаленным сервером невозможно представить без безопасной системы передачи файлов между ним и пользователем – и тут без SFTP обойтись сложно. Но чтобы протокол работал корректно, критически важна правильная настройка SFTP с разными версиями как Linux, так и Windows. В этой статье мы расскажем, как сделать это быстро и легко!
- Что такое SFTP?
- Как проходит настройка SFTP?
- Настройка сервера с SSH File Transfer Protocol в Windows
- Вместо P.S.
Что такое SFTP?
SSH File Transfer Protocol – именно так расшифровывается аббревиатура SFTP. В полном названии отлично видна главная особенность протокола: он построен на технологии Secure Shell. За счет этого передача всей информации зашифрована: от файлов до имен пользователей и паролей. Даже в FTPS (FTP с SSL), не говоря уже об обычном FTP, ограничений больше. Кстати, если вникнуть в детали, SFTP вообще не связан с FTP – у них разная технологическая база.
Кроме высокой защищенности SSH File Transfer Protocol имеет и другие плюсы:
- одно соединение и для отсылки файлов, и для команд;
- возможность прерывания и возобновления отправки файлов и их удаления;
- поддержка символических ссылок, списков каталогов, ряда других функций;
- немного более быстрые и стабильные подключение и работа;
- доступная аутентификация через ключ SSH, где нет данных о владельце.
Отдельно надо оговорить: протокол SFTP используется на UNIX-системах, и часто в стандартных утилитах уже есть и клиент, и сервер SSH.
Как проходит настройка SFTP?
Установка и настройка SSH File Transfer Protocol не слишком сложная, но рассказ стоит разделить на два направления – в зависимости от используемой ОС.
Настройка сервера с SSH File Transfer Protocol в Linux
В первую очередь следует установить на стороне сервера OpenSSH и на стороне пользователя SSH-пакет. Первая задача решается такими командами:
- Ubuntu и Debian: sudo apt install openssh-server
- CentOS и RHEL: sudo yum –y install openssh-server openssh-clients
А чтобы организовать доступ с компьютера, нужна команда следующего вида:
- sudo apt install ssh
После этого можно перейти непосредственно к настройке SFTP. Всю работу стоит разделить на несколько этапов:
1. Создание групп и пользователей. Создавая пользователей и разделяя их по группам, вы сможете тонко регулировать их права, возможности и ограничения по доступу к тому или иному каталогу на сервере. Для этого необходимо выполнить:
- создать группу: sudo groupadd GROUPNAME
- добавить в нее пользователя: sudo useradd -g GROUPNAME USERNAME
- задать пароль пользователя: sudo passwd PASSWORD
2. Создание каталогов. Если на сервере есть корневой каталог (назовем его для примера catalog), каждый пользователь может иметь доступ лишь к определенной «своей папке» – именно в нее он попадает при входе. При этом можно настроить SFTP так, чтобы пользователь мог видеть содержимое папки, но файл загружал в отдельный раздел (допустим, zagruzka). Вам понадобятся такие команды:
- sudo mkdir -p /catalog/USERNAME/zagruzka
- sudo chown -R root.GROUPNAME /catalog/ USERNAME
- sudo chown -R USERNAME.GROUPNAME /catalog/USERNAME/zagruzka
3. Настройка sshd_config. Это необходимо для двух задач. С одной стороны, у пользователя будет открываться SFTP (а не обычная оболочка SSH). С другой же, он не сможет подняться в каталоге на уровень выше и видеть разделы для других пользователей. Для этого в файле /etc/ssh/sshd_config добавьте такой код:
Match Group GROUPNAME
ChrootDirectory /catalog/%u
ForceCommand internal-sftp
4. Перезагрузка. Чтобы вся система заработала, остается перезапустить ее:
- sudo systemctl restart sshd
Все – настройка на Linux SFTP завершена! Вход аналогичен такой же команде под SSH. Для управления содержимым сервера используйте специальный синтаксис:
COMMAND [SOURCE] [DESTINATION]
Приведем несколько наиболее используемых примеров:
- загрузка с удаленного сервера на локальный: GET photo1.jpg ~/Photos
- загрузка с локального на удаленный: PUT ~/prices/price.pdf zagruzka/
- удаление файла на удаленном сервере: RM zagruzka/file_325.xlsx
Настройка сервера с SSH File Transfer Protocol в Windows
Изначально настольные и серверные ОС от Microsoft не поддерживали протокол SFTP, потому для работы с ним требовались сторонние инструменты. Но сегодня уже существует официальный пакет для таких задач – Win32-OpenSSH. Запуск и настройка зависят от того, какая версия операционной системы установлена.
1. Windows Server 2019 или Windows 10 1803+
Эти варианты ОС от Microsoft предлагают максимально простой сценарий старта SFTP-сервера, ведь Win32-OpenSSH фактически есть в них. Способов установки два:
- через PowerShell: задайте командлет вида Add-WindowsCapability -Online -Name OpenSSH.Server*
- через интерфейс: Settings » Apps » Optional Features » Add a feature » Open SSH Server » Install
Остается узнать адреса, по которым будет расположено все самое важное:
- исполняемые файлы: C:WindowsSystem32OpenSSH
- конфигурационный файл: C:ProgramDatassh
- лог: C:WindowsSystem32OpenSSHLogssshd.log
- ключи: %USERNAME%.ssh
2. Windows Server 2016/2012 R2
В этой ОС, как и в ранних «десятках», для настройки SFTP надо скачать OpenSSH – вариант для 64-битной системы ищите на GitHub. После распаковки архива в нужный каталог (к примеру, C:catalog_OpenSSH) нужно выполнить ряд процедур:
- Откройте PowerShell под администратором и перейдите в созданный вами ранее целевой каталог командлетом Cd C:catalog_OpenSSH. Затем путь к нему необходимо добавить внести в переменную окружения Path.
- Запустите инсталляцию командой: .install-sshd.ps1 (успешность подтвердит сообщение с зелеными буквами). После этого следует сгенерировать ключи для запуска службы SSH указанием: ssh-keygen.exe -A
- В PowerShell запустите автозапуск службы SSH двумя последовательными командами: Set-Service -Name sshd -StartupType ‘Automatic’ и с новой строки Start-Service sshd.
- Откройте порт TCP 22 для входящего на SSH-сервер трафика. Это можно сделать в брандмауэре через PowerShell командой: New-NetFirewallRule -Protocol TCP -LocalPort 22 -Direction Inbound -Action Allow -DisplayName SSH
- Откройте конфигурационный файл (он расположен в C:ProgramDataSSH) и убедитесь, что в директиве Subsystem sftp корректно указан нужный файл – то есть sftp-server.exe.
После настройки в Windows SFTP остается только внести ряд изменений в файл конфигурации. Приведем несколько стандартных примеров:
- AllowGroups corpadmingroup # открывает доступ к OpenSSH пользователям заданной группы
- AuthenticationMethods password # запрещает SSH-ключи (вход будет только по паролю пользователя)
- ForceCommand internal-sftp #
ChrootDirectory C:inetpubwwwrootftpfolder # создает и задает каталог входа для SFTP-пользователя
После всех корректировок запускайте клиент SFTP (например, WinSCP), вводите в нем тип и имя сервера, учетные данные – и логиньтесь (при первом подключении должно появиться сообщение об отсутствии в кэше ключа хоста). Если открылся привычный интерфейс файл-менеджера с каталогом пользователя на сервере, то значит: все настроено правильно!
Вместо P.S.
Практика показывает: хотя настройка SFTP достаточно проста, во многих случаях у пользователей возникают различные вопросы и нестандартные ситуации. Чтобы разобраться в них, не помешает грамотная помощь – в виде профессиональной техподдержки от провайдера. Мы в компании HostZealot уделяем ей максимум внимания. Заказываете ли вы VPS на Windows или Linux, вы сможете положиться на консультации наших специалистов – они помогут не только с отладкой SSH File Transfer Protocol, но и любыми другими задачами в настройке вашего сервера!
- Содержание статьи
- Создание пользователя для SFTP
- Настройка сервера SSH
- Настройка директорий для пользователя SFTP
- Частые ошибки
- Комментарии к статье ( 9 шт )
- Добавить комментарий
Если по какой-то причине потребовалось дать удаленный доступ к файлам на компьютер под управлением операционной системы из семейства Linux, то безопаснее всего будет это сделать через SFTP. SFTP обозначает SSH File Transfer Protocol, и не имеет никакого отношения к обычному FTP протоколу, а так же в разы безопаснее. Однако, приступим к настройке.
Опубликованные ниже манипуляции проводились с операционной системой Debian 7.
Создание пользователя для SFTP
Создаем нового пользователя:
useradd -m -s /sbin/nologin crazyadmin-m — указывает необходимость создать домашнюю директорию пользователя в каталоге /home;
-s — задает оболочку пользователя — /sbin/nologin запрещает пользователю использовать shell.
crazyadmin — имя пользователя
Устанавливаем созданному пользователю пароль:
passwd crazyadminЕсли что-то пошло не так, то всегда можно удалить пользователя командой userdel username, например:
userdel crazyadminИ создадим для нового пользователя папку chroot, о её предназначении будет рассказано ниже.
mkdir /home/crazysadmin/chrootНастройка сервера SSH
Теперь отправляемся в конфиг SSH — /etc/ssh/sshd_config
Ищем следующую строчку:
Subsystem sftp /usr/lib/openssh/sftp-serverи меняем на
Subsystem sftp internal-sftpТеперь отправляемся в самый конец конфига, и там дописываем:
Match User crazyadmin
        X11Forwarding no
        AllowTcpForwarding no
        AllowAgentForwarding no
        PermitTunnel no
        ForceCommand internal-sftp
        ChrootDirectory %h/chroot
ChrootDirectory — родительский каталог той папки, к которой мы хотим открыть доступ по SFTP. В данном примере используется директория chroot, которая лежит в папке пользователя.
Если на вашем сервере настроен доступ по SSH только через файл ключа, а нужно сделать возможность заходить по паролю, то тогда дописываем еще следующее:
PasswordAuthentication yesЕсли на сервере установлен метод авторизации по паролю, а есть желание сделать более надежную авторизацию через файл ключа, то можно воспользоваться данной статьей.
После завершения всех манипуляций с SSH сервером, его нужно перезагрузить:
service ssh restartНастройка директорий для пользователя SFTP
Отправляемся в директорию /home и там ищем папку свежесозданного пользователя, а в ней папку chroot. Устанавливаем её владельцем пользователя root:
chown root:root /home/crazyadmin/chrootУстанавливаем нужные права на папку:
chmod 755 /home/crazyadminВнимание! Ни в коем случае не следует выставлять ChrootDirectory какие-либо другие права, в таком случае будет выскакивать следующая ошибка: fatal: bad ownership or modes for chroot directory component.
Теперь представим, что нам нужно предоставить доступ к нескольким папкам, и они все лежат за пределами ChrootDirectory. Выход из ситуации следующий:
Допустим нам нужно разрешить доступ к папке /var/www/sysadmin.ru. Создаем в домашнем каталоге пользотвателя /home/crazyadmin папку с названием sysadmin.ru.
mkdir /home/crazyadmin/sysadmin.ruТеперь смонтируем в эту папку ту директорию, доступ к которой нам нужно обеспечить:
mount --bind /var/www/pc.ru/ /home/crazyadmin/pc.ru/chrootВыставляем необходимые для редактирования права для нашей директории /var/www/sysadmin.ru:
chmod 777 /var/www/sysadmin.ru
find /var/www/sysadmin.ru -type f -exec chmod 664 {} +
find /var/www/sysadmin.ru -type d -exec chmod 777 {} +
Если в процессе монтирования директории что-то пошло не так, то можно убрать монтирование командой unmount:
umount /home/crazysyadmin/sysadmin.ruНа этом настройка SFTP сервера завершена.
Частые ошибки
- fatal: bad ownership or modes for chroot directory component — как писалось выше, данная ошибка появляется тогда, когда владельцем ChrootDirectory является не пользователь root, и права не равны 755.
- No supported authentication methods available (server sent public key) — сервер настроен на авторизацию по ключу. Если нужна авторизация по паролю, то в конфиге /etc/ssh/sshd_config нужно поменять значение у переменной PasswordAuthentication с no на yes, а после перезапустить сервер командой service ssh restart.