Introduction
This document describes how to configure a default route or gateway of last resort.
Prerequisites
Requirements
There are no specific requirements for this document.
Components Used
This document is not restricted to specific software and hardware versions. The command outputs shown were taken from a Cisco 3900 Series router with Cisco IOS®Software Release 15M.
The information in this document was created from the devices in a specific lab environment. All of the devices used in this document started with a cleared (default) configuration. If your network is live, ensure that you understand the potential impact of any command.
Conventions
For more information on document conventions, see theCisco Technical Tips Conventions.
Background Information
Default routes are used to direct packets addressed to networks not explicitly listed in the routing table. Default routes are invaluable in topologies where it is not desirable to learn all the more specific networks, as in case of stub networks, or not feasible due to limited system resources such as memory and limited resources.
The next IP commands are used and described in more detail:
-
ip default-gateway
-
ip default-network
-
ip route 0.0.0.0 0.0.0.0
Use Command ip default-gateway
Theip default-gatewaycommand differs from the other two commands as it must be used only be used whenip routingis disabled on the Cisco router. For instance, if the router is a host in the IP world, you can use this command to define a default gateway for it. You can also use this command when your low end Cisco router is in boot mode in order to TFTP a Cisco IOS® Software image to the router. In boot mode, the router does not haveip routingenabled. This example defines the router on IP address 172.16.15.4 as the default route:
ip default-gateway 172.16.15.4
Use Command ip default-network
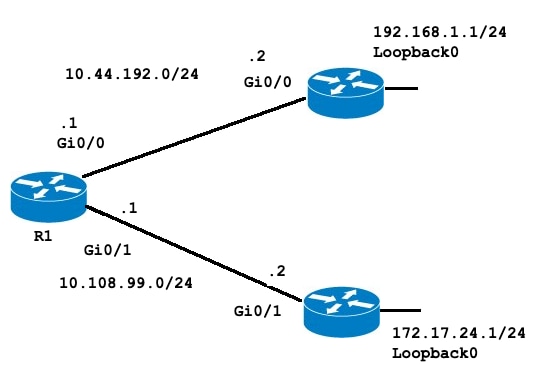
Unlike theip default-gatewaycommand, you can useip default-network whenip routingis enabled on the Cisco router. When you configureip default-networkthe router considers routes to that network for installation as the gateway of last resort on the router. For every network configured withip default-network, if a router has a route to that network, that route is flagged as a candidate default route. This network diagram displays the routing table taken from router R1:
R1#show ip route
Codes: L - local, C - connected, S - static, R - RIP, M - mobile, B - BGP
 D - EIGRP, EX - EIGRP external, O - OSPF, IA - OSPF inter area
 N1 - OSPF NSSA external type 1, N2 - OSPF NSSA external type 2
 E1 - OSPF external type 1, E2 - OSPF external type 2
 i - IS-IS, su - IS-IS summary, L1 - IS-IS level-1, L2 - IS-IS level-2
 ia - IS-IS inter area, * - candidate default, U - per-user static route
 o - ODR, P - periodic downloaded static route, H - NHRP, l - LISP
 a - application route
 + - replicated route, % - next hop override, p - overrides from PfRGateway of last resort is not set 10.0.0.0/8 is variably subnetted, 4 subnets, 2 masks
C 10.44.192.0/24 is directly connected, GigabitEthernet0/0
L 10.44.192.1/32 is directly connected, GigabitEthernet0/0
C 10.108.99.0/24 is directly connected, GigabitEthernet0/1
L 10.108.99.1/32 is directly connected, GigabitEthernet0/1
S 192.168.1.0/24 [1/0] via 10.44.192.2
Notice that the static route to 192.168.1.0 via 10.44.192.2 and that the gateway of last resort is not set. If you configureip default-network 192.168.1.0, the routing table changes as follows:
R1#configure terminal
Enter configuration commands, one per line. End with CNTL/Z.
R1(config)#ip default-network 192.168.1.0
R1(config)#end
R1#
R1#show ip route
Codes: L - local, C - connected, S - static, R - RIP, M - mobile, B - BGP
D - EIGRP, EX - EIGRP external, O - OSPF, IA - OSPF inter area
N1 - OSPF NSSA external type 1, N2 - OSPF NSSA external type 2
E1 - OSPF external type 1, E2 - OSPF external type 2
i - IS-IS, su - IS-IS summary, L1 - IS-IS level-1, L2 - IS-IS level-2
ia - IS-IS inter area, * - candidate default, U - per-user static route
o - ODR, P - periodic downloaded static route, H - NHRP, l - LISP
a - application route
+ - replicated route, % - next hop override, p - overrides from PfRGateway of last resort is 10.44.192.2 to network 192.168.1.0
S* 0.0.0.0/0 [1/0] via 10.44.192.2
10.0.0.0/8 is variably subnetted, 4 subnets, 2 masks
C 10.44.192.0/24 is directly connected, GigabitEthernet0/0
L 10.44.192.1/32 is directly connected, GigabitEthernet0/0
C 10.108.99.0/24 is directly connected, GigabitEthernet0/1
L 10.108.99.1/32 is directly connected, GigabitEthernet0/1
S* 192.168.1.0/24 [1/0] via 10.44.192.2
R1#
R1#show ip protocols
*** IP Routing is NSF aware ***Routing Protocol is "application"
Sending updates every 0 seconds
Invalid after 0 seconds, hold down 0, flushed after 0
Outgoing update filter list for all interfaces is not set
Incoming update filter list for all interfaces is not set
Maximum path: 32
Routing for Networks:
Routing Information Sources:
Gateway Distance Last Update
Distance: (default is 4)R1#
The gateway of last resort is now set as 10.44.192.2. This result is independent of any routing protocol, as shown by theshow ip protocolscommand output no routing protocol is configured. You can add another candidate default route with the configuration of another instance ofip default-network:
R1#configure terminal
Enter configuration commands, one per line. End with CNTL/Z.
R1(config)#ip route 172.17.24.0 255.255.255.0 10.108.99.2
R1(config)#ip default-network 172.17.24.0
R1(config)#end
R1#
R1#show ip route
Codes: L - local, C - connected, S - static, R - RIP, M - mobile, B - BGP
D - EIGRP, EX - EIGRP external, O - OSPF, IA - OSPF inter area
N1 - OSPF NSSA external type 1, N2 - OSPF NSSA external type 2
E1 - OSPF external type 1, E2 - OSPF external type 2
i - IS-IS, su - IS-IS summary, L1 - IS-IS level-1, L2 - IS-IS level-2
ia - IS-IS inter area, * - candidate default, U - per-user static route
o - ODR, P - periodic downloaded static route, H - NHRP, l - LISP
a - application route
+ - replicated route, % - next hop override, p - overrides from PfRGateway of last resort is 10.44.192.2 to network 192.168.1.0
S* 0.0.0.0/0 [1/0] via 10.44.192.2
10.0.0.0/8 is variably subnetted, 4 subnets, 2 masks
C 10.44.192.0/24 is directly connected, GigabitEthernet0/0
L 10.44.192.1/32 is directly connected, GigabitEthernet0/0
C 10.108.99.0/24 is directly connected, GigabitEthernet0/1
L 10.108.99.1/32 is directly connected, GigabitEthernet0/1
172.17.0.0/16 is variably subnetted, 2 subnets, 2 masks
S 172.17.0.0/16 [1/0] via 172.17.24.0
S 172.17.24.0/24 [1/0] via 10.108.99.2
S* 192.168.1.0/24 [1/0] via 10.44.192.2
Note: After theip default-networkcommand was entered you can observe that the network was not flagged as a default network. TheFlag a Default Networksection explains the reason.
Flag a Default Network
Theip default-networkcommand is classful, this means that if the router has a route to the subnet indicated by this command, it installs the route to the major network. At this point neither network has been flagged as the default route. Theip default-networkcommand must be run again, this time with the use of the major network in order to flag the candidate as a default route.
R1#configure terminal
Enter configuration commands, one per line. End with CNTL/Z.
R1(config)#ip default-network 172.17.0.0
R1(config)#end
R1#sh
*Jul 15 22:32:42.829: %SYS-5-CONFIG_I: Configured from console by consoR1#show ip route
Codes: L - local, C - connected, S - static, R - RIP, M - mobile, B - BGP
D - EIGRP, EX - EIGRP external, O - OSPF, IA - OSPF inter area
N1 - OSPF NSSA external type 1, N2 - OSPF NSSA external type 2
E1 - OSPF external type 1, E2 - OSPF external type 2
i - IS-IS, su - IS-IS summary, L1 - IS-IS level-1, L2 - IS-IS level-2
ia - IS-IS inter area, * - candidate default, U - per-user static route
o - ODR, P - periodic downloaded static route, H - NHRP, l - LISP
a - application route
+ - replicated route, % - next hop override, p - overrides from PfRGateway of last resort is 172.17.24.0 to network 172.17.0.0
S* 0.0.0.0/0 [1/0] via 172.17.24.0
10.0.0.0/8 is variably subnetted, 4 subnets, 2 masks
C 10.44.192.0/24 is directly connected, GigabitEthernet0/0
L 10.44.192.1/32 is directly connected, GigabitEthernet0/0
C 10.108.99.0/24 is directly connected, GigabitEthernet0/1
L 10.108.99.1/32 is directly connected, GigabitEthernet0/1
* 172.17.0.0/16 is variably subnetted, 2 subnets, 2 masks
S* 172.17.0.0/16 [1/0] via 172.17.24.0
S 172.17.24.0/24 [1/0] via 10.108.99.2
S* 192.168.1.0/24 [1/0] via 10.44.192.2
If the original static route had been configured to the major network, the previous step would not have been necessary.
There are still no IP Protocols configured in the router, without any dynamic protocols you can configure your router to choose from a number of candidate default routes based on whether the routing table has routes to networks other than 0.0.0.0/0. Theip default-networkcommand allows you to configure robustness into the selection of a gateway of last resort. Rather than the use of static routes to specific next-hops, you can have the router choose a default route to a particular network based in the routing table information.
If you lose the route to a particular network, the router selects the other candidate default. In that scenario, you can then remove the lost route from the configuration as shown in the next output:
R1#configure terminal
Enter configuration commands, one per line. End with CNTL/Z.
R1(config)#no ip route 172.17.24.0 255.255.255.0 10.108.99.2
R1(config)#end
*Jul 15 22:52:59.047: %SYS-5-CONFIG_I: Configured from console by console
After you remove the static route to the network, the routing table looks like this:
R1#show ip route
Codes: L - local, C - connected, S - static, R - RIP, M - mobile, B - BGP
D - EIGRP, EX - EIGRP external, O - OSPF, IA - OSPF inter area
N1 - OSPF NSSA external type 1, N2 - OSPF NSSA external type 2
E1 - OSPF external type 1, E2 - OSPF external type 2
i - IS-IS, su - IS-IS summary, L1 - IS-IS level-1, L2 - IS-IS level-2
ia - IS-IS inter area, * - candidate default, U - per-user static route
o - ODR, P - periodic downloaded static route, H - NHRP, l - LISP
a - application route
+ - replicated route, % - next hop override, p - overrides from PfRGateway of last resort is 10.44.192.2 to network 192.168.1.0
S* 0.0.0.0/0 [1/0] via 10.44.192.2
10.0.0.0/8 is variably subnetted, 4 subnets, 2 masks
C 10.44.192.0/24 is directly connected, GigabitEthernet0/0
L 10.44.192.1/32 is directly connected, GigabitEthernet0/0
C 10.108.99.0/24 is directly connected, GigabitEthernet0/1
L 10.108.99.1/32 is directly connected, GigabitEthernet0/1
S* 192.168.1.0/24 [1/0] via 10.44.192.2
R1#
Use Different Routing Protocols
Gateways of last resort selected via theip default-networkcommand are propagated differently based on which routing protocol is used. For EIGRP there are different methods to Configure a Default Route in EIGRP which are preferred. The default route announced with theip default-networkcommand is not propagated by Open Shortest Path First (OSPF) or by Intermediate System-to-Intermediate System (IS-IS). For more detailed information on behavior of default routes with OSPF, refer toHow Does OSPF Generate Default Routes?.
Use Command ip route 0.0.0.0 0.0.0.0
A static route configured with the command ip route 0.0.0.0 0.0.0.0 is another way to set the gateway of last resort on a router. As with theip default-networkcommand, the use of the static route to 0.0.0.0 is not dependent on any routing protocols. However,ip routingmust be enabled on the router.
Note: EIGRP propagates a route to network 0.0.0.0, but the static route must be redistributed into the routing protocol.
In earlier versions of RIP, the default route created through theip route 0.0.0.0 0.0.0.0was automatically advertised by RIP routers. In Cisco IOS Software Release 12 and later, RIP does not advertise the default route if the route is not learned via RIP. It can be necessary to redistribute the route into RIP.
The default routes configured with theip route 0.0.0.0 0.0.0.0command are not propagated by OSPF and IS-IS. Additionally, this default route cannot be redistributed into OSPF or IS-IS through theredistributecommand. Use the default-information originate command to generate a default route into an IS-IS or OSPF routing domain. For more detailed information about the behavior of default routes with OSPF, please refer toHow Does OSPF Generate Default Routes?. The next output is an example on how to configure a gateway of last resort with the use of theip route 0.0.0.0 0.0.0.0command:
R1#configure terminal
Enter configuration commands, one per line. End with CNTL/Z.
R1(config)#ip route 0.0.0.0 0.0.0.0 10.108.99.2
R1(config)#end
R1#
R1#show ip route
Codes: L - local, C - connected, S - static, R - RIP, M - mobile, B - BGP
D - EIGRP, EX - EIGRP external, O - OSPF, IA - OSPF inter area
N1 - OSPF NSSA external type 1, N2 - OSPF NSSA external type 2
E1 - OSPF external type 1, E2 - OSPF external type 2
i - IS-IS, su - IS-IS summary, L1 - IS-IS level-1, L2 - IS-IS level-2
ia - IS-IS inter area, * - candidate default, U - per-user static route
o - ODR, P - periodic downloaded static route, H - NHRP, l - LISP
a - application route
+ - replicated route, % - next hop override, p - overrides from PfRGateway of last resort is 10.108.99.2 to network 0.0.0.0
S* 0.0.0.0/0 [1/0] via 10.108.99.2
10.0.0.0/8 is variably subnetted, 4 subnets, 2 masks
C 10.44.192.0/24 is directly connected, GigabitEthernet0/0
L 10.44.192.1/32 is directly connected, GigabitEthernet0/0
C 10.108.99.0/24 is directly connected, GigabitEthernet0/1
L 10.108.99.1/32 is directly connected, GigabitEthernet0/1
D 192.168.1.0/24 [90/130816] via 10.44.192.2, 00:20:24, GigabitEthernet0/0
R1#show ip route 0.0.0.0 0.0.0.0
Routing entry for 0.0.0.0/0, supernet
Known via "static", distance 1, metric 0, candidate default path
Routing Descriptor Blocks:
* 10.108.99.2
Route metric is 0, traffic share count is 1
Note:If you configure multiple networks as candidate default routes via theip default-networkcommand, the network that has the lowest administrative distance is chosen as the network for the gateway of last resort. If all the networks have the same administrative distance then the network listed first in the routing table is chosen as the network for the gateway of last resort. If you use both theip default-networkandip route 0.0.0.0 0.0.0.0commands to configure candidate default networks theip route 0.0.0.0 0.0.0.0command, takes precedence and is chosen for the gateway of last resort. If you use multipleip route 0.0.0.0 0.0.0.0commands to configure a default route, traffic is load-balanced over the multiple routes.
Summary
Use theip default-gatewaycommand whenip routingis disabled on a Cisco router. Use theip default-networkorip route 0.0.0.0 0.0.0.0commands to set the gateway of last resort on Cisco routers that haveip routingenabled. The way in which routing protocols propagate the default route information varies for each protocol.
Related Information
- IP Routed Protocols Technology Support Page
- Technical Support — Cisco Systems
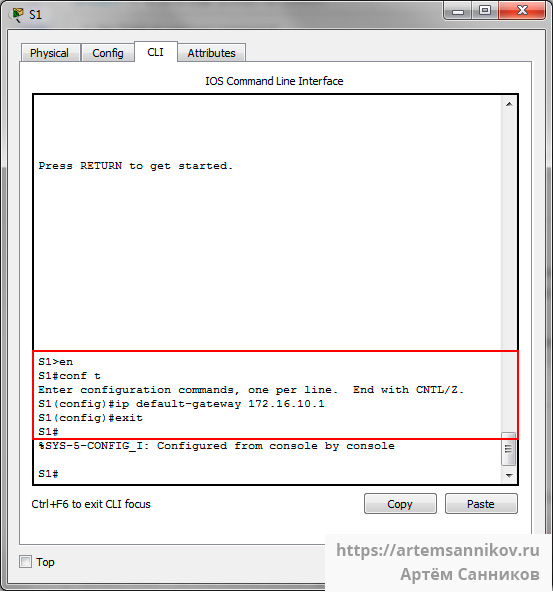
Шлюз по умолчанию для коммутатора. Cisco packet tracer.
Чтобы настроить шлюз по умолчанию на коммутаторе необходимо выполнить команду ip default-gateway в CLI.
S1> en // переходим в привилегированный режим EXEC
S1# conf t // режим глобальной конфигурации
S1(config)# ip default-gateway 172.16.10.1 // устанавливаем шлюз по умолчанию
S1(config)# exit // выход из режима глобальной конфигурации
Результат выполнения команды ip default-gateway.
Метки: Cisco, ip default-gateway, Packet tracer.
Routing is the process of selecting a path along which the data can be transferred from the source to the destination. In this article, we will see default routing and its configuration in the cisco packet tracer.
It is a type of routing which is useful in those cases when the destination network id is unknown to the router. In such cases, the router will use a default route and will send all the incoming traffic to that route, by default. Generally used on the internet where the destinations are unknown. Default Routing is a method wherein a router is configured to ship all of the packets to the equal hop tool, and it would not be counted whether or not it belongs to a specific community or not. a packet is transmitted to the tool for which it’s far configured in default routing.
- We can say that default routing can be considered a special type of static routing.
- The default route is used to send data packets to an unknown target to a single next-hop address.
For more details please refer Types of Routing article.
Default Routing is used while networks address a single go-out point. It is also useful while the bulk of transmission networks need to transmit the information to the equal hop device.
When a particular route is referred to withinside the routing table, the router will pick the particular route as opposed to the default route. The default route is selected most effective whilst a particular route is not referred to in the routing table.
Example: The Address of Yahoo is unknown.
- It is the last preferred routing
- Also can be used at end locations.
- Default routes help in reducing the size of your routing table.
CLI command:
R-1(config)#ip route (any destination) (any subnet mask) (next hop IP address)
R-1(config)#ip route 0.0.0.0 0.0.0.0 10.0.0.2
Steps to Configure the Default Routing in Cisco packet Tracer:
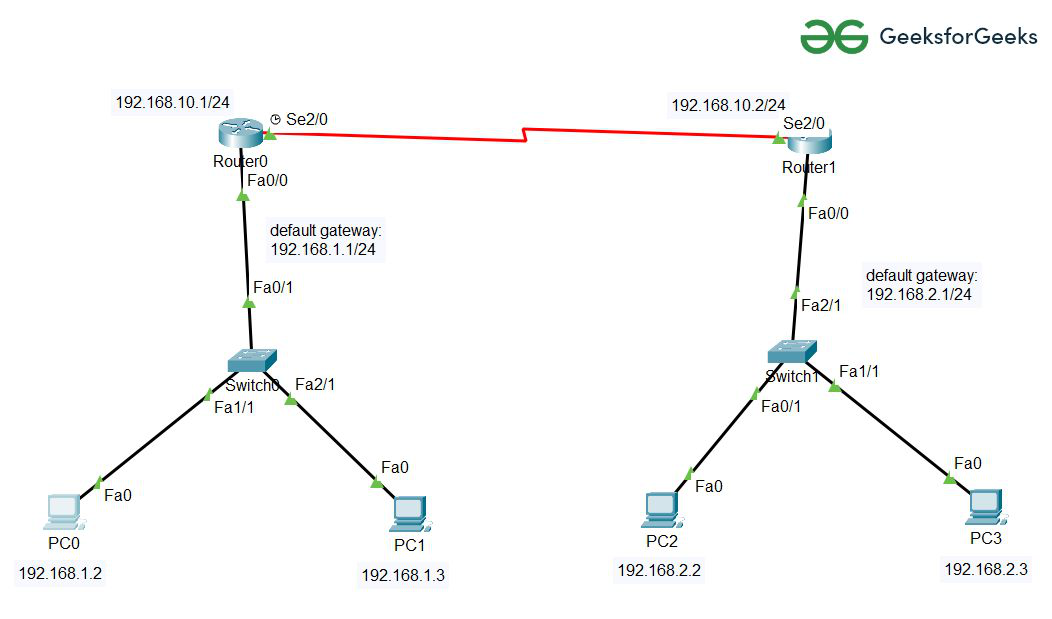
Step 1: First, create a network topology of these given devices listed below in the table:
| S.No | Device | Model name | Quantity |
|---|---|---|---|
| 1. | PC | pc | 4 |
| 2. | Switch | PT-switch | 2 |
| 3. | Router | PT-Router | 2 |
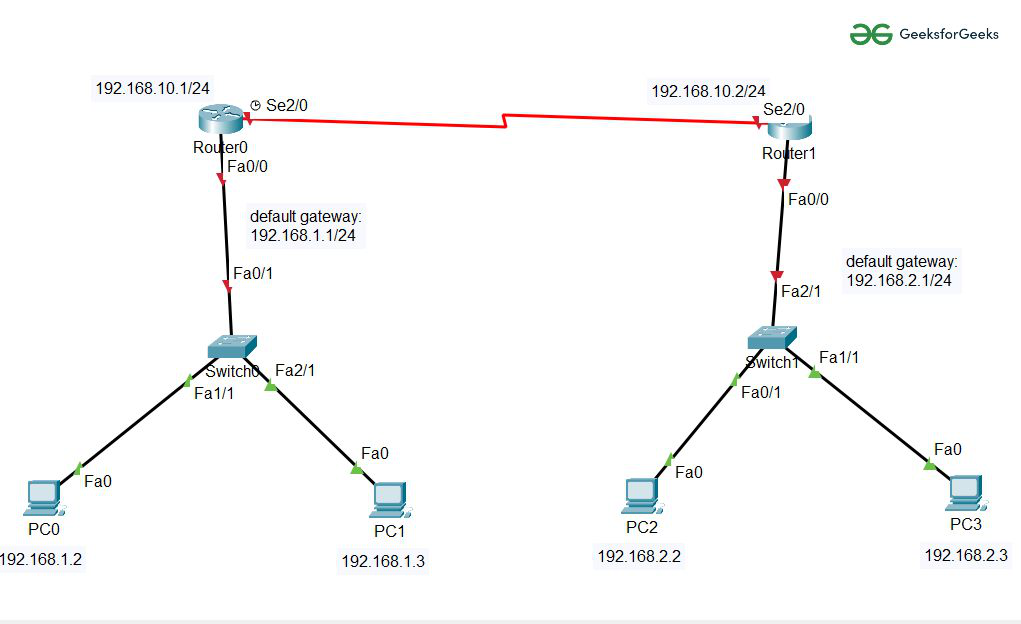
Step 2: Configuring Hosts (PCs) with IP addresses and Default Gateway using IP Addressing table given below:
| Device name | IPv4 Address | Subnet Mask | Default Gateway |
|---|---|---|---|
| PC0 | 192.168.1.2 | 255.255.255.0 | 192.168.1.1 |
| PC1 | 192.168.1.3 | 255.255.255.0 | 192.168.1.1 |
| PC2 | 192.168.2.2 | 255.255.255.0 | 192.168.2.1 |
| PC3 | 192.168.2.3 | 255.255.255.0 | 192.168.2.1 |
To configure PCs follow these steps:
- Click on PC0 then go to desktop.
- Click on IP configuration.
- Then on the static route, fill up the IP configuration according to the IP addressing table given above.
- Repeat the same procedure with other PCs to configure them.
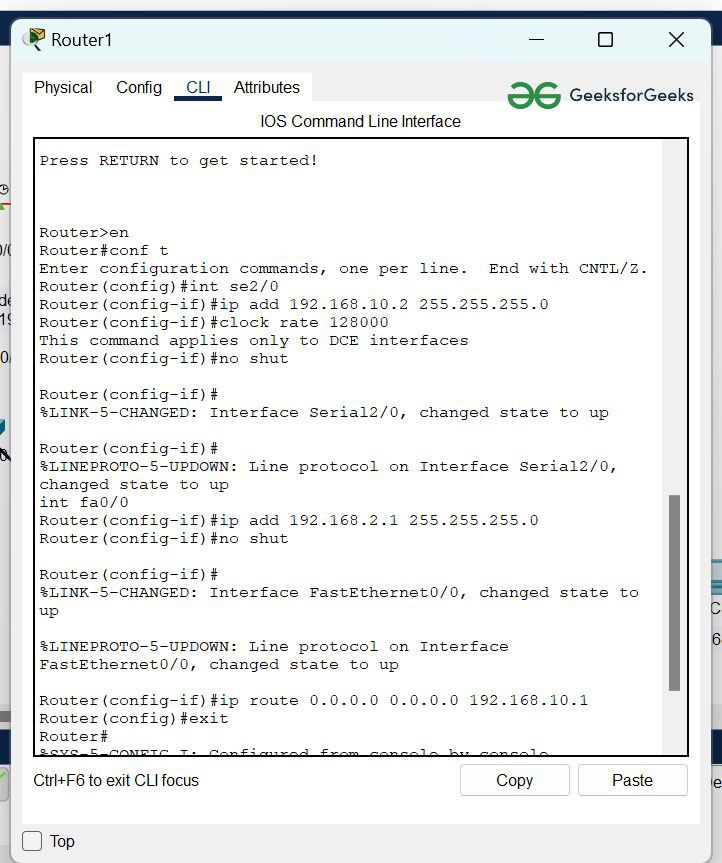
Step 3: Configuring the Interfaces (routers) with IP Addresses and Default gateways and assigning the default routes.
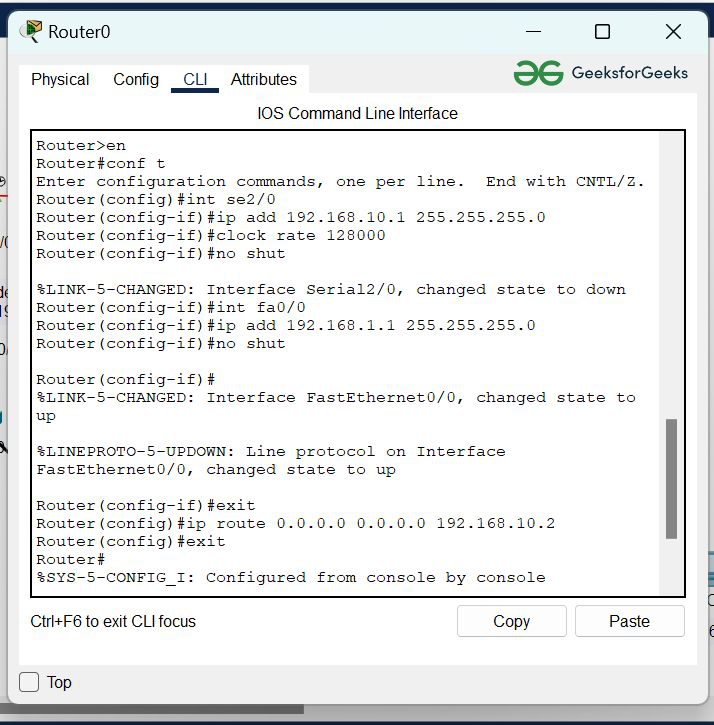
Router0 Configuration:
- Click on router0 then, Go to CLI commands and enter commands to configure them given below.
- Now we will add the IP address of the serial se2/0 and its subnet mask.
- In this step, we will add the IP address of the interface FastEthernet port fa0/0 and its subnet mask.
- Then we need to add Default Routes to configure the router:
R-1(config)#ip route (any destination~reserved)
(any subnet mask~reserved) (next hop IP address)
- Add the IP address of the next hope to connect with another LAN.
Router1 Configuration:
- Click on the router1 then, Go to CLI commands, and enter commands to configure them given below.
- Now, we will add the IP address of the serial se2/0 and its subnet mask.
- Second, we will add the IP address of the interface FastEthernet port fa0/0 and its subnet mask.
- Then we need to add Default Routes to configure the router:
R-1(config)#ip route (any destination~reserved)
(any subnet mask~reserved) (next hop IP address)
- Add the IP address of the next hope to connect with another LAN.
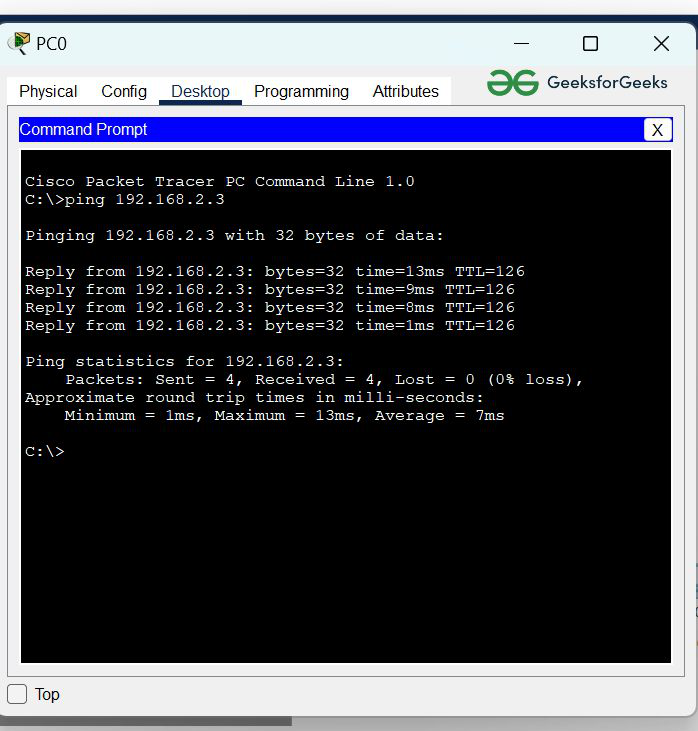
Step 4: After configuring all the devices red indicator turns into green and the network is live so we can send and receive packets.
To verify the network we’ll verify the network by pinging the IP address of the target node in any Host.
- Click on PC0 then, Go to the desktop.
- Click on Command Prompt, and types this command “ping 192.168.2.3“
- In the below image we can see that we getting replies from a targeted node which means the connection is established successfully.
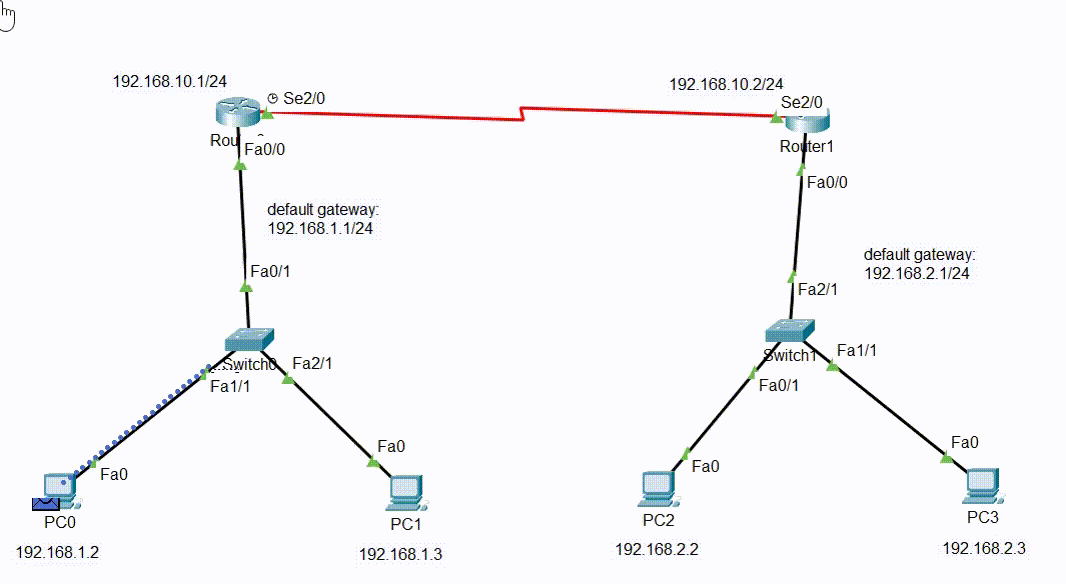
The below representation shows exactly how the packets are moving from the source node to the destination node.
- The PDU packet started moving from PC0 to PC3 and then came backward green tick shows that we are getting replies successfully.
Last Updated :
07 Jun, 2022
Like Article
Save Article
Чтобы направить пакеты адресованные в сети, которые явно не указаны в таблице маршрутизации используется маршрут по умолчанию (Default route). Маршруты по умолчанию доступны в топологиях где не желательно изучение более специфичных сетей, как в случае, конечных тупиковых сетей (stub network) или когда количество системных ресурсов ограничено, например нет достаточно оперативной памяти, чтобы принять все маршруты которые существуют в мире.
Данный документ объясняет как настроить маршрут по умолчанию или шлюз последнего доступа с помощью следующих IP команд:
- ip default-gateway
- ip default-network
- ip route 0.0.0.0 0.0.0.0
IP DEFAULT-GATEWAY
Команда ip default-gateway отличается от двух других команд. Она должна использоваться только в случаях когда ip routing выключен на Cisco маршрутизаторе. Например, если маршрутизатор это хост в мире IP, вы можете использовать данную команду, чтобы определить маршрут по умолчанию для него. Вы можете также использовать эту комнаду, когда ваш маршрутизатор находиться в режиме загрузки (boot mode) для того, чтобы загрузить IOS по протоколу TFTP. В режиме boot у роутера выключен ip routing.
Следующий пример определяет роутер с IP адресом 172.16.15.4 как маршрут по умолчанию
ip default-gateway 172.16.15.4
IP DEFAULT-NETWORK
В отличие от команды ip default-gateway, вы можете использовать команду ip default-network когда на роутере включена маршрутизация. Когда вы настраиваете ip default-network маршрутизатор рассматривает маршруты на такую сеть как шлюз последнего выбора. Для каждой сети настроенной с помощью команды ip default-network, если у роутера есть маршрут на такую сеть , этот маршрут помечается как кандидат в маршрут по умолчанию.
Нижеследующая сетевая диаграмма показывает таблицу маршрутизации взятую с роутера 2513

2513#show ip route
Gateway of last resort is not set161.44.0.0/24 is subnetted, 1 subnets
C 161.44.192.0 is directly connected, Ethernet0
131.108.0.0/24 is subnetted, 1 subnets
C 131.108.99.0 is directly connected, Serial0
S 198.10.1.0/24 [1/0] via 161.44.192.2
Заметим, что статический маршрут на сеть 198.10.1.0 идет через 161.44.192.2 и что шлюз по умолчанию не установлен. Если мы сконфигурируем команду ip default-network 198.10.1.0, таблица маршрутизации измениться на такую
2513#show ip route
Gateway of last resort is 161.44.192.2 to network 198.10.1.0161.44.0.0/24 is subnetted, 1 subnets
C 161.44.192.0 is directly connected, Ethernet0
131.108.0.0/24 is subnetted, 1 subnets
C 131.108.99.0 is directly connected, Serial0
S* 198.10.1.0/24 [1/0] via 161.44.192.2
R1#2513#show ip protocols
2513#
Теперь шлюз последнего выбора установлен на 161.44.192.2. Этот результат независим от любого протокола маршрутизации, как показано в выводе команды show ip protocols ниже. Вы можете добавить другой кандидат в маршрут по умолчанию, настроив другой экземпляр ip default-network
2513#configure terminal
Enter configuration commands, one per line. End with CNTL/Z.
2513(config)#ip route 171.70.24.0 255.255.255.0 131.108.99.2
2513(config)#ip default-network 171.70.24.0
2513(config)#^Z2513#show ip route
Gateway of last resort is 161.44.192.2 to network 198.10.1.0171.70.0.0/16 is variably subnetted, 2 subnets, 2 masks
S 171.70.0.0/16 [1/0] via 171.70.24.0
S 171.70.24.0/24 [1/0] via 131.108.99.2
161.44.0.0/24 is subnetted, 1 subnets
C 161.44.192.0 is directly connected, Ethernet0
131.108.0.0/24 is subnetted, 1 subnets
C 131.108.99.0 is directly connected, Serial0
S* 198.10.1.0/24 [1/0] via 161.44.192.2
Однако, после того как была введена команда ip default-network в выводе выше, сеть не была помечена как сеть по умолчанию. Следующий раздел объясняет почему.
Обозначение сети по умолчанию
Помните, что команда ip default-network является классовой (classfull). Это означает, что маршрутизатор имеет маршрут на подсеть указанную в этой команде, он инсталлирует маршрут на основную сеть. С этого места никакая сеть не обозначается как сеть по умолчанию. Команду ip default-network необходимо ввести еще раз, используя основную сеть, для того, чтобы пометить кандидата в маршрут по умолчанию.
2513#configure terminal
Enter configuration commands, one per line. End with CNTL/Z.
2513(config)#ip default-network 171.70.0.0
2513(config)#^Z2513#show ip routeGateway of last resort is 171.70.24.0 to network 171.70.0.0* 171.70.0.0/16 is variably subnetted, 2 subnets, 2 masks
S* 171.70.0.0/16 [1/0] via 171.70.24.0
S 171.70.24.0/24 [1/0] via 131.108.99.2
161.44.0.0/24 is subnetted, 1 subnets
C 161.44.192.0 is directly connected, Ethernet0
131.108.0.0/24 is subnetted, 1 subnets
C 131.108.99.0 is directly connected, Serial0
S* 198.10.1.0/24 [1/0] via 161.44.192.2
Если же первоначальный статический маршрут указывал на основную сеть, то нет необходимости дважды вводить это команду.
Здесь все еще нет работающих IP протоколов. В отсутствие работающих динамических протоколов вы можете настроить маршрутизатор, чтобы он выбирал маршрут по умолчанию из ряда кандидатов, основываясь на том, имеет ли таблица маршрутизации маршрут на сети отличные от 0.0.0.0/0. Вы можете сделать так, чтобы маршрутизатор выбирал маршрут по умолчанию на определенную сеть проверяя свою роутинговую таблицу, а, не конфигурируя статически маршруты на указанные next-hop.
Если вы потеряли маршрут на определенную сеть , маршрутизатор выберет другой кандидат в маршрут по умолчанию. В следующем примере мы удаляем статический маршрут:
2513#configure terminal
Enter configuration commands, one per line. End with CNTL/Z.2513(config)#no ip route 171.70.24.0 255.255.255.0 131.108.99.2
2513(config)#^Z
2513#
После удаления маршрута на сеть по умолчанию, таблица маршрутизации выглядит так:
2513#show ip routeGateway of last resort is 161.44.192.2 to network 198.10.1.0161.44.0.0/24 is subnetted, 1 subnets
C 161.44.192.0 is directly connected, Ethernet0
131.108.0.0/24 is subnetted, 1 subnets
C 131.108.99.0 is directly connected, Serial0
S* 198.10.1.0/24 [1/0] via 161.44.192.2
2513#
ip route 0.0.0.0 0.0.0.0
Создание статического маршрута на сеть 0.0.0.0 это другой способ установить шлюз последнего выбора для маршрутизатора. Однако, на маршрутизаторе должен быть включен ip routing.
Заметим, что протокол маршрутизации IGRP не понимает маршрут 0.0.0.0. Поэтому он не может вещать маршрут по умолчанию созданный с помощью команды ip route 0.0.0.0 0.0.0.0. Взамен используйте команду ip default-network.
EIGRP может вещать маршрут на сеть 0.0.0.0, но статический маршрут быть впрыснут в протокол маршрутизации командой redistribute.
Маршрут по умолчанию созданный командой ip route 0.0.0.0 0.0.0.0 не распространяется протоколами маршрутизации OSPF и IS-IS. Дополнительно, маршрут по умолчанию не может быть впрыснут в OSPF или IS-IS используя команду redistribute. Для генерации маршрута по умолчанию в роутинговом домене OSPF или IS-IS используйте команду default-information originate.
В следующем примере мы настраиваем шлюз последнего выбора
router-3#configure terminal
Enter configuration commands, one per line. End with CNTL/Z.
router-3(config)#ip route 0.0.0.0 0.0.0.0 170.170.3.4
router-3(config)#^Z
router-3#
router-3#show ip route
Gateway of last resort is 170.170.3.4 to network 0.0.0.0170.170.0.0/24 is subnetted, 2 subnets
C 170.170.2.0 is directly connected, Serial0
C 170.170.3.0 is directly connected, Ethernet0
S* 0.0.0.0/0 [1/0] via 170.170.3.4
router-3#
Если вы настраиваете несколько сетей как кандидаты в маршруты по умолчанию, используя команду ip default-network, сеть которая имеет наименьшую административную дистанцию выбирается как сеть для шлюза последнего выбора. Если сети имеют одну и туже административную дистанцию, тогда первая по списку сеть в таблице маршрутизации (show ip route) выбирается как сеть для шлюза последнего выбора.
Если вы используете обе команды ip default-network и ip route 0.0.0.0 0.0.0.0 для конфигурации кандидатов в сети по умолчанию, и сеть используемая в команде ip default-network известна статически, то сеть определенная в команде ip default-network иметь преимущество и выбирается как сеть для шлюза последнего выбора.
Если же сеть используемая в команде ip default-network доставляется протоколом маршрутизации, то команда ip route 0.0.0.0 0.0.0.0, которая имеет меньшую административную дистанцию, имеет преимущество.
Если вы используете несколько команд ip route 0.0.0.0 0.0.0.0 для конфигурации маршрутов по умолчанию, трафик будет балансироваться по нескольким маршрутам
Источник: blogsvazista.ru/cisco-default-route-ip-commands/
Read the article BASIC CONFIGURATION OF THE CISCO ROUTER. ACCESS TO THE INTERNET in ![]() English
English
Рассмотрим схему подключения офиса к сети Интернет с помощью маршрутизатора Cisco. Для примера возьмем модель Cisco 881. Команды для настройки других маршрутизаторов (1841, 2800, 3825…) будут аналогичными Различия могут быть в настройке интерфейсов, вернее в их названиях и нумерации.
В схеме присутствуют:
- канал в Интернет со статическим адресом
- несколько компьютеров в локальной сети офиса
- маршрутизатор
- коммутатор, который используется для организации локальной сети офиса
Задача: обеспечить доступ компьютеров локальной сети в Интернет.

Шаг 0. Очистка конфигурации
Первое, с чего стоит начать настройку нового маршрутизатора – полностью очистить стартовую конфигурацию устройства. (Выполнять только на новом или тестовом оборудовании!) Для этого нужно подключиться с помощью специального кабеля к консольному порту маршрутизатора, зайти в командную строку и выполнить следующее:
Войти в привилегированный режим(#), возможно потребуется ввести логин/пароль.
router> enable
Удалить стартовую конфигурацию
router# write erase

/подтверждение/
Перезагрузить маршрутизатор
router# reload

/подтверждение/
После выполнения маршрутизатор должен перезагрузиться в течение 3ех минут, а при старте вывести запрос о начале базовой настройки. Следует отказаться.
Would you like to enter the basic configuration dialog (yes/no): no
В текущей конфигурации маршрутизатора будут только технологические строки по умолчанию, и можно приступать к основной настройке.
Шаг 1. Имя устройства
Задание имени маршрутизатора для удобства последующего администрирования выполняется командой hostname «название устройства»
router#conf t

router (config)#hostname R-DELTACONFIG

R-DELTACONFIG(config)#
Шаг 2. Настройка интерфейсов
Необходимо настроить 2 интерфейса: внешний и внутренний.
Через внешний интерфейс будет осуществляться связь с Интернет. На нем будут те ip адрес и маска сети, которые предоставил Интернет провайдер.
Внутренний интерфейс будет настроен для локальной сети 192.168.0.0 /24
Предположим, что оператор связи предоставил нам следующие адреса:
- Сеть 200.150.100.0
- Маска подсети 255.255.255.252 или /30
- Шлюз по умолчанию 200.150.100.1
Настроим внешний интерфейс: зададим ip адрес и сетевую маску, и включим его командой no shut
R-DELTACONFIG#conf t

R-DELTACONFIG (config)#

interface Fa 4

ip address 200.150.100.2 255.255.255.252

no shutdown
После этого соединяем этот интерфейс маршрутизатора с портом оборудования провайдера при помощи прямого патч корда и далее проверяем его доступность командой ping.
Сначала собственный интерфейс
R-DELTACONFIG#ping 200.150.100.2

Type escape sequence to abort.

Sending 5, 100-byte ICMP Echos to 200.150.100.2, timeout is 2 seconds:

!!!!!

Success rate is 100 percent (5/5), round-trip min/avg/max = 1/1/4 ms
Затем соседний адрес — шлюз провайдера
R-DELTACONFIG#ping 200.150.100.1

Type escape sequence to abort.

Sending 5, 100-byte ICMP Echos to 200.150.100.1, timeout is 2 seconds:

!!!!!

Success rate is 100 percent (5/5), round-trip min/avg/max = 2/4/10 ms
Убедившись в доступности шлюза Провайдера, переходим к настройке внутреннего интерфейса.
В локальной сети будет использоваться следующая адресация
- Сеть 192.168.0.0
- Маска подсети 255.255.255.0
- Внутренний адрес маршрутизатора, который выполняет роль шлюза в Интернет для всех хостов в сети, 192.168.0.1
- Диапазон внутренних адресов сети (пользователи, принтеры, серверы и.т.д.) советую начинать с адреса 192.168.0.5
- Максимально возможный доступный для использования адрес в этой сети будет 192.168.0.254
- Адреса с 192.168.0.2 до 192.168.0.4 оставим про запас для непредвиденных технологических нужд
Для настройки внутреннего интерфейса локальной сети следует зайти в режим конфигурирования виртуального интерфейса Vlan 1, задать на нем ip адрес и соотнести ему один из физических интерфейсов маршрутизатора (Fa 0).
R-DELTACONFIG#conf t

interface Vlan 1

Ip address 192.168.0.1 255.255.255.0

no shutdown
Выбираем физический интерфейс маршрутизатора и соотносим его с виртуальным Vlan
interface Fa 0

switchport access vlan 1

no shutdown
Для наглядности:

ip address => interface Vlan X => interface Fastethernet Y
Ip адрес присваивается виртуальному интерфейсу Vlan X, а он привязывается к физическому интерфейсу Fastethernet Y.
Интерфейс маршрутизатора Fa 0 нужно соединить с коммутатором, где располагаются рабочие станции локальной сети или напрямую с рабочей станцией администратора. После этого проверить доступность этого интерфейса маршрутизатора с помощью ping из командной строки.
Шаг 3 Настройка удаленного доступа к маршрутизатору
Получить доступ к консоли маршрутизатора можно не только с помощью консольного кабеля, но и удаленно с помощью протоколов Telnet(данные передаются в открытом виде) или SSH(защищенное соединение).
Рассмотрим настройку безопасного подключения.
Включаем протокол SSH 2 версии и задаем произвольное имя домена
R-DELTACONFIG (config)#

ip ssh ver 2

ip domain-name xxx.ru
Генерируем ключи rsa, необходимые для подключения. При запросе указываем 1024.
crypto key generate rsa

How many bits in the modulus [512]: 1024
Задаем имя пользователя с правами администратора и его пароль (*****)
username admin privilege 15 secret 0 *****
Включаем авторизацию через локальную базу устройства (тот пользователь, которого создали строчкой выше)
line vty 0 4

login local
Задаем пароль на привилегированный режим
enable secret 0 *****
После этого при помощи специальной программы, поддерживающей протокол SSH можно зайти в командную строку маршрутизатора удаленно с любой из рабочих станций локальной сети. При авторизации следует ввести логин и пароль, которые были задан. Подробнее про доступ на устройство по протоколу SSH написано в этой статье.
Шаг 4. Шлюз по умолчанию
Для маршрутизации пакетов в сеть Интернет на устройстве необходимо указать шлюз по умолчанию(default gateway).
R-DELTACONFIG (config)#

ip route 0.0.0.0 0.0.0.0 200.150.100.1
После этого можно проверить не только доступность оборудования провайдера, но и полностью канала в Интернет. Для этого необходимо запустить ping до любого адреса во внешней сети в цифровой форме(DNS для локальной сети лучше настраивать после настройки маршрутизатора). Для примера возьмем адрес лидера на рынке ping – www.yandex.ru (93.158.134.3)
R-DELTACONFIG#ping 93.158.134.3

Type escape sequence to abort.

Sending 5, 100-byte ICMP Echos to 93.158.134.3, timeout is 2 seconds:

!!!!!

Success rate is 100 percent (5/5), round-trip min/avg/max = 1/5/10 ms
Важно!
Обратите внимание, что на данный момент ping внешних адресов работает только(!) будучи запущенным из консоли управления маршрутизатором. Рабочие станции локальной сети все еще не имеют доступа в Интернет.
Шаг 5 Настройка трансляции адресов (NAT)
Для доступа в Интернет из локальной сети необходимо динамически транслировать все внутренние адреса в определенный внешний ip адрес. В нашем случае, так как провайдер предоставляет только один внешний адрес 200.150.100.2 (определяется маской подсети /30 в условиях примера), то все адреса локальной сети должны транслироваться в него.
Указываем список внутренних адресов, которые будем транслировать во внешний адрес.
R-DELTACONFIG (config)#

ip access-list standard ACL_NAT

permit 192.168.0.0 0.0.0.255
Указываем внутренний интерфейс для процедуры трансляции
Interface Vlan 1

ip nat inside
Указываем внешний интерфейс для процедуры трансляции
Interface Fa 4

ip nat outside
Создаем правило трансляции (NAT)
ip nat inside source list ACL_NAT interface fa4
В результате должен появиться доступ с любой рабочей станции локальной сети в Интернет при условии, что шлюзом по умолчанию указан внутренний ip адрес маршрутизатора (192.168.0.1). Проверить можно с помощью команды ping до адреса в Интернет из командной строки. Желательно, чтобы проверяемый адрес был в цифровом виде, чтобы исключить потенциальные проблемы с DNS именами.
Важно!
В указанном примере меняется собственный адрес источника. Если в процессе работы необходимо транслировать адрес назначения — пускать траффик на вымышленный адрес, чтобы попасть на некий настоящий, то прочитайте статью ip nat outside.
Важно!
Не стоит оставлять полный доступ в Интернет со всех адресов локальной сети. Советую после проверки работоспособности соединения для безопасности ограничить доступ в Интернет и разрешить его только с конкретных адресов — например с прокси сервера и рабочих станций администратора и/или директора. О том как это сделать можно прочитать в статье «немного об access lists«.
Важно!
Не забудьте сохранить конфигурацию на всех устройствах командой write или copy run start. Иначе после перезагрузки все изменения будут потеряны.
R-DELTACONFIG#write

Building configuration...

[OK]