Тайники (англ. Lost Lewts) – побочное задание в дополнении «The Secret Armory of General Knoxx» в игре Borderlands. Выдаёт устройство-радар в хижине в локации Road’s End. Выполняется там же.
Описание
Вы нашли странное устройство, которое оказалось радаром от Лансера. Инструкция гласит: «Этот радар позволяет найти тайники Атлас, которые, как считается, исчезли во время первой оккупации. При приближении к тайнику, на радаре появятся импульсы. Чем ближе тайнику, тем меньше красный круг на радаре. Когда размер круга будет минимальным, следует выпрыгнуть из машины и раскопать тайник. Если на радаре горит зеленый огонь, значит этот тайник уже раскопан.»
Цели
Главная цель — используй радар, чтобы найти спрятанные тайники.
- Тайник 1
- Тайник 2
- Тайник 3
- Тайник 4
- Тайник 5
Прохождение
Как только вы возьмете радар, идите к станции Тачкомат и берите Лансер. Езжайте к точкам отмеченным на карте. Когда вы будете приближаться к тайнику, на радаре Лансера появятся круги. Чем ближе тайник, тем меньше красный круг на радаре. Тайники — это сундуки Алого копья. Они сильно засыпаны песком, так, что от ящика видны только грани, а то и один угол. Смотрите внимательнее, используйте вид заднего фона на карте для ориентира.
Сообщение при выполнении
Вау! Вы нашли все тайники Атлас! Люди искали их годами. Ничего не хотите продать?
Задание «Тайники» в Borderlands выдается специальным радаром в локации Road’s End. За этот побочный квест можно заработать 4320 баллов опыта, но он доступен только тем персонажам, которые прокачались до 58 уровня.
Главная цель – найти все 5 тайников. Подойдите к Тачкомату и садитесь в бронированный Лансер. Включайте радар, откройте карту и направляйтесь к точкам, появившимся на ней. Когда тайник будет где-то поблизости, на мониторе появятся красные круги, которые будут уменьшаться, по мере приближения к ним. Ящики надежно спрятаны, поэтому их практически невидно под завалами песков, иногда можно разглядеть грани или углы. Как только найдете все тайники, получите награду.

а, так легко их найти. Их вроде всего 5 штук. ставишь на машину солдат спец прибор и ездишь, там на радаре рядом с машиной образуется зеленый круг при нахождении рядом с закопаным ящиком, останавливаешься и ищешь уголок торчащий из песка и открываешь)
- пожаловаться
- скопировать ссылку
Чо за тайники такие?
Это часом не миссия такая в генерале кноксе?
- пожаловаться
- скопировать ссылку

Нет, эти тайники нужно искать на локации Road’s End как я понял, так что это дом это не то. Сам сижу на этом квесте. Надеюсь только на одной локации их нужно искать. Если кто находил покажите пожалуйста на скринах.
- пожаловаться
- скопировать ссылку
В продолжении популярной серии кооперативных шутеров вы сможете исследовать не только Пандору, но и несколько других планет, на каждой из которых можно отыскать массу интересных вещей, начиная от сундуков с ценными предметами и заканчивая именными врагами. Вот только большинство этих сокровищ и событий можно запросто упустить из виду, если не знать об их существовании.
По этой причине мы решили представить карты локаций Borderlands 3, на которых отмечено расположение всех коллекционных вещей, боссов, ресурсов, квестодателей, точек быстрого путешествия, сундуков и множества других важных объектов.
Интерактивная карта мира Borderlands 3
Выше вы можете воспользоваться с интерактивной картой мира, на которой представлены локации всех основных планет (мест):
- Пандора (Pandora)
- Убежище-3 (Sanctuary)
- Прометея (Promethea)
- Афина (Athenas)
- Эдем-6 (Eden-6)
- Некротофейо (Nekrotafeyo)
Пользоваться этой картой легче легкого – просто выберите нужный регион, а затем нажмите на объект, который вы хотите найти. Карта автоматически отобразит его расположение. Можете также вписать название предмета в строку поиска. Вы сможете приближать или удалять карту, используя колесико мышки.
Если карта кажется вам маленькой, то используйте комбинацию Ctrl + колесико мыши, чтобы увеличить страничку сайта. Ниже мы укажем все вещи, которые можно найти на этой карте.
Коллекционные предметы
- Алое радио (Crimson radio)
- Записи Эхо (Echo Log)
- Угон (Hijack Target)
- Тайники Тифона (Typhon Drop)
- Приоритетная цель (Zero Target)
- Мертвый железяка (Dead Claptrap)
- Эридианские скрижали (Eridian Writing)
- Легендарная охота (Legendary Hunt)
- Записи Тифона (Typhon Log)
Добыча
- Боссы (Boss)
- Именные противники (Named Enemy)
- Транспорт (Vehicle)
- Эридий (Eridium)
- Красные сундуки (Red Chest)
- Белые сундуки (White Chest)
Другое
- Квестодатели (Mission Giver)
- Ящики с боеприпасами (Ammo Dump)
- Пасхалки (Easter Egg)
- Точки быстро перемещения (Fast Travel)
- Гаражи (Catch-a-Ride)
- Торговый автомат Маркуса (Marcus Munitions)
Надеемся, что карты локаций Borderlands 3 помогут вам быстро найти необходимый сундук, босса, ресурс или транспортное средство. Отметим, что интерактивная карта постоянно обновляется, поэтому если вы не нашли на ней что-то сейчас, то вполне можете сделать это в будущем.
In the nooks and crannies of Borderlands 3’s planets you’ll find impenetrable caches of loot tantalisingly sealed and cloaked in mystery. How do you open these locked chests? By finding Typhon Logs in almost every area in the game.
Behind all the memes and references, crude humour, and Claptrap ramblings there’s actually a fair amount of lore in Borderlands 3. But whether that’s in tapes that you find lying around or the Typhon Logs hidden across Pandora and beyond, if someone’s jabbering at you over Echo, you might as well open the locked chests and bag some sweet loot at the end of it.
Throughout Borderlands 3 there are three Typhon Logs to find in just about every location, and even some sublocations. Sometimes the Typhon Logs are easy to find, sometimes they’re devilishly hidden just out of reach. And sometimes you’ll have to complete certain story tasks to gain access to the areas they’re hidden inside of.
Here’s how to find the Typhon Logs in Borderlands 3 to open those pesky locked chests!
Borderlands 3 Typhon Logs — How to open locked chests
Pandora Typhon Logs
Borderlands 3 The Droughts Typhon Logs
In total, there are three Typhon Logs to find in The Droughts. Only when you’ve found all three can you open the locked chest.
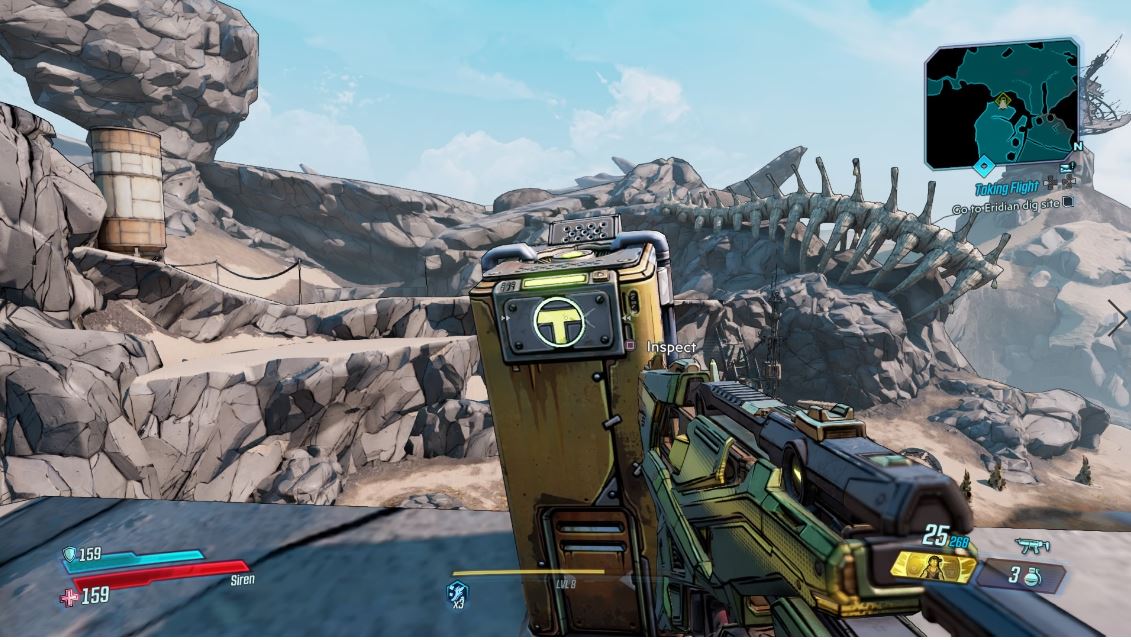
The first just to the northwest of the makeshift Crimson Raiders base in The Droughts — we’ve marked it on the map below:

It’s on the edge of the ridge overlooking the giant monster spine in the distance.
The second one is in the middle of a skag nest on the eastern side of the area.

You have to climb on top of some rocks to reach it.

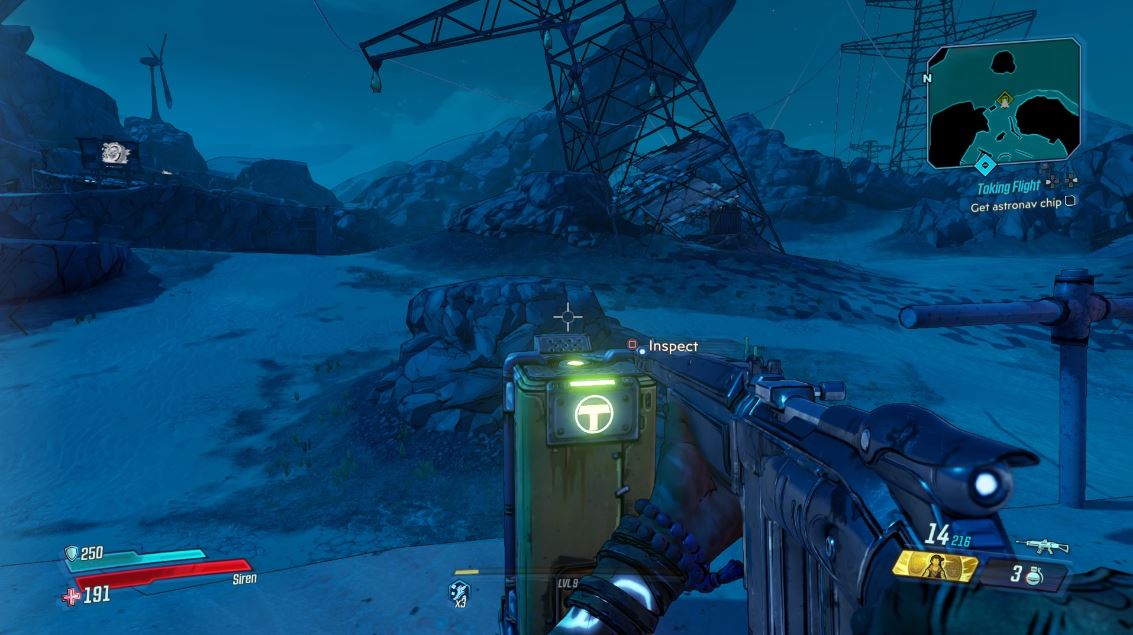
The final Typhon Log is the most difficult to access. It can only be reached during the story mission “Taking Flight”, so play the main missions up to that if you haven’t already.

You’ll find the log overlooking a cliff edge at the back of the encampment where you find the Space Nav Chip.
Once you’ve found all three, you’ll unlock the location of the Typhon Dead Drop — the locked chest.
How to open the locked chest
Once you’ve found all three Logs, head over to the western side of the map marked on the image below:

The chest is in the back corner of this sub-area, and is guarded by a tough enemy. It’s also where you’ll find a Big Succ quest objective.
Borderlands 3 Ascension Bluff Typhon Logs
The Typhon Logs in Ascension Bluff aren’t too difficult to find if you know where to look. The first is to your right as you head forward from the entrance of the area.
It looks out over the edge of the map:

The second is a little further down the road, also looking off the cliffside, but over towards the COV camp:

Finally, the third Typhon Log is to the south of the second one, near the Path of Sacrifice:

The Typhon Dead Drop is then just in front of the COV camp entrance, inside a shipping container:

Promethea Typhon Logs
Borderlands 3 Meridian Outskirts Typhon Logs
Once you reach the second fast travel point in the Meridian Outskirts, go a little further forward and look to your left. There’s a bandit camp build into a bridge here. Go to the southern side, behind the elevator, and mantle up into the ledge to get to the bridge part of the camp. The Typhon Log is off the side of the ledge, so you’ll have to look down and drop down to it:


The second Typhon Log is close to the first. Just a little to the northwest:

The final Typhon Log is around the corner in the second part of the Spillways, looking back out into the road where the Radio Tower challenge is:

You can then find the Typhon Dead Drop in the civilian settlement part of the area. Find the elevator near the map marker. Make it go down but jump out. Then call it back up and jump on top of it before it reaches you:


Borderlands 3 Meridian Metroplex Typhon Logs
In the Merdian Metroplex city area, there are another three Typhon Logs to find. The first is on the eastern side of the city overlooking an underpass:

The second Typhon Log is in the extreme west of the city, next to Meridian Mercantile:

Finally, the last one is up in the north area of the map in front of a bandit camp:

You can then find the Typhon Dead Drop in the centre of the city, but to get up to it you need to go over to the square with the Lectra City map transition in it, jump up onto the wall on the right hand side and run across to the cache:


Borderlands 3 Lectra City Typhon Logs
In Lectra City, there are three more Typhon Logs in the notable areas of the map that are linked to the Killavolt quest. The first is on a little island off the end of the docks area:

The second in close-by, overlooking Big Dock Energy on the mainland bit of the area:

The final Log is on a roof in The Hills where you fight another of the token bearers before Killavolt. You’ll need to jump to the top of the roofs to get there:


You’ll have to do some more parkour to get to the Dead Drop as well. It’s found in the centre of the map:

Borderlands 3 Skywell-27 Typhon Logs
Skywell-27 has some of the most deviously hidden Typhon Logs that we’ve seen so far. You’ll likely get the marker for the first one in Maliwan Modulars before you can get to it. For access, you need to go around to the next area and go inside the tunnel marked “1” to get into the room:


The second Typhon Log is in the area with the stability jets, on some ledges that you have to jump through. To get to this area from the starting area you need to go through the Maintenance Corridor:

Finally, the last one is the most devious. Once you’ve jumped down the shaft to the lower area, you’ll probably find the marker for the last log. To get up to it, you need to go over to the left, climb the ladder, then mantle the ledges across to it:


The Dead Drop is then also found in the lower area, it’s just at the end of a corridor:

Borderlands 3 Atlas HQ Typhon Logs
In the Atlas HQ, the first Typhon Log is up on the balcony overlooking the area where you first fight off Maliwan. To get there you have to run all the way around, through the Ratches, and back across to the other side:

The second is up on the second floor when you go into the labs:

And the final Typhon Log is on the right hand balcony where you fight with the turrets:

Then the Dead Drop is back up on the second floor of the labs:


Borderlands 3 Neon Arterial Typhon Logs
There are three Typhon Logs in the Neon Arterial, but they’re quite easy to find because the area is so linear. The first is just on the left as soon as you get into the area:

Keep going forward in the Neon Arterial until you get to the vending machines, then look to the ledge on the right in the area after:

Then the last is on a left-hand side path towards the end of the area:

The Typhon Dead Drop is then on the right just after:

Borderlands 3 Athenas Typhon Logs
Athenas is a really large area, but still only has three Typhon Logs to find. The first one is in the Stormhaven Square sub-area, on top of a building, near the start of the level:


Then the second one in the graveyard sub-area, Dido’s Remorse:


You can then find the final Typhon Log inside of the Vault after the Captain Traunt fight:

Eden-6 Typhon Logs
Borderlands 3 Floodmoor Basin Typhon Logs
The swamp planet of Eden-6 is home to sprawling area of Floodmoor Basin, where you’ll find three more Typhon Logs amongst the undergrowth. To get to the first Typhon Log, go north from the first fast travel point to the town of Mudhaven. The log is on a raised structure overlooking the pool of water:


In the centre of the map you’ll find the second log, near the bridge that leads to the prison:


Then finally, you’ll find the last Typhon Log in the extreme northwest of the map, near the prison:


The Dead Drop is then in the northeast of the map, nestled behind a hut:

Borderlands 3 The Anvil Typhon Logs
Inside The Anvil prison you’ll come across another three Typhon Logs. Once you’re in the first area, there’s a log on the raised structure on your left:


The second is a little off the beaten track. When you meet up with Meatslab, he’ll open a door so you can meet a demolitions expert. But before you go that way, there’s a side path you can enter full of monster enemies. There’s a Typhon Log just inside here:


Finally, you’ll find another Log on top of a walkway in The Yard. You have to use the outside of the structure to mantle up onto the platform on top:


The Dead Drop is then next to the Vending Machines with the demolitions expert:

Borderlands 3 Jakobs Estate Typhon Logs
The Typhon Logs in the Jakobs Estate are quite straightforward, but there are big gaps between where you find them. From the starting fast travel point, you find the first log near Murl in the Leerly Hamlet:


To get the second Typhon Log, just get to the gates on the outside of the Manor and look to the left hand side:

The final Typhon Log is overlooking the Cabaret theatre where you fight Billy, the Anointed:


You can then pick up the Dead Drop from just around the corner:

Borderlands 3 Voracious Canopy Typhon Logs
Although it looks like a big area, you don’t actually spend that long in the Voracious Canopy map. What’s more, there’s a whole side path with two Typhon Logs that’s completely missable, and the one that is one your way to a story objective is well hidden.
First, there’s a Typhon Log on the left-hand fork of the road just up from where you enter the area. It’s quite a difficult jump to get up to it. Look for a crashed part of a spaceship and then look to your left — there should be some glowing purple trees and some ledges that you can mash the mantle button to try and climb:


The second Typhon Log is further along that left-hand fork. Once you get to the scientific facility, you’ll see a domed structure. The Log is overlooking the left-hand side of the dome:


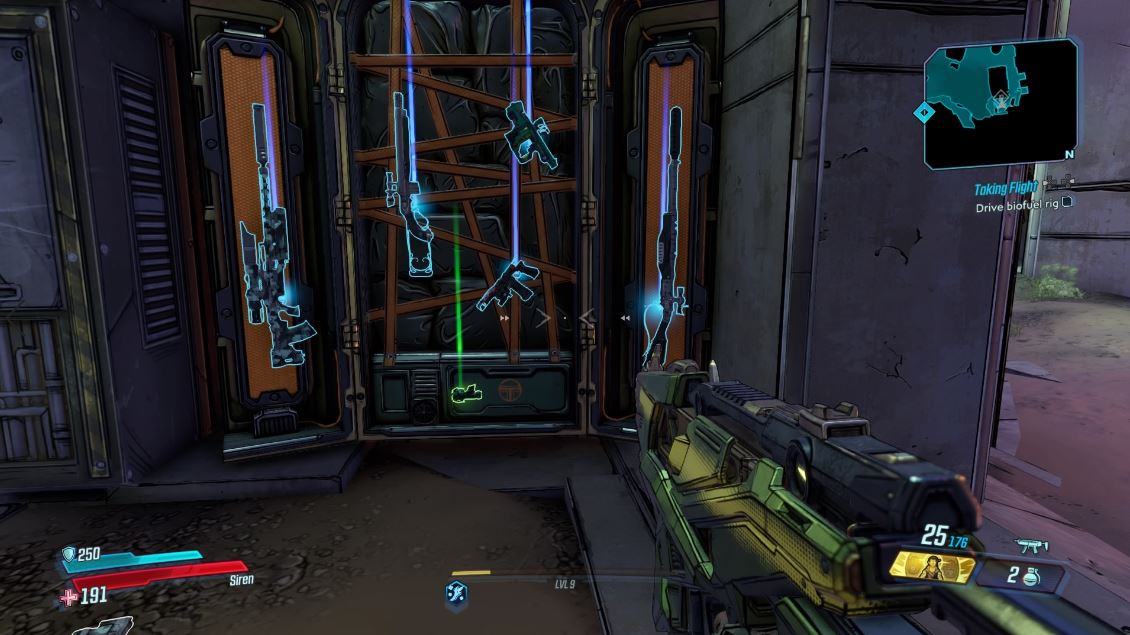
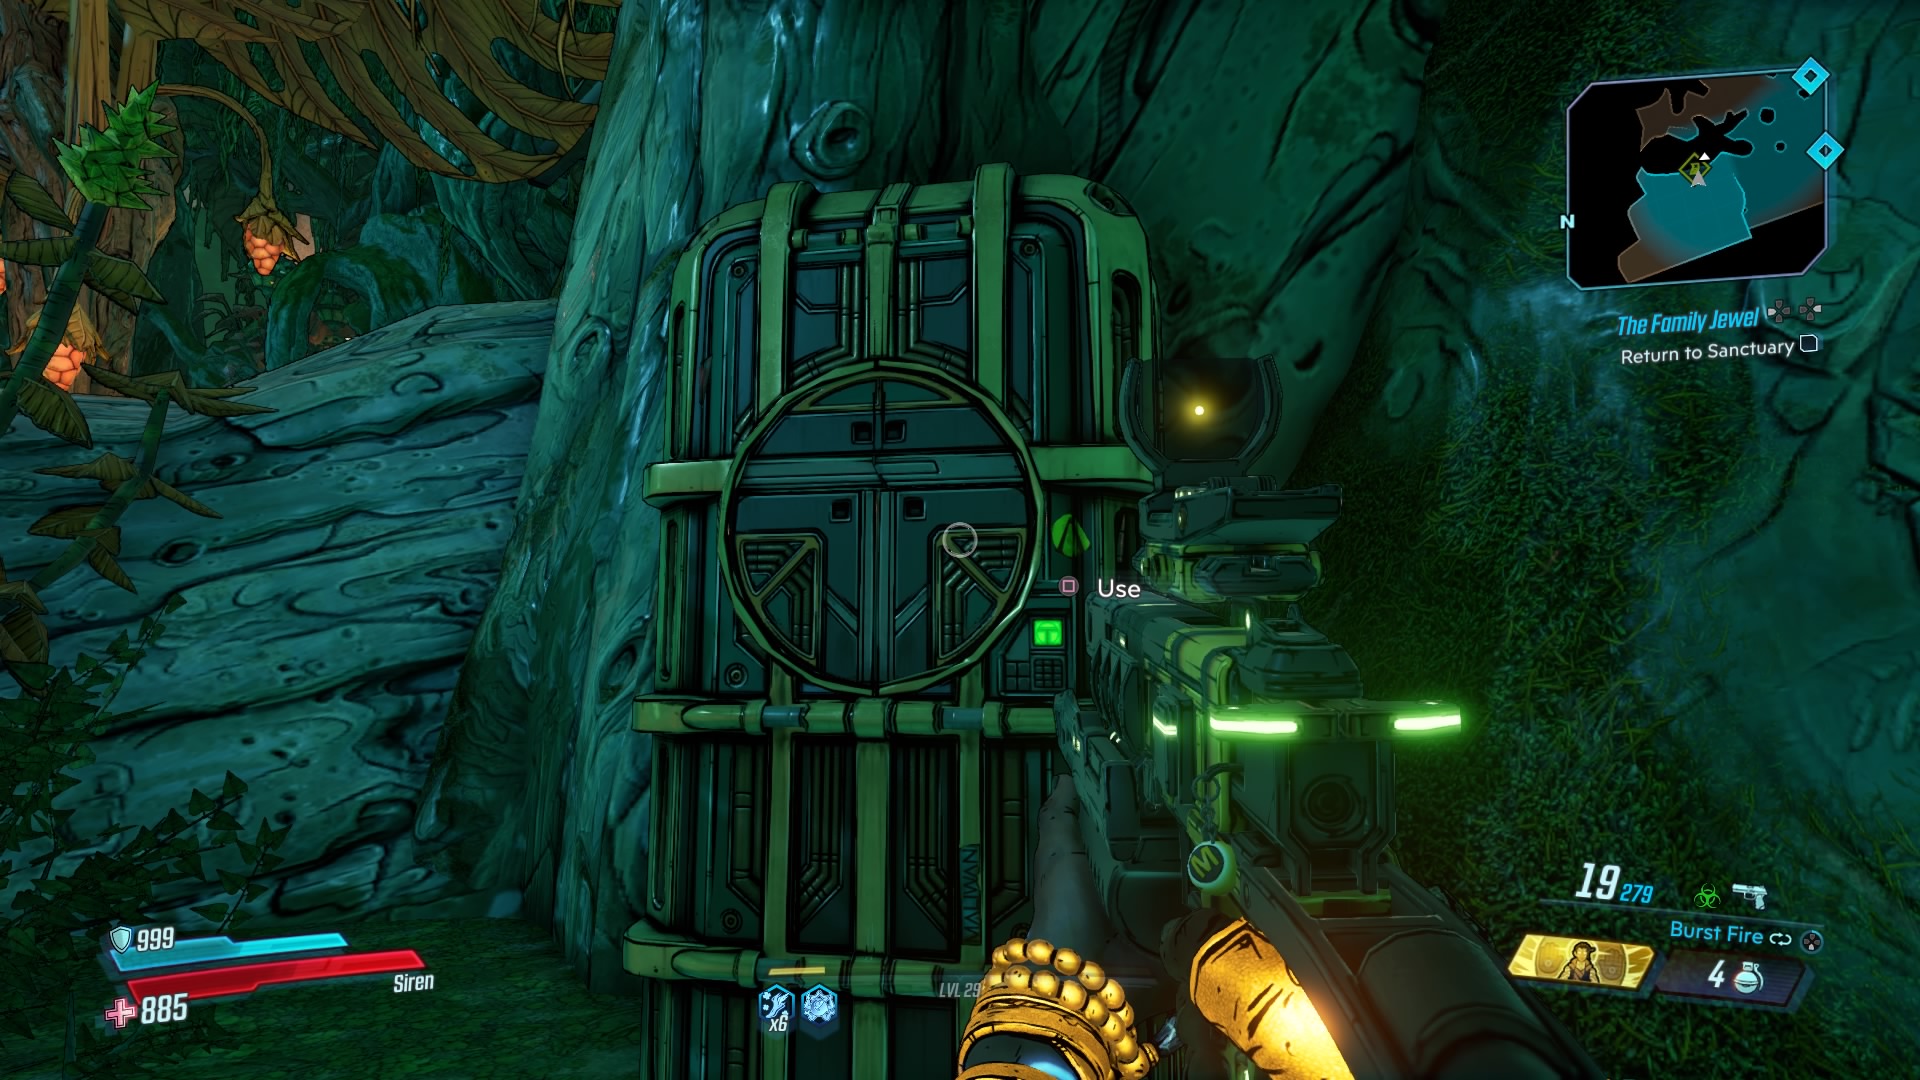
Finally, the last Typhon Log is in the Family Jewel ship. Fight your way through to the second set of vending machines, then look to their right — there should be a side passage you can climb up here. This leads to Jakobs’ private quarters and a Typhon Log:


You can then find the Dead Drop in the far west of the area:

Borderlands 3 Ambermire Typhon Logs
The Ambermire is a huge area, but luckily the Typhon Logs aren’t too hard to find. The first one is just up from where you enter the area, in the middle of the jungle floor:


You’ll find the second Typhon Log just after you’ve visited the Rogue’s hideout in the center of the area. Just wander forward from where you jumped out of the window and you’ll see the Log next to some Eridian Writing:


Then the last Typhon Log for this area is back closer to the hideout, but was inaccessible before because of a locked gate. This time it’s on a raised platform in the swamp water:


Your last stop in the area is the Typhon Dead Drop, which you can find off the edge of the dock area in the top-left corner of the map:


For more on Borderlands 3, take a look at our character builds guide. Or if it’s OP equipment you’re after, here’s how to get the Porcelain Pipe Bomb grenade, Rick and Morty shotgun, and One Punch Man gun!