![]()
Download Article
![]()
Download Article
This wikiHow teaches you how to open the Terminal utility on Mac, which provides Mac users with a way to access and adjust settings of the operating system with text-based commands.
-

1
Click the Finder icon in your dock. It’s a square icon with a half-light blue and half-dark blue smiley face.
- Alternatively, simply click on your desktop wallpaper.
-
2
Click Go in the menu bar. It’s at the top of the screen.
Advertisement
-
3
Click Utilities.
- Alternatively, you can press ⇧ Shift+⌘+U.
-
4
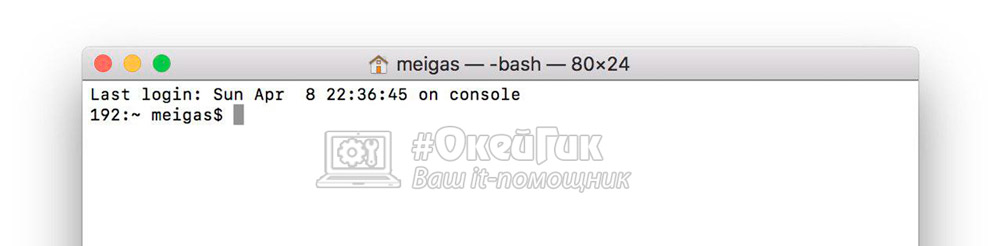
Scroll down and double-click Terminal in the Utilities window. A terminal window will open.


Advertisement
-
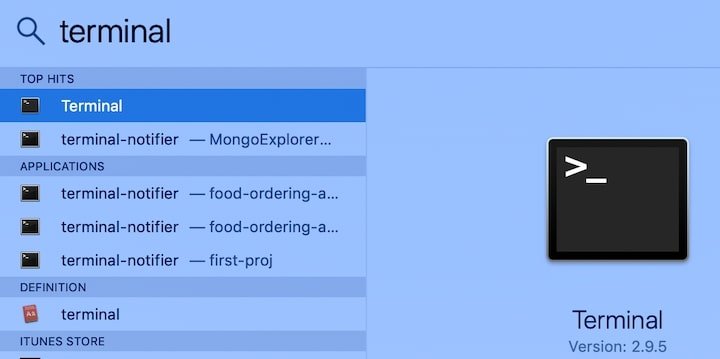
1
Click the Spotlight icon. It’s the magnifying glass in the upper-right corner of the screen.
- Alternatively, you can press ⌘+space.
-
2
Start typing terminal in the search field. Do so until the Terminal icon appears.
-
3
Double-click Terminal. A terminal window will open.


Advertisement
Add New Question
-
Question
What’s the use for spotlight?

Nuclearblowout
Community Answer
Spotlight is used mainly for finding apps quickly. It is much faster then the dock and to use it, just press command and space.
-
Question
How do you find uninstalled apps?
You can find uninstalled apps that you purchased from the App Store by going clicking on your profile picture in the bottom left corner of the App Store and then by seeing purchases.
-
Question
Terminal opens at login, how do I change this to make it stop?
It looks like you have it in Login items to startup on boot. To fix this, open System Preferences, then Users, then choose the User you log into, then Login items. It will display a bunch of apps. To change it, first click on bottom left padlock and enter password to be able to edit settings. Next, select Terminal and/or other apps and press the «-» sign just below the box. That’s it. Try restarting and check.
See more answers
Ask a Question
200 characters left
Include your email address to get a message when this question is answered.
Submit
Advertisement
About This Article
Article SummaryX
1. Click the Finder icon in your dock.
2. Click Go.
3. Click Utilities.
4. Double-click Terminal.
Did this summary help you?
Thanks to all authors for creating a page that has been read 265,847 times.
Is this article up to date?
![]()
Загрузить PDF
![]()
Загрузить PDF
Из этой статьи вы узнаете, как открыть терминал (командную строку) в Mac OS X с помощью Launchpad, Spotlight и Finder. Терминал предоставляет доступ к Unix-компоненте системы Mac OS X, то есть вы сможете управлять файлами, вносить изменения в настройки и запускать скрипты с помощью текстовых команд.
-
1
Откройте Launchpad. Значок этой программы имеет вид серебряной ракеты на сером фоне и находится в доке. Док – это панель инструментов, которая обычно находится в нижней части экрана, хотя ее можно переместить на левую или правую сторону экрана.[1]
- Если вы пользуетесь ноутбуком и хотите открыть Launchpad, щелкните по трекпаду четырьмя пальцами.
- Также можно нажать F4, чтобы открыть Launchpad.
-
2
Щелкните по папке Другие. Ее значок имеет вид квадрата с несколькими мелкими значками.
-
3
Щелкните по Terminal. Откроется окно терминала.
- Если в папке «Другие» значка терминала нет, возможно, его переместили в другую папку. В этом случае воспользуйтесь другим методом.
Реклама


-
1
Щелкните по значку Spotlight. Он выглядит как лупа и расположен в верхнем правом углу экрана. [2]
- Также Spotlight можно открыть, если нажать ⌘ Command+Пробел.
-
2
В строке поиска введите терминал. Значок терминала отобразится в результатах поиска.
-
3
Дважды щелкните по Терминал. Откроется окно терминала.
Реклама


-
1
Откройте Finder. Это значок в виде двуцветного улыбающегося лица, который находится в нижней части экрана.
-
2
Нажмите Программы. Эта опция находится на левой панели Finder.
- Если на левой панели нет опции «Программы», нажмите «Переход» > «Программы» (в верхней части экрана).
-
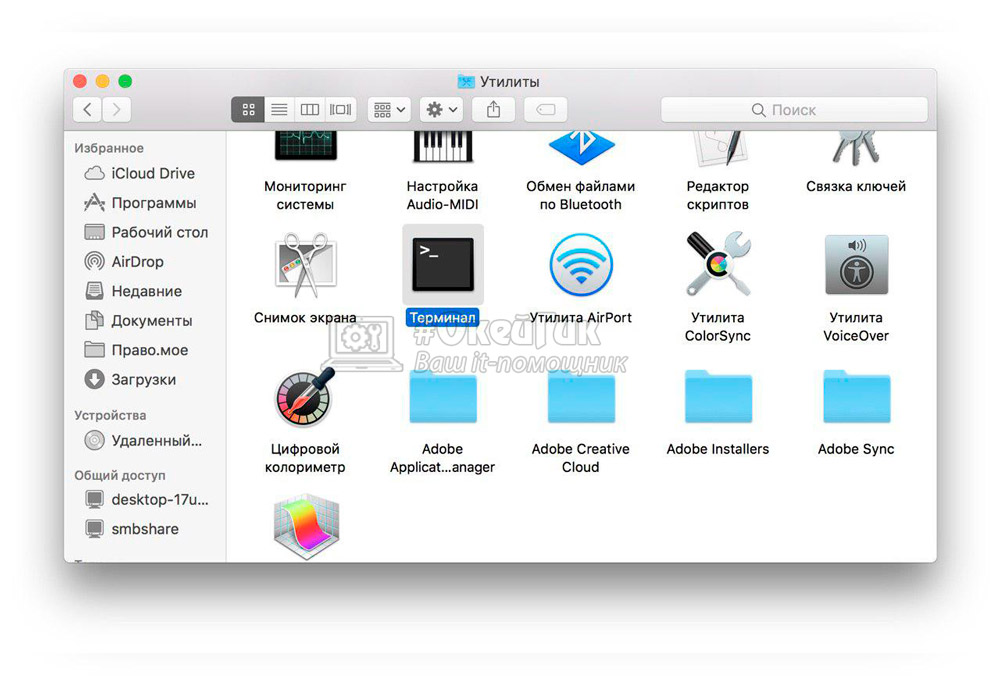
3
Нажмите Утилиты. Прокрутите вниз и найдите утилиту «Терминал».
-
4
Дважды щелкните по Терминал. Откроется окно терминала.[3]
Реклама


Советы
- Чтобы закрыть терминал, нажмите ⌘ Command+Q.
- Чтобы изменить цветовую схему окна терминала, нажмите «Терминал» > «Настройки» (в верхней части экрана). Выберите одну из тем в левой части экрана или настройте цвета на главной панели.
Реклама
Об этой статье
Эту страницу просматривали 89 698 раз.
Была ли эта статья полезной?
Терминал – полезный инструмент для выполнения команд на Mac, хоть им и пользуются далеко не все. В конце концов, ввод команд – это не так просто. В данном разделе нашего сайта вы найдёте много полезных статей с командами для терминала.

Перед тем, как использовать программу, её нужно открыть. Это можно сделать разными способами, и ниже мы расскажем о всех из них.
Использование Поиска Spotlight
Один из самых простых способов открыть Терминал на Mac – с помощью поиска Spotlight.
1) Если на панели меню у вас есть кнопка Поиска Spotlight, нажмите её. Если нет – используйте сочетание клавиш Command + Space.
2) Введите «Терминал».
3) Программа Терминал появится в самом верху меню с результатами. Нажмите её дважды, чтобы открыть.

Использование Finder
Откройте Finder или убедитесь, что для панели меню используется именно Finder, а не другая программа.
1) На панели меню выберите Переход > Утилиты.
2) В папке Утилиты дважды нажмите программу Терминал.

Использование папки Программы
Если у вас уже открыт Finder, программу Терминал можно найти и в папке с Программами.
1) В меню слева выберите Программы.
2) Нажмите стрелочку, чтобы расширить папку Утилиты.
3) Дважды нажмите программу Терминал.

Если папка Программы закреплена в вашем Доке, вы можете открывать Терминал оттуда.
1) Выберите Программы в своём доке.
2) Теперь выберите Утилиты.
3) Откройте программу Терминал.
Использование Launchpad
Вы можете открывать Терминал через Launchpad двумя способами в зависимости от организации Launchpad.
По умолчанию Launchpad содержит папку Другие с программой Терминал.
1) Откройте Launchpad из Дока или сочетанием клавиш Fn + F4.
2) Найдите и выберите папку Другие.
3) Откройте Терминал.

Если вы меняли организацию Launchpad и удалили эту папку, есть другой способ.
1) Откройте Launchpad из Дока или сочетанием клавиш Fn + F4.
2) Введите «Терминал» в строку поиска наверху.
3) Когда появится иконка Терминал, нажмите её.

Использование Siri
Есть максимально простой способ открыть Терминал на Mac – с помощью Siri.
1) Выберите значок Siri на панели меню или откройте Siri из папки Программы.
2) Теперь просто скажите: “Открой Терминал”.

Быстрый доступ к терминалу
Если вы будете часто использовать Терминал, то лучше всего добавить программу прямо в Док.
Когда иконка Терминал будет отображаться в Доке среди недавних программ, делайте следующее:
1) Зажмите клавишу Control и нажмите иконку Терминал в Доке или просто нажмите на неё правой кнопкой мыши.
2) В меню выберите Параметры.
3) Нажмите Оставить в Dock.

Терминал – отличный инструмент для быстрого выполнения команд на Mac. Когда вы привыкните им пользоваться, это не будет казаться вам сложным.
Launchpad Terminal
If you buy through affiliate links, we may earn a commission at no extra cost to you. Full Disclosure Here…
Shortcut to open Terminal on Mac is:
To open Termical on Mac: Press Command (⌘) key and hit the Space bar. In the Spotlight Search bar type “terminal” and hit Enter. This will open Terminal in the current user directory.
I know that a smart reader like you would count the keystrokes and say: “Hey, Al, I have to hit the keyboard 11 times. You promised 4. What happened?”
Well, first, if you hit Command and Space bar, and then type just “t” it is possible that autocomplete function in Spotlight will display Terminal and all you need to hit Enter to start the app. And second, we’re not there yet. We still have some hacks to learn.
I promised, and I will deliver. But now, let’s answer the question that many people ask.
How to open Terminal in the current directory?
Let’s assume you were working with the Finder. Finder is the built-in app which allows users to browse disks and folders on Mac. If you not familiar with the Finder or need a refresher read my post about it:
Windows Explorer for Mac – Easy Guide For PC Switchers
For instance, I created three folders in my Desktop: TestFolder1, TestFolder2, and ScreenShots. And I want to open the Terminal in TestFolder1 directory.
The first approach is to open a Terminal, type cd, and hit Space. Then drag the folder to the Terminal window. This will paste the full path of the folder in the Terminal app. Now if you hit Enter, the current directory will change to TestFolder1.

This technique is also useful when you need to work with the file. For instance, if I had a text file TestFile.txt on the Desktop and I want to open it with built-in nano editor all I need to do is type “nano” and then drag the file to the Terminal window.
However, there is a better way to open the current directory.
- Select the folder you want to open in the Finder.
- Click on Finder menu and scroll to Services item.
- When Services item expands click on New Terminal at Folder.

And this, my dear reader, is how you open the Terminal on Mac in 3 clicks: tap on the folder, click on Finder menu and tap on New Terminal item.
But, what if you don’t see New Terminal option in Services menu? There are two possible reasons for this.
Reason 1. The options were not configured yet. To enable both “New Terminal at Folder” and “New Terminal tab at Folder” go to Finder menu, scroll to Services, and then scroll all the way to the bottom and tap on “Services Preferences.”
Make sure the Shortcuts tab is selected at the top of the pop-up window and click on Services item in the left pane. Scroll and find both options under Files and Folders section in the right pane. Make sure that both options are checked.
How to set a shortcut to open Terminal on Mac
After enabling both “New Terminal at Folder” and “New Terminal tab at Folder” options in the Service Preferences add command shortcuts. By default, the shortcut is none.
Click on “New Terminal at Folder” option and the label will change to Add Shortcut. Tap on Add Shortcut label.
With your left hand press Control, Option (Alt) and Command buttons and hold. Then with the right hand, tap on T key and release all keys.

Now, select any folder in the Finder and use newly created Control+Option+Command+T key combination. This is how you will open a Terminal app in the selected directory in 4 keystrokes!
Here’s the second reason why the New Terminal option is not available in Services (and the key combination isn’t working) – Finder does not allow Services on items in the Sidebar (left pane). So, if you want to open Terminal app in Desktop folder from the Finder’s sidebar, it will not work.
But I happened to know a workaround for this issue. Right-click on the sidebar item, e.g., Downloads or Desktop, and in the context menu select “Show in Enclosing Folder.” Using this feature will reveal the folder in the right pane of the Finder.

Now, you can use Control+Option+Command+T key combination (or Finder->Services menu) to open the Terminal.
How to open Finder from Terminal
But how about the opposite? What if I’ve been switching directories in the Terminal and now I want to reveal my current directory in the Finder app?
It’s super easy. Use open command followed by the directory name. There is a shortcut for the current directory in macOS – a dot symbol. So, to open the current directory in the Finder type “open .“, like this:

Basic navigation commands in Terminal
Since you are planning to use the command line, you need to know some basic commands. There are many commands, but all you need is only three.
PWD
The first command is PWD, which stands for Print Working Directory. If you type it, the command will print the full path of the current folder, so you will never get lost. By the way, all commands are case-insensitive. It means it doesn’t matter if you type pwd or PWD; the result will be the same.
LS
This command will list the current directory contents. So, if you want to know which files and directories locate under the current folder, use this command.
CD
Next command is CD which stands for Change Directory. Before using this command, you have to know the difference between the relative and absolute paths. If the path of the folder in the command starts with slash ‘/’ then it’s an absolute path, i.e., it starts from the root.
Otherwise, the path is relative, i.e., relative to the current folder.
Examples:
cd Desktop will change the current directory to the Desktop folder located in the current directory. If the current directory does not contain Desktop, the result would be an error “No such file or directory.”
cd /Library will change the current directory to Library folder under root (in macOS startup disk level).
There are three handy shortcuts for folder names.
One we already know – ‘.’ is for the current directory. Another one is ‘..’ – two dots. It’s a parent folder. So, if you want to go up in directory tree hierarchy type:
cd ..
Don’t forget the space between cd and dots.
The third shortcut is ‘~’ – tilde, which is used for the home directory. In macOS, it’s /Users/user_name folder (your user folder). So, if you need to go back to home folder type:
cd ~
Using auto-complete in Terminal
Since now you are almost a command line expert, it’s time for a neat productivity hack.
Let’s enable the autocomplete feature:
- Open the Terminal app
- Type nano ~/.inputrc
- Paste the following on separate lines
set completion-ignore-case on
set show-all-if-ambiguous on
TAB: menu-complete
- Hit Control+O to save changes to the file
- Hit Control+X to exit nano
- Hit Command+Q to close the program
Open a new Terminal window and type:
CD
Hit the Space bar
Now, if you hit the Tab key, the Terminal will show the directory or file name located in the current folder. You can also type the first few characters and hit Tab for auto-complete. Every time you hit Tab, the app will rotate and display the next possible directory or file.
This feature is super useful to increase speed when working with directories and reduce spelling mistakes.
Terminal customization
I don’t know about you, but I don’t like the default app theme: black text on a white background. Fortunately, it is easy to change the look and feel of the program.
- Start Terminal
- Goto Terminal menu and click on Preferences
- Click on the Profile tab and select the one you like. I like Pro.
- Click on Default button.
- Close the Preferences window.
- Close the Terminal.
- Start Terminal again with the new profile.

Other ways to open Terminal
As I mentioned earlier, there are multiple ways to open the Terminal. I already described the best ways to do it, but here I want to go over the other options quickly.
Open from Dock
When Terminal is open its icon will appear in the Dock (a bar with all icons usually at the bottom of the screen). Right-click on the app’s icon and in the context menu, click on “Keep in the Dock” option.
From now on, you can open Terminal with one click on the icon.

Open from Finder
- Start Finder
- Click on Applications folder in the Sidebar
- Scroll to Terminal app under the Utilities folder
- Double click on Terminal .app

Now, you know where Terminal is on Mac: in ApplicationsUtilities folder.
Open on Start
If you want the Terminal app to start as soon as you log in, there is a solution for that too.
- Open System Preferences (System Settings on macOS Ventura and above)
- Tap on Users & Groups pane
- Click on the Login Items tab
- Click on the plus icon
- In the open file, dialog locate the app the same way we did in the previous paragraph

Next time, you log in or restart MacBook the Terminal app will start automatically.
Another way opening from Finder
- Start the Finder app
- Click on Go menu
- Scroll to and click on Utilities item
- Find the Terminal in the folder and start it

From Launchpad
Macs have a special place to launch their apps: Launchpad (an icon with rocket picture).
- Click on Launchpad
- Click on Other pane
- Click on Terminal
Bonus
That’s all you need to know to become an expert in Terminal.
In the end, I want you to have some fun and watch a Star War movie. Start the Terminal and paste the following:
telnet towel.blinkenlights.nl
Enjoy!
Topics:
 Опытные пользователи компьютеров наверняка знакомы с таким понятием как Unix. Это группа операционных систем, к которым относятся GNU/Linux, Mac OS, а также многие другие менее известные системы. Одной из особенностей таких групп операционных систем является наличие командной строки. Такая командная строка есть и Mac OS, о чем могут не знать многие пользователи. Через нее можно выполнять различные действия для настройки и отладки работы операционной системы, и она в Mac OS носит название “Терминал”. Рассмотрим в данной статье, как запустить “Терминал” на Mac.
Оглавление:
1. Как открыть терминал на Mac OS
- Через Finder
- Через поиск Spotlight
2. Полезные команды “Терминала” на Mac OS
3. Как ускорить работу Mac OS через “Терминал”
Как открыть терминал на Mac OS
Открыть терминал на операционной системе от Apple можно несколькими способами. Рассмотрим их.
Через Finder
Самый простой способ открыть терминал на Mac OS — это использовать Finder. В операционной системе Mac OS все необходимые программы для работы с системой собраны в папке “Утилиты”, которая располагается в разделе “Программы” папки Finder. Чтобы запустить “Терминал”:
- Перейдите в список утилит операционной системы;
- Далее найдите среди доступных программ “Терминал” и запустите его.

После этого сразу откроется окно терминала, и с ним можно будет начать работы.
Через поиск Spotlight
Владельцы компьютеров на Mac, наверняка, знают, что можно любое приложение открыть через поиск Spotlight.
Чтобы открыть “Терминал” через Spotlight:
- Нажмите на клавиатуре сочетание Command+Пробел;
- Появится строчка поиска. Введите в нее “Терминал”. Операционная система покажет найденные варианты, среди которых программа “Терминал” будет одна из первых. Нажмите на нее, чтобы запустить.


Обратите внимание: Также открыть поиск Spotlight можно, если нажать на соответствующий значок с лупой в правом верхнем углу экрана.
Полезные команды “Терминала” на Mac OS
Открыв программу “Терминал”, можно воспользоваться ее функциональностью, чтобы ускорить работу операционной системы, отключить некоторые активированные по умолчанию функции, настроить интерфейс, узнать техническую информацию о процессах и так далее. Приведем несколько команд “Терминала”, которые полезно знать каждому пользователю операционной системы Mac OS:
- Узнать IP-адрес сайта и проверить ответ сервера. Простая команда, которая позволяет определить, доступен сейчас сайт или нет, а также узнать информацию о времени его отклика и IP. Необходимо использовать команду “ping” и ввести также адрес сайта, к которому идет обращение.
ping www.okeygeek.ru
- Выключить тени на скриншотах. В операционной системе Mac OS удобно реализована функция быстрого создания скриншотов, но по умолчанию при создании скриншотов к ним добавляется тень. Это может не устраивать некоторых пользователей, и у них есть возможность отключить тень через “Терминал”. Для этого введите команду:
defaults write com.apple.screencapture disable-shadow -bool TRUE
После чего подтвердите свои действия командой:
killall SystemUIServer
После этого тени на скриншотах в Mac OS больше не будут отображаться. Если понадобится вновь их включить, используйте вновь указанные команды, но замените True на False.
- Изменение формата скриншота в Mac OS. По умолчанию в операционной системе Mac OS скриншот делается в формате PNG. Если вы хотите это изменить, можно использовать команду:
defaults write com.apple.screencapture type -string «jpg»
Вместо формата JPG можно также указать BMP, GIF, PDF или TIFF.
- Показать скрытые файлы на Mac OS. В операционной системе Windows посмотреть скрытые файлы и папки достаточно просто. На Mac их отображение включается через “Терминал”. Чтобы увидеть, какие элементы в Finder скрыты, выполните команду:
defaults write com.apple.finder AppleShowAllFiles -bool TRUE
Далее потребуется перезапустить Finder, чтобы изменения вступили в силу. Это можно сделать командой:
killall Finder
После выполнения данных действий скрытые файлы на Mac OS будут отображаться.
- Отключить сон в Mac OS. Еще одна полезная команда для пользователей компьютеров под управлением Mac. Как известно, спустя некоторое время бездействия компьютер на Mac OS переходит в спящий режим. Чтобы ему помешать это сделать, можно использовать в “Терминале” команду:
caffeinate
Стоит отметить, что при необходимости команду можно применить, совместно со временем (в секундах), в течение которого компьютер должен бодрствовать. Выглядит подобная команда примерно так:
caffeinate -t 150000
- Включить или отключить частую проверку обновлений Mac OS. Пользователям Windows хорошо знакома проблема с постоянными обновлениями операционной системы. На Mac это происходит значительно реже. Но, если вы хотите полностью отключить обновления, либо сделать их менее регулярными, можно использовать команду:
defaults write com.apple.SoftwareUpdate ScheduleFrequency -int 1
Обратите внимание, что в приведенном выше примере цифра “1” указывает, что проверка обновлений будет проводиться каждый день. Если нужно выполнять поиск актуальной версии ОС раз в год, напишите вместо “1” число “365”.
- Провести стресс-тест компьютера. Для проверки ноутбука на Mac OS может быть полезно выполнить стресс-тест. Команда, чтобы его запустить:
yes > /dev/null &
Завершить процесс можно командой:
killall yes
- Очистка корзины без предупреждения. Всем известно, что при попытке очистить корзину операционная система обязательно потребует подтверждения действий. Это можно исправить через “Терминал” следующей командой:
defaults write com.apple.finder WarnOnEmptyTrash -bool false
После ее выполнения корзина будет очищаться без дополнительных уведомлений.
Как ускорить работу Mac OS через “Терминал”
Выше были рассмотрены многие команды, которые могут быть полезны пользователям компьютеров с настольной операционной системой от Apple. Но есть целая группа команд, которые позволяют ускорить работу интерфейса Mac OS, отключив всевозможную анимацию. Если компьютер достаточно старый, будет полезно использовать все (или большую часть) приведенных ниже команд для ускорения скорости работы системы.
Чтобы Mac OS работала быстрее, выполните в “Терминале” следующие команды:
- Убрать анимацию при открытии данных через Finder:
defaults write com.apple.finder DisableAllAnimations -bool true
- Убрать анимацию, которая возникает при запуске программ, расположенных в панели Dock:
defaults write com.apple.dock launchanim -bool false
- Ускорить открытие панели Dock (может потребоваться, если она у вас убирается, что можно настроить в системе):
defaults write com.apple.Dock autohide-delay -float 0
- Выключить анимацию открытия-закрытия окон:
defaults write NSGlobalDomain NSAutomaticWindowAnimationsEnabled -bool false
- Отключить анимацию, которая возникает при быстром просмотре (например, при быстром просмотре изображений по клавише “Пробел” из Finder):
defaults write -g QLPanelAnimationDuration -float 0
- Ускорить рендеринг страниц в браузере Safari:
defaults write com.apple.Safari WebKitInitialTimedLayoutDelay 0.25
Выполнив описанные выше действия, можно значительно ускорить работу Mac OS.
Стоит отметить, что если после выполнения указанных действий вы захотите вернуть все настройки к дефолтным значениям, это можно сделать при помощи команды:
defaults delete NSGlobalDomain KeyRepeat
![]()
![]()
![]()
![]()
![]() (173 голос., средний: 4,61 из 5)
(173 голос., средний: 4,61 из 5)
![]() Загрузка…
Загрузка…