Use a personal access token in place of a password when authenticating to GitHub in the command line or with the API.
Warning: Treat your access tokens like passwords. For more information, see «Keeping your personal access tokens secure.»
About personal access tokens
Personal access tokens are an alternative to using passwords for authentication to GitHub when using the GitHub API or the command line.
Personal access tokens are intended to access GitHub resources on behalf of yourself. To access resources on behalf of an organization, or for long-lived integrations, you should use a GitHub App. For more information, see «About creating GitHub Apps.»
Types of personal access tokens
GitHub currently supports two types of personal access tokens: fine-grained personal access tokens and personal access tokens (classic). GitHub recommends that you use fine-grained personal access tokens instead of personal access tokens (classic) whenever possible.
Organization owners can set a policy to restrict the access of personal access tokens (classic) to their organization. For more information, see «Setting a personal access token policy for your organization.»
Fine-grained personal access tokens
Fine-grained personal access tokens have several security advantages over personal access tokens (classic):
- Each token can only access resources owned by a single user or organization.
- Each token can only access specific repositories.
- Each token is granted specific permissions, which offer more control than the scopes granted to personal access tokens (classic).
- Each token must have an expiration date.
- Organization owners can require approval for any fine-grained personal access tokens that can access resources in the organization.
Personal access tokens (classic)
Personal access tokens (classic) are less secure. However, some features currently will only work with personal access tokens (classic):
- Only personal access tokens (classic) have write access for public repositories that are not owned by you or an organization that you are not a member of.
- Outside collaborators can only use personal access tokens (classic) to access organization repositories that they are a collaborator on.
- Some REST API operations are not available to fine-grained personal access tokens. For a list of REST API operations that are supported for fine-grained personal access tokens, see «Endpoints available for fine-grained personal access tokens».
If you choose to use a personal access token (classic), keep in mind that it will grant access to all repositories within the organizations that you have access to, as well as all personal repositories in your personal account.
As a security precaution, GitHub automatically removes personal access tokens that haven’t been used in a year. To provide additional security, we highly recommend adding an expiration to your personal access tokens.
Keeping your personal access tokens secure
Personal access tokens are like passwords, and they share the same inherent security risks. Before creating a new personal access token, consider if there is a more secure method of authentication available to you:
- To access GitHub from the command line, you can use GitHub CLI or Git Credential Manager instead of creating a personal access token.
- When using a personal access token in a GitHub Actions workflow, consider whether you can use the built-in
GITHUB_TOKENinstead. For more information, see «Automatic token authentication.»
If these options are not possible, and you must create a personal access token, consider using another service such as the 1Password CLI to store your token securely, or 1Password’s GitHub shell plugin to securely authenticate to GitHub CLI.
When using a personal access token in a script, you can store your token as a secret and run your script through GitHub Actions. For more information, see «Encrypted secrets.» You can also store your token as a Codespaces secret and run your script in Codespaces. For more information, see «Managing encrypted secrets for your codespaces.»
Creating a fine-grained personal access token
Note: Fine-grained personal access token are currently in beta and subject to change. To leave feedback, see the feedback discussion.
-
Verify your email address, if it hasn’t been verified yet.
-
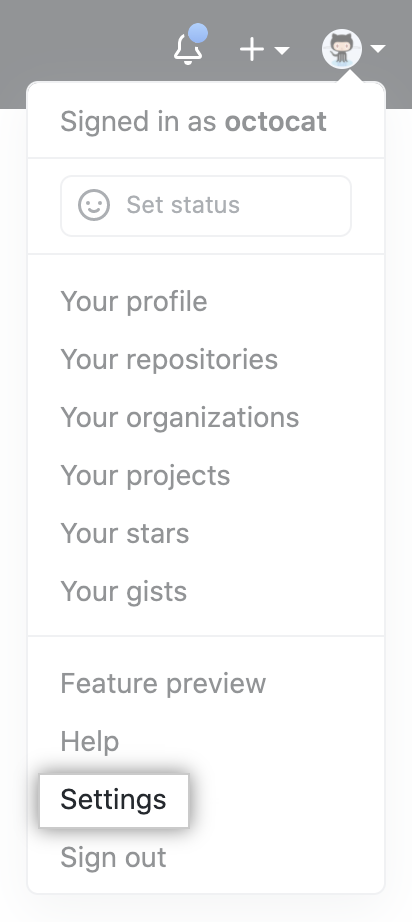
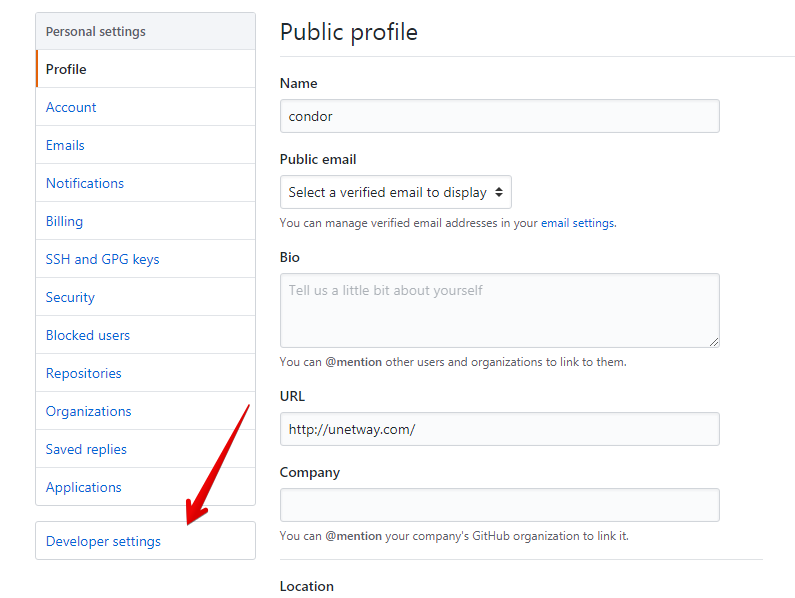
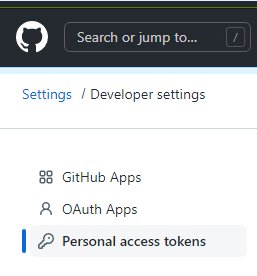
In the upper-right corner of any page, click your profile photo, then click Settings.

-
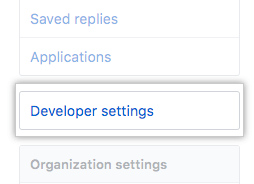
In the left sidebar, click Developer settings.
-
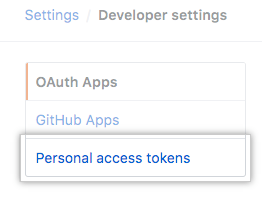
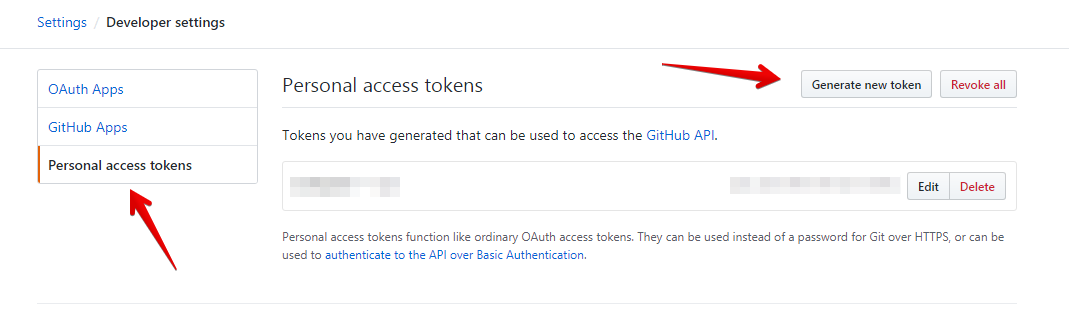
In the left sidebar, under Personal access tokens, click Fine-grained tokens.
-
Click Generate new token.
-
Under Token name, enter a name for the token.
-
Under Expiration, select an expiration for the token.
-
Optionally, under Description, add a note to describe the purpose of the token.
-
Under Resource owner, select a resource owner. The token will only be able to access resources owned by the selected resource owner. Organizations that you are a member of will not appear unless the organization opted in to fine-grained personal access tokens. For more information, see «Setting a personal access token policy for your organization.»
-
Optionally, if the resource owner is an organization that requires approval for fine-grained personal access tokens, below the resource owner, in the box, enter a justification for the request.
-
Under Repository access, select which repositories you want the token to access. You should choose the minimal repository access that meets your needs. Tokens always include read-only access to all public repositories on GitHub.
-
If you selected Only select repositories in the previous step, under the Selected repositories dropdown, select the repositories that you want the token to access.
-
Under Permissions, select which permissions to grant the token. Depending on which resource owner and which repository access you specified, there are repository, organization, and account permissions. You should choose the minimal permissions necessary for your needs. For more information about what permissions are required for each REST API operation, see «Permissions required for fine-grained personal access tokens.»
-
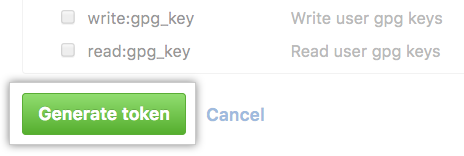
Click Generate token.

If you selected an organization as the resource owner and the organization requires approval for fine-grained personal access tokens, then your token will be marked as pending until it is reviewed by an organization administrator. Your token will only be able to read public resources until it is approved. If you are an owner of the organization, your request is automatically approved. For more information, see «Reviewing and revoking personal access tokens in your organization».
Creating a personal access token (classic)
Note: Organization owners can restrict the access of personal access token (classic) to their organization. If you try to use a personal access token (classic) to access resources in an organization that has disabled personal access token (classic) access, your request will fail with a 403 response. Instead, you must use a GitHub App, OAuth App, or fine-grained personal access token.
Note: Your personal access token (classic) can access every repository that you can access. GitHub recommends that you use fine-grained personal access tokens instead, which you can restrict to specific repositories. Fine-grained personal access tokens also enable you to specify fine-grained permissions instead of broad scopes.
-
Verify your email address, if it hasn’t been verified yet.
-
In the upper-right corner of any page, click your profile photo, then click Settings.
-
In the left sidebar, click Developer settings.
-
In the left sidebar, under Personal access tokens, click Tokens (classic).
-
Select Generate new token, then click Generate new token (classic).
-
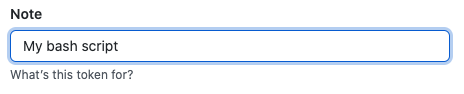
In the «Note» field, give your token a descriptive name.
-
To give your token an expiration, select Expiration, then choose a default option or click Custom to enter a date.
-
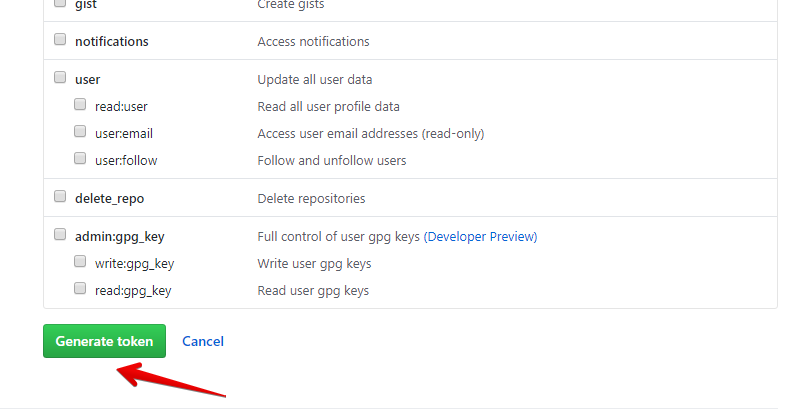
Select the scopes you’d like to grant this token. To use your token to access repositories from the command line, select repo. A token with no assigned scopes can only access public information. For more information, see «Scopes for OAuth Apps».
-
Click Generate token.
-
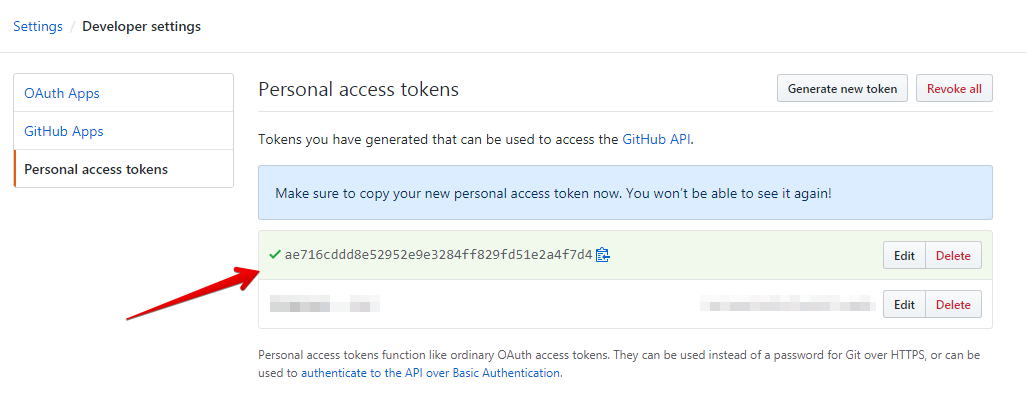
Optionally, to copy the new token to your clipboard, click .
-
To use your token to access resources owned by an organization that uses SAML single sign-on, authorize the token. For more information, see «Authorizing a personal access token for use with SAML single sign-on» in the GitHub Enterprise Cloud documentation.

Using a personal access token on the command line
Once you have a token, you can enter it instead of your password when performing Git operations over HTTPS.
For example, on the command line you would enter the following:
$ git clone https://github.com/USERNAME/REPO.git
Username: YOUR_USERNAME
Password: YOUR_TOKEN
Personal access tokens can only be used for HTTPS Git operations. If your repository uses an SSH remote URL, you will need to switch the remote from SSH to HTTPS.
If you are not prompted for your username and password, your credentials may be cached on your computer. You can update your credentials in the Keychain to replace your old password with the token.
Instead of manually entering your personal access token for every HTTPS Git operation, you can cache your personal access token with a Git client. Git will temporarily store your credentials in memory until an expiry interval has passed. You can also store the token in a plain text file that Git can read before every request. For more information, see «Caching your GitHub credentials in Git.»
Further reading
- «About authentication to GitHub»
- «Token expiration and revocation»
guides
-
Подтвердите свой адрес электронной почты, если он еще не подтвержден.
-
В правом верхнем углу любой страницы щелкните фотографию своего профиля, затем нажмите Settings (Настройки).
- На левой боковой панели нажмите Developer settings (Настройки разработчика).
- На левой боковой панели щелкните Personal access tokens (Личные токены доступа).
- Щелкните Generate new token (Создать новый токен).

- Дайте вашему токену описательное имя (любое, удобное Вам).
- Выберите области или разрешения, которые вы хотите предоставить этому токену. Чтобы использовать свой токен для доступа к репозиториям из командной строки, выберите repo.

- Щелкните Generate token (Создать токен).
- Щелкните кнопку , чтобы скопировать токен в буфер обмена. По соображениям безопасности после того, как вы покинете страницу, вы больше не сможете увидеть токен. Сохраните его в удобном и надёжном месте, чтобы не потерять.
 , чтобы скопировать токен в буфер обмена. По соображениям безопасности после того, как вы покинете страницу, вы больше не сможете увидеть токен. Сохраните его в удобном и надёжном месте, чтобы не потерять.
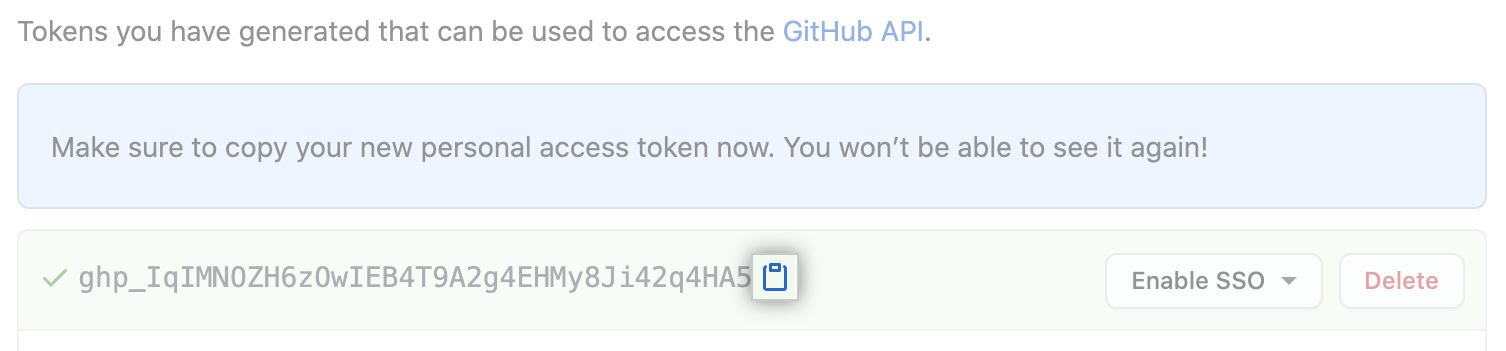
- В дальнейшем, при запросе учетных данных (логина и пароля), вместо пароля указывайте этот токен.
$ git clone https://github.com/username/repo.git
Username: ваш юзернейм
Password: токен, который вы сгенерировали
Предупреждение: относитесь к своим токенам как к паролям и держите их в секрете. Обязательно сохраните токен и не теряйте его! При утере проделайте все шаги заново.
Оригинал
Half the point of passwords is that (ideally) you memorize them and the system hashes them, so therefore they’re never stored anywhere in plain text.
Yet GitHub’s personal access token system seems to basically force you to store the token in plain text?
First, a PAT (Personal Access Token) is not a simple password, but an equivalent that:
- you can generate multiple time (for instance, one per machine from which you need to access GitHub repository)
- you can revoke at any time (from the GitHub web interface), which makes that PAT obsolete, even if it lingers around on one of those machines.
That differs from your password, which is unique to your account, and cannot be easily changed without having to also modify it everywhere you happen to use it.
Since a PAT can be used in place of a password when performing Git operations over HTTPS with Git on the command line or the API, you can use a git credential helper to cache it securely.
On Windows, for instance, that would use the Windows Credential Manager, through the GCM — Git Credential Manager — for Windows, Mac or Linux:
git config --global credential.helper manager-core
# Git 2.39+
git config --global credential.helper manager
(manager-core is being replaced by/renamed as manager for Git 2.39+, Q4 2022)
The first time you are pushing to a repo, a popup will ask for your credentials: username and your PAT.
The next time, it won’t ask, and reuse directly that PAT, which remains stored securely in your Credential Manager.
A similar idea applies for Mac with the OSX keychain, and Linux with the GNOME Keyring (in 2021, it would need a DBus session and libsecret), but in 2021, GCM-Core covers those use cases.
The idea remains: store the PAT in an encrypted credentials store.
As mentioned above, the more modern solution (Q4 2020) is Microsoft Git-Credential-Manager-Core, or, Q4 2022, Microsoft Git-Credential-Manager
git config --global credential.helper manager-core
# Git 2.39+:
git config --global credential.helper manager
Before Git 2.39 (Q4 2022), for Linux:
You need for that to install git-credential-manager-core, downloading its latest release, like gcmcore-linux_amd64.2.0.474.41365.deb
sudo dpkg -i <path-to-package>
git-credential-manager-core configure
Although, with GCM (Git-Credential-Manager-Core) on Linux, as noted by Mekky Mayata in the comments, you need to define a git config --global credential.credentialStore first.
See «Credential stores on Linux«:
There are four options for storing credentials that Git Credential Manager (GCM) manages on Linux platforms:
- freedesktop.org Secret Service API
- GPG/
passcompatible files- Git’s built-in credential cache
- Plaintext files
By default, GCM comes not configured.
You can select which credential store to use by setting theGCM_CREDENTIAL_STOREenvironment variable, or thecredential.credentialStoreGit configuration setting.
As noted by agent18 in the comments, using git-credential-libsecret after installing libsecret-1-0 and libsecret-1-dev is a good first step.
But, again, that should be now wrapped by credential-manager-core (before Git 2.39).
Вы можете создать токен доступа и использовать его вместо пароля при выполнении операций Git через HTTPS с Git в командной строке или API.
Для аутентификации в GitHub требуется токен персонального доступа в следующих ситуациях:
- Когда вы используете двухфакторную аутентификацию
- Для доступа к защищенному контенту в организации, использующей единый вход SAML (SSO). Токены, используемые с организациями, использующими SAML SSO, должны быть авторизованы.
Создание токена
1) Проверьте свой адрес электронной почты , если он еще не подтвержден.
2)В правом верхнем углу любой страницы щелкните фотографию своего профиля и нажмите «Settings» .

3) В левой боковой панели нажмите «Developer settings»
4) В левой боковой панели нажмите «Personal access tokens» и затем чтобы создать новый токен нажмите «Generate new token»
5) Задайте маркеру описание и выберите область действия или разрешения, которые нужно предоставить этому токену. Чтобы использовать маркер для доступа к репозиториям из командной строки, выберите repo.

6) Нажмите «Generate token», чтобы создать токен.
7) Скопируйте полученный токен в буфер обмена для следующего использования.
Из соображений безопасности после перехода со страницы вы не сможете снова увидеть токен.
Использование токена в командной строке
Теперь, с помощью токена, вы можете ввести его вместо пароля при выполнении операций Git через HTTPS.
Например, в командной строке вы должны ввести следующее:
git clone https://github.com/username/repo.git
Username: your_username
Password: your_token
Или:
composer config --global --auth github-oauth.github.com <token>How to generate GitHub personal access token
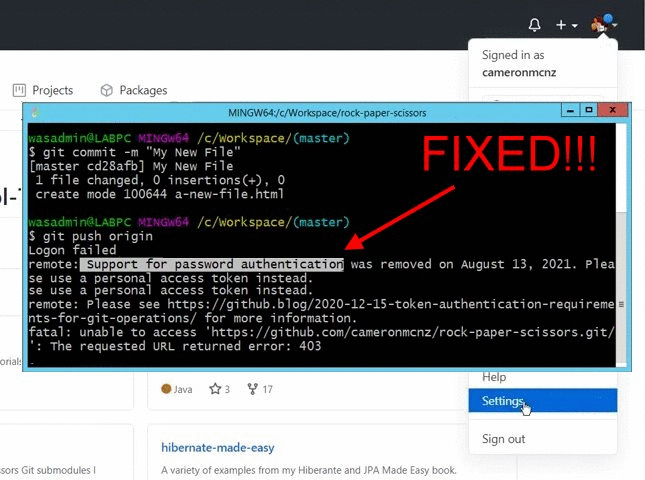
If you ask me, GitHub’s removal of support for password authentication on August 13, 2021 was a bit of an overstep. But fortunately, it’s not overly difficult to create and use a GitHub personal access token instead. Just generate the personal access token in GitHub, and provide the token whenever Git prompts for your password.
The link to create a GitHub Personal Access Token is found under ‘Developer Settings’ in the admin console.
Steps to create a GitHub personal access token
To create a personal access token in GitHub, follow these steps:
- Log into the online administrative console.
- Under your GitHub user profile (not the repository profile), click the “Settings” link.
- Scroll down and click the “Developer Settings” link.
- Click the GitHub “Personal access tokens” link.
- Click the “Generate new token” link and provide your password again if required.
- Provide a name for the GitHub personal access token in the “Note” field.
- Set the access token’s expiration timeout to “No expiration.”
- Click the checkbox for every permission scope to give your GitHub token full repository access.
- Click “Generate token.”
- Copy the GitHub Personal Access Token and use this as the password when you do a Git push.
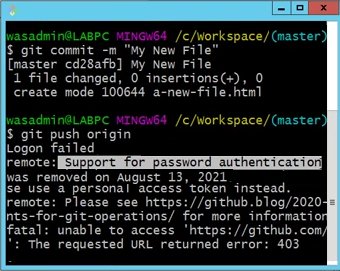
If you try to push to GitHub, you are told you need a personal access token.
How to use a GitHub personal access token?
The GitHub personal access token replaces your password. Any operation like a Git push that requires credentials prompts you for your username and password.
For the username, simply provide your GitHub account name.
For the password, provide your GitHub personal access token.
How to push with a GitHub access token?
The first time you perform a push to GitHub, you are prompted for your username and password. Simply provide your GitHub username and the access token and your files are uploaded to GitHub.
Use your GitHub personal access token as your password when you perform a git push to GitHub operation.
If you use Windows, your old credentials may be stored in the Windows Credentials Manager. Open this service, look for the web credential used by Git and delete it. Then perform a new push to GitHub.
The next time you perform a push with a GitHub personal access token, the new token will be stored by Windows. You won’t need to remember the value of the GitHub token on future Git push operations.