Ваше приключение в Batman: Arkham Knight вы начнёте с локации под названием Остров Блик / Island Bleake. Это северо-восточная часть Готэм-сити. В этой части города вам придётся не мало попотеть чтобы забрать все призы Загадочника. Некоторые лежат в открытом виде, и к ним нужно просто подойти и взять, остальные спрятанные в укромных местах, и потребуют от вас определённых умений в решение головоломок. В данном гайде, мы расскажем и покажем вам, расположение всех Трофев Риддлера на Острове Блик / Riddler Trophies Bleake Island и то, каким способом их лучше заполучить.
Мы готовим для вас материал по всем местам Готэма, используйте ссылки ниже для определения местоположения Трофеев Риддлера на других Островах и Локациях таких как:
Остров Миагани Трофеи Риддлера
Остров Основателей Трофеи Риддлера
Дирижабли Стэга Трофеи Риддлера
Панесса Студиос Трофеи Риддлера
Трофеи Риддлера
Надеемся, что наш гайд вам помог, не забывайте делиться информацией со своими друзьями и знакомыми.
Трофеи Риддлера Остров Блик
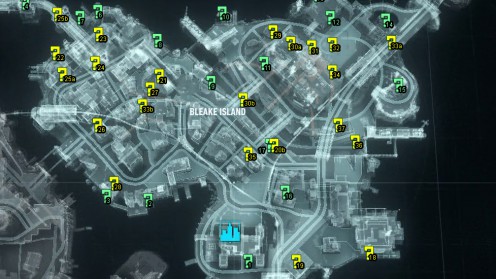
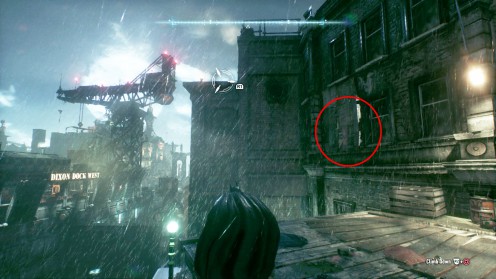
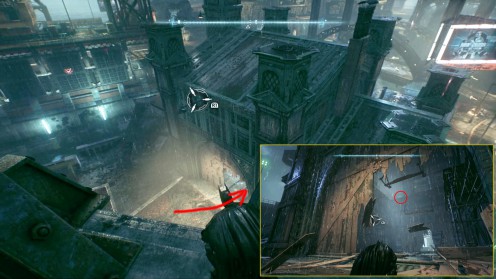
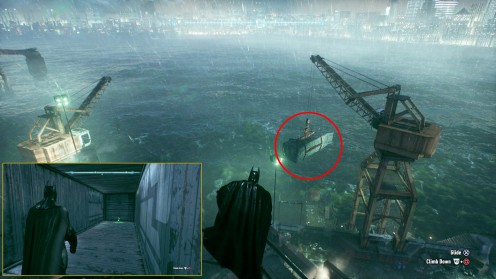
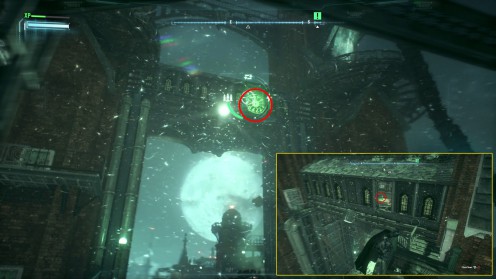
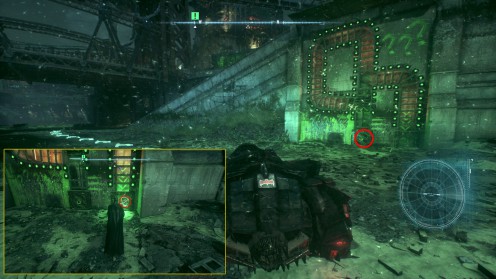
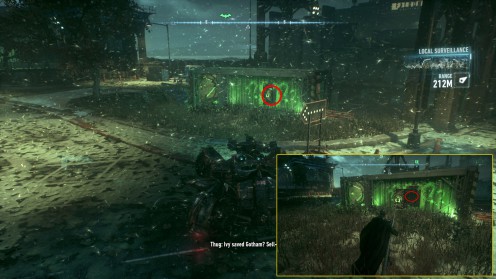
Так называемые Трофеи Риддлера нужно просто найти, а иногда достать из труднодоступных мест, месторасположение таких Трофеев мы пометили для вас на карте и на самих местах.
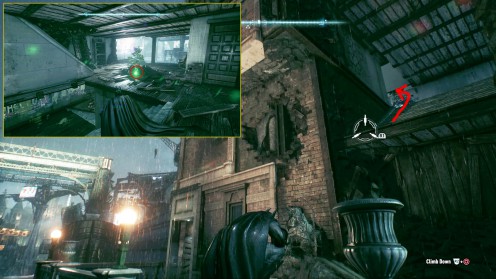
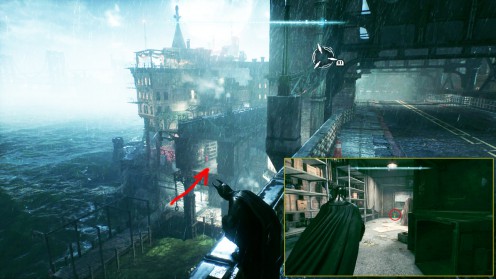
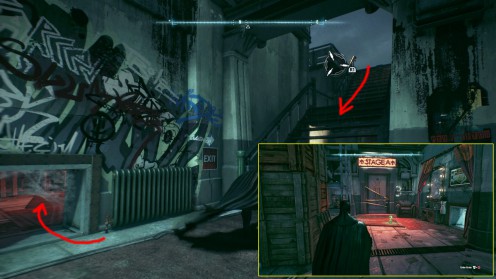
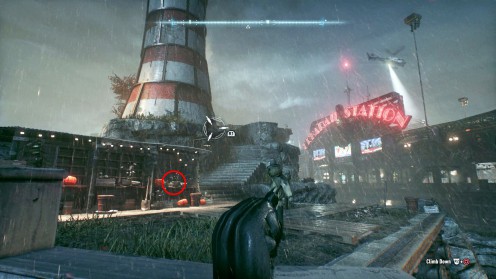
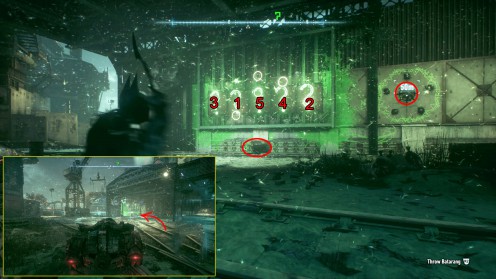
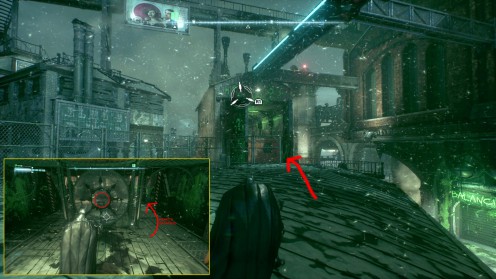
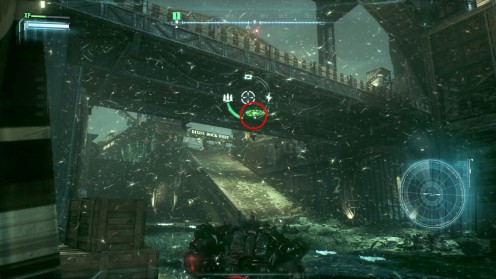
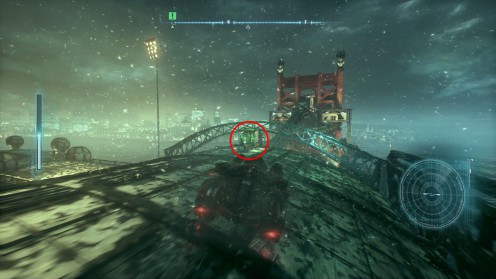
Стреляем из пушки в режиме танка на Бэтмобиле, а затем спокойно достаём крюком.
Обновление: Трофей #17-alfa находится в Водных Туннелях Готэма. Найти его можно во время прохождения миссий Пингвина «Контрабанда оружия». Более подробной информации по данному трофею у меня к сожалению нет.
Трофеи Риддлера – Головоломки.
С решением логических задачек Риддлера придётся изрядно попjтеть, поэтому нам понадобится некоторое время на решение таких загадок, большинство таких загадок заблокированы прохождением сюжетных и второстепенных миссий, и не доступны с самого начала игры. Некоторые из них требуют гаджеты, к которым вы получите доступ намного позже. Головоломки Риддлера обозначены на карте жёлтыми знаками.
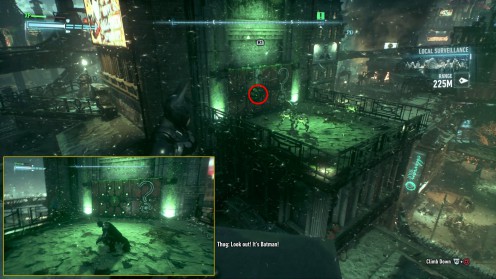
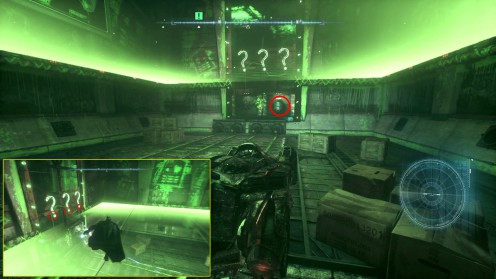
Обновление: В 25a, когда знаки вопроса поднимутся на мост, то нужно свернуть в правый переулок, быстро добраться до края знака на мосту и уже оттуда продолжить слежение. Спасибо пользователю
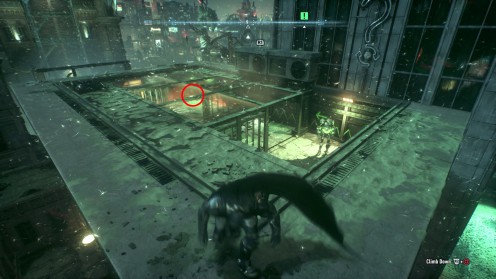
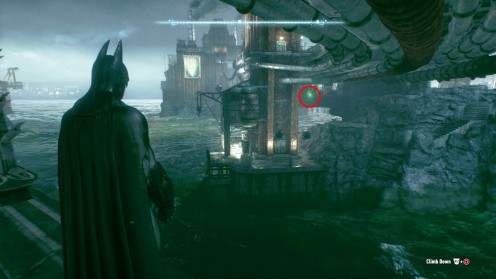
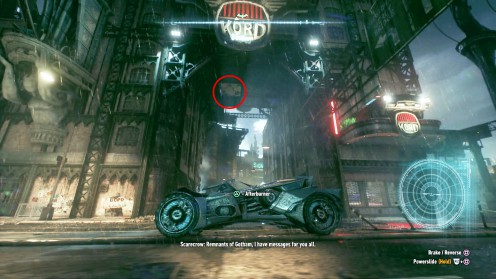
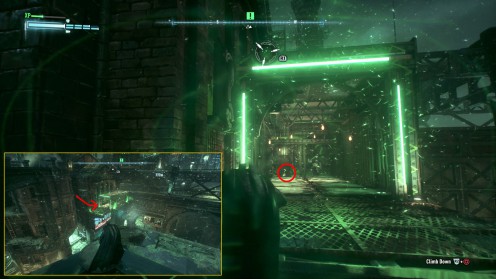
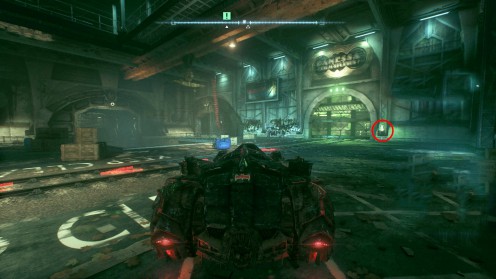
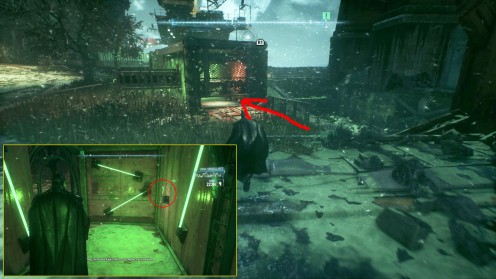
Используйте устройство удалённого взлома, чтобы отключить турели, это поможет роботу.


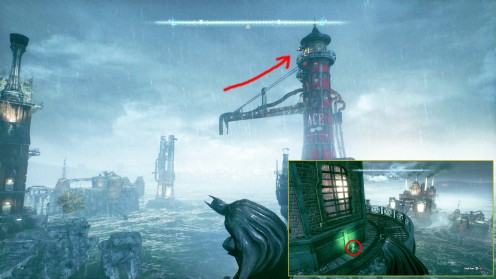
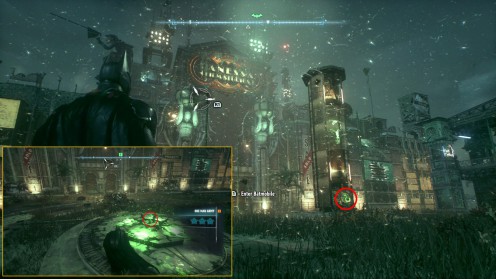
Обновления: По поводу трофея #31, сразу скажу, что играю я на геймпаде. Ваши действия, подъезжаем подключаем лебёдку, ждём когда машина получит заряды и включаем ЭМИ с помощью кнопки «Оглушение плащом». Электричество вырубается и тогда вам нужно будет действовать быстро. Выпрыгиваем из Бэтмобиля нажав «Двойную кнопку прыжка» и удерживая её выпускаем «Тросомёт» удерживая левый аналог. Всё это нужно делать предельно быстро. Да это сложно! И да это неудобно! На то они и Трофеи Риддлера.
Ну вот мы и нашли, все возможные трофеи Риддлера на острове Блик. Не забывайте подписываться на новости в контакте, и следите за обновлениями.
![]()

Если вы хотите собрать все трофеи Риддлера, то вам понадобится помощь. Пользователь YouTube под ником «Batman Arkham Videos» опубликовал видео-руководство, в котором показано, как собрать все трофеи. Видео не одно, а несколько.
1. Остров Блик
www.youtube.com/watch?feature=player_embedded&am..
2. Панесса Студиос
www.youtube.com/watch?feature=player_embedded&am..
3. Штаб-квартира Рыцаря Аркхама
www.youtube.com/watch?feature=player_embedded&am..
4.Остров Миагани
www.youtube.com/watch?feature=player_embedded&am..
5. Дирижабли Стегга
www.youtube.com/watch?feature=player_embedded&am..
6. Остров Основателей
www.youtube.com/watch?feature=player_embedded&am..
Riddler has a unique way to keep Batman busy working out several clues to solve his puzzles. In Arkham City, he has given Batman the daunting task of finding all the hidden trophies, deactivating all the cameras, and finding other objects of value.
You will need specific gadgets and upgrades for some of these and if you come across any trophy that you can’t collect, just mark it on your map so you can collect it later.
How should you mark the location of that trophy on your map? Well, during the Steel Mill part of the game, you will learn how to mark Riddler trophies on your map, so remember that.
Table of Contents
Park Row
- Riddler trophies
- Riddle solutions
- Catwoman Riddler trophies
- Cameras
Amusement Mile
- Riddler trophies
- Riddle solutions
- Cameras
- Balloons
Industrial District
- Riddler trophies
- Riddle solutions
- Cameras
- Balloons
Subway
- Riddler trophies
- Riddle solutions
- Catwoman Riddler trophies
- Joker Teeth
Bowery
- Riddler trophies
- Riddle solutions
- Catwoman Riddler trophies
- Cameras
Steel Mill
- Riddler trophies
- Riddle solutions
- Catwoman Riddler trophies
- Harley statues
Museum
- Riddler trophies
- Riddle solutions
- Catwoman Riddler trophies
- Penguin
WonderCity
- Riddler trophies
- Riddle solutions
- Demon heads
Park Row
All the collectibles are in the Park Row area of Batman Arkham City.
Riddler Trophy Locations
- The first trophy can be found in the hidden area near ACE chemicals. Once you enter ACE chemicals, head east, and search for a gargoyle. You’ll find that this gargoyle is marked with Riddler’s trademark question sign. Latch on to it and simply dive to the other side, where the trophy is found.
- Head east from the first trophy location, and continue along until you find a wall next to a roof area. You’ll now see 5 of Riddler’s trademark question signs, smash the right-most sign with a Batarang when it starts glowing, and earn the trophy.
- The next trophy is obtained after smashing a riddler sign, hidden inside a ventilation system. The area is inaccessible so a Remote controlled Batarang should be the weapon of choice. Head to the ACE Chemicals building, the ventilation system should be to your north.
- To obtain the third trophy head to the Park Row building and climb towards its roof. You can locate the building using your minimap. The trophy is obtained through a timed panel completion on the western side of the roof’s building.
- To acquire the fifth trophy, you must travel to the Solomon Wayne Tower and head northwest. 4 riddler question signs are to be smashed within a four-second time limit. Locate all the signs using your detective mode and mark them with the explosive gel. Now you must smash the 4th sign using a Batarang while exploding the other three with your gel.
- To obtain the 6th trophy a few pressure pads are to be activated. Climb over the north-sided roof, right above the Riddler sign. Now leap off and glide over to the south wall, once there activate the pressure pad. Next, you must leap off again and this time glide over to the other side of the wall. Activate the pressure pad there to acquire the trophy.
- Travel towards the Solomon Wayne Courthouse, head east, and ascend the tallest building roof there. Once up, activate the pressure pad, allowing you access to a wooden board. Leap down towards the wooden board and blow it up using your Explosive Gel to expose the Riddler Trophy.
- You must head southeast from the 7th trophy’s location. Throw your Batarang to hit a Riddler Sign on a chimney, atop a building roof, doing so will reveal the Riddler Trophy.
- Travel towards the Solomon Wayne Courthouse and head east until you reach a tall building. Now ascend to its rooftop and head to the northern ledge. Once there explode all 4 Riddler question signs to obtain the trophy.
- Travel towards Park Row and head north. Locate a path leading through a fence and frail wall structure. Defeat the Tiger Camera guarding the area and collect the trophy.
- To obtain this Riddler Trophy, you must blow up a frail wall structure within a demolished overpass. Doing so will reveal the Trophy.
- Travel towards the Black Canary building, once there look at the adjacent building. Your search for the Riddler Question mark must be within the buildings between the Church and the northern part of the restricted area. Activate your Detective mode to find the marks and smash them using remote controller Batarangs to obtain the trophy
- Travel towards ACE chemicals and head west. Now ascend the roofs of the buildings nearby and locate the Riddler trophy cramped up inside a Cage structure, pull it out using your REC. gun.
- Travel to the eastern region of the map, once there locate the buildings with bar sets on its rooftop. Ascend to the roof and access and a Tyger Panel was found on top. The trophy is revealed as a result.
- Travel to the western side of the map and locate a wall structure, search the pathway beside it to obtain the trophy.
- Travel towards ACE Chemicals and ascend to its rooftop. Now leap off from the top gliding towards Gotham Bank. Dive Bomb and access the panel beside a few Gargoyles to reveal the trophy.
- Travel towards ACE Chemicals and search the ground floor for a cage. Enter the cage and obtain the Riddler Trophy. You can do so by making use of Freeze Grenades.
- Travel towards ACE Chemicals and locate a nearby rundown car towards the building’s western side. Search below it to obtain the trophy.
- Travel towards ACE Chemicals and locate the blocked area on the building’s western side. The area can be accessed by leaping off the adjacent building and blowing up the frail wall structure. You’ll find the trophy within this area.
- Head towards the Church building and ascend to its rooftop Activate the Tyger Panel and access the area to find the Riddler Trophy.
- Head towards the Church building and ascend to its rooftop, once up, locate a pathway with a frail wall structure on one side and an electrified fence on the other. Make use of your REC to disable the fence and blow up the wall using explosive gel. Doing so will reveal the Riddler Trophy.
- Head towards the Church building and make your way to its rear pathway using your Line Launcher. Obtain the trophy inside the cage, activating the red pressure pads will block the cage.
- Head to the northern wall on the map and search for Riddler signs on the waterside. Destroy all 5 using Batarangs to reveal the trophy.
- Travel towards the Solomon Wayne Courthouse, head west and locate the pathway through the two buildings Blowout the fuse to takeout the electric floor trap and access the Tyger Panel to obtain the trophy
- Travel towards the Solomon Wayne Courthouse and head west towards a tall building. Enter the building by exploding its frail north wall, open the power gate by your REC and obtain the Riddler Trophy.
- Travel towards the Solomon Wayne Courthouse building. You’ll find a cage by the hot air vent by the building’s entrance area. Access the cage to obtain the trophy.
- Access to the Line Launcher will make obtaining this trophy a lot easier. Travel towards the Church building, latch onto the gargoyle upfront, and glide to your left. Once you drop down, you’ll find a frail wall structure that you can destroy to reveal the Riddler Trophy.
- Head towards the 2nd Confessional Booth, and destroy its frail wall to reveal the Riddler Trophy.
- Travel towards the Bell Tower and get to its rooftop. You can take the staircase and then grapple yourself onto the top floor. Locate the trophy on this level, it will be attached to a wall that you can grab with your Batclaw.
- Travel towards the ACE Chemicals building, the small building beside it has frail wall northeast. The building
- Travel towards the ACE Chemicals building and head west until you reach the Gotham Casino. Enter the pathway adjacent to the Casino and pry the gate open using REC, this will reveal the Riddler Trophy for you to collect.
- Head to the Solomon Wayne Courthouse building and go towards its rear side where you will find a staircase. Climb down from the stairs, find the trophy just on top of the doorway and grab it using your Batclaw.
- Travel towards the Solomon Wayne Courthouse building and head towards its back entrance. Now use the Remote controlled Batarang and control it through the electricity and down the staircase, before guiding it through the bars and taking out the fuse. Doing this lets you acquire the Riddler Trophy.
- Travel towards the Solomon Wayne Courthouse building and head southwest until you locate a pathway, slide through the space in between, and jump over the fence. This will lead you to the Riddler Trophy.
- Move towards the Confiscated Goods Vault, and search for the cage as you move east. You’ll find that the area will be protected by a bunch of land mines so carefully make your way through, unlock the cage, and obtain the Riddler Trophy.
- Head to the Amusement Mile and Park Row area, go to its northeast end and find the trophy. You can create a scaffolding to obtain the trophy by using Freeze Grenades.
Riddles Locations/Solutions
This question can only be answered from an unusual perspective. Can you get yourself there?
- Grapple up to the roof of Solomon Wayne Courthouse and walk to the pole there. Switch to your detective mode and scan the area to find the hidden Riddler mark.
DA campaign special: get two votes, for the price of one.
- When you are moving west from Solomon Wayne Courthouse, find Harvey Dent’s DA campaign poster.
It’s far from PURRFECT, but she calls it home.
- Go up on the roofs of the central northern building in Park Row, which is northeast of Solomon Wayne Courthouse. The window there will enable you to look into the room below. Use your detective mode to scan that room.
You’ve been warned. People aren’t the only unstable part of this city.
- Go towards the broken overpass and scan the ‘Catastrophic Subsidence’ sign.
If you find the name, does the Cash come hand-in-hand?
- Get inside the church and search the west side of the room at ground level. You will find a small room with a desk. Scan the photograph for the riddle.
This den is where the vicious animals take your treasure, is it theft, if it’s already stolen?
- Scan the Confiscated Goods Vault on the west wall of Arkham City.
Do you have Strange thoughts? Maybe you should seek help?
- There is an abandoned store called Strange Minds on the road to Monarch Theatre. Scan the ‘The Stacked Deck’ sign beneath the orange.
I am an actor who can transform a film with the final cut. Who am I?
- Go to the Monarch Theatre and scan the poster ‘The Terror’. You will find this poster on the wall left of the entrance.
Six legs went in and only two came out. Where am I?
- Find an alley to the right of the Monarch Entrance behind a chain link fence. Scan the ‘Crime Alley’ sign here.
Who’s crazy enough to date this guy?
- Look for Calendar Man downstairs in Solomon Wayne Courthouse. He is locked in a cell, scan him to solve the riddle.
BANG! BANG! Order in the court.
- Find the acid bath in Solomon Wayne Courthouse and look for the platform nearby to climb on to investigate the closed booth. Zoom in and scan Two-Face’s gabble to solve the riddle.
Acing the chemistry test will illuminate you.
- Grapple up to the top of the ACE Chemicals building and scan the large neon sign.
Has this flower turned over a new leaf?
- Go east from the Confiscated Goods Vault to the Baudelaire store. Scan it to solve the riddle.
I wonder how you can land an appointment with this milliner? Perhaps it would be best to book?
- Inside the building, you can get access to it after you have defeated Mad Hatter.
Catwoman Riddler Trophies Locations
- Latch onto the chain roof, and once there make your way over to the grid. Access it to gain entry to the cage and obtain the trophy.
- Travel towards the Church building and move towards its rear side entrance to find a pathway with ground pressure plates. Jump above, latch across the ceiling, and make your way to the trophy.
- Head towards the Solomon Wayne Courthouse and travel west till you find a tall building. Blow up the frail wall structure using Explosive Gel and enter the building. Latch onto the ceiling grate right above you, and obtain the trophy.
- Head towards Park Row and climb the rooftop of the building on its northwest side. Move towards the billboard sign there and look underneath it to find the trophy.
- Travel towards the ACE Chemicals building and head west to find a few iron bars and a barricade with a prohibited entry sign. Latch onto the roof and make your way across to obtain the trophy.
Tyger Cameras Locations
- On the building west of the destroyed overpass.
- Next to the alleyway at ground level west of ACE chemicals. Read trophy 17 for a detailed description of the location.
- It is on the road between ACE Chemicals and the Bank of Gotham. If you can’t find it look for it next to an ACE Chemicals sign.
- Northeast corner of the Bowery building.
- Northeast of the destroyed overpass, near the north wall.
- It is east of the Confiscated Goods Vault. Look it for in the corner of the first building nearby.
- Corner of the building, east of Solomon Wayne Courthouse entrance.
- Take the road east from the Courthouse entrance and look for it behind a blue neon ‘Lounge’ sign in the corner of the nearby building.
- Get yourself on the road leading to the Solomon Wayne Courthouse and look in the west of the Church and you will find it.
- It is south of the church. Look for it at the dead-end blocked by a wall to the Wonder Tower.
- It is northwest of the church, opposite to barricades of the destroyed overpass.
- It is southwest of the entrance to the Courthouse.
- South of Solomon Wayne Courthouse, near the Monarch Theatre’s entrance.
Amusement Mile
All the collectibles in the Amusement Mile of Batman Arkham City.
Riddler Trophies Locations
- Look for a ventilation system that opens and closes on top of the Krank Co Toys building. You can throw a remote Batarang and control o get successfully through the door. The mark on the right stops the shutters that open and close, while the mark on the left opens the trophy cage.
- There is a cage with six pressure pads on the east side of the Krank CO Toys building. You can use the line launcher to reach the cage by aligning yourself with the right wall.
- There is a pressure pad on the platform sound of Krank Co Toys. There are five riddler marks on the north wall. Step on the pad and watch the patterns the marks light up in, and use your Batarang to hit each mark in the same pattern. Do it twice to open the trophy cage and get the riddler trophy.
- Raise the crane’s hook by using REC on the electromagnet and get the riddler trophy.
- Look for a pressure pad on the roof of the building to the northwest of the bridge leading to the industrial district. Glide your way to the pad on the south visible from the pad then immediately glide to the last pad. Glide and grapple back up to reach the trophy cage at the top and get the riddler trophy.
- Look for it on the middle platform of the GCR radio.
- There are three riddler pressure pads beneath Amusement Mile on the map, east of the church. Walk across these pressure pads to get the riddler trophy.
- Look for a cage along the west wall blocking entry to the Wonder Tower. It is filled with landmines so once you have the disruptor, use it on these mines to walk through the cage safely and retrieve the trophy.
- Look for it on the underside of the raised overpass leading to the entrance of the Industrial District. You can throw a freeze grenade below the trophy and get it with Batclaw.
- When you enter the GCPD building, continue down the first corridor and find a cell locked with a Tyger Panel. Unlock this cell, then use explosive gel on the destructible wall to get the riddler trophy.
- Grapple up onto the platform above near the entrance of The CPD building. Now, use the Line Launcher to reach each of the three pressure pads in turn without touching the ground.
- Locate the morgue inside the GCPD building. It is on the east side of the building.
TYGER Cameras Locations
- It is north of the church, the start of the overpass.
- On the wall of the building south of the overpass, east of the church.
- The southeast corner of the large building with a rooftop garden –is north of the previous camera location.
- To the left of the Gotham Casino Sign.
- It is west of the GCPD building, and south of Ivy’s sanctuary.
- Close to the destroyed overpass, on the building to the right of Ivy’s sanctuary.
- Look for it on the building connected to Ivy’s sanctuary.
- You will find it in the center of the rooftop garden building – overlooking the frozen swimming pool.
- It is to the right of the REC-controlled door leading to the entrance of the museum.
- Look for it on the wall northwest of the raised overpass leading to the Industrial District.
- North side of the raised overpass.
- South side of the raised overpass.
Riddle Locations/Solutions
These questions can only be answered from an unusual perspective. Can you get yourself there?
- Look for the REC-controlled door and activate it. Glide to the building opposite and look for the other half of the Riddler mark under the billboard.
Which acrobat family gambled with their lives, and has now been left to fly solo?
- Search the poster with Cancelled writing across it on the north wall on the east side of the building with the rooftop garden.
If she is the ROOT of evil, how could anyone be expected to CONTAIN her?
- Find a cabinet near the roots of Ivy’s sanctuary.
Always a shining example of justice? Not if you ask me.
- Scan any of the GCPD Building’s spotlights to solve this riddle.
Would an invitation to party like the gods be a bolt out of the blue?
- Find Gotham City Olympus sign and statue – It is above the weak wooden wall with the riddler trophy inside it.
This place has taken a TURN for the worse. Is it a little BEAR for your tastes?
- Scan the large neon sign above the Krank Co Toys building.
If you’re afraid, don’t be scared to crow about it.
- There is a pile of hay on top of the raised overpass leading to the Industrial District. Scan the mask on the ground here to solve this riddle.
Look out! Can you see where the madness began?
- Scan Arkham Island from the rooftop of the GCPD Building.
Park in his spot and you may just get a ticket.
- Get access to the underground section of the GCPD building using the wooden wall along its north side. Use the Line Launcher to get yourself across the water. Scan James Gordon’s parking space to solve this riddle.
Joker Balloons
- It’s on the west side of the building, on the railing above the blue Gotham City Olympus sign.
- Southwest corner of the large building with a garden rooftop that is west of the Gotham Olympus building.
- Look for it on the top of a set of speakers near the raised overpass leading to the Industrial District.
- West of GCR mast, end of a destroyed ventilation system.
- It’s attached to a broken ventilation system south of Ivy’s sanctuary near the northern section of the destroyed overpass.
- Top of announcement speakers, outside GCPD building.
- Top of short tower south of GCPD building.
- Small building west of the large building with garden rooftop.
- Top of the Gotham Casino sign.
- The second floor of the GCR mast.
- West wall of the area, attached to a set of speakers.
- It is attached to the center of the raised overpass leading to the Industrial District.
Industrial District
All the collectibles in the Industrial District of Batman Arkham City.
Riddler Trophies Locations
- Lower the hook of the crane into the water and then raise it to reveal the riddler trophy. You can now use the Batclaw to get it.
- There is a destructible wall under the crane. Destroy this wall and you will see a cage with two electromagnets. Drag the riddler trophy across the cage and collect it.
- There is a pressure pad in an alleyway southwest of the crane. Gain some momentum in a gliding maneuver then dives bomb on top of the pressure pad. You need a lot of momentum to activate this pad so you may need to give it a few tries before you get it right. Activating the pressure pad will unlock the trophy.
- There is a passageway blocked by electricity along the west wall. Get the Tyger encryption codes to unlock and get the trophy.
- Five pressure pads on top of the roof along the west wall. Run across these pressure pads when they are green to get the trophy. You will have to time your run to get it right.
- Near the entrance of the Subway Maintenance Access is an open area. You need to slide under a large digger here to collect the trophy.
- Look for a pressure pad and a set of riddler marks on the rooftop of the southwest building. When you step on the pad, it will highlight a single riddler mark, track this mark, then use the Batarang to activate it and get the trophy.
- Look for a cage on the ground with three pressure pads Northwest of the Subway Maintenance Access. Step on one of them, then use Line Launcher to get yourself across the gap. Drop onto the next pad in time and repeat to unlock the cage and get the trophy.
- Find the building on the ground floor of the southwest corner with a weak wall and a REC-controlled door. Access the door and walk on the pressure pad, then use the upgraded Cryptographic Sequencer to hack the Tyger Panel. Destroy the weak wall and get the trophy.
- Passageway on the south side of the wall. Cross the electrified floor using Line Launcher and get the trophy.
- Under the building northeast of Subway Maintenance Access Tunnel – Look for it behind a weak wall.
- On the north side, on top of the Steel Mill. Look for it behind a weak wooden wall.
- Find a small train cart running through the Steel Mill on the south side of the tunnel. Push the train forward using the REC, then step on it to apply explosive gel to the ceiling. Get the trophy and vanish.
- There is a cage in the water south of Steel Mill. From the southeast corner of the Steel Mill, use the dive bomb glide to land at the end of the cage. Aim for the left side of the cage with a small opening.
- Apply explosive gel to the destructible wall on the east side of the Steel Mill. Climb over the room to get the trophy cage on the other side. Use Remote Batarang to activate the riddler mark inside and get the trophy.
- Look on the map for the section of the Steel Mill that sticks out on the east. Find this area on the rooftop and you will find the trophy out in the open.
- There is a cage with electromagnets northeast of the entrance to the Steel Mill. Use REC to pull and push the trophy to the end of the cage and get it.
- Look for it inside the carriages at the top of the Ferris Wheel. You can use Batclaw to grab it.
- There is a cage behind a wall northwest of the gate entrance to Steel Mill. It is filled with proximity mines so use a disruptor.
- Look for it in a tunnel running along the north side of the building northwest of the Subway Maintenance Tunnel. You will need Cryptographic Sequencer to get the trophy.
- Look for a tower with two wooden walls north of the gate leading to Joker’s Funhouse. Glide down from the top of broken pipes to the east and hit the panel inside the cage. Apply pressure against the wall to get the riddler trophy.
- Look for a vent you can latch on to with the Batclaw in the water northwest of the Steel Mill. You will need to use the freeze grenades to create a platform here to get the trophy.
- Get yourself on top of the tallest chimneys in the district. There is a pressure pad on the chimney in the northwest from here and two more on the chimneys you are on. Glide from one pressure pad to another to get the trophy between the two chimneys. Use Grapnel Boost to avoid touching the ground.
- Look for a pressure pad in the small courtyard in the middle of the building in the northeast of the district. Use remote Batarang here to hit all three riddler marks here before the trophy cage closes. Start from the right, then the center, and finally the left.
- Go north from where you found the last trophy and look for it on a set of hot air vents and land mines.
- Look for it inside a small roof access building behind a weak wall on the northeast of the building near the water.
- There is a cage with neon arrows pointing inside near the Docks by the water. You need an upgraded Line Launcher to create a tightrope after firing the second line to use it to grapple up to the edge and get the trophy.
- There is a room with a wooden wall near the cranes on the northeast side of the district. Glide from a high position and collect the trophy.
- West of the large building in the northern section of the district. Destroy the three wooden walls and get the trophy.
- Look for a Tyger Panel behind a wall south of the entrance to the district. Unlock this panel to get the riddler trophy.
- There is a small platform with a shelter on the rooftop of the large building in the northeast. Walk on the pressure pad on top of the shelter and quickly drop down and use the Batclaw to get the trophy.
- Look for pressure pads in an alleyway between two buildings. Each pressure pad has several lights – step on each pressure pad to illuminate all lights.
- Sprint through the pressure pads in an alleyway on the south side of the building in the northwestern section of the district.
- Find a corridor with a locked door in the building southwest of the Steel Mill. You have to slide underneath it to get the trophy on the ceiling.
- Glide from a high position towards a small platform that leads to a hidden passageway to the south. You will see the riddler trophy.
- This riddler trophy is on the wall inside Zsasz’s hideout – To collect it, create an ice platform and get the trophy with Batclaw.
- Activate the panel to create electric current above water, when you defeat Zsasz. Stand next to the trophy cage and look up to the left for a vent. Charge Remote Batarang with electricity and guide it left through the vent to hit the power supply. Get the trophy and leave.
Joker Balloons Locations
- Look for it on the building north of the district and east of the entrance – It is overlooking the water to the north.
- Look for it between the tower and the large building south of the cranes. It is right off the Joker’s Funland sign.
- East side of the large building to the northeast of the district.
- Look to the right of the large Joker’s Funland sign blocked by a van, north of the entrance to the Steel Mill.
- Northeast of the base of the Ferris Wheel.
- It is on the arm of the toy soldier statue, above the large gates at the entrance to the Steel Mill.
- Top of the crane to the northeast.
- Center of the district, on top of the Naval sign.
- Opposite the tall tower, look for a set of speakers northwest of the Steel Mill.
- In the center of the Steel Mill rooftop, look for Joker’s toy soldier statues in the center.
- There is another top soldier on the ground south of the Steel Mill – It is overlooking the water.
- Look for it on top of the digger’s arm next to the entrance to the Subway Maintenance Access tunnels.
Riddle Locations/Solutions
This question can only be answered from an unusual perspective. Can you get yourself there?
- You can see the top of the question from most places in the district. You can find the dot on top of the tall chimney, north of the area.
Which notorious family keeps talking trash?
- Scan the Falcone Shipping sign on the barge in the waters north of the district.
Breaking news! Get out while you still can.
- Scan the set of flyers announcing Arkham City on the side of Bill’s Hotdogs in the north of the area.
Air, sea, or land. It would be criminal not to use these wise guys, wouldn’t it?
- Look for a Falcone Billboard advertisement on the east wall of the building, northeast of the entrance to the Steel Mill.
Was this parasite ratted out, or does he continue to plague Gotham?
- Look for Flannegan’s Pest Control poster on the ground along the northwest of the Steel Mill.
Does Zsasz still pose a threat? This guy called to find out.
- Find the dead body attached to the pay phone north of the Joker’s Fun House tunnel running through the Steel Mill.
Did you hear the HOLE story of how Black Mask escaped?
- There is a wall overlooking the water with posters of the Black Mask, south of the Steel Mill. Scan these posters to solve this riddle.
If you’re planning on making your mark in Arkham City, you’ll need a special kind of realtor.
- Deal with Zsasz in his hideout and then scan the collection of broker cards on his desk.
Can you find this cool couple before the romance thaws?
- Go back to the place where you saved Nora and scan the couple together. (Mr. Freeze and his wife)
Tyger Cameras
- Corner of the building east of the entrance.
- East from where you found the last camera – look to the right of the door that is blocked by a van.
- Right off the door leading to the area, Nora Fries is held, hostage.
- Northwest corner of the large building northeast of the area.
- Go north from the entrance of the Steel Mill until you reach a large doorway that is blocked by a van. Look for the camera on the right.
- Look for it to the right of the large gates at the entrance to the Steel Mill.
- Look for this balloon in the center of the archway leading to a small courtyard west of the Steel Mill entrance.
- Right of the set of doors leading to Zsasz’s lair.
- Look for it to the left of large gates, north of Joker’s Fun House tunnel leading through the Steel Mill.
- The tall building is next to the stairs that lead up to the walkways. South of the rear entrance to the Steel Mill.
- There is a gate with lights on the west of the rear entrance to the Steel Mill. It has a Ferris Wheel carriage inside. Look for the camera to the right.
- Large Wall northwest of the entrance to the Subway Maintenance Access Tunnels.
Subway
The following collectibles are in the Subway area of Batman Arkham City.
Riddler Trophies Locations
- In the west of the section, search for the Catwoman trophy. After you open the vent nearby, destroy the fragile floor at the end to reveal the trophy.
- After entering the Bowery (in the main room), you will find a small closet blocked by some iron bars. Hack the door panel to enter and get the trophy.
- In the room with the train tracks, look for a vent in the north section. You will find the trophy inside the vent.
- In the same room with the train tracks in it, you can find a Riddler trophy in a short bay inside the floor panels.
- After you destroy the wall and enter a training area, head west till you find the trophy.
- Before you move through the REC Controlled door leading to the subway, you will find a destructible wall to the left. Move to the room behind the wall to collect the trophies. Collect them fast and then use a Line Launcher rope before the electricity thingy starts. Wait for the timer to run out and then you can leave.
- Move to the left from where you collected the last three trophies. You will find another one a pressure pad. You need to hit all three Riddler points on the ceiling with your Batarang within the time limit.
- After getting the Tyger encryption protocols, hack the panel here and find the Riddler trophy inside the left-hand train.
- In the subway terminal, there is a trophy on the underside of the roof of one of the trains.
- In the Subway terminal, head to the southeast section and break the wooden walls. Search the area and you will find a trophy down the stairs.
- You will find a small ledge on the left side of the Subway terminal. You can find a trophy along with a Tyger Panel here.
- Climb up the stairs to the left side of the west bridge and use a Line Launcher to move through the fragile wooden panels to the west.
- You will find a small section you can enter on the floor in the northwest section of the subway terminal. Crouch inside to get to the trophy.
- Move to the east from the point where you collected the previous trophy. When you turn around, use the REC launcher to target the fuse box through the panel and move up the stairs on the left side.
- Just after the door leading to the Wonder Tower, on the right side is a REC-controlled gate. You can find a trophy here.
- While moving to the tower, you will spot a water pit. The trophy is on the other side of the pit. To open the case, you are going to require an upgraded Cryptographic Sequencer.
- Explore the south section of the water going to Wonder Tower. You should use the freeze blast to get the trophy.
- In the Subway maintenance Access tunnels, destroy the fragile wall in the west and then stand on the pressure pad to activate the Riddler mark on the vault door. Garb the trophies quickly then use the Freeze Blast to deal with the hot air from the vents. You can use the detective vision to find them.
- In the Subway Maintenance Access tunnels, you can get a Riddler trophy in the northeast section simply by using your Batclaw.
- When you drop down to the lower area in Maintenance Access tunnels, look for the sewerage waterfall beside which you find another trophy.
- When you drop from the industrial district to the Subway Maintenance Access tunnels, you will find an electric current. Charge a Remote Batarang from here and target it to the north through the bars to hit the fuse box.
- In the room with waterfalls (in the Subway Maintenance section), use the freeze blast in the water and then slide down. You can use the Batclaw to get the Riddler trophy off the wall.
Riddles Locations/Solutions
When you are inside the train in the west tunnels. Search for a mirror and when you use the detective vision, you will be able to see the reflection in the mirror.
BOARD at drive-time? I’m not going to broadcast any more clues.
- In the northeast corner of the bottom floor of the Subway station is a poster you are looking for.
Coming back from the dead is cheating on any day of the week.
- On the east side of the Subway tunnels, there is an advertisement of Solomon Grundy on the wall you should scan. It’s just west of the REC-controlled gate.
It’s vacation time. Where shall I go? Somewhere venomous?
- On the north side wall of Subway Terminal is another poster of Santa Prisca you can scan.
This Killer was collared, but is he now on the loose?
- You can use the launcher at the top of the waterfall. Destroy the fragile panel on the floor. Then scan the collar in the right end section of the room.
Catwoman Riddler Trophies
- The first trophy can be acquired from a room making your way through the Bowery entrance.
- To obtain this trophy you must destroy a weak wall structure, left of the doorway open by the REC. After going through the latch on and climbing through the grated ceiling to find the trophy.
- Behind the same REC opened doorway, in the area before the Subway Terminal, look above towards the roof to find the trophy.
- Head towards the Maintenance room and move to its northwestern side. Look up at the roof to find the trophy.
- Head in the opposite direction from the previous trophy, and now locate a room that has waterfalls inside and enters it. Simply collect the trophy inside this room.
Joker Teeth
- You will find one in the first tunnel when you enter the Subway Maintenance Access tunnels.
- You will find teeth just before you experience the waterfall drop to the lower level.
- After you have dropped down to the lower levels, move through the passage under a gate. You can find the teeth just before the water.
- When you are about to enter the Subway Terminal from the Subway Maintenance Access tunnels.
- You will find teeth inside the Subway Terminal when you are dropped down from the Maintenance access tunnel.
- Watch for the teeth on the ground floor of the Subway Terminal. West side to where you found Penguin’s Jammer.
- Just beside the door leading to the wonderful city.
- When you are about to enter the Subway terminal, there is a small room. You can find the trophy near the REC-controlled doorway.
- On the top of the train, you will find the pipes coming from the north Subway tunnel. The trophy is near the pipes.
- After you move out of the vent, you will have to climb on the top before the train and pass through the subway tunnels.
- When you are on the bottom floor of the Subway Station, look for the trophy in the center of the room.
- On the top floor of the Subway Station, you will find a small booth with a TV inside. The southwest corner is the place to look for the trophy.
The Bowery
These collectibles can be picked up from The Bowery area of Batman Arkham City.
Riddler Trophies Locations
- There is small roof access on top of the roof south of ACE Chemicals – Look behind it for the trophy.
- Look south of the area where you found the previous trophy and you will find a ladder. Get down and use the Line Launcher to access the riddler trophy that is behind the weak wooden wall.
- You will find this trophy attached to the wall above the locked room high up near the east wall. You can use the Batclaw to get it.
- Look for this trophy in a small alleyway west of Wonder Tower, behind a cage blocked by hot air. You need to freeze the air and get the trophy.
- Top of Finnigan’s, southwest of the wonder tower. Look behind a set of iron bars. You will have to hack the nearby Tyger Panel to get access to it.
- Find a pressure pad on the roof in the far southeast corner of the area. Step on the pressure pads and continue to the nearest pad below from there, use the Line Launcher to get to the final pressure pad without touching the ground. Get the trophy when the cage opens.
- Look for this trophy on top of the tall building northeast of the entrance to the Subway.
- Top of the tall building along the south wall of the area. You can use a Remote Batarang and get it to pass through the ventilation system to hit the riddler mark button and retrieve the trophy.
- From where you found the previous trophy (roof), glide onto the pressure pad on the wall of the building to the west. Now, glide over to the opposite wall’s pad, then back again to land on the final pad that is next to the riddler trophy.
- Look for the riddler trophy behind the Inmate Behavioral Analysis Unit door, southwest of the area on the ground floor.
- Look for it behind a destructible wall south of the previous trophy.
- Look for it on the rooftop of the building where you found the last trophy. You need to use the combination of pull and push with electromagnets while stepping off and on the pressure, pads to switch the gates inside the cage and get the trophy.
- You need to slide underneath the chain link fence at the end of the alleyway to the south of the Museum to get this trophy.
- The rooftop of the Museum, along the south wall.
- There is a set of wooden walls at the entrance of the Museum. Access the highest one by climbing on top of the entrance to the Subway to the east. Use the Line Launcher to get through the wooden panel to retrieve the trophy.
- There is another wooden panel under the last trophy. You need to punch through and destroy it to get it.
- There is a cage in the southwest of the area around the back of the Museum with a pressure pad in front of it. Step on the pressure pad and create a tightrope with Line Launcher to enter the cage. Hit the buttons without blocking them to get the trophy.
- There is a set of pressure pads underneath the rear entrance to the Museum along the west wall. Use Line Launcher and travel between these three pads without touching the ground to open the cage and get the trophy.
- Look for a trophy cage with a set of three riddler marks on top of the roof in the corner to the west. Apply explosive gel on each of these marks, then step on the pressure pad outside. Now, zoom in to blast these marks and get the trophy.
- Look for a REC-controlled door in the east of the last trophy, on the ground in an alleyway. Open the door to get the trophy.
- Look for the horse statue near the rear entrance of the Museum. Climb the platform and then create a tightrope with Line Launcher to reach the riddler trophy.
- This trophy is locked behind Tyger Panel controlled iron bars in the north of the horse statue outside the Museum’s rear entrance.
- There is a short passageway on top of the roof north of the rear entrance to the Museum. Destroy the wall of the small roof access building to get access and follow the tunnel inside to get the trophy.
- Top of the right pillar southwest of the Bank of Gotham.
- Follow the pillar from the previous trophy down to its base and you will find the riddler trophy in front.
- Look for an electric fence near the eighteenth trophy. You need to dive bomb and glide from above the area and gain enough momentum to fly over the fence and get this riddler trophy.
- Look for this trophy inside the tram south of the Museum’s rear entrance. Take the stairs and then hack the Tyger Panel to get it.
- There is a pressure pad on top of the building west of the Bank of Gotham. Run across it and slide into the tunnel when the gates open to get the trophy.
- Look for the trophy cage that locks automatically west of the Bank of Gotham. Climb the nearby vents and get it with Batclaw.
- There is a REC-controlled doorway beneath an Italian Cuisine sign on the ground floor, southwest of the Bank of Gotham. Open the doorway to get the trophy.
- Find the landmines toward the east end of the passageway underneath the central building. Use the explosive gel on the wall nearby to get the trophy.
- Find riddler marks under the rooftop of the large central building in the area south of the Bank of Gotham. There are three riddler marks on each wall. You can quickly throw Batarangs at all six to unlock the trophy cage and get the trophy.
- Look for the trophy on the rooftop of the large central building.
- Glide down from above into the weak wooden panel of the tram, southwest of the Bank of Gotham.
- Look for this trophy on the ground behind a wall, southeast of the Bank of Gotham. Activate the riddler mark to the east using remote Batarang. When the timer starts, activate the second riddler mark to the north and get the trophy.
Riddles Locations/Solutions
This question can only be answered from an unusual perspective. Can you get yourself there?
- When you enter the processing center for the first time, use Cryptographic Sequencer to unlock the door. Switch to detective mode and align the riddler marks to solve this riddle.
My intellect towers above yours, Batman. I wonder if you’ll ever solve this riddle?
- Zoom in on the Wonder Tower and scan it to solve this riddle.
The feuding families always sit down to a good meal. Will there be a massacre?
- Find the San Maroni restaurant on the east side of the tall central building. It is on the walkway near the main road.
Cowboy, trilby, or bowler? Hats off to anyone brave enough to try one on.
- There is a Hat Shop sign opposite the entrance to the Museum. Scan it to solve this riddle.
Do you need to look SHARP to campaign for change?
- Look for a billboard for Sharp’s campaign on the rooftop of the tall building west of Wonder Tower.
Was the writing on the wall from the moment you entered?
- Find a small plaque to the right of the entrance to the Processing Center. Zoom in to solve the riddle.
Arkham City is not a place to be rich or famous. Bruce Wayne has never felt quite so wanted.
- Look for a set of wanted posters for Bruce Wayne to the right of the entrance to the Museum.
You’re a dummy if you don’t try and buy one.
- Scan the Ventriloquist sign on the ground between Park Row and The Bowery.
Studies have shown that if you’re not on your best behavior, you’ll come out crazy. How Strange?
- To solve this riddle, scan the large gate to the Inmate Behavioral Analysis Unit, southwest of the area.
You don’t want to be caught off-guard in this place, do you?
- There is an interrogation room to the northwest inside Processing Center. Enter the room and scan the guard.
You don’t have to be crazy to shop here, do you?
- Find the Jezebel Center sign above the locked gates at the north side of Bowery’s west side road.
Tyger Cameras Locations
- Right off the locked gate leading into the Bowery, look on the west side of the border between Park Row.
- Go east from the previous camera and look at the northeast corner of the next building.
- Go west from the exit from the Processing Center and look at the south pillar in the center of the road.
- Look on the first-floor walkways overlooking the road, southeast of the base of the Bank.
- It is above the exit from the Processing Center.
- South of Bowery, near the Titan container.
- Southeast corner, next to a neon sign, opposite of Gotham News van.
- Look at the wall, south of the entrance to the Museum.
- The same level, on the east of the entrance to the Museum.
- Look above one of the Monorail entrances on the north side.
- Look on the ground floor, under the glass dome.
- North of the rear entrance to the Museum.
Steel Mill
- All the collectibles are in the Steel Mill area of Batman Arkham City.
Riddler Trophies Locations
- After moving through the furnace and then into the tunnels, you will find a cooling chamber to the left. Use the bat claw to get the trophy.
- To the west of that large alcove area is an elevator. It’s locked. You can use the Tyger panel to get inside.
- Move to the Harley Head in the assembly room. From here, grapple up to the top of the room. You can find the trophy behind the fragile wall.
- In The room where you save Dr. Stacey Baker, first open the vent and then grapple up onto the wall on the right.
- On the ground floor where you find molten steel moving beneath it, you can find a Riddler trophy under a shot gap.
- To the south side wall in the smelting, the chamber is a water-cooling chamber you can break to collect the trophy.
- In cooling tunnel D (you will enter from the smelting chamber), use the Remote Electric Charge to charge the electromagnet. The mine cart will move, and you collect the trophy.
- While moving through the assembly line, you can use the REC on the electromagnet in the large room where you dealt with the gunmen before. When the cars are moved, open the vent and move down the tunnel to find the trophy on the conveyor belt.
- When the bumper cars are moved, you will find another opened tunnel to your right. Use the freeze blast grenade to neutralize the hot air inside.
- As you enter the freight elevator area, you will find a cooling chamber to your left. Use your bat claw at it to get the trophy.
- In the loading bay section when you take down Joker’s door, use the electromagnet to destroy the fan at the back of the room. Get up there to find the trophy.
- From the point where you found the previous trophy, move down on the pipe below and then move across the lava and then step on the pressure pad to collect the trophy.
- In the back entrance of the Steel Mill, move to the ledge near the big tank. Use the Explosive Gel on the wall to get the trophy.
- In cooling Tunnel B, get across the water using the line launcher. Hack the Tyger panel to collect the reward.
- You will find a Riddler mark at the end of the streaming water. As you activate it, you will notice an open area. You can use the line launcher to get across. Head inside the vent there and get the trophy.
- Destroy the wall that leads to the water-cooling tunnel Throw a freeze blast at the far end wall and then move up to the hidden bay above.
- In Cooling Tunnel D, you will have to duck once to move under a wall. Just after that, you will find a trophy on the ceiling.
- During the same ride in the cooling tunnel D, look for the vent on your right side. You can open it using the bat claw and then enter inside to collect the trophy.
- You need to hit the fuse box in the room where Joker’s men are interrogating one of Two Face’s men. After you have lowered the bridge, use the electric current to charge a Batarang and then navigate through the opened chamber to strike the fuse box.
- Drop through the grates in the central section of the loading bay. Find the hot pipe and use the freeze blast to neutralize it. Head inside to grab the trophy.
- Grapple to the base of the freight elevator to get the trophy.
- At the bottom of the Freight Elevator is a small panel you can destroy. Use Explosive gel to get access and find the trophy.
- You will find a destructible wall in the basement to the north. You can find the trophy behind that wall.
- After you destroy all the penguins in Joker’s game, you can use the bat claw to reveal the trophy in one of them.
Riddles Locations / Solutions
This question can only be answered from an unusual perspective. Can you get yourself there?
- In cooling tunnel D’s room, move to the edge of the ledge up there. You can find the dot on the ledge. You can use the camera to reveal the question mark on the wall ahead.
They say the more things change the more they stay the same. Which dummy said that?
- You can find Harley Quinn’s outfit in the Manager’s office, in the corner.
Once assembled, do these two become one again?
- You will have to come back to solve this riddle. You should search the north room of the assembly line. Scan the area for two Abramovici brothers as they are lying against the gate.
Surely someone was clowning around when they qualified this person?
- On the top floor of the Smelting Chamber, the east room has some pictures of Joker and a certificate.
Do you need to hammer it home? Everyone knows Harley is stupid.
- You will find a hammer near Harley’s chamber in the cooling tunnel D room. You should scan this.
Who can BOYLE and Freeze at the same time?
- At the end of cooling Tunnel B, in a room is a poster of Boyle Cryogenics. Needs some scanning.
What’s a funnyman without his box of tricks?
- You should look for Joker’s pranks in a small box placed on the crate in the boiler room.
Harley Heads Locations
- Search the northeast corner of the loading bay area.
- Before you enter the large room with three gunmen guarding it, take a left to the first room of the assembly line. You can collect the trophy from here.
- You can find a head in the second room in the assembly line section. It’s after you defeat the gunmen.
- It’s part of the cutscene, so can’t be missed.
- On the ground floor, in the northeast section of the smelting chamber is a barrel. The head is nearby.
- As you enter from the smelting chamber to the cooling tunnel D section.
- As you enter through the back entrance of the Steel Mill, you will find it right in front of you.
- While you are at the end of Tunnel B, you will find it just before the door.
- Cooling tunnel D, it’s to the right of a fragile wall in the first room.
- Search the bottom of the Freight Elevator beside the door.
- Inside the Boiler room, just near the crates.
- You can have it in Manager’s office in the corner.
Catwoman Trophies Locations
- Head to the loading bay and locate the elevator. You’ll find the elevator has been sealed off, activate the Tyger Panel to gain access to it, and obtain the trophy.
- Head to the assembly room, latch onto the roof and ascend, a Joker symbol will be in front of you. At this point switch out to Catwoman and make your way through to find the trophy.
- Head to the Smelting Chambers and make your way over to its eastern block. Search under the pathways in this section to locate the trophy.
- Head towards the Cooling Tunnels and make your way over to the D tunnel. Search under the bridge here to find the trophy.
- Head to the loading bay area and search its ventilation unit to find the trophy.
Museum
All the collectibles in Museum in Batman Arkham City.
Riddler Trophies Locations
- Jump left through the wooden panel at the entrance of the museum. Throw multiple Batarangs at the three marks ahead to get the trophy.
- At the top of the trophy room is a platform that you can grapple onto. There is a trophy there, so use the grapple and get it.
- Look for the weak wall on the top floor of the trophy room. It’s in the south, on a set of crates.
- Look above the Scarface display in the trophy room and you will find a vent. Use Batclaw to oust it and then climb through to the next corridor. You will find the trophy protected by a Tyger Camera.
- There is a barrier leading to the southwest corridor. You can slide through it to get the trophy, only to get blocked by lasers ahead. To counter these lasers, use an upgraded Cryptographic Sequencer and unlock the bars to get the trophy.
- Turn left from the corridor leading out of the trophy room. Use the REC to open the gate to get the trophy.
- When you get the previous riddler trophy, look above and you will find a cage with an access grate. Unlock it to get the trophy.
- Before you take the elevator after unlocking the gate having survived the gladiator pit, activate it so you can destroy the weak wall on the right and get the trophy.
- Take the elevator and reach the floor above. Look for a water-cooling chamber on the wall on the top floor. You can open it using Batclaw. Do that to get the riddler trophy.
- Use the remote controller Batarang and pass it through the electric current from the top of the gladiator pit. Use it to overload the fusebox in the central corridor with the locked gate. Open the gate to get the trophy.
- Smash through the window at the end of the corridor where you found the last trophy and get the riddler trophy ahead.
- When you enter the torture chamber, look for a water-cooling chamber below the platform as you enter. Drop on the ice and use your Batclaw to open the vent to get the trophy inside.
- There is a REC-powered door in the northern corridor of the Torture chamber. You can activate and slider under it. Use your Batarang to hit one of the riddler marks below.
- There is a locked door in the northeast corner of the Armory. There is a panel on the left that you can use to unlock it and get the trophy.
- There is a riddler trophy inside the floor grates that run along the south side of the ground floor of Armory.
- There is a hidden corridor on the far west side of the Armory. You will find the trophy in the northern corner of this area. It is blocked by hot air so freeze the air first to get the trophy.
- You would need an upgraded Cryptographic Sequencer to get this trophy. Look for a Tyger Panel underneath the central bridge of the Armory. Get access to it to get the trophy.
- Look for the weak walls on the east side of the bridge in the Armory. You can destroy them to get the trophy inside.
- Look for a riddler trophy in the northwest corner of the torture chamber. You will need freeze grenades to get it since it’s frozen. You can come back later if you don’t have freeze grenades, just mark their location on your map.
- There is a trophy inside the chamber holding Mr. Freeze.
- There is a trophy in the northeast corner of the War Room – it is blocked by hot air so you will need to freeze the air to get it.
- Look for a riddler trophy inside the room connected to the bottom floor of the Iceberg Lounge. You can slide through the small gap beneath the gate to get the trophy but first, you will need to deal with the mines.
Catwoman Trophies Locations
- Head towards the corridor connecting to the trophy room, and take a left to encounter a doorway opened by REC. open the door and enter the room, latch onto the roof grate and obtain the trophy.
- Whilst on the north ledge by the torture chamber, you’ll find a ground access grate, latch on to grab the trophy dangling by the roof.
- From the previous trophy, the location latches onto the roof, heads to the northwest end of the room, and jumps down onto the cage to obtain the trophy.
- In the Armoury room, search the area near Mr. Freeze’s suit, the trophy will be found above it.
Riddles Locations/Solutions
This question can only be answered from an unusual perspective. Can you get yourself there?
- Inside the torture chamber on the eastern side, you will find the water-cooling chamber. Stand at its right and use detective mode to find the riddler mark.
Who’s in control here? The puppet or the puppeteer?
- Scan the Scarface display in the northwest corner of the trophy room.
Was he framed? Or does it run in the family?
- There is a picture of two people with a young penguin in the corridor leading out of the trophy room as it turns west.
Have Joker’s pets laughed themselves to death, or just eaten too much?
- Find a display with a hyena inside in the corridor leading to the war room.
Brothers in arms. Brothers at war. Who’s right? Who’s… left?
- Scan the red poster with Abramovici Twins at the back of the war room.
See no evil, hear no evil, speak no evil, or there will be explosive consequences.
- Scan the skeletons display (arranged to represent this riddle) in the northwest corner of the Armory area on the bottom floor.
Can anyone TOP the Penguin when it comes to the full VIP treatment?
- Find the top hat in a small room connected to the bottom floor of the Iceberg Lounge. Zoom in to scan it and solve the riddle.
Penguin Statues Locations
- When you enter the museum, take a right and go to the room on the northern side.
- The right of the display is reserved for Batman. You will find it downstairs in the trophy room.
- There is a vent in the northwest corner of the trophy room and that is where you will find this statue. Use your Batclaw to open it and get inside. Look to your left in the corridor on the other side and you will find the statue on the table.
- Find the gate in the southeastern corridor of the trophy room. You can slide under the gate and when you do, look to your right and you will find the trophy on the table.
- When you switch off the power to the gates in Gladiator Pit, search the gate on the north side and you will find the statue on the ground.
- Take the stairs from where you found the last statue and look for a gap in the fence. You will find the statue in the hanging cage. Use the remote controller Batarang to hit the statue.
- There is a boat with the statue on the right, in the northern corridor leading from the torture chamber.
- In the broken display case in the east corridor on the ground floor of the armory.
- Look for a penguin statue beneath the mammoth statue that you will find under the bridge.
- You will find a penguin statue on the table in the corridor that leads from the torture chamber to the war room.
- There are two penguin statuses on the table at the bottom of the Iceberg Lounge.
Wonder City
All the collectibles are in the Wonder City area of Batman Arkham City.
Riddler Trophies Locations
- You will find one just after you enter the collapsed streets. You will find a grapple point above there.
- Stop the hot air using the freeze blast and you can get a trophy behind it.
- In the section in Collapsed streets where you need to use the line launcher, look for a small room with a trophy inside to the south. You can use your line launcher to get there.
- First covert the water into ice to the eastern section of the Collapsed Streets. Then you need to get to the top position (you will need a platform below) to grab the trophy using the Batclaw.
- To get to the center of the water, make it icy and the trophy will be yours.
- If you jump through the glass window at the end, then you can have a look at the trophy form here but can’t grab it yet. You need to destroy the fragile wall to your left using a gel explosive. Then enter the room through which you can see, and this time grab the trophy.
- From the point, you collected the previous trophy, turn around and move through the broken wall. You can find the Riddler trophy on the ceiling. Use the Batclaw.
- When you enter the Wonder Tower Foundations, it’s beneath the door you enter the area. There is a set of iron bars you can unlock through the Tyger panel.
- To the eastern section of the Wonder Tower Foundation, destroy the fragile wall on the middle floor to reveal a trophy.
- In the Wonder Tower Foundations, look for a Riddler trophy in the southeast corner beside some grates.
- To the left of Wonder Avenue, you can find a trophy inside a baby’s carriage.
- You will find a fragile wooden wall on the left corridor of Wonder Avenue. The trophy is behind the wall.
- You will find one trophy behind a destructible wall while to Ra’s lair. For the Riddler mark, you will have to navigate the Remote Batarang around the building to get to the other side wall.
- You need to use some pressure pads. One is in one of the rooms on the second floor of Wonder Tower. After the west, use the line launcher to move to the east. And then head south for the final pressure pad.
- While moving through Wonder Avenue (main pathway), look for a small gap you can slide under to collect the trophy.
- When you get to the secret corridor, deal with the fence using the disruptor and get the trophy on the other side.
- Behind a destructible wall in the corridor leading to Ra’s lair. The Riddler mark to activate this is on the other side of the wall, so use a Remote Batarang to navigate around the building.
- From one of the rooms on the second floor of Wonder Tower is a pressure pad. Start from the west side then use the Line Launcher to travel east, then south onto the last pressure pad.
- Underneath a small gap – which you must slide under – to the right of the main path through Wonder Avenue.
- In the Secret Corridor, there’s a fence with a mine blocking it. Use the Disruptor to bypass this and collect the trophy on the other side.
- Behind a REC-controlled gate to the west of the Chamber of the Demon.
- In the west set of Collapsed Streets, to the south of the room filled with water. Use the Freeze Blast to create a platform underneath the ledge, then use the Batclaw to grab it.
- In the northwest corner of the west set of Collapsed Streets. Use the Line Launcher from the entrance to the room, then fire a second shot to the left to reach it.
- Opposite Trophy XX. Use the Batclaw to cut the Riddler trophy down, then create an ice platform to collect it.
- South of Trophy XX. Use the upgraded Cryptographic Sequencer to unlock the case then the Batclaw to collect the trophy.
- In the room connected to the Wonder Tower Foundations is a destructible floor panel. Use a Batarang on the Riddler mark above it to open the Riddler case on the ground below.
- In the southwest corner of the south set of Collapsed Streets is a door locked by a TYGER panel. Once you have the right codes, open the door and Batclaw the Riddler trophy off the ceiling at the bottom of the steps.
- After riding the elevator to the observation deck of the Wonder Tower and unlocking the fence, shimmy all the way around to the east side of the tower.
- While climbing the Wonder Tower you’ll pass through the elevator shaft and into a corridor with an iron bar cage. After exiting the cage, grapple onto it and follow it around to find the Riddler trophy on the top.
Wonder City Riddles Locations/Solutions
This question can only be answered from an unusual perspective. Can you get yourself there?
- While climbing the Wonder Tower you’ll cross a tightrope to a second beam. Beneath the second beam is the Riddler question mark. To successfully scan this, you will need to drop or glide away from the tower and scan it as you fall.
Crime is a global issue. You’ll never stop it, Batman.
- At the center of the Wonder Tower Foundations is a large globe. Scan this.
Read all about it! Is this a sign of the Times?
- Head down the east corridor after entering the Wonder Tower and look for a newspaper board with “Wonder City: Shut Down”.
Wanted: Dead… and alive?
- Look for a wanted poster of Solomon Grundy in the corridor east of the Chamber of the Demon.
Do these demonic twins pose a threat?
- Scan the two statues at the end of the Chamber of the Demon.
Where can you get a wonderful view of the past?
- At the top of the elevator to Wonder Tower is a plaque with Gotham City etched onto it. Scan this.
Demon Seals
- Inside the Wonder Tower Foundations, above the entrance to the lift in the center. Use the Batclaw.
- Above the door leading to Wonder Avenue. Use the platforms above to reach it.
- Along the west wall on the ground floor.
- Above the last door before entering Wonder Avenue proper.
- From the last Demon Seal, turn 180 degrees and look for the next above the archway.
- In the center of the large, locked door leading to the Wonder City Temple.
- After climbing out of the vent into the Chamber of the Demon, turn around and find the seal in the center of the door.
- Each of these is on either side of the large door to the final room of the Chamber of the Demon.
- After riding the elevator to the observation deck of Wonder Tower, on the outside of the tower.
- The same position as Demon Seal 10, but on the inside of the elevator shaft.
- While climbing the Wonder Tower, you will pass through the elevator shaft to a lower level. Turn around and spot the seal above the area you came from.

- Форум
- Мультиплатформенные игры
- Вышедшие игры
- B
- Batman: Arkham Knight
- PS4 Batman: Arkham Knight вопрос по поиску трофеев Загадочника.

Тема: Batman: Arkham Knight вопрос по поиску трофеев Загадочника.
-
16.11.2015, 05:36
#1
0
Batman: Arkham Knight вопрос по поиску трофеев Загадочника.
Уважаемые, подскажите, где найти эти трофеи?
На всех картах пишет,что ни чего не осталось, всё по 0, но загадок разгадано 241шт.
Сообщников не могу найти.
Игру переустанавливал, консоль перезагружал*
Выкачиваю патч 5гб, может быть он чем поможет…Последний раз редактировалось PsyMouse; 16.11.2015 в 05:42.
-
16.11.2015, 07:27
#2
0
бегай по карте и чуваков зелёных допрашивай.
А внутри зданий все знаки собрал?Последний раз редактировалось Karim; 16.11.2015 в 11:53.
-
16.11.2015, 07:53
#3
0
бегал по карте и чуваков зелёных допрашивай.
А внутри зданий все знаки собрал?БегаАЛ? ДопрашивАЙ?
Летал и ездил по всей карте не один час.
Внутри всё собрал: Панесса Студиос, Штаб квартира, Оба дирижабля, здание полицейского управления.
-
16.11.2015, 16:58
#4
0
В подземельях глянь)
Отправлено с моего GT-N7100 через Tapatalk
-
16.11.2015, 17:09
#5
0
Раз всё в доль и поперёк прочесал, как ты говоришь, то воспользуйся видеогайдом и повтори всё один в один, да это займёт время, но зато найдёшь недостающую загадку. Похожая ситуация была со мной в Аркхам Сити, тоже бубнел на разрабов, а в итоге сам недоглядел.
-
16.11.2015, 17:41
#6
То же с такой проблемой столкнулся, с поиском отдельного трофея. В меню игры они все в разнобой, так что найти какой-то определенный очень сложно. Наткнулся на шикарный видеогайд. Автор переред взятием трофея, в меню показывает в какой ячейке он находится. Например в твоем случае на острове Миагани, четвёртый трофей в третьей колонке на видео время 45:43.
Последний раз редактировалось danteqw; 16.11.2015 в 17:47.
-
16.11.2015, 21:25
#7
0
То же с такой проблемой столкнулся, с поиском отдельного трофея. В меню игры они все в разнобой, так что найти какой-то определенный очень сложно. Наткнулся на шикарный видеогайд. Автор переред взятием трофея, в меню показывает в какой ячейке он находится. Например в твоем случае на острове Миагани, четвёртый трофей в третьей колонке на видео время 45:43.
Спасибо! Особенно за время на видео тк в моём городе очень грустно обстоят дела с интернетом!
Уже всё сделал, осталось получить Brutality 101 Trophy и первая платина у меня в кармане.
Всем спасибо!
Тема закрыта.


- Форум
- Мультиплатформенные игры
- Вышедшие игры
- B
- Batman: Arkham Knight
- PS4 Batman: Arkham Knight вопрос по поиску трофеев Загадочника.
Информация о теме
Пользователи, просматривающие эту тему
Эту тему просматривают: 1 (пользователей: 0 , гостей: 1)
Ваши права

- Вы не можете создавать новые темы
- Вы не можете отвечать в темах
- Вы не можете прикреплять вложения
- Вы не можете редактировать свои сообщения
- BB коды Вкл.
- Смайлы Вкл.
- [IMG] код Вкл.
- [VIDEO] code is Вкл.
- HTML код Выкл.
Правила форума
15 июля 2015
15.07.15
5
352K
Миссия 10. Контрабанда оружия
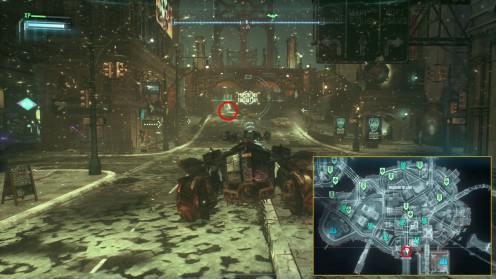
По сюжету миссии вам необходимо найти и уничтожить все тайники с оружием старого пройдохи Пингвина. Найтвинг предоставит вам данные обо всех фургонах с оружием Пингвина. Отправляйтесь к этому месту, отслеживайте фургон и запугивайте бандитов. Когда они попытаются оторвать от вас, то забирайтесь на крышу и следит за фургоном. Держитесь за ними, пока они не доберутся до «Сионис Индастриз» около Falcone Shipping Antenna на острове Блэйк.
Войдите внутрь здания через боковую дверь и взломайте консоль на стене с другой стороны. Используйте для этого устройство для дистанционного взлома, что поможет открыть главные ворота. Переключитесь на бэтмобиль и разберитесь со всеми турелями. Найдите решетку, по которой вы можете забраться выше, используйте переключатель, чтобы открыть проход на крышу.
Двигайтесь на крышу и разбейте окна. После того, как вы спуститесь ниже, то победите головорезов вместе с Найтвингом. Нанесите взрывчатый гель на ящики с оружием внутри хранилища, после чего взорвите его.
Второе хранилище с оружием будет доступно после того, как вы уничтожите ракетную установку по мотивам сюжетной миссии на дирижаблях, на острове Основателей. Двигайтесь к месту, где стоит фургон, и начните атаковать его. Постучитесь в грузовик или вызовите бэтмобиль, чтобы напугать врагов. Двигайтесь за ними, перемещаясь по крышам, пока они не приведут вас к одному из тайников с оружием Пингвина.
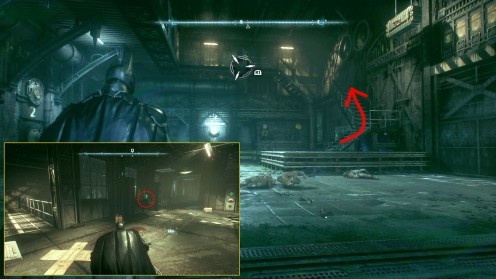
Разберитесь с охранниками снаружи здания и пройдите через дверь. Войдите в вентиляцию неподалеку и доберитесь до стены с трещиной. Используйте взрывчатый гель, но не взрывайте его. После вернитесь в вентиляцию. Когда у стены будут два врага, то взорвите тот самый гель. Разберитесь с остальными.
Используйте бэткоготь, чтобы вытащить решетку, закрывающую отверстие под потолком. Двигайтесь через это отверстие, используйте дезинтегратор, чтобы отключить ящик с вооружением и разобраться с двумя бронированными солдатами около него. Хорошо здесь работает прием мульти-удар. Взорвите хранилище с оружием, чтобы завершить часть миссии.
Это хранилище становится доступным только после того, как в сюжетной миссии появится Харли Куинн. Двигайтесь к отмеченному месту, где стоит фургон на карте, затем запугайте врагов бэтмобилем или постучитесь в дверь. Преследуйте их по крышам, пока они не доберутся до места тайника на заводе по фильтрации воды, что на острове Блэйк. Осмотрите ворота, где проехал грузовик, после чего Альфред поможет вам попасть в туннель.
Двигайтесь вперед по пути, ведущему в канализацию. Там есть несколько вооруженных противников, поэтому проще будет убить их при помощи бэтмобиля. Пройдите в комнату выше, чтобы найти электрический бокс, контролирующий преграду ниже. Потяните за рычаг, а со стола, по желанию, заберите трофей Загадочника.
Садитесь в бэтмобиль и используйте мощную лебедку, чтобы поднять тяжелые ворота. Подкрадитесь к врагам и используйте мульти-удар. Вверху есть три решетки, через которые вы можете пробраться. Внутри нет вооруженных врагов.
После того, как вы устраните охранников внутри, установите взрывчатку (гель) на ящики с оружием и закройте дверь в хранилище. Чуть позже взорвите его. В этом случае активируется кат-сцена, и вы увидите, что Найтвинг попал в плен Пингвина. Отправляйтесь к месту дислокации Пингвина, чтобы спасти его.
Поднимитесь на крышу и проверьте локацию. Здесь вы не можете использовать режим детектива, поскольку есть помехи от одного из охранников. Если вам удастся разобраться с бандитом, носящим рюкзак, то помехи исчезнут. Сначала заберитесь на точку наблюдения и разберитесь со снайпером. После устранения всех охранников на крыше получите доступ к боксу с предохранителями, чтобы открыть дверь лифта. Опуститесь вниз, пока не увидите бандитов, окруживших Найтвинга.
Вам нужно попасть внутрь и атаковать врагов неожиданно. В стене есть отверстие, через которое вы можете пролезть. В коридоре будет турель. Отключите ее при помощи устройства взлома, после чего уничтожьте. Откройте вентиляционную решетку и ползите через шахту. Проберитесь через отверстие. В итоге вы должны оказаться у потрескавшейся стены, с другой стороны которой находится Найтвинг и бандиты.
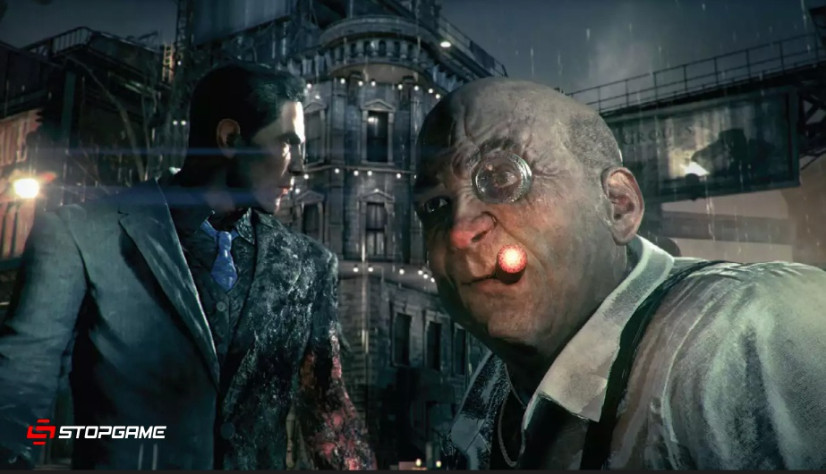
Встреча с Пингвином в конце миссии «Контрабанда оружия».
Взорвите стену и победите всех противников. Далее установите взрывчатку и закройте дверь последнего хранилища. Пингвин возьмет в заложники Найтвинга. Выполните командный двойной удар и взорвите взрывчатку. Последнее хранилище взорвано, поэтому вы можете смело доставить Пингвина в полицейское управление.
Миссия 11. Двуликий бандит
Двигайтесь к банку Готэма и пройдите внутрь. Будет включена сигнализация, поэтому ползти мимо бандитов совершенно необязательно. Пока они вас не видят, вы можете застать их врасплох, не привлекая внимания соседних головорезов. После того, как вы уничтожите первую вражескую волну, появятся другие противники. Просто разберитесь с ними всеми, чтобы добиться цели миссии. Это разблокирует новые вызовы. Район Дрешер находится на острове Основателей.
После того, как вы зачистите филиал в районе Дрешер, вам нужно будет двигаться в Кингстон. Это самый крупный банк и поэтому вам придется столкнуться с большим количеством бандитов. Также будет два транспорта. Используйте приемы, комбо и свои гаджеты.
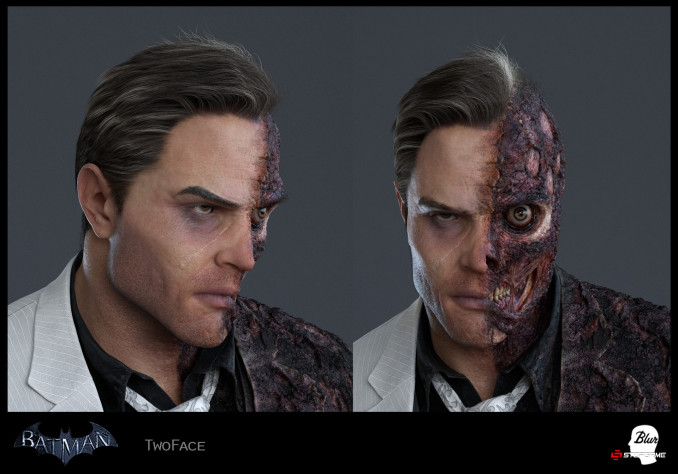
Двуликий бандит попытается ограбить все банки Готэма.
После уничтожения последнего врага в банке прибудет Двуликий в сопровождении свиты. Используйте мульти-удар. В режиме детектива будьте осторожны, поскольку во вражеской группе есть элитный специалист. Используйте дезинтегратор, чтобы отключать оружие. Это касается и Двуликого бандита, у которого в руках будет огнестрельное оружие.
Наконец, победив всех врагов, сразите Двуликого и отвезите его в полицейское управление.
Миссия 12. Друг в беде
Эта миссия станет доступна после инцидента с Харли Куинн во время сюжетной главы. Двигайтесь к башне Уэйна на острове Миагани, чтобы начать миссию. Получите доступ к лифту на подземной парковке (пройдите с юго-восточной стороны от банка Готэма), пройдите к компьютеру и используйте сканирование сетчатки глаза.
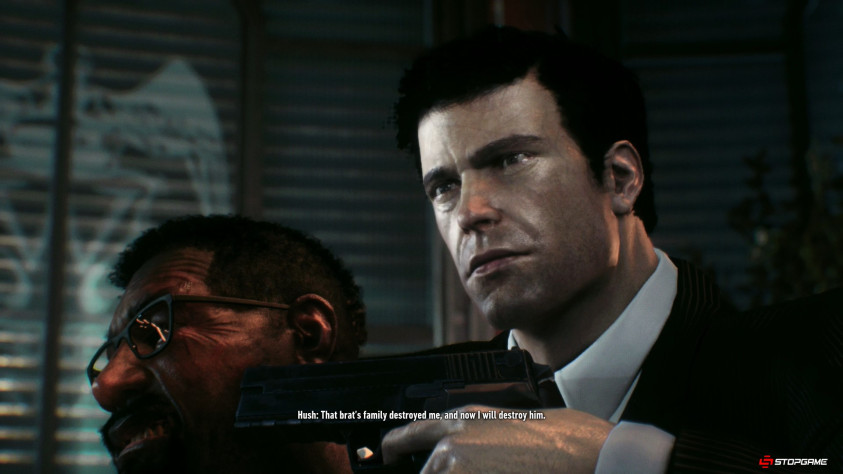
Хаш взял в заложники Люциуса Фокса.
Когда вы будете управлять реальным Бэтмэном, то подойдите к двери и просмотрите кат-сцену, в которой выявите нарушителя. Следуйте внутрь офиса, чтобы разобраться с ним. Спасите Люциуса, нажав на появившуюся на экране кнопку (клавишу). Когда Хаш повернет оружие в вашу сторону, то нажмите на кнопку, чтобы разоружить его.
Миссия 13. Жертвенный Агнец
Вы получите эту миссию после зачистки башни с часами и восстановления связи с Барбарой (Оракул). Двигайтесь к статуе «Леди Готэма» на острове в центре города. Вы окажетесь в клетке с сумасшедшей толпой. Разберитесь со всеми, используйте дистанционный заряд, чтобы отключить генераторы. После этого нужно будет выбраться из клетки.
Миссия 14. Месть Загадочника
В Batman: Arkham Knight Эдвард Энигма, известный вам по прозвищу Загадочник, разошелся не на шутку. Существует около 240 разных загадок, разбросанных Эдвардом по всему Готэму. Вам придется искать трофеи Загадочника, спасать жертв, разгадывать загадки и уничтожать различные объекты.
Тем не менее, для того, чтобы повергнуть Загадочника и спасти Женщину-кошку, необходимо пройти 10 испытаний, отмеченных на вашей карте.
P.S. 10 пройденных испытаний позволят вам первый раз сразиться с Загадочником и его роботами. Но если вы хотите раз и навсегда покончить со злодеем и отвезти того в полицейское управление, вам придется собрать ВСЕ трофеи и решить ВСЕ загадки, разбросанные по Готэму.

По мотивам миссии «Месть Загадочника» Бэтмэн должен снять с шеи Женщины-кошки ожерелье с бомбой.
Первое испытание
Прежде всего, садитесь в бэтмобиль и двигайтесь к первому маркеру. Заезжайте в гараж Загадочника. В подвале вы должны мчаться по кругу и объезжать различные препятствия. С каждым новым кругом количество препятствий будет возрастать. Если вы не закончите круг за отведенное время, то необходимо будет повторить попытку вновь. Следите за дорогой и нажимайте на кнопку B (кружок) для удаления препятствий Загадочника, когда вы сталкиваетесь с ними.
После того, как вы завершите 3 круга, то будете управлять Женщиной-кошкой. Нужно получить доступ, введя правильный ключ. В то время как вы будете перемещаться на бэтмобиле, на стене увидите зеленый свет в окружении красных огоньков. То же самое, что видит Женщина-кошка. Если вы играете на обычном уровне сложности, то зеленый ключ будет расположен в четвертой строке и третьем столбце. В режиме «Новая игра +» ищите ключ в первой строке и третьем столбце.
Второе испытание
Вам нужно следовать к заводу «Эйс Кемикалс» и сверните на мост с левой стороны. Немного дальше будет дверь с надписью Balancing Act. Следуйте через нее, начнется второе испытание. Вам необходимо подняться по рамке и покинуть бэтмобиль. Становитесь на переключателе, переключитесь на бэтмобиль и езжайте на балансирующую платформу. Это позволит вам активировать первый блок и открыть путь дальше.
Для красных и зеленых платформ нужно использовать иммобилайзер. Разместитесь на второй платформе баланса, после чего используйте цветные блоки, чтобы добраться до самого конца. Нужен будет форсаж, чтобы перепрыгивать через пропасти. Для активации платформы нужно объехать по кругу лифт и использовать лебедку справа. Давите на педаль газа, удерживая стрелку в оранжевой зоне.
Для нормального режима игры ключ находится на последней строке и во втором столбце. Для режима «Новая игра +» ключ ищите на четвертой строке первого столбца.
Третье испытание
Двигайтесь в приют Пинкни на острове Миагани, где вас ждет пазл. Здесь будут три вопросительных знака. Бросьте в каждый из этих знаков управляемый бэтаранг. Выровняйте круги, чтобы из них получился вопросительный знак. После этого встаньте таким образом, чтобы ваше отражение в зеркале стало точкой для этого вопросительного знака. Отсканируйте весь знак целиком. Идите в комнату Numeracy, Бэтмэном идите к правому переключателю, а Женщиной-кошкой – к левому переключателю. Теперь нужно ударить по знакам вопроса в таком вот порядке: 3-1-4-5-2 Бэтмэн и 1-3-5-2-4 Женщина-кошка. Начнется схватка.
Четвертое испытание
Следуйте в сторону госпиталя в Бристоле на острове Миагани, пройдите через дверь с надписью Crushonator. Убейте врагов и пройдите в третью пещеру. Сделайте три круга, проходя препятствия и укладываясь в отведенное время. На нормально уровне сложности ключ находится на последней строке и в четвертом столбце. При прохождении в режиме «Новая игра +» ключ ищите на третьей строке и в последнем столбце.
Пятое испытание
Двигайтесь в область Кингстон на острове Миагани. Спуститесь в гараж летной школы, чтобы отыскать четвертую пещеру. Вам нужно добиться концентрации воздуха, что поможет добраться до трех платформ. С первого раза пройти это испытание будет достаточно непросто. На нормальном уровне сложности ключ находится в пятой строке и четвертом столбце. На уровне сложности «Новая игра +» ключ ищите на второй строке и в третьем столбце.
Шестое испытание
Вновь посетите приют Пинкни на острове Миагани, где вас ждет новый пазл. Пройдите через дверь с надписью «Физика». Чтобы решить головоломку, вам нужно бросить бэтаранг в вопросительный знак на стене слева и встать на левый переключатель. Далее Женщина-кошка должна встать на другой переключатель, а Бэтмэна нужно переместить к третьему переключателю. После этого выведите Бэтмэна. Встаньте Бэтмэном на вторую площадку, а Женщиной-кошкой разместитесь на первой площадке. Когда разряд пройдет, то идите на первую площадку около Кошки. Для получения ключ вы должны прыгнуть в роли Бэтмэна на площадку с правой стороны. Женщиной-кошкой подберите ключ.
Седьмое испытание
Следуйте в район Отисбург на острове Основателей, в сторону церкви. Спускайтесь в гараж с надписью Drain Pain в церкви и получите доступ к пещере. Вам нужно использовать лебедку, после чего по стене сползать вниз, к лезвиям. Двигайтесь справа, пока не увидите, что в стене есть брешь. Разместитесь на платформе, чтобы понизить уровень воды, и на бэтмобиле следуйте ко второму номеру справа.
Вновь выстрелите лебедкой и спуститесь в воду. Следуйте по левой стороне, пока не увидите отверстие на слабой стене, которую разрушьте выстрелом из пушки. Покиньте бэтмобиль и двигайтесь к отверстию, чтобы встать на платформе и удалить воду. Вернитесь в бэтмобиль и следуйте вперед до лезвий. Двигайтесь по стене и отыщите третий номер. Спускайтесь с помощью лебедки, вращайтесь по стене и поднимитесь наверх. Покиньте бэтмобиль и заберитесь в дыру. Используйте площадку, после чего уничтожьте турели, используя бэтмобиль. Разместитесь на платформе внизу ямы и заберите ключ.
На нормальном уровне сложности ключ находится в третьей строке и четвертом столбце, а на уровне сложности «Новая игра +» – третья строка и пятый столбец.
Восьмое испытание
Встаньте Бэтмэном на ловушке, расположенной с правой стороны. Женщина-кошка должна подняться на потолок и встать на панель в соседнем помещении. На табло будет свет, отражающий движения. Если персонаж встанет на правильную панель, то количество света будет увеличиваться. Двигайтесь к нужному месту. Точка на вопросительном знаке – начало пути. Управляйте то одним, то другим персонажем, пока не доберетесь до панели, уравнивающей противников. Убейте красных и синих противников и получите ключ.
Девятое испытание
В новой пещере будет такая же гонка, как и раньше. Нужно проехать три круга с препятствиями за отведенное время. Для удаления препятствий вам понадобится иммобилайзер. На нормальном уровне сложности ключ находится во второй строке четвертого столбца. На уровне сложности «Новая игра +» ключ ищите в четвертой строке и в последнем столбце.
Десятое испытание
Пройдите через дверь приюта «Финальный экзамен». Следуйте во второе помещение и внутри увидите площадку из клеток 5х5. В конце каждого ряда платформ расположен генератор. Используйте устройство для выстрела электрическим зарядом и попадите в генератор около открытого пространства. Это позволит притянуть или оттолкнуть платформы. Вы не можете становиться на эти платформы и должны прыгать с потолка, управляя Женщиной-кошкой. Если Женщина-кошка будет стоять на платформе, то это предотвратит движение других платформ, расположенных позади нее. Пустой квадрат должен быть в том месте, куда падает красный луч. В этом заключается смысл загадки. Когда это произойдет, нужно запрыгнуть Женщиной-кошкой на потолок, чтобы избежать шипов.
Луч с пустым квадратом должен быть выстроен трижды. Когда это сделаете, то идите в предыдущее помещение, чтобы заполучить ключ, после чего попытаться покинуть приют. Когда вы попробуете уйти, то появится Загадочник со своими роботами. На этот раз роботы случайным образом меняют цвет с красного на синий. Бэтмэн должен атаковать синих роботов, а Женщина-кошка – красных.
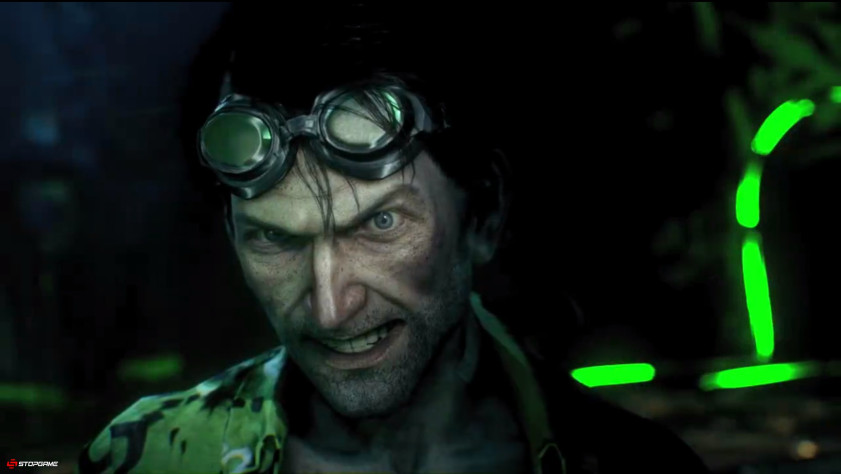
Безумный Загадочник, имя которому Эдвард Энигма.
Уничтожьте всех роботов, чтобы закончить первый раунд сражения с Загадочником. Миссия еще не завершена. Соберите все трофеи Загадочника и решите все головоломки Загадочника, размещенные по всем Готэму. После этого вернитесь в приют, чтобы сразиться с Загадочником во второй раз.
Получите доступ к панели с вопросительным знаком и разберитесь с Загадочником и роботами. Сначала роботы будут практически все синего цвета, но под конец вы обнаружите несколько красных врагов. Устройство для выстрела электрическим зарядом поможет вам пугать красных роботов. Когда около них будет Женщина-кошка, то переключитесь на нее и победите красных роботов.
Заканчиваем прохождение побочных миссий Batman Arkham Knight.
Загадочник ударит по земле, используя свою механическую руку. Цвет кулака указывает на то, кто может атаковать Загадочника. Напоминаем, что красный цвет – Женщина-кошка, а синий цвет – Бэтмэн. Если кулак будет зеленого цвета, то Загадочника может атаковать любой из ваших персонажей. Продолжайте атаковать первый кулак Загадочника, пока не разберетесь со всем запасом ХП. Далее отвезите Загадочника в участок и завершите миссию.
Поддержи Стопгейм!