Иногда случается, что мы случайно удаляем еще нужные нам файлы. Особенно это опасно в терминале Linux, поскольку здесь файлы удаляются не в корзину, а стираются с диска сразу и навсегда.
Понятно, что нужно аккуратно обращаться с командами удаления файлов, но что делать если уже все удалено, а файлы были важные и их нужно срочно восстановить? В некоторых случаях это возможно. В нашей сегодняшней статье мы рассмотрим восстановление удаленных файлов linux.
Немного теории
Каждый файл занимает определенное пространство на жестком диске, но файловая система для предоставления доступа к файлу дает нам ссылки на его начало, по которым любая программа может получить уже содержимое всего файла. Было бы неэффективно, если бы удаление файла приводило к полному перезаписыванию его области на диске.
Вместо этого, файловая система просто удаляет ссылку на эту область со своей базы, а затем помечает пространство, где находился файл, неразменным. Но на самом деле там еще остались все ваши файлы. Из этого делаем вывод, что если после удаления файловую систему очень быстро переключить в режим только для чтения, то все удаленные файлы могут быть восстановлены.
Если же вы работали с этой файловой системой и данные на диске были перезаписаны другими, то вы уже ничего сами не спасете. Возможно, вы слышали, что спецслужбы могут восстанавливать несколько раз перезаписанные данные по остаточному магнитному следу на диске. Это действительно так. Но для решения такой задачи нужно специальное оборудование, здесь недостаточно нескольких программ, нужен специальный лазер, который может считать магнитный след по краям дорожки и другая аппаратура. Так что про этот метод для себя можете забыть.
Ну а мы остановимся на программном восстановлении, когда данные были формально удалены, но физически еще находятся на диске в целостности и сохранности. Дальше рассмотрим несколько утилит, которые помогут восстановить удаленные файлы Linux.
1. Safecopy
Safecopy — это довольно простой инструмент для восстановления данных, который просто копирует данные из одного места в другое. Утилита, как таковая, не восстанавливает отдельные файлы. Она просто позволяет скопировать данные из поврежденного устройства на нормальное.
Разница между этой утилитой и другими программами копирования в том, что Safecopy не завершается при обнаружении каких-либо ошибок, будь то плохая операция чтения или поврежденный сектор. У нее есть множество дополнительных опций для настройки, а также возможность создания образа файловой системы из поврежденного носителя. Данные восстанавливаются тщательно и быстро, насколько это возможно.
Утилиту можно установить из официальных репозиториев вашего дистрибутива. Пользователи Ubuntu могут воспользоваться такой командой:
sudo apt install safecopy
Здесь вы не восстановите удаленные файлы, но вы можете скопировать поврежденные данные. Например, для видео несколько повреждений не играют большой роли. Для запуска восстановления файлов в linux с раздела /dev/sda1 выполните:
sudo safecopy /dev/sda1 /home/files/
Все файлы, которые удастся скопировать будут в /home/files/.
2. TestDisk
TestDisk — это очень мощный инструмент для восстановления данных. Он не пытается скопировать данные из поврежденного устройства, а позволяет исправить ошибки и проблемы на уровне разделов, которые могут мешать работе с вашими данными.
Утилита может восстанавливать потерянные разделы, исправлять таблицу разделов GPT и MBR, делать резервные копии дисков, восстанавливать загрузочные записи, а главное восстанавливать удаленные файлы с файловых систем NTFS, FAT, exFAT и файловых систем семейства Ext. Также вы можете копировать файлы даже с удаленных разделов для тех же файловых систем.
Способ работы утилиты очень сильно отличается в зависимости от нужного действия. Здесь вас ждет псевдографический мастер, который проведет вас через все шаги. Установить testdisk можно ещё и из официальных репозиториев. В Ubuntu используйте для этого команду:
sudo apt install testdisk
Поскольку тема нашей статьи — восстановление файлов linux, рассмотрим как это делается с помощью этой утилиты. Запустите программу:
sudo testdisk
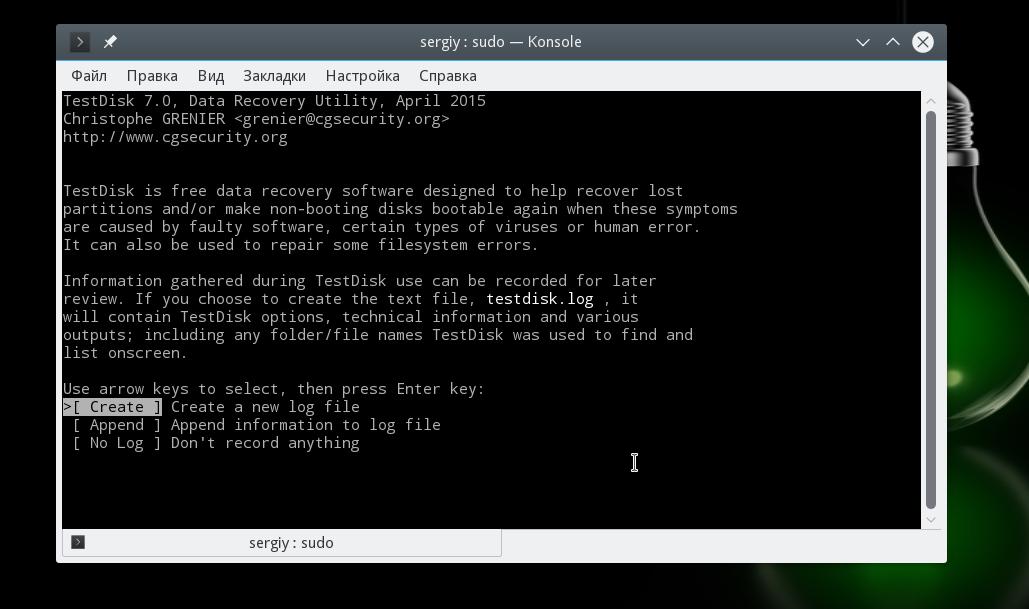
На первом шаге мастера выберите Create New Log:
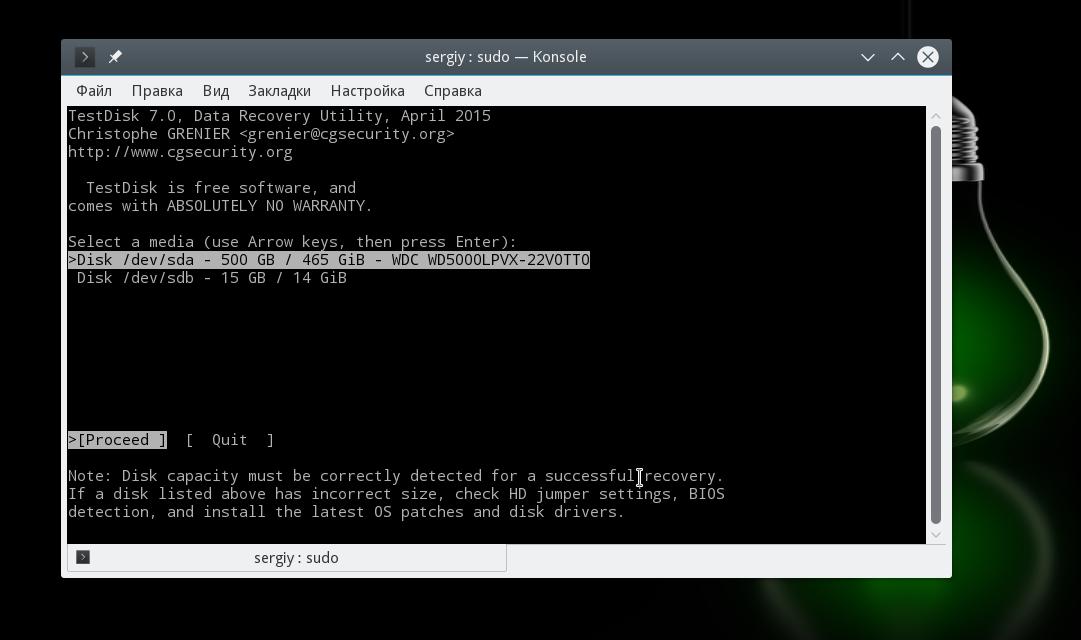
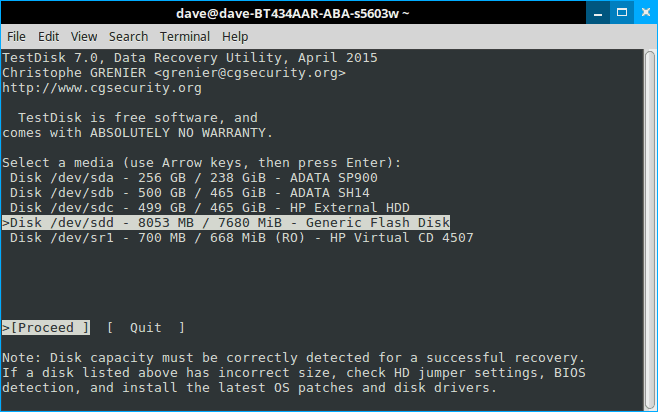
Дальше выберите диск, с которым будем работать:
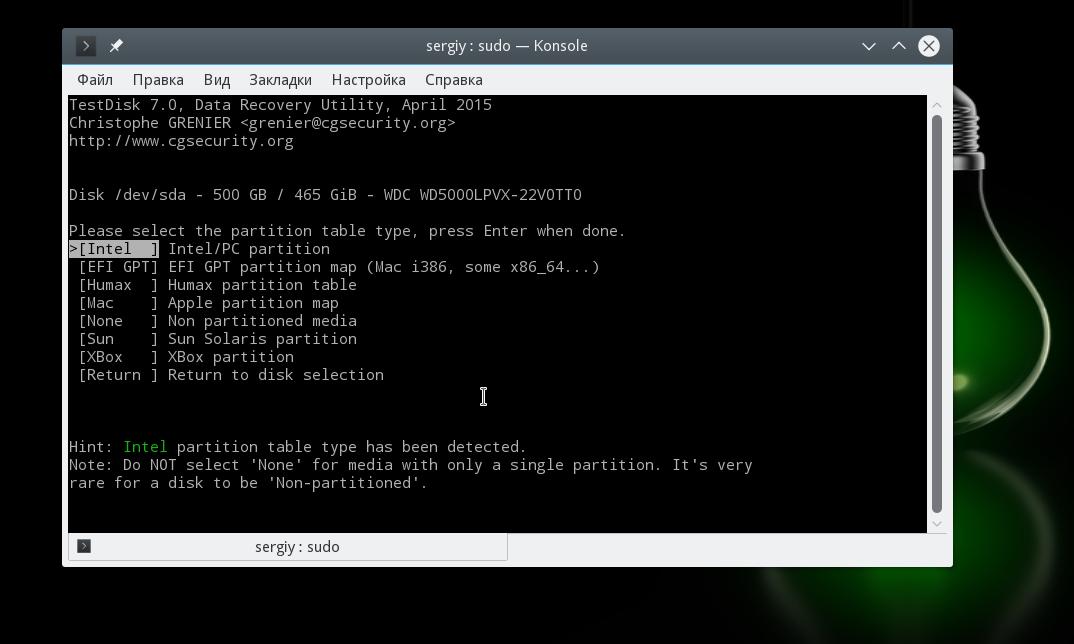
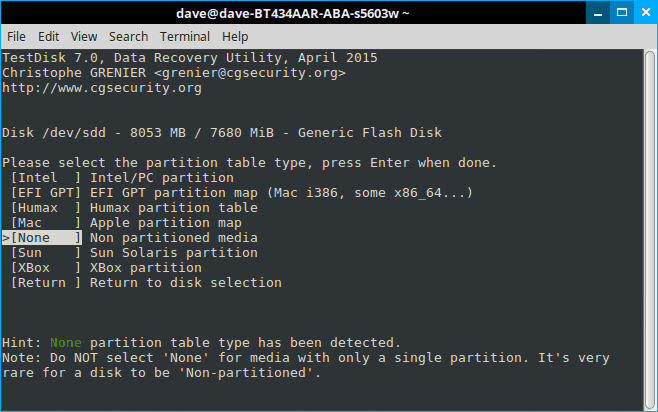
Выберите таблицу разделов на диске:
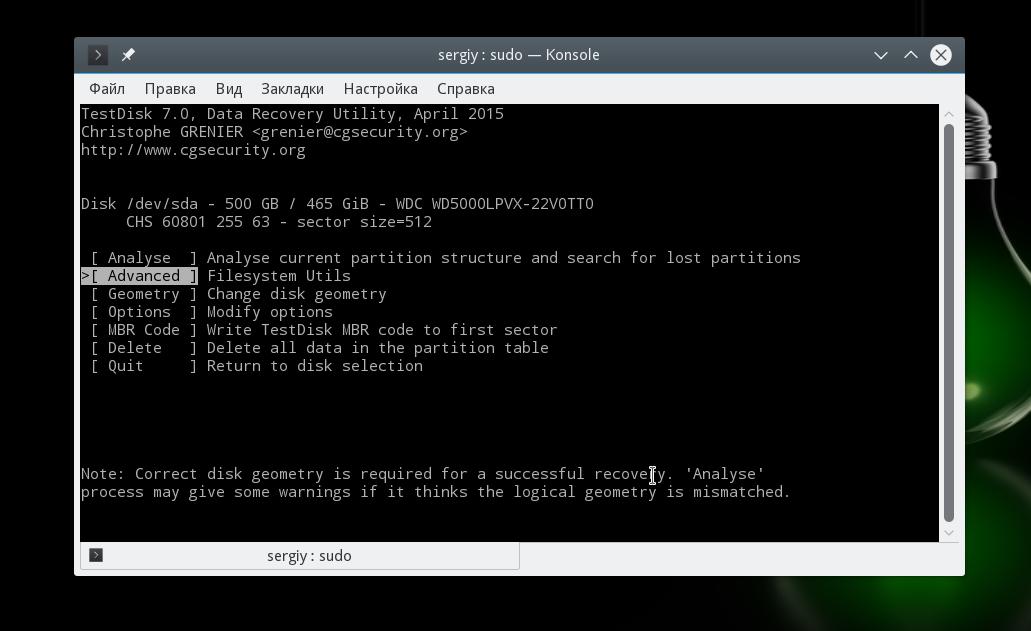
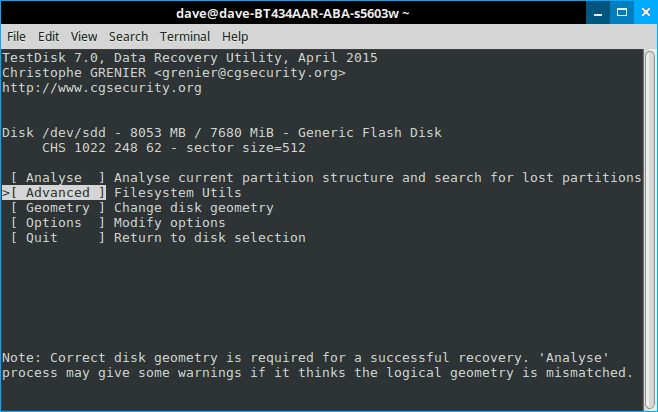
Для работы с файловой системой выберите пункт Advanced:
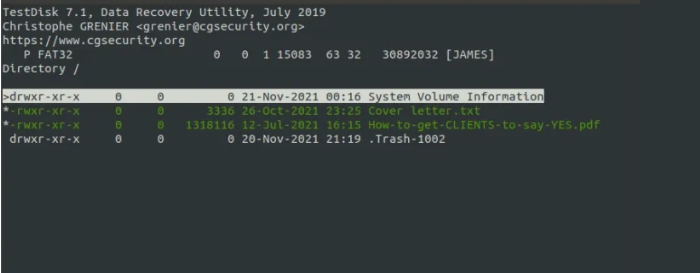
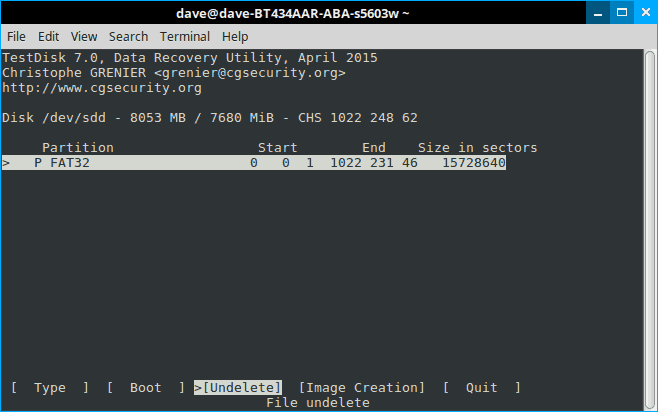
Далее выберите раздел, затем команду list:
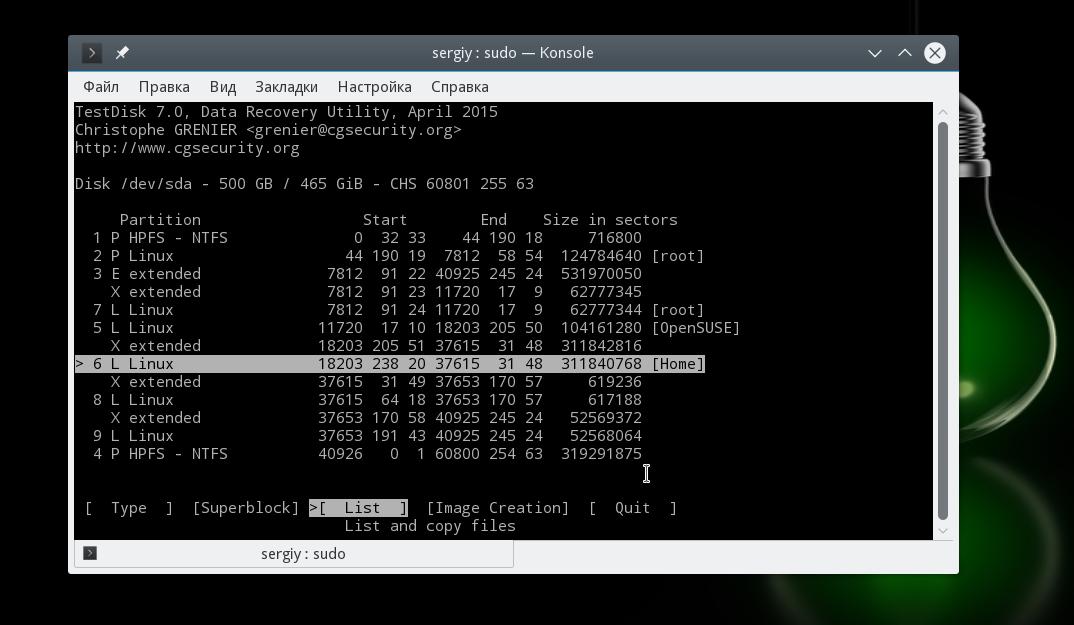
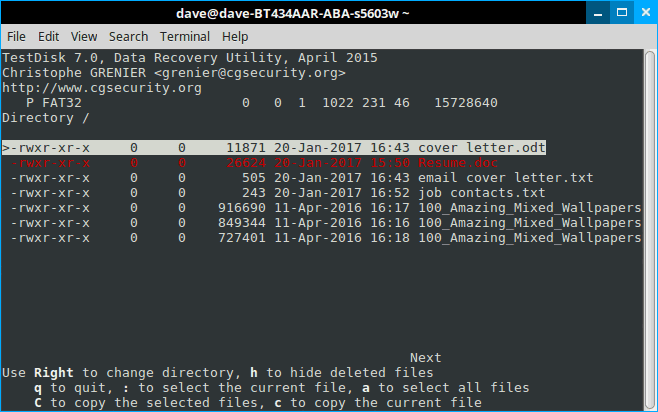
Тут вы увидите все файлы, которые есть на этом разделе. Удаленные, но подлежащие восстановлению файлы будут помечены красным.
Работать с этой утилитой удобнее, чем с Photorec, потому что здесь вы можете выбрать только один нужный файл, а не восстанавливать сразу кучу мусора. Чтобы скопировать файл просто выберите его, нажмите c и выберите папку для сохранения. Правда, вы же понимаете, что для восстановления нужно, чтобы файлы были не перезаписаны, где-то чуть перезапишется и все.
3. PhotoRec
Наша последняя программа ориентирована в первую очередь на поиск и восстановление удаленных видео, фото, документов и архивов. Можно сказать, что это программа восстановления удаленных файлов linux. Преимущество PhotoRec заключается в том, что она полностью игнорирует файловую систему и смотрит на сырые данные, а это значит, что она все равно будет работать, даже если файловая система повреждена или переформатирована, но только в быстром режиме, там где стираются лишь заголовки.
Во избежание каких-либо проблем, здесь используется доступ только для чтения, этого вполне достаточно для восстановления данных. Но как я говорил раньше, вам нужно остановить все операции записи, как только вы поняли, что нужно восстановить файл. В противном случае нужные данные могут быть перезаписаны чем-то новым и вы уже не сможете их восстановить.
В утилиты есть несколько настроек. Вы можете указать расширения файлов, которые нужно найти, размер, дату изменения и так далее. Установить программу можно так же как и TestDisk — из официальных репозиториев.
Например, в Ubuntu выполните:
sudo apt install photorec
Что касается использования, то тут похожий на testdisk интерактивный интерфейс. Запустите утилиту командой:
photorec
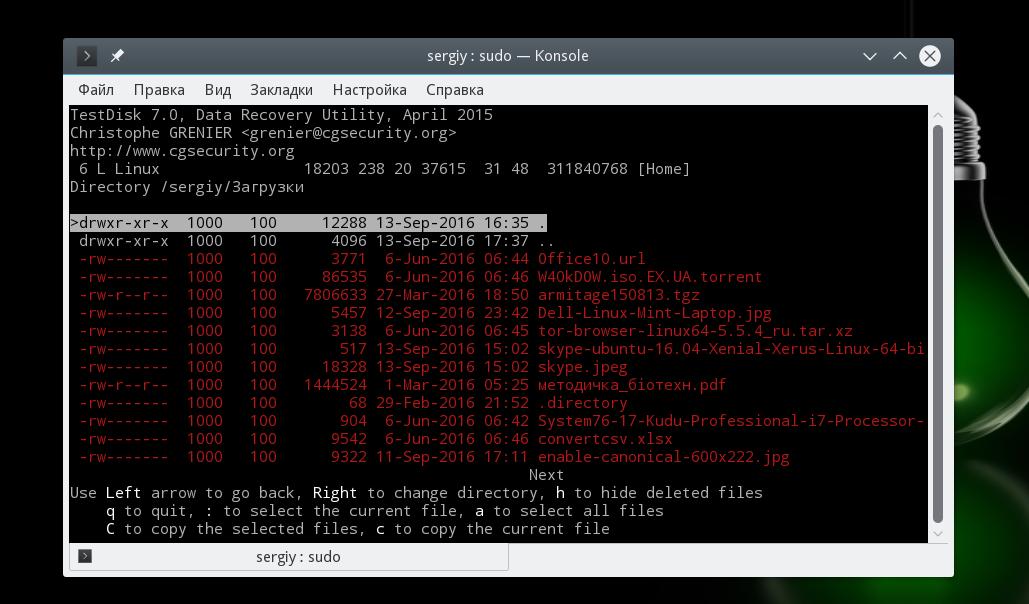
Выберите диск, с которым нужно работать:
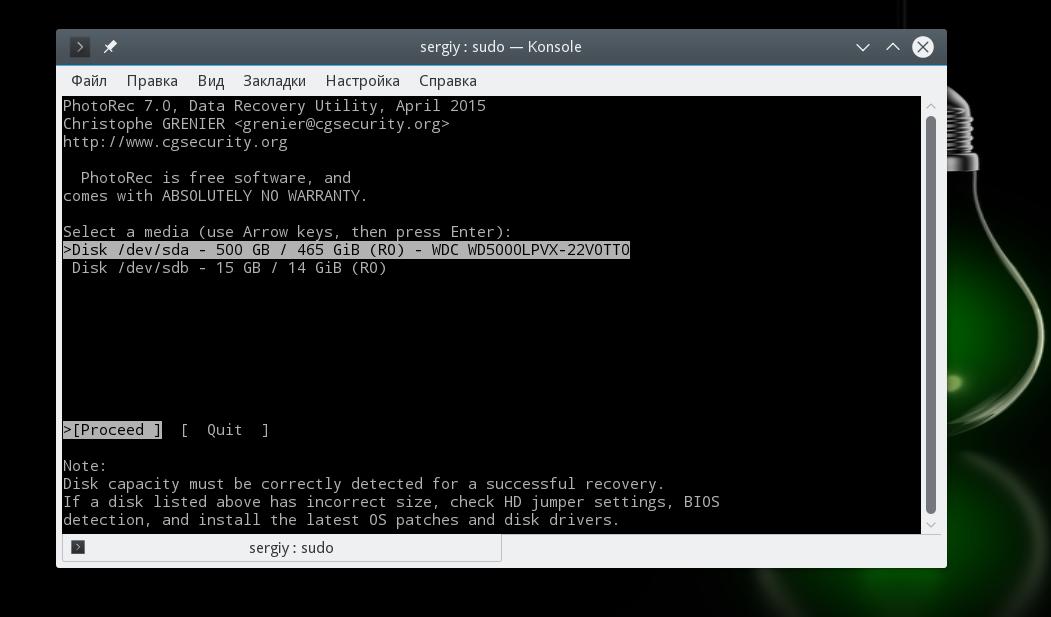
Выберите раздел:
Выберите файловую систему:

Выберите способ сканирования (неразмеченное пространство/весь раздел) Затем выберите папку для сохранения результата:
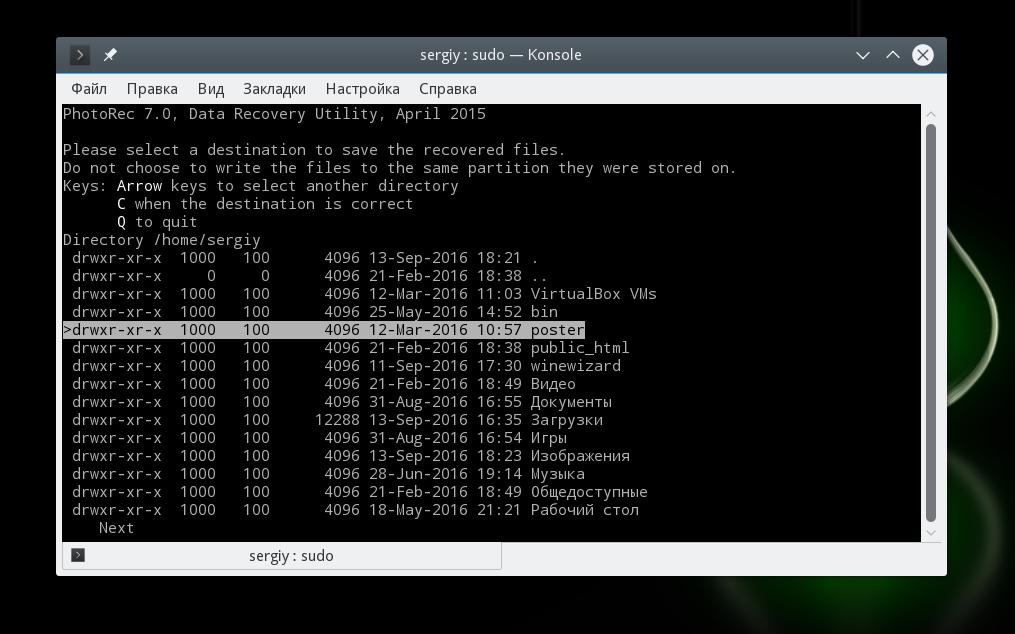
Дождитесь завершения процесса:

Программа восстановит много файлов, и скорее всего больше чем вам нужно. Причем главная ее проблема в том, что имена файлов не сохраняются и вам придется еще поискать, чтобы найти есть ли там то что нужно.
Выводы
Эти три инструмента охватывают широкий спектр задач по восстановлению файлов Linux. Здесь вы сможете выполнить не только восстановление удаленных файлов Linux из ext4, но и исправить жесткий диск или скопировать файлы с поврежденных носителей.
А какие ваши любимые утилиты для восстановления данных? Какими вы пользуетесь? Напишите в комментариях!
На десерт видео от Discovery о том, как работает жесткий диск:
Источник: www.makeuseof.com
Обнаружили ошибку в тексте? Сообщите мне об этом. Выделите текст с ошибкой и нажмите Ctrl+Enter.
| Workable Solutions | Step-by-step Troubleshooting |
|---|---|
| Where Do Deleted Files Go in Linux | Deleted files in Linux are typically sent to a particular folder called the «trash can»…Full steps |
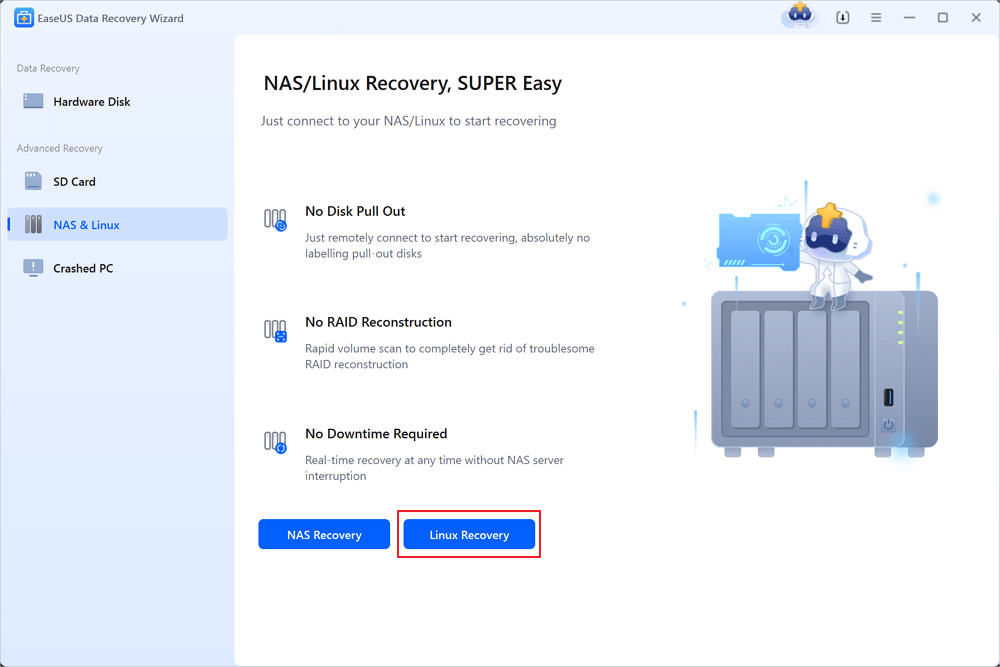
| Recover Deleted Files with EaseUS | Install and Launch EaseUS Data Recovery Wizard > choose «Linux Recovery»…Full steps |
| Recover with Command Prompt | Install the TestDisk software device > recover deleted documents using TestDisk…Full steps |
Have you ever wanted to recover your files in Linux? Maybe you accidentally deleted an important file or folder and wished you had a simple solution to recover it. A large number of users install Linux without even realizing it. Their computer works better for various reasons, such as better battery life and no crashes, at least the perception is about using Linux. Often these users (or their friends) will accidentally delete files they don’t realize were ever on their system or didn’t know how to back up. That’s where this guide comes into play. This article will show you the step-by-step method to recover your data in Linux.
Where Do Deleted Files Go in Linux
When you delete a file or a directory in Linux, that doesn’t mean it’s gone forever. There are a few layers of folders where the deleted files can go before being erased from your system entirely.
They may be corrupt, outdated, sensitive, or user-created. Whatever the reason for deletion, deleted files and folders can still occupy space on your hard drive after deletion (even if it’s «empty»).
Deleted files in Linux are typically sent to a particular folder called the «trash can». The folder is available as «TRASH» in the system and can not only be accessed by enabling the hidden folder view option.
If you want to access the TRASH folder in Linux, you can use the following command:
sudo su
cd /.TRASH
ls -l
You can also directly access them by navigating to ~/. local/share/Trash/files/
However, depending on how your system is configured, they may also be permanently deleted.
![]()
How to Recover Deleted Files in Linux with Data Recovery Software
There are several methods and software tools you can use to scan your hard drive for data, but the situations differ. These situations all have their requirements that may make the whole process more complicated than it needs to be.
You can restore deleted files or directories in Linux using EaseUS Data Recovery Wizard. It is designed with the primary goal of recovering all types of data loss. Data loss usually occurs accidentally deleted files, programmers, viruses, and other damaging factors that may lengthen the recovery time. Using this recovery software, you can save all your important documents, pictures, videos, and additional valuable information from being lost forever.
EaseUS is compatible with Linux in all versions, including MX Linux, Manjaro, Linux Mint, Ubuntu, Debian, etc. With this program, users can recover deleted files from Linux on Windows PC. In simple words, you can connect the Linux drive to a Windows PC, and then recover files.
Here is the list of things you can recover using EaseUS Data Recovery Wizard:
- Deleted photos, videos, documents, audio, and other files.
- Formatted or Crashed hard drive
- Unbootable Windows PC or Laptop
To Take benefits of the features of EaseUS and to restore your lost files for free, you can download EaseUS. You can access free recovery from various data loss situations and preview before recovery by downloading. Follow the steps listed below to recover your deleted files in Linux with EaseUS Data Recovery software:
Step 1. Install and Launch EaseUS Data Recovery Wizard on your Windows PC. Choose «Linux Recovery» on the left panel.
Step 2. This software will detect your IP and Port automatically. You need to input the user name and password. If the IP address or Port is not right, you can correct it manually. Then, click «Connect Now».
Step 3. After successfully connecting to your Linux device, EaseUS recovery software will start scanning the disk to find all lost and deleted files. When the scan process completes, click «Filter» > «Type» to specify lost file types.

Step 4. You can preview the scanned files first. Then, select the target data and click the «Recover» button to restore lost files in Linux.

How to Recover Deleted Files in Linux Using Command Prompt
While one document is accidentally deleted, the lsof command can provide life-saving assistance to recover it. A duplicate is generated of the deleted report before it may be closed because it becomes shut by using the application conserving it open after it is accidentally deleted. Let’s see how:
Step 1. Installing the TestDisk software device.
Step one is to put in TestDisk. To achieve this on Debian/Ubuntu distributions, replace the package deal lists and set up TestDisk.
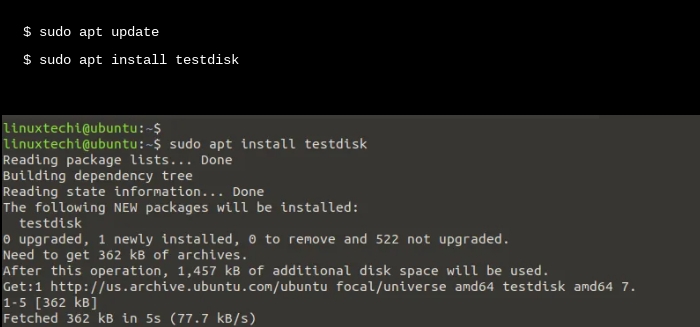
Images from: https://www.linuxtechi.com/how-to-recover-deleted-files-in-linux/
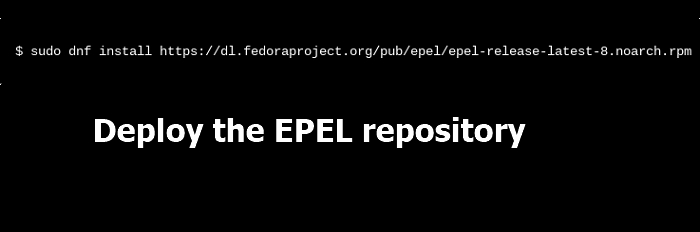
If you are running CentOS eight, RHEL 8, Rocky Linux eight, and AlmaLinux eight, you want to, first, deploy the EPEL repository.
Next, update the gadget and deploy the check disk as follows.
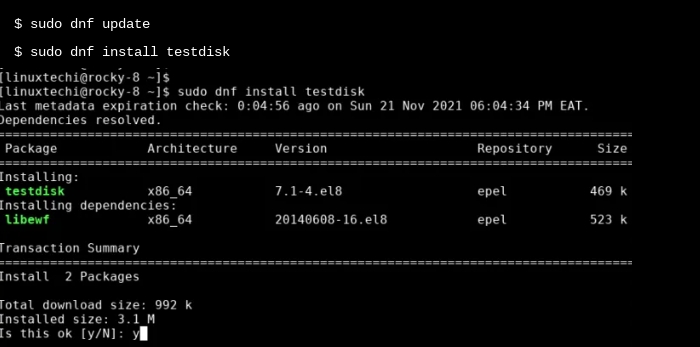
As soon as set up, you may verify that Testdisk is set up by checking the version of TestDisk as follows.
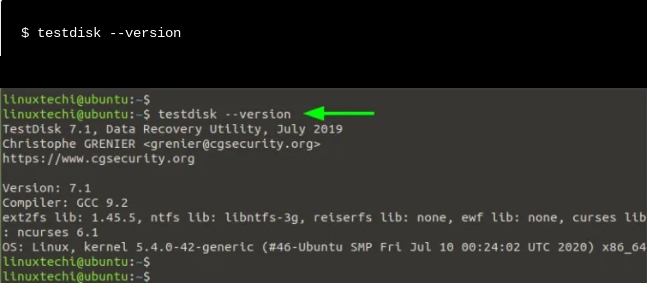
From the output, you may see that we have set up TestDisk 7.1. Now, allowing you to simulate how you could recover deleted files from pressure.
Step 2. Recover deleted documents using TestDisk.
To illustrate how you may recover documents deleted from a Disk, we’ve deleted files from a USB drive. The papers are not even within the trash bin, and our goal is to recover them.
You can have a similar setup where you’ve deleted a few files in your pen drive/ USB force. To get better them, observe along.
in your terminal, run the subsequent command to launch TestDisk
$ testdisk
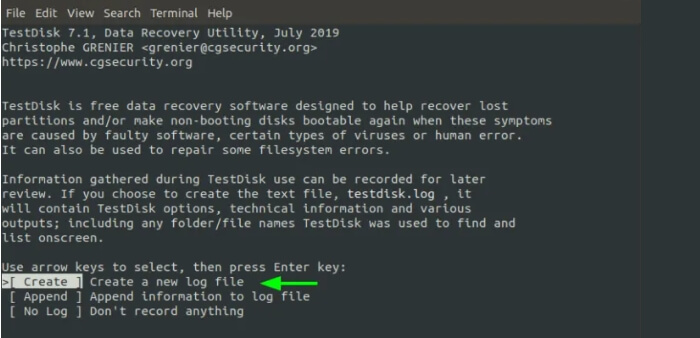
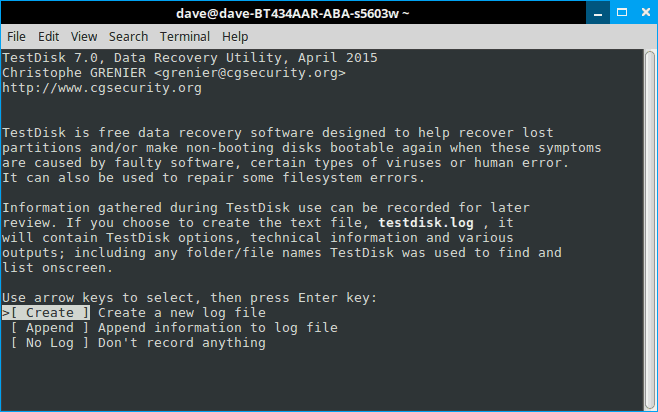
Being a command-line device, TestDisk provides a list of options as shown. By default, it highlights the maximum logical chance to take as you get began out. So, press input on the «Create» choice.
The following screen offers you the installed volumes. However, to view all the disks and walls, you need sudo permissions.
Consequently, using the forward arrow key, pick «Sudo» and press input.
Observe: To avoid the hassle, you can genuinely run the testdisk utility as a sudo person from the terminal.
Now, this time around, all the setup partitions could be displayed. Choose your selected force. In our case, we have decided on our detachable USB power. Using the arrow forward key, choose «continue» and press input.
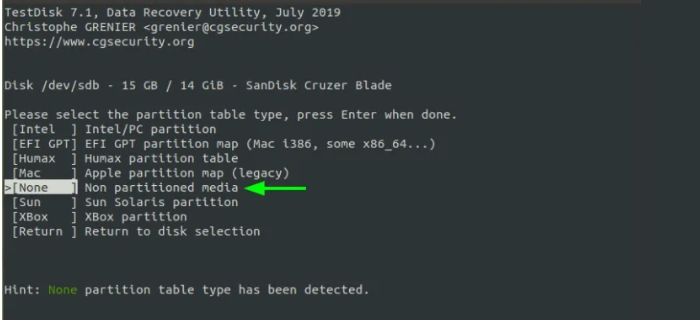
TestDisk robotically detects the partition desk kind. For non-partitioned disks, including USB drives, a non-partitioned media kind may be detected. So, press input.
Your removable force’s partition table could be indexed as indicated. At the lowest, pick «Undelete».

TestDisk scans your force for undeleted documents and highlights them in purple.
To recover these files, you want to choose them first. So, scroll down and quite the entire colon (:) for every choice. You may discover that every record is highlighted in green.
Now, to copy the files, press «SHIFT + C» for a capital «C». You will then be able to choose your desired location to store the files. In this case, we have chosen to save the documents in the «Public» listing. Next, decide on the directory and press input.
The modification dates of the target listing can be displayed. You can pick out any choice and, once again, press input.
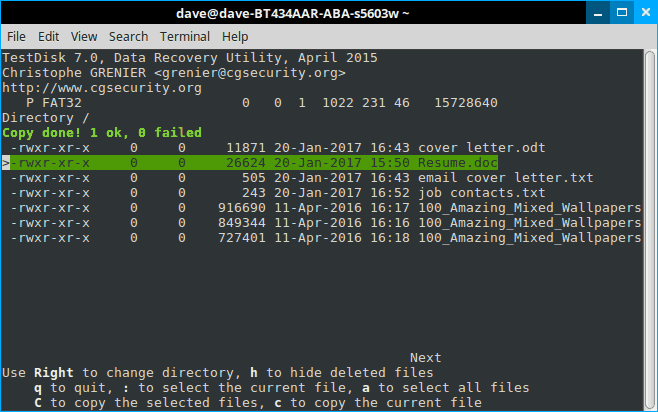
TestDisk will notify you that the files have been successfully copied.
To confirm that the files were copied, head over to the vacation spot listing and verify that the documents exist.
The recovered documents are saved with root permissions and ownership. You may change the permissions with the chown command.
To go out TestDisk, press «q» again and again until you ultimately pass again to your bash shell.
![]()
Conclusion
Recovering the accidentally deleted files is very significant; it might prove life-saving sometime. This article covers all the information to recover your data in Linux using EaseUS and Command prompt. It is a quick and easy option for file recovery. With this software, you can recover files in a fraction of the time it would take using other methods.
Contents
- CAUTION
- Guidelines
-
Lost Partition
- GNU Parted
- Testdisk
- Gpart
-
Imaging a damaged device, filesystem or drive
- Software choices
- Ran out of space while imaging the drive?
-
Extract filesystem from recovered image
- Mounting partitions on the image
-
Extract individual files from recovered image
- Foremost
- Scalpel
- Magic Rescue
- Photorec
- recoverjpeg
- Ntfsprogs
-
Sleuth Kit and Autopsy
- Autopsy
- Sleuthkit
- Cleaning up
- Prevention
- Other links
Deleted or lost files can sometimes be recovered from failed or formatted drives and partitions, CD-ROMs and memory cards using the free/libre software available in the Ubuntu repositories. The data is recoverable because the information is not immediately removed from the disk. Follow these steps to recover lost data.
CAUTION
You should NOT write to the failed device, as it can worsen a hardware failure, and overwrite existant data in case of lost files .
Shut down the affected machine as soon as possible, and restart it from a LiveCD or LiveUSB. Be certain that the «live» cd does not automatically mount any partition or swap space.
Guidelines
The following software will passively try to recover your data from failed or failing hardware. If your data is not replaceable, do not attempt to write to the failed device if the following applications do not work but seek professional advice instead.
If your device is damaged, it is advisable to image the device and work on the image file for data recovery. (See below.) If hardware failure is not the problem, you can recover data directly from the device.
To recover data from a failed device, you will need another device of equal or greater storage onto which to save your data. If you need to make an image of the failed device, you will need yet another quantity of space. You should run these tools from another OS which resides on another disk or a «live» CD.
An Ubuntu Desktop CD will work fine. If you do not have a lot of ram, or do not have an internet connection on the failed computer, you can use SystemRescueCd, a live cd data recovery toolkit. It includes most of the software mentioned in this page.
[More info needed here: Is this page covering two separate scenarios: one for lost partitions, and one for damaged or deleted files? Or are the techniques described for damaged or deleted files ALSO needed if a partition has been inadvertently lost? If they are separate scenarios, it would be good to say that here.]
Lost Partition
If you made a mistake while partitioning and the partition no longer appears in the partition table, so long as you have not written data in that space, all your data is still there.
GNU Parted
Run Parted from the command line to recover your partition.
When changing the partition table on your hard drive, you must ensure that no partition on the disk is mounted. This includes swap space. The easiest way to accomplish this is to run the live cd. Parted is installed on the base Ubuntu system. Once at the desktop, open a terminal and run_:
sudo swapoff -a
Next run parted and tell it to use the device in question. For example, if your /dev/sda drive is the drive from which you want to recover, run:
sudo parted /dev/sda
Then, use the rescue option:
rescue START END
where Start is the area of the disk where you believe the partition began and END is its end. If parted finds a potential partition, it will ask you if you want to add it to the partition table.
Testdisk
Alternatively, the testdisk application may recover your partition. Use any method to install the testdisk package.
Run testdisk and it will scan your computer for media and offer you a menu-driven way to recover your partition.
sudo testdisk
Gpart
Another program that can scan drives and re-create a partition table based on «guesses» is Gpart. Use any method to install the package gpart.
To scan the first hard disk using default settings type
sudo gpart /dev/sda
or
sudo gpart /dev/hda
depending on your Ubuntu version.
You can restore the «guessed» partition table, only after checking it very carefully (you’re strongly advised to write to another device instead), using
sudo gpart -W /dev/sda /dev/sda
Imaging a damaged device, filesystem or drive
Software choices
There are two different programs for making an image of a damaged device, in preparation for rescuing files. They are confusingly given the same name:
-
GNU ddrescue (packaged as gddrescue, though once installed the command is «ddrescue»)
-
This is the one you want. This documentation currently only applies to GNU ddrescue.
-
-
dd_rescue (packaged as ddrescue)
- This is an older, slower shell script that needs to be run in combination with another script to do the same thing as the GNU version.
From /usr/share/doc/gnuddrescue/README
GNU ddrescue is a data recovery tool. It copies data from one file or block device (hard disc, cdrom, etc) to another, trying hard to rescue data in case of read errors.
Ddrescue does not truncate the output file if not asked to. So, every time you run it on the same output file, using a logfile, it tries to fill in the gaps.
The basic operation of ddrescue is fully automatic. That is, you don’t have to wait for an error, stop the program, read the log, run it in reverse mode, etc.
If you use the logfile feature of ddrescue, the data is rescued very efficiently (only the needed blocks are read). Also you can interrupt the rescue at any time and resume it later at the same point.
Automatic merging of backups: If you have two or more damaged copies of a file, cdrom, etc, and run ddrescue on all of them, one at a time, with the same output file, you will probably obtain a complete and error-free file. This is so because the probability of having damaged areas at the same places on different input files is very low. Using the logfile, only the needed blocks are read from the second and successive copies.
If the filesystem you are imaging is greater than 4 gigs in size, you will not be able to use an MSDOS (VFAT) filesystem (usually found on USB drives) to store the image, since there is a 4G limit to the maximum size of a file on such filesystems. Use EXT3 or another filesystem that can handle such file sizes.
Use any method to install the following package:
gddrescue
Run gnuddrescue like this:
ddrescue [options] infile outfile [logfile]
So, if /dev/sda is unreadable, you will need to acquire another disk (or other media) onto which to save the output image. You will need to have more room on the new media than on the failed disk.
sudo ddrescue -r 3 /dev/sda /media/usbdrive/image /media/usbdrive/logfile
Run successive passes like this:
sudo ddrescue -r 3 -C /dev/sda /media/usbdrive/image /media/usbdrive/logfile
and gnuddrescue will use the log file to only read the gaps with errors. In both cases, the -r option determines the number of times gddrescue will try to read when it encounters an error (-1 = infinity).
From Forensics Wiki:
First you copy as much data as possible, without retrying or splitting sectors:
-
ddrescue —no-split /dev/hda1 imagefile logfile
Now let it retry previous errors 3 times, using uncached reads:
-
ddrescue —direct —max-retries=3 /dev/hda1 imagefile logfile
If that fails you can try again but retrimmed, so it tries to reread full sectors:
-
ddrescue —direct —retrim —max-retries=3 /dev/hda1 imagefile logfile
Other examples:
These two examples are taken directly from the ddrescue info pages.
Example 1: Rescue an ext2 partition in /dev/hda2 to /dev/hdb2
ddrescue -r3 /dev/hda2 /dev/hdb2 logfile
e2fsck -v -f /dev/hdb2
mount -t ext2 -o ro /dev/hdb2 /mnt
Example 2: Rescue a CD-ROM in /dev/cdrom
ddrescue -b 2048 /dev/cdrom cdimage logfile
write cdimage to a blank CD-ROM
Ran out of space while imaging the drive?
Using Gnu ddrescue with a log file, you can continue imaging to another drive and then span the images. In this example, you have imaged some of the drive to a file on one drive, and the rest of the drive to a file on another drive. Here is how you put the pieces together:
sudo losetup /dev/loop1 /media/Drive1/image
sudo losetup /dev/loop2 /media/Drive2/image
sudo mdadm -B /dev/md0 -l linear -n 2 /dev/loop1 /dev/loop2
Your complete image fill be found at /dev/md0.
And then to take the array down:
sudo mdadm -S /dev/md0
sudo losetup -d /dev/loop1
sudo losetup -d /dev/loop2
An separate disk space concern is that /var/log/kern.log and /var/log/syslog can become extremely large due to frequent I/O errors. For a severely problematic drive, it may be necessary replace these logs with links to /dev/null during use of ddrescue to avoid the / filesystem from becoming full.
Now that the drive has been imaged, you can recover the filesystem from the image. If the filesystem is not recoverable, you can try to recover individual files.
Mounting partitions on the image
If you imaged the whole drive, you can mount the individual partitions on the image by using the «offset» option when mounting a loop filesystem. The Sleuth Kit can help.
Use any method to install the following package:
sleuthkit
mmls can show you the partitions found within an image:
$ mmls file -b
DOS Partition Table
Offset Sector: 0
Units are in 512-byte sectors

     Slot    Start        End          Length       Size    Description
00:  -----   0000000000   0000000000   0000000001   0512B   Primary Table (#0)
01:  -----   0000000001   0000000031   0000000031   0015K   Unallocated
02:  00:01   0000000032   0001646591   0001646560   0803M   DOS FAT16 (0x06)
03:  00:00   0001646592   0002013183   0000366592   0179M   DOS FAT16 (0x06)
This shows several partitions. In this example, we want to mount the DOS partition starting at block 32. To calculate the number of bytes, multiply by 512:
$ bc
bc 1.06
Copyright 1991-1994, 1997, 1998, 2000 Free Software Foundation, Inc.
This is free software with ABSOLUTELY NO WARRANTY.
For details type `warranty'.
32 * 512
16384
quit
Mount the partition:
sudo mount -o loop,offset=16384 file mnt
(32 multiplied by 512 byte blocks = 16384)
For mounting a typical NTFS partition created by Windows use:
sudo mount -t ntfs -o r,force,loop,offset=32256 file mnt
(63 multiplied by 512 byte blocks = 32256)
Foremost
Foremost is a command-line tool which can recover files from a number of filesystems, including fat, ext3 and NTFS. It can be installed and run from the live cd.
Boot from the live cd and then enable the universe repository and install foremost:
Use any method to install the following package:
foremost
Foremost can recover files from an image of the drive, or from the drive directly. If the drive has suffered hardware problems, use gnuddrescue to image the drive first.
Assuming the lost files are on hda, you need to create a writeable directory on another drive where you can put the recovered files (lets say you have a big external usb drive (sdb)
sudo mount /dev/sdb1 /recovery
sudo mkdir /recovery/foremost
And then run foremost:
sudo foremost -i /dev/hda -o /recovery/foremost
To run formost on an image, just substitute the filename for the device
sudo foremost -i image -o /recovery/foremost
The recovered files will then be owned by root. Change their ownership so that you can use them:
sudo chown -R youruser:youruser /recovery/foremost
Use the -w switch to obtain only an audit of recoverable files:
sudo foremost -w -i /dev/hda -o /recovery/foremost
To recover only specific file types, use the -t switch:
sudo foremost -t jpg -i /dev/hda -o /recovery/foremost
Available types:
|
Filetype |
Comment |
|
jpg |
Support for the JFIF and Exif formats including implementations used in modern digital cameras. |
|
gif |
|
|
png |
|
|
bmp |
Support for windows bmp format. |
|
avi |
|
|
exe |
Support for Windows PE binaries, will extract DLL and EXE files along with their compile times. |
|
mpg |
Support for most MPEG files (must begin with 0x000001BA) |
|
wav |
|
|
riff |
This will extract AVI and RIFF since they use the same file format (RIFF). note faster than running each separately. |
|
wmv |
Note may also extract -wma files as they have similar format. |
|
mov |
|
|
|
|
|
ole |
This will grab any file using the OLE file structure. This includes PowerPoint, Word, Excel, Access, and StarWriter |
|
doc |
Note it is more efficient to run OLE as you get more bang for your buck. If you wish to ignore all other ole files then use this. |
|
zip |
Note is will extract .jar files as well because they use a similar format. Open Office docs are just zip’d XML files so they are extracted as well. These include SXW, SXC, SXI, and SX? for undetermined OpenOffice files. |
|
rar |
|
|
htm |
|
|
cpp |
C source code detection, note this is primitive and may generate documents other than C code. |
|
all |
Run all pre-defined extraction methods. [Default if no -t is specified] |
Scalpel
Scalpel is a fast file carver that reads a database of header and footer definitions and extracts matching files from a set of image files or raw device files. It is similar to foremost and may have some improvements.
By default, all file types in the database (/etc/scalpel/scalpel.conf) are commented out. To specify which filetypes you want to carve, you need to edit the file and uncomment each line.
sudo scalpel FILE -o Directory
Where FILE is the image file (or device) and Directory is the output directory.
Magic Rescue
Another program that scans for files using «magic bytes» to identify their presence and type, and which can be extended for many file types using «recipes», can be obtained by installing, using any method, the package magicrescue.
Note that most of the provided recipes need other software installed to work, so open the desired recipes in /usr/share/magicrescue/recipes/ using a text editor and read the comments contained.
If you want to recover (for example) gzip files and PNG images from a partition named /dev/sda1, you can run
mkdir ~/output
sudo magicrescue -r gzip -r png -d ~/output /dev/hdb1
This will write all recovered files in a directory output inside your home directory.
Photorec
Photorec is file data recovery software designed to recover lost pictures from digital camera memory or even Hard Disks. It has been extended to search also for non audio/video headers. It searches for 80 different types of files. Photorec is part of the Testdisk package. Use any method to install the following package:
testdisk
To run Photorec on an image file, do:
sudo photorec imagefilename
To recover files directly from a device, run photorec without any arguments and you will be given a menu of available devices.
sudo photorec
See this link for a detailed description of how to use Photorec.
recoverjpeg
This program is dedicated to identifying and recovering JPEG pictures. You can install the package recoverjpeg using any method, and then run (assuming /dev/sda1 is the partition you want to recover from)
sudo recoverjpeg /dev/sda1
Recovered files will be saved in your home directory, with names following the pattern image*.jpg.
Ntfsprogs
NtfsUndelete can recover deleted files from an NTFS file-system. The Windows and LiveCd versions have a very nice intuitive gui but the linux one is probably stronger and does not have a front-end gui at the moment.
Briefly, it has 3 modes
- «Scan», searches for deleted files and find info about them
- «Undelete», see note below …
- «Copy», err i am not sure what this does as i am not a wizard
The best simple guide i have found so far (24-11-2010) is http://www.howtogeek.com/howto/13706/recover-deleted-files-on-an-ntfs-hard-drive-from-a-ubuntu-live-cd/
When undeleting chose which files to undelete and where to undelete them too. By default this appears to be the desktop of the OS you are booted into, whether that is a LiveCd or on a different partition or drive. For a LiveCd or LiveUsb you will need to move them onto Usb-stick or safe partition before rebooting as the desktop gets forgotten on LiveCds unless you are using a «Persistent image».
To search
ntfsundelete /dev/sda2
To undelete
ntfsundelete /dev/sda2 -u -i 3689 -o work.doc -d ~/output
This will write all recovered files in a directory output inside your home directory.
For better information on using ntfsundelete please see the separate page NtfsUndelete, particularly the External Links there.
Sleuth Kit and Autopsy
(Obtained the following from http://www.sleuthkit.org/autopsy/desc.php)
The Autopsy Forensic Browser is a graphical interface to the command line digital investigation analysis tools in The Sleuth Kit. Together, they can analyze Windows and UNIX disks and file systems (NTFS, FAT, UFS1/2, Ext2/3).
The Sleuth Kit and Autopsy are both Open Source and run on UNIX platforms. As Autopsy is HTML-based, you can connect to the Autopsy server from any platform using an HTML browser. Autopsy provides a «File Manager»-like interface and shows details about deleted data and file system structures.
Autopsy
Autopsy can be run from the «live» CD, but you must specify an address to which you can connect remotely. You must also specify an external disk on which it can save the extracted information.
For example, assuming you have an external disk mounted to /media/disk with an autopsy folder on it and your IP address is 192.168.0.1, you can run:
sudo autopsy -d /media/disk/autopsy 192.168.0.1
Sleuthkit
Extract unallocated (deleted) blocks from a disk or disk image.
Example:
dls inputimage > outputimage
Use any data carving tool to search the output image for files.
List file and directory names in a forensic image. fls lists the files and directory names in the image and can display file names of recently deleted files for the directory using the given inode. This includes deleted files. If you have imaged your filesystem to a file named «loopfile», you can list the contents by running:
fls loopfile -r -f fat -i raw
r/r 3: test (Volume Label Entry)
r/r * 5: sample.docx
r/r * 7: sample.pptx
r/r * 9: sample.xlsx
Copy file by inode. icat opens the named image(s) and copies the file with the specified inode number to standard output.
Example:
fls has shown you the inode number of some files on an image. To recover a file by using th einode number run:
icat -r -f fat -i raw loopfile 5 > sample.docx
sorter — Sort files in an image into categories based on file type. Sorter is a Perl script that analyzes a file system to organize the allocated and unallocated files by file type.
Example: This will sort all the files found in /dev/sdc1 and put image files in a directory named «out»:
sudo sorter -h -s -i raw -f fat -d out -C /usr/share/sleuthkit/windows.sort /dev/sdc1
Here is a description of a script that will pull all files from an image using fls and icat:
http://forums.gentoo.org/viewtopic-t-365703.html
Another, similar script which attempts to «rebuild» the filesystem directory structure plus file content:
http://matt.matzi.org.uk/2008/07/03/reconstructing-heavily-damaged-hard-drives/
Cleaning up
from:How to recover lost files after you accidentally wipe your hard drive
Sort certain types of files:
sudo mkdir recovery/VID recovery/JPG

find recovery/ -name "*.avi" | xargs -i mv {} recovery/VID/

find recovery/ -name "*.mpg" | xargs -i mv {} recovery/VID/

find recovery/ -name "*.jpg" | xargs -i mv {} recovery/JPG/
Eliminate small photos:
sudo mkdir recovery/SMALL

find recovery/JPG/ -name "*.jpg" -size -1024k | xargs -i mv {} recovery/SMALL/
Rename jpegs according to exif data:
find JPG/ -name "*.jpg" | xargs -i jhead -nf%Y%m%d-%H%M%S {}
Then, remove duplicates.
find /var/recovery/JPG/ -name "*a.jpg" | xargs -i mv {} /var/recovery/JPG/DUPS/
Copy files with matching strings:
cd recovery
mkdir ../copy/
grep -l "enter the string of text here" *.doc | xargs -i cp {} ../copy/
Prevention
The best way to avoid data loss is by performing regular backups. See: BackupYourSystem
Other links
-
http://www.sleuthkit.org/informer/sleuthkit-informer-14.html#recover
-
http://goinggnu.wordpress.com/2008/02/14/recover-deleted-files-from-memory-card
-
http://www.linuxquestions.org/questions/linux-hardware-18/can-i-use-linux-to-recover-files-from-corrupted-hard-drive-784550/
CategoryBackupRecovery
Статья расскажет о том, как в Linux с помощью инструмента командной строки Test Tool восстановить удаленные файлы. Это легкий в использовании инструмент, который практически любой сможет использовать в целях восстановления утерянных файлов в Ubuntu или иных дистрибутивах Linux.
Вы когда-нибудь были в ужасе? В ужасе от понимания того, что файлы стерты и даже из корзины. Зачастую за ужасом приходит следующая фаза — отрицание. Ее запускает мысль: “Я знаю, что где-то лежит копия”.
Но вместо того, чтобы проходить все эти фазы, лучше не беспокоиться. Главное помните, вы не одни. Рано или поздно все через это проходят.
“Не беспокоится? — возразите вы, — Я только что стер единственную копию резюме!”
Нет, правда, не беспокойтесь. На самом деле все, что вы удалили просто было вынесено из списка. Пока вы больше ничего на него не запишете все останется на месте. На самом деле, даже если после удаления записать что-то на диск, то есть шанс, что удаленная информация все равно на нем останется (это зависит от размера удаленной информации и оставшегося свободного места, но все же).
“Да, хорошо, — скажете вы, — мне легче от мысли, что резюме ‘существует’ в неком абстрактном месте. Но теперь меня беспокоит, что его нельзя открыть, отредактировать или распечатать. То есть все равно его будто нет. Очень помогло бы найти способ ‘разудалить’ файл. Ну и чтобы этот способ не требовал наличие исследовательской IT лаборатории”.
Правда, не беспокойтесь — лаборатории не понадобится. Боле того, если вы не боитесь примитивных графических интерфейсов, то это еще и весьма несложно провернуть. Я продемонстрирую вам, как использовать Test Disk для восстановления файлов.
Как восстанавливать удаленные файлы с помощью TestDisk в Linux
Давайте приведу простой пример: я подключил флешку, загрузил на нее файлы и что-то удалил. Теперь, в моей системе есть возможность удаления файлов прямо с флешки, в обход корзины. Для этого надо на файле нажать правой кнопкой мыши и выбрать “delete”. Будет выведено предупреждение. После нажатия на кнопку “yes” все файлы будут удалены безвозвратно. По крайней мере так кажется.
Но теперь у меня нет этого ужасного чувства. И нет, это не потому что все по сценарию. Я знаю, что мне нужно всего лишь открыть терминал и написать “testdisk” и нажать “enter. И тут наступает один из этих “Linux моментов”. Если у вас нет данного инструмента, то он напишет, как его установить! Просто введите “sudo apt install testdisk”, нажмите “enter” и через 10 секунд он у вас.
Если вы предпочитаете видео, то можете посмотреть ролик с тем же руководством на YouTube канале FOSS:
Шаг 1
Для начала установите инструмент TestDisk. Он есть в официальных репозиториях большинства Linux дистрибутивов. На Ubuntu и Linux дистрибутивах на базе Ubuntu вроде Linux Mint, elementary OS и т.п. для установки TestDisk вы можете использовать следующую команду:
sudo apt install testdisk
Пользователи Arch Linux могут установить его из AUR. В иных дистрибутивах Linux вы можете воспользоваться вот этой ссылкой.
Несмотря на то, что в данном руководстве мы будем говорить о командах в Ubuntu, инструмент не ограничен данным дистрибутивом. Команды, указанные в данной статье, подойдут и в других дистрибутивах.
Шаг 2
Запустите в терминале TestDisk с помощью данной команды:
testdisk
Шаг 3
Как только он откроется, вы увидите это. Не торопитесь! Интерфейс на самом деле прямолинейный, но текст надо читать внимательно. Используйте стрелки для навигации и ‘Enter’ для подтверждения выбора.
Экран с дополнительными командами их подскажет. Также стоит отметить, что TestDisk 7.0 выделяет следующий логический шаг, но практически всегда правильно читать, что написано на экране, так как инструмент не умеет читать мысли. В любом случае, если TestDisk просто позволения создать log file, соглашайтесь — это полезно.
Шаг 4
Теперь, в данный момент, если вам повезет, вы должны увидеть свой диск. Можете переходить к последним шагам. Но давайте представим, что диска нет, скажем, у вас мультизагрузка. В таком случае права доступа могут съехать, и TestDisk потребует разрешение на открытие. Вы увидите нечто подобное:

Выберите “sudo” и введите пароль. Нажмите “enter” и “enter” снова на следующем экране для того, чтобы создать log file.
Шаг 5
В этот раз TestDisk отобразит все диски. С помощью стрелочек выберите нужный диск и нажмите “enter”:
Шаг 6
TestDisk снова выбрал верный вариант. Логично, так как простое устройство для хранения данных редко бывает разбитым. Снова жмем “enter”:
Шаг 7
А вот теперь пора подумать. Если вы прочли первый экран (а я в этом не уверен), то наверняка поняли, что это не просто программа для восстановления удаленных файлов. Это мощная дисковая утилита. Но, если мы помним, чего делаем, то выбор не составит труда: мы не пытаемся починить диск, мы пытаемся его восстановить. Выбираем “Advanced” и жмем “enetr”:
Шаг 8
Снизу страницы находим “Undelete” и готовимся увидеть привидение!
Шаг 9
TestDisk начнет искать файлы и сгенерирует список удаленных файлов, выделенных красным. Стрелкой спускаемся к нему и внимательно изучаем варианты внизу страницы.
Шаг 10
И снова, не забываем, что TestDisk многофункциональное средство. Большинство вариантов отвечает за работу с группами файлов. Нам же просто надо их вернуть! Жмем “c”.
Счет 1-0 в нашу пользу. После нажатия на “c” появились варианты мест для сохранения. По дефолту файлы сохранятся в домашнюю директорию. По сути, это опять отличный вариант, так как навигация в TestDisk местами замороченная.
Пара советов по восстановлению файлов с помощью TestDisk
Во-первых, если вы не понимаете где оказались, для возврата жмите на “q”. Так вы не закроете программу и не потеряете прогресс. “q” ведет себя как кнопка “назад” в классических приложениях с графическим интерфейсом — будете постоянно жать “q”, в какой-то момент окажетесь на стартовом экране.
Во-вторых, чем меньше отвлекающих моментов, тем проще найти то, что ищешь. Иными словами, отключите все не нужные в процессе восстановления хранилища. В минималистичных окружениях простота — друг.
Наконец, TestDisk может помочь восстановить файлы, которые стали недоступны по другим причинам. На самом деле я стал пользоваться ей именно из-за этого. Я пытался сохранить файлы с испорченного диска, отказывающегося запускаться.
Что если диск отформатирован в LVM? Это мой случай. Подключенный LVM диск совсем не похож на обычную Linux ОП. Обычные файлы не появляются, а что-то вычленить не выходит. Это, на ряду с иными причинами, происходит из-за того что большинство файловых менеджеров Linux больше не умеют работать с файловыми системами ext.2
Так или иначе, после печального начала, у меня получилось найти и восстановить утраченные файлы. Отмечу, что в вышеописанном случае шаги будут немного другими. Вам возможно понадобиться использовать функцию “Analyze”. Она приведет диск к нужному состоянию и вам останется только потыкаться в поисках домашней директории. А еще файлы не будут отмеченными красным, ведь их не удаляли. Как только вы их найдете процедура копирования будет такой же.
С TestDisk и небольшой долей удачи вы никогда не потеряете свое резюме, так как всегда сможете восстановить удаленные файлы в Linux.
Потеря данных — это плохая и неприятная вещь, с которой рано или поздно приходится сталкиваться всем пользователям компьютеров. Будь то из-за сбоя жесткого диска или случайного удаления, мы все были в ситуациях, когда нам хотелось бы вернуть наши удаленные данные.
К счастью, восстановить удаленные файлы в Linux относительно проще, чем в других операционных системах. Вы можете легко восстановить удаленные файлы с помощью таких инструментов, как TestDisk, PhotoRec и Foremost. Проверять Можно ли восстановить данные с USB-накопителя? Что тебе нужно знать.
Что нужно знать, прежде чем начать
Системы Linux, как и другие операционные системы, предоставляют корзину / корзину, которая упрощает доступ к удаленным данным. Поэтому, если вы удалили файлы с помощью кнопки «Удалить» на клавиатуре, вы можете сразу же восстановить их, посетив Корзину и восстановив их.
Однако, если вы навсегда удалите файлы с помощью ярлыка Шифт + Дел Вам нужно будет восстановить его с помощью одного из приложений для восстановления данных, доступных для Linux. Но поскольку разные приложения используют разные методы для восстановления потерянных данных, может потребоваться несколько попыток, чтобы вернуть все удаленные файлы в Linux.
К счастью, даже в случае безвозвратного удаления данные не теряются сразу. Они скрыты от файловой системы, но стираются только при перезаписи. Таким образом, первый шаг к восстановлению потерянных данных с раздела жесткого диска — сделать раздел доступным только для чтения. Это гарантирует, что вы не перезапишете случайно удаленные данные.
Например, если удаленные файлы расположены на разделе /dev/sdb1, вам сначала нужно размонтировать его, а затем перемонтировать как доступный только для чтения. Вы можете сделать это, используя приведенные ниже команды. Обязательно установите имя раздела в соответствии с вашей системой.
sudo umount /dev/sdb1

sudo mount -o ro /dev/sdb1 /media/read-only
Также рекомендуется клонировать раздел на другой диск. Это гарантирует, что вы не потеряете исходный раздел во время восстановления данных. Вы можете использовать команду dd Клонировать разделы Linux. Приведенная ниже команда копирует содержимое /dev/sdb1 в раздел sda1 /dev/sda на другом диске.
dd if=/dev/sdb1 of=/dev/sda1 bs=1M
Восстановление удаленных файлов в Linux с помощью TestDisk
TestDisk — это специальное приложение для восстановления данных с открытым исходным кодом, которое может эффективно восстанавливать безвозвратно удаленные файлы или разделы. Он содержит множество полезных функций и предлагает простой в использовании интерфейс. Вы можете установить TestDisk в Linux, используя следующие команды:
# Убунту и Дебиан
sudo apt install testdisk
# RHEL и CentOS
sudo yum install epel-release

sudo yum install testdisk
# Арх Линукс
sudo pacman -S testdisk
После установки вы можете запустить TestDisk, открыв Терминал и введя команду testdisk.
sudo testdisk
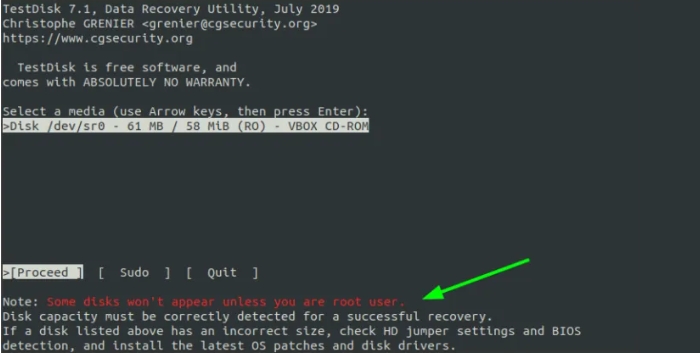
Вы окажетесь в интерактивной подсказке TestDisk. Используйте клавиши со стрелками на клавиатуре для навигации и нажмите Enter для выбора вариантов. Первый доступный вариант — создать файл журнала. Вы можете пойти дальше и создать его.
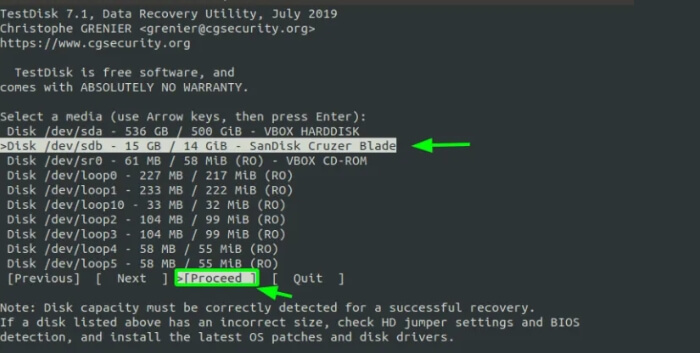
На следующем экране отобразится список носителей, подключенных к вашей системе. Выберите устройство, содержащее удаленные файлы. Мы будем использовать аргументы /dev/sdb для этого каталога. Выберите соответствующую опцию и нажмите Продолжить.
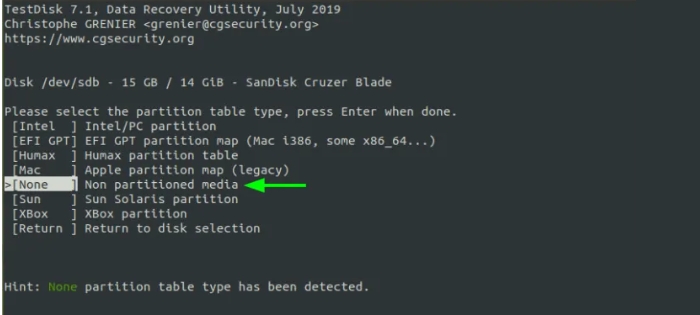
На следующем экране вам будет предложено выбрать тип раздела для вашего диска. Выберите то, что подходит для вашего диска. Обратите внимание, что TestDisk попытается определить правильный тип автоматически. Итак, если вы не уверены, перейдите к типу раздела, который обнаружил TestDisk.
На следующем экране вы увидите несколько доступных опций. Параметр «Анализ» полезен для восстановления потерянных разделов. Однако мы будем использовать Расширенные настройки Для восстановления удаленных файлов.
После этого вы увидите список всех разделов на выбранном вами устройстве. Выберите раздел, содержащий ваши удаленные данные, и выберите Восстановить из нижнего меню.
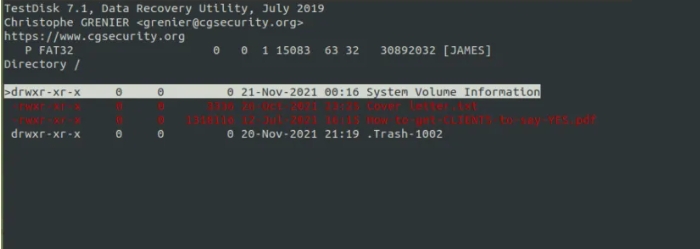
TestDisk проверит записи MFT на наличие удаленных файлов в этом разделе и перечислит их здесь. Мы ищем файл картинка.jpg показано на этом экране.
Вы можете выбрать/отменить выбор определенных файлов, используя : و a Для всех файлов, использующих тип файла. После выбора файлов для восстановления нажмите C скопировать его.
Вам будет предложено выбрать место для погашения. Перейдите туда и нажмите C чтобы сохранить файл.
Восстановление удаленных файлов в Linux с помощью PhotoRec
PhotoRec — еще одно мощное приложение для восстановления данных, созданное разработчиками TestDisk. Он был разработан для восстановления удаленных фотографий в Linux, но превратился в полноценное приложение. Вы можете использовать PhotoRec Для восстановления всех типов удаленных файлов.
Разница между TestDisk и PhotoRec заключается в том, что последний может восстанавливать файлы даже с жестких дисков, которые были повреждены без возможности восстановления. Он использует сигнатуры файлов для обнаружения удаленных файлов, что делает его очень мощным. Однако файлы, восстановленные с помощью PhotoRec, не сохраняют свое исходное имя файла.
Вы можете установить PhotoRec в разных дистрибутивах Linux, используя те же команды, что и для установки TestDisk. Итак, если вы уже установили TestDisk, вам не нужно снова устанавливать PhotoRec. Если вы не устанавливали TestDisk ранее, проверьте раздел выше и установите пакет testdisk.
sudo photorec
Эта команда запустит PhotoRec и откроет меню «Пуск». Макет похож на TestDisk, как и просмотр. Вам будет предложено выбрать дисковый носитель. Выберите правильный вариант и нажмите Продолжить.
Затем вам нужно будет выбрать исходный раздел. Выберите нужный раздел и выберите Файл Опция из нижнего меню.
Здесь вы можете выбрать тип файла для удаленных файлов. PhotoRec по умолчанию выберет все типы файлов. Вы можете отключить все виды использования и выбрать конкретный тип, используя x. мы выберем JPG Чтобы восстановить файл изображения.
Теперь посчитайте с q И выберите опцию поиска, чтобы начать восстановление файлов в Linux.
Затем вам нужно будет выбрать тип файловой системы. Выбирать еще Если исходный раздел не ext3/ext4.
На этом шаге вы должны указать, хотите ли вы искать файлы указанных типов во всем разделе или только в свободном пространстве. мы сделаем вариант Свободное пространство Чтобы искать быстрее.
На следующем шаге пользователи должны выбрать каталог назначения. Убедитесь, что файлы не сохранены в том же разделе, который вы сканируете. Переместитесь в нужное место с помощью клавиш со стрелками и нажмите C сохранить.
Теперь PhotoRec будет сканировать свободные сектора и сохранять восстановленные файлы в указанном месте. Он сохранит восстановленные файлы в каталоге с именем recovery_dir.
Проверять Лучшие бесплатные приложения для восстановления файлов для Windows.
Восстановить удаленные файлы с помощью Foremost в Linux
Foremost — бесплатное приложение для восстановления данных для Linux. Он поставляется с простым интерфейсом CLI. Хотя приложение не такое интерактивное, как TestDisk или PhotoRec, оно все же полезно в определенных сценариях. Вы можете установить Foremost в Linux, используя следующие команды:
# Убунту и Дебиан
sudo apt install foremost
#федора
sudo dnf install foremost
# Арх Линукс
sudo pacman -S foremost
После установки использовать приложение относительно просто. Вы можете перечислить все возможные варианты, прежде всего, используя команду ниже:
foremost -h
Удаленный файл picture.jpg можно восстановить с помощью следующей первой команды:
foremost -v -t jpg -i /dev/sdb1 -o ~/recovery/
Эта команда будет искать все потерянные изображения JPG в /dev/sdb1 и восстанавливать их в ~/recovery. Знак позволяет -v Продолжительная запись, укажите -i Исходный раздел, указать -o руководство по выходу.
Вариант разрешен -t Пользователи могут указать, какие файлы следует искать. Прежде всего, приложение поддерживает различные типы файлов и может находить изображения, видео, тексты и исполняемые файлы. Вы можете искать несколько расширений, используя список, разделенный запятыми. Проверять Лучшие приложения для восстановления удаленных файлов, которые мы не проверяли раньше.
Восстановить удаленные файлы в Linux с помощью extundelete
extundelete — еще одно приложение для восстановления данных, которое может восстанавливать удаленные файлы из файловых систем ext3/ext4. Это файловые системы, используемые популярными дистрибутивами Linux, такими как Ubuntu. Вы можете установить extundelete с помощью одной из следующих команд:
# Убунту и Дебиан
sudo apt install extundelete
# RHEL и CentOS
sudo yum установить extundelete
# Арх Линукс
sudo yay -S extundelete
После установки вы можете приступить к восстановлению удаленных файлов из вашей системы Linux с помощью extundelete. Используйте команду ниже, чтобы быстро восстановить определенный файл. Обратите внимание, что путь к файлу относится к основному разделу.
sudo extundelete — restore-file picture.jpg /dev/sdb1
Следующая команда извлекает все файлы из раздела /dev/sdb1. Измените название раздела, чтобы оно соответствовало вашему источнику.
sudo extundelete — restore-all /dev/sdb1
Если вы хотите сохранить восстановленные файлы в определенном каталоге, выберите его с помощью опции -o.
sudo extundelete -o ~/recovery — restore-all /dev/sdb1
По умолчанию extundelete сохраняет восстановленные файлы в подкаталоге /ВОССТАНОВЛЕНО_ФАЙЛЫ.
R-Linux — это графический интерфейс для восстановления данных в Linux, который является бесплатным, но не с открытым исходным кодом. Он может сканировать файловые системы ext2/ext3/ext4 на наличие удаленных файлов и восстанавливать их. Вы можете загрузить двоичный файл R-Linux с веб-сайта R-Tools Technology для определенного дистрибутива.
Скачать: Р-Линукс
После загрузки установите его с помощью менеджера пакетов. После установки откройте приложение, перейдя в список приложений. Введите пароль sudo при появлении запроса.
Теперь выберите исходный раздел, содержащий удаленные файлы, и отсканируйте его с помощью графического интерфейса. Вы можете выбрать один из различных методов сканирования в зависимости от ваших требований и типа файлов.
Дождитесь окончания сканирования, чтобы увидеть список удаленных файлов. Выберите то, что вам нужно, и восстановите его из верхнего меню.
Снова получить доступ к удаленным файлам в Linux
Со многими высококачественными приложениями для восстановления данных восстановление удаленных файлов в Linux очень просто. Вы можете выбрать любой из вышеперечисленных инструментов в зависимости от типа удаляемого файла и конфигурации вашего системного раздела. Тем не менее, мы рекомендуем TestDisk и PhotoRec, потому что оба обеспечивают четкую и простую интерактивную подсказку.
Поскольку восстановление данных может стать кошмаром для многих, всегда следует хранить резервные копии на внешних устройствах. Это позволит восстановить удаленные данные всего за несколько кликов. Теперь вы можете просмотреть Забудьте об облачном хранилище: почему вам следует перейти на локальное резервное копирование