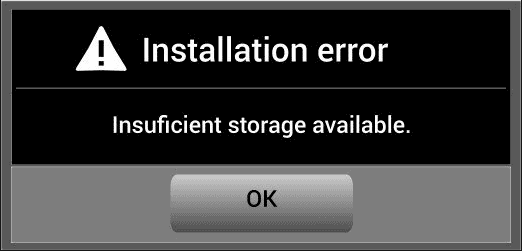
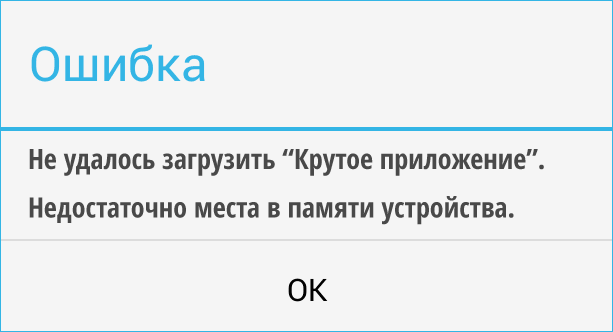
Если ваш Андроид-планшет (или смартфон) внезапно осчастливил вас сообщением «Недостаточно места в памяти устройства» или еще более пугающим «insufficient storage available», хотя этой самой памяти у него (и вы в этом точно уверены) предостаточно, то переживать особо не стоит. Вы не первый(ая), кому приходится сталкиваться с этой довольно распространенной ошибкой ОС Android.
А раз ошибка не редкая и уже известная, значит, кто-то грамотный уже придумал, как ее устранить.
Конечно, так бывает не всегда, но в этот раз действенная «таблетка» от этой болезни действительно уже есть.
Итак, как устранить ошибку «Недостаточно места в памяти устройства» (insufficient storage available) на Андроиде:
ШАГ 1 — находим 2 мегабайта
Для начала отметим, что уведомление об ошибке с формулировкой «Недостаточно места в памяти устройства» (insufficient storage available), чаще всего появляется в случае, когда юзер пытается установить новое приложение на свой Андроид-смартфон или планшет, и при этом значительный объем данных из физической памяти устройства переносится на карту памяти microSD, вызывая сбой в кэше.
Собственно, в некорректном обновлении кэша и кроется причина данной ошибки — это важно знать.
Потому что, теперь, когда ошибка «Недостаточно места в памяти устройства» (insufficient storage available) уже обозначилась, чтобы проблему эту устранить, вам понадобится специальный программный инструмент, проще говоря, приложение, емкостью 2MB, которое надо будет куда-то скачать и установить.
А поскольку память ваш Андроид выделять под это уже не хочет, то, скорее всего, придется пожертвовать чем-то наименее нужным из того, что хранится или установлен в памяти устройства (а не на карточке — это тоже важно).
Другими словами, чтобы решить вопрос, вам придется в любом случае освободить 2MB памяти, что-то удалив из памяти смартфона или планшета (наименее нужное приложение, несколько старых фоток, видеороликов или аудиофайлов), даже если по отчетам памяти вроде бы много. Иначе никак. Но это, пожалуй, самая трудная часть всего мероприятия.
ШАГ 2 — качаем инструмент
Изыскав 2 мегабайта памяти, идем на Google Play Store, ищем и загружаем оттуда бесплатное приложение, которое называется App Cache Cleaner – 1Tap Clean.
ШАГ 3 — чистим кэш
Если приложения вы скачали и установили, то дальше все — дело техники. Открываем программку, и она автоматически начинает сканировать память устройства на предмет изучения состояния кэша установленных ранее приложений.
По факту завершения данной процедуры вам будет предоставлена возможность очистить кэш каждого из приложений путем поочередного нажатия иконок с изображением корзинки, расположенных рядом с названиями программок, либо удалить весь кэш оптом — нажатием на одну большую кнопку внизу экрана.
ШАГ 4 — работаем дальше
После этого вы снова получаете доступ к свободной памяти на своем Андроид-смартфоне или планшете и можете снова качать и устанавливать нужное вам приложение или обновление.
Ошибка «Недостаточно места в памяти устройства» (insufficient storage available) устранена!
[irp]
Android Mobiles are slowly moving to no external storage option. Thus we are limited in the storage space available on our mobile. Even if you have external storage, When you have Low Internal Storage space, that also can’t help you much. Whenever you try to free up some specs on your mobile, Even if you didn’t open the file for years, you feel everything is essential for you and can’t make decisions to delete it or not. So, Without deleting critical files on your mobile, here we are going to fix the insufficient storage on your mobile. It doesn’t mean I am going to tell you how to increase the Internal memory, It is not suitable for regular users, and It is not efficient. With simple techniques, We can deal this issue even if you have less than 16 GB Internal memory.
How to Find Which Files are occupying your Internal Memory?
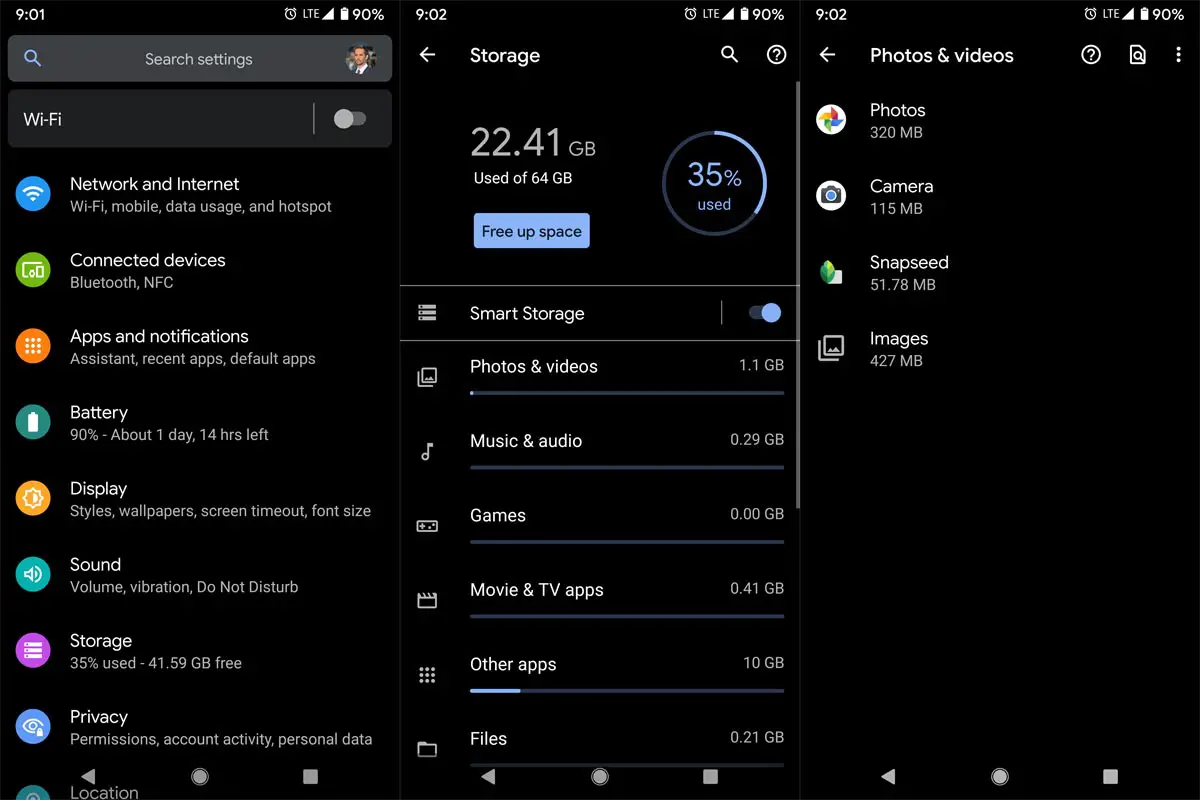
When you got the notification “Android Storage space running out,” the first thing you should do is check which files are occupying your Internal memory. You can do this in the storage option in Settings. Most of the time, the default in-built option is enough to differentiate the files based on the types. If you want deep analysis, you can use third-party apps. It will give you clear ideas about what you have on your mobile. Based on the stats, we can organize and free up space.
Most of our memory occupied by Media files such as photos and videos. Other than this, We have Social Media Apps, that will consume more storage, when you download media files. That will show us your app have a lot of storage. So, By Organizing the files, we can surely fix the issue. You can understand your mobile based on storage stats. Based on the information, we can take further action. Your storage occupies in different ways. Thus the fix also should be in different ways. When you follow the below methods, I assure you can free up to 40-60% storage on your mobile. It can vary depending on the services you are already using.
1. Fix Low Internal Storage Issue in Android Mobiles By Deleting Unnecessary users
When you have multiple user profile settings in your Android Mobile, Each user profile can have the same apps clone. Thus the user data between the apps can consume a lot of data. Most of the mobile, like Pixel phones, can use only user data between the different profiles when the apps are the same. But, Some mobiles act as cloners and make the exact copy of the already installed app. So, By deleting unnecessary users, We can get some space in our memory. To do this, follow the below steps.
Steps to Remove System users in Android Mobiles
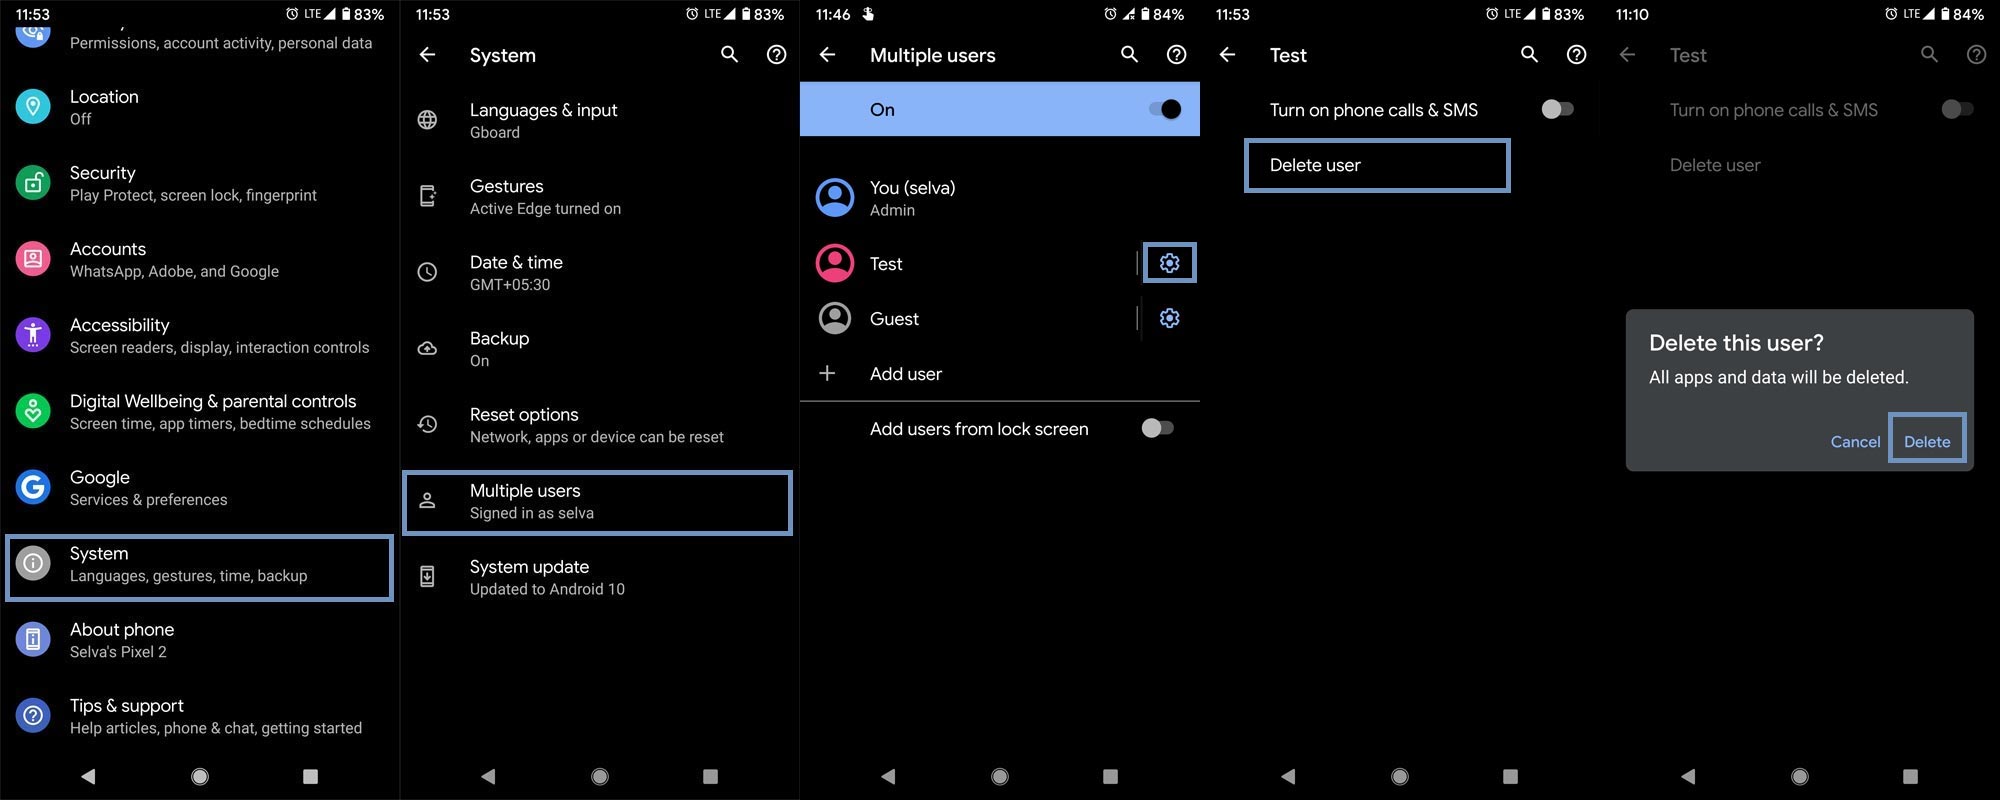
- Go to Settings and Choose System.
- You will get the details about your System data. Select Advanced>Multiple users.
- Choose the user and select the gear icon. You can choose only the secondary account, Where you can use your mobile without Google Account unless you add-in settings. In most of the mobiles, You can’t delete the Guest mode. So, leave Admin and Guest mode.
- After selecting the gear icon, select “Delete user” and choose “Delete.” If you want to maintain privacy without tracking, you can use the guest mode. Don’t add more than two user profiles. It may consume a lot of storage. To maintain privacy, you use guest modes. Thus you can maintain your privacy without removing the Google account.
2. Use External Storage if you can
If there is a possibility of using external storage like SD card or OTG Cable, you can use it as backup storage. When you have the best camera setup with an AI camera. Most of the time, you avoid DSLR and take photos using your mobile. In those situations, when you find free time, use external storage options to move the media files. Even if you have 128GB or 256 GB storage, when you shoot high-quality images and videos, your memory will run out. When choosing OTG, It is better to buy a micro USB or Type-C inbuilt pen drives. You can also use Wi-Fi enabled Pendrives. Because that’s the way the external storage becomes handy, and you can avoid multiple connections.
Utilize Your SD Card with Adaptive Storage
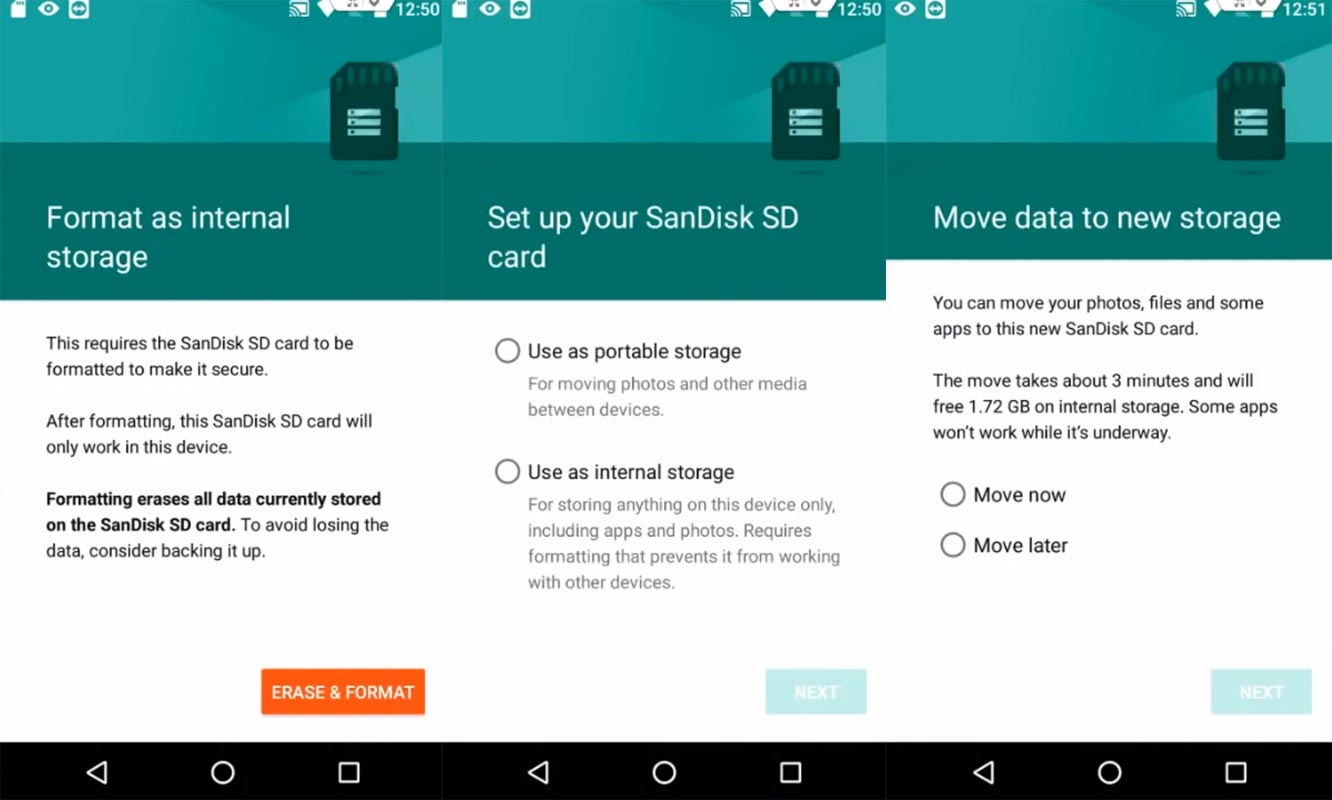
SD Card support mobiles allow Adaptive Storage If the Internal memory is UFS 2.1 storage or below. Most of the UFS 3.1 type storage mobiles avoid SD card support, which can slow down your mobile. When your mobile has Adaptive storage, you can move your installed apps to the SD card. But, It may be slow compare with your phone memory. You can move your apps using the below methods. It is better to use a minimum of Class 10 SD cards. It is not necessary. But, I recommend using one.
- Remove and Re-Insert your SD Card.
- Your mobile will ask to format the SD card as internal storage and allow the process.
- After successfully formatted the SD card, move internal storage files. You can also move installed apps in Settings>Apps>Selct App>Move to SD card.
- This method is still working on most of the recent Android versions also.
3. Using Google Photos and Google Drive as a Media Backup to Fix Low Internal Memory issue
You should always take a backup of your photos and videos to any Cloud Backup. It is not a precaution. Taking backup with Cloud services like Google photos is necessary. It is free and easy to use.
Why should you use Google Photos to Backup Media files?
If you didn’t use the pricing plans, Google Drive is limited to 15 GB Storage. If you back up all the media files in Google Drive, your storage will become full soon. But, the alternative is, When you use Google Photos, you can get Unlimited standard quality photos and videos. When you have pixel phones, you can get limited time full quality images and videos. So, use the backup like this- Use Google Drive to backup text messages and media files to Google Photos. I will explain the steps to do this in the parts below. Text messages, Images, and Documents backup will not get more than 100-200 MB, Even if you have thousands of messages. Because when uploading to the cloud, It will compress the files. But, When you upload videos, It will take more storage.
If you use iOS devices, You can use iCloud to make a backup of text messages and Google Photos to backup media files. When you are using paid service and have a lot of storage, you don’t need alternative storage ideas.
Steps to backup Media files to Google Photos
- Download and Install Google Photos on your Android mobile.
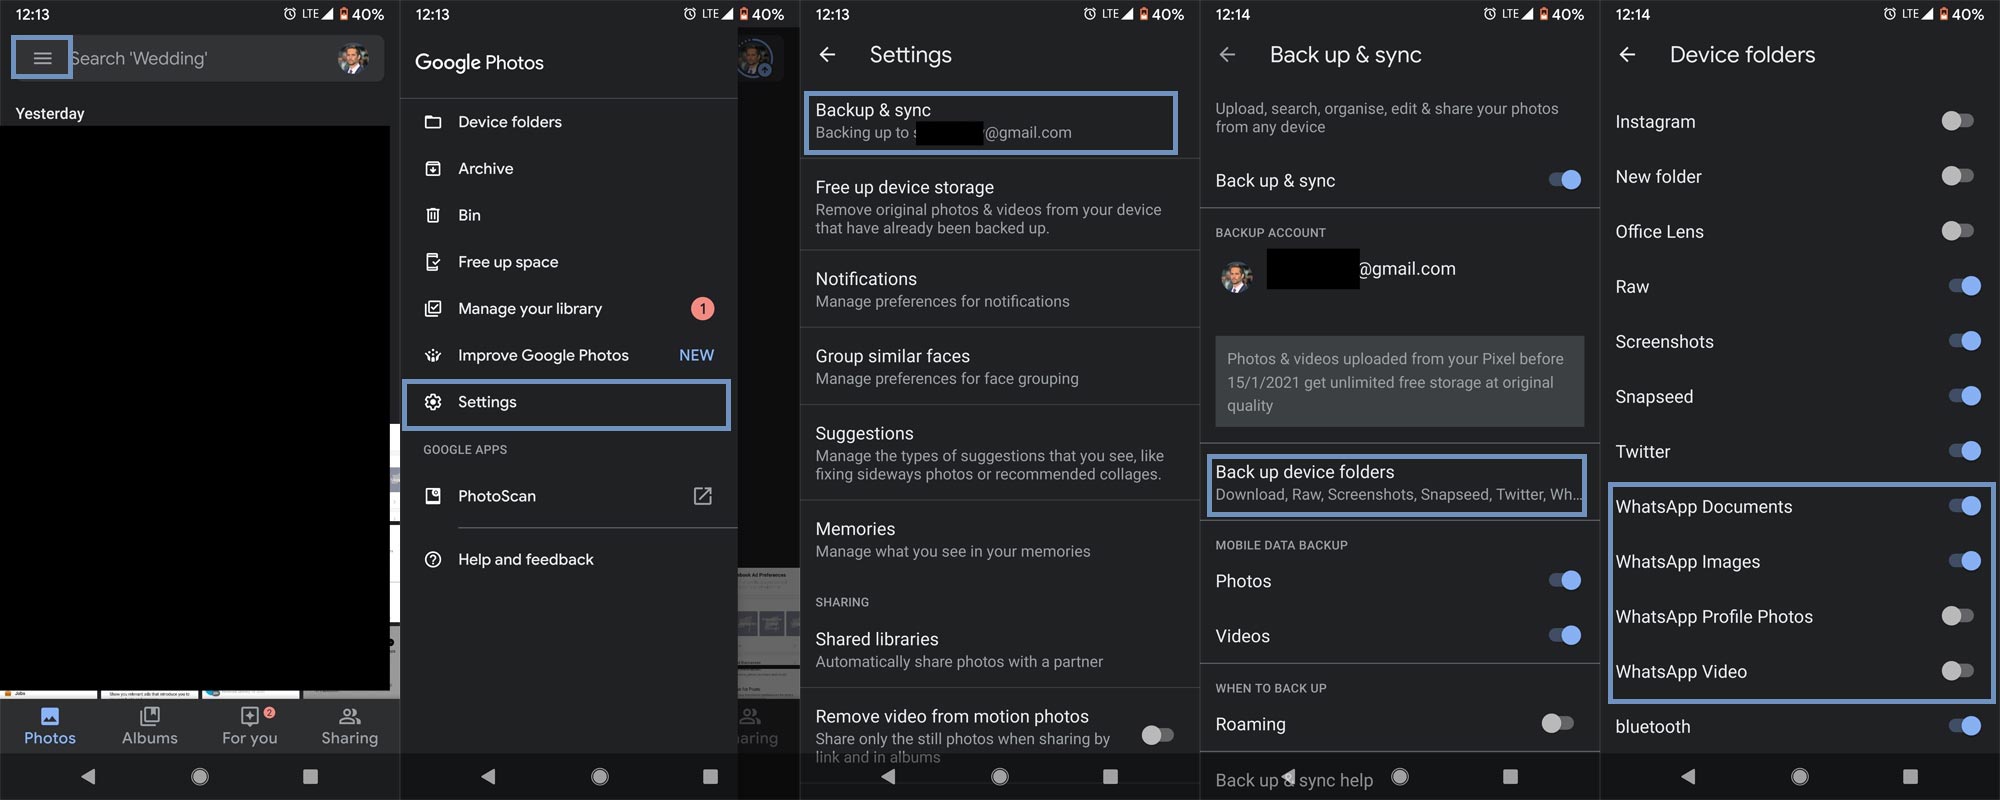
- Open the Google Photos app and select the hamburger menu.
- Select Settings> Backup and sync. Then choose Back up device folders.
- Enable all the folders that detected as media folders like DCIM, WhatsApp Documents, Images, Profile Photos, and Video. That’s all hereafter; the media files will automatically backup to Google Photos. By Backup Whatsapp files alone, you can save a considerable amount of memory.
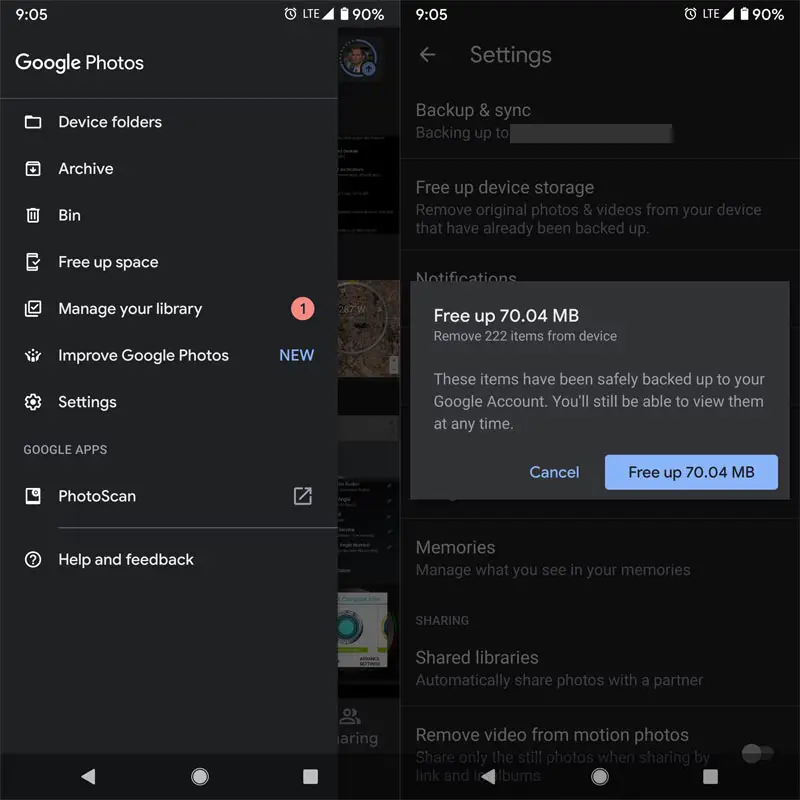
- After the sync completed successfully, you can free up space on your mobile. You don’t have to delete the files manually. Google Photos can take care of this. Select the hamburger menu and choose “Free up space.”
Steps to backup Document and other non-media files to Google Drive
You can only save media files like photos and videos in Google Photos. Other than these files, you can use Google Drive to store different types of files. Unlike Google Photos, you have limited storage capacity when you are using a free plan.
- Download and Install Google Drive on your Android mobile from Play Store.
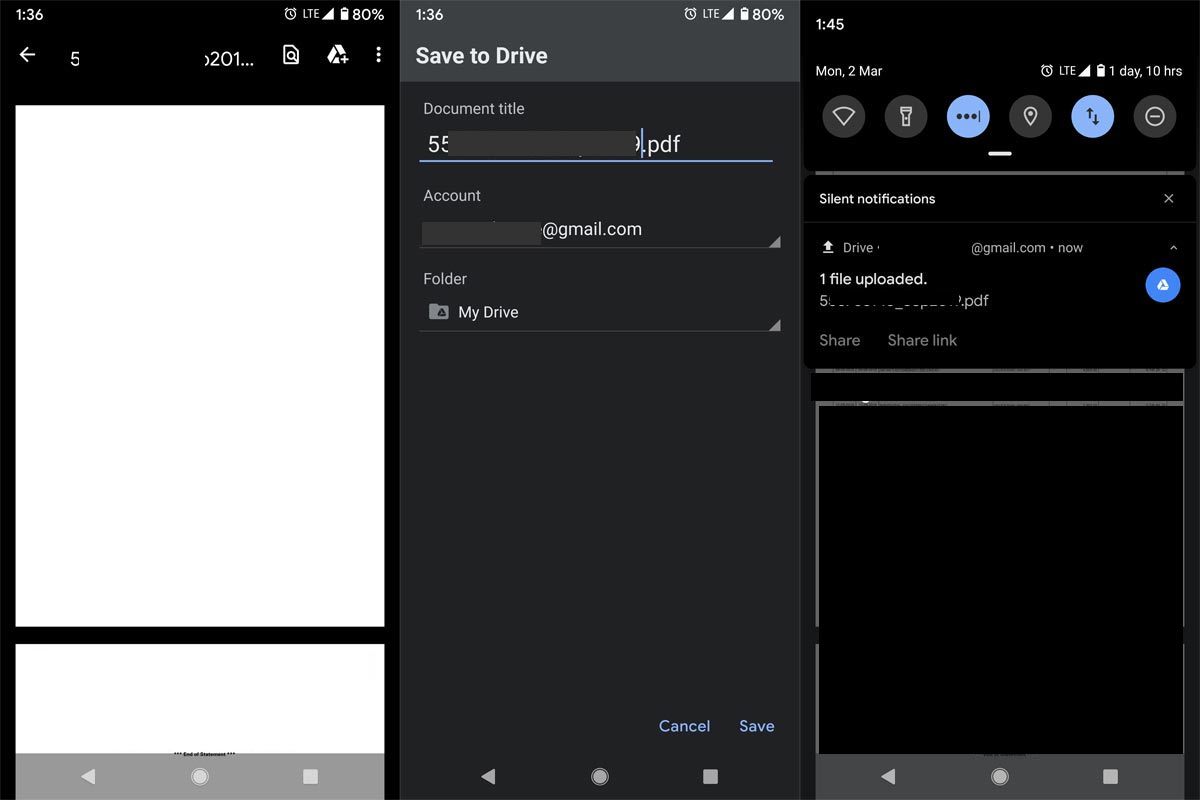
- Open the file you want to want to move to Google Drive. You can find the Google Drive logo with the “+” icon. Select the icon; It will ask you for the save location and account. Choose further details and select save. Other than essential files you should have in your mobile like ID Documents, don’t use the offline method for all files.
4. Find same and not opened files using Intelligent File managers
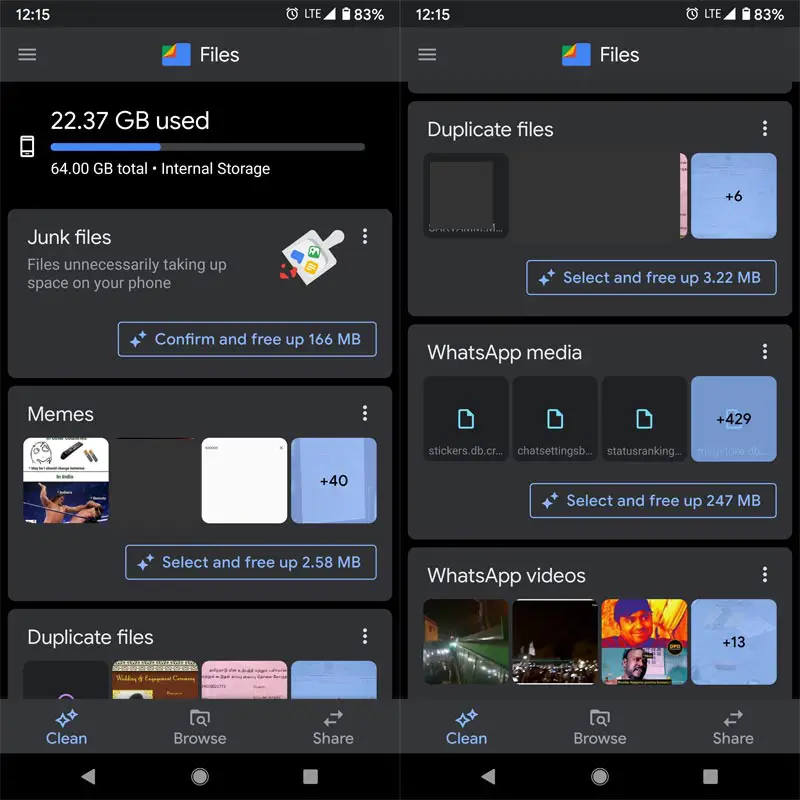
Most of the time, there is a chance of the same files can be in multiple folders. We can’t manually find the files every time. Smart file managers can do this process successfully. Here I take Files by Google as an example. You can use any file explorer that can do the job.
- Download and Install Files By Google on your Android mobile.
- Open the app and review the suggestions. This app can identify the Memes, Duplicate files, Unused Large files for a long period like that. Based on the suggestions, you can remove the files.
5. Using Lite Weight apps to utilize low internal storage
Most of the Big Memory consuming apps have their alternative Lite apps for limited RAM mobiles. So, you don’t have to install the 100 MB+ files. If you worry about the graphic design and UI, you can use the regular version. But, When your preference is to do the job, then you can use lite apps version. I already covered the topic on less RAM consuming lite weight Android apps. Youtube Go, Google Maps Go, Facebook Lite, and Twitter lite are some lite weight apps alternatives for the regular versions.
6. Use Online Streaming Services to Save Internal Storage
Instead of downloading and store audio and video files, You can use Online streaming services like YouTube, Spotify, Amazon Prime, and Netflix. When you use those apps, don’t use offline or download method. It doesn’t make sense when our goal is to save memory on our mobile.
- Songs– Spotify, Saavn, Google Play Music, and Youtube Red.
- Videos– Youtube, Vimeo.
- Podcast– Google Podcasts
- Movies and Web series– Netflix and Amazon Prime.
Further, We can access all of these services through the web version. So, You can use your browser instead of downloading and installing this app. But, the experience will differ. So, based on your priority, use mixed app versions.
7. Clear Cache in your mobile
To access the files quickly, most of the smartphone apps use cache technology. Whenever you use the app, It will first check with the cache to provide fast access to the files you are going to visit. It is a good technology. But, When your app cache more often, it will occupy more space. We cab free up space by clearing those cache files. Don’t Delete App storage. It stores your logged-in information like user name and password. When you clear this storage, you have to set up everything from the beginning in that particular app.
Clear Cache in Installed Apps
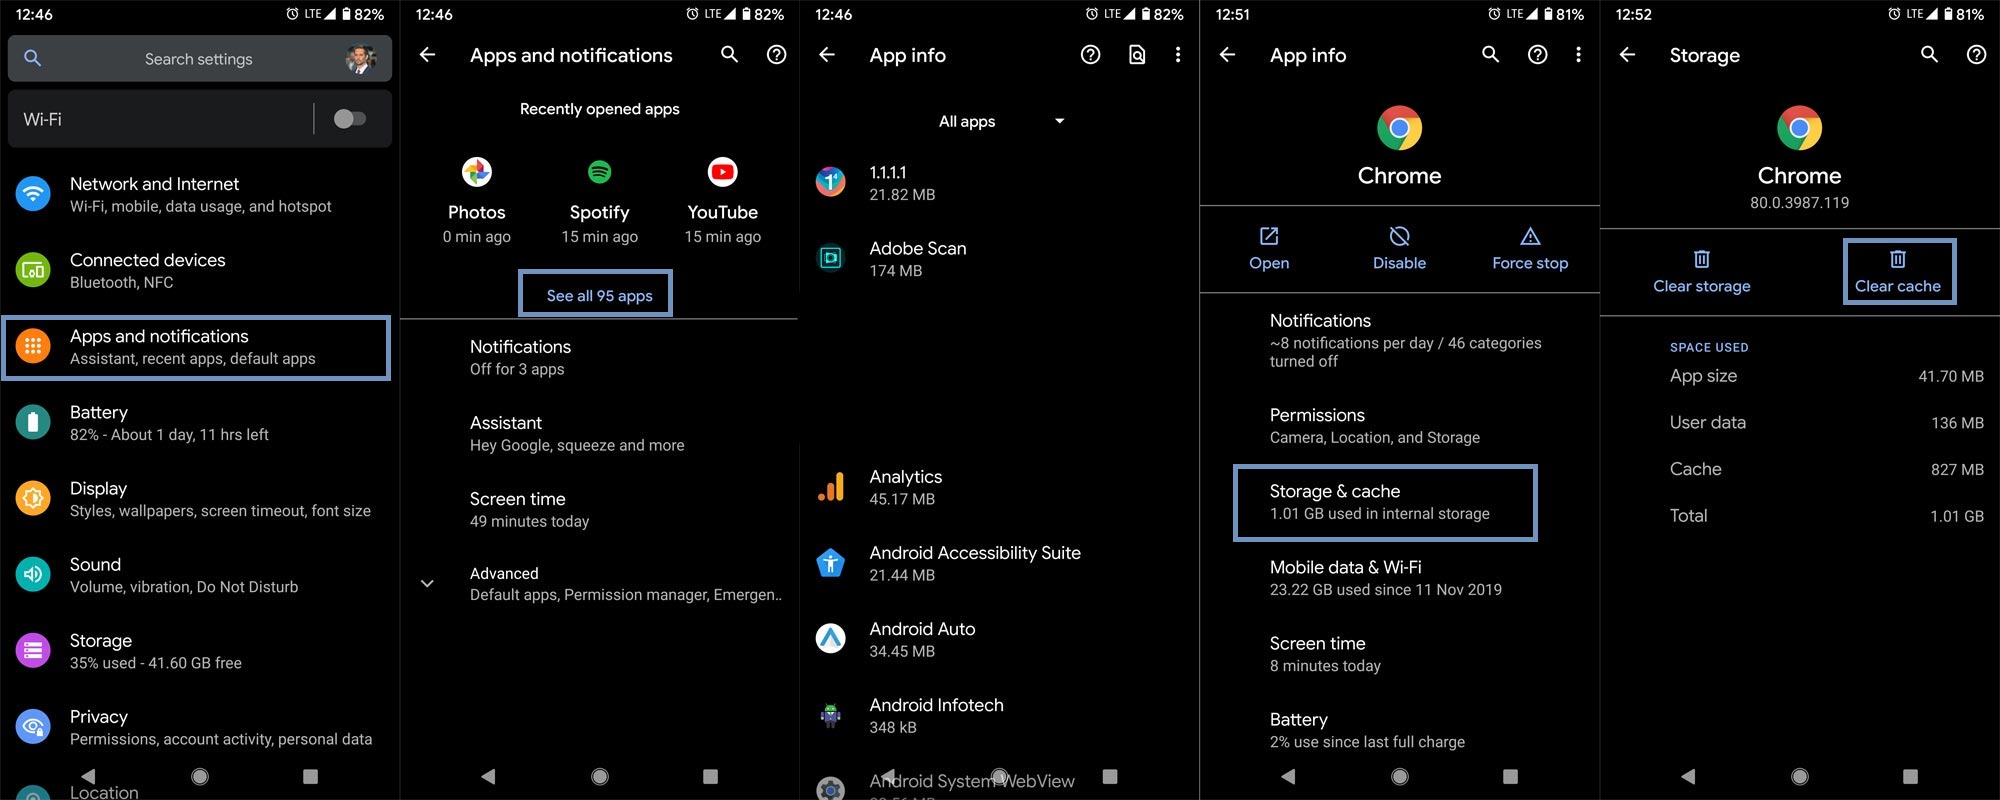
- Go to Settings and Choose “Apps and notifications.”
- Select see all apps. Initially, go with the browser apps. These apps always store a lot of data compare with other installed apps.
- Open the app, select “Storage and Cache.” Clear cache. It will not affect your history and other files. We only delete cache files here. Proceed with this process as much as possible in every app.
Stock Recovery method
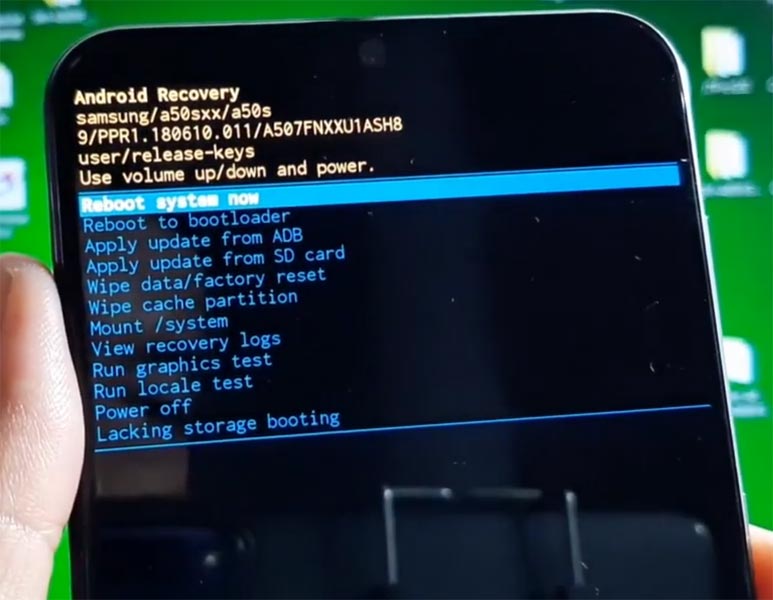
Sometimes when you update your mobile, there is a chance of the temporary installing files may persist in the storage. Some storage from your internal memory will disappear. You can’t find the file using your mobile UI. When you have this kind of issue, you can clear the cache partition in the stock recovery.
- Switch off your device. Then, enter into the Stock Recovery mode. To do this- Press and hold down the Volume Up + Power buttons at the same time for some time. It will boot your mobile into Recovery mode. The physical key combination may vary depending on the manufacturers.
- If you didn’t use Rooted mobiles, most of the time, you have Stock Recovery, which is provided by your official mobile manufacturer. If you have a stock recovery, you have the direct option as “Wipe cache partition.” Navigate to this option and confirm it using the power key button. Remember, It will not delete your entire mobile data. But as a precaution, backup first before the process.
TWRP Recovery method
When you use Rooted mobiles, you either use Stock Recovery or TWRP custom recovery. If you have Stock Recovery, you can use the above process. When you installed TWRP on your mobile, follow the steps below.
- The Keycombinations will boot your mobile into TWRP Recovery mode.
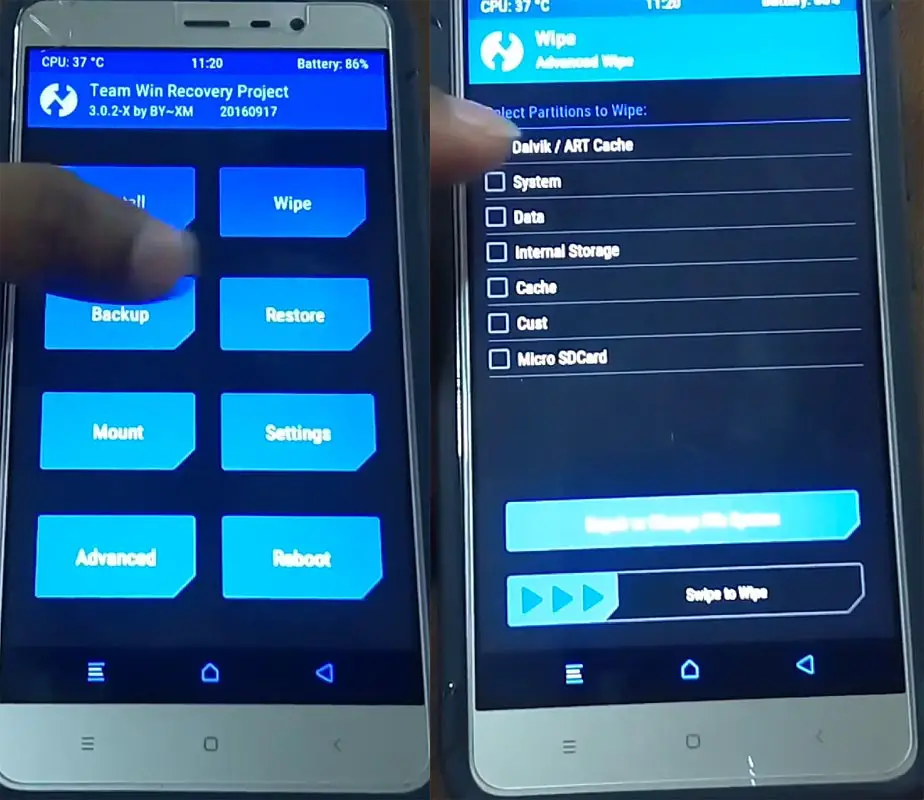
- On the Home screen, you can find the option as “Wipe.” Select the wipe option; you will receive further details. Select “Cache.” Don’t select the System. It will wipe your OS. After selecting other choices, swipe to erase the data. When the process completes, return to home and boot into OS.
Wrap Up
If you follow the above steps one by one, as I mentioned earlier, you can save up to 40-60% memory. When you have less internal storage by default, You can’t expect huge improvements. Because your Android Mobiles OS alone can occupy 4-15 GB storage based on the Android versions. If your mobile manufacturer using Custom Skin OS, But you have rooted mobile and using a custom recovery, you can use near Stock Android Custom ROMs. Compare with Custom Skin OS; Stock Android ROMs consume less memory. I hope these methods help you to free up some space in your internal memory. When you follow different methods, and it is working great, comment below. It will help our other friends.
Source, (2), (3), (4)
Selva Ganesh is the Chief Editor of this Blog. He is a Computer Science Engineer, An experienced Android Developer, Professional Blogger with 8+ years in the field. He completed courses about Google News Initiative. He runs Android Infotech which offers Problem Solving Articles around the globe.
What should you when Android phone shows with «Insufficient Storage Available» or has limited space available? Follow these solutions to increase phone memory.
| Workable Solutions | Step-by-step Troubleshooting |
|---|---|
| Fix 1. Delete Useless Apps | Go to «Settings» > Tab «Apps» > Choose useless apps or unwanted apps and select «Uninstall»…Full steps |
| Fix 2. Transfer Data to Cloud | If you have a Cloud account such as Google Drive or Dropbox for your Android phone…Full steps |
| Fix 3. Expand Android Storage Space | Connect a USB flash drive or a memory card reader to the end of the adapter…Full steps |
| Fix 4. Use Terminal Emulator | Partition your SD card with EaseUS Partition Master. Check how to make it at the end of this article…Full steps |
| Fix 5. Run GOM Saver | Download the GOM Saver app from the Google Play Store…Full steps |
How Do I Increase My Android Phone’s Internal Storage
«Yesterday, when I tried to install a new app on my Android phone, I received a warning message — insufficient storage available. My phone has 4GB of internal storage, and it seems not enough for today’s high-quality data. How to increase phone memory of Android phone because I have no plans to change my phone for the time being.”
As we all know, there are many Android phones are facing low internal memory issue when installing games and apps. This problem is especially serious in budget phones because most of these phones have little memory; for example, some Android phones only have 4G memory.
If you are running insufficient storage space on your Android phone, you can expand and increase internal memory through several different methods. Here in this article, you’ll find six effective methods to fix the «not enough storage available» error and increase internal storage space on Android phones.
Fix 1. Delete Apps, Clean History to Increase Internal Memory
Sometimes, Android apps will take up quite a lot of space in Android phones with browsing history and caches. As time goes by, every app on the users’ phone will be filled with cached files. Therefore, cleaning up useless apps, history, or caches will surely save more useful space and extend Android internal memory.
1. Delete unwanted apps on Android
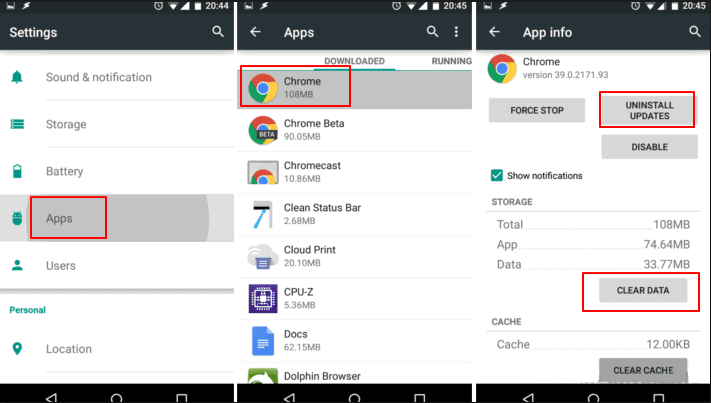
Go to «Settings» > Tab «Apps» > Choose useless apps or unwanted apps and select «Uninstall» or «Clear Data».
2. Clean up app history or caches to increase phone memory
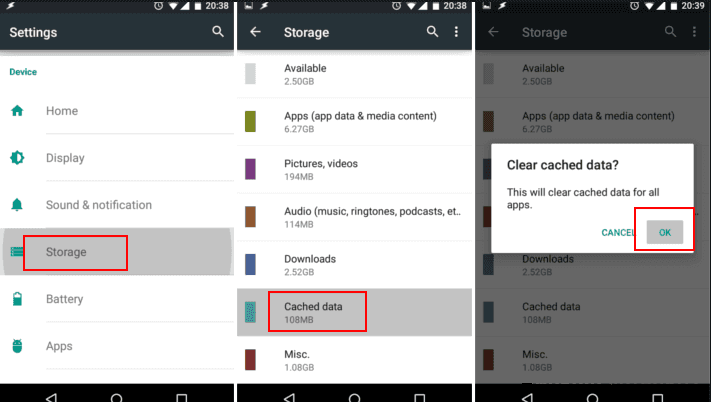
Go to «Settings» > «Storage» > Click «Cached data» > You’ll receive a message showing «This will clear cached data for all apps», click «OK».
Fix 2. Transfer Data to Cloud Storage or PC to Extend Storage
If you have a Cloud account such as Google Drive or Dropbox for your Android phone, it will be a good way to save Android phone storage space by transferring data to Cloud storage. Wonderful photos, videos, or other files can be upload to Cloud so to save more free space on Android.
If you don’t have a Cloud account, you may choose a PC or tablet or other external storage devices to save internal memory on the Android phone. You can try to export rarely used data to a PC and delete them on your phone.
If you don’t want to move your Android data or files out and save in Cloud or PC, you can also try to add memory to increase internal memory on Android with USB OTG. Detailed steps will be listed in Fix 4.
Fix 3. Expand Android Storage Space with USB OTG
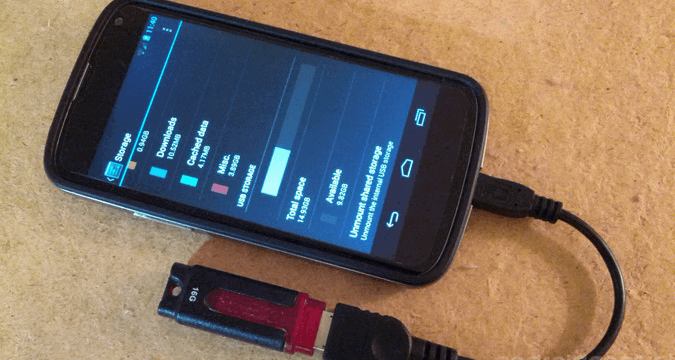
USB On-The-Go (USB OTG or OTG) allows USB devices such as tablets or smartphones to act as hosts and allows other USB devices (such as USB flash drives, digital cameras, mice, or keyboards) to connect to them. So you can connect a peripheral such as a USB storage device to your Android phone and add more space to it.
USB OTG will help you to increase Android internal storage space by adding an external hard drive or USB drive to the phone with an OTG adapter. If you don’t know whether your phone supports USB OTG or not, you can download the USB OTG Checker app to test.
See how to increase internal storage space on Android phones by using USB OTG.
Step 1. Connect a USB flash drive or a memory card reader to the end of the adapter. Then, connect the OTG cable to the Android phone.
Step 2. The file manager will automatically appear. If not, swipe down from the top to show the notification bar.
Step 3. Tap USB Drive. Now, you can transfer files from your Android phone to the connected USB flash drive or memory card.
Go to «Internal Storage» > select the file you’d like to move. Tap the three dots button and select «Copy». Then, navigate to the USB drive and tap «Done» to complete the process.
Fix 4. Use Terminal Emulator/INT2EXT/Mounts2SD Apps
In addition to Link2SD, other known apps such as Terminal Emulator, INT2EXT, or Mounts2SD can also help to add SD card space to an Android phone, so to increase Android internal memory with ease. You may selectively try any one of these apps and apply them to increase your Android internal storage space then.
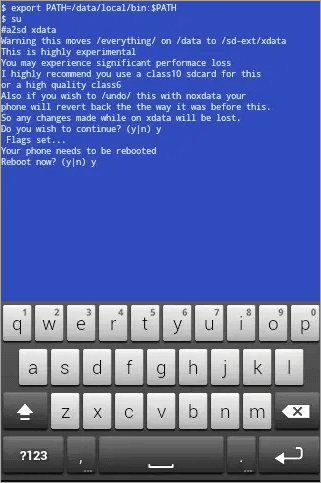
Let’s talk briefly about how to use Terminal Emulator to borrow free space from the memory card to increase the internal storage space of Android.
Preparations:
- Higher class micro SD card(class 4 or higher)
- Install Terminal Emulator app to your Android phone
Step 1. Partition your SD card with EaseUS Partition Master. Check how to make it at the end of this article.
Step 2. Download and install Terminal Emulator App on your Android phone. Launch the app.
Step 3. Type su and tab enter. Type a2sd xdata and tab Enter. When you input these commands, the app will ask you whether to continue with the process or not. Here, type y and press Enter.
Step 4. Now, Type y to reboot your device as required.
Step 5. In this way, you have successfully increased internal storage space on Android. You can go to Menu > Settings > Storage to check it.
If you want to undo the process and revert the phone back to the way it was before, type su > a2sd noxdata >y. Press Enter after typing each command.
Fix 5. Install and Run GOM Saver to Increase Storage Space on Android
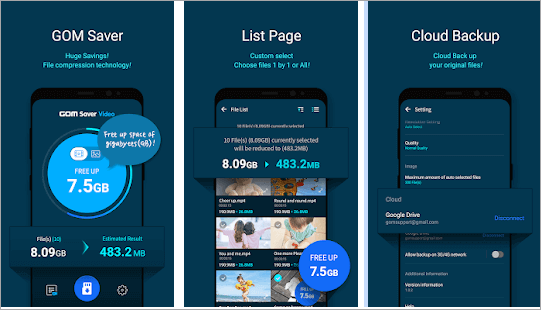
You can use GOM Saver to compress your photos and videos. The average saving is about 50% of the original file amount. You can also clear some space in this way and increase storage on Android.
Step 1. Download the GOM Saver app from the Google Play Store.
Step 2. Launch GOM Saver, and enter the main screen. You can see how much memory you can save by running the video or image compression.
Step 3. You can delete the original file or cloud back it up.
Step 4. If you choose to compress the images or videos, the compressed files will be left on your phone.
More Quick Codes to Increase Phone Memory on Android
Except for using the solutions above to fix the «Insufficient storage available» error, you can also try the following simple tips to increase internal storage on Android.
- Disable bloatware
- Delete photos and videos
- Temporarily disabling apps
- Remove unwanted downloads
Additional Help — How to Partition/Initialize an SD Card
Adding a memory card into an Android phone will surely help to expand internal space. Usually, the SD card you insert will be initialized and partitioned by the phone itself. If your SD card really cannot be initialized or partitioned, you can try EaseUS partition software — EaseUS Partition Master. This disk management software can resize, format, and increase space on your hard drive, SD card, and USB flash drive.
Connect your SD card to the PC, and follow the steps below. This is an example of initializing a hard drive or SSD:
Step 1. Open EaseUS Partition Master and got to Partition Manager.
Step 2. Right-click the target disk — HDD or SSD and select «Initialize to MBR» or «Initialize to GPT». Click «Execute Task» and «Apply» to save the changes.
0:00-0:18 Initialize to MBR; 0:19-0:44 Initialize to GPT;
Then if you cannot initialize your SD card with EaseUS Partition Master, it means that the SD card has a physical problem. You can repair your SD card with an SD card repair tool.
Conclusions
This post covers the most useful approaches to increase internal storage space on Android phones. The best way to increase Android’s internal storage is to borrow it from the SD card with the help of the Link2SD app. If you are going to adopt this method, note the following tips:
- Back up your memory card contents before in advance
- Have a charged phone to avoid any disruptions
- You must root your phone before transferring data to an SD card
For any further problems, you can turn to our technical support team for help via live chat.
Codes to Increase Phone Memory FAQs
If you still have questions, you can read the questions and answers below to get additional help.
How can I increase my phone’s internal memory?
Quick Navigation :
- Disable bloatware
- Delete photos and videos
- Temporarily disabling apps
- Remove unwanted downloads
- Delete Useless Apps
- Transfer Data to Cloud…
How can I increase my phone speed?
Tips To Increase Android’s Performance
- Update your Android
- Remove Unwanted Apps
- Disable Unnecessary Apps
- Update Apps
- Use High-Speed Memory Card
- Keep Fewer Widgets…
Why is the phone slow?
If your Android is running slow, chances are the issue can be quickly fixed by clearing out excess data stored in your phone’s cache and deleting any unused apps. A slow Android phone may require a system update to get it back up to speed, although older phones may not be able to run the latest software properly.
Why is my phone slow and freezes?
There are several reasons why an iPhone, Android, or another smartphone might freeze. The culprit may be a slow processor, insufficient memory, or a lack of storage space.

Прежде всего несколько важных моментов: даже если вы устанавливаете приложения на карту microSD, внутренняя память все равно используется, т.е. должна быть в наличии. Кроме этого, внутренняя память не может быть задействована вся до конца (требуется место для работы системы), т.е. Android будет сообщать о том, что недостаточно памяти раньше, чем ее свободный объем окажется меньше размера загружаемого приложения. См. также: Как очистить внутреннюю память Android, Как использовать SD-карту в качестве внутренней памяти на Android.
Примечание: я не рекомендую использовать для очистки памяти устройства специальные приложения, особенно те их них, которые обещают автоматически очищать память, закрывать неиспользуемые приложения и прочее (кроме Files Go — официального приложения для очистки памяти от Google). Самый частый эффект от таких программ — по факту более медленная работа устройства и быстрый разряд аккумулятора телефона или планшета.
Как быстро очистить память Android (самый простой способ)
Важный момент, который следует иметь в виду: если на вашем устройстве установлена Android 6 или более новая версия, а также присутствует карта памяти, отформатированная как внутреннее хранилище, то при её извлечении или неисправности вы всегда будете получать сообщение о том, что недостаточно памяти (при любых действиях, даже при создании скриншота), пока вновь не установите эту карту памяти или не перейдете по уведомлению о том, что она извлечена и не нажмете «забыть устройство» (учитывайте, что после этого действия вы больше никаким образом не сможете прочитать данные с этой карты памяти).
Как правило, для начинающего пользователя, который впервые столкнулся с ошибкой «недостаточно места в памяти устройства» при установке Android приложения, самым простым и часто успешным вариантом будет простая очистка кэша приложений, который подчас может отнимать драгоценные гигабайты внутренней памяти.
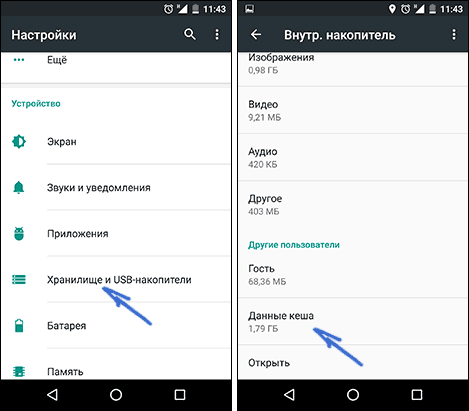
Для того, чтобы очистить кэш, зайдите в настройки — «Хранилище и USB-накопители», после этого внизу экрана обратите внимание на пункт «Данные кэша».
В моем случае — это почти 2 Гб. Нажмите по этому пункту и согласитесь на очистку кэша. После очистки, попробуйте загрузить ваше приложение снова.
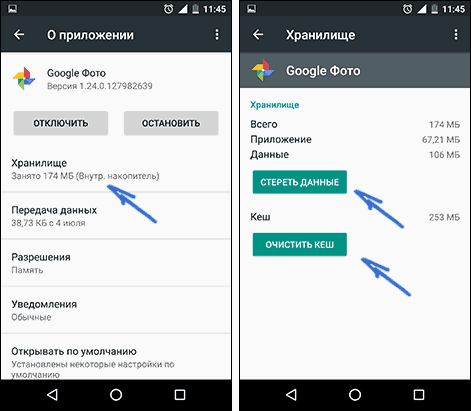
Похожим способом можно очистить кэш отдельных приложений, например, кэш Google Chrome (или другого браузера), а также Google Фото при обычном использовании занимает сотни мегабайт. Также, если ошибка «Недостаточно памяти» вызвана обновлением конкретного приложения, следует попробовать очистить кэш и данные для него.
Для очистки, зайдите в Настройки — Приложения, выберите нужно приложение, нажмите по пункту «Хранилище» (для Android 5 и выше), после чего нажмите кнопку «Очистить кеш» (если проблема возникает при обновлении данного приложения — то используйте также «Очистить данные»).
Кстати, обратите внимание, что занимаемый размер в списке приложений отображает меньшие значения, чем тот объем памяти, который приложение и его данные фактически занимают на устройстве.
Удаление ненужных приложений, перенос на SD-карту
Загляните в «Настройки» — «Приложения» на вашем Android устройстве. С большой вероятностью в списке вы найдете те приложения, которые вам больше не нужны и давно не запускались. Удалите их.
Также, если ваш телефон или планшет имеет карту памяти, то в параметрах загруженных приложений (т.е. тех, которые не были предустановлены на устройстве, но не для всех), вы найдете кнопку «Переместить на SD карту». Используйте ее для освобождения места во внутренней памяти Android. Для новых версия Android (6, 7, 8, 9) вместо этого используется форматирование карты памяти в качестве внутренней памяти.
Дополнительные способы исправить ошибку «Недостаточно памяти на устройстве»
Следующие способы исправления ошибки «недостаточно памяти» при установке приложений на Android в теории могут приводить к тому, что что-то будет работать неправильно (обычно не приводят, но все равно — на свой страх и риск), но являются достаточно действенными.
Удаление обновлений и данных «Сервисы Google Play» и «Play Маркет»
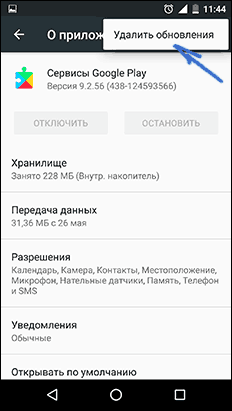
- Зайдите в настройки — приложения, выберите приложения «Сервисы Google Play»
- Зайдите в пункт «Хранилище» (при его наличии, иначе на экране сведений о приложении), удалите кэш и данные. Вернитесь к экрану информации о приложении.
- Нажмите по кнопке «Меню» и выберите пункт «Удалить обновления».
- После удаления обновлений, повторите то же самое для Google Play Маркет.
По завершении, проверьте, появилась ли возможность устанавливать приложения (если сообщат о необходимости обновить сервисы Google Play — обновите их).
Очистка Dalvik Cache
Данный вариант применим не ко всем Android устройствам, но попробуйте:
- Зайдите в меню Recovery (найдите в Интернете, как зайти в рекавери на вашей модели устройства). Действия в меню обычно выбираются кнопками громкости, подтверждение — коротким нажатием кнопки питания.
- Найдите пункт Wipe cache partition (важно: ни в коем случае не Wipe Data Factory Reset — этот пункт стирает все данные и сбрасывает телефон).
- В этом пункте выберите «Advanced», а затем — «Wipe Dalvik Cache».
После очистки кэша, загрузите ваше устройство в обычном режиме.
Очистка папки в data (требуется Root)
Для этого способа требуется root-доступ, а работает он, когда ошибка «Недостаточно памяти на устройстве» возникает при обновлении приложения (причем не только из Play Маркет) или при установке приложения, которое ранее уже было на устройстве. Также потребуется файловый менеджер с поддержкой root-доступа.
- В папке /data/app-lib/имя_приложения/ удалите папку «lib» (проверьте, исправилась ли ситуация).
- Если предыдущий вариант не помог, попробуйте удалить всю папку /data/app-lib/имя_приложения/
Примечание: если уж у вас есть root, загляните также в data/log с помощью файлового менеджера. Файлы журналов также могут отъедать серьезное количество места во внутренней памяти устройства.
Непроверенные способы исправить ошибку
Эти способы попались мне на stackoverflow, но ни разу не были мною опробованы, а потому об их работоспособности судить не могу:
- С помощью Root Explorer перенести часть приложений из data/app в /system/app/
- На устройствах Samsung (не знаю, на всех ли) можно набрать на клавиатуре *#9900# для очистки файлов журнала, что также может помочь.
Это все варианты, которые я могу предложить на текущий момент времени для исправления ошибок Android «Недостаточно места в памяти устройства». Если у вас имеются собственные работающие решения — буду благодарен вашим комментариям.
Представьте, что вы не можете загрузить новую песню, которую поделился ваш друг, или вложение электронной почты. Зачем? Вы получите уведомление о том, что пространство внутренней памяти заканчивается. Вау !!!
Это не конец истории. Если вы попытаетесь закрыть уведомление, проведя по нему, оно не исчезнет. Столкнулся с такой ситуацией? Ты не одинок. Устройства Android с внутренней памятью 16 ГБ или меньше обычно сталкиваются с этой проблемой. Ну так что ты делаешь?
Ну, самое простое решение — это скрыть уведомление, но это неправильное решение. Вы должны добраться до корня проблемы. И проблема в основном в том, что на вашем устройстве заканчивается внутреннее пространство, что видно из уведомления. Для правильной работы всех устройств Android требуется как минимум 500 МБ-1 ГБ свободного внутреннего пространства.
Поэтому, чтобы исправить это, вам нужно освободить внутреннее хранилище. Как только вы это сделаете, уведомление автоматически исчезнет. Вот несколько способов сделать это.
Также на
Очистить кэш устройства
Шаг 1: Откройте настройки устройства на вашем телефоне и перейдите к хранилищу.
Шаг 2: В разделе «Хранение» найдите данные в кэше. Нажмите на него. Вы получите всплывающее подтверждение. Нажмите на ОК.
Примечание. Очистка кэша приведет к удалению только временных файлов на вашем устройстве. Это не удалит какие-либо данные.
Начиная с Android 8.0 Oreo, Google убрал возможность очищать кеш устройства. Тем не менее, вы все еще можете сделать это. Все, что вам нужно сделать, это очистить кэш индивидуально для каждого приложения. Больно, но пока единственный безопасный вариант.
Для этого в разделе «Настройки» перейдите в раздел «Приложения и уведомления». Затем нажмите на каждое приложение и нажмите Хранилище. В разделе «Хранение» нажмите «Очистить кэш». Вы можете следовать нашему руководству по очистке кэша в телефонах Android 8.0 Oreo.
Отключить Bloatware
Большинство смартфонов, кроме тех, которые работают на Android, поставляются с предустановленным множеством дополнительных приложений, которые обычно называются вредоносными программами. Например, недавно я купил устройство от Amazon. Угадай, что? На устройстве предустановлено приложение Amazon.
Подобные приложения занимают место для хранения. Хотя мы не можем удалить их, мы всегда можем отключить их. Вот как.
Шаг 1. Перейдите в настройки устройства и нажмите «Приложения и уведомления»> «Диспетчер приложений»> «Установленные приложения».
Шаг 2: Нажмите на название приложения, которое вы хотите отключить. На следующем экране вы получите возможность отключить его. Нажмите на него.
Иногда вместо кнопки «Отключить» вы найдете кнопку «Удалить обновления». Поэтому сначала удалите обновления, а затем отключите приложение.
Удалить ненужные данные
Если вы часто пользуетесь WhatsApp, я почти уверен, что на вашем телефоне скопился огромный массив видео, фотографий и других файлов. Возможно, вы забыли отключить функцию автоматической загрузки для групп WhatsApp. Точно так же ваше устройство будет иметь неиспользуемые данные из других приложений. Поэтому лучше регулярно удалять такие файлы.
Для этого вам понадобится приложение File Explorer. Как только у вас есть это, запустите приложение и перейдите в папку, которая содержит максимальный объем данных. Обычно его можно найти в подпапках, таких как «Медиа», «Аудио», «Видео» и т. Д.
Совет для профессионалов: проверьте папку «Загрузки». Там вы найдете кучу неиспользуемых файлов.
Используйте приложение, чтобы найти самые большие папки
В то время как WhatsApp и мультимедийные приложения легко определить, что они занимают место, сложно определить, какие другие приложения или папки также занимают много места.
Чтобы найти такие папки, вам нужно скачать приложение, которое показывает ваше использование памяти. Одним из таких крутых приложений является DiskUsage, который занимает всего 180 КБ. Приложение показывает папки, которые занимают максимальное пространство. Как только вы знаете самые большие папки, вы можете легко удалить данные из них, чтобы восстановить внутреннее хранилище.
Скачать DiskUsage
Также на
Как разделить громкость звонка и уведомления на Android
Переключиться на облегченную версию приложений
Если у вас есть устройство с 16 ГБ встроенной памяти или меньше, попробуйте переключиться на версии приложений Lite или Go. Большинство популярных приложений теперь имеют облегченные версии, которые занимают очень мало места.
Вы можете попробовать Facebook Lite, Messenger Lite, Maps Go и т. Д. Просто найдите название приложения, а затем Lite или Go в Google Play Store. Конечно, эти приложения будут лишены некоторых функций.
Отключить уведомление
Если у вас все в порядке, когда на вашем устройстве мало места и вы не хотите удалять ничего, кроме самого уведомления, вы также можете сделать это, скрыв уведомление.
Чтобы отключить уведомление, нажмите и удерживайте его. Затем нажмите на информацию о приложении. На следующем экране вы получите опцию Показать уведомления. Снимите это.
Избавься от мусора!
Это были одни из лучших способов управлять внутренним хранилищем и избавиться от ошибки исчерпания пространства хранения. Дайте нам знать, если вы смогли решить проблему.


