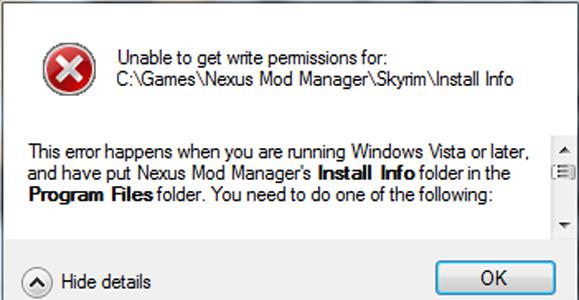
I ran into this problem today, and I’ve come up with a few solutions. The root cause is that the default folder that Nexus Mod Manager wants to install into is not typically writable by normal users. They want you to install into a subfolder of C:, and if you don’t have administrator rights, chances are you can’t create the «Games» folder you need (C:Games).
You’ve got a few options:
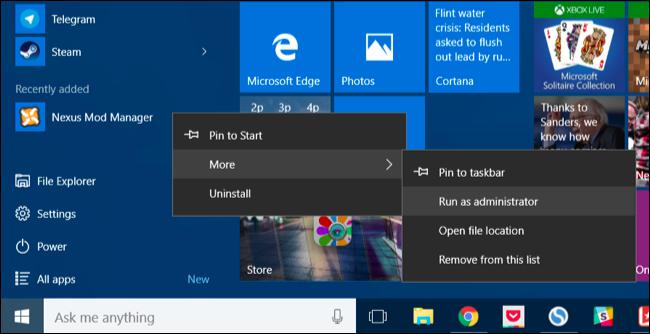
Run the program as administrator. This way, it will have permissions to write to the root of C:, and then you can create the files/folders there. Just right click, and choose the «Run as Administrator» option.
Get write permission on C:Games. You can do this if you have administrator rights by:
- Open your C: in Windows Explorer
- If the «Games» folder does not exist, right click, choose «New Folder» and name it «Games»
- Right click on the «Games» folder, and choose «Properties»
- Click the «Security» tab
- Click the «Edit» button
- Click the «Add» button
- Type your login name (if you log in as «bobsmith» then you’d type «bobsmith» here)
- Click «Check Names» and if the name becomes underlined, you did it right! Click OK. If not, double check your login name from step 7.
- On the bottom half of the «Permissions» dialog, click «Full Control» for the user you just added.
- Click OK to dismiss this dialog, and then click OK on the properties dialog.
Now you can write to C:Games, which ought to make NMM happy.
Put your Nexus Mod Manager files somewhere else. If you install to some subdirectory of your home directory, you won’t have to worry about permissions and so forth. When the Mod Manager asks you where you want to save the mod files, pick someplace under C:Users(your user name) or C:Documents and Settings(your user name), depending on the version of Windows you’re using. You could potentially put this in your Documents folder, but I have «projects» folder I created in my home directory, which works well for me.
You do not want to set these directories to something under C:Program Files or in the Steam folder, etc. This is a Bad Idea.
If you’ve already selected the default mod directories, you won’t be asked if you want to change them when you get this error. If that’s the case, you can edit or delete the config file so that you can pick a new directory.
The config file for Nexus Mod Manager is stored in %LOCALAPPDATA%Black_Tree_Gaming — you can copy and paste this into the address bar of Windows Explorer to go there, or paste it into the «Run» or «Search» dialog on the Start menu. Alternatively, from your user’s home directory, look for «AppData» and then «Local» and then «Black_Tree_Gaming»
The name of the directories in this folder depend on your version of NMM, but the file you’re looking for is user.config. You can delete this file, but you’ll lose any other NMM settings (including the location of any games that were scanned previously). You can also edit it with a text editor.
Look for a block that looks like:
    <setting name="ModFolder" serializeAs="Xml">
        <value>
            <PerGameModeSettingsOfString>
                <item modeId="Skyrim">
                    <string>C:GamesNexus Mod ManagerSkyrimMods</string>
                </item>
            </PerGameModeSettingsOfString>
        </value>
    </setting>
    <setting name="InstallInfoFolder" serializeAs="Xml">
        <value>
            <PerGameModeSettingsOfString>
                <item modeId="Skyrim">
                    <string>C:GamesNexus Mod ManagerSkyrimInstall Info</string>
                </item>
            </PerGameModeSettingsOfString>
        </value>
    </setting>
The directories here are the ones you’d want to change to some folder you can write to.
Moved from original location to the new Tutorials and Guides section — RC
NMM users:
This thread is a WIP. I will try to regularly inform you about all updates, troubleshooting and bugs about NMM. The most important updates and tips will be placed here, and other info and news will be posted in the thread.
All information is collected from various sources: Nexus site, NMM troubleshooting forums, various experienced users and personal experience.
— All versions of NMM 0.61.+ were tested on Windows 7 Professional 64 bit.
Although I created this thread, I have no exclusive rights for providing answers/help. You can all participate in helping others. So, if there is a need for help and you know how to help, please do, do not wait for me to answer first. You don’t need my approval. It’s your right. 
****provocations like: MO is better than NMM and advertising MO in this thread will be immediately reported to moderators.
————————————————————————————————————————————————————————————————————————————————————————————-
NMM 0.61.+ is very tricky for to install. Be careful in how you do it. Here are some tips that can help you and save you from «going mad».
We cannot stress enough that we are still in the beta stage of NMM. NMM is in a very good state and will be usable by nearly everyone, but Beta stages are typically used for testing and bug fixing, and some of you will find bugs.
We are using a bug tracker system on our forums that allows you to post any bugs you might have with NMM. We cannot fix a bug if you do not report it! Using the tracker system is as intuitive as making a post on a forum, and you can login to it using your Nexus username and password.
We also have a beta test subforum that contains all the information you need to know to get started, report bugs and help us with development of NMM.
Limitations
We don’t want to make you think that NMM is the solution to your problems getting 1,000 mods to all work together right now. It’s our aim to to reach that point and it’s what we’re working towards. However, even simple mods can be a complex business and trying to get many mods to all work together is something people in the community have been working hard to do since the start of this community. NMM is designed to make your life downloading, installing, updating and managing mods easier, but it will not currently be the wonder pill that will make all your conflicts and compatibility issues disappear. Load orders, conflicts and compatibility issues still exist with NMM at this time.
Mods may not work for a number of different reasons, and not all of them are the fault of NMM or the mod author who created the mod(s). Please remember this before you verbally abuse us, or the file authors, for not being able to get your mods to work.
Having said that, development is ongoing with NMM to make these difficult aspects of modding as easy to overcome as is possible within the limits of the game. We are working hard to not only ensure these issues are mitigated as much as possible within NMM, but also to ensure our program is compatible with any other tools and utilities you might use at the moment to deal with them.
IMPORTANT!!! IMPORTANT!!! IMPORTANT!!!
Before you do any changes to your game (mod upgrades, uninstallation, new mods installation … ) :
— back up your present game and the mods from Games/Nexus Mod Manager/Skyrim/Mods. (You might loe them … Not necessary, but precautions … one can never be sure enough … Seriously — Do back up)
Beginners guide to modding for NMM users (by gromulos)
READ! Read the description pages for each mod. Read the install instructions for each mod or utility. Read the Skyrim owners manual. No one was ever hurt by just reading.
while this was primarily made for Skyrim, it also works for Fallout 3 and Fallout New Vegas, FO4
This guide will NOT work for any unofficial version of Skyrim, Fallout New Vegas, Fallout 3 or FO4.
1) You need to run LOOT, Wrye Bash and TES5Edit, in that order.
Loot is not 100% and if that is all you’re using you’re going to have many problems as you progress through your play through, BOSS is no longer being supported and thus is out of date with newer mods. With many mods loaded, you should be using 2 other programs, Wrye Bash and TES5Edit. Sort the plugins with loot then click apply.
LOOT = load order
Wrye Bash = verification of load order and primary and secondary file load
TES5Edit = verification of primary and secondary file load
2) Wrye Bash 306-beta — Standalone Executable
2.1) When you run Wrye Bash if any checkmarks are not green, those mods are causing problems in your game, you make them turn green by dragging them up or down in your load order in wrye bash till they do turn green.
2.2) You HAVE to have either a merged patch or bashed patch file, once again Wrye Bash is your friend because it will automatically make you a bashed patch file when it loads your mods. A bashed patch file makes all your weapon and armor and other mods play nice together, it also keeps track of leveled lists in the game and makes them work better together also.
2.3) One other thing, make sure you enable ( check mark ) the bashed patch Wrye Bash makes, then right click it and choose rebuild patch as the one Wrye Bash makes is empty, which should always be last in your load order unless you’re using an ENB, SUM, ASIS, or the Reproccer.
2.4) Make sure you go through both lists on the left and right panes of the window and make sure each entry that has a listing also has a check mark for the box next to it. Rebuilding the bashed patch is not going to help you if EVERYTHING is not included.
2.5) Concerning what the red, orange, and green check marks mean in Wrye Bash.
Red means a missing master file — basically a guaranteed CTD on startup.
Orange means that some ESP has requested its master files in an order that is different to the the order that you currently have them in. Orange mods are arguably more dangerous, because you won’t necessarily get an immediate CTD every time, so you may be lulled into a false sense of security, whereas in reality you have an unstable load order.
Clicking on the orange/red mods will show you what masters they have, and what order they want them in. From here on in, it becomes like a puzzle: you need to manually drag and drop the various masters in your load order until their order is harmonious ( IE:. you’ve managed to provide the desired order of master files for every single ESP in your list simultaneously ) and all of your oranges have disappeared.
Green means you are good to go for that mod
If it’s not possible to eliminate all orange mods, you may need to do one of the following:
- Manually download and manually install the mod — sometimes they are corrupted, this has worked for other people in the past that I have helped one-on-one
- Ditch one or two mods / patches — last resort
- Sort the master files for the orange mod in TES5Edit — see appendix 1
Appendix 1 —
open WRYE
find an orange mod
when tes5 opens and lists all your mods, right click the window
load in Tes5Edit only that mod and tes5 will load the rest ( best to do one at a time )
then right click the orange mod and pick sort masters
then close and save
The first 9 files should ALWAYS be in this order, no exceptions.

DO NOT USE A MERGED PATCH AND A BASHED PATCH AT THE SAME TIME, ONE OR THE OTHER.
#1 rule — NEVER delete a mod once you install it unless you are making a new character — N E V E R !!!
3) TES5EDIT is used to do 2 things,
— verify that your load order is not missing any files that your mods need and
— verify that no primary files are being loaded after secondary files. When you run TES5EDIT it will throw up an error box and the error will be displayed at the bottom of the right pane / panel. All you have to do is read what it says and it will tell you exactly how to fix the problem in Wrye Bash. Yes, you can open Wrye Bash while TES5EDIT is open so you don’t even have to write down what the error is 
Please remember that while LOOT is a great program it is NOT 100 %
All the files in here are in my siggy, just run them in the order I have them listed
EDIT: SKYui should be loaded directly above your bashed patch. SKYui is a menu management mod and thus should be loaded AFTER any other mods except the patch file, Reproccer, ASIS, or an ENB
Additional info that may be of use for some people below:
1) MotoSxorpio — If you have removed a plugin or changed load order, a reference ID for objects being missing could cause CTD.
2) Oubliette — Error checking mod combos isn’t impossible it’s just a pain to do and no one wants to do it for anyone but themselves — which answers your other question.
The following is standard trouble shooting for mod issues not pinned to a single mod (this is why you test every single mod in your install as you go, individually and with all your other mods — to pinpoint problems at the mod from the very beginning).
First — have you verified your game files through steam and updated to the latest patch?
Second — uncheck all your mods, start a new game, save after the chargen. This will be your ‘tester save.’ Do Not Overwrite or Delete this save.
Third — Enable five mods.
Four — Go into game with your tester save. Run from one end of the game world to the other. Go into a few cities. Interact with a few things that are mod related. See if anything crashes.
Five — No sign of problems? Repeat 3-5. It crashed or something’s not right? Go to step 6.
Six — something crashed? uncheck one of the five mods then go back to your tester save, repeat step 4.
Continue until you have found and fixed your error.
Intermediate guide by — Tony971 — http://www.nexusmods…im/mods/56894/?
Advanced guide by — GrandBulwark — http://www.nexusmods…im/mods/32363/?
How many mods and plugins does NMM support
Skyrim(!) only understands 255/256 Bethesda plugins. These will be files that have either the ESM or ESP file extension. Prefix is inbuilt for 32 bit game. Period.
You can pile up SKSE plugins, textures and meshes above that number, because they do not have Bethesda plugin extensions at all.
Load order only understands plugins. It does not care or manage anything else.
Your ability to pile up other mods above plugins depends on your computer. You can have 1,000,000,000 texture mods overwriting each other, but both Skyrim and your computer still needs to go through each and every one of them. This is why it is recommended to use a limited number of mods overwriting each other.
While bashed patches can allow for some mods to be integrated into it, and while in the actual program it marks this as merging mods, this is not a true merge. The only mods that can be compiled into a bashed patches are basic mods that only touch Skyrim’s setting files or basic information regarding levelled lists, or very basic fiddling with other base information such as biped slots, so it is more compiling a group of settings changes that previously would need an esp slot to be picked up on by the game.
This is an AUTOMATIC process and you cannot get it to accept any mods that are not set up to be merged with a bashed patch by the author. Some mods (such as multiple floor sandboxing) have an alternate version that is specifically designed for Wrye Bash to recognise it so that it can be integrated.
Inactive plugins in your load order also counts towards the plugin limit, for instance, let’s say that you have 100 active plugins and 10 inactive plugins, so the plugin count will be 110, and not 100 !!!!
[/spoiler]
How to install Skyrim and FO4 mods mods using NMM (link and video)
http://wiki.tesnexus.com/index.php/How_to_install_Skyrim_mods
How to make Backup and how to restore your Backup
How to back up NMM:
- Create a backup folder on your Desktop or somewhere on your hard-drive that has plenty of space
- Create the following folders inside your backup folder:
— Data
— ini
— Install Info
— Plugins
3. Backup your game’s Data folder (eg. C:SteamsteamappscommonskyrimData for Skyrim) by copying (not moving) all the files and folders from the game’s Data folder to your newly created Backup/Data folder (for games like Skyrim you can skip the default BSA files that the game installs in the data folder if you so wish)
4. Go to your NMM folder for the game you’re backing up (eg. C:Nexus Mod ManagerSkyrim for Skyrim) and copy (not move) the content of the Install Info folder to your BackupInstall Info folder.
5. Go to where your game’s .ini files are located (eg. My DocumentsMy GamesSkyrim for Skyrim) and copy (not move) the Skyrim.ini and SkyrimPrefs.ini files in to your Backupini folder.
6. Go to where your game’s plugins.txt and loadorder.txt files are located (eg. C:Users{Your User Name}AppDataLocalSkyrim for Skyrim). You might need to find this folder by using the address bar if you have not turned on hidden files in your computer settings. Copy (not move) the loadorder.txt and plugins.txt files to your BackupPlugins folder you previously created.
Restoring NMM back to your backup settings
- Go to your the game’s Data folder and copy the contents of your BackupData folder to it (overwriting if asked)
- Go to your NMM folder for that game, open the Install Info folder and delete everything that’s in this folder. Then copy the contents of your BackupInstall Info folder in to it.
- While still in your NMM game’s folder, go in to the Mods folder and delete the ModProfiles and VirtualModActivator folders if they exist.
- Go to where the .ini files are located and overwrite them with the ones from your backup in Backupini.
- Go to where the loadorder.txt and plugins.txt files are located and overwrite them with the ones from your BackupPlugins folder.
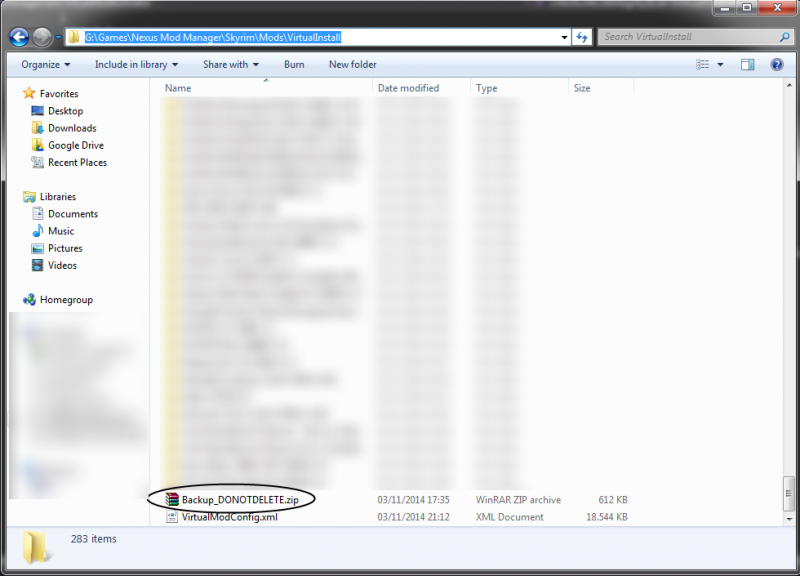
The backup file is created automatically and it is named Backup_DONOTDELETE.zip, it will be placed in the selected VirtualInstall folder (usually in your Mods folder for that specific game).
Restoring your Backup
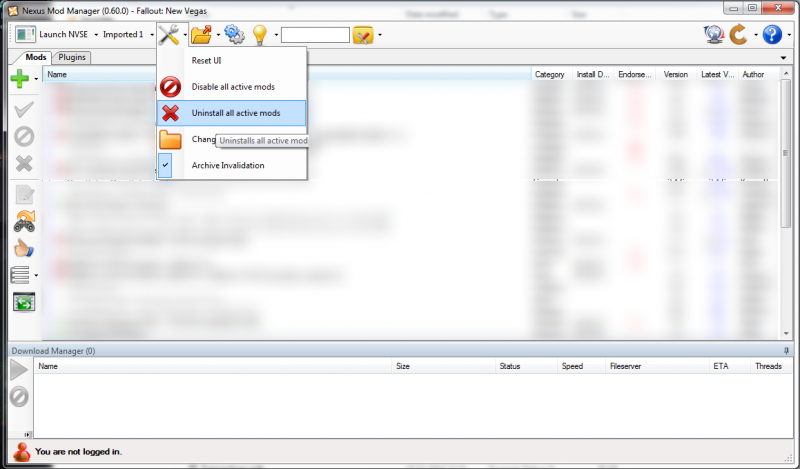
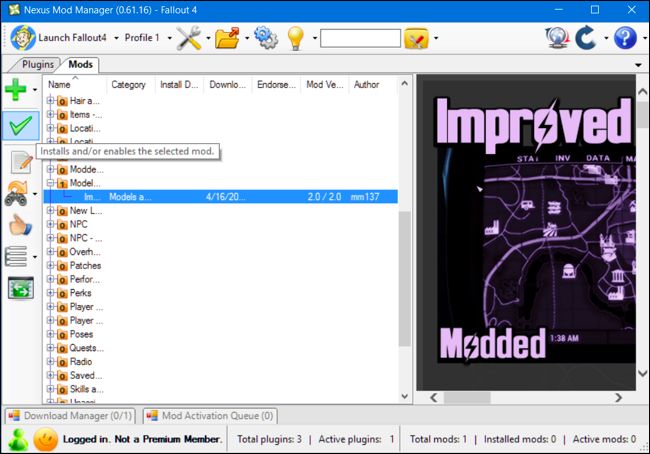
If you installed any mod using the Profiles version of NMM, or you just allowed it to migrate your mod install, it’s better if you uninstall all mods using this version: go in the Tools menu (check the picture), and select Uninstall all active mods , this will automatically and properly clean your mod installation and any file link created by this build, you can now close and uninstall this NMM version.
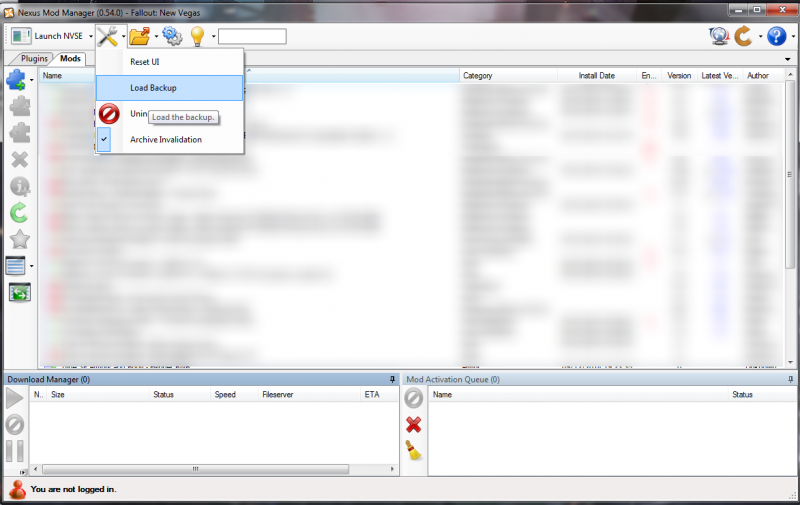
Open your NMM version 0.54.0 (or higher), go in the Tools menu and select Load Backup (check the picture for reference), find and select the Backup_DONOTDELETE.zip file, confirm, and NMM will automatically restore your previous mod install (keep in mind that you will be required to interact with scripted installers, like the one used by the mod «A Quality World Map» for Skyrim), this procedure will take several minutes or even hours based on the number and size of mods, and the performances of your system.
What to do on first installation/upgrading of NMM 0.61.+ (VERY IMPORTANT)
This prompt informs you that NMM needs to uninstall all your mods and then asks you a question.
If you click YES, NMM attempts to reinstall all your mods how they were before the update.
If you click NO, NMM will uninstall all your mods and leave you to reinstall your mods how you see fit.
If you click Cancel then none of the above will happen, but you won’t be able to use version 0.61, allowing you to gracefully roll-back to your original NMM version through the normal method (installing the last version over the top of the usual NMM location). If you do this, nothing will have been changed and you’ll be completely back to normal on the old build of NMM.
How can I disable «Updating message»
Spoiler
You can disable the update messages in NMM, just go to Settings and under Options, uncheck the box where it says «Check for updates on start up«.
How to create load order list (in pictures)
Adding more supporting tools (text and pictures)
Spoiler
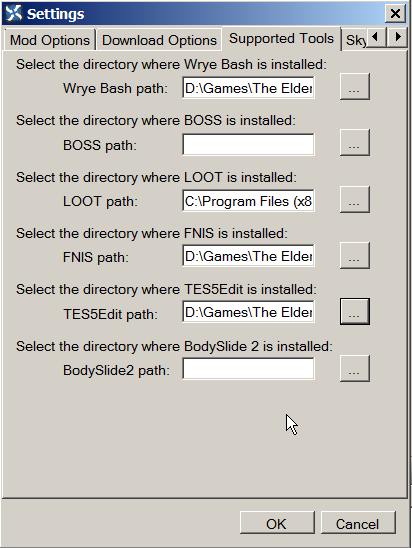
If you want to add more supporting tools to your manager, tools like Wrye bash, Tes5edit, Bodyslide path and similar, the procedure is very simple.
1. Click on your «Settings» Icon
The new box will pop up with new options. Go to «Supported tools» tab and you will see new options. Now, Since I have Wrye bash (WB) , I added it to my «Supported tools. I clicked on «…» beside the line and a new box popped up. All I had to do is to find the root directory of my WB and when found, click on OK. NMM adds WB to my supported tools. Now I can run WB directly from the manager. This is a great advantage since NMM can directly pass its master list and load order to WB where you can manually move mods up and down in your list. Change you make in either manager are visible and implied in both..
2. To check if your new tool is added to NMM, click on your supported Tools Icon and you will expand it. You’ll see that there are already two Icons in it: LOOT and FNIS that you can run directly from your manager. The integration with these two tools is great so you can use them without fear.
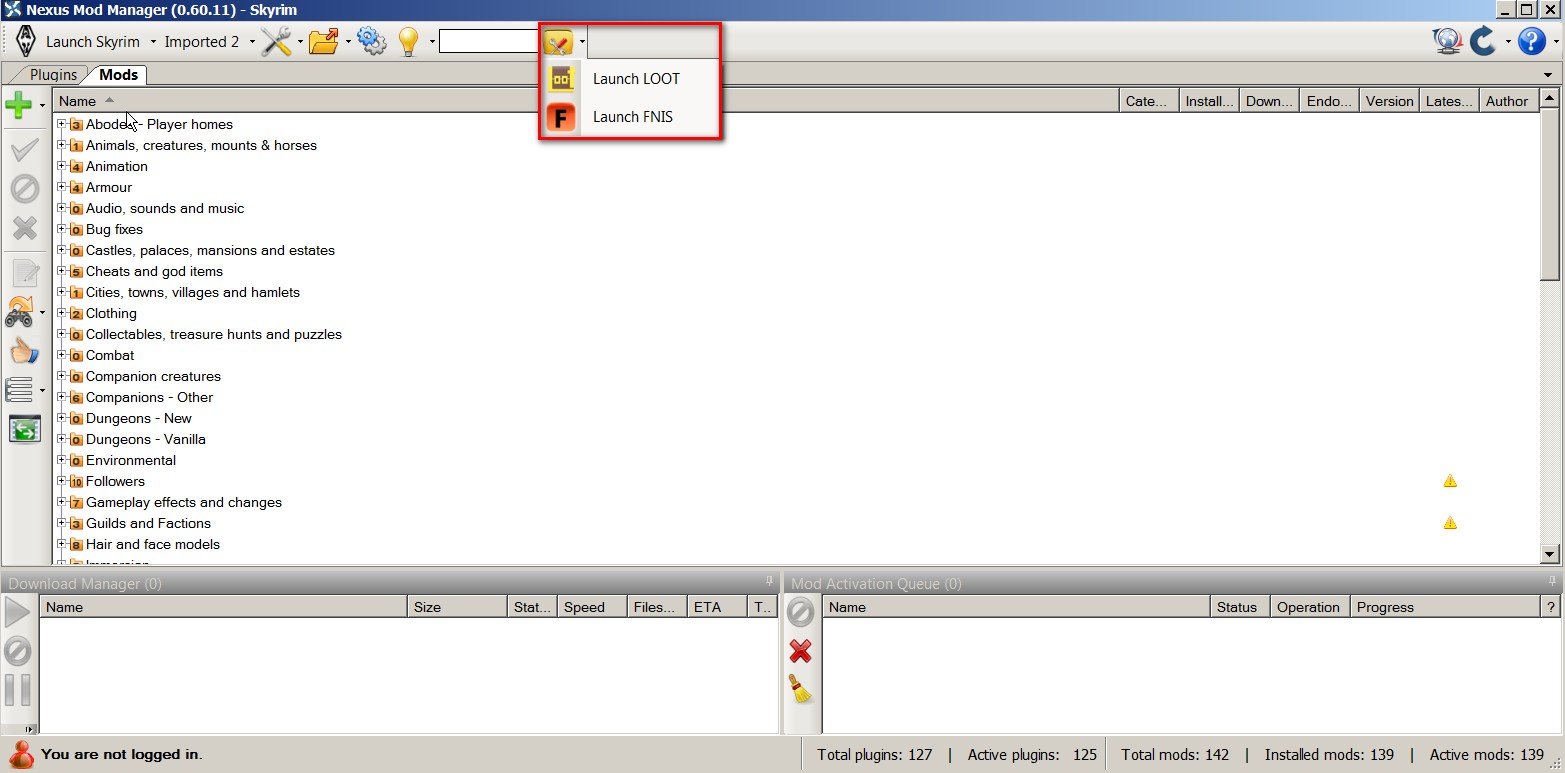
If you haven’t managed to add a new tool to NMM, don’t worry, NMM will not let you leave the box until you properly add the tool’s path. You’ll see red blinking «!» at the right side of the desired tool path line and you will got a small warning box. So, NMM will not let you make a mistake. Once you add your line correctly, the box will close.
I can no longer interact with mods that have scripted installers after I’ve installed them. How do I redo the options?
Spoiler
NMM now has three mod states; active, inactive and uninstalled.
If a mod is active, it’s installed and turned on in your profile so should show in your game.
If it’s inactive the mod is installed, but it’s not turned on in your current profile so should not show in your game. It may, however, be active in other profiles you have.
If it’s uninstalled then the mod is not installed and it’s not active in any of your profiles.
When you interact with a scripted installer for a mod it will install the mod with the options you set. If you want to reinstall that mod and go through the scripted installer again you need to uninstall it, not deactivate it. To do so, simply right-click it and select «uninstall». When you go to install the mod again you’ll then be prompted with the scripted installer, as per normal.
I can’t install downloaded mod because NMM sees it as «Read only»
Spoiler
In that case, browse to the place where you download your mod, right click on it and disable «Read only»
How to properly install and use NMM (basic important tips)
Spoiler
Download latest NMM manager from here: http://www.nexusmods…ds/modmanager/?
Download latest NMM manager from here: http://www.nexusmods…ds/modmanager/?
1. Install the manager.
— at the end of NMMs installation, you’ll be asked to run FNIS and will be warned about some problems if creating multiple profiles. Choose to «Run FNIS». FNIS box will pop up and run FNIS. If FNIS works, you’re OK. If doesn’t, reinstall FNIS using NMM.
— although this version is very fast, it is slow when installing/uninstalling big size mods (over 80 MB). It takes time and sometimes it shows «Not responding» on the top of framework. Do not cancel or stop installation/uninstallation process because you will need to repeat the operation. Be patient and wait. When finish, NMM will report about completing operation on the bottom of the manager.
— 0.61.+ versions supports creating multiple profiles. After the installation of the manager, you will see «New profile» tab under toolbar. I would suggest you to create at least one more profile beside the default one. If something goes wrong, you can always go back to your original (default) profile. You can check this under:. You can check this under: How to play (create) multiple characters
2. Mod installation is much «smarter» now and autonomous. Searching files and integration with Master files is improved.
— If you are doing new installation of the manager, be very careful where will you place your VirtualInstall folder (see the topic 4)
— When starting, NMM 0.61+ will uninstall your mods first and then reinstall them. During that process you’ll be asked to choose/confirm certain installation from some mods like, FOMODS, XP32 Maximum Skeleton, SOS and other mods you had installed and you did these steps before.
3. After mod installation you should run FNIS and LOOT from the manager. NMM co-works with LOOT, Wrye bash, Tes5edit and FNIS much better now.
4. On the first installation of NMM 0.61+, be careful to NOT TO install «Virtualinstall» in the «Nexus Mod Manager/Skyrim folder». When asked, chose ONLY main, Nexus Mod Manager folder.

— You should never move your VirtualInstall folder to another location manually, nowhere else because some mods requires that their .exe, .esp or .esm files be in game installation directory. (But, if you are persistant to do it, do it at your own risk)
— if you want to move your mod folder back where they were using NMM. Open NMM, to change the VirtualInstall go into the Tools menu, click on Change Virtual Install and then select the new path, NMM will automatically uninstall stuff from the old location and activate it in the new folder
5. Upgrading your manager:
— upgrading to the new version is 99% successful and works great. If something goes wrong during and after upgrading the manager, you can try to do it again and if it still not working, disable your mods, uninstall present version and install a new one. Before you do that, check How to completely uninstall/remove NMM and Answers to various NMM problems first.
— If you upgraded NMM to 0.61.+ from previous versions, recheck your mods. Some of them will not be installed even after NMM’s mods re installation. Not installed mods will be greyed in your manager. Here is one serious bug. Some of the mods will be showed in manager as reinstalled, but they aren’t. So how can you know which ones aren’t reinstalled. Thanks heavens for SKSE 1.7.3 and its .ini modification.
— If you start the game and got info box «Some mods are missing», that means you don’t have needed line in your SKSE.ini file and therefore you don’t know which ones are missing since NMM showed all your mods as (re)installed.
Open SKSE.ini (SteamApps/Common/Skyrim/Data/SKSE. You can create the folder, if it does not already exist), and add line: «EnableDiagnostics=1» under [General]. So, next time you start the game, you’ll see which mods are missing. Then go back to NMM, uninstall them (see topic and install them again. Yeap, this is the bad side of upgrading your NMM to present game.
— When running the LOOT after upgrading, you will have to clean again some mods using Tes5edit. It depends on what LOOT will report as mods with dirty files.
6. NMM supports Wrye bash. You can download it from here: http://www.nexusmods…rim/mods/1840/? or any other site that contains this program. Just google.
After the installation of NMM, FNIS and LOOT, Wrye bash is the third tool that NMM users need. What does it do?
— Basically what Wrye Bash is in a nutshell is a way for you to manage many, many mods in a very simple yet very powerful interface.
— When a package is installed, it will override files installed by lower order packages, but not files already installed by higher order packages.
Similarly when a package is uninstalled, an «annealing» process will automatically reinstall files from lower level packages that were previously obscured.
— It fixes mod conflicts
— Lifting of the 255 plugin limit through automatic merging of compatible mods
— editing your saves and lets you fix them manually
… and many other great features.
For more details about this program, check here: http://guides.tesfan…ral Readme.html
7. If you have SKYUI 5.+, NMM might report error and presence of SKYUI 4.+ files during re installation process. (It happens on new game installation). The box will pop up with description of the «old files» and suggestion for their deletion. Go to the that location and delete all 4 files. When done, click on «Refresh». After that, NMM will proceed with further installation.
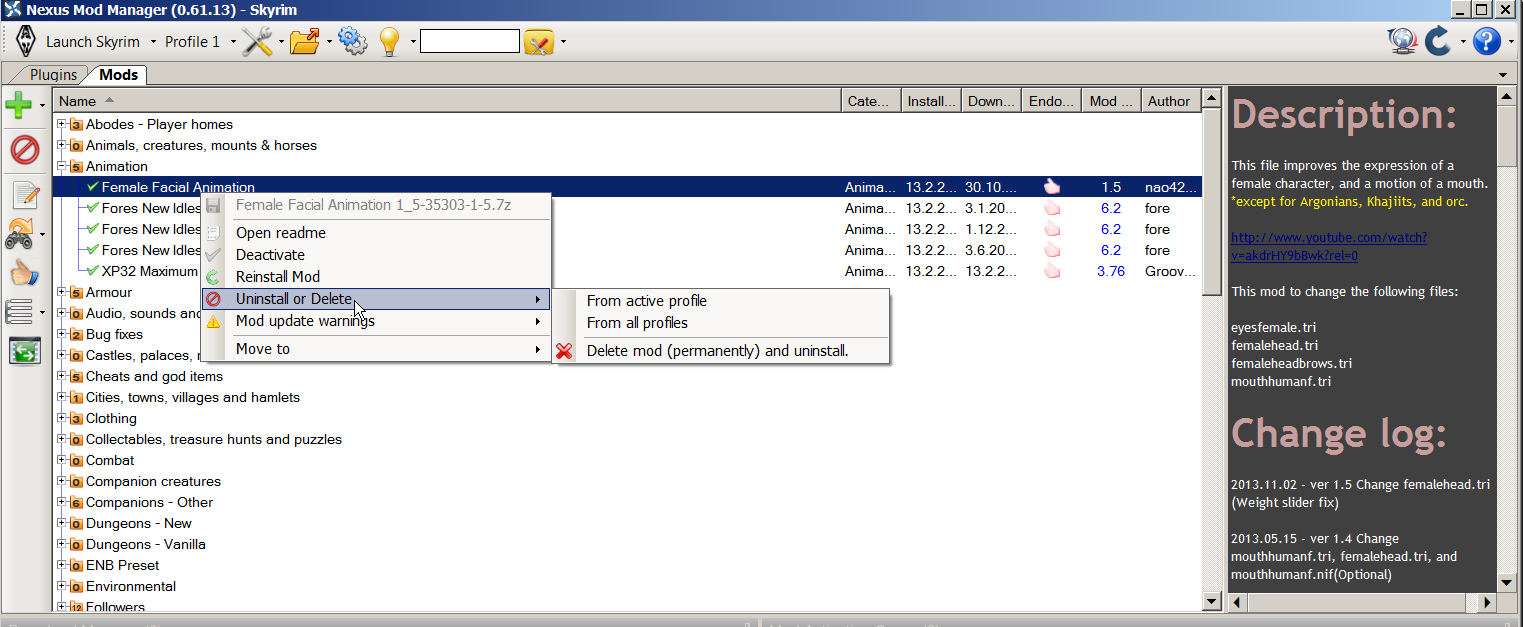
8. Uninstallation of the mods: right mouse click on desired mod, choose «Uninstall or Delete». Correct uninstallation of the mod will be like this — uninstalled mod will turn into grey color and will not have red crossed circle on the front. I usually disable the mod first and then uninstall it. There are several more options… see the picture.
9. If you get: «Unable to get write permissions for: C:GamesNexus Mod ManagerSkyrimInstall Info» message, run NMM as administrator.
10. If you use LOOT via NMM, LOOT will arrange your load order directly from the Master list it receives from NMM. Do not use external LOOT since it will/might change your load order bit differently from NMM and you might experience game problems when loading it via NMM. Use either one, not both.
11. If you want to uninstall several mods in row, it is recommended to uninstall them one by one waiting for manager to finish the task first and then uninstall another mod because the manager sometimes hangs on processing multiple processes and freezes. It that happens, close the manager, reopen it and repeat the task.
12. After every installation/uninstallation of animation mods or/and skeleton, run FNIS to avoid CTDing, or t-posing.
Well, this is basic info and tips. I just wanted to share them with all NMM users and help them to not became frustrated (as I almost was) when installing NMM 0.61.+ version.
NMM — downloads (Virus free rar and .exe installers. All files were checked for viruses by Kaspersky AV and Anti Malware & Spyware PRO):
— Latest versions : 0.61.3, 0.61.4, 0.61.5, 0.61.6, 0.61.7, 0.61.10, 0.61.12, 0.61.14, 0.61.15, 0.61.16 — requirements and installation
— (0.61.+ hotfixes description)
Warning: This versions requires .Net Framework 4.6 (If you’re not using Windows 10, you can download it HERE )
How to completely uninstall/remove NMM
Spoiler
1. Open NMM and press «Tools» icon. Select «Uninstall all active mods»
2. Delete Games/Nexus mod manager (It is placed in your Skyrim installation directory)
3. Delete My documetns/Games/Skyrim folder
4. Use Revo uninstaller or CCleaner or any other Win tool to remove NMM traces from your computer and clean up registry
NMM 0.56.1 and older versions download and video: how to revert to earlier NMM workable version)
Spoiler
here: Nexus Mod Manager-0.56.1.rar
Other older versions:
http://forums.nexusm…download-links/
Note: installation might report broken installation file. If this happens:
1. delete all NMM files in My Document,
2. delete NMM folders in …Games/Nexus Mod manager/Skyrim/Install info (Do not delete «Mods» folder from this directory)
3. delete Games/Nexus Mod manager/Skyrim/VirtualInstall folder
4. Clean your registry.
5. Restart your computer and try to install older version
If this doesn’t help you install previous version, sorry, no help, you’re stack with the one you don’t like.
How to manually revert NMM to older version (before 0.61.+)
Spoiler
You can restore your mods in the previous NMM by doing the following:
- Uninstall currently installed NMM, remove all config files when asked
- Install a pre-0.60.x build (in my case 0.56.1)
- Launch 0.56.1 and go through all the setup
- With NMM loaded to the mod list screen, click on Tools (wrench and screwdriver icon) and select Restore Backup
- Find the file Backup_DONOTDELETE.zip located in the VirtualInstall folder and open it
- Restoration of all your mods should commence
NMM and load order tweaking
Spoiler
NMM greatly co-wroks with LOOT. When LOOT sorts your installed mods and creates load order, NMM memorize it and saves it in its clipboard. According to your settings for update master files list (default is every third day but you can change it as you like) NMM updates your master list (yaml) and «Informs» LOOT about all changes that are made in meantime. Then LOOT adopts and change your load order according to received informations from NMM. Well, this is the sword with two blades. Let’s assume you had a load order that worked fine, but you installed and de-installed some mods in the meantime. All worked fine untill LOOT change your master mods load order, and suddenly your game doesn’t run as it use to. LOOT rearranged your mods according to the yaml informations from NMM and the game behaves «weird». So what can you do to return your game stability into previous state? Here is the answer.
1. When you installed all mods and you are satisfied with the stability of your game, open NMM and press «Plugins» tab.
2. On the left panel you’ll see two blank pages with arrows pointing to the right. Click on the first one in the row (Export the current load order) and choose «Export to the clipboard». Now, you saved your present load order into NMM’s clipboard.
3. When LOOT change your load order and your game doesn’t run well, open NMM again and this time choose the second blank page icon (Import load order) and choose (Import load order from clipboard). Now, you restored your load order that ran well. All new installed mods and changes, LOOT will adopt to your load order until your master mods list change it again. Just repeat this operation again.
If you aren’t satisfied with LOOT’s work, you can manually change your load order by moving mod(s) up or down using big green arrows under «Plugins» After that run LOOT directly from NMM. If you like the way your game behaves, export your current load order to clipboard.
Mods downloading, but not activating on NMM 0.61.+
Spoiler
If you downloaded certain mod using NMM manager and it «refuse» to activate it, there can be several reasons for that:
1. manager downloaded mod but with errors
(suggestions):
— check for error reports in Mod activation Quene Monitor. If there are no errors report(s) do next step:
— delete downloaded mod, exit NMM, restart NMM and download mod again
— If the problem remain, download the mod manually
If NMM reported error in downloaded mod or during downloading process there can be several reasons:
— server error
(suggestions): try to download later
— mod’s error
— NMM manager error
2. Mod is probably not meant to be installed via NMM
(suggestions):
— install mod manually following mod’s author insturctions
— after installation open NMM and activate mod in Plugins tab
— if NMM still doesn’t acivate mod then it’s a probably bug in NMM.
3. Mod was uploaded with errors
(suggestions):
— check often the author’s info and read the users posts on his original site about bug reports and author’s notes. Report error to the author of the mod.
4. Probable bug in NMM
(suggestions):
— report bug to NMM bug report on Nexus. http://forums.nexusm…x.php?/tracker/
To be able to report bug, you have to be a registered member on Nexus.
Before installing mod, always check downloaded mod with decent Anti virus program.
Single profile users tip (where to install armour, meshes, textures)
Spoiler
Question: Let’s say I installed an armor mod with NMM. If i made a texture or mesh that I wanted to overwrite from that NMM install, should I put it in the main Skyrim directory? Or In the virtual install? Which filepath is prioritized when you’re just dragging and dropping certain things in the main Skyrim install folder?
Answer: Skyrim will always run the files in the Data folder. The texture and mesh files in there are actually links going back to the Virtual Install folder. In essence, the mod files in the Data file that NMM installs are «fake» files linking to the original files in the Virtual Install folder. You should do so in the Virtual Install folder. If it is not installed through NMM, you can edit them in the Data folder as usual.
How to play (create) multiple characters.
Spoiler
Lets assume you want to create two different characters, one an Imperial and the second a Redguard.
1.In NMM press New profile. New box will pop up where you can name it as Imperial or whatever you want.
2.Start the game via NMM and create the Imperial character, save and exit.
3.In NMM click on «New profile» and save it as Redguard or whatever you like
4.Start the game via NMM and create the Redguard. Save and exit.
5.Once you create those two profiles in order to play the one you want, you need to start NMM and choose the desired profile and then press «Launch Skyrim» unless you using mods needing SKSE to start the game. In that case, press «Launch SKSE»
This might work also in already created multiple characters, but no guaranties. It’s recommended to use it on the new game. If you want try anyway, all you have to do is «Rename profile» in NMM then load your character’s save via NMM (SKSE or Skyrim) then save and exit. Repeat for other character(s).
— I have three main profiles that I treat as «masters». I know exactly what I want and do not want to install on them. So, here is example: I have one profile with «basic» mods (armour, textures, weapons and similar and SexLab). I call it Basic. On the second one, I have mods related to creatures (call it Creatures) and on the third one, I have mods with RCOTS (call it RCOTS). So, I made a copy of each of them and called them: Basic1, Creatures1 and RCOTS1. So whenever I install any new mod I install it on the copies, not on «masters». If anything goes wrong in any of them and I if I can’t fix the problem, I just delete their copy. In that case, I don’t have to do reinstallatin of all mods.
You can install certain mod in one profile and NMM install it in all profiles, but if you don’t want that mod in other profiles, you just open wanted profile and choose «Uninstall from active profile». It’s important to do it before you want to play the game without unwanted mod in your profile. Otherwise, when you uninstall that mod later from the profile where you didn’t want to have it, and when you load that profile, the game will report «missing mod» and you’ll have to do a clean save later.
How to install mods from URLs. (Note: it works only with URLs from Nexus site):
Spoiler
you can download the mod directly from the mod page. For instance if you want to do that you have to:
![]()
2. The new box will show up:
![]()
3. Open the page you want to install mod from and highlight the URL and right click on «Copy».
![]()
4. Paste the URL into the box:
5. It should looks like this: (press OK, and that’s it)
WARNING — Although this type of mods installation works in most cases, sometimes it causing installation errors. But, have no worries, it will not damage your game, but the mod won’t install properly. If installation fails, you can always install the mod with provided download link/option under «Files».
How to work with problematic large size mods that NMM can’t install (sometimes)
Spoiler
Sometimes some large mods can cause installation troubles in sense that NMM reports errors or simply refuse to install them. If that happens, you can do following steps as Slorm (thank you) did with «Interesting NPCs 3.09 mod.
This was done using Interesting NPC’s v3.09 (later versions give a lot of log spam)
IMPORTANT — Make sure you keep a copy of your 3DNPC mod in a safe place as a backup as it’s a large download if you need to get it from nexus again
1/ Extract the Interesting NPC’s.7z into a folder (also known as 3DNPC)
2/ Navigate down the folders until you find Sound
3/ Cut the whole Sound folder and paste somewhere else
4/ Now re-archive the remaining Data folder with 7z. (If you copy the name from the original mod it will keep the mod author details and link back to nexus as well)
5/ Create a folder called Data and move the Sounds folder into it
6/ Make a new 7z archive and call it something like Interesting NPCs Sound Files (so you know what it is). This will take a long time as it’s around 2Gb
7/ Check both new archives to ensure the file structure is correct
8/ Now you have a choice. If you want to keep the mod connected to nexus then go to where nexus stores your mods (for me it’s /games/nexus mod manager/skyrim/mods) delete the original 3DNPC mod and copy the new version over which you used the same name for.
9/ If you don’t care about the link to nexus then just open NMM delete the old mod from the database and upload the two new ones
10/ Install the two new mods
11/ Get coffee, beer, porn mags/vids as the sound files takes around 40 minutes to install on a high end pc
How to fix missing mod files after migration to lastest NMM version:
Spoiler
There was an issue with the migration process that caused some mods to be unable to properly reinstall.
We fixed this issue in version 0.60.5.
If you already tried the migration process and it failed to properly reinstall everything, follow these instructions:
1. Download&Install version before latest one
2. Run it, go in the Tools menu and select «Restore the Backup Profile».
3. Switch to the newly created Backup profile.
This should fix all the missing mod files.
Also remember that you could be required to rerun some patchers after the migration (Skyproc, PerkusMaximus, Dual Sheat, TES5Edit, FNIS, etc etc..).
How to export your NMM load order:
NMM is not working, how to fix it:
Spoiler
go to Documents/My games/Skyrim and open skyrimprefs.ini and in the [Launcher] line add this:
bEnableFileSelection=1
bShowAllResolutions=1
uLastAspectRatio=3
bLoadLooseFiles=1
NMM is crashing to Desktop (important tips for all NMM new users):
Spoiler
Most common cause of NMM problems is an overzealous firewall or antivirus. Trend Micro is notorious for not playing nice with NMM. There is an entire topic on that in the forums.
Javascript must be enabled and not blocked for NMM to work.
be sure you are logged into windows as a administrator.
be sure you have NMM running with admin privileges ( NOT the same thing as being logged in as an admin)
http://s1.zetaboards…opic/4912979/1/
Be sure that Windows UAC isn’t blocking you ( it won’t bother to tell you if it is)
Make sure your firewall is not blocking you
Make sure your antivirus is not blocking you
Have you tried using a different browser?
Try with a portable browser and NO add ons. Here is a link to find portable browsers.
http://portableapps…. both of these.
Are you using any download accelerator or download manager? Some will cause NMM to not download properly.
Be sure to disable them for testing.
Are you running any browser add ons that block anything — ads, scripts, cookies — anything.
I can’t download mods via NMM (for FireFox users):
Spoiler
Go to options > Applications > scroll down to where it says «nxm» and then click on it and select «use nexus mod manager». If nexus mod manager isn’t already listed, click «use other», then browse to where nexus mod manager.exe is, and select it.
(If you are using Mod Organizer, the instructions are the same but you would set it to use nxmhandler.exe).
Answers to various NMM problems:
http://forums.nexusmods.com/index.php?/topic/721054-problems-read-here-first-nexus-mod-manager-frequent-issues/
What zip files NMM reads and support?
Spoiler
NMM can read and install following types of files: 7zip, Zip, Rar, Gzip, BZip2, Tar, jar and X2.
— If you have mod that is not compatible with NMM you can do following:
1. Download and install one of NMM compatible extractors like 7Zip or Rar
2. Right click on the mod and choose «Add to 7Zip» or if you have Rar, choose «Add to XXX.Rar»
3. Start NNM, choose destination of your zipped mod and install the mod.
How to fix «unfixable» mess that NMM 0.61+ caused
Spoiler
First of all, NMM doesn’t kill your game. It makes a lot of mess but all is fixable. I’m not saying that «Killing your game» can’t happened, but if that happens, it must be that something seriously went wrong. Honestly, other mod managers can «kill your game» too, only if your manager got «broken» or you don’t know what you’re doing.
1. Before you do any changes to your mods (upgrades, uninstall, install new mods…) make back up of your present game.
— you can do it by clicking on the «Imported2» tab in your tool bar and press «save current profile». Then, simply follow the wizard. If something goes wrong and you don’t know how to fix it, click on the «Tools icon» in your tool bar and choose «Restore the backup profile»
2. If the tip from the first topic doesn’t help you, click on the «Tools icon» again and click on «Uninstall all active mods». When operation is finished, close NMM.
— Start NMM again and click «Reset UI» in «Tools icon».
— After that, click on «Install all mods» and let NMM insall them.
— Run FNIS
— Run LOOT
…. and that’s it
How to report NMM bug to Nexus?
Spoiler
1. You must be registered user on Nexus to report bug.
2. After registration on Nexus, start NMM, click on the question mark in big blue balloon in the upper right corner and do as showed on the picture:
http://www.loverslab…-1442718436.png
Fundamental fixes and tweaks for smooth Skyrim running
————————————————————————————————————————————————————————————————————
Credits and biiiiiiiig «thank you» for help and support, bug reports and tutorials:
— Calliban44 (+ correcting my typing errors and English grammar)
— Slorm
— CPU
— ritualclarity
— prinyo
Вопрос о том, как пользоваться Nexus Mod Manager, впервые возник у фанатов Skyrim. В особенности у любителей «обмазывать» игру всевозможными модами, многие из которых требуют наличия упомянутой утилиты. Подробнее о том, как пользоваться, пойдет речь в статье.
Что вообще происходит?
Геймер, привыкший к классическому методу загрузки модификаций, недоумевает, когда сталкивается с упомянутым выше системным требованием. Где это видано, чтобы у обычного мода были какие-либо условия установки? Оказывается, апгрейд «Скайрима» идет семимильными шагами.
По сути, утилиту можно сравнить с клиентом µTorrent, которым пользуются для файлообмена с различными торрент-трекерами. У Nexus Mod Manager аналогичный принцип работы — требуется зарегистрироваться на официальном сайте и загружать архивы посредством нажатия соответствующей кнопки.
Как пользоваться?
Поистине переход от классического скачивания изменений к Nexus Mod Manager можно назвать историческим событием. Система настолько усложнилась, что возникла необходимость получать апгрейды не отдельными файлами (как это было прежде), а целыми папками, объединенными логической структурой.
Установка производится опять-таки посредством все той же утилиты. Если открыть сам архив, то в нем можно будет увидеть лишь набор файлов и не обнаружить ярлыка запуска Setup.
Все потому, что процедура осуществляется посредством Nexus Mod Manager и весь мод был «заточен» исключительно под данную программу. Инсталляция подразумевает выбор ряда опций. Овладение этим навыком требует наличия элементарной логики, потому у геймера не возникнет вопроса о том, как пользоваться программой Nexus Mod Manager.
Для Skyrim, например, установка ретекстур брони дает возможность выбрать, когда и при каких погодных условиях будет наилучший эффект от комплекта. Другими словами, замерзнет ли женский персонаж в реалиях суровой зимы на вершине Глотки Мира, надев, грубо говоря, один лишь «бронелифчик».
Как пользоваться Nexus Mod Manager, уже понятно. Остается разобраться, какими полезными опциями утилита способна облегчить жизнь рядовому пользователю (помимо принудительного изучения английского языка).
Свойства открываются путем выбора ярлыка Settings в окне программы:
- есть возможность выбрать директорию для хранения модов;
- периодичность автоматической проверки обновлений;
- запросить последние версии интересующих геймера изменений;
- указать формат, в котором будут храниться архивы (rar, zip, 7zip) и уровень компрессии;
- выбрать сервер (Европа или США).
Возможности
Еще одна из причин, почему следует задаться вопросом, как пользоваться Nexus Mod Manager, является возможность отрегулировать порядок загрузки файлов при запуске игры. Все дело в том, что модов от разных разработчиков выпущено очень много, у каждого свои принципы программирования. Потому малейшие нестыковки в функционировании вышеописанных апгрейдов могут привести к сбоям в игре, багам и вылетам.
Утилита позволяет отрегулировать порядок загрузки обновлений, чтобы игра функционировала на высшем уровне. Но для соблюдения подобного баланса рекомендуется устанавливать файлы только посредством этой программы и никак иначе.
Требования
Утилита весьма неприхотливая и не отличается особо высокими критериями для корректной работы. Тем не менее все началось с релиза версии для Windows XP, в которой постепенно исправлялись различные баги и «допиливались» новые возможности, а также базы модов и ответы на вопросы о том, как пользоваться.
Nexus Mod Manager 0.54.10 уже был адаптирован под такие операционные системы, как Windows 7, 8 и Vista. Последующие обновления уже включали в себя доработки для всех наиболее востребованных ОС.
Поддерживаемые проекты
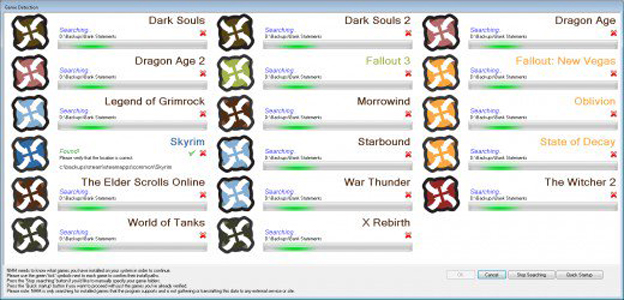
Это далеко не вся информация о том, как пользоваться Nexus Mod Manager. В последних версиях проекта реализована автоматическая проверка обновления игр, установленных на компьютере.
Таковых довольно много, потому рекомендуется отключить сканирование тех проектов, которые отсутствуют на ПК, во избежание бессмысленного генерирования пустых папок программой и достижения лучшего понимания того, как пользоваться Nexus Mod Manager. Fallout 4, Skyrim и Dragon Age: Origins — самые популярные из поддерживаемых релизов. Полный перечень игр можно увидеть в описании к устанавливаемой версии.
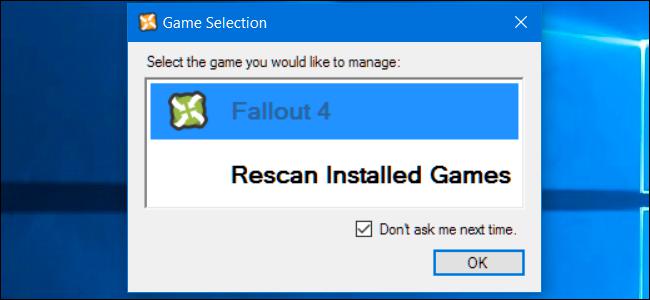
При запуске пройдет быстрое сканирование, утилита зафиксирует наличие необходимых игр, после чего будет предложено выбрать файлы для апгрейда. Все остальное — полностью автоматически.
Баги
Увы, ни одна программа не застрахована от сбоев. Причины могут быть разные: от наличия какого-либо вредоносного ПО на игровой платформе, влияющего на утилиту, до недоработок создателей, реализовавших новую версию Nexus Mod Manager.
Как пользоваться приложением, если наблюдаются баги? Все очень просто: в сети имеется достаточно русскоязычных форумов и пабликов, где можно получить ответ на вопрос.
Например, программа корректнее всего работает с дистрибутивом .Net Framework 4.6.1. Если при установке происходит откат к версии 4.0 и высвечивается ошибка 0x80070643, дело может быть в установленных обновлениях операционной системы. Следует найти через «Панель Управления» дистрибутивы KB2918614, KB3008627, KB3072630 и KB3000988 и удалить их.
Ошибка несовместимости, которая выглядит как Unable to get write permissions, решается посредством запуска NMM от имени администратора. В основном наблюдается на Windows Vista.
Все остальные сбои, связанные с недоступностью профилей, поддерживаемостью модов для определенных проектов были связаны с постепенным добавлением игр в утилиту и решались с выходом новой версии. Потому первый совет, как пользоваться Nexus Mod Manager, если возникла ошибка — переустановить программу, заменив на более свежую версию.
Заключение
Интерес к такому приложению (как уже упоминалось выше) возрос, благодаря желанию геймеров буквально забивать игры серии The Elder Scrolls всевозможными модификациями. В особенности это касается Skyrim.
Впрочем, каждый второй игрок по-прежнему прибегает к стандартной загрузке модов, пока не натолкнется на фанатский релиз, где в системных требованиях прописано обязательное наличие NMM. В этот момент и возникают вопросы: что это такое, как с помощью утилиты запускать Skyrim и как пользоваться?
Nexus Mod Manager хорош тем, что полностью сводит на нет вероятность скачать вредоносное ПО, ведь сканированию обновлений подвергаются проверенные файлы. Кроме того, существует только англоязычная версия. Если вдруг встречается русификатор или русскоязычный релиз утилиты, рекомендуется обходить стороной данный продукт, так как с высокой вероятностью там может быть вирус или шпионская программа, которая навредит компьютеру.
NMM весьма удобен. Функционал системы позволяет установить в тот же пресловутый Skyrim великое множество модов. Важно лишь упорядочить их, чтобы избежать бесконечного количества всплывающих окон инструкций при запуске игры и неизбежного вылета.
В этом случае еще и следует обращать внимание на описание. Чаще всего разработчик указывает, с какими модификациями функционирует корректно, а с какими нет. Аналогично и с обязательным наличием других апгрейдов: некоторые могут не работать, если загружаются раньше других или в списке нет необходимых файлов. Опять же следует упорядочить релизы.
На данный момент NMM позволяет установить обновления для таких игр, как «Ведьмак 3», Dark Souls, Dragon’s Dogma, все проекты серии Fallout и многие другие. Новые игры добавляются, ошибки, связанные с релизами, устраняются. Все делается для удобного пользования системой и комфортной игры.
Остается только соблюдать меру в плане тотального скачивания модов и не перегнуть палку, чтобы не нарушить игровой баланс и не испортить все впечатление от проекта. Известны случаи, когда геймер устанавливает Skyrim, в течение одного или двух дней «обмазывает» модификациями буквально «с ног до головы» проект, а потом решает полностью деинсталлировать.
История, которая уже давно стала шуткой, но все же отражает суровую действительность. Удачной игры!
In this video I will show you how to fix the Nexus Mod Manager Error: Unable to Write Permissions Error Message.
[HD] Nexus Mod Manager Error: Unable to Write Permissions FIX *VOICE TUT*
Просмотров 206 тыс. 10 лет назад
this is probably outdated idk this video is 7 years old IF THIS DID NOT HELP PM ME! Hey guys! Found a fix for that dumb error on .
FOMM [GER] Anleitung + Error — Unable to get write permissions
Просмотров 5 тыс. 9 лет назад
So funktioniert der Fallout Mod Manager (FOMM). Mit Lösung für Fehlermeldung: Unable to get write permissions for: .
Решение ошибки в nexus mod
Просмотров 40 тыс. 6 лет назад
Skyrim-NMM(Nexus Mod Manager) fehler beheben GANZ-EINFACH
Просмотров 336 6 лет назад
Error Unable to get write permissions for: c:GamesNexus Mod ManagerSkyrimInstall Info Einfach als administrator ausführen.
How To Create Your First NMS Mod | no mans 2023 | part 2
Просмотров 58 17 часов назад
In this 2 part series tutorial I’m going to show you how to make a simple mod in no mans sky, part 2 is how you use mbin compiler .
Nexus mod manager error fix
Просмотров 85 тыс. 10 лет назад
Fixing unable to write permission.
Nexus Mod Manager: Download Error Fix
Просмотров 147 7 лет назад
Also try uninstalling the mod manager and reinstalling If you download a mod and it fails this could help. How To Fix The Nexus .
How to fix ‘Unable to get permisson for’ error for Nexus Mod Manager Skryim
Просмотров 18 тыс. 9 лет назад
‘Unable to get permisson for SKYRIM», nexus mod manager I made this in 2013 but it still works I think.
Nexus Mod Manager Doesn’t Open (Fix in comments!)
Просмотров 64 тыс. 10 лет назад
SO as you can tell i am having trouble with NMM if any of you know how to fix this i would greatly appreciate it. Anyways i am sort .
ModApp — The Nexus Mods Manager
Просмотров 410 9 лет назад
Please post any questions or suggestions as a comment!
Skyrim Nexus Mod Meneger ERROR weg bekommen [German,Deutsch]
Просмотров 215 9 лет назад
Bitte lesen Hi, ich zeige euch heute wie ihr denn ERROR bei skyrim nexus mod meneger weg .
[Fix] Nexus Mod Manager not starting
Просмотров 18 тыс. 6 лет назад
Исправляем ошибку с Nexus mod manager
Просмотров 23 тыс. 5 лет назад
Помогите каналу money.yandex.ru/to/410015098764773.
Nexus Mod Manager error — SevenZipSharp
Просмотров 12 тыс. 8 лет назад
Hey guys, i’ve got some issues with nexus mod manager when i try to install a mod over a certain size 🙁 so stuff like NMC texture .
Nexus Mod Manager Install Guide
Просмотров 1,3 тыс. 4 года назад
Please Give the video a Thumbs up if you enjoyed the video! and a thumbs down if you did not. NEED to create a Nexus account .
Nexus Mod Manager — Not Installing Correctly [FIX]
Просмотров 11 тыс. 4 года назад
Solution: Open Nexus Mod Manager as Administrator. Symptoms: Missing content. Invisble/non-existent objects and/or items.
How To Use Nexus Mod Manager Release *0.46.0*
Просмотров 2,5 тыс. 9 лет назад
NEXUS MOD MANAGER DOWNLOAD PAGE / www.nexusmods.com/games/? if this helped you in anyway let me know and .
Nexus Mod Manager 0.46 released : Fixes download with manager
Просмотров 18 тыс. 9 лет назад
Nexus Mod Manager 0.46 released : Fixes download with manager.
Skyrim Nexus Mod Manager [Tutorial]
Просмотров 326 9 лет назад
Hier zeigt Nico wie man Mods für Skyrim macht mit NMM (Nexus Mod Manager 🙂 )
Как исправить ошибку в Nexus Mod Manager
Просмотров 9 тыс. 4 года назад
How to EASILY Install Skyrim Mods
Просмотров 471 тыс. Год назад
How to install SKYRIM SE Mods is a comprehensive guide to install a wide range of mods on Skyrim: Special Edition. In this video .
How To Fix Nexus Mod Manager From Not Opening
Просмотров 79 тыс. 5 лет назад
Please watch: «Let’s Play Downward part — 1 | Hardcore Parkour» ruclips.net/video/CPAiu-QoYr8/видео.html .
NEXUS MOD MANAGER: Beginner’s Guide #4 — Profiles (The Basics)
Просмотров 67 тыс. 7 лет назад
00:10 — What are profiles? 02:50 — Creating our Winter Profile (and a base profile) 04:50 — Creating our Tropical Profile Introduction .
Nexus Mod Manager : File not found?
Просмотров 22 тыс. 10 лет назад
Nexus Mod Manager : File not found? A quick message regarding the problems people are having with Nexus Mod Manager.
How to Fix Nexus Mod Manager Not Downloading (Download Button Not Working) — Tutorial
Просмотров 108 тыс. 6 лет назад
«Download with Manager» button not working? This quick guide will show some things to check if your Nexus Mod Manager won’t .
How to Install SkyrimVR mods MANUALLY (For those who can’t get Nexus Mod Manager to Work)
Просмотров 15 тыс. 4 года назад
Hopefully this helps, here are the things you need: For the SkyrimPrefs.ini [Launcher] bEnableFileSelection=1 For the plugins.txt .
How to fix Skyrim Update.esm problem [basic]
Просмотров 138 тыс. 9 лет назад
Download Patch File : kickass.so/the-elder-scrolls-v-skyrim-update-11-reloaded-t6788157.html Download SkyUI Mod .
NexusMods Server Issues
Просмотров 27 тыс. 9 лет назад
NexusMods Server Issues A quick update about what little I know about the problems Nexus is currently having.
Skyrim — Nexus Mod Manager Install Guide
Просмотров 66 тыс. 11 лет назад
Nexus Mod Manager Link: www.skyrimnexus.com/content/modmanager/ Macho Dragons: .
Skyrim Mods of the Week, Part 1: Nexus Mod Manager, Skyrim Script Extender (SKSE), and Skyboost
Просмотров 14 тыс.
11 лет назад
Skymods of the Week, Part 1: Windows Restore, Nexus Mod Manager, Skyrim Script Extender,
Nexus Mod Manager Error: Unable to Write Permissions FIX! EASY!
Перед этим в “Панели управления” откройте “Свойства Папок” и снимите галочку с пункта “скрывать расширения для зарегистрированных типов файлов”. В Windows 10 этот раздел называется “Параметры Проводника”.

Снимаем галочку в Параметрах Проводника
Затем проверяем что бы не стоял атрибут “только для чтения”. Нажимаем ПКМ по файлу и смотрим свойста, если галочка стоит — убираем.

Теперь запускаем игру от имени администратора и смотрим исчезла ли ошибка. Если нет читаем дальше.
Еще варианты решения
Если не помогло можно поиграться с настройками совместимости, это помогает когда вы запускаете игры вышедшие 5 и более лет назад во время эпохи Windows 7 и 8 и Vista. В свойствах ярлыка тогда необходимо пробовать разные варианты.
-
Сначала пробуем Windows Vista с пакетом обновлений 2 как на скриншоте.

Параметры настроек совместимости
Всегда смотрите путь в адресной строке к файлу, если у вас он отличается — заходим в папку, которая указана и смотрим там.

Unable to write to C Program Files(x86) R.G.Mechanics
После этих манипуляций игра должна запуститься. Напишите в комментариях решилась ли проблема, а так же какой из способов вам помог. Так вы поможете следующим читателям этой статьи. Сообщите если ошибка “Unable to write to C:Program Files” осталась и мы найдем другие способы. Инструкции описанные в данной статье можно посмотреть в видео формате ниже.
Евгений Загорский
IT специалист. Автор информационных статей на тему Андроид смартфонов и IOS смартфонов. Эксперт в области решения проблем с компьютерами и программами: установка, настройка, обзоры, советы по безопасности ваших устройств. В свободное время занимается дизайном и разработкой сайтов.
Ошибка «Unable to write to C:Program Files (x86)R.G. MechanicsMechSet.ini» – решение
Репаки от студии Механики любимы многими поклонниками видеоигр. С ней связана целая эпоха. Она позволила играть, не тратя денег на покупку лицензионной версии. На сегодняшний день продукты от Механиков занимают лидирующие позиции на фоне конкурентов, что и не удивительно, ведь разработчики славятся качеством и стабильностью.
Читать еще: Найдите ошибочные примеры описания гиперссылки
В последнее время у пользователей частенько возникает проблемное уведомление «Unable to write to C:Program Files (x86)R.G. Mechanics…MechSet.ini» при запуске игр. Эта ситуация сопутствует различным видеоиграм: GTA 5, Civilization, Far Cry 3, Total War: WARHAMMER, Dishonored 2 и др. Устранить проблему можно, и достаточно просто, а весь комплекс процедур займет у вас пару минут.

Способы исправления
Из указанного в ошибке пути можно понять, что проблема возникает с MechSet.ini – исполняемым файлом запуск-лаунчера. Уведомление сигнализирует о необходимости указать этот файл, так как система не видит, он поврежден, либо удален. Обращаем ваше внимание на то, что блокировать ini-файл способны антивирусные программы.
- Вирусы и повреждения жесткого диска вряд ли будут столь целенаправленными. Поэтому, желательно добавить папку с игрой в исключения всех служб защиты на ПК.
- Советуем так же отключать антивирусник, когда собираетесь поиграть.
Лучший метод
Чтобы зайти в игру, Wowсе не обязательно сильно заморачиваться с поиском информации об устранении причины сбоя. Для этого хватит настроек совместимости, после чего потребуется запустить приложение от имени администратора. Как это сделать?
- Нажать правой клавишей по иконке игры либо лаунчеру.
- Заходим в пункт «Свойства», в открывшемся окошке перейти в раздел «Совместимость».
- В меню выбора совместимости с операционкой нужно выбрать: Windows Vista со вторым пакетом обновления.

Настройки совместимости с Windows Vista 2
После этого все должно запуститься. Если вы выполнили все в точности так, но игра отказывает запускаться, тогда попробуйте совместимость с Windows 7 различных сервис паков. Если и это не поможет, тогда попробуйте заменить сам исполнительный файл. Вот наглядное видео.
Еще варианты
Если у вас установлен любой другой софт от Механиков, то просмотрите путь, указанный в ошибке, по аналогичному пути поищите этот файлик в другой игре. Удалось найти? Тогда смело копируйте MechSet.ini. Иногда он может называться немного иначе: mech.set.ini. В этом случае переименуйте его в нужный. Попробуйте создать пустой файл с таким названием и расширением .ini.
Последним вариантом будет снова скачать сборку и выполнить полную переустановку, предварительно удалив игру и почистив ПК программой CCleaner.

После удаления выполните эти две опции в CCleaner
Пикап Форум
Срочно : проблема с атрибутом папок в wind.
 Лёлик 25 май 2005
 Лёлик 25 май 2005
DrLove 25 май 2005
Лёлик 25 май 2005
Ну и в чём проблема. Тебе это мешает .

бл*ть, я наверное не просто так спрашиваю !
DrLove 25 май 2005
Ну и в чём проблема. Тебе это мешает .
бл*ть, я наверное не просто так спрашиваю !
так, е*, скажи конкретно чем мешает
alucard 25 май 2005
 alucard 25 май 2005
DrLove 25 май 2005
вообще у тебя не получиться пока ты не будешь пытаться менять пермишн без прав системы.
какая файловая система стоит.
ос какая (включая сервис пак и билд)
причины
да не, это не при чём. всегда на любой папке стоит read only, при этом делай с ней что хочешь — это такая фича, при этом делать что-либо с этим бесполезно, независимо от системы, пусть хоть Chicago стоит
Лёлик 25 май 2005
Лёлик 25 май 2005
DrLove 25 май 2005
А проблема следующая: Есть такая прога Electronic WorkBench 5.0
У меня есть только архив (то есть нету установки, а только конечные файлы). Так вот, после разархивации запускаю прогу. Выдаёт ошибку :
Unable to write to EWB program directory
Please change the permissions of this directory.
Читать еще: Пишет ошибка приложения что делать
А права админские или нет .
Возможно, система запрещает архиву произвести распаковку, попробуй куда-нить в другое место.
Бывает ещё такое, что просто система сама использует каталог(глюк ядра), в этом случае помогает перезагрузка.
Лёлик 25 май 2005
Herrin 25 май 2005
Woofer 26 май 2005
 Woofer 26 май 2005
zapretnyii_plod 26 май 2005
 zapretnyii_plod 26 май 2005
В этой винде у всех папок по умолчанию стоит атрибут «только чтение». Если его убираешь , то сука windows его обратно ставит. Как с этим разобраться. Очень нужно.
P.s: другой винды нет.
Вообще-то такое может быть ли на папках CD-ROM или специальные папки Windows. Создай папку, поставь атрибут ‘только чтение’, затем убери. Windows и в этом случае поставит его обратно?
Как исправить ошибку WordPress “Upload: Failed to Write File to Disk”?

Вам выдает ошибку “Upload: Failed to write file to disk”, когда пытаетесь загрузить файлы в WordPress? Эта распространенная ошибка может быть очень хлопотной для новичков. В этой статье мы покажем как можно от нее избавиться.
Что служит причиной этой ошибки?
Эта ошибка может возникнуть по целому ряду причин. Однако самой распространенной причиной будут неправильные права доступа к папке. Видите ли, у каждого файла и у каждой папки на вашем сайте есть набор прав доступа. Ваш сервер управляет доступом к этим файлам, руководствуясь правами доступа. Неправильные права могут отнять у вас возможность записывать файлы на сервер.
Это означает, что ваш сервер не может создавать или добавлять новые файлы в определенные папки. Если вы попробуете загрузить изображения или любые другие файлы из админки WordPress, вы увидите одно из следующих сообщений об ошибке:
• WordPress failed to write to disk
• WordPress has failed to upload due to an error failed to write file to disk
• Unable to create directory wp-content/uploads/2016/03. Is its parent directory writable by the server?
Исправляем ошибку Upload Failed to Write to Disk
Сперва вам надо соединиться с сайтом посредством FTP-клиента. В этой инструкции мы будем использовать клиент Filezilla. Как только подсоединитесь, вам надо щелкнуть правой кнопкой мыши по папке wp-content и выбрать права доступа.

Это откроет диалоговое окно с правами доступа у вас в клиенте FTP, которое покажет права доступа для владельца, группы и публики.

Вам надо ввести 755 в поле Numeric value. После этого вам надо отметить ячейку возле Recurse into subdirectories. Наконец вам надо щелкнуть по Apply to directories only. Нажмите по кнопке ОК, чтобы продолжить. Ваш клиент теперь установит доступ папки 755 и применит ко всем подпапкам внутри wp-content. Это также включает папку uploads, где хранятся все ваши изображения.
Вам также надо убедиться, что доступ к индивидуальным файлам в вашей папке wp-content настроен должным образом. Снова нажмите правой кнопкой мыши по папке wp-content и выберите доступ к файлам. В этот раз мы поменяем права доступа к файлам. Введите 644 в числовом поле и отметьте ячейку возле Recurse into subdirectories. Наконец нажмите по опции Apply to files only.
Нажмите на кнопку ОК, чтобы продолжить. Теперь ваш FTP-клиент настроит доступ к файлам на 644 для всех файлов внутри папки wp-content.
Теперь можете зайти на сайт и попробовать загрузить файлы. Если вы до сих пор видите ошибку, значит, вам надо связаться с владельцем своего хостинга и попросить их очистить папку временных файлов. WordPress загружает ваши изображения, используя PHP, который сперва сохраняет загрузки во временную директорию на вашем сервере. После этого он перемещает их в вашу папку загрузок.
Если эта директория забита или неправильно отлажена, то WordPress не сможет записать файл на диск. Эта временная папка расположена на вашем сервере и в большинстве случаев вы не можете получить к ней доступ через FTP. В этом случае вам понадобится связаться с поддержкой хостинга и попросить их очистить её для вас.
Читать еще: Код ошибки c1201
Наша специальность — разработка и поддержка сайтов на WordPress. Контакты для бесплатной консультации — [email protected] , +371 29394520
How To Solve Unable To Write Error In Gta 5
Загрузил: Basic PCTuner
Длительность: 44 сек
Размер: 988.28 KB
Битрейт: 192 Kbps
Похожие песни
Gta V Unable To Write To C Program Files X86 R G Mechanics Fix
Fix Unable To Execute File In The Temporary Directory Setup Aborted 100 Working Updated
Fix Fumefx Unable To Write To Fumefx Ini
How To Fix Isdone Dll Error During Game Installations For All Big Games Hd
Erro Gta V Parou De Funcionar Resolvido 2016
Pedro Henrique Freire
Windows Cannot Find C Program Files X86 User Extensions Client Exe
Windows 7 8 10 You Do Not Have Permission To Access Error Fix
Far Cry 3 Как Устранить Ошибку Mechset Ini Как Играть В Far Cry 3
Run Grand Theft Auto V Using Play Gtav Exe Fix 100 Working With Proof
How To Fix Error Isdone Dll File Specified For Isarcextract Pops Up During Installation
The Gamer’s Territorio
How To Fix Can T Write To C Program Files In Windows 7 Error Opening File For Writing
Fix Unspecified Error When Launching Google Chrome For Windows
Unable To Write To C Program Files X86 R G Mechanics
Edit Steam Api Ini Archives
Gta 5 Please Run Grand Theft Auto V Using Playgtav Exe Fix 100 Working With Proof
Risen 3 Unable To Write To C Program Files X86 Rg Mechanics Risen 3 Bin Mechset Ini
Gta5 Error Fix Unable To Write To C Program Files X86 R G Mechanics Grand Theft Auto V Mechset Ini
Far Cry 3 Blood Dragon Launcher Error Fix
Como Corrigir O Erro 0Xc000007B No Gta V Por Definitivo 2018 X64
Gta V Launcher Stopped Working Windows 10 Fixed
Слушают
Girls Boys Jesse
Yuppie Psycho Heir
Bir Kızı Sevdim
Бо Дигар Кас Дил Бубасти
Drama Din Caracal
Мальчик Ягодный Бабл Гам
Fnaf 3 Bad Ending Piano
Hemra Rejepow Ayrylsa
Beats From Chiraq Featuring Chiraq Beats Earthquake Feat Chiraq Beats
Знаю Что Я Тебя Потеряю Знаю Я Свою Душу Спасаю
Tasli Tulegenow Aysoltan Agan Bolayyn
Скачивают
D16Y7 Y8 High Compression Budget Buld Pt 1
How To Solve Unable To Write Error In Gta 5
Реклама Мегафон Всё Что Тебя Касается
Locked Vtec Idle It S A Beautiful Thing
Turbo B16 Civic Vs Nitrous Rsx Vs B18 Crx
Холоп Фильм Музыка Ost 2 Hammali Navai Прятки Милош Бикович Александра Бортич Александр Самойленко
Street Tuning My Turbo D16Y8 Civic Part 1 Street Pulls
E46 330Cd Rm Exhaust Part2
The Witcher 3 Soundtrack Kaer Trolde Ard Skellig Village
Rso Richie Sambora Orianthi Wanted Dead Or Alive Live Melbourne Australia 7 1 2018
Caresana Mx Park Ottobiano
K20 Turbo Civic 8Th Gen Civic Johns El Veterano 11 2 Sec Street Car Mec Newman Elliot Tuned
Opel Kadett Gsi 16V C20Xe Eds Ph1 Lexmaul Ram 0 200 Km H
Yo Gabba Gabba 301 School Full Episodes Hd Season 3
Источник: llscompany.ru
Unable to write to config directory. Please make sure you have permissions for your Klei save folder ошибка в игре steam

ALex Dragas
29.12.2019
Главная › CS:GO
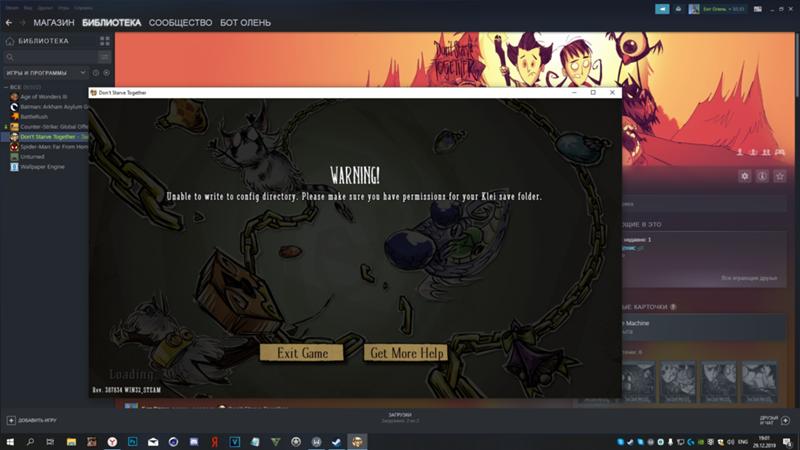
После запуска игры Don’t Starve Together у меня вылазит вот такая ошибка, читал форум, исправлял, но результат один и тот же — не могу зайти в игру. И ещё там написано WIN32, если это операционная система, то у меня 64 битная. Помогите.
Дополнено (1). Заметил что в документахklei не было папки с донт старвом, а только пиратский оксиген нот энклюден.
( игра установлена ) но нету в документах папки

Джимми Хопкинс
30.12.2019
Попробуй запустить Стим и игру от имени администратора

Гость
16.05.2020
- Residen Evil 2 Remake перенос save’ов с пиратки на стим Подскажите, кто знает, как перенести сохранения с пиратки (codex) на steam?! Уж очень не хочется всё по новой проходить)
- (Steam ошибка) An error occurred while processing your request. Ошибка Стим An error occurred while processing your request. Reference #102.942d1bb8.1569701760.4090cad8 Резко перестал работать клиент, сайт и мобильное приложение
- Почему вылезает ошибка My Summer Car ERROR: STEAM STILL NOT FOUND, CHECK YOUR CONNECTION Please В игре My summer car вылезает черный баннер с красной надписью ERROR: STEAM STILL NOT FOUND, CHECK YOUR CONNECTION Please хотя стим включен и к интернету я подключен
- Что делать если при запуске RutonyChat вылетает такая ошибка please launch the program from your Steam client Перезапуск Стрим и включение от админа, удаление игры и установка заново вообще ничего не помогает… Подскажите че делать?
Источник: steamru.org
#1

Posted 29 March 2012 — 07:02 pm
bigdelt
-
- Supporter
-
- 1 posts
Stranger


«Unable to get write permissions for: C:gamesfallout3installinfo
This happens when I try to open the mod manager. I believe I need to do something along the lines of moving the steam directory or something, but I’m not sure. If someone could tell me what I need to do and how to do it that would be great.
- Back to top
 Back to top
#2
Fonger
Posted 29 March 2012 — 07:31 pm
check to see if the directory in question is somehow write-protected
- Back to top
#3
khurram1998
Posted 12 April 2012 — 01:17 pm
khurram1998
-
- Members
-
- 1 posts
Stranger

Try running the mod manager as admin, I had the same problem, it fixed by doing this, hope I helped
- Back to top
#4
Ulipstar
Posted 29 April 2012 — 11:02 pm
Ulipstar
-
- Members
-
- 1 posts
Stranger

Try running the mod manager as admin, I had the same problem, it fixed by doing this, hope I helped
This worked for me, thanks!
- Back to top
#5
Talari12
Posted 23 June 2012 — 05:12 am
Talari12
-
- Supporter
-
- 9 posts
Stranger

It wont work for me when i try using Run as admin it says it has stopped working can anyone help??
- Back to top
#6
bben46
Posted 23 June 2012 — 12:43 pm
bben46
-
- Premium Member
-
- 24,973 posts
I had a title once, but I forgot what it was.

First, to run a program as an admin, you MUST be a computer administrator . Or it will not allow you to do that. A user cannot make these changes.
Then, open your program listing — navigate to that program.(NOT the folder) RIGHT click on it. If it shows in the drop down list, ‘Take Ownership‘ of the program. It will then close the drop down list. If it is not shown, go to the next step.
RIGHT click again. this time click on ‘Run as Administrator’ It will close the list again.
Right click again, select ‘Properties» at he bottom of the list. on the pop up that appears, click on the ‘Security‘ tab.
Now find ‘Group or user names’ and click on ‘Administrators‘ to highlight it
Look down to find ‘Permissions for program name‘.
You will need a check mark in the ‘allow’ column for all categories (click edit & make changes)
When you have them all checked, click on ‘Apply‘ then on ‘OK‘
Hope this works for you. 
- Back to top
#7
zecmaz
Posted 23 September 2012 — 09:41 pm
zecmaz
-
- Members
-
- 1 posts
Stranger

check to see if the directory in question is somehow write-protected
This also worked for me buddy thank you so much! 
- Back to top
#8
scan919
Posted 12 October 2012 — 06:20 am
scan919
-
- Members
-
- 5 posts
Stranger

Try running the mod manager as admin, I had the same problem, it fixed by doing this, hope I helped
THANKYOU!!! 
- Back to top
#9
sirjako999
Posted 28 October 2012 — 09:37 pm
sirjako999
-
- Members
-
- 2 posts
Stranger

Try running the mod manager as admin, I had the same problem, it fixed by doing this, hope I helped
thanks worked
- Back to top
#10
SunnyTheCat
Posted 01 November 2012 — 05:29 pm
I have accidentally specified D:Nexus Mod Manager… folder as mods folder instead of D:Nexus Mod Managed…. Now I’m getting this error because of a missing slash and I cannot change it as every time I run the program, I’m getting this error. How do I fix it without having to re-install it?
- Back to top
Is Nexus Mod Manager Error Unable To Write Permissions Fix appearing? Would you like to safely and quickly eliminate Nexus Mod Manager which additionally can lead to a blue screen of death?
When you manually edit your Windows Registry trying to take away the invalid nmm unable to get write permissions keys you’re taking a authentic chance. Unless you’ve got been adequately trained and experienced you’re in danger of disabling your computer system from working at all. You could bring about irreversible injury to your whole operating system. As very little as just 1 misplaced comma can preserve your Pc from even booting every one of the way by!
Troubleshooting unable to get write permissions for c /games/nexus mod manager/skyrim/install info Windows XP, Vista, 7, 8 & 10
Simply because this chance is so higher, we hugely suggest that you make use of a trusted registry cleaner plan like CCleaner (Microsoft Gold Partner Licensed). This system will scan and then fix any Nexus Mod Manager Error Unable To Write Permissions Fix complications.
Registry cleaners automate the entire procedure of finding invalid registry entries and missing file references (including the Manager error) likewise as any broken hyperlinks inside of your registry.
Issue with nexus mod manager can’t get permission
Backups are made immediately prior to each and every scan providing you with the choice of undoing any changes with just one click. This protects you against doable damaging your pc. Another advantage to these registry cleaners is that repaired registry errors will strengthen the speed and performance of one’s procedure drastically.
- https://www.youtube.com/watch?v=bSmOEiOt5S8
- http://forums.nexusmods.com/index.php?/topic/769596-unable-to-get-write-permission-for-cgamesnexus-mod-managerskyriminstall-info/
- https://www.youtube.com/watch?v=_-wEQG4SkI8
- https://www.youtube.com/watch?v=EaZNXDie87A
Cautionary Note: Yet again, for those who are not an state-of-the-art consumer it’s very encouraged that you simply refrain from editing your Windows Registry manually. If you make even the smallest error within the Registry Editor it can result in you some serious issues that may even call for a brand new set up of Windows. Not all difficulties attributable to incorrect Registry Editor use are solvable.
Fixed: skyrim nexus can’t get permission
Symptoms of Nexus Mod Manager Error Unable To Write Permissions Fix
“Nexus Mod Manager Error Unable To Write Permissions Fix” appears and crashes the energetic method window.
Your Personal computer routinely crashes with Nexus Mod Manager Error Unable To Write Permissions Fix when running the exact same system.
“Nexus Mod Manager Error Unable To Write Permissions Fix” is shown.
Windows operates sluggishly and responds little by little to mouse or keyboard input.
Your computer periodically “freezes” for the number of seconds in a time.
Will cause of Nexus Mod Manager Error Unable To Write Permissions Fix
Corrupt obtain or incomplete set up of Windows Operating System software program.
Corruption in Windows registry from a new Windows Operating System-related application adjust (install or uninstall).
Virus or malware infection which has corrupted Windows method documents or Windows Operating System-related application data files.
Another method maliciously or mistakenly deleted Windows Operating System-related files.
Mistakes this sort of as “Nexus Mod Manager Error Unable To Write Permissions Fix” can be brought about by several different elements, so it really is important that you troubleshoot every of the achievable brings about to forestall it from recurring.
Simply click the beginning button.
Variety “command” inside the lookup box… Will not hit ENTER nonetheless!
Although keeping CTRL-Shift in your keyboard, hit ENTER.
You’re going to be prompted that has a authorization dialog box.
Click on Of course.
A black box will open having a blinking cursor.
Variety “regedit” and hit ENTER.
Within the Registry Editor, choose the nmm unable to get write permissions connected key (eg. Windows Operating System) you wish to back again up.
Within the File menu, choose Export.
Inside the Preserve In list, pick out the folder in which you wish to save the Windows Operating System backup key.
Inside the File Title box, sort a reputation for the backup file, these types of as “Windows Operating System Backup”.
From the Export Vary box, ensure that “Selected branch” is selected.
Click on Help you save.
The file is then saved by using a .reg file extension.
You now use a backup within your unable to get write permissions for c /games/nexus mod manager/skyrim/install info related registry entry.
Solution to your nexus mod manager error install info problem
There are actually some manual registry editing measures that can not be talked about in this article due to the high chance involved for your laptop or computer method. If you want to understand more then check out the links below.
Additional Measures:
One. Conduct a Thorough Malware Scan
There’s a probability the Write Mod To Manager Unable Fix Nexus Permissions Error error is relevant to some variety of walware infection. These infections are malicious and ready to corrupt or damage and possibly even delete your ActiveX Control Error files. Also, it’s attainable that your Nexus Mod Manager Error Unable To Write Permissions Fix is actually connected to some element of that malicious plan itself.
2. Clean how to move nexus mod manager install info Disk Cleanup
The a lot more you employ your computer the extra it accumulates junk files. This comes from surfing, downloading packages, and any sort of usual computer system use. When you don’t clean the junk out occasionally and keep your program clean, it could turn into clogged and respond slowly. That is when you can encounter an Nexus error because of possible conflicts or from overloading your hard drive.
Once you clean up these types of files using Disk Cleanup it could not just remedy Nexus Mod Manager Error Unable To Write Permissions Fix, but could also create a dramatic change in the computer’s efficiency.
Tip: While ‘Disk Cleanup’ is definitely an excellent built-in tool, it even now will not completely clean up Nexus Mod discovered on your PC. There are numerous programs like Chrome, Firefox, Microsoft Office and more, that cannot be cleaned with ‘Disk Cleanup’.
Since the Disk Cleanup on Windows has its shortcomings it is extremely encouraged that you use a specialized sort of challenging drive cleanup and privacy safety application like CCleaner. This system can clean up your full pc. If you run this plan after each day (it could be set up to run instantly) you are able to be assured that your Pc is generally clean, often operating speedy, and always absolutely free of any Unable error associated with your temporary files.
How Disk Cleanup can help nexus mod manager unable to get write permissions fallout 4
1. Click your ‘Start’ Button.
2. Style ‘Command’ into your search box. (no ‘enter’ yet)
3. When holding down in your ‘CTRL-SHIFT’ important go ahead and hit ‘Enter’.
4. You will see a ‘permission dialogue’ box.
5. Click ‘Yes’
6. You will see a black box open up plus a blinking cursor.
7. Variety in ‘cleanmgr’. Hit ‘Enter’.
8. Now Disk Cleanup will start calculating the amount of occupied disk space you will be able to reclaim.
9. Now a ‘Disk Cleanup dialogue box’ seems. There will be a series of checkboxes for you personally to pick. Generally it will likely be the ‘Temporary Files’ that consider up the vast majority of your disk area.
10. Verify the boxes that you want cleaned. Click ‘OK’.
How to repair unable to get write permissions for fallout 4
3. System Restore can also be a worthwhile device if you ever get stuck and just desire to get back to a time when your computer system was working ideal. It will work without affecting your pics, paperwork, or other crucial information. You can discover this option with your User interface.
Nexus Mod
Manufacturer
Device
Operating System
Nexus Mod Manager Error Unable To Write Permissions Fix
4.5 out of
5
based on
35 ratings.
I ran into this problem today, and I’ve come up with a few solutions. The root cause is that the default folder that Nexus Mod Manager wants to install into is not typically writable by normal users. They want you to install into a subfolder of C:, and if you don’t have administrator rights, chances are you can’t create the «Games» folder you need (C:Games).
You’ve got a few options:
Run the program as administrator. This way, it will have permissions to write to the root of C:, and then you can create the files/folders there. Just right click, and choose the «Run as Administrator» option.
Get write permission on C:Games. You can do this if you have administrator rights by:
- Open your C: in Windows Explorer
- If the «Games» folder does not exist, right click, choose «New Folder» and name it «Games»
- Right click on the «Games» folder, and choose «Properties»
- Click the «Security» tab
- Click the «Edit» button
- Click the «Add» button
- Type your login name (if you log in as «bobsmith» then you’d type «bobsmith» here)
- Click «Check Names» and if the name becomes underlined, you did it right! Click OK. If not, double check your login name from step 7.
- On the bottom half of the «Permissions» dialog, click «Full Control» for the user you just added.
- Click OK to dismiss this dialog, and then click OK on the properties dialog.
Now you can write to C:Games, which ought to make NMM happy.
Put your Nexus Mod Manager files somewhere else. If you install to some subdirectory of your home directory, you won’t have to worry about permissions and so forth. When the Mod Manager asks you where you want to save the mod files, pick someplace under C:Users(your user name) or C:Documents and Settings(your user name), depending on the version of Windows you’re using. You could potentially put this in your Documents folder, but I have «projects» folder I created in my home directory, which works well for me.
You do not want to set these directories to something under C:Program Files or in the Steam folder, etc. This is a Bad Idea.
If you’ve already selected the default mod directories, you won’t be asked if you want to change them when you get this error. If that’s the case, you can edit or delete the config file so that you can pick a new directory.
The config file for Nexus Mod Manager is stored in %LOCALAPPDATA%Black_Tree_Gaming — you can copy and paste this into the address bar of Windows Explorer to go there, or paste it into the «Run» or «Search» dialog on the Start menu. Alternatively, from your user’s home directory, look for «AppData» and then «Local» and then «Black_Tree_Gaming»
The name of the directories in this folder depend on your version of NMM, but the file you’re looking for is user.config. You can delete this file, but you’ll lose any other NMM settings (including the location of any games that were scanned previously). You can also edit it with a text editor.
Look for a block that looks like:
    <setting name="ModFolder" serializeAs="Xml">
        <value>
            <PerGameModeSettingsOfString>
                <item modeId="Skyrim">
                    <string>C:GamesNexus Mod ManagerSkyrimMods</string>
                </item>
            </PerGameModeSettingsOfString>
        </value>
    </setting>
    <setting name="InstallInfoFolder" serializeAs="Xml">
        <value>
            <PerGameModeSettingsOfString>
                <item modeId="Skyrim">
                    <string>C:GamesNexus Mod ManagerSkyrimInstall Info</string>
                </item>
            </PerGameModeSettingsOfString>
        </value>
    </setting>
The directories here are the ones you’d want to change to some folder you can write to.