PYTHONPATH is an environment variable whose value is a list of directories. Once set, it is used by Python to search for imported modules, along with other std. and 3rd-party library directories listed in Python’s «sys.path».
As any other environment variables, you can either export it in shell or in ~/.bashrc, see here.
You can query os.environ[‘PYTHONPATH’] for its value in Python as shown below:
$ python3 -c "import os, sys; print(os.environ['PYTHONPATH']); print(sys.path) if 'PYTHONPATH' in sorted(os.environ) else print('PYTHONPATH is not defined')"
IF defined in shell as
$ export PYTHONPATH=$HOME/Documents/DjangoTutorial/mysite
THEN result =>
/home/Documents/DjangoTutorial/mysite
['', '/home/Documents/DjangoTutorial/mysite', '/usr/local/lib/python37.zip', '/usr/local/lib/python3.7', '/usr/local/lib/python3.7/lib-dynload', '/usr/local/lib/python3.7/site-packages']
ELSE result =>
PYTHONPATH is not defined
To set PYTHONPATH to multiple paths, see here.
Note that one can add or delete a search path via sys.path.insert(), del or remove() at run-time, but NOT through os.environ[].
Example:
>>> os.environ['PYTHONPATH']="$HOME/Documents/DjangoTutorial/mysite"
>>> 'PYTHONPATH' in sorted(os.environ)
True
>>> sys.path // but Not there
['', '/usr/local/lib/python37.zip', '/usr/local/lib/python3.7', '/usr/local/lib/python3.7/lib-dynload', '/usr/local/lib/python3.7/site-packages']

>>> sys.path.insert(0,os.environ['PYTHONPATH'])
>>> sys.path // It's there
['$HOME/Documents/DjangoTutorial/mysite', '', '/usr/local/lib/python37.zip', '/usr/local/lib/python3.7', '/usr/local/lib/python3.7/lib-dynload', '/usr/local/lib/python3.7/site-packages']
>>>
In summary, PYTHONPATH is one way of specifying the Python search path(s) for imported modules in sys.path. You can also apply list operations directly to sys.path without the aid of PYTHONPATH.
Иногда нам нужно проверить пакеты или модули по пути, где установлен Python. В этой статье мы покажем три способа, как найти путь, по которому установлен Python в Windows:
- с помощью командной строки
- через меню “Пуск
- используя параметры переменной среды
Итак, давайте начнем!
Примечание редакции: о собственно установке Python читайте в статье “Как установить Python на Windows 10 или 11”.
Чтобы узнать, где установлен Python, используя командную строку Windows, следуйте приведенным ниже примерам.
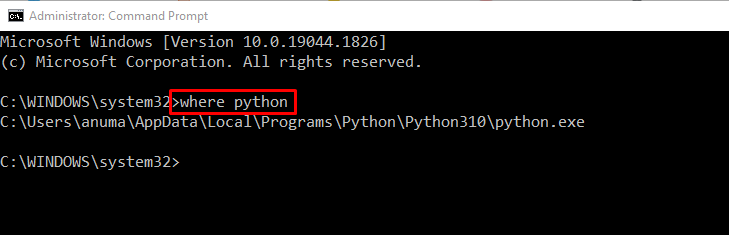
Пример 1: команда where
Для начала попробуйте использовать команду where, чтобы вывести путь к директории установленного Python:
>where python
Как видите, в результате нужный путь был найден и отображен в командной строке:
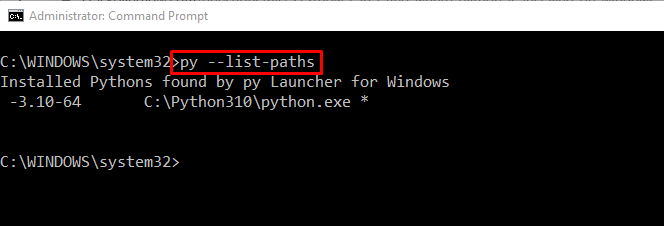
Пример 2: команда py
Команда py с опцией --list-paths также может быть использована для перечисления путей к Python:
Как найти место установки Python в Windows с помощью меню “Пуск”
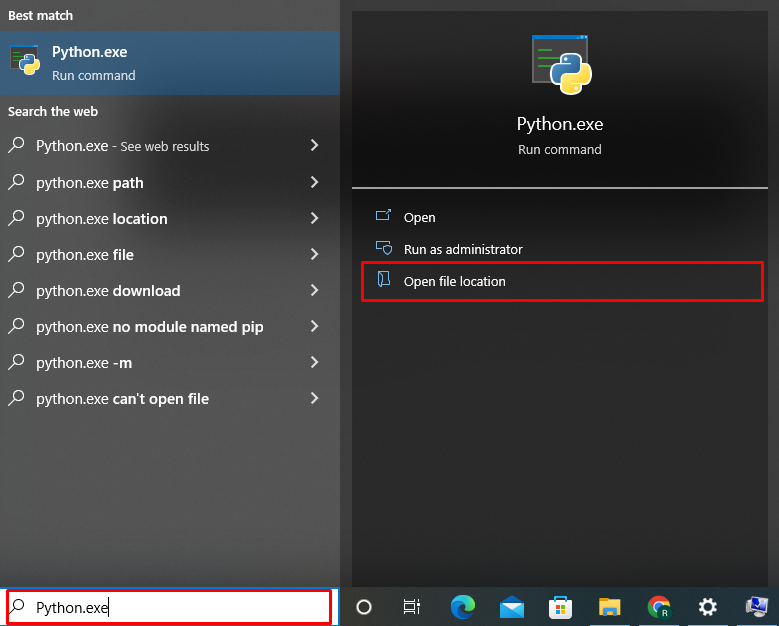
Чтобы найти, где установлен Python, используя меню “Пуск”, выполните следующую процедуру.
Сначала найдите файл “Python.exe” в меню “Пуск”. Затем выберите опцию “Открыть расположение файла”, чтобы открыть соответствующую папку:
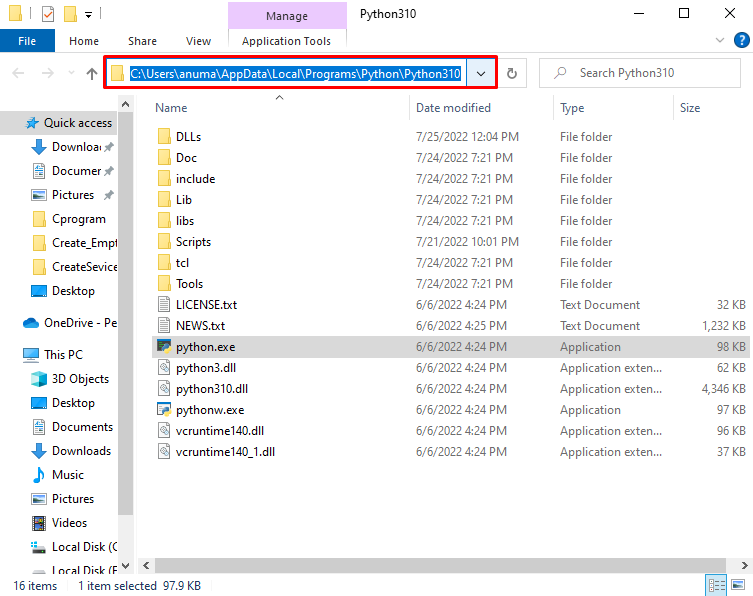
В результате вы будете перемещены в каталог, где установлен Python:
Как найти место установки Python в Windows с помощью переменной окружения
Чтобы узнать, где установлен Python, используя переменную окружения PATH, выполните следующие действия.
Шаг 1. Откройте расширенные системные настройки
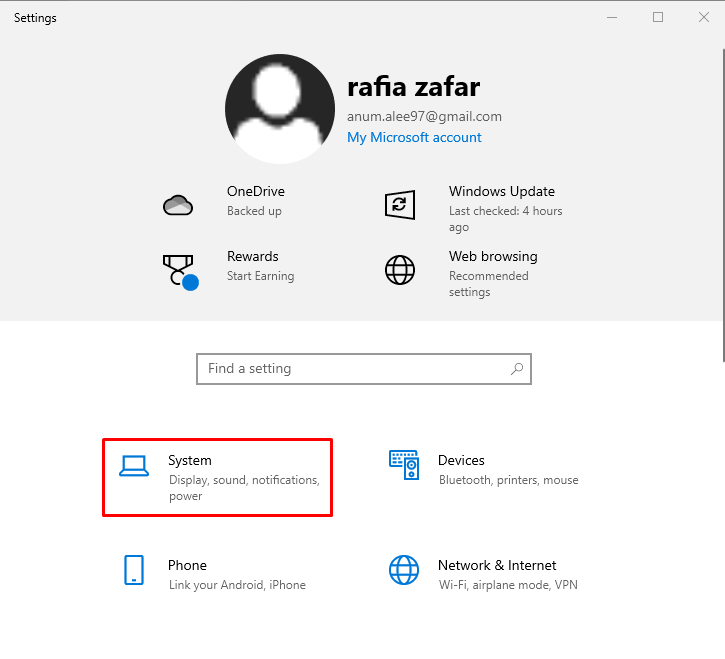
Нажмите Window+I, чтобы открыть Настройки системы. Затем выберите “Система” из списка доступных категорий:
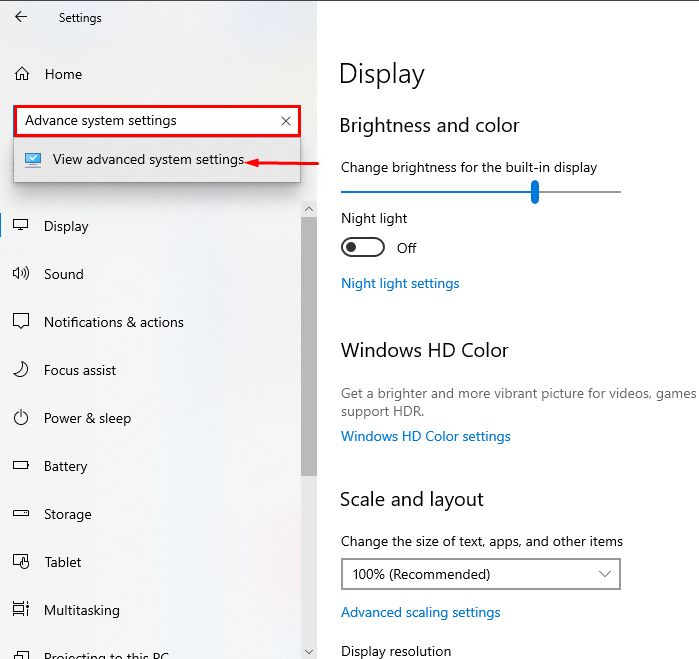
Найдите в строке поиска “Дополнительные параметры системы” и откройте их:
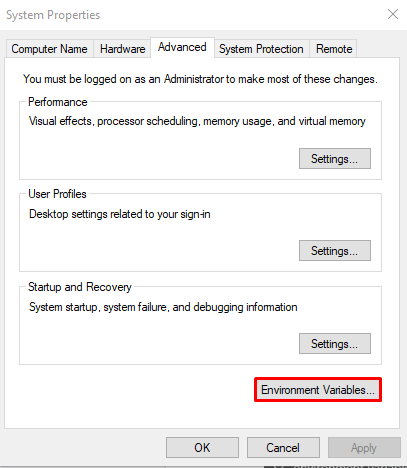
Шаг 2. Откройте переменные среды
В Дополнительных параметрах системы нажмите на кнопку “Переменные среды”:
Шаг 3. Откройте переменную среды Path
На вкладке “Системные переменные” выберите “Path” и нажмите кнопку “Изменить” для просмотра сведений о пути:
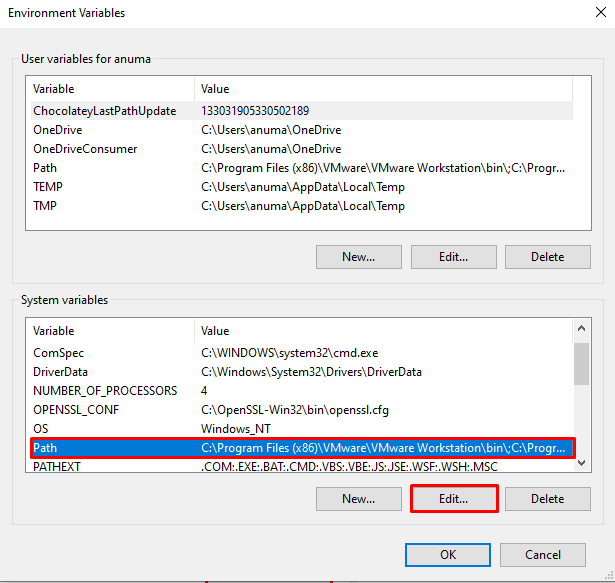
Из переменной среды Path можно найти место, где установлен Python, как показано ниже:
Заключение
Узнать, где в Windows установлен Python, можно разными способами, например, с помощью командной строки, меню “Пуск” и системных переменных среды.
Для первого способа откройте командную строку и воспользуйтесь командой where python. Во втором случае найдите “python.exe” в меню “Пуск” и откройте местоположение файла. При третьем подходе вы можете узнать расположение Python через переменную среды “Path”.
Перевод статьи Rafia Zafar «How Can I Find Where Python is Installed on Windows».
You may need to add Python to PATH if you’ve installed Python, but typing python on the command line doesn’t seem to work. You may be getting a message saying that the term python isn’t recognized, or you may end up with the wrong version of Python running.
A common fix for these problems is adding Python to the PATH environment variable. In this tutorial, you’ll learn how to add Python to PATH. You’ll also learn about what PATH is and why PATH is vital for programs like the command line to be able to find your Python installation.
The steps that you’ll need to take to add something to PATH will depend significantly on your operating system (OS), so be sure to skip to the relevant section if you’re only interested in this procedure for one OS.
Note that you can use the following steps to add any program to PATH, not just Python.
How to Add Python to PATH on Windows
The first step is to locate the directory in which your target Python executable lives. The path to the directory is what you’ll be adding to the PATH environment variable.
To find the Python executable, you’ll need to look for a file called python.exe. The Python executable could be in a directory in C:Python or in your AppData folder, for instance. If the executable were in AppData, then the path would typically look something like this:
C:Users<USER>AppDataLocalProgramsPython
In your case, the <USER> part would be replaced by your currently logged-in user name.
Once you’ve found the executable, make sure it works by double-clicking it and verifying that it starts up a Python REPL in a new window.
If you’re struggling to find the right executable, you can use Windows Explorer’s search feature. The issue with the built-in search is that it’s painfully slow. To perform a super-fast full system search for any file, a great alternative is Everything:
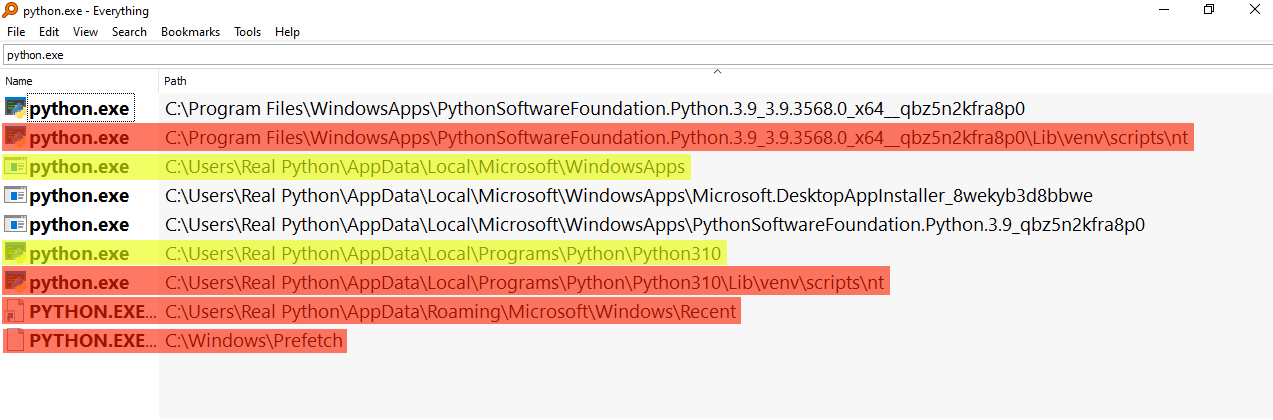
Those paths highlighted in yellow, namely those at WindowsApps and Python310, would be ideal candidates to add to PATH because they look like executables at the root level of an installation. Those highlighted in red wouldn’t be suitable because some are part of a virtual environment—you can see venv in the path—and some are shortcuts or internal Windows installations.
You may also encounter Python executables that are installed within the folder for a different program. This is due to the fact that many applications bundle their own version of Python within them. These bundled Python installations would also be unsuitable.
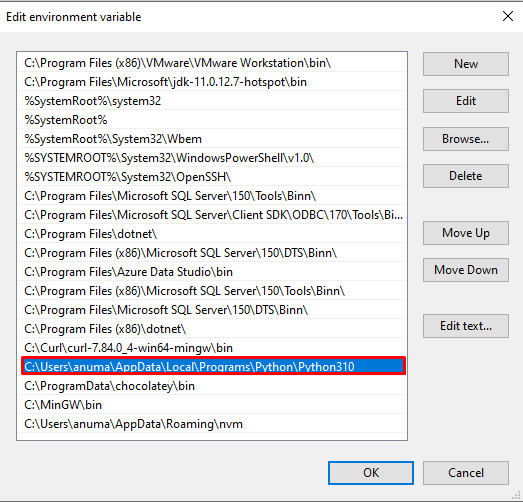
Once you’ve located your Python executable, open the Start menu and search for the Edit the system environment variables entry, which opens up a System Properties window. In the Advanced tab, click on the button Environment Variables. There you’ll see User and System variables, which you’ll be able to edit:
In the section entitled User Variables, double-click on the entry that says Path. Another window will pop up showing a list of paths. Click the New button and paste the path to your Python executable there. Once that’s inserted, select your newly added path and click the Move Up button until it’s at the top.
That’s it! You may need to reboot your computer for the changes to take effect, but you should now be able to call python from the command line.
For setting the PATH environment variable from the command line, check out the section on Configuring Environment Variables in the Windows Python coding setup guide. You can also find instructions in the supplemental materials:
You may also want to set up PATH on your Linux or macOS machine, or perhaps you’re using Windows Subsystem for Linux (WSL). If so, read the next section for the procedure on UNIX-based systems.
How to Add Python to PATH on Linux and macOS
Since Python typically comes pre-installed on UNIX-based systems, the most common problem on Linux and macOS is for the wrong python to run, rather than not finding any python. That said, in this section, you’ll be troubleshooting not being able to run python at all.
The first step is locating your target Python executable. It should be a program that you can run by first navigating to the containing directory and then typing ./python on the command line.
You need to prepend the call to the Python executable with its relative path in the current folder (./) because otherwise you’ll invoke whichever Python is currently recorded on your PATH. As you learned earlier, this might not be the Python interpreter that you want to run.
Often the Python executable can be found in the /bin/ folder. But if Python is already in the /bin/ folder, then it’s most likely already on PATH because /bin/ is automatically added by the system. If this is the case, then you may want to skip to the section on the order of paths within PATH.
Since you’re probably here because you’ve installed Python but it’s still not being found when you type python on the command line, though, you’ll want to search for it in another location.
That said, it might be that /bin/ has been removed from PATH altogether, in which case you might skip forward to the section on mangaging PATH.
Once you’ve located your Python executable and are sure it’s working, take note of the path for later. Now it’s time to start the process of adding it to your PATH environment variable.
First, you’ll want to navigate to your home folder to check out what configuration scripts you have available:
You should see a bunch of configuration files that begin with a period (.). These are colloquially known as dotfiles and are hidden from ls by default.
One or two dotfiles get executed whenever you log in to your system, another one or two run whenever you start a new command-line session, and most others are used by other applications for configuration settings.
You’re looking for the files that run when you start your system or a new command-line session. They’ll probably have names similar to these:
.profile.bash_profile.bash_login.zprofile.zlogin
The keywords to look for are profile and login. You should, in theory, only have one of these, but if you have more than one, you may need to read the comments in them to figure out which ones run on login. For example, .profile file on Ubuntu will typically have the following comment:
# This file is not read by bash(1), if ~/.bash_profile or ~/.bash_login
# exists.
So, if you have .profile but also .bash_profile, then you’ll want to use .bash_profile.
You can also use a .bashrc or .zshrc file, which are scripts that run whenever you start a new command-line session. Run command (rc) files are common places to put PATH configurations.
To add the Python path to the beginning of your PATH environment variable, you’re going to be executing a single command on the command line.
Use the following line, replacing <PATH_TO_PYTHON> with your actual path to the Python executable, and replace .profile with the login script for your system:
$ echo export PATH="<PATH_TO_PYTHON>:$PATH" >> ~/.profile
This command adds export PATH="<PATH_TO_PYTHON>:$PATH" to the end of .profile. The command export PATH="<PATH_TO_PYTHON>:$PATH" prepends <PATH_TO_PYTHON> to the PATH environment variable. It’s similar to the following operation in Python:
>>>
>>> PATH = "/home/realpython/apps:/bin"
>>> PATH = f"/home/realpython/python:{PATH}"
>>> PATH
'/home/realpython/python:/home/realpython/apps:/bin'
Since PATH is just a string separated by colons, prepending a value involves creating a string with the new path, a colon, then the old path. With this string, you set the new value of PATH.
To refresh your current command-line session, you can run the following command, replacing .profile with whichever login script you’ve chosen:
Now, you should be able to call python from the command line directly. The next time you log in, Python should automatically be added to PATH.
If you’re thinking this process seems a bit opaque, you’re not alone! Read on for more of a deep dive into what’s going on.
Understanding What PATH Is
PATH is an environment variable that contains a list of paths to folders. Each path in PATH is separated by a colon or a semicolon—a colon for UNIX-based systems and a semicolon for Windows. It’s like a Python variable with a long string as its value. The difference is that PATH is a variable accessible by almost all programs.
Programs like the command line use the PATH environment variable to find executables. For example, whenever you type the name of a program into the command line, the command line will search various places for the program. One of the places that the command line searches is PATH.
All the paths in PATH need to be directories—they shouldn’t be files or executables directly. Programs that use PATH take each directory in turn and search all the files within it. Subdirectories within directories in PATH don’t get searched, though. So it’s no good just adding your root path to PATH!
It’s also important to note that programs that use PATH typically don’t search for anything except executables. So, you can’t use PATH as a way to define shortcuts to commonly used files.
Understanding the Importance of Order Within PATH
If you type python into the command line, the command line will look in each folder in the PATH environment variable for a python executable. Once it finds one, it’ll stop searching. This is why you prepend the path to your Python executable to PATH. Having the newly added path first ensures that your system will find this Python executable.
A common issue is having a failed Python installation on your PATH. If the corrupted executable is the first one that the command line comes across, then the command line will try and run that and then abort any further searching. The quick fix for this is just adding your new Python directory before the old Python directory, though you’d probably want to clean your system of the bad Python installation too.
Reordering PATH on Windows is relatively straightforward. You open the GUI control panel and adjust the order using the Move Up and Move Down buttons. If you’re on a UNIX-based operating system, however, the process is more involved. Read on to learn more.
Managing Your PATH on UNIX-based Systems
Usually, your first task when managing your PATH is to see what’s in there. To see the value of any environment variable in Linux or macOS, you can use the echo command:
$ echo $PATH
/usr/local/sbin:/usr/local/bin:/usr/sbin:/home/realpython/badpython:/usr/bin:/sbin:/bin:/usr/games:/usr/local/games
Note that the $ symbol is used to tell the command line that the following identifier is a variable. The issue with this command is that it just dumps all the paths on one line, separated by colons. So you might want to take advantage of the tr command to translate colons into newlines:
$ echo $PATH | tr ":" "n"
/usr/local/sbin
/usr/local/bin
/usr/sbin
/home/realpython/badpython
/usr/bin
/sbin
/bin
/usr/games
/usr/local/games
In this example, you can see that badpython is present in PATH. The ideal course of action would be to perform some PATH archaeology and figure out where it gets added to PATH, but for now, you just want to remove it by adding something to your login script .
Since PATH is a shell string, you don’t have access to convenient methods to remove parts of it, like you would if it were a Python list. That said, you can pipe together a few shell commands to achieve something similar:
export PATH=`echo $PATH | tr ":" "n" | grep -v 'badpython' | tr "n" ":"`
This command takes the list from the previous command and feeds it into grep, which, together with the -v switch, will filter out any lines containing the substring badpython. Then you can translate the newlines back to colons, and you have a new and valid PATH string that you use right away to replace your old PATH string.
Though this can be a handy command, the ideal solution would be to figure out where that bad path gets added. You could try looking at other login scripts or examine specific files in /etc/. In Ubuntu, for instance, there’s a file called environment, which typically defines a starting path for the system. In macOS, that might be /etc/paths. There can also be profile files and folders in /etc/ that might contain startup scripts.
The main difference between configurations in /etc/ and in your home folder is that what’s in /etc/ is system-wide, while whatever’s in your home folder will be scoped to your user.
It can often involve a bit of archeology to track down where something gets added to your PATH, though. So, you may want to add a line in your login or rc script that filters out certain entries from PATH as a quick fix.
Conclusion
In this tutorial, you’ve learned how to add Python, or any other program, to your PATH environment variable on Windows, Linux, and macOS. You also learned a bit more about what PATH is and why its internal order is vital to consider. Finally, you also discovered how you might manage your PATH on a UNIX-based system, seeing as it’s more complex than managing your PATH on Windows.
The pathlib module, introduced in Python 3.4 (PEP 428 — The pathlib module — object-oriented filesystem paths), makes the path-related experience much much better.
pwd

/home/skovorodkin/stack

tree

.
└── scripts
    ├── 1.py
    └── 2.py
In order to get the current working directory, use Path.cwd():
from pathlib import Path

print(Path.cwd())  # /home/skovorodkin/stack
To get an absolute path to your script file, use the Path.resolve() method:
print(Path(__file__).resolve()) # /home/skovorodkin/stack/scripts/1.py
And to get the path of a directory where your script is located, access .parent (it is recommended to call .resolve() before .parent):
print(Path(__file__).resolve().parent) # /home/skovorodkin/stack/scripts
Remember that __file__ is not reliable in some situations: How do I get the path of the current executed file in Python?.
Please note, that Path.cwd(), Path.resolve() and other Path methods return path objects (PosixPath in my case), not strings. In Python 3.4 and 3.5 that caused some pain, because open built-in function could only work with string or bytes objects, and did not support Path objects, so you had to convert Path objects to strings or use the Path.open() method, but the latter option required you to change old code:
File scripts/2.py
from pathlib import Path

p = Path(__file__).resolve()

with p.open() as f: pass
with open(str(p)) as f: pass
with open(p) as f: pass

print('OK')
Output
python3.5 scripts/2.py

Traceback (most recent call last):
  File "scripts/2.py", line 11, in <module>
    with open(p) as f:
TypeError: invalid file: PosixPath('/home/skovorodkin/stack/scripts/2.py')
As you can see, open(p) does not work with Python 3.5.
PEP 519 — Adding a file system path protocol, implemented in Python 3.6, adds support of PathLike objects to the open function, so now you can pass Path objects to the open function directly:
python3.6 scripts/2.py

OK
Время на прочтение
10 мин
Количество просмотров 15K
В каждой операционной системе существуют свои правила построения путей к файлам. Например, в Linux для путей используются прямые слэши (“/”), а в Windows — обратные слэши (“”).
Это незначительное отличие может создать проблемы, если вы занимаетесь проектом и хотите, чтобы другие разработчики, работающие в разных операционных системах, могли дополнить ваш код.
К счастью, если вы пишете на Python, то с этой задачей успешно справляется модуль Pathlib. Он обеспечит одинаковую работу ваших путей к файлам в разных операционных системах. Кроме того, он предоставляет функциональные возможности и операции, которые помогут вам сэкономить время при обработке и манипулировании путями.
Необходимые условия
Pathlib по умолчанию поставляется с Python >= 3.4. Однако, если вы используете версию Python ниже 3.4, у вас не будет доступа к этому модулю.
Как работает Pathlib?
Чтобы разобраться, как можно построить базовый путь с помощью Pathlib, давайте создадим новый файл Python example.py и поместим его в определенный каталог.
Откройте файл и введите следующее:
import pathlib

p = pathlib.Path(__file__)
print(p)
example.py
В данном примере мы импортируем модуль Pathlib. Затем создаем новую переменную p, чтобы сохранить путь. Здесь мы используем объект Path из Pathlib со встроенной в Python переменной под названием __file__. Эта переменная служит ссылкой на путь к файлу, в котором мы ее прописываем, а именно, example.py.
Если мы выведем p, то получим путь к файлу, в котором сейчас находимся:
/home/rochdikhalid/dev/src/package/example.pyВыше показано, что Pathlib создает путь к этому файлу, помещая этот конкретный скрипт в объект Path. Pathlib содержит множество объектов, таких как PosixPath() и PurePath(), о которых мы узнаем больше в следующих разделах.
Pathlib делит пути файловой системы на два разных класса, которые представляют два типа объектов пути: Pure Path и Concrete Path.
")
Pure path предоставляет утилиты для обработки пути к файлу и манипулирования им без совершения операций записи, в то время как Concrete path позволяет производить обработку пути к файлу и выполнять операции записи.
Другими словами, Concrete path — это подкласс Pure path. Он наследует манипуляции от родительского класса и добавляет операции ввода/вывода, которые выполняют системные вызовы.
Pure path в Python
Pure path управляет путем к файлу на вашей машине, даже если он принадлежит другой операционной системе.
Допустим, вы работаете в Linux и хотите использовать путь к файлу Windows. Здесь объекты класса Pure path помогут вам обеспечить работу пути на вашей машине с некоторыми базовыми операциями, такими как создание дочерних путей или доступ к отдельным частям пути.
Но Pure path не сможет имитировать некоторые другие операции, такие как создание каталога или файла, потому что вы не находитесь в этой операционной системе.
Как использовать Pure path
Как видно из приведенной выше диаграммы, Pure path состоит из трех классов, которые обрабатывают любой путь к файловой системе на вашем компьютере:
PurePath() — это корневой узел, который обеспечивает операции по обработке каждого объекта пути в Pathlib.
Когда вы инстанцируете PurePath(), он создает два класса для обработки путей Windows и других, отличных от Windows. PurePath() создает общий объект пути «agnostic path», независимо от операционной системы, в которой вы работаете.
In [*]: pathlib.PurePath('setup.py')
Out[*]: PurePosixPath('setup.py')
PurePath() в приведенном выше примере создает PurePosixPath(), поскольку мы предположили, что работаем на машине Linux. Но если вы создадите его на Windows, то получите что-то вроде PureWindowsPath('setup.py').
PurePosixPath() — это дочерний узел PurePath(), реализованный для путей файловой системы, отличной от Windows.
In [*]: pathlib.PurePosixPath('setup.py')
Out[*]: PurePosixPath('setup.py')
Если вы инстанцируете PurePosixPath() в Windows, то не возникнет никакой ошибки, просто потому что этот класс не выполняет системных вызовов.
PureWindowsPath() — это дочерний узел PurePath(), реализованный для путей файловой системы Windows.
In [*]: pathlib.PureWindowsPath('setup.py')
Out[*]: PureWindowsPath('setup.py')
То же самое относится и к PureWindowsPath(), поскольку этот класс не предусматривает системных вызовов, следовательно, его инстанцирование не вызовет ошибок для других операционных систем.
Свойства Pure path
Каждый подкласс в PurePath() предоставляет следующие свойства:
PurePath().parent выводит родительский класс:
In [*]: pathlib.PurePath('/src/goo/scripts/main.py').parent
Out[*]: PurePosixPath('/src/goo/scripts')
В примере выше мы используем свойство .parent, чтобы получить путь к логическому родителю main.py.
PurePath().parents[] выводит предков пути:
In [*]: p = pathlib.PurePath('/src/goo/scripts/main.py')
		p.parents[0]
Out[*]: PurePosixPath('/src/goo/scripts')

In [*]: p.parents[1]
Out[*]: PurePosixPath('/src/goo')
Вы всегда должны указывать индекс предка в квадратных скобках, как показано выше. В Python 3.10 и выше можно использовать срезы и отрицательные значения индекса.
PurePath().name предоставляет имя последнего компонента вашего пути:
In [*]: pathlib.PurePath('/src/goo/scripts/main.py').name
Out[*]: 'main.py'
В этом примере конечным компонентом пути является main.py. Таким образом, свойство .name выводит имя файла main.py, то есть main с суффиксом .py.
В свою очередь, PurePath().suffix предоставляет расширение файла последнего компонента вашего пути:
In [*]: pathlib.PurePath('/src/goo/scripts/main.py').suffix
Out[*]: '.py'
По сравнению со свойством .name, .suffix выводит расширение файла и исключает имя файла.
PurePath().stem выводит только имя конечного компонента вашего пути без суффикса:
In [*]: pathlib.PurePath('/src/goo/scripts/main.py').stem
Out[*]: 'main'
Как видно выше, свойство .stem исключает суффикс конечного компонента main.py и предоставляет только имя файла.
Методы Pure path
Каждый подкласс PurePath() предоставляет следующие методы:
PurePath().is_absolute() проверяет, является ли ваш путь абсолютным или нет:
In [*]: p = pathlib.PurePath('/src/goo/scripts/main.py')
        p.is_absolute()

Out[*]: True

In [*]: o = pathlib.PurePath('scripts/main.py')
        o.is_absolute()

Out[*]: False
Обратите внимание, что абсолютный путь состоит из корня и имени диска. В данном случае PurePath() не позволяет нам узнать имя диска.
Если вы используете PureWindowsPath(), то можете репрезентовать абсолютный путь, содержащий имя диска, как PureWindowsPath('c:/Program Files').
PurePath().is_relative() проверяет, принадлежит ли данный путь другому заданному пути или нет:
In [*]: p = pathlib.PurePath('/src/goo/scripts/main.py')
        p.is_relative_to('/src')

Out[*]: True

In [*]: p.is_relative_to('/data')

Out[*]: False
В данном примере заданный путь /src является частью или принадлежит пути p, в то время как другой заданный путь /data выдает False, поскольку он не имеет никакого отношения к пути p.
PurePath().joinpath() конкатенирует путь с заданными аргументами (дочерними путями):
In [*]: p = pathlib.PurePath('/src/goo')
        p.joinpath('scripts', 'main.py')

Out[*]: PurePosixPath('/src/goo/scripts/main.py')
Обратите внимание, что нет необходимости добавлять слэши в заданные аргументы, так как метод .joinpath() делает это за вас.
PurePath().match() проверяет, соответствует ли путь заданному шаблону:
In [*]: pathlib.PurePath('/src/goo/scripts/main.py').match('*.py')
Out[*]: True

In [*]: pathlib.PurePath('/src/goo/scripts/main.py').match('goo/*.py')
Out[*]: True

In [*]: pathlib.PurePath('src/goo/scripts/main.py').match('/*.py')
Out[*]: False
Исходя из приведенных примеров, шаблон должен совпадать с путем. Если заданный шаблон является абсолютным, то и путь должен быть абсолютным.
PurePath().with_name() изменяет имя конечного компонента вместе с его суффиксом:
In [*]: p = pathlib.PurePath('/src/goo/scripts/main.py')
        p.with_name('app.js')
Out[*]: PurePosixPath('/src/goo/scripts/app.js')

In [*]: p
Out[*]: PurePosixPath('/src/goo/scripts/main.py')
Метод .with_name() не изменяет имя последнего компонента навсегда. Кроме того, если указанный путь не содержит имени, возникает ошибка, как отмечено в официальной документации.
PurePath().with_stem() изменяет только имя последнего компонента пути:
In [*]: p = pathlib.PurePath('/src/goo/scripts/main.py')
        p.with_stem('app.py')
Out[*]: PurePosixPath('/src/goo/scripts/app.py')

In [*]: p
Out[*]: PurePosixPath('/src/goo/scripts/main.py')
Это аналогично методу .with_name(). Метод .with_stem() изменяет имя последнего компонента на время. Также, если указанный путь не содержит имени, произойдет ошибка.
PurePath().with_suffix() временно изменяет суффикс или расширение последнего компонента пути:
In [*]: p = pathlib.PurePath('/src/goo/scripts/main.py')
        p.with_suffix('.js')
Out[*]: PurePosixPath('/src/goo/scripts/main.js')
Если имя заданного пути не содержит суффикса, метод .with_suffix() добавляет суффикс за вас:
In [*]: p = pathlib.PurePath('/src/goo/scripts/main')
        p.with_suffix('.py')
Out[*]: PurePosixPath('/src/goo/scripts/main.py')
Но если мы не включим суффикс и оставим аргумент пустым ' ', текущий суффикс будет удален.
In [*]: p = pathlib.PurePath('/src/goo/scripts/main')
        p.with_suffix('')
Out[*]: PurePosixPath('/src/goo/scripts/main')
Некоторые методы, такие как .with_stem() и .is_relative_to(), были недавно добавлены в Python 3.9 и выше. Поэтому, если вы их вызываете, используя Python 3.8 или ниже, будет выдана ошибка атрибута.
Concrete Path в Python
Concrete Paths позволяет обрабатывать, манипулировать и выполнять операции записи над различными путями файловой системы.
Другими словами, этот тип объекта пути помогает нам создать, скажем, новый файл, новый каталог и выполнить другие операции ввода/вывода, не находясь в данной операционной системе.
Как использовать Concrete path
В Concrete path обрабатываются любые пути файловой системы и выполняются системные вызовы на вашем компьютере. Эти объекты пути являются дочерними путями Pure path и состоят из трех подклассов, как и сами Pure path:
Path() — это дочерний узел PurePath(), он обеспечивает операции обработки с возможностью выполнения процесса записи.
Когда вы инстанцируете Path(), он создает два класса для работы с путями Windows и отличных от Windows. Как и PurePath(), Path() также создает общий объект пути «agnostic path», независимо от операционной системы, в которой вы работаете.
In [*]: pathlib.Path('setup.py')
Out[*]: PosixPath('setup.py')
Path() в приведенном выше примере создает PosixPath(), поскольку мы предполагаем, что работаем на Linux. Но если вы создадите его в Windows, то получите что-то вроде WindowsPath('setup.py').
PosixPath() — это дочерний узел Path() и PurePosixPath(), реализованный для обработки и управления путями файловой системы, отличной от Windows.
In [*]: pathlib.PosixPath('setup.py')
Out[*]: PosixPath('setup.py')
Вы получите ошибку при инстанцировании PosixPath() на компьютере с Windows, поскольку нельзя выполнять системные вызовы во время работы в другой операционной системе.
WindowsPath() — это дочерний узел Path() и PureWindowsPath(), реализованный для путей файловой системы Windows.
In [*]: pathlib.WindowsPath('setup.py')
Out[*]: WindowsPath('setup.py')
То же самое относится и к WindowsPath(), поскольку вы работаете в другой операционной системе — поэтому ее инстанцирование приведет к ошибке.
Свойства Concrete path
Поскольку Concrete path является подклассом Pure path, вы можете делать с Concrete path все, что угодно, используя свойства PurePath(). Это означает, что мы можем использовать, например, свойство .with_suffix для добавления суффикса к Concrete path:
In [*]: p = pathlib.Path('/src/goo/scripts/main')
        p.with_suffix('.py')
Out[*]: PosixPath('/src/goo/scripts/main.py')
Или вы можете проверить, относится ли данный путь к исходному пути с помощью .is_relative_to:
In [*]: p = pathlib.Path('/src/goo/scripts/main.py')
        p.is_relative_to('/src')

Out[*]: True
Всегда помните, что Concrete path наследуют операции обработки от Pure path и добавляют операции записи, которые выполняют системные вызовы и конфигурации ввода/вывода.
Методы Concrete path
Каждый подкласс Path() предоставляет следующие методы для обработки путей и выполнения системных вызовов:
Path().iterdir() возвращает содержимое каталога. Допустим, у нас есть следующая папка, содержащая следующие файлы:
data
	population.json
	density.json
	temperature.yml
	stats.md
	details.txt
папка данных
Чтобы вернуть содержимое каталога /data, вы можете использовать метод .iterdir():
In [*]: p = pathlib.Path('/data')

        for child in p.iterdir():
        	print(child)

Out[*]: PosixPath('/data/population.json')
         PosixPath('/data/density.json')
         PosixPath('/data/temprature.yml')
         PosixPath('/data/stats.md')
         PosixPath('/data/details.txt')
Метод .itertir() создает итератор, который случайным образом перечисляет файлы.
Path().exists() проверяет, существует ли файл/каталог в текущем пути. Давайте воспользуемся каталогом из предыдущего примера (наш текущий каталог — /data):
In [*]: p = pathlib.Path('density.json').exists()
        p
Out[*]: True
Метод .exists() возвращает True, если заданный файл существует в каталоге data. Метод возвращает False, если его нет.
In [*]: p = pathlib.Path('aliens.py').exists()
        p
Out[*]: False
То же самое относится и к каталогам, метод возвращает True, если заданный каталог существует, и False, если каталог отсутствует.
Path().mkdir() создает новый каталог по заданному пути:
In [*]: p = pathlib.Path('data')
        directory = pathlib.Path('data/secrets')
        directory.exists()
Out[*]: False

In [*]: directory.mkdir(parents = False, exist_ok = False)
        directory.exists()
Out[*]: True
Согласно официальной документации, метод .mkdir() принимает три аргумента. В данный момент мы сосредоточимся только на аргументах parents и exist_ok.
По умолчанию оба аргумента имеют значение False. Аргумент parents выдает ошибку FileNotFound в случае отсутствия родителя, а exist_ok выдает ошибку FileExists, если данный каталог уже существует.
В приведенном примере вы можете установить аргументы в True, чтобы игнорировать упомянутые ошибки и обновить каталог.
Мы также можем создать новый файл по указанному пути с помощью метода Path().touch():
In [*]: file = pathlib.Path('data/secrets/secret_one.md')
        file.exists()
Out[*]: False

In [*]: file.touch(exist_ok = False)
        file.exists()
Out[*]: True
Та же логика применима к методу .touch(). Здесь параметр exist_ok может быть установлен в True, чтобы игнорировать ошибку FileExists и обновить файл.
Path().rename() переименовывает файл/каталог по заданному пути. Рассмотрим пример на примере нашего каталога /data:
In [*]: p = pathlib.Path('density.json')
        n = pathlib.Path('density_2100.json')
        p.rename(n)
Out[*]: PosixPath('density_2100.json')
Если вы присваиваете методу несуществующий файл, он выдает ошибку FileNotFound. То же самое относится и к каталогам.
Path().read_text() возвращает содержимое файла в формате строки:
In [*]: p = pathlib.Path('info.txt')
        p.read_text()

Out[*]: 'some text added'
Также вы можете использовать метод write_text() для записи содержимого в файл:
In [*]: p = pathlib.Path('file.txt')
        p.write_text('we are building an empire')

Out[*]: 'we are building an empire'
Обратите внимание, что метод .write_text() был добавлен в Python 3.5 и недавно был обновлен в Python 3.10, получив некоторые дополнительные параметры.
Важное замечание
Вы можете спросить себя, зачем использовать пути файловой системы Windows — ведь каждый пакет должен быть совместим и с другими операционными системами, а не только с Windows.
Вы правы, если цель состоит в том, чтобы сделать путь, не зависящий от ОС. Но иногда мы не можем этого сделать из-за некоторых параметров, уникальных для Windows или Posix систем. Вот почему предоставляются данные объекты — чтобы помочь разработчикам справиться с такими вариантами использования.
Некоторые пакеты нацелены на решение проблем, присутствующих только в экосистеме Windows, и Python поддерживает эти юзкейсы в данной библиотеке.
Что дальше?
Надеемся, это руководство помогло вам узнать, как и зачем использовать Pathlib и в чем его польза для обработки и манипулирования путями файловой системы.
Было бы здорово обыграть полученные знания и воплотить их в реальном проекте.
В этой статье я рассказал об основах, необходимых для использования Pathlib в вашем проекте.
В официальной документации описано больше методов и свойств, которые вы можете применить к путям файловой системы: Pathlib — Объектно-ориентированные пути файловой системы
Всех желающих приглашаем на открытое занятие, на котором научимся работать со встроенными модулями. Узнаем про модули (os, pathlib, functools). Регистрация открыта по ссылке.