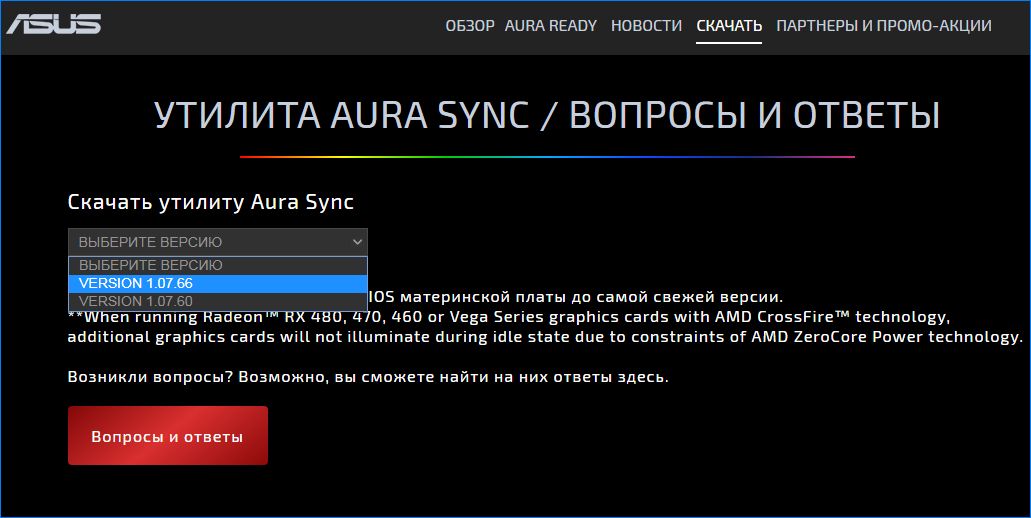
Многие материнские платы ASUS оснащены управляемой системой LED подсветки AURA. Она обеспечивает настраиваемое поведение RGB-индикаторов и даже позволяет синхронизировать другие светодиодные ленты, прикрепленные к ней.
Программа позволяет пользователям персонализировать цветность LED индикаторов и устанавливать ее в соответствии с их предпочтениями. Уже настроен ряд различных предустановленных режимов, поэтому добавить новый будет намного легче. С момента появления системы было много нареканий у пользователей о том, что ASUS AURA работает не так, как ожидалось. Она либо вообще не открывается, либо переходит в состояние «не отвечает».
Поскольку это приложение привязано к элементам управления на материнской плате ASUS, есть несколько причин, при которых AURA может не работать.
- Файлы установки приложения повреждены и стали непригодными для использования.
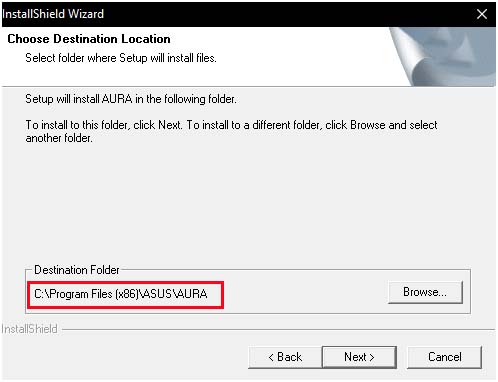
- Указанный путь установки программного обеспечения AURA должен быть сохранен по умолчанию, иначе приложение не будет работать.
- Конфликт с другими программами управления подсветкой. Уже известный факт, что другие утилиты для настройки подсветки, такие как Corsair и прочие вызывают конфликты с ASUS AURA.
- Неправильно подключена RGB лента к материнской плате.
- Версия программного обеспечения AURA несовместима с установленным оборудованием.
- Активирован быстрый запуск Windows. Эта функция помогает очень быстро загрузить операционную систему, но также может конфликтовать с приложением AURA.
Перед выполнением следующих действий проверьте, что материнская плата физически не повреждена, включая контакты LED подсветки. Кроме того, нужно зайти в систему как администратор.
Отключение быстрого запуска Windows
Эта функция предназначена для сокращения времени запуска системы. Она сохраняет начальную конфигурацию Windows при завершении работы компьютера. Поэтому, когда включаем ПК снова, он быстро извлекает состояние системы и загружается, не занимая много времени. Функция пытается дать ощущение «SSD», когда на самом деле установлен жесткий диск HDD. Мы попытаемся отключить эту функцию и посмотреть, будет ли работать система RGB индикации.
- Откройте окно «Выполнить» (клавиши Win + R), впишите control panel и нажмите на Enter для входа в Панель управления.
- Установите просмотр на крупные значки, затем перейдите в раздел «Электропитание».
- Выберите в левом боковом меню «Действие кнопок питания».
- Теперь кликните на опцию, предоставляющей администраторские права с именем «Изменение параметров, которые сейчас недоступны».
- После этого снимите флажок «Включить быстрый запуск», сохраните изменения и выйдите из окна.
Перезагрузите компьютер и проверьте, работает ли подсветка на материнской плате ASUS.
Переустановка ASUS AURA
Если после отключения быстрой загрузки AURA по-прежнему не работает, попробуйте полностью удалить приложение, а затем заменить его на последнюю версию. Дело в том, кроме установочных файлов повреждаются данные сохраненных настроек пользователя. Для удаления нужно использовать деинсталлятор AURA, чтобы не осталось никаких следов.
- Загрузите утилиту AuraCleaner. Кликните правой кнопкой мыши на исполняемом файле и выберите запуск от имени администратора. AURA будет удален со всеми сохраненными пользователем файлами.
- Выключите компьютер. Отключите кабель питания, также проверьте, что все периферийные устройства отключены. Теперь подождите 5-10 минут, прежде чем подключить все обратно.
- Откройте официальный сайт ASUS AURA, загрузите последнюю версию приложения.
- Запустите исполняемый файл и не изменяйте каталог установки, указанный путь оставьте по умолчанию, иначе приложение работать не будет.
После завершения установки перезапустите компьютер, посмотрите, работает ли индикация.
Если последняя версия не работает на конфигурации вашего компьютера, попробуйте установить предыдущую.
Проверка разъемов RGB
Часто пользователи подключают дополнительные светодиодные ленты. На материнских платах в основном есть два разъема: для светодиодной ленты и подсветки вентилятора (Fan RGB header). В некоторых лентах нет направляющих, поэтому можно ошибиться с правильностью их подключения.
Поэтому еще раз проверьте, правильно ли подключена RGB лента. Кроме этого, не применяйте физическую силу, так как можете повредить разъемы.
Удаление других программ управления подсветкой
Известно, что AURA конфликтует с другими приложениями RGB, среди которых Corsair, Cooler master и прочие. Поскольку все эти приложения используют одни и те же основные компоненты, может возникнуть ситуация, когда каждый модуль конкурирует за использование внешнего ресурса.
Откройте диалоговое окно «Выполнить» (Win + R), наберите команду appwiz.cpl для входа в раздел удаления / изменения программ. Кликните правой кнопкой мыши на другую установленную программу управления подсветкой и удалите ее.
Перезагрузите компьютер и проверьте, правильно ли работает функция подсветки.

ASUS Aura — это программное обеспечение для управления светодиодными индикаторами компьютеров, но многие пользователи сообщают, что ASUS Aura перестала работать для них.
Это может быть проблема, и в сегодняшней статье мы рассмотрим ее подробно и по возможности, как решить эту проблему раз и навсегда.
Почему не работает синхронизация ауры?
Существует несколько причин, по которым ASUS Aura не работает, но наиболее распространенной из них является поврежденная установка.
Стоит отметить, что другое программное обеспечение для управления освещением также может мешать Asus Aura, поэтому вы можете удалить его, если подозреваете, что оно вызывает проблемы.
Что делать, если Asus Aura перестала работать?
1. Переустановите Asus Aura
- Скачать последнюю версию Asus Aura.
- Запустить установочный файл.
- Предыдущая версия Asus Aura будет удалена.
- Запустить установочный файл еще раз, чтобы переустановить ASUS Aura.
Вы также можете переустановить вручную, выполнив возможность его действия:
- Открыть приложение «Настройки» и богатство в разделе «Приложения.
- Теперь удалите следующие программные продукты:
- АУРА
- АУРА Сервис
- ГАЛАКТИЧЕСКИЙ ГЕЙМЕР RGB
- Патриот Гадюка RGB
- После удаления таких приложений в следующем каталоге:
C:Program Files (x86) - Теперь найдите и удалите каталог ОсвещениеСервис.
- После удаления всех упомянутых выше приложений и каталогов снова установите ASUS Aura.
В качестве альтернативы мы рекомендуем использовать профессиональное стороннее приложение, которое удаляет с удалением также очищает остатки.
Когда вы получили приложение вручную, в вашей системе оказались незаметные ненужные файлы, что со временем показало его скорость и функциональность.
2. Разблокируйте папку AsIO
- Удалите программное обеспечение Asus Aura.
- Перейти к
C:Program Files (x86)Io - Вы должны увидеть несколько папок АсИО.
- Щелкните правой кнопкой мыши первый каталог и выберите «Свойство.
- Теперь установите флажок «Разблокировать», «Применить»И«ОК», чтобы сохранить изменения.
- Повторите эти шаги для всех каталогов ASiO.
- После этого снова установите Asus Aura.
Несколько пользователей сообщили, что вам необходимо разблокировать установочный файл Asus Aura перед установкой, поэтому обязательно рекомендуется и это.
ASUS Aura — подходящий инструмент, но если ASUS Aura перестала работать, обязательно выполните полную переустановку и навсегда устраните проблему.
Похожие темы
Skip to content
Accessibility help


Gaming
Business
Support
Skip to content
Accessibility help
Create an ASUS account today to register your product for better support.


ASUS Vivobook x BAPE Exclusive Edition Collaboration
Sign up for the latest updates
Learn more

The world’s first carbon-neutral business laptop
Learn more
ROG RYUJIN III ARGB COOLER
COOLER THAN COOL

Wow the world in 3D
Learn more
Shop and Learn
Mobile / Handhelds
- Phones
- Accessories
Laptops
- For Home
- For Work
- For Creators
- For Students
- For Gaming
- Accessories
Displays / Desktops
- Monitors
- Projectors
- All-in-One PCs
- Tower PCs
- Gaming Tower PCs
- Mini PCs
- Workstations
- Accessories
Motherboards / Components
- Motherboards
- Graphics Cards
- Gaming Cases
- Cooling
- Power Supply Units
- Sound Cards
- Optical Drives
- Data Storage
- External Graphics Docks
Networking / IoT / Servers
- WiFi 7
- WiFi 6
- WiFi Routers
- Whole Home Mesh WiFi System
- Business Network Solutions
- Wired Networking
- Intelligent Robots
- AIoT & Industrial Solutions
- Servers
- Smart Home
Accessories
- Keyboards
- Mice and Mouse Pads
- Headsets and Audio
- Streaming Kits
- Apparel Bags and Gear
- Cases and Protection
- Adapters and Chargers
- Docks Dongles and Cable
- Power Banks
- Controller
- Gimbal
©ASUSTeK Computer Inc. All rights reserved.
Terms of Use Notice
Privacy Policy
r/pcmasterrace
Welcome to the official subreddit of the PC Master Race / PCMR!
All PC related content is welcome, including build help, tech support, and any doubt one might have about PC ownership.
You don’t necessarily need a PC to be a member of the PCMR. You just have to love PCs. It’s not about the hardware in your rig, but the software in your heart!
Join us in celebrating and promoting tech, knowledge, and the best gaming and working platform. The PC.
Members
Online
Is your Aura Sync not detecting the device? Do you want to know how to fix this issue? Glad to help, dig out this article to find the answer.
Is your Aura Sync not working up and you don’t know how to deal with this problem? Are you a gamer, your Aura Sync showing an error and you have no idea what’s happening?
Firstly, Aura Sync mostly shows errors due to many errors, and while gaming if the Aura Sync stops working then this is one of the most annoying situations. Right?
ASUS recently offers a broad range of RGB functions that have been featured on most of the industry’s highest motherboards. The AURA app also allows you to adjust a motherboard’s RGB lighting so that you can use it to synchronize other LED strips that are wired to it. Also, you can adjust the ASUS AURA application to customize the RGB lighting according to your requirements.
There might be numeral errors that will be the root cause of Aura Sync not working, so delve into this article to find the reason and how you can fix them.
How can we fix the issue of Aura Sync not detecting devices?
There will be several reasons that make the AURA sync not detect the device and also the number of methods how you can fix all this.
-
Restart the application
If there’s an error in AURA sync the first thing you need is to shut the application, restart the device, and then relaunch it. As this step is mandatory so do this and check if AURA sync is working or not.
-
Undo fast startup
The fast startup is one of the functions that help to fastly launch any app, so this startup might be the reason for AURA sync not detecting anything. So, it’s better to untick the fast startup for this you have to do the following steps;
- Open the control panel and then click the power section.
- Now, for any settings that seem to be temporarily unavailable, tap on the change settings option.
- Untick the box to enable fast startup and then save all changes.
Now, restart the device and check if there’s an error or not.
-
Updated version
The old version of the application can also be the reason for AURA sync not detecting anything so make sure that you have the latest version of the application.
Because it might be possible that the expired version of the app will have some faults, as there’s also a chance that you won’t be able to browse due to incompatibilities.
Sometimes the reason why AURA sync is not detecting the device is due to the faulty cable connections. So before doing anything just double-check that all the cables are placed correctly to the motherboard headers.
It is preferable to rejoin wires again even when they are correctly attached. Simply take them apart and carefully reassemble them.
After that, restart your pc and double-check that the Asus Aura app is running or not.
-
Compatible part
If the PC has ASUS RGB components then it is quietly fine, but if you are using any other RGB software then it’s better to switch it to avoid any kind of inconvenience.
You must use a certified iCUE application for corsair pieces in the same way. In general, each maker’s RGB program is unique to its goods.
To minimize errors, you can just opt for compatible parts. If you’re not sure which application to use, consult the handbook that comes with every PC device you purchase.
- App reinstallation
If till now your AURA sync has not detected any device and you haven’t seen any RGB lighting then it is better to reinstall the app. For uninstalling follow the below steps;
- Open the program and files and uninstall the AURA sync app.
- Now, again install the app from the official site and then follow the on-screen directions and get RGB lighting.
What are the possible errors that occur if AURA Sync does not detect anything?
Here we are mentioning the possible error that happens and the AURA sync stops detecting anything.
- No access to the app
When the user clicks the app, it might seem unresponsive which is quite inconvenient, users fail to acknowledge or operate RGB lights.
How to fix this issue?
There can be several causes why you can’t access it, but by far the most common causes are faulty installation or limited internal storage. So, simply reinstall the app and then make sure you have quite enough space for storage on the disk drive.
- AURA stopped functioning
The Asus RGB software would occasionally cease operating after being opened, therefore, you won’t be able to change the RGB lighting if this error occurs. If you are facing this issue then there are a variety of causes that let it happen;
- The application isn’t installed correctly.
- Check to see whether the app has been stopped by the antivirus.
- Turn off the overclocker.
How to fix this issue?
Firstly, reboot the computer and now try to see if the problem has been resolved; if it’s not, reinstall the app.
Frequently Asked Questions
Why is my aura sync not working?
Several reasons are the main cause that the AURA sync is not working but the foremost reason is faulty app installation. It’s important to remember that some lighting software applications can interact with ASUS Aura, therefore if you sense it’s creating problems, you should uninstall it.
How do I add a device to Aura sync?
For adding any device to AURA sync you just have to get into the setting and click on the add device option and write down the model of the device. After this, if it’s not connecting then the device is not compatible with AURA sync.
Why is the Armory Crate not detecting devices?
ASUS offers a few new Gaming items that are friendly with the Armoury crate RGB, however, due to some faults, the Armory Crate is unable to identify the AURA program components. Therefore, the RGB computer becomes a non-RGB computer that’s why you need to upgrade the Armoury crate program to resolve the issue.
What are Aura Sync compatible devices?
The AURA sync compatible devices are ROG RYUO 240, ROG RYUO 120, ROG STRIX LC 360/ ROG STRIX LC 360 RGB, ROG STRIX LC 240/ ROG STRIX LC 240 RGB, ROG STRIX LC 120/ ROG STRIX LC 120 RGB.
Conclusion
We have mentioned all the possible fixation methods by which you easily get your AURA sync software back, we hope you find this article AURA sync not detecting device helpful and informative.
This Article is Updated.
- Author
- Recent Posts
Robert Smith is a technology lover and loves to write about laptops, monitors, printers, tablets, Apple products and anything that’s related to computers and games. He is passionate enough that he maintains this blog regarding tech updates on a daily basis.


