Table of Contents
- Introduction
- The PathLib Module: Defining the Path Structure
- Finding Files in the Current Directory
- Searching for Files Recursively in Python
- Finding a Single File Recursively
- Finding an Absolute Path
- Getting the Directory of the Currently Executing File
- Creating a File In the Same Directory As a Python File
- Yes, But Does the File Exist?
- Working with Files and Directories
- Example: Recursively Listing Files and Directories in Python:
- Finding Other Files and Directories
- Get the User’s Home Directory in Python
- Getting the Current Working Directory
- Example: Creating a Directory in the User Home Directory in Python
- Finding Python Module Paths and Files
- Exploring the PYTHONPATH and sys.path Variables
- Finding the Filename from Which a Python Module Was Loaded
- Closing Thoughts
- You May Also Enjoy
Introduction
In addition to being an excellent general-purpose programming language, Python is also well known as a handy language for scripting. Naturally, therefore, Python has support for the kinds of file searching and path operations one can do in a bash script, for example.
However, finding files in Python can be daunting if you don’t know where to start, especially since you can choose between more than one library to find and manipulate paths and files. Before version 3.4, one would have used the glob module to find a file and used os.path module to perform other path operations, such as getting a directory given an absolute filename or creating an absolute path from a relative path. Python 3.4 introduced the pathlib module as an object-oriented API for filesystem paths.
This guide will focus on the pathlib module and teach you the basics of finding files and manipulating paths, including using glob patterns and recursive searching. We’ll also learn how to find various paths we might need to use as a starting point. For example, how would you find a file in a subdirectory of the user’s home directory, what’s the path of the currently executing file, or given a Python module name, where did that name come from? With the tools we’ll provide in this article, you’ll be able to locate any file in your system with ease.
The PathLib Module: Defining the Path Structure
Whether we’re dealing with the user’s home directory, the current working directory, or the directory containing an executing Python file, we’ll always need a way to build and manipulate paths robustly. Pyth n’s pathlib module provides most of what we need for this task. Although this module has a concept of “pure” paths (i.e., paths you can manipulate without really referring to the file system), it’s much more common that we simply want to construct a concrete path class.
For example, passing a file or directory name to the Path class constructor creates a concrete object of the type PosixPath on Linux or Unix-style systems (like macOS) or a WindowsPath object on Windows. Using the Path class, the root of the concrete classes in Python, allows the code we’ll demonstrate in this article to work in both environments.
Finding Files in the Current Directory
To start getting our hands on the Pathlib module, we can run the following code either as a file or from the command prompt. This will list the contents of the current working directory, that is, wherever we run it from (not where the Python script is located).
# list_dirs.py
from pathlib import Path
here = Path(".")
files = here.glob("*")
for item in files:
    print(item)
We pass in a “.” as a starting point to construct the Path. We can then call the glob method on the path object to list all the files in this directory using “*.” The glob expression, *, will expand to mean “all files and directories,” just as it would if we used “ls *” on Linux or “dir *” on Windows.
Listing the contents of the directory I was working in, I get the following output:

I’ve tried to keep this folder pretty minimal. You c n see we list two python files and the subdirectory. By changing"*" to "*.py", we could focus on just the Python files, or specify a full filename, etc.
Searching for Files Recursively in Python
The glob method also supports an extended glob syntax, "**/*", which allows you to search for files recursively. (This syntax may be new to some of my readers, but it’s the same syntax supported by zsh and .gitignore files if you’re familiar with those). This glob pattern means “search here and in all subdirectories.”
# list_dirs_recursive.py
from pathlib import Path
here = Path(".")
files = here.glob("**/*")
for item in files:
    print(item)
This time we see a test file I put in the directory for the purpose and our new Python file.

Finding a Single File Recursively
Using just a little creativity, we can also search recursively for a single file or a subset of files. For example, if we just wanted to find something.txt no matter where it was starting from our current working directory, we could use “**/something.txt” as the glob pattern:
# find_file.py
from pathlib import Path
here = Path(".")
files = here.glob("**/something.txt")
for item in files:
    print(item)
The output will show the folder structure relative to where the Path object is set.
my_subdirectory/something.txtWe use a for loop to iterate because glob returns a generator of path objects of the same type as the path on which it’s called (in our case, PosixPath).
Finding an Absolute Path
So far we’ve shown examples of using relative paths. We started out by setting a variable to Path("."), and relative to that, we were able to use “glob” to find “my_subdirectory omething.txt”, for example. But sometimes what we need to find is an absolute path given that information. Using path objects like Posix path or WindowsPath, we can use the resolve method to get this information. Resolve returns an absolute path. It also resolves any symbolic links.
"""Display some known relative and absolute paths"""
from pathlib import Path
here = Path(".")
file_path = Path("my_subdirectory/something.txt"
print(f"The absolute path to {here} is {here.resolve()}")
print(f"The absolute path to {file_path} is {file_path.resolve()}")
Output:
The absolute path to . is /Users/johnlockwood/paths-demo
The absolute path to my_subdirectory/something.txt is /Users/johnlockwood/paths-demo/my_subdirectory/something.txt
Getting the Directory of the Currently Executing File
You may already be aware that when Python loads a module, such as a program file, it sets a variable for that module, “__file__“, to the (absolute) filename of the module. Given a file, therefore, we can display where it is:
# print_path.py
print(__file__)
Output:
/Users/johnlockwood/paths-demo/print_path.pyThe __file__ variable is not a path object, but a string. However, by constructing a path from it, we can query two special attributes of a file, name and parent, which will give us just the name portion of the file and the directory portion, respectively:
# print_directory.py
from pathlib import Path
file_path = Path(__file__)
print(f"The file {file_path.name} is located in directory {file_path.parent}.")
Output:
The file print_directory.py is located in directory /Users/johnlockwood/paths-demo.Creating a File In the Same Directory As a Python File
Generally, retrieving the file’s directory using the parent attribute is more useful than getting its name, since we can now construct an absolute filename we can use to pass to another function. This is the correct approach to locating a file next to another Python file, since — unlike Path(".") — the path given by Path(__file__) will always be relative to the file itself, not where the file was run from.
For the Path classes in the pathlib module, we can join path components together using an overloaded “/” operator. (Note that we use “/” for this even on Windows — where the Path class will do the right thing and use the backslash operator in the constructed path).
With Path imported and given what we have so far, we can create a new filename using the one-liner:
output_path = Path(__file__).parent / "output.txt"To review, this code constructs a Path from the __file__ string, uses the parent attribute to get the file’s directory, then uses the slash operator to construct a new Path object to an output file in the same directory as the running Python file.
Yes, But Does the File Exist?
In the last example, you may have noticed that we constructed a path that doesn’t exist. Not to worry, we can ask a path to tell us if what it points to exists or not, us ng (no surprises here), the exists method.
Here’s a quick IPython screenshot that demonstrates how it works:

Next, let’s turn our attention to two more such “query” methods.
Working with Files and Directories
When we constructed a new filename based on the name of the Python __file__ built-in variable, we knew that __file__ was a file name, so it made sense to use the parent attribute to get the directory where the file was located. Of course, given an absolute path to a directory, parent behaves “differently,” returning the directory that contains this one. For example:
"""Display the current and parent directory"""

from pathlib import Path
here = Path(".").resolve()
print(f"You are here: {here}, a sub-directory of {here.parent}.")
Sample output:
You are here: /Users/johnlockwood/paths-demo, a sub-directory of /Users/johnlockwood.So far, in these simple examples, we’ve always known the type of Path we’re dealing with, but if we didn’t, the concrete path classes we’ve been dealing with can let us know if we’re referring to a file or a directory using the methods is_file()and is_dir(). We’ll use these methods in the following example:
Example: Recursively Listing Files and Directories in Python:
Let’s put together a few of the techniques we’ve been discussing to build a sample where we do a recursive search for all files and directories and print the results.
# list_paths.py

"""Recursively list files and directories"""
from pathlib import Path
here = Path(".")

for path in sorted(here.glob("**/*")):
    path_type = "?"
    if path.is_file():
        path_type = "F"
    elif path.is_dir():
        path_type = "D"
    print(f"{path_type} {path}")
Abbreviated output:
F abs_path.py
F construct_filename.py
F directory_parent.py
F list_paths.py
D module
F module/file_in_module.py
D my_subdirectory
F my_subdirectory/something.txt
F print_directory.py
Finding Other Files and Directories
Get the User’s Home Directory in Python
To get the user’s home directory, simply call the class method “home” on the Path class. This will retrieve the user’s home directory whether in a Linux-like environment or on Windows.
"""Display the user's home directory"""
from pathlib import Path
print(Path.home())
The output of course will depend on the user.
Getting the Current Working Directory
To get us started constructing Path objects, I’ve been using the path given by Path(".") to retrieve the current working directory. I’ve tested that that method works even if you change the current working directory programmatically, but there is another way to accomplish this that is perhaps a bit more clear: Path.cwd(). As you might expect, just like Path.home, Path.cwd is a class method, so you can call it on the class itself — you don’t need an instance.
Like the Path string constructor, Path.cwd() and Path.home() both return concrete Path objects, so we can build paths immediately using the slash operator. Do you need to query whether the user already has a configuration installed for Amazon’s AWS command-line interface, for example?
from pathlib import Path
default = Path.home() / ".aws"
print(default.exists())
Example: Creating a Directory in the User Home Directory in Python
The concrete pathlib.Path class has many useful methods in addition to the ones we’re focusing on here, i.e., those that are related to finding files and directories.
Because it’s such a common use case, however, we thought we’d show an example using the Path.mkdir() method. Starting with the user’s home directory, we’ll create a “hidden” directory for a hypothetical CodeSolid command line.
Because creating a directory will fail with an exception if the path already exists, we check for this and do the right thing.
"""Creates a .codesolid directory in the user's home directory"""

from pathlib import Path

DIRECTORY_NAME = ".codesolid"
config_directory = Path.home() / DIRECTORY_NAME

if not config_directory.exists():
    config_directory.mkdir()
    print(f"Directory {config_directory} created.")
else:
    print(f"Directory {config_directory} already exists, skipping.")
Finding Python Module Paths and Files
Unlike the current working directory and the user’s home directory, which are common locations in which we might want to read or write files and directories, it’s perhaps less common to need to find locations related to where Python will search for modules or the actual locations containing a specific module. Nevertheless, occasionally this may help with troubleshooting, especially if the wrong code appears to be getting loaded or things are otherwise not working as you’d expect.
Exploring the PYTHONPATH and sys.path Variables
As you know, the PYTHONPATH environment variable adds search paths to the default locations through which Python will search when you import a module. Therefore you can read it as you would any environment variable:
$ export PYTHONPATH=/Users/johnlockwood/source/CodeSolid
$ python
...
>>> import os
>>> os.environ["PYTHONPATH"]
'/Users/johnlockwood/source/CodeSolid'
If you’re troubleshooting, however, reading the environment variable is probably not sufficient, since what you’re really interested in is the effective combination of the PYTHONPATH plus whatever the default search path is. For this purpose, the sys.path attribute is a much more handy tool:
>>> import sys
>>> sys.path
['', '/Users/johnlockwood/source/CodeSolid', '/Users/johnlockwood/.pyenv/versions/3.11.0a6/lib/python311.zip', '/Users/johnlockwood/.pyenv/versions/3.11.0a6/lib/python3.11', '/Users/johnlockwood/.pyenv/versions/3.11.0a6/lib/python3.11/lib-dynload', '/Users/johnlockwood/.pyenv/versions/3.11.0a6/lib/python3.11/site-packages']
The first element of the array will be the directory that loaded the current module or an empty string, as shown here, if Python was launched interactively. After that, you’ll see the PYTHONPATH entries and the default module search location
PYTHONPATH shows us how the module path could have been altered, while sys.path gives us all the paths from which a module could have been loaded. We can even go further than this, however, and examine the exact location from which Python has loaded (or even would load) a specific module. The simplest way to do this for a loaded module is to use our friend, the __file__ attribute. or example:
Finding the Filename from Which a Python Module Was Loaded
>>> import json
>>> json.__file__
'/Users/johnlockwood/.pyenv/versions/3.11.0a6/lib/python3.11/json/__init__.py'
Using a somewhat less reliable method, we can sometimes find the path from which a module would be loaded even without actually loading it. This generally works for user-defined modules and Python runtime library modules that are not loaded by the “FrozenLoader” module loader. As we’ll see below, it doesn’t work well for the “os” module.
"""Shows how find_spec can sometimes be used to get a file load location path"""
from importlib.util import find_spec

for module in ['os', 'json', 'module.file_in_module']:
    spec = find_spec(module)
    print(f"{module} origin: {spec.origin}")
Sample output:
os origin: frozen
json origin: /Users/johnlockwood/.pyenv/versions/3.11.0a6/lib/python3.11/json/__init__.py
module.file_in_module origin: /Users/johnlockwood/paths-demo/module/file_in_module.py
Closing Thoughts
As we’ve seen, the Python pathlib library contains most of what you need to find files in Python and list directories and files recursively as well. However, as we suggested at the outset, there’s considerable overlap between what’s available in pathlib and what we find in the os and os.path libraries. We chose to focus on pathlib here since we believe that in many cases it makes the code more convenient to work with, and we didn’t see much point in a tutorial that taught you two ways to do something if one would suffice. That said, if you have code based on os.path that works well, we honestly see no compelling reason to go rework it.
In the end, for cases like these, sometimes we just have to open a console, type import this, and bask in the wisdom of the Zen of Python:
There should be one– and preferably only one –obvious way to do it.
Although that way may not be obvious at first unless you’re Dutch.
You May Also Enjoy
Python Indexing and Slicing
Python Operators: The Building Blocks of Successful Code
Модуль Python OS используется для работы с операционной системой и является достаточно большим, что бы более конкретно описать его применение. С помощью его мы можем получать переменные окружения PATH, названия операционных систем, менять права на файлах и многое другое. В этой статье речь пойдет про работу с папками и путями, их создание, получение списка файлов и проверка на существование. Примеры приведены с Python 3, но и с предыдущими версиями ошибок быть не должно.
Модуль OS не нуждается в дополнительной установке, так как поставляется вместе с инсталлятором Python.
Получение директорий и списка файлов
Есть несколько способов вернуть список каталогов и файлов по указанному пути. Первый способ используя os.walk, который возвращает генератор:
import os

path = 'C:/windows/system32/drivers/'
print(path)
Такие объекты можно итерировать для понятного отображения структуры:
import os

path = 'C:/Folder1'
for el in os.walk(path):
    print(el)
Сам кортеж делится на 3 объекта: текущая директория, имя вложенных папок (если есть), список файлов. Я так же разделил их на примере ниже:
import os

path = 'C:/Folder1'
for dirs,folder,files in os.walk(path):
    print('Выбранный каталог: ', dirs)
    print('Вложенные папки: ', folder)
    print('Файлы в папке: ', files)
    print('n')
Os.walk является рекурсивным методом. Это значит, что для поиска файлов в конкретной директории вы будете итерировать и все вложенные папки. Обойти это с помощью самого метода нельзя, но вы можете использовать break так как os.walk возвращает указанную директорию первой. Можно так же использовать next():
import os

path = 'C:/Folder1'
for dirs,folder,files in os.walk(path):
    print('Выбранный каталог: ', dirs)
    print('Вложенные папки: ', folder)
    print('Файлы в папке: ', files)
    print('n')
    # Отобразит только корневую папку и остановит цикл
    break

# Отобразит первый итерируемый объект
directory = os.walk(path)
print(next(directory))
Получение файлов через listdir
Есть еще один метод получения файлов используя listdir. Отличия от предыдущего метода в том, что у нас не будет разделения файлов и папок. Он так же не является рекурсивным:
import os

path = 'C:/Folder1'
directory = os.listdir(path)
print(directory)
Получение полного абсолютного пути к файлам
Для последующего чтения файла нам может понадобится абсолютный путь. Мы можем использовать обычный метод сложения строк или метод os.path.join, который сделает то же самое, но и снизит вероятность ошибки если программа работает на разных ОС:
import os

path = 'C:/Folder1'
for dirs,folder,files in os.walk(path):
    print('Выбранный каталог: ', dirs)
    print('Вложенные папки: ', folder)
    print('Файлы в папке: ', files)
    print('Полный путь к файлу: ', os.path.join(dirs, files))

Исключение каталогов или файлов из списка
У нас может быть список полных путей, например из списка выше, из которого мы хотим исключить папки или файлы. Для этого используется os.path.isfile:
import os

path = ['C:/Folder1',
        'C:/Folder1/Folder2/file2.txt']
for el in path:
    if os.path.isfile(el):
        print('Это файл: ', el)
    else:
print('Это папка: ', el)")
Такой же принцип имеют следующие методы:
- os.path.isdir() — относится ли путь к папке;
- os.path.islink() — относится ли путь к ссылке;
Получение расширения файлов
Расширение файла можно получить с помощью os.path.splittext(). Этот метод вернет путь до расширения и само расширение. Этот метод исключает ситуацию, когда точка может стоять в самом пути. Если в качестве пути мы выберем каталог (который не имеет расширения) , результатом будет пустая строка:
import os

path = ['C:/Folder1',
        'C:/Folder1/Folder2/file2.txt']
for el in path:
    print(os.path.splitext(el))
os.path.basename(path) — вернет имя файла и расширение.
Создание и удаление директорий
Методы по изменению папок следующие:
- os.mkdir() — создаст папку;
- os.rename() — переименует;
- os.rmdir() — удалит.
import os

# Имя новой папки
path = 'C:/Folder1/NewFolder'
# Ее создание
os.mkdir(path)
# Переименуем папку
os.rename(path, 'C:/Folder1/NewFolder2')
# Удалим
os.rmdir('C:/Folder1/NewFolder2')

Если попытаться создать несколько вложенных папок сразу, используя предыдущий пример, появится ошибка FileNotFoundError. Создание папок включая промежуточные выполняется с os.makedirs():
import os

path = 'C:/Folder1/Folder1/Folder1/'
os.makedirs(path)
Проверка директорий и файлов на существование
Если мы пытаемся создать папку с существующим именем, то получим ошибку FileExistsError. Один из способов этого избежать — использование os.path.exists(), который вернет True в случае существования файла или папки:
import os

path = ['C:/Folder1/file1.txt',
		'C:/Folder1/NotExistFolder']
for el in path:
	if os.path.exists(el):
		print('Такой путь существует: ', el)
	else:
		print('Такого пути нет', el)
Получение и изменение текущей директории
Запуская любую программу или консоль, например CMD, мы это делаем из определенной директории. С этой и соседней директорией мы можем работать без указания полного пути. Для того что бы узнать такую директорию в Python используется метод os.getcwd():
import os

current_dir = os.getcwd()
print(current_dir)
В директории ‘D:’ сохранен мой файл, с которого я запускаю методы. Вы можете изменить такую директорию с os.chdir() . Такой подход удобен, когда файлы, с которыми вы работаете в основном находятся в другом месте и вы сможете избежать написания полного пути:
import os

current_dir = os.getcwd()
print(current_dir)
new_dir = os.chdir('D:/newfolder/')
print(os.getcwd())
Так же как и в любых языках, в любых методах описанных выше, вы можете использовать ‘..’ для работы с директорией выше или ‘/’ для работы со внутренней:
import os

# Текущая директория
print(os.getcwd())
# Переход во внутреннюю
old_dir = os.chdir('/newfolder/')
print(os.getcwd())
# Переход на уровень выше
new_dir = os.chdir('..')
print(os.getcwd())
…
Теги:
#python
#os

Python становится все популярнее благодаря относительной простоте изучения, универсальности и другим преимуществам. Правда, у начинающих разработчиков нередко возникают проблемы при работе с файлами и файловой системой. Просто потому, что они знают не все команды, которые нужно знать.
Эта статья предназначена как раз для начинающих разработчиков. В ней описаны 8 крайне важных команд для работы с файлами, папками и файловой системой в целом. Все примеры из этой статьи размещены в Google Colab Notebook (ссылка на ресурс — в конце статьи).
Показать текущий каталог
Самая простая и вместе с тем одна из самых важных команд для Python-разработчика. Она нужна потому, что чаще всего разработчики имеют дело с относительными путями. Но в некоторых случаях важно знать, где мы находимся.
Относительный путь хорош тем, что работает для всех пользователей, с любыми системами, количеством дисков и так далее.
Так вот, для того чтобы показать текущий каталог, нужна встроенная в Python OS-библиотека:
import os
os.getcwd()
Ее легко запомнить, так что лучше выучить один раз, чем постоянно гуглить. Это здорово экономит время.
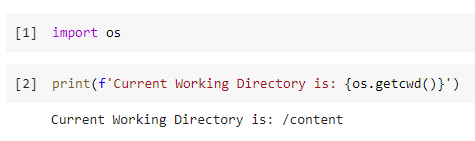
Имейте в виду, что я использую Google Colab, так что путь /content является абсолютным.
Проверяем, существует файл или каталог
Прежде чем задействовать команду по созданию файла или каталога, стоит убедиться, что аналогичных элементов нет. Это поможет избежать ряда ошибок при работе приложения, включая перезапись существующих элементов с данными.
Функция os.path.exists () принимает аргумент строкового типа, который может быть либо именем каталога, либо файлом.
В случае с Google Colab при каждом запуске создается папка sample_data. Давайте проверим, существует ли такой каталог. Для этого подойдет следующий код:
os.path.exists('sample_data')
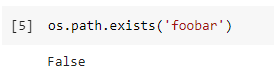
Эта же команда подходит и для работы с файлами:
os.path.exists(‘sample_data/README.md’)
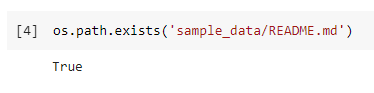
Если папки или файла нет, команда возвращает false.
Объединение компонентов пути
В предыдущем примере я намеренно использовал слеш «/» для разделителя компонентов пути. В принципе это нормально, но не рекомендуется. Если вы хотите, чтобы ваше приложение было кроссплатформенным, такой вариант не подходит. Так, некоторые старые версии ОС Windows распознают только слеш «» в качестве разделителя.
Но не переживайте, Python прекрасно решает эту проблему благодаря функции os.path.join (). Давайте перепишем вариант из примера в предыдущем пункте, используя эту функцию:
os.path.exists(os.path.join('sample_data', 'README.md'))
Создание директории
Ну а теперь самое время создать директорию с именем test_dir внутри рабочей директории. Для этого можно использовать функцию
os.mkdir():
os.mkdir('test_dir')Давайте посмотрим, как это работает на практике.
![]()
Если же мы попытаемся создать каталог, который уже существует, то получим исключение.
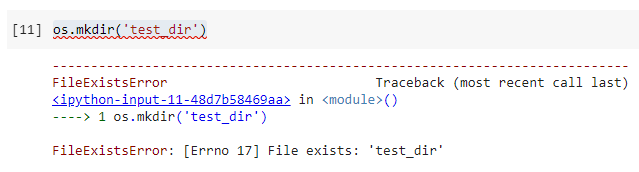
Именно поэтому рекомендуется всегда проверять наличие каталога с определенным названием перед созданием нового:
if not os.path.exists('test_dir'):
    os.mkdir('test_dir')
Еще один совет по созданию каталогов. Иногда нам нужно создать подкаталоги с уровнем вложенности 2 или более. Если мы все еще используем os.mkdir (), нам нужно будет сделать это несколько раз. В этом случае мы можем использовать os.makedirs (). Эта функция создаст все промежуточные каталоги так же, как флаг mkdir -p в системе Linux:
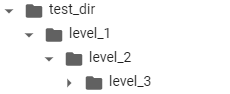
os.makedirs(os.path.join('test_dir', 'level_1', 'level_2', 'level_3'))Вот что получается в результате.
Показываем содержимое директории
Еще одна полезная команда — os.listdir(). Она показывает все содержимое каталога.
Команда отличается от os.walk (), где последний рекурсивно показывает все, что находится «под» каталогом. os.listdir () намного проще в использовании, потому что просто возвращает список содержимого:
os.listdir('sample_data')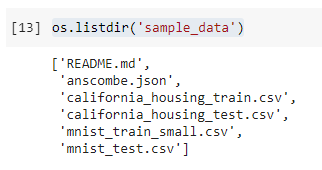
В некоторых случаях нужно что-то более продвинутое — например, поиск всех CSV-файлов в каталоге «sample_data». В этом случае самый простой способ — использовать встроенную библиотеку glob:
from glob import globlist(glob(os.path.join('sample_data', '*.csv')))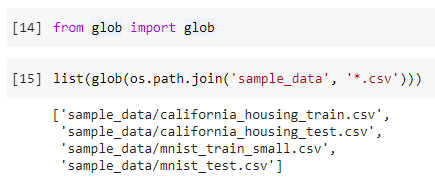
Перемещение файлов
Самое время попробовать переместить файлы из одной папки в другую. Рекомендованный способ — еще одна встроенная библиотека shutil.
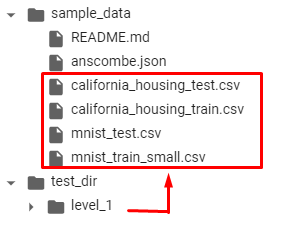
Сейчас попробуем переместить все CSV-файлы из директории «sample_data» в директорию «test_dir». Ниже — пример кода для выполнения этой операции:
import shutilfor file in list(glob(os.path.join('sample_data', '*.csv'))):
    shutil.move(file, 'test_dir')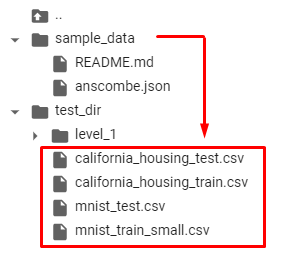
Кстати, есть два способа выполнить задуманное. Например, мы можем использовать библиотеку OS, если не хочется импортировать дополнительные библиотеки. Как os.rename, так и os.replace подходят для решения задачи.
Но обе они недостаточно «умные», чтобы позволить перемесить файлы в каталог.
Чтобы все это работало, нужно явно указать имя файла в месте назначения. Ниже — код, который это позволяет сделать:
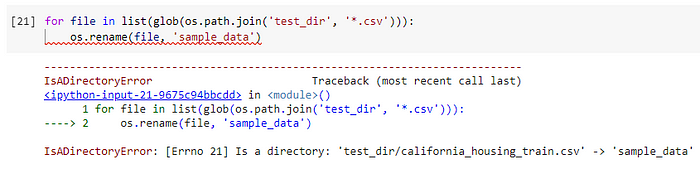
for file in list(glob(os.path.join('test_dir', '*.csv'))):
    os.rename(
        file,
        os.path.join(
            'sample_data',
            os.path.basename(file)
    ))
Здесь функция os.path.basename () предназначена для извлечения имени файла из пути с любым количеством компонентов.
Другая функция, os.replace (), делает то же самое. Но разница в том, что os.replace () не зависит от платформы, тогда как os.rename () будет работать только в системе Unix / Linux.
Еще один минус — в том, что обе функции не поддерживают перемещение файлов из разных файловых систем, в отличие от shutil.
Поэтому я рекомендую использовать shutil.move () для перемещения файлов.
Копирование файлов
Аналогичным образом shutil подходит и для копирования файлов по уже упомянутым причинам.
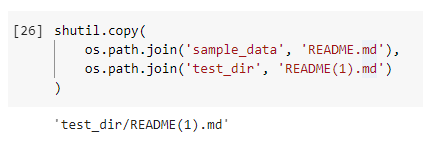
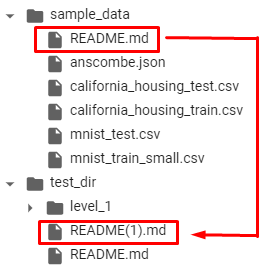
Если нужно скопировать файл README.md из папки «sample_data» в папку «test_dir», поможет функция shutil.copy():
shutil.copy(
    os.path.join('sample_data', 'README.md'),
    os.path.join('test_dir')
)
Удаление файлов и папок
Теперь пришел черед разобраться с процедурой удаления файлов и папок. Нам здесь снова поможет библиотека OS.
Когда нужно удалить файл, нужно воспользоваться командой os.remove():
os.remove(os.path.join('test_dir', 'README(1).md'))Если требуется удалить каталог, на помощь приходит os.rmdir():
os.rmdir(os.path.join('test_dir', 'level_1', 'level_2', 'level_3'))
Однако он может удалить только пустой каталог. На приведенном выше скриншоте видим, что удалить можно лишь каталог level_3. Что если мы хотим рекурсивно удалить каталог level_1? В этом случае зовем на помощь shutil.
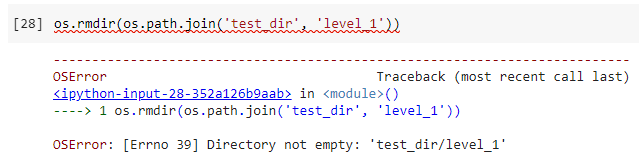
Функция shutil.rmtree() сделает все, что нужно:
shutil.rmtree(os.path.join('test_dir', 'level_1'))Пользоваться ею нужно с осторожностью, поскольку она безвозвратно удаляет все содержимое каталога.
Собственно, на этом все. 8 важных операций по работе с файлами и каталогами в среде Python мы знаем. Что касается ссылки, о которой говорилось в анонсе, то вот она — это Google Colab Network с содержимым, готовым к запуску.

-
Главная
-
Инструкции
-
Python
-
Работа с модулем pathlib в Python 3

Порой разработчику приходится отойти от мира программной абстракции и обратиться к практическим вещам. Например, к файловой системе. Манипуляции путями файловых систем в Python 3 реализуется несколькими библиотеками. Одна из них — pathlib. И в этой статье мы хотели бы вам рассказать о том, как использовать модуль pathlib и решать практические задачи с помощью него.
Файловая система
Прежде, чем перейти непосредственно к практической части применения библиотеки pathlib, необходимо повторить матчасть и обсудить основную концепцию файловой системы и её терминологию.
Итак, у нас есть файл example.exe расположенный в C:Program Files (файловая система Windows). У этого файла есть 4 основные характеристики с точки зрения файловой системы:
- Путь — это идентификатор файла, определяющий его местонахождение в файловой системе, исходя из последовательности названий каталогов. Их разделяют на два типа:
- Абсолютный путь — полный путь файла, начинающийся с корневого каталога. Например, C:Program Filesexample.exe
- Относительный путь — путь к файлу относительно другого каталога. Например, Program Filesexample.exe
- Каталог (C:Program Files) — это объект в файловой системе, необходимой для иерархической организации файловой системы. Иногда его называют директория или папка. Название «папка» отлично описывает практическое название этого объекта — удобное хранение и быстрое нахождение при необходимости.
- Расширение (.exe) — это формат файла. С помощью расширения пользователь или программы определяют тип данных, хранящихся в файле (видео, текст, музыка и т.д.).
Экземпляры Path
Импортируем модуль pathlib для манипуляции путями файловых систем:
from pathlib import *Классы этого модуля можно разбить на два типа: Pure (или «чистые») и Concrete (или «конкретные»). Первые нужны для абстрактной вычислительной работы с путями, при которой не осуществляется непосредственное взаимодействие с файловой системой ОС. Вторые же необходимы для взаимодействия с ней (создания и удаление директорий, чтения файлов и т.д.).
Если вы не уверены, какой класс подходит для выполнения вашей задачи, то, скорее всего, класс Path будет в самый раз. Он позволяет взаимодействовать с файловой системой ОС, под которую сам подстраивается (UNIX или Windows), но и при этом ваша манипуляция путями не страдает от ограничений. В рамках этой статьи мы рассмотрим все классы и их применение, но сосредоточимся конкретно на Path.
Итак, начнем с малого. Создадим переменную с типом данных Path:
>>> PathExample = Path('Timeweb', 'Cloud', 'Pathlib')
>>> PathExample
WindowsPath('Timeweb/Cloud/Pathlib')
Как видим, модуль сам подстроился под операционную систему — в нашем случае Windows 10. Конструктор Path(args) создает новый экземпляр класса Path и на вход принимает его компоненты (директории, файлы, другие пути).
Путь PathExample — относительный. Чтобы он стал абсолютным необходимо добавить корневой каталог.
С помощью методов Path.home() и Path.cwd() мы можем получить каталог текущего пользователя и текущую рабочую папку:
>>> Path.home()
WindowsPath('C:/Users/Blog)
>>> Path.cwd()
WindowsPath('C:/Users/Blog/AppData/Local/Programs/Python/Python310')
Сделаем PathExample абсолютным и рассмотрим другие аспекты работы с pathlib:
>>> PathExample = Path.home() / PathExample
>>> PathExample
WindowsPath('C:/Users/Blog/Timeweb/Cloud/Pathlib')
С помощью оператора «/» мы можем создавать новые пути.
Атрибуты Path
Pathlib предоставляет различные методы и свойства для получения разнообразной информации о путях. Для наглядности добавим введем новую переменную AttributeExample и добавим в неё файл:
>>>AttributeExample  = PathExample / 'file.txt'
>>> AttributeExample
WindowsPath('C:/Users/Blog/Timeweb/Cloud/Pathlib/file.txt')
Диск
Чтобы узнать букву или имя диска, необходимо использовать свойство.drive:
>>> AttributeExample.drive
'C:'
Родительские каталоги
Мы можем получить родительские каталоги с помощью двух свойств: parent и parents[n].
Parent возвращает родительский каталог:
>>> AttributeExample.parent
WindowsPath('C:/Users/Blog/Timeweb/Cloud/Pathlib')
Чтобы получить более «высокие» родительские каталоги, можно использовать parent несколько раз:
>>> AttributeExample.parent.parent
WindowsPath('C:/Users/Blog/Timeweb/Cloud')
Или воспользоваться свойством parents[n], который возвращает n-го предка:
>>> AttributeExample.parents[3]
WindowsPath('C:/Users/Blog)
Имя
Для получения имени файла нужно использовать свойство .name:
>>> AttributeExample.name
'file.txt'
Расширение
Для того, чтобы получить расширение файла, необходимо использовать свойство .suffix или .suffixes (при наличии двойного расширения, например .tar.gz):
>>> AttributeExample.suffix
'.txt'
>>> Path('file.tar.gz').suffixes
['.tar', '.gz']Абсолютный или относительный путь
Мы можем определить, является ли путь абсолютным, с помощью метода .is_absolute():
>>> AttributeExample.is_absolute()
True
Составные части
Мы можем разложить путь на компоненты с помощью свойства .parts:
>>> AttributeExample.parts
('C:\', 'Users', ‘Blog’, 'Timeweb', 'Cloud', 'Pathlib', 'file.txt')
Сравнение путей
Мы можем сравнивать пути как с помощью операторов сравнения, так и с помощью различных методов.
Операторы сравнения
Мы можем узнать, являются ли пути одинаковыми:
>>>Path('timeweb') == Path('TIMEWEB')
True
Стоит упомянуть, что такое же сравнение для UNIX-систем будет давать результат False:
>>> PurePosixPath('timeweb') == PurePosixPath('TIMEWEB')
False
Это связано с тем, что в Windows регистр не имеет значения в имени директории, в отличие от файловой системы UNIX-систем.
Методы сравнения
Мы можем узнать, является ли один путь частью другого, с помощью метода .is_relative_to():
>>> CompareExample = AttributeExample
>>> CompareExample.is_relative_to('C:')
True
>>> CompareExample.is_relative_to('D:/')
FalseТакже можно использовать шаблоны для проверки с помощью метода .match():
>>> CompareExample.match('*.txt')
True
Создание и удаление папок и файлов
Для создания папок с помощью модуля pathlib необходимо использовать метод .mkdir(parents = True/False, exist_ok =True/False). Метод получает на вход (помимо пути, по которому нужно создать папку) 2 логические переменные: parents и exist_ok.
Если значение parents = True, то метод создаст родительские каталоги (при их отсутствии). Если False, то вернет ошибку при их отсутствии.
Exist_ok отвечает за обработку ошибок, возникающих при существовании целевой папки.
Создадим папку CreateExample, но сначала проверим, есть ли уже такая директория с помощью метода .is_dir():
>>> CreateExample = CompareExample
>>> CreateExample.is_dir()
False
Теперь попробуем его создать:
>>> CreateExample.mkdir(parents = True, exist_ok = True)
>>> CreateExample.is_dir()
True
Проверим папку в проводнике:
Как видим, появилась именно папка, а не файл. Чтобы создать пустой файл, необходимо использовать метод .touch(). Но сначала удалим папку file.txt с помощью метода .rmdir():
>>> CreateExample.rmdir()
>>> CreateExample.touch()
>>> CreateExample.is_file()
True
Для удаления файлов существует метод .unlink().
Поиск файлов
На основе имеющегося каталога создадим более сложную структуру:
>>> SearchingExample = CreateExample>>> Hosting = Path(SearchingExample.parents[2],'hosting/host.txt')
>>> Hosting.parent.mkdir(parents=True, exist_ok = True)
>>> Hosting.touch()
>>> Docker = Path(SearchingExample.parents[1],'Docker/desk.txt')
>>> Docker.parent.mkdir(parents=True, exist_ok = True)
>>> Docker.touch()
Мы создали и получили такую структуру (начиная с C:UsersBlogTimeweb):
Cloud
|— Pathlib
|    `— file.txt
`— Docker
        `— desk.txt
Hosting
`— host.txt
Использование модуля pathlib для поиска файлов подразумевает применение цикла for и метода .glob():
>>> for file_cloud in SearchingExample.parents[2].glob('*.txt'):
    print(file_cloud)
Этот код не смог ничего найти, так как он не рассматривал вложенные папки. Чтобы он корректно работал, необходимо его немного изменить:
>>> for file_cloud in SearchingExample.parents[2].glob('**/*.txt'):
    print(file_cloud)
...
...
C:UsersBlogTimewebCloudDockerdesk.txt
C:UsersBlogTimewebCloudPathlibfile.txt
C:UsersBlogTimewebhostinghost.txt
Чтение и запись в файл
Обе операции можно выполнять как в текстовом, так и в бинарном режиме. Мы сосредоточимся на первом варианте. Для работы с содержимым файла pathlib предоставляет 4 метода:
- Чтение: .read_text() и .read_bytes();
- Запись: .write_text() и .write_bytes();
Запишем какую-нибудь важную информацию в файл, которую просто необходимо запомнить. Например, «Timeweb Cloud предлагает очень крутые облачные серверы!». Действительно, такое лучше где-нибудь записать:
>>> WRExample = SearchingExample >>> WRExample.is_file()
True
>>> WRExample.write_text('Timeweb Cloud предлагает очень крутые облачные серверы!')
55 #Длина сообщения
>>> WRExample.read_text()
'Timeweb Cloud предлагает очень крутые облачные серверы!'
glob is useful if you are doing this in within python, however, your shell may not be passing in the * (I’m not familiar with the windows shell).
For example, when I do the following:
import sys
print sys.argv
On my shell, I type:
$ python test.py *.jpg
I get this:
['test.py', 'test.jpg', 'wasp.jpg']
Notice that argv does not contain "*.jpg"
The important lesson here is that most shells will expand the asterisk at the shell, before it is passed to your application.
In this case, to get the list of files, I would just do sys.argv[1:]. Alternatively, you could escape the *, so that python sees the literal *. Then, you can use the glob module.
$ getFileNames.py "*.jpg"
or
$ getFileNames.py *.jpg