
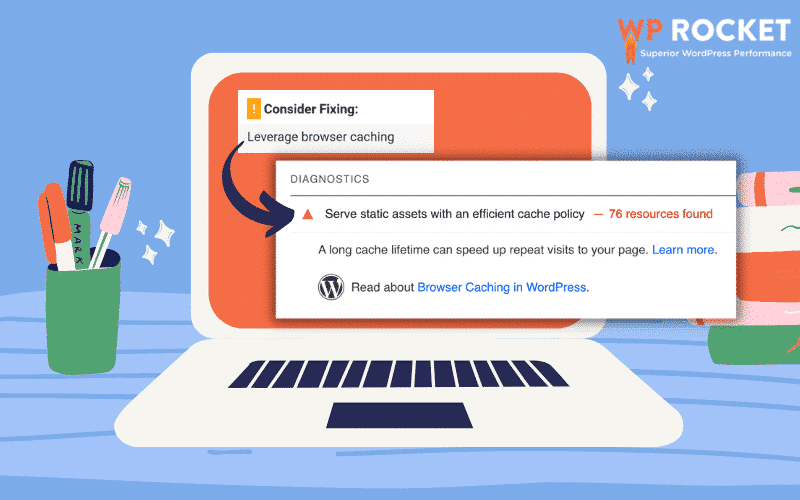
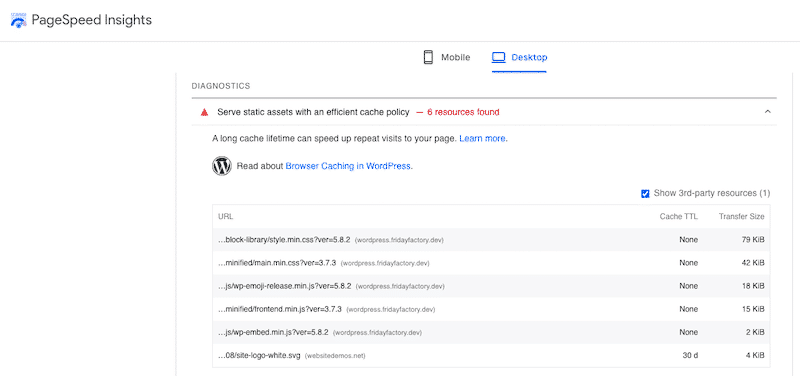
PageSpeed Insights wants you to serve static assets with a cache policy of 31536000 seconds (equivalent to 1 year).
The first step is to learn which files need to be fixed which you can see in PSI or a browser caching checker. If the files are served by a third-party domain like Google Analytics or Tag Manager, you should host them locally (so you can control the cache policy) or delay them. Perfmatters, Flying Scripts, and some cache plugins can host files locally and delay JavaScript.
If files are already hosted locally but you still get errors, you’ll need to find settings in your hosting account or .htaccess to edit cache expirations. Do a Google search for “static cache expiration [your host]” to look for instructions (for example, see instructions for Cloudways and Kinsta). Some hosts will require you to change the cache expiration by editing .htaccess.
CDNs and some cache plugins do this too. Cloudflare has a setting to increase browser cache TTL to 1 year. LiteSpeed Cache and W3 Total Cache have a setting to change the browser cache TTL. Otherwise, you’ll need to change it in your server settings or .htaccess to fix this item in PSI. If everything else fails, contact your host since cache expirations are usually set at a server level.
1. Learn Which Files Need Longer Cache Expirations
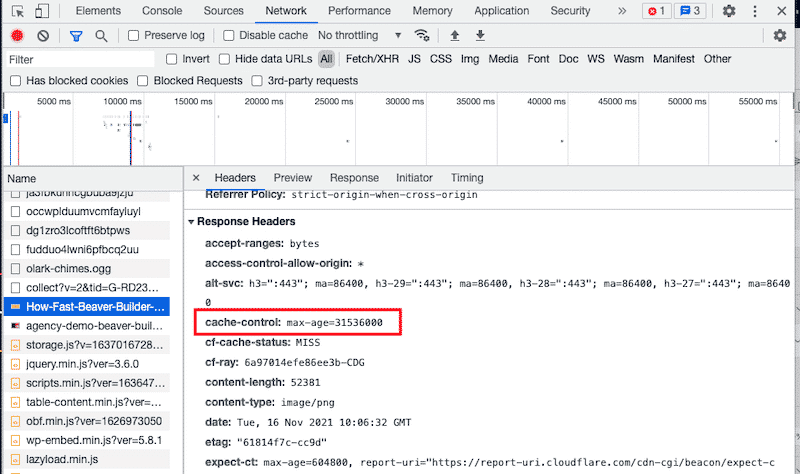
Browser caching checker shows a list of assets with their expiration time.
You can immediately see whether short cache expiration times are caused by assets served from your domain, your CDN, or third-party domains like Google Fonts and Google Analytics.

2. Increase Browser Cache TTL In Cloudflare
Assuming you’re using Cloudflare’s CDN by activating the orange cloud to proxy traffic, you can set browser cache TTL to “1 year” in the Cloudflare dashboard under Caching → Configuration.

Other CDNs usually have a similar option. For example, BunnyCDN can change browser cache expiration time to 1 year under Pullzone → Your Website → Cache → Browser Cache Expiration.
3. Increase Browser Cache TTL In WP Rocket
WP Rocket doesn’t have a browser cache TTL setting. Instead, they add cache expirations to your .htaccess file automatically, which looks like this:
# Expires headers (for better cache control)

ExpiresActive on
    ExpiresDefault                              "access plus 1 month"
    # cache.appcache needs re-requests in FF 3.6 (~Introducing HTML5)
    ExpiresByType text/cache-manifest           "access plus 0 seconds"
    # Your document html
    ExpiresByType text/html                     "access plus 0 seconds"
    # Data
    ExpiresByType text/xml                      "access plus 0 seconds"
    ExpiresByType application/xml               "access plus 0 seconds"
    ExpiresByType application/json              "access plus 0 seconds"
    # Feed
    ExpiresByType application/rss+xml           "access plus 1 hour"
    ExpiresByType application/atom+xml          "access plus 1 hour"
    # Favicon (cannot be renamed)
    ExpiresByType image/x-icon                  "access plus 1 week"
    # Media: images, video, audio
    ExpiresByType image/gif                     "access plus 4 months"
    ExpiresByType image/png                     "access plus 4 months"
    ExpiresByType image/jpeg                    "access plus 4 months"
    ExpiresByType image/webp                    "access plus 4 months"
    ExpiresByType video/ogg                     "access plus 4 months"
    ExpiresByType audio/ogg                     "access plus 4 months"
    ExpiresByType video/mp4                     "access plus 4 months"
    ExpiresByType video/webm                    "access plus 4 months"
    # HTC files  (css3pie)
    ExpiresByType text/x-component              "access plus 1 month"
    # Webfonts
    ExpiresByType font/ttf    "access plus 4 months"
    ExpiresByType font/otf    "access plus 4 months"
    ExpiresByType font/woff   "access plus 4 months"
    ExpiresByType font/woff2  "access plus 4 months"
    ExpiresByType image/svg+xml                 "access plus 1 month"
    ExpiresByType application/vnd.ms-fontobject "access plus 1 month"
    # CSS and JavaScript
    ExpiresByType text/css                      "access plus 1 year"
    ExpiresByType application/javascript        "access plus 1 year"
The problem is that even when you change the expiration values to 1 year, WP Rocket automatically regenerates the .htaccess file once you save changes. Which means, it won’t save.
You can try adding custom rules to your .htaccess file or WP Rocket also recommends checking with your host to make sure they don’t block WP Rocket rules and that Mod_expires is enabled.
If you don’t know how to edit .htaccess, use the Htaccess File Editor plugin.

4. Increase Browser Cache TTL In Other Cache Plugins
LiteSpeed Cache and W3 Total Cache let you change browser cache TTL in the settings. You’ll see it in LiteSpeed Cache in Cache → Browser → Browser Cache TTL. In W3 Total Cache, it’s found in Browser Cache → Expires Header Lifetime (do this for CSS, JS, fonts, and media files).


5. Search “Static Cache Expiration Instructions” For Your Host
This step is important because the cache expiration in your server usually overrides that of CDNs. (i.e. Cloudflare’s browser cache TTL respects those in your server unless they’re higher).
Instructions
- Cloudways instructions
- Kinsta instructions
Follow KeyCDN’s tutorial when using Apache or Nginx which explains why you need both cache-control and expires headers, and how to add them to Apache (.htaccess) or Nginx (server block).
Nginx Cache-Control Headers
location ~* .(png|jpg|jpeg|gif)$ {
    expires 365d;
    add_header Cache-Control "public, no-transform";
}

location ~* .(js|css|pdf|html|swf)$ {
    expires 30d;
    add_header Cache-Control "public, no-transform";
}
Nginx Expires Headers
location ~* .(jpg|jpeg|gif|png)$ {
    expires 365d;
}

location ~* .(pdf|css|html|js|swf)$ {
    expires 30d;
}
Apache Cache-Control Headers
<filesMatch ".(ico|pdf|flv|jpg|jpeg|png|gif|js|css|swf)$">
    Header set Cache-Control "max-age=2592000, public"
Apache Expires Headers
## EXPIRES CACHING ##

    ExpiresActive On
    ExpiresByType image/jpg "access 1 year"
    ExpiresByType image/jpeg "access 1 year"
    ExpiresByType image/gif "access 1 year"
    ExpiresByType image/png "access 1 year"
    ExpiresByType text/css "access 1 month"
    ExpiresByType text/html "access 1 month"
    ExpiresByType application/pdf "access 1 month"
    ExpiresByType text/x-javascript "access 1 month"
    ExpiresByType application/x-shockwave-flash "access 1 month"
    ExpiresByType image/x-icon "access 1 year"
    ExpiresDefault "access 1 month"

## EXPIRES CACHING ##
6. Delay Third-Party Code
Delaying JavaScript can fix cache policy errors caused by third-party code.
If your PageSpeed or Browser Caching Checker report includes external domains (Google Analytics, Tag Manager, FB Pixel, etc), delaying JavaScript will improve core web vital scores.
While WP Rocket and LiteSpeed Cache do this automatically, you have to manually do it in Perfmatters, FlyingPress, and Flying Scripts (free). Check their documentation or see this list of common JavaScript files to delay. You can also try delaying plugins loading below the viewport.

Common JavaScript Files To Delay
ga( '
ga('
google-analytics.com/analytics.js
analytics.js
gtagv4.js
analytics-minimal.js
/gtm.js
/gtag/js
gtag(
/gtm-
adsbygoogle.js
grecaptcha.execute
fbevents.js
fbq(
/busting/facebook-tracking/
wp-content/plugins/plugin-name
7. Host Fonts/Analytics Locally (So You Can Control Them)
Google Fonts and Google Analytics create external requests to third-party domains like fonts.gstatic.com and www.google-analytics.com. Hosting each of these locally is faster because not only does it prevent external requests, but you can control their cache expiration.

Perfmatters has settings to host fonts and analytics locally. It even has settings to reduce the size of your Google Analytics tracking code by using a smaller a script type (like analytics-minimal.js) and disabling remarketing features to prevent a second request to Doubleclick.
Some cache plugins also do it (WP Rocket hosts analytics locally but not fonts… FlyingPress hosts fonts locally but not analytics). There are also free plugins like OMGF and Flying Analytics.

8. Disable Cloudflare Email Obfuscation + Rocket Loader
Email Obfuscation adds a small piece of JavaScript (email-decode.min.js) as well as Rocket Loader (rocket-loader.min.js). Since they’re loaded from external domains, you might get errors.
I don’t recommend Rocket Loader since it’s notorious for breaking sites, and there are other ways to hide your email than using Rocket Loader, so disable them in your Cloudflare settings.

9. Purge Files And Retest Your Site
Once you’re done changing the cache expiration, purge files and retest your site. Remember that Lighthouse can take 28 days to update, so you may want to try SpeedVitals or GTmetrix.

How do I serve static assets with an efficient cache policy in WordPress?
Change browser cache expiration to 1 year (31536000 seconds). This is typically done in your hosting account, cache plugin, or CDN settings, or by editing these values in your .htaccess file. Hosting fonts/analytics locally and delaying third-party code can also help.
How do I serve static assets with an efficient cache policy in WP Rocket?
Since WP Rocket adds cache expirations to .htaccess (but regenerates it when you save settings), errors for serving static assets with an efficient cache policy are common. You might have better luck changing the cache expirations in your hosting and CDN settings.
How do I serve static assets with an efficient cache policy in Cloudflare?
Login to your Cloudflare dashboard and go to Caching → Configuration → Browser Cache TTL where you’ll change it to 1 year.
Cheers,
Tom
Do you want to know how to easily fix the leverage browser caching warning in your WordPress site? You are at the right place. Google PageSpeed Insights is a useful tool for measuring website performance, but it’s possible to be intimidated by some of its suggestions. The “Leverage browser caching” recommendation has recently been changed to “Serve static assets with an efficient cache policy”.
How to fix this warning for your WordPress site?
In this article, we will share several optimization techniques you can follow, and we’ll also explain what “Leverage Browser Caching” is. Finally, a performance test will also be conducted before and after using WP Rocket to see how easy it is to improve your Google PageSpeed score and address the browser caching issue.
What Browser Caching is and How it Works
Browser Caching Explained in Plain English
Implementing browser caching will help to reduce the server load by reducing the number of requests per page. Caching allows recent web pages to be stored temporarily in the web browser of your visitors.
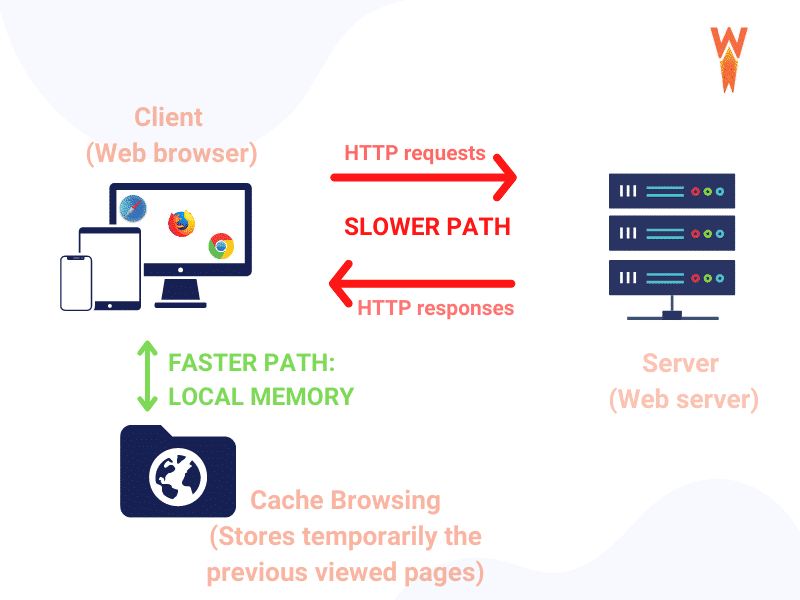
Speeding up your web page loading can be accomplished with browser caching, which stores the frequently accessed resources on local memory for faster access. All the requests are running locally rather than being sent over a network connection. As a result, your HTML pages and images are rendered faster, reducing bandwidth usage and server load.
To activate caching in the browser, we will be looking at both “Expires” and “Cache-Control” headers:
“Cache-Control” header: it’s more detailed and gives fine-grained options to control the caching behavior of the browser.
How to Check if Browser Caching is Enabled on Your Site
To check if browser caching is enabled on your WordPress site, go to Google PageSpeed Insights and run the audit with the URL of your site. If you see the “Serve static assets with an efficient cache policy” warning, then that means you are not using a cache.
Similarly, you can use GTmetrix to check if the browser caching is activated:

Finally, you can also use the “Network” tab in Chrome’s developer tools. Simply select the page that you want to analyze and check the “Headers” tab:
What Does Serve Assets With an Efficient Cache Policy Mean on PageSpeed Insights?
“Leverage Browser Caching” was a recommendation in version 4 of the PageSpeed Insights API, which was shut down in May 2019. Since Version 5, real-world data from the Chrome User Experience Report and lab data are coming from Lighthouse, which replaced the diagnostic with the “Serve assets with an efficient cache policy” warning.
“Leverage Browser Caching” (2019) → “Serve assets with an efficient cache policy” (2021)
Why Do You See the “Serve Static Assets With An Efficient Cache Policy” Issue?
Leverage browser caching means that you should specify how long web browsers should keep your files stored locally – on the visitor’s browser. There are two headers involved in browser caching, namely “Cache-Control” and “Expires”. If you see the Lighthouse’s issue, that means that both headers are missing or that their expiration period is too short.
– The resource is a font, image, media file, script, or stylesheet
– The resource has a 200, 203, or 206 HTTP status code
– The resource doesn’t have an explicit no-cache policy
There are three main reasons why Lighthouse flags your WordPress site with that issue, namely:
1. Leverage Browser Caching for Google Analytics and Tag Manager
Google Analytics is the most popular tool when it comes to statistics of your WordPress site. However, the code in the “analytics.js” file goes back and forth to Google’s server, so the browser treats it every time as a new external resource. Google has set a 2 hours cache policy that is too short for Lighthouse, which triggers the warning.
2. Leverage Browser Caching for Other Third-Party and External Scripts
Sometimes, you may use plugins that require adding some additional scripts from another server, such as a YouTube video or your Instagram feed. Some plugin authors have set up a cache policy on their scripts.
3. Nginx Servers Where The Expiry Headers Are Not Properly Set
Nginx is the king of the servers to deliver content quickly. The thing is, Nginx does not use a .htaccess file, so you need to add the configuration for both headers in the main server block if you want Nginx to read them. If you don’t do that, Nginx (and Lighthouse) will not detect the expiry data properly.
To leverage browser caching on WordPress also means an improvement in the loading speed of your website because the files don’t need to be “re-downloaded”. To make things easier, we have put together a list of techniques you can use to fix leverage browser caching warnings (with and without a WordPress plugin).
How to Serve Assets With an Efficient Cache Policy with a Plugin
The easiest way to leverage browser caching is to do it with a WordPress plugin such as:
- WP Rocket is one of the best caching plugins for WordPress, allowing you to leverage browser caching in WordPress.
WP Rocket sets the optimal expiration lengths for certain files by adding some rules via the .htaccess file.
Note: WP Rocket will work automatically on Nginx servers, but you can add some extra configuration from Github. It will add headers to cache CSS, JS, and images to leverage the browser’s cache by reducing requests to your web server.
🚀 WP Rocket automatically applies the necessary “Expires” header rules in the .htaccess file
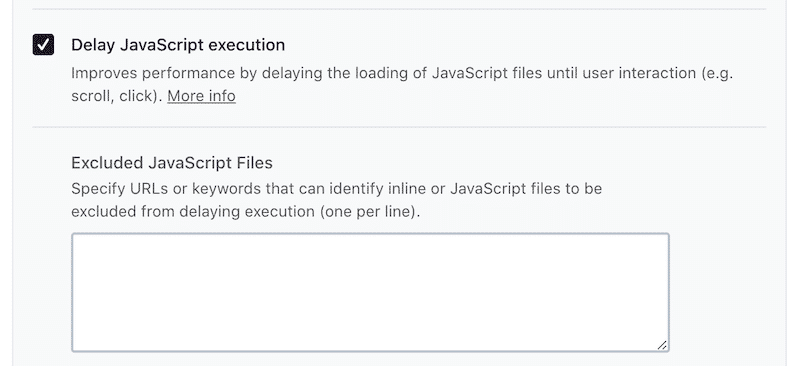
WP Rocket also comes with the Delay JavaScript option that optimizes the loading of 3rd party scripts. We can compare it as Lazy Loading but for JavaScript. WP Rocket will delay any JS scripts until there is user interaction with the web page:
Another benefit of WP Rocket is the list of compatibility exclusions to spare you the hassle of figuring out what should or shouldn’t be hosted.
- The Leverage Browser Caching plugin – limited to Apache/LiteSpeed servers where the browser cache can be controlled by using the .htaccess file (it does not work with Nginx servers). There are no options that need to be activated. It works immediately upon the activation of the plugin. It simply adds the browser caching code inside the .htaccess file.
- Complete Analysis Optimization Suite (CAOS) – fixes GA leverage browser caching warning in WordPress by hosting the analytics.js/gtag.js file locally. By default, Google sets the expiration at 2 hours, and the plugin simply overrides this setting. Note that CAOS won’t work with any other GA’s related plugin.
![]()
How to Serve Assets With an Efficient Cache Policy Without a Plugin
There are a few techniques you can use to set up your static asset cache manually. The first thing you need to do is figure out which web server is used for serving files on the website, then follow these instructions accordingly:
1. Add “Cache-Control” and “Expires” Headers in Nginx
First, find your server block usually located at /etc/nginx/site-enabled/default.
Then, add the following code snippets with the number of days until expiration next to the “expires” line:
“Cache-Control” header in Nginx:
location ~* .(png|jpg|jpeg|gif)$ {
    expires 365d;
    add_header Cache-Control "public, no-transform";
}

location ~* .(js|css|pdf|html|swf)$ {
    expires 30d;
    add_header Cache-Control "public, no-transform";
}
“Expire” header in Nginx:
location ~* .(jpg|jpeg|gif|png)$ {
    expires 365d;
}

location ~* .(pdf|css|html|js|swf)$ {
    expires 30d;
}
2. Add Cache-Control Header in Apache
For Apache servers, simply put the following code in your .htaccess file:
# Expires headers (for better cache control)
<IfModule mod_expires.c>
ExpiresActive on
    ExpiresDefault                              "access plus 1 month"
    # cache.appcache needs re-requests in FF 3.6 (thanks Remy ~Introducing HTML5)
    ExpiresByType text/cache-manifest           "access plus 0 seconds"
    # Your document html
    ExpiresByType text/html                     "access plus 0 seconds"
    # Data
    ExpiresByType text/xml                      "access plus 0 seconds"
    ExpiresByType application/xml               "access plus 0 seconds"
    ExpiresByType application/json              "access plus 0 seconds"
    # Feed
    ExpiresByType application/rss+xml           "access plus 1 hour"
    ExpiresByType application/atom+xml          "access plus 1 hour"
    # Favicon (cannot be renamed)
    ExpiresByType image/x-icon                  "access plus 1 week"
    # Media: images, video, audio
    ExpiresByType image/gif                     "access plus 4 months"
    ExpiresByType image/png                     "access plus 4 months"
    ExpiresByType image/jpeg                    "access plus 4 months"
    ExpiresByType image/webp                    "access plus 4 months"
    ExpiresByType video/ogg                     "access plus 4 months"
    ExpiresByType audio/ogg                     "access plus 4 months"
    ExpiresByType video/mp4                     "access plus 4 months"
    ExpiresByType video/webm                    "access plus 4 months"
    ExpiresByType image/avif                    "access plus 4 months"
    ExpiresByType image/avif-sequence           "access plus 4 months"
    # HTC files  (css3pie)
    ExpiresByType text/x-component              "access plus 1 month"
    # Webfonts
    ExpiresByType font/ttf    "access plus 4 months"
    ExpiresByType font/otf    "access plus 4 months"
    ExpiresByType font/woff   "access plus 4 months"
    ExpiresByType font/woff2  "access plus 4 months"
    ExpiresByType image/svg+xml                 "access plus 4 months"
    ExpiresByType application/vnd.ms-fontobject "access plus 1 month"
    # CSS and JavaScript
    ExpiresByType text/css                      "access plus 1 year"
    ExpiresByType application/javascript        "access plus 1 year"
</IfModule>
You can find those code snippets directly on Github or GTMetrix.
3. Self-host 3rd Party Scripts When Possible
Third-party scripts are the calls made on an external server instead of yours. The most common external scripts include advertising tags, YouTube videos, Google Maps, and web fonts.
You can increase the performance of your website by hosting third-party scripts on your server. Hosting them helps you reduce DNS lookups, round trip times and improves HTTP caching headers with advanced features like HTTP/2 server push.
Important note: Not all 3rd party scripts can be self-hosted, and some might even break if they are. Self-hosted is recommended only if any critical scripts depend upon it (e.g., jQuery). It’s acceptable not to have all 3rd party scripts with a proper browser cache policy; the performance gain is negligible when it’s just a few of them.
4. Reduce Third-Party Scripts
You may be in control of your Google PageSpeed Insights score, but third-party scripts on the page can cause problems as we don’t know what their caching policies are like. Also, all these elements have to be downloaded from different servers, which can cause performance issues, as your server needs to connect to multiple servers to download them.
While you can’t have full control over those scripts, you can still minimize their effects on your WordPress site by applying those four optimization techniques:
- Minify/Combine CSS and Minify/Combine JS – the files hosted on external domains will be processed and hosted on your own domain. Use a tool like minifycode.com to minify your code.
- Delay the execution of external JavaScript – to reduce its negative performance impact. Use the defer and async attribute to delay JS.
- Optimize Google Fonts – it does improve the performance (but does not host fonts locally).
- LazyLoad your images and videos – this will improve the performance of externally hosted images and videos. You can find more about the lazy loading script in our dedicated guide.
Do you want to apply those four techniques in a couple of clicks instead?
Let WP Rocket do the job for you!
5. Use Cloudflare browser cache Time To Live (TTL)
Cloudflare offers a CDN with 250 servers distributed internationally. The free service caches content for its users, while paid customers can customize how long their data is served up in the global cache. By default, Cloudflare honors the expiration date set in an Expires header and Cache-Control settings, but you can also specify a different time range if desired. When the TTL expires, the browser will request the asset again.

How to Easily Serve Assets With an Efficient Cache Policy With WP Rocket
Thanks to WP Rocket, it’s very easy to get rid of the browser caching warning on Google PageSpeed Insights. The plugin sets the best expiration lengths for each file by adding automatic rules via the .htaccess file.
Let’s see it in action.
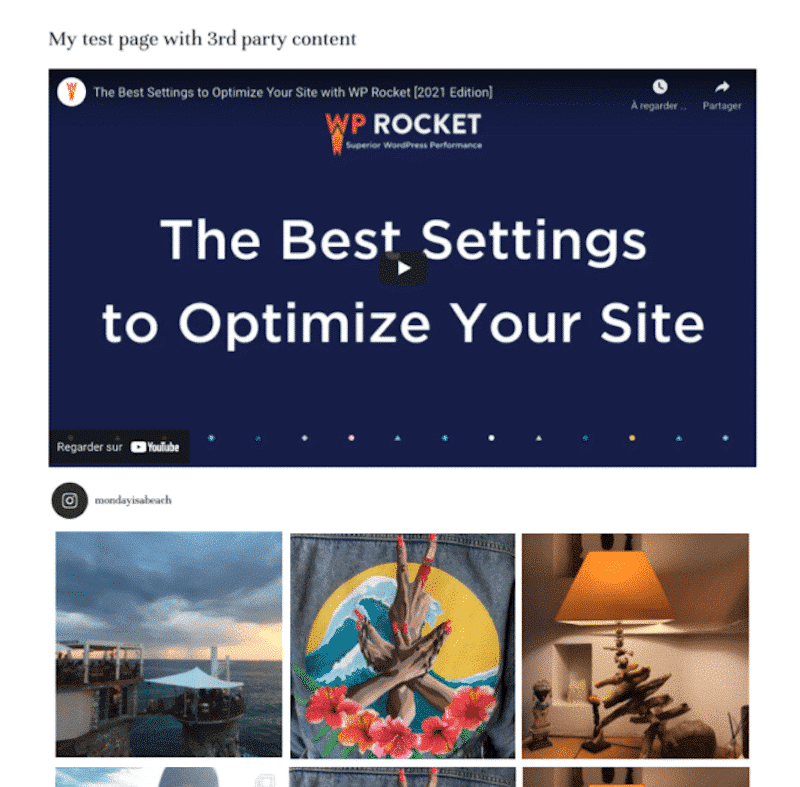
I’ve created a web page on WordPress containing some text modules, images, and third-party content (a YouTube video and my Instagram feed).
We will run the two following scenarios:
Scenario #1 – Performance score and analysis of the diagnostics and opportunities sections (no WP Rocket).
Scenario #2 – Performance score and analysis of the diagnostics sections (🚀 with WP Rocket).
Performance tool used – I will use Google PageSpeed Insights (Lighthouse) to measure our speed and performance.
Device – I’ll present results on mobile.
Let’s dive in!
Scenario #1 – Performance score and analysis of the diagnostics and opportunities sections (no WP Rocket)
My overall performance score is 52/100 on mobile, and one of my Core Web Vitals is red (Largest Contentful Paint). Other metrics such as Speed Index, Time to Interactive, First Contentful Paint, and Total Blocking Time are red.
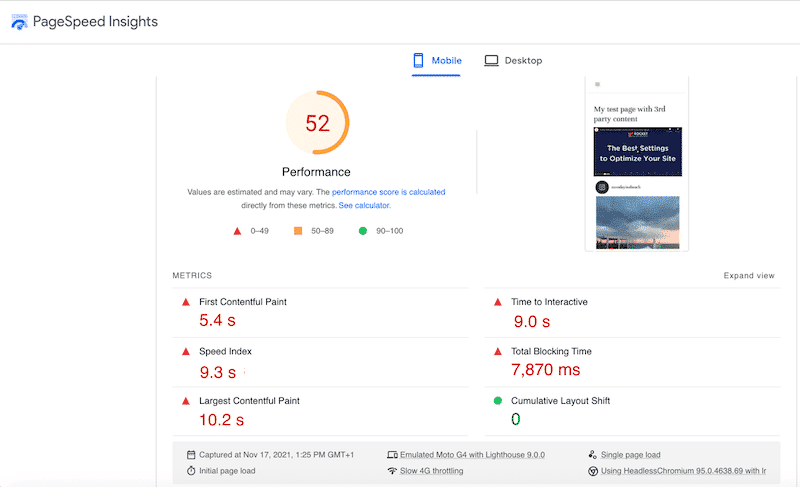
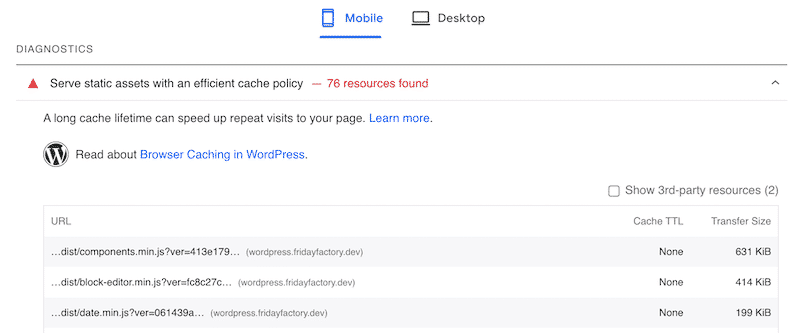
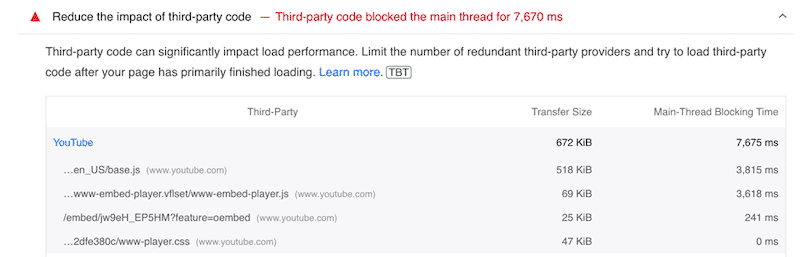
In the diagnostics section below, we can see that Lighthouse is making a few recommendations to improve my performance score:
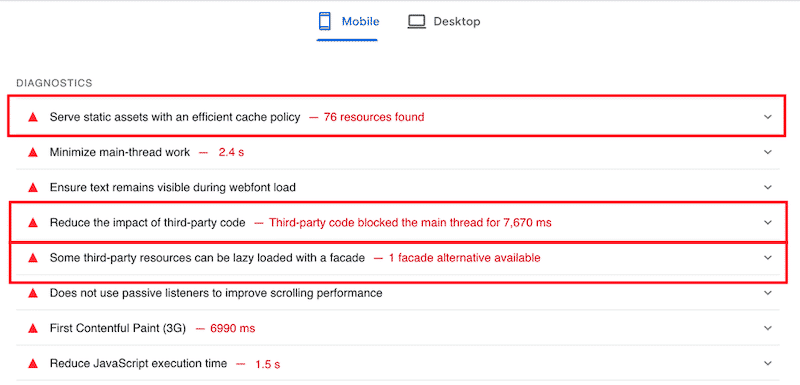
I can see three familiar recommendations:
- Serve static assets with an efficient cache policy (previously knowns as “Leverage Browser Caching” )
- Reduce the impact of third-party code
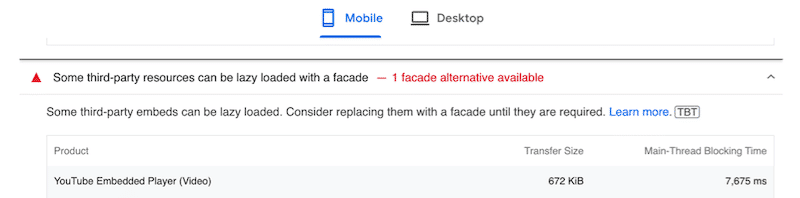
- Some third-party resources can be lazy-loaded with a facade
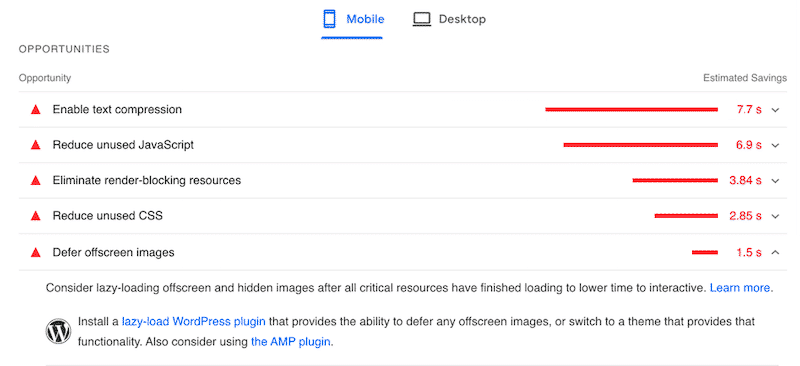
In the opportunities section, Lighthouse also tells me to enable text compression, optimize my JS/CSS code, and defer offscreen images to optimize my performance.
Now let’s activate WP Rocket to see if those performance-related warnings disappear.
Scenario #2 – Performance score and analysis of the diagnostics section (🚀 with WP Rocket)
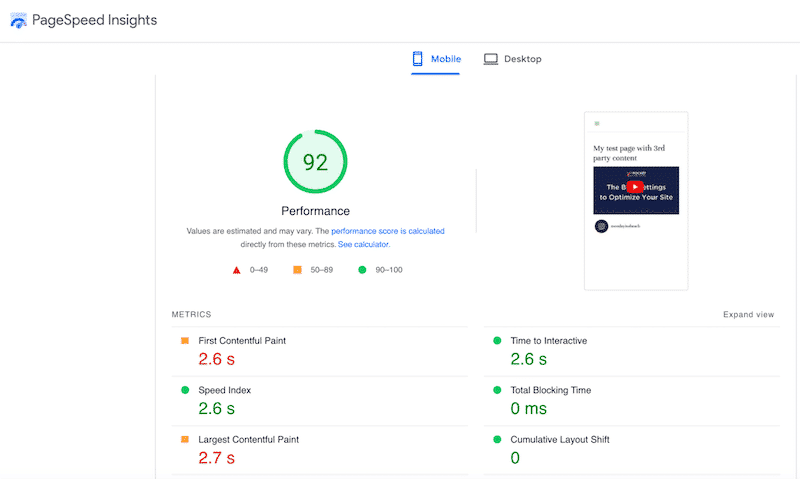
My performance is much better when WP Rocket is activated. My score on mobile went from 52/100 to 92/100, and none of my metrics are in the red anymore:
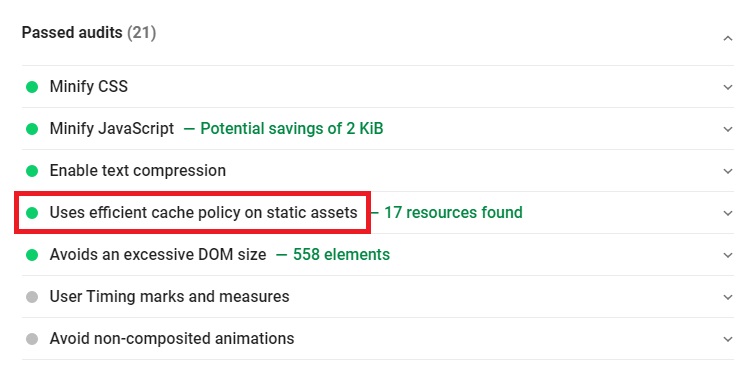
And last but not least: all my PSI issues got solved just by enabling WP Rocket! The following warnings, “uses an efficient cache policy” (previously known as leverage browser caching) “Minimize third-party usage” and “Lazy load third-party resources with facade” are now in the passed audits section:
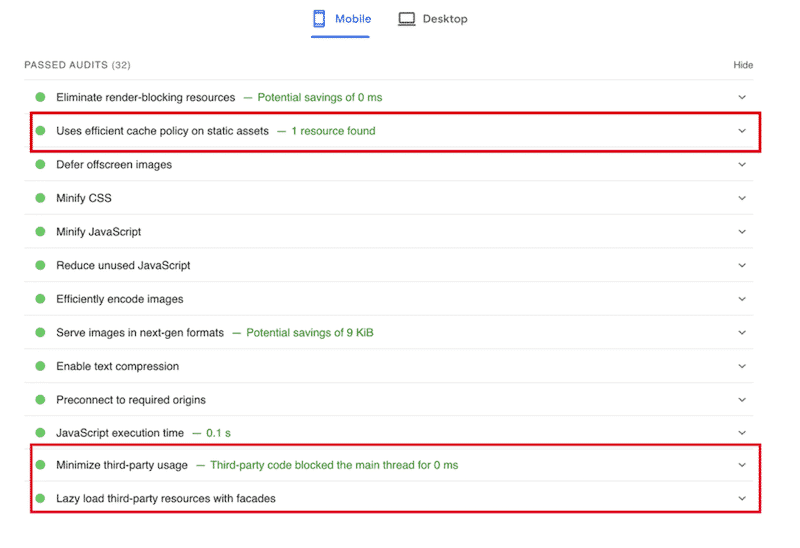
As a side note, WP Rocket also fixed other performance issues. Upon activation, I managed to minify my CSS/JS, lazy load my images, reduce my unused CSS and JS files, delay the non-critical JS and enable text compression.
Wrapping Up
Caching is crucial to ensure that your webpage loads fast for returning users. We’ve seen some manual techniques you can use to fix the leverage browser caching issue on WordPress, mainly by adding lines of code to your .htaccess file. But if you want to save time, let WP Rocket complete all the optimization process for you.
So you can automatically go from this:

To this:

WP Rocket will apply 80% of web performance best practices upon its activation, as seen in our previous section’s performance audit.
Give it a try today, and if you don’t see any improvements, you get a refund within 14 days of your purchase. See? You don’t take any risk! Simply activate WP Rocket and speed up your site right away!
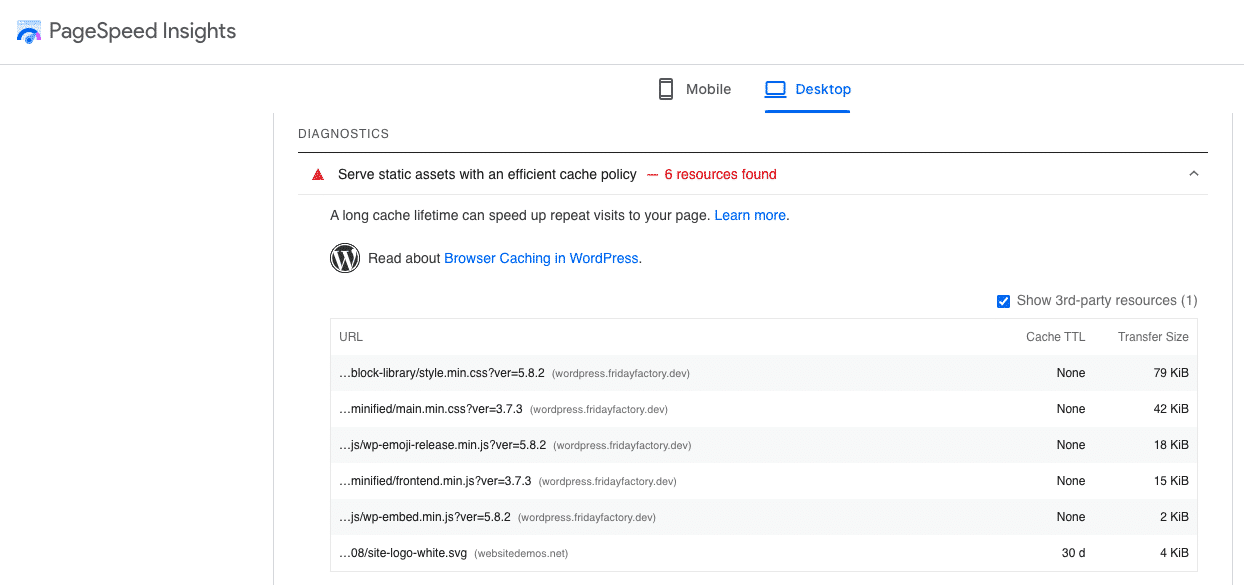
But still its keeping this error with 77 resources.
Bear in mind that some of these resources are on external domains for which you have no control.
As stated in the linked document from the PageSpeed results:
When possible, cache immutable static assets for a long time, such as a year or longer.
For one of your .jpg resources .../images/rosterelftechsupport.jpg which is reported by Google’s pagespeed insights as being cached for «30 d» it has the following HTTP response headers:
cache-control: max-age=2592000, public
expires: Thu, 12 May 2022 16:05:33 GMT
Whilst the expires header states a cache time of 1 year, the max-age directive of the cache-control header states 30 days (2,592,000 seconds). All modern browsers will prioritise the cache-control: max-age header, so «30 days» is the cache time.
ExpiresByType image/jpeg "access 1 year"
This mod_expires directive sets both the expires and the cache-control: max-age headers on .jpg (mime-type: image/jpeg) files. So, this does seem to be honoured, since the expires header is set correctly and you aren’t explicitly setting this anywhere else.
<FilesMatch ".(jpg|jpeg|png|gif|swf)$">
    Header set Cache-Control "max-age=604800, public"
</FilesMatch>
However, any Header set Cache-Control (mod_headers) directive, such as this, will override the Cache-Control header set by mod_expires and affect the cache time. So, it would seem you may still have a rogue Header directive?
You certainly don’t need both. If you are using mod_expires then only use mod_expires. You do not need mod_headers for this. In other words, you should remove all <FilesMatch ...> Header set Cache-Control ... </FilesMatch> blocks (such as that above) since they are directly conflicting with the mod_expires directives (ie. ExpiresByType).
The only reason to use a mod_headers Header set Cache-Control ... directive is if mod_expires was not available on your server. The only reason to use both mod_expires and mod_headers here is if you are installing your application on multiple servers and it is expected that mod_expires is not installed on all servers (unlikely). In which case, the mod_headers directives should be enclosed inside a <IfModule !mod_expires.c> container (ie. «if mod_expires is not available»), otherwise mod_headers will always take priority (as mentioned above).
You need to make sure the browser and any intermediary proxy caches are clear before testing, since this resource has been cached for «30 days».
UPDATE:
I have removed FilesMatch from file and also checked in my «Private Window» of my browser and opened the website and then ran the «Pagespeed Insights» .. but its still showing around 56 resources not cached including png images etc.
All the .jpg and .png images served from your domain are no longer present in that report, so they would seem to be «resolved».
The remaining 8 .png images that are still showing in the report and have no Cache-Control or Expires headers are being served directly from s3-ap-southeast-2.amazonaws.com — which your directives are not necessarily going to influence. You may need to check the settings on your S3 bucket?
...config/176…?v=2.9.39&r=stable(connect.facebook.net) 20m
You have 7 resources served from external 3rd parties (such as this) which you have no control over.
...industries/nonprofit.svg(www.rosterelf.com)                30 d

ExpiresByType image/svg+xml "access plus 1 month"
You have 22 .svg images served from your domain. These are all served with a image/svg+xml content-type. As you can see from the above ExpiresByType directive these are «only» set to be cached for a period of «1 month» (ie. 30 days). If you want these to be cached for a longer period then change the above directive as you have already done for JPEG and PNG files.
...js/swiper-bundle.min.js(www.rosterelf.com)                 30 d

ExpiresByType application/javascript "access plus 1 month"
You have 11 .js files served from your domain — all served with an application/javascript content-type. Change the above ExpiresByType directive accordingly if you want these files to be cached for longer.
HOWEVER, you should note that Google’s PageSpeed report is only a «suggestion». Only change this (and other caching directives) if it makes sense for your system. You will have issues if these files need to be changed before the cache expires unless you have implemented some other cache-busting technique.
This also means that the following directives are entirely superfluous and can be removed:
ExpiresByType text/javascript "access plus 1 month"
ExpiresByType text/x-javascript "access plus 1 month"
Your server is sending .js responses with the correct application/javascript mime-type, so setting caching directives for text/javascript and text/x-javascript as well is not required.
...css/custom.min.css(www.rosterelf.com)                     30 d

ExpiresByType text/css "access plus 1 month"
You have 6 .css files served from your domain. The same applies above as for .js files.
... fonts/social-media-icon.ttf?lvmhu5(www.rosterelf.com) 30 d
You have 6 .ttf (font) files. Yes, these should certainly be cached for a longer period. These are all served with an application/font-sfnt*1 mime/content-type. However, you do not explicitly have a directive that covers this, so it will default to the ExpiresDefault (ie. 1 month). You need to add the appropriate directive for this mime-type. For example:
ExpiresByType application/font-sfnt "access plus 1 year"
(*1 application/font-sfnt is actually deprecated in favour of font/sfnt.)
This might mean that all the following (font-caching) directives are superfluous, if you are not serving these file-types?
ExpiresByType font/opentype "access plus 1 month"
ExpiresByType application/vnd.ms-fontobject "access plus 1 month"
ExpiresByType application/x-font-ttf "access plus 1 month"
ExpiresByType application/font-woff "access plus 1 month"
ExpiresByType application/font-woff2 "access plus 1 month"
ExpiresByType image/vnd.microsoft.icon "access plus 1 year"

# Fonts
ExpiresByType font/ttf "access plus 1 year"
ExpiresByType font/otf "access plus 1 year"
ExpiresByType font/woff "access plus 1 year"
ExpiresByType font/woff2 "access plus 1 year"
ExpiresByType application/font-woff "access plus 1 year"
And to emphasise my comment above… the results from Google’s PageSpeed report (and any other SEO report) are only advisory… a possible suggestion. It is not necessarily «wrong» to serve resources with a shorter cache time. These «suggestions» are not meant to be followed blindly. Do not implement long cache times to simply satisfy the report. Only if it makes sense to your application should these resources be cached for longer periods.
HTTP caching can speed up your page load time on repeat visits.
When a browser requests a resource, the server providing the resource can tell the browser how long it should temporarily store or cache the resource. For any subsequent request for that resource, the browser uses its local copy rather than getting it from the network.
How the Lighthouse cache policy audit fails
Lighthouse flags all static resources that aren’t cached:

Lighthouse considers a resource cacheable if all the following conditions are met:
- The resource is a font, image, media file, script, or stylesheet.
- The resource has a
200,203, or206HTTP status code. - The resource doesn’t have an explicit no-cache policy.
When a page fails the audit, Lighthouse lists the results in a table with three columns:
| URL | The location of the cacheable resource |
| Cache TTL | The current cache duration of the resource |
| Size | An estimate of the data your users would save if the flagged resource had been cached |
How to cache static resources using HTTP caching
Configure your server to return the Cache-Control HTTP response header:
Cache-Control: max-age=31536000The max-age directive tells the browser how long it should cache the resource in seconds. This example sets the duration to 31536000, which corresponds to 1 year: 60 seconds × 60 minutes × 24 hours × 365 days = 31536000 seconds.
You should cache immutable static assets for a long time, such as a year or longer.
One risk of long cache durations is that your users won’t see updates to static files. You can avoid this issue by configuring your build tool to embed a hash in your static asset filenames so that each version is unique, prompting the browser to fetch the new version from the server. (To learn how to embed hashes using webpack, see webpack’s Caching guide.)
Use no-cache if the resource changes and freshness matters, but you still want to get some of the speed benefits of caching. The browser still caches a resource that’s set to no-cache but checks with the server first to make sure that the resource is still current.
A longer cache duration isn’t always better. Ultimately, it’s up to you to decide what the optimal cache duration is for your resources.
There are many directives for customizing how the browser caches different resources. Learn more about caching resources in The HTTP cache: your first line of defense guide and Configuring HTTP caching behavior codelab.
To see which resources the browser is getting from its cache, open the Network tab in Chrome DevTools:
- Press
Control+Shift+J(orCommand+Option+Jon Mac) to open DevTools. - Click the Network tab.
The Size column in Chrome DevTools can help you verify that a resource has been cached:

Chrome serves the most requested resources from the memory cache, which is very fast, but is cleared when the browser is closed.
To verify a resource’s Cache-Control header is set as expected, check its HTTP header data:
- Click the URL of the request, under the Name column of the Requests table.
- Click the Headers tab.

Cache-Control header via the Headers tab.
Stack-specific guidance
Drupal
Set the Browser and proxy cache maximum age in the Administration > Configuration > Development page. See Drupal performance resources.
Joomla
See Cache.
WordPress
See Browser Caching.
Resources
- Source code for Serve static assets with an efficient cache policy audit
- Cache-Control specification
- Cache-Control (MDN)
Updated on Friday, October 4, 2019 • Improve article
Table of contents
- How the Lighthouse cache policy audit fails
- How to cache static resources using HTTP caching
- How to verify cached responses in Chrome DevTools
- Stack-specific guidance
- Drupal
- Joomla
- WordPress
- Resources
The “Serve static assets with an efficient cache policy” or “Leverage browser caching” is one of the metrics used by Google PageSpeed Insights and similar website performance testing tools as a suggestion to improve page loading times. In short, leverage browser storage to speed up your website!
The warning indicates that the website doesn’t have an efficient cache policy, which means it’s not using the browser storage to cache static resources like images, CSS, JS, etc. You need to fix the warning to improve page load times on repeat visits by storing these files locally in the user’s browser.

By setting browser caching rules, you can specify how long web browsers should keep your website’s static assets (images, CSS, JS, etc.) stored locally. And the user’s browser will download less data while navigating through pages, which will improve the page loading speed of your website.
Browser caching will surely help your website to reduce bandwidth consumption and the number of server requests. And that’s why it’ll improve the user experience and SEO (Search Engine Optimization) rankings of your site as loading speed is one of the ranking factors for search rankings.
In this tutorial, we’ll learn to fix the browser caching warning by setting up an efficient cache policy in the Apache (through .htaccess file) and Nginx (through nginx.conf file) servers.
Fix Leverage Browser Caching Warning in Apache
You can easily fix the leverage browser caching warning in Apache servers by putting custom rules to the .htaccess file. You can find the .htaccess file in your website’s root folder.
Here are the custom rules for the .htaccess file to fix the browser caching issue for the static files or serve static assets with an efficient cache policy for your website:
## Different Content Types
<IfModule mod_mime.c>
    AddType text/css .css
    AddType application/x-javascript .js
    AddType application/json .json
    AddType text/xml .xml
    AddType image/gif .gif
    AddType image/jpeg .jpe .jpg .jpeg
    AddType image/png .png
    AddType image/svg+xml .svg
    AddType image/x-icon .ico
    AddType image/webp .webp
    AddType audio/ogg .ogg
    AddType audio/mpeg .mp3 .m4a
    AddType video/mp4 .mp4 .m4v
    AddType video/webm .webm
    AddType application/pdf .pdf
    AddType application/font-woff .woff
    AddType application/font-woff2 .woff2
    AddType application/vnd.ms-fontobject .eot
    AddType application/x-font-ttf .ttf
</IfModule>
## Set Browser Caching Expires Rules
<IfModule mod_expires.c>
    ExpiresActive On
    # Web files
    ExpiresByType text/css "access plus 1 year"
    ExpiresByType application/javascript "access plus 1 year"
    ExpiresByType application/x-javascript "access plus 1 year"
    ExpiresByType application/x-web-app-manifest+json "access plus 0 seconds"
    ExpiresByType application/xml "access plus 0 seconds"
    ExpiresByType application/atom+xml "access plus 1 hour"
    ExpiresByType application/rss+xml "access plus 1 hour"
    ExpiresByType text/cache-manifest "access plus 0 seconds"
    ExpiresByType text/xml "access plus 0 seconds"
    # Media files
    ExpiresByType image/gif "access plus 1 year"
    ExpiresByType image/jpg "access plus 1 year"
    ExpiresByType image/jpeg "access plus 1 year"
    ExpiresByType image/png "access plus 1 year"
    ExpiresByType image/svg "access plus 1 year"
    ExpiresByType image/svg+xml "access plus 1 year"
    ExpiresByType image/x-icon "access plus 1 year"
    ExpiresByType audio/ogg "access plus 1 year"
    ExpiresByType video/mp4 "access plus 1 year"
    ExpiresByType video/ogg "access plus 1 year"
    ExpiresByType video/webm "access plus 1 year"
    ExpiresByType application/pdf "access plus 6 months"
    ExpiresByType application/x-shockwave-flash "access plus 1 year"
    # Font files
    ExpiresByType application/font-woff "access plus 1 year"
    ExpiresByType application/font-woff2 "access plus 1 year"
    ExpiresByType application/vnd.ms-fontobject "access plus 1 year"
    ExpiresByType application/x-font-ttf "access plus 1 year"
    ExpiresByType font/opentype "access plus 1 year"
    # Other files
    ExpiresDefault "access plus 7 days"
</IfModule>
## Set Cache Control Header
<IfModule mod_headers.c>
    <FilesMatch ".(gif|jpeg|png|ico|css|js|swf)$">
        Header set Cache-Control "public"
    </FilesMatch>
</IfModule>
Add the lines in your .htaccess file and save the file after this. That’s it! This change will add an efficient cache policy for the static assets of your site. For example, the user’s browser will store the JavaScript files of your site for 1 year, and it’ll store PDF files for 6 months.
You can change the expiry times according to your needs. However, make sure that it’s not too long because your recurring visitors might not get the latest version of your site. You should not exceed 1 year cache expiration time period as most web browsers ignore them anyway!
If you retest the website with the Google PageSpeed Insights, GTmetrix, etc. after this, you’ll no longer see the “Serve static assets with an efficient cache policy” suggestion to fix!
From now on, your website visitors will get a better speed for repeat visits to your page since the browser has stored some of the content in the web cache as your direction! As a result, your website’s search rankings will improve as page speed is one of the search ranking factors.
Your website is hosted on an Nginx server? There are custom rules for the Nginx servers as well!
Fix Leverage Browser Caching Warning in Nginx
You can add expires header or efficient cache policy for the static assets in Nginx servers by adding these rules in the nginx.conf configuration file in the “/etc/nginx/sites-enabled/default” location:
location ~* .(html|css|js|xml|json|txt)$ {
   expires 1d;
   add_header Cache-Control "public";
}

location ~* .(png|jpg|jpeg|gif|svg|ico|woff|woff2)$ {
   expires 365d;
   add_header Cache-Control "public";
}
You can adjust the expiry date to whatever you wish in this code. If you change the “365d” to the “30d” value, the user’s browser will store .jpeg files for 30 days instead of 365 days.
And that’s it! The Nginx hosted site will no longer be asked to fix the leverage browser caching warning. The site will be much faster after this, and this will result in better search rankings.
Final Thoughts
Using browser storage is one of the best techniques to improve the page speed of your website. It’s applied to store static content like images, CSS, JavaScript, etc. to the user’s browser.
And as a result, users enjoy faster loading times as it cuts the HTTP requests by a lot. That’s why serving static assets with an efficient cache policy improves the search rankings.
You can fix the leverage browser caching warning in the Apache servers by putting custom rules to the .htaccess file and in the Nginx servers, it can be solved through nginx.conf file.
Liked this tutorial? Please share this tutorial far and wide! Have any other tips or questions about fixing the leverage browser caching? Let us know in the comments section below!